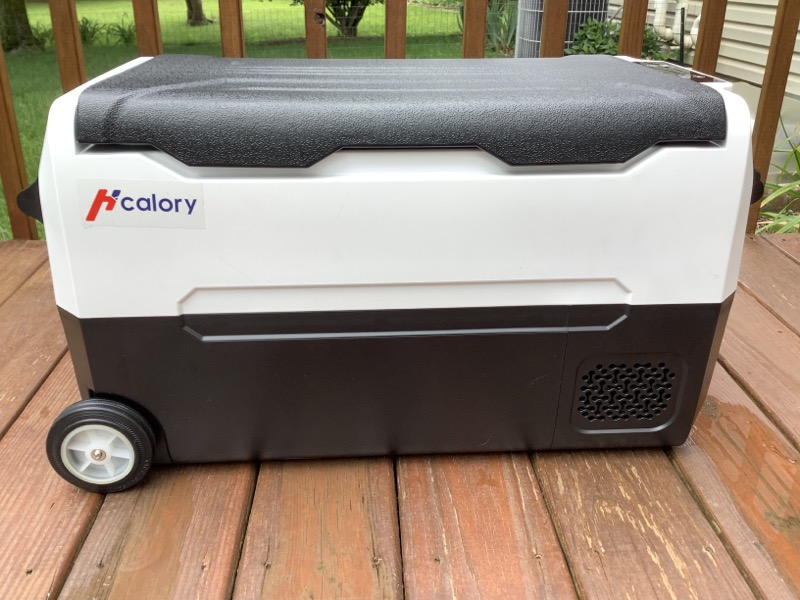
REVIEW – Perfect for camping, picnics or even the mundane task of keeping things chilled while grocery shopping, the Hcalory 35L Portable car refrigerator / freezer can come in handy in these and many other situations where portable refrigeration is needed. Let’s look at what this portable refrigeration unit has to offer.
What is it?
The Hcalory 35L Portable car refrigerator / freezer is a two zone, 120-240V AC or 12-24V DC powered unit. It has a digital display so the inside temperature can be easily monitored. The unit is rated at -20 ℃ to 20 ℃ (-4 ℉ to 68 ℉).
What’s in the box?
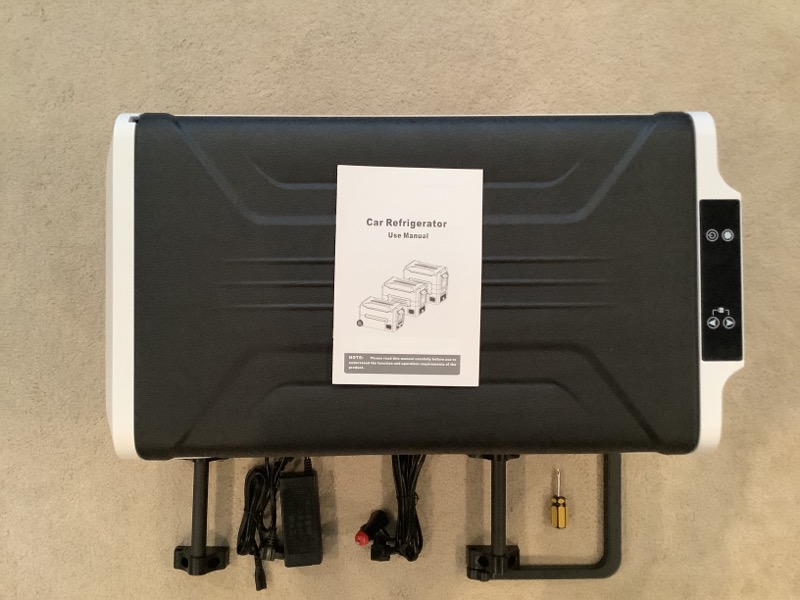
The Hcalory 35L Portable car refrigerator / freezer arrived in a single box. Inside the fridge was a smaller box which included two handles that need to be attached, one of which can be used as a drag handle. In addition, the unit had a user guide, as well as the 120V-240V AC and 12V-24V DC power adapters.
Design and Features
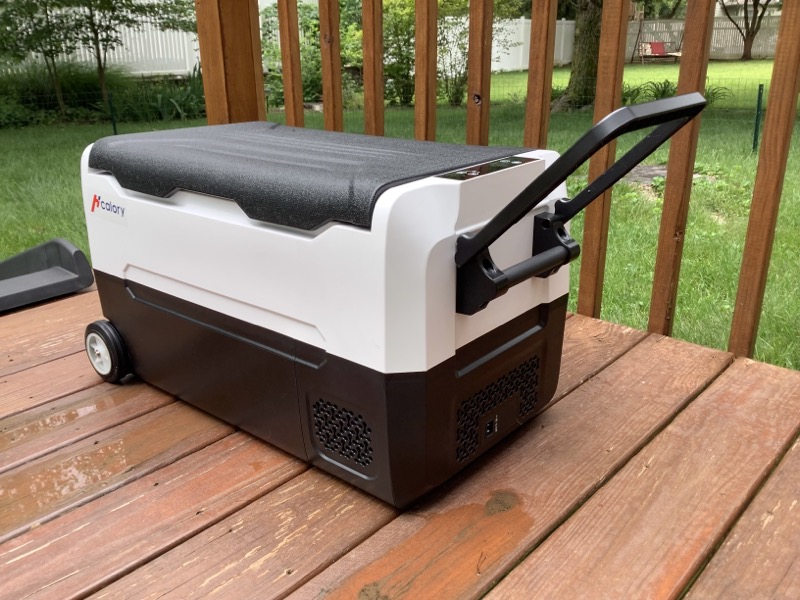
I was a little surprised that I had to assemble the handles onto the unit. While adding the handles was not hard, I would have preferred to have the unit ship with them already attached. They did provide a small Phillips-head screwdriver to aid in the assembly, I found a cordless drill with a Phillips-head bit a much better tool. Each handle required three screws and they were deeply recessed into the handle frames. I had to put the unit on its end to attach each handle and was just not thrilled to have to do that. All in all, it only took about 5 or so minutes which is not a big deal, but it would have been much better had I had to do nothing at all.
The unit is designed to have two separate temperature zones; however, they are not independently controllable. There is a main zone, marked with an ‘L’ for left on the display while facing the opened unit, and a smaller zone, marked with, you guessed it, an ‘R’ for the right zone. There is a removable divider that separates the unit in these two zones. The right zone is much smaller than the left zone and includes a carveout that houses the unit’s compressor. The divider has what looks like a magnet in the end which activates a switch that seems to control the independent displaying of the current temperatures for both zones. If the divider is inserted, there are two temperatures displayed on the unit, if removed, there is only one.
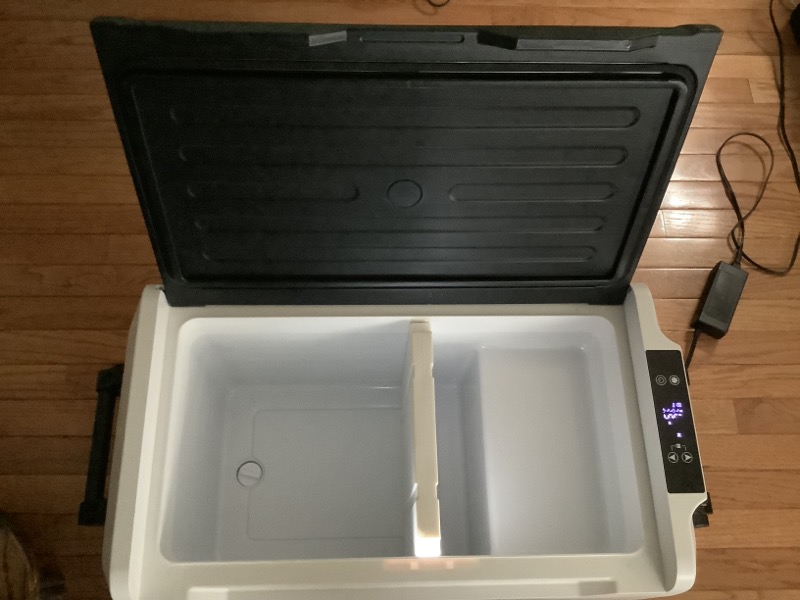
Again the two zones are not independently controlled. Basically, the left section is controlled, and the right section will just be warmer as part of it is isolated from the larger controlled section and the cutout houses the compressor, which I am sure funnels some heat into the area. With the Hcalory empty, and set to -5 ℃, the left hand side had cooled to -3 ℃ while the right hand side showed 8 ℃ . So there is a warmer side, but it is not actually temperature controlled. It just is, what it is.
The unit contains both a Max and Eco setting for the compressor. As one would expect, the Max setting requires more power as it drives the compressor harder, to reach the desired setpoint, compared to the Eco setting. I did a brief test, measuring the time from room temperature (22 ℃) to -15 ℃. In Eco mode, it took almost 42 minutes. In Max mode, it only took 28 minutes. I am thinking that if you are using the refrigerator in an environment where the lid is opened and closed a bunch of times, and you have a good power source, Max is probably the right setting for you, as it can drive down the temperature faster when it raises due to frequent access to refrigerated food.
As mentioned earlier, the unit can be powered by either standard AC (120V or 240V) or DC (12-24V). The unit is relatively quiet when the compressor is on all things considered. In addition, it contains circuitry when operating on DC to prevent the unit from completely draining the battery it is attached to. Basically, there are three setpoints that can be selected where the unit will cease to operate if the incoming battery voltage is determined to be below that set point. The setpoints are designated H, M, & L on the display, ranging from high protection, to low protection for the battery. Here is how the setpoints break down.
| Battery Protection | 12V Cut-off | 12V Cut-in | 24V Cut-off | 24V Cut-in |
| L – Low | 9.6V | 10.9V | 21.3V | 22.7V |
| M – Medium | 10.4V | 11.7V | 22.8V | 24.2C |
| H – High | 11.1V | 12.4V | 24.3V | 25.7V |
I did not get a chance to test this feature of the unit. That said, it seems like a very welcomed one if it works as designed, and I have no reason to believe that it does not.
Setup / Operation
Setting up and operating the unit is straight forward. The control panel for the unit is basically in child lock out mode all the time. To get it out of that, all one needs to do is rest their fingers over both up and down switches until you hear a beep, and then you can interact with the other controls on the control panel. There are up and down arrows which are primarily used to adjust the temperature setting for the unit. Unfortunately, the unit is hard wired to express temperatures only in ℃. When setting the temperature, the user is only controlling the left side of the unit. If the separator is in place, the user is presented with the temperatures of both sections, removing the separator turns the entire unit into a single zoned unit. I personally found the display to be a little confusing to look at.
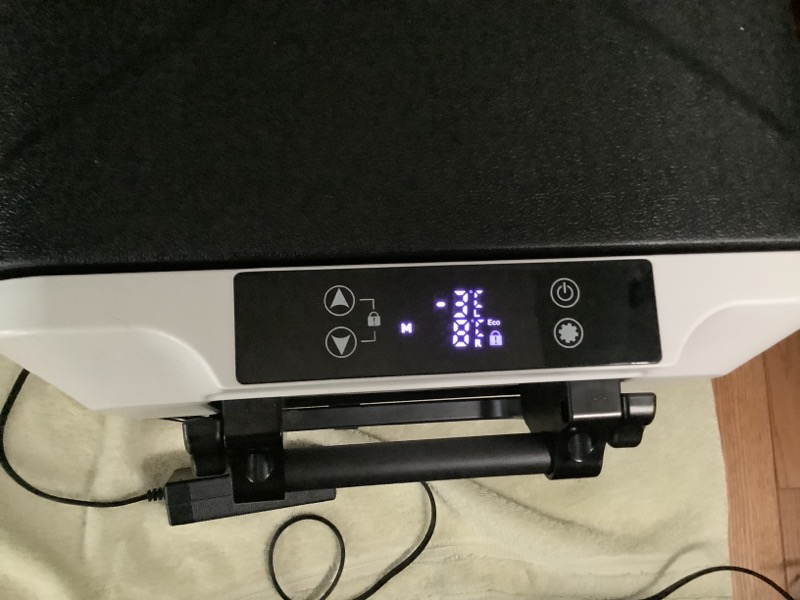
The -3 is the temp, but what looks like an E is ℃ with the letter ‘L’ under it, for the left-hand side temperature. The right-hand side 8 ℃ is clearer as the ‘R’ is easier to individually discern on the display. You can see that the display is locked, in Eco mode, and the setting for the battery low voltage setting is set to ‘M’ (Medium).
Given the inputs on the control panel are somewhat limited, there is a dance on the keys that is time based which allows for the individual settings the unit provides. Fortunately, the most common setting is the temperature and just required the keyboard to be unlocked, before the up and down arrow keys can be accessed to adjust the temperature to the desired setpoint. The unlocking of the keyboard is very easy in that all a user must do, is rest their finger on both the up and down arrow keys for about six seconds to unlock it. From the unlocked state all features can be accessed. The set-key (filled in gear) is over-loaded in that in regular mode it is used to toggle the unit from Max to Eco. In the alternative mode, achieved when holding the set-key for 6 seconds, allows you to cycle the low voltage setting from H, M, and L. The unit comes shipped with this setting set to M (Medium). I think the defaulted locked keyboard is brilliant as it makes it very hard to accidentally change the temperature, or more importantly, turn the unit off.
So let’s talk about some real world test scenarios.
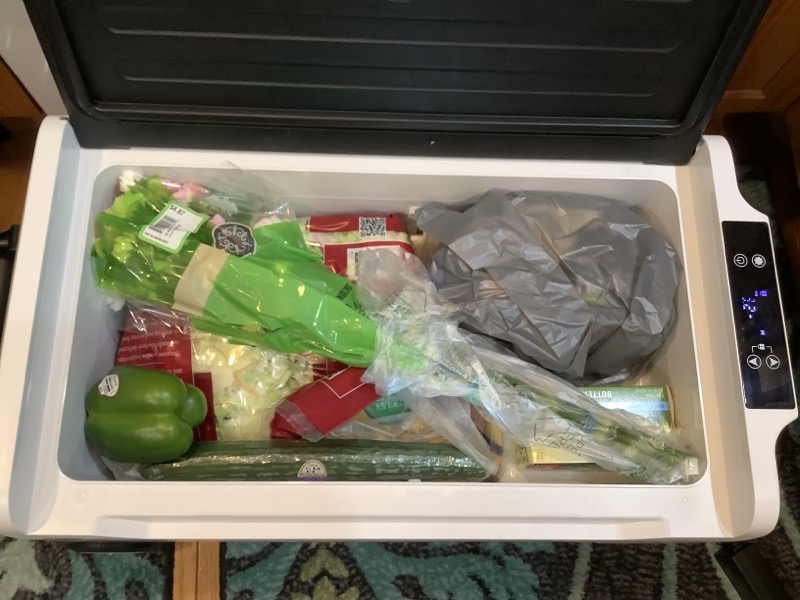
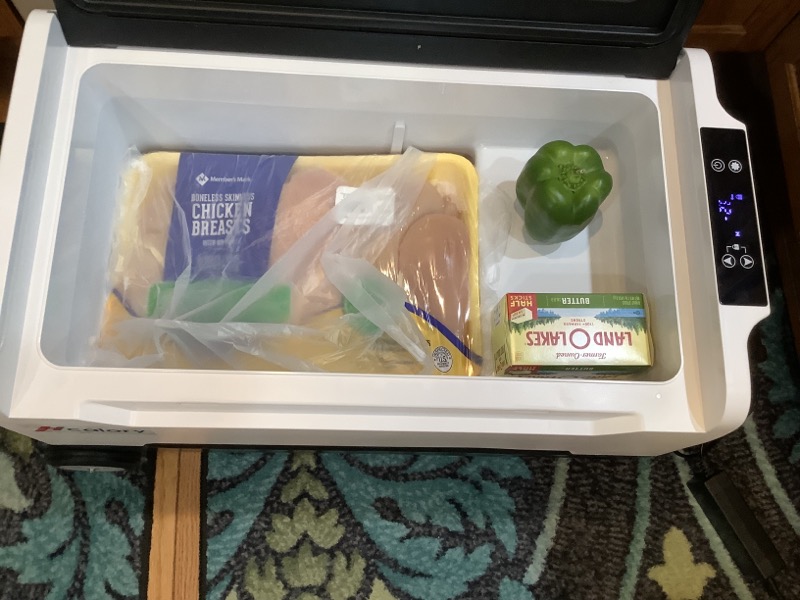
Trips to the grocery store. I am sure I am not alone doing weekly shopping at more than one store. Usually, we bring along a soft cooler with frozen blue ice bricks to maintain refrigerated items while we shop in the next store. I decided to utilize the Hcalory 35 L fridge to see how it performed. This is a test where I coupled it with the ROCKPALS Rockpower 500 solar generator that I reviewed recently. Since the fridge only uses 40 or so watts to run, I would place it in the van, and just plug it into the ROCKPALS and set the temp to 1 ℃. The unit would reach that temp by the time we arrived at that first store. Here are some pics from two recent grocery loadouts. That is ice cream wrapped in a bag, just in case it melted and leaked, it did not!

Another test was with a single bowl of ice cream. This time I placed the Hcalory outside to see how long it took to cool the empty space, starting out in partial sun, with a temperature in the low 80’s. I set the temp to -17 ℃, and it took about 40 minutes to drive the inside temperature down to that level. During the cool down the entire unit was exposed to direct sunlight and the temperature was close to 90. The black lid was hot to the touch and the internal temperature raised up to -9 ℃. At this time, I decided to shade the unit with a towel and the internal temp immediately fell back to -17. It was at this point that I decided to place a bowl of ice cream in the unit and see how it faired. As it turned out with temperatures in the 90’s the ice cream remained in perfect shape for the four hours of the test. Here are some pictures, the first one being the state of the ice cream before the test, and the second, the result of 4 hours in the heat of the day. I would say this is a pass and to be fair, exceeded my expectation.


My last real-world test was using the unit to store refrigerator items during a cross country move (son to college) from the Midwest to the New England area. I filled the fridge with his odds and ends that only he eats from our home fridge, plugged the unit into the DC outlet in the van, and headed out. This was a two day driving event. For the overnights, I again enlisted the ROCKPALS unit to maintain the fridge throughout the night, plugging the Hcalory fridge back in for the second day of travel, and then again, on the same charge, ran the unit overnight with the ROCKPALS. Moving in the next day, everything was still very cold, maybe even colder than in our fridge as I set the temp to 1 ℃ which is slightly lower than my home fridge setting.
Some Specs
- Color: Black+White
- Material: ABS+PP
- Household Charging: AC110-240v wide voltage
- Car Charging: DC12/24V universal
- Power Consumption: 50W
- Capacity: 35L/45L/55L
- Temperature Range: – 20 ℃ ~ 20 ℃ / – 4 ℉ ~ 68 ℉
- Battery Protection: Voltage Protection
- Noise: 35 decibels
- Control Panel: LED Display Touch Screen
- Size(s):
35L: 710*440*450mm / 27.95*17.32*17.7inch
45L: 710*440*512mm / 27.95*17.32*20.15inch
55L: 710*440*582mm / 27.95*17.32*23inch
What I Like?
- The performance of the unit.
- Two temperature zones for when needed.
- AC and DC operation
- Low Power Requirements.
What I’d Change?
- Ship unit with no assembly necessary
- Add the ability to interact with the unit in degrees Fahrenheit
- Noisy display design
- Black lid should be lighter in color to allow for better operation in direct sunlight
- The lid does not seal well.
Final Thoughts?
What can I say? It is so nice being able to maintain refrigerator temperatures without having to mess with ice and the mess that ensues. During the move, I used the Hcalory fridge one more time. This time my wife and I did some early morning shopping for my son, in a nearby town, getting some of the essentials to get him started. Milk, eggs, lunch meat, produce, etc. And let’s just say that my son’s sleeping habits are not completely aligned to ours. Purchasing groceries literally hours before we could put them into the new home’s fridge just would not have been as care free as it was using the Hcalory 35L car refrigerator / freezer. I would say that the experiences with this unit has converted me from using a Yeti like cooler for any real extended refrigeration needs.
Price: $270.99
Where to buy: Hcalory Online Store, Banggood, and Amazon
Source: This review sample was provided by Bangood.

GMKtec G3 Pro Mini PC, Intel Core i3-10110U (Beats 4300U/N150) 16GB DDR4 (Dual Channel) 512GB PCIe M.2 SSD, Desktop Computer 4K Dual HDMI/USB3.2/WiFi 6/BT5.2/2.5GbE for Office, Business
(as of June 18, 2026 14:06 GMT -05:00 - More infoProduct prices and availability are accurate as of the date/time indicated and are subject to change. Any price and availability information displayed on [relevant Amazon Site(s), as applicable] at the time of purchase will apply to the purchase of this product.)
Gadgeteer Comment Policy - Please read before commenting
Hey there!
I bought the same fridge, and I was wondering if there is any way to turn off the beeping sounds when there is an error? For me it’s error 1 (low input voltage) what I can’t change atm and the fridge still works king of fine. But the beeping is soooo annoying!
Help would be appreciated!
Thank you!
Raphaela,
I am not aware of a way to silence the beeping. I assume you have tried to lower the low voltage set point? If not, this might prevent the error from occurring if the input voltage is above 9.6 V (assuming a 12 volt system). The procedure is in the manual. If you do not have access to that, let me know and I will provide it for you.
What situation are you using the refrigerator in where you are getting this error? This feature of the system not only protects the refrigerator, but also can be used maintain your car battery state of charge.
Sorry I could not help more.