Product Requirements:
Device:
Compaq iPAQ (without expansion sleeves)
Vaja (located in Argentina) creates some of the nicest quality leather PDA cases available. They have done it again
with their iPAQ Sync-able case. This all leather padded case comes in a
variety of colors: Brown Buffalo Skin/Brown Leather, Black Plain Leather/Black
Plain Leather, Black Ostrich/Black Leather, Brown Grain Leather/Brown Leather,
Cognac Ostrich/Dark Tan Leather, Dark Tan Leather/Dark Tan Leather, Black Grain
Leather/Black Leather, Dark Green Grain Leather/Dark Tan Leather, and Tan
Ostrich/Black Plain Leather. The case that I’ll be reviewing is the Brown
Buffalo Skin with Brown Leather with belt clip. This case comes in both a belt
clip and non-belt clip version.


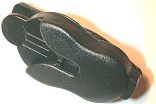
The belt clip version of this case uses a metal stud to lock into the belt
clip. The stud sticks out of the case less than .25in (.64cm). The belt clip
allows the case to swivel 360 degrees on the clip. This makes the case more
comfortable to wear while you are sitting because you can turn the case sideways
on your belt.
The iPAQ slides into and out of the case easily and fits it like a glove. The
PDA is almost entirely enclosed in leather. Only the top two corners and some of
the bottom of the PDA are exposed.
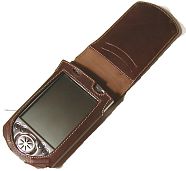
The cover and back of the case are padded. The cover also has an ABS plastic
insert that gives added protection to the screen when closed. The cover does not
use snaps or Velcro to hold it closed. Instead, it uses magnets that have been
sewn into the leather (you can not see them). On the inside of the cover there
are three card pockets. Two are regular sized card slots with one larger slot
behind them. Because the cover uses magnets to hold it closed, you should NOT
use credit cards with magnetic strips in the card slots. Doing so will probably
ruin the card.
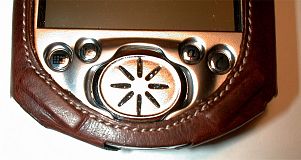

The main cut out for the case allows you total access to the screen and all
the buttons. The leather is pretty thick around the application button area
which makes accessing the two outside buttons a little awkward. For everyday
use, this is no real problem, but if you play games that use these two outside
buttons, you might have some trouble.
There are also cut outs for the microphone, light sensor, battery charger LED
and power button. The leather is also thick in this area too which makes
pressing the power button difficult. Right handed people might find this more
annoying that lefties like me though. If you use your right thumb to turn the
iPAQ on, then you’ll probably have some trouble. I usually use my left thumb
which is easier.
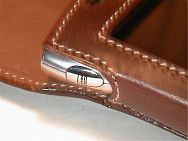

The case also has a cutout for the voice recorder button. This makes it very
easy to use this feature while the PDA is in the case. The bottom of the case is
cutout to allow for syncing with the iPAQ cradle. The AC adapter port, serial
port and reset switch are also exposed.
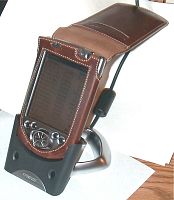
This case allows you to sync with your PC without removing the PDA from the
case. I found that the case needs a good ‘breaking in’ period before syncing is
easy. You’ll need to press the PDA firmly into the cradle. When I first started
using the case, I had a real hard time getting syncing and battery charging to
work. After a week or so of inserting and removing the PDA from the cradle, it
started working pretty well. I still continue to have problems once in awhile
though. If the iPAQ cradle didn’t have that plastic post for the AC adapter
port, I think it would be much easier to use.
So, if you are thinkng about buying this case specifically so that you can
sync without removing it, be warned that you will probably have to work with the
case in order to get it to work. If you want this case because it is made
extremely well, looks great, and feels great, then it’s for you.
Price: $69.90 ($67.90 without belt clip)
Pros:
No Velcro
Can sync and charge while in the case
Three card slots
Cons:
Pressing the power button is difficult
Case requires a ‘breaking in’ period
Pricey
KOOFORWAY 8 Inch 2-in-1 Mini Laptop,HD Rotatable Touch Screen Support Handwriting Windows 11 Pro Small Laptop, N150,12GB RAM, 1TB SSD,Wi-Fi 6, BT 5.2,2 MP Camera,G-Sensor,HDMI,Type C Ultra Pocket PC
(as of February 5, 2026 20:35 GMT -06:00 - More infoProduct prices and availability are accurate as of the date/time indicated and are subject to change. Any price and availability information displayed on [relevant Amazon Site(s), as applicable] at the time of purchase will apply to the purchase of this product.)DreamQuest Mini PC with Windows 11 Pro, Intel N95 (up to 3.4GHz) Mini Desktop Computers 12GB DDR5 1TB SSD, 2*USB C, 2*HDMI, 4*USB 3.2, LAN,WiFi 6, Bluetooth5.3, Support 4K 60Hz
(as of February 5, 2026 19:58 GMT -06:00 - More infoProduct prices and availability are accurate as of the date/time indicated and are subject to change. Any price and availability information displayed on [relevant Amazon Site(s), as applicable] at the time of purchase will apply to the purchase of this product.)Product Information
| Price: | $69.90 |
| Manufacturer: | Vaja |
| Pros: |
|
| Cons: |
|


Gadgeteer Comment Policy - Please read before commenting
Hello all, my first post ever, but Ive been reading Gadgeteer for long time now.
My first thought about houses is that when you build them, make the wiring ACCESSABLE…… I have always wondered why you couldn’t have a panel at the base of the wall disguised as moulding, remove panel and have access to the wire. My dream home would not only have current tech, but be upgradable with minimum “rip up the drywall” problems. If you built the house with Cat5 or something, and then Fiber became all the rage, remove panels, either remove old wire, or add new. Make your house “plug and play” lol.
Michael
Official keeper of nothing special.
😀
Actually, that’s not a bad idea to run all of the wiring under a removable molding. That might be something to look into when we build. :0)
I’m a programmer of HVAC systems. I run wire all day, at least 3 days a week. (Gotta have sensors and outputs before you can program it). The ONE thing you most definately should do is have the electricains run conduit, for everything. In residential construction it’s permissable to just run romex right through the walls for electrical, it’s a bad idea. If you’ve got conduit, it’s easy to pull wire from place to place.
With Conduit, it’s easy to reroute wires from one box to another (ie, balance the electrical load). I’d also recommend that for every electrical outlet, a second, empty, and seperately conduited box (4×4) (I’d recommend 3/4 inch or 1 inch conduit) be installed right on the other side of the wall stud. That makes it easy to install coax, cat5, fiber, etc at any point in the house where there is going to be equipment to use it.
All the electrical should be conduited back to the electrical load panel and LABELED. All the others should run to a closet, fair sized (linen closet size) that you’ll mount all your networking, fiber, cable tv (or satalite) gear. This closet gets it’s own, 20 amp circuit. Make sure all these conduits are labeled to. I’d draw up a basic floor plan and make up a code that shows you where every conduit. Then make several copies (lamented) so it doesn’t get lost.
The reason I recommend using this, as opposed to wiremold (that’s what that trough is called) is it’s REALLY ugly, the metal stuff is next to impossible to reopen, the plastic is always cracking or coming open when you don’t want it. And the industrial stuff that has a hinge and screws closed, is butt ugly, at best.
Now, if you want to talk about home automation…. well, it’s probably a bad idea to get me started on that unless you REALLY want to know! 🙂
P.S. The controls we use to run HVAC systems, use BASIC as the programming language, it’s super easy to learn and gives you BIG TIME flexiblity on how your house/building runs. There is NO LIMIT to what you can automate with these systems. Solar Power, seperate temperatures in seperate rooms, automated lights, anything is possible.
Gremlin, great post! I’m also a big fan of conduits, having been seated on the Austin Telecommunications Commission, where I pushed hard to get the city to consider doing that for downtown Austin (where they were constantly having problems by fiber companies digging up the streets to put down new cables.)
Another thing to consider is the style of house construction you do… make sure it won’t interfere with wireless! In our current house, we’ve run various network cables along the walls, but in our next house, it’ll probably be all wireless. Most modern house construction won’t interfere with 802.11 signals, but if you’re building with a lot of stone or metal, you potentially could have problems.
—Ell