REVIEW – Look around you. Yes, right now. Take a look all around you. Look at all the things you see. Is what you see all there is? The answer is no. There’s an entire hidden world out there and that is the variety of temperatures all around you. Teslong is offering a thermal camera that lets you use your Android phone to peer into this otherwise hidden world. Let’s pull back the curtain and peek into this interesting world of thermal imaging.
What is it?
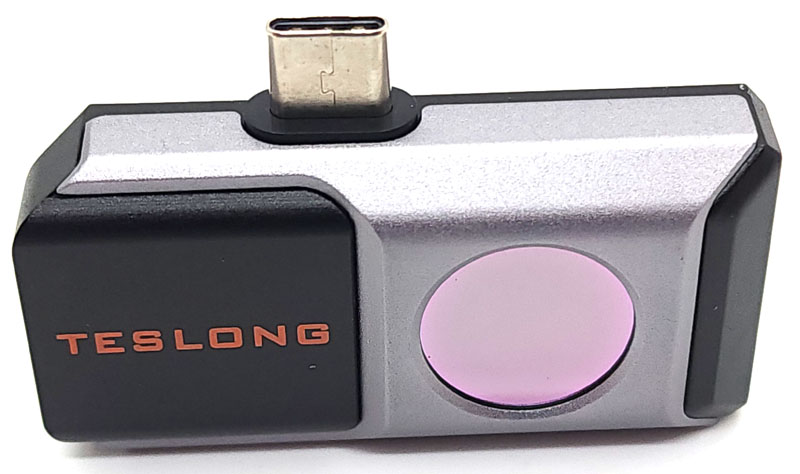
This is a thermal camera that plugs into the USB-C port on most Android phones. It allows you to view items based on their relative temperatures.
What’s in the box?
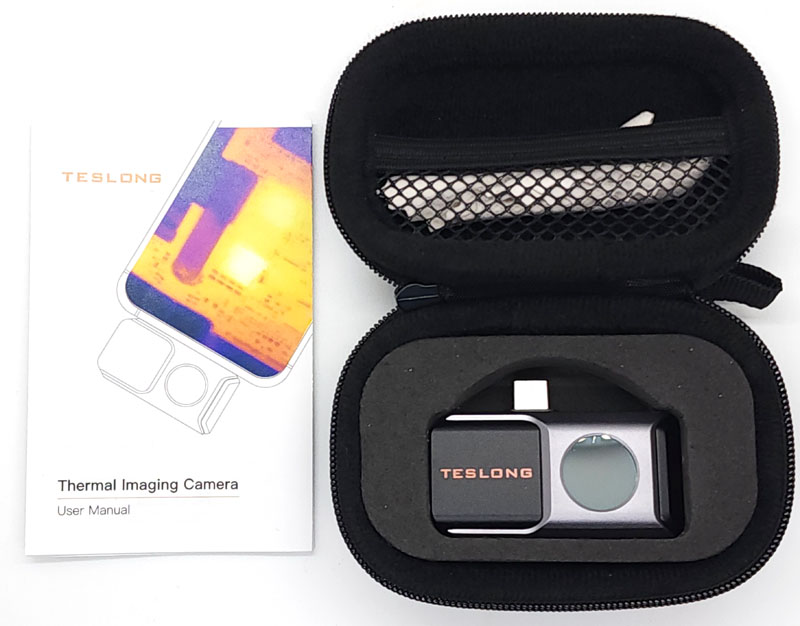
- Teslong Thermal Imaging Camera
- Protective case
- Microfiber cloth (in the mesh pocket)
- User manual
Hardware specs
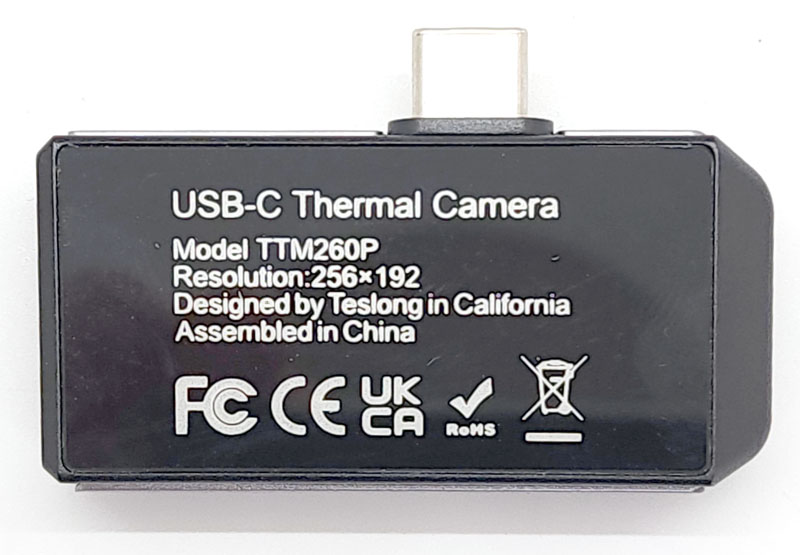
- Model: TTM260P
- Dimensions: 2″ W x 1″ H x 0.5″ D
- Weight: 0.8 ounces
- Lens: 3.2mm
- Infrared resolution: 256 x 192
- Field of view: 56° x 42°
- Refresh rate: 25 Hz
- Temperature measurement range: -15°C – 600°C
- Temperature measurement accuracy: +/- 2°C or +/- 2%
- NETD (Noise Equivalent Temperature Difference): <50mK@25°C (a measure for how well a thermal imaging detector can distinguish between very small differences in thermal radiation in the image)
- Connectivity: USB-C, Android-only, plug and play
- Color palettes: 6 – Iron, White Hot, Black Hot, Rainbow, Red Hot, and Cold Blue
- Measurement dimensions: Point, Line (highest and lowest), and Surface (highest and lowest)
Design and features
Setup
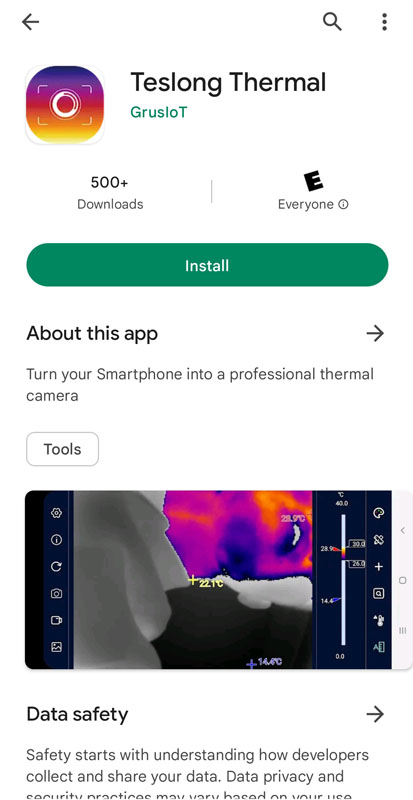
First, you download the Teslong Thermal app from the Google Play store.
Plugging the camera into your phone opens the app and starts showing you thermal images. But…there is an additional and unfortunate setup step needed.
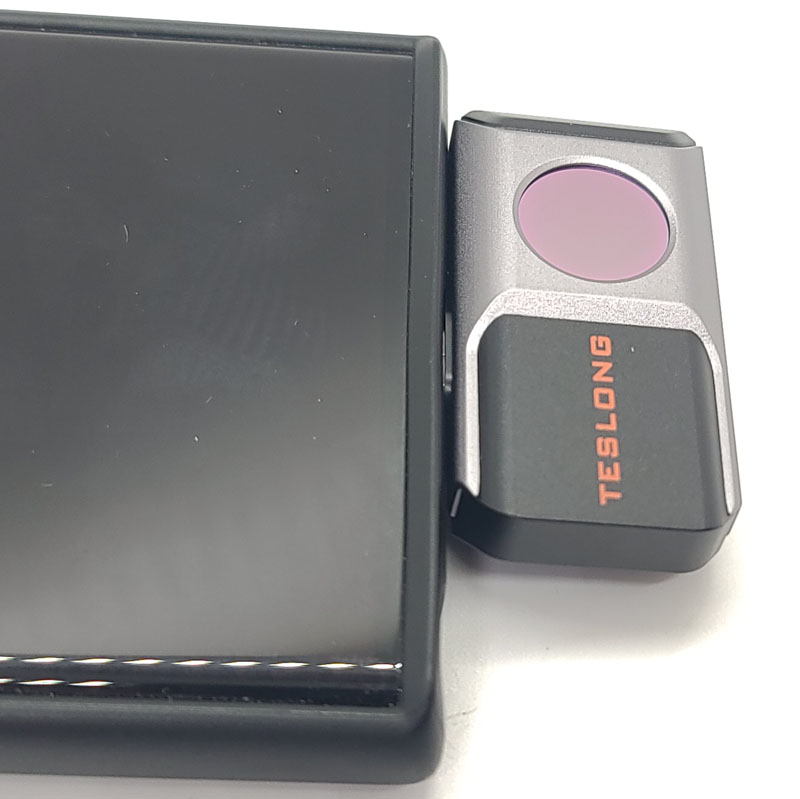
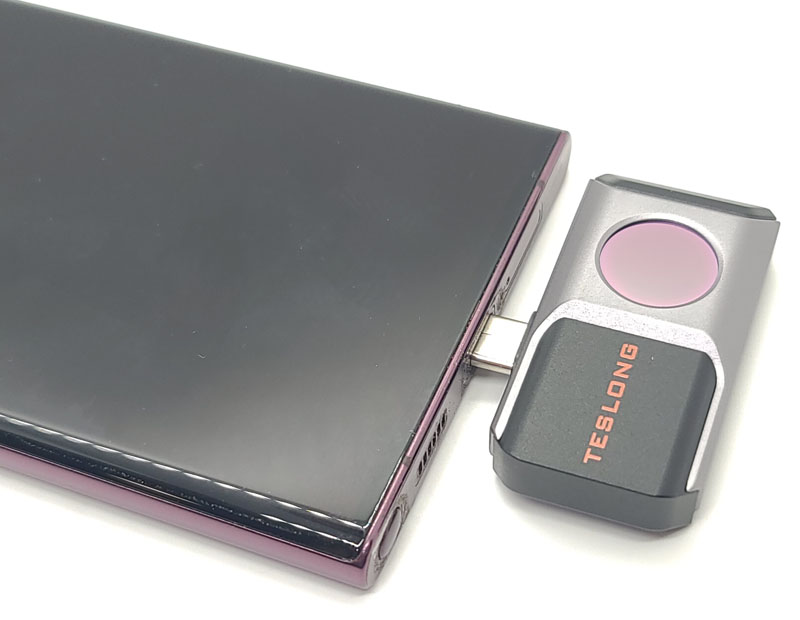
As you can see, I have an extremely thin case on my Samsung Galaxy S22 Ultra. But even with that, the USB-C connector on the Teslong camera is too short and it won’t engage without taking the cover off my phone. This means I have to hold a slippery phone with a camera sticking off the bottom of it. Including a USB extender or making the connector longer would be a huge improvement.
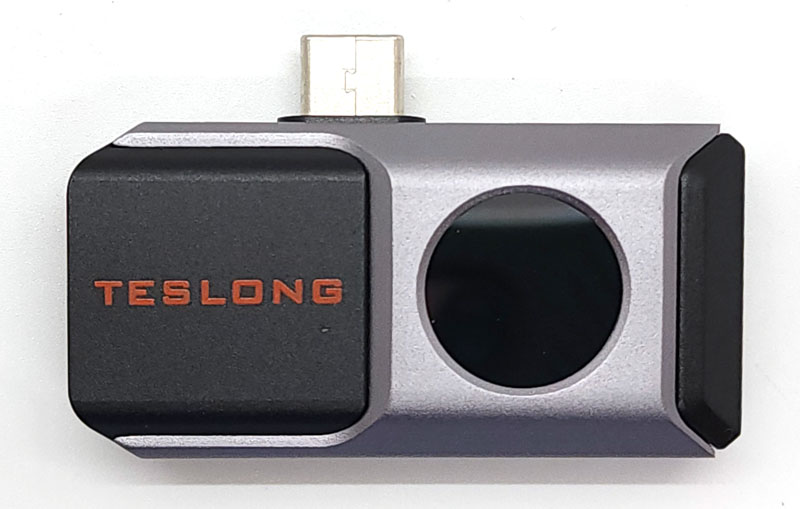
The lens is on the front of the Teslong Thermal Imaging Camera. The USB-C connector is on top.
The back contains the usual tech info.
Performance
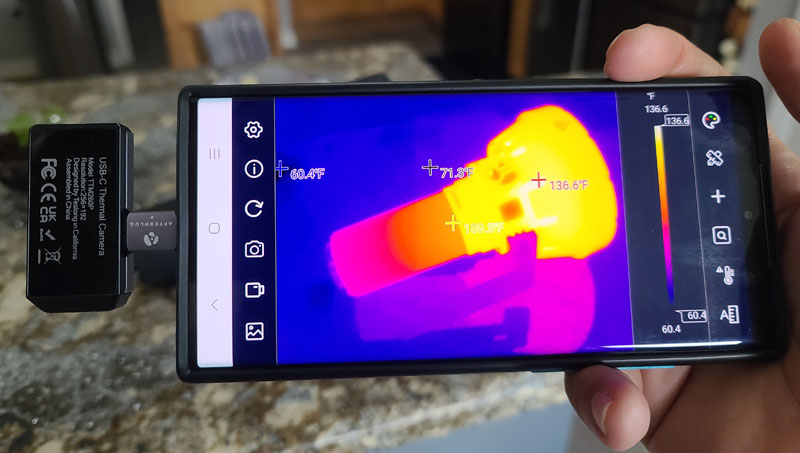
Let’s plug the camera into the phone and get measuring! Here is the camera about to be snapped into place. Generally, you plug it in facing away from the face of the phone, but photos look better this way.
The app automatically opens as soon as you plug the camera into the phone’s USB-C port. Well, it is supposed to work that way. Occasionally, it would open but nothing would work. Unplugging the camera and plugging it back in fixed it. Still, the app seemed a little flaky at times.
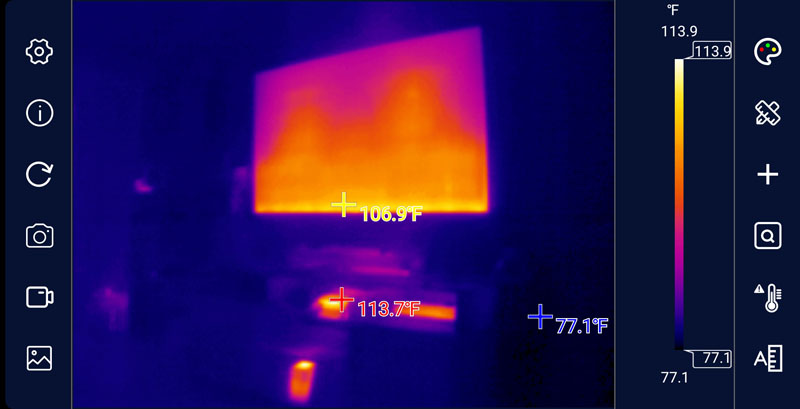
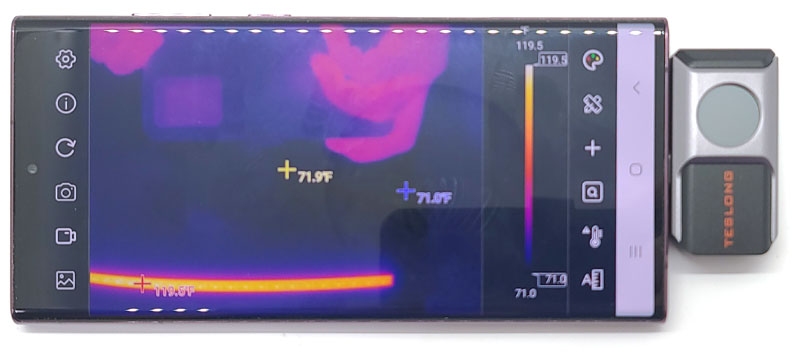
Before we get into things – an interesting aside – the big rectangle is my Samsung TV. The item reporting 113.7° is my Eero 6 router. The item to the right of that is the Mecool Now Android TV and video calling device, and the orange item at the bottom is my Xfinity cable modem. Who knew they were all so hot?
The settings available from top left to bottom right are:
- Left side top to bottom
- Settings – general camera and app settings
- Info – app information – version, etc
- Camera reset – reset to the startup state
- Take a photo – capture a photo and save it to the album
- Take a video – record a video and save it to the album
- Open the album – review photos and videos
- Right side top to bottom
- Color palette selection – change the color palette
- Regional temperature measurement – define points, lines, and boxes on the screen to capture temperature measurements
- Temperature tracking – turn on high, low, and center point temperature measurement points
- Rectangle temperature measurement – define rectangular areas on the screen to highlight temperatures – each rectangle can have its own high, low, and midpoint measurements
- High-temperature alarm – set temperature threshold so higher temperatures sound an alarm and highlight it on the screen
- Highlight high-temperature regions – the maximum temperature regions will highlight on the screen
To the right of the main window, we see a temperature color highlight bar. Sliding the top or bottom temperatures limits the range of temperatures that will display in color.
Available color palettes:
- Iron
- In the high-temperature region, red appears more than other colors. This is good for wide, high-temperature readings.
- White Hot
- White highlights high temperatures, with black defaulting for lower temperatures. This is good for high-temperature items mixed in with lower-temperature targets.
- Black Hot
- Like white hot, but low temperatures appear white and higher temperatures appear black. This is good for highlighting low-temperature targets
- Rainbow
- Red highlights high temperatures, yellow highlights medium, and blue and black highlight lower temperatures. This is good for areas with a wide range of temperatures, allowing colors to highlight the differences.
- Red Hot
- The main colors are red, black, and white. Used for focusing on high-temperature states with the color transitions defining boundaries.
- Cold Blue
- Blue marks colder regions. Useful for observing low-temperature targets
Shown below:
Iron White Hot
Black Hot Rainbow
Red Hot Cold Blue
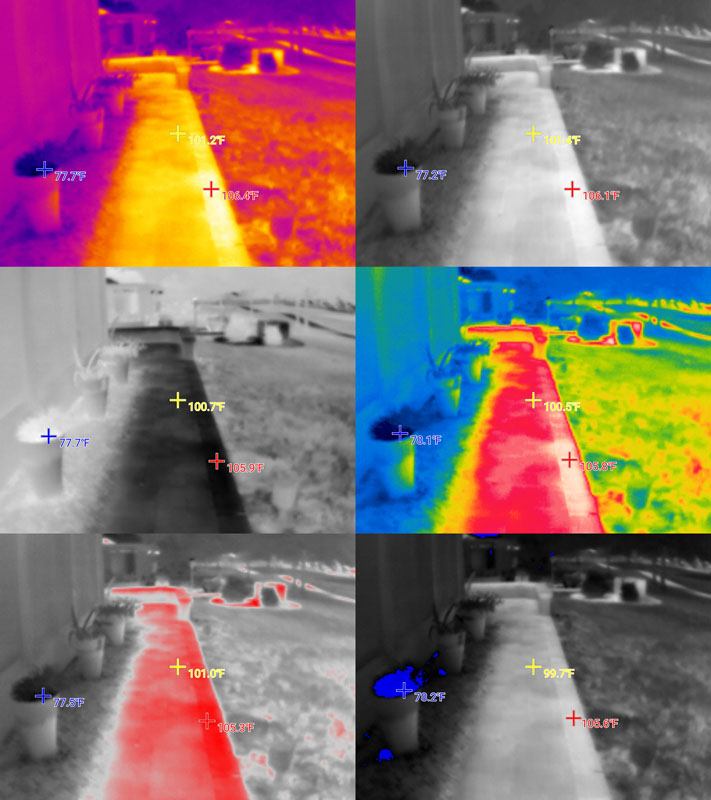
All were shot at the same target a few seconds apart – the sidewalk behind the lanai at the back of our house. It is interesting to note the differences in temperature of the same point as clouds were moving across. The temperature change from sun to shade was almost instantaneous.
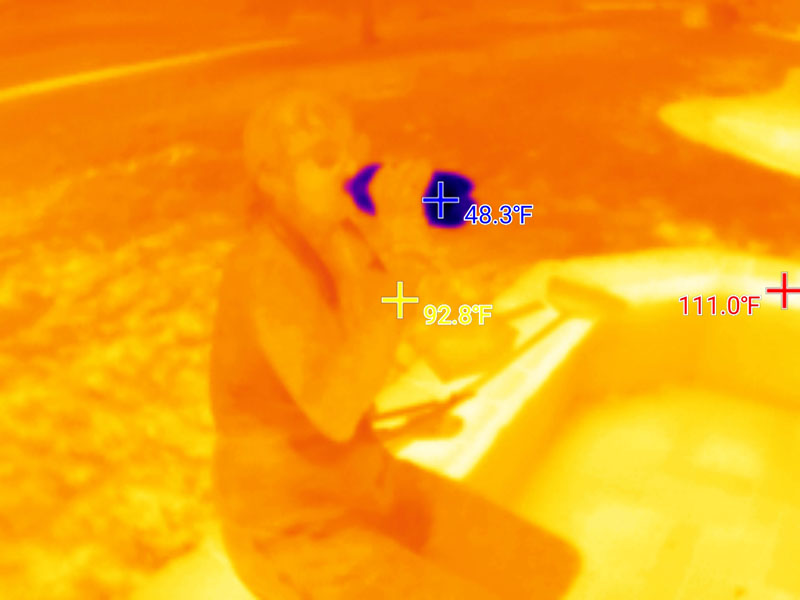
Here’s a shot of my lovely wife, looking up from reading her Kindle.

It is interesting to see the various temperature areas. Her eyeglasses and the leather chair are relatively cool as are the folds on her clothing. Clothes that sit right on her skhin, as well as her skin itself, are the hot spots in the photo – her mouth being the highest reporting 91.7°. Of course, that makes sense as she exhales. I found it interesting that the tip of her nose was relatively cool.
Here she is again, taking a break from a little gardening on a hot day.
As you can see from the minor color variations, everything was hot except the drink she had just gotten from the refrigerator.
Back inside, I sat in one of our dining chairs for a few minutes and then got up.
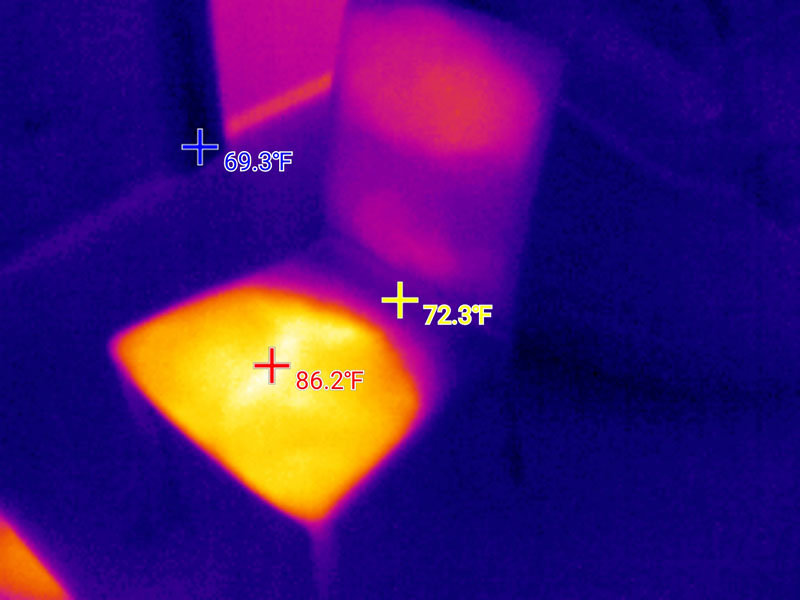
It is pretty easy to tell where I was contacting the chair.
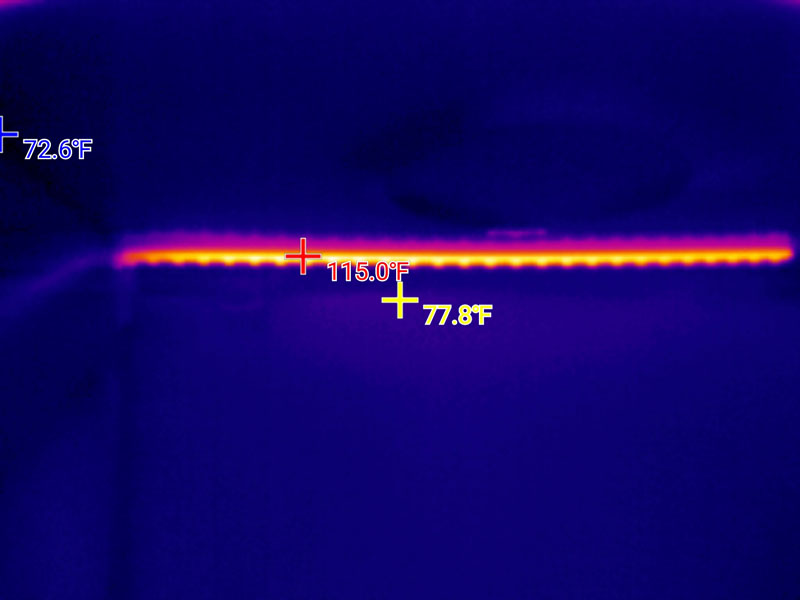
Here’s a look at an LED light strip I have installed under a lip on our patio.
This is a look at the sliding door that leads to our lanai. We did not have the air conditioning running on the lanai and that’s pretty evident looking at the temperature on the glass.
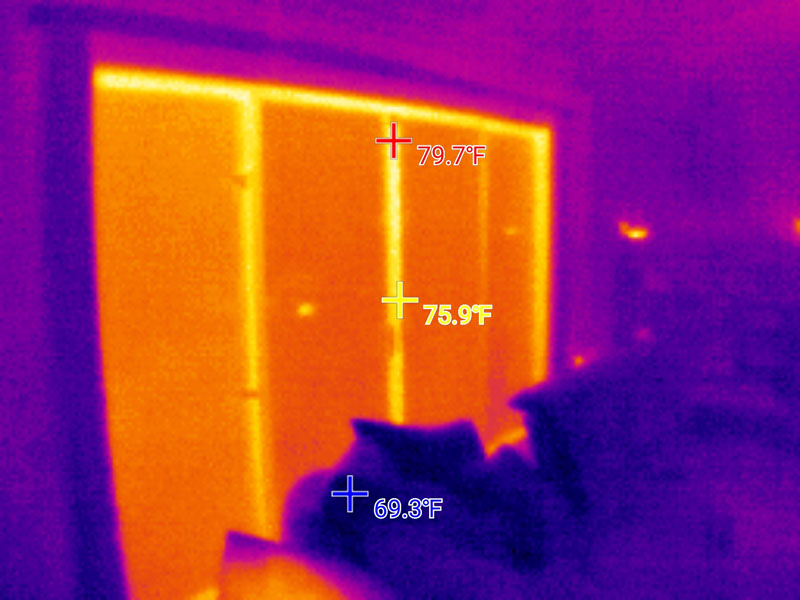
Even though it was a warm day, overall, the glass wasn’t too warm. That’s the thing about the Iron color palette. The colors adapt to the range of temperature in the scene you are viewing at the time. Red-orange isn’t necessarily “hot” – it is the warmest temperature you’re looking at right now.
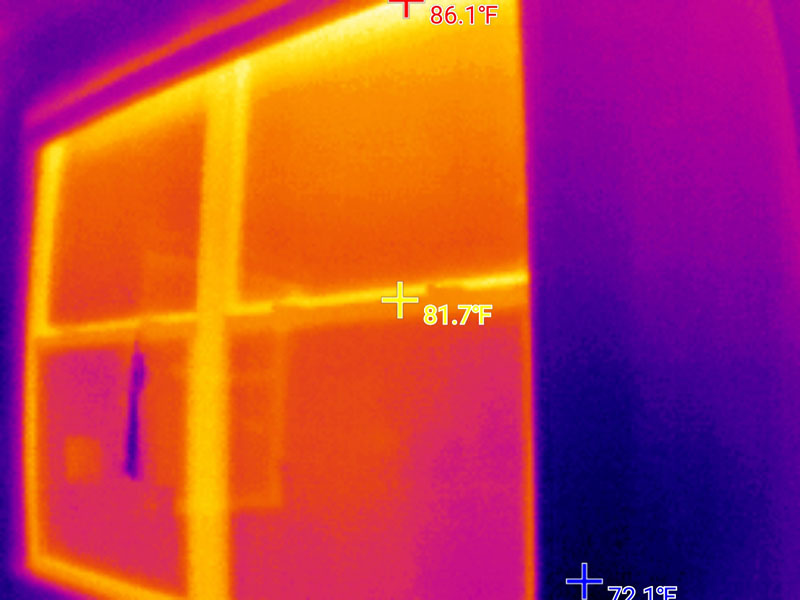
Looking at my cheap, builder-grade windows, I can see how we could benefit from multi-pane, Low-E windows.
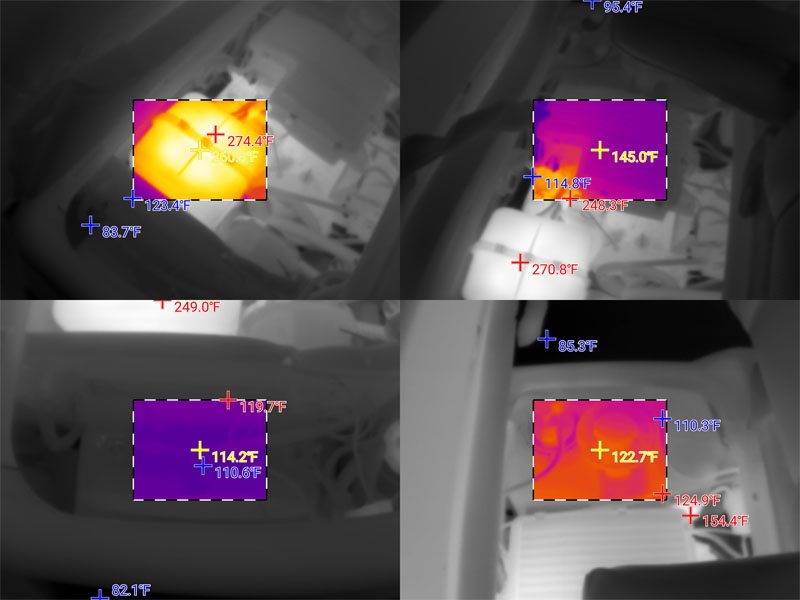
I took the Teslong Thermal Imaging Camera out to the garage after I got home from a round of golf. I lifted the seat of the golf cart and looked around. Here, you can see the hot spot on the engine as well as the battery compartment to the left.
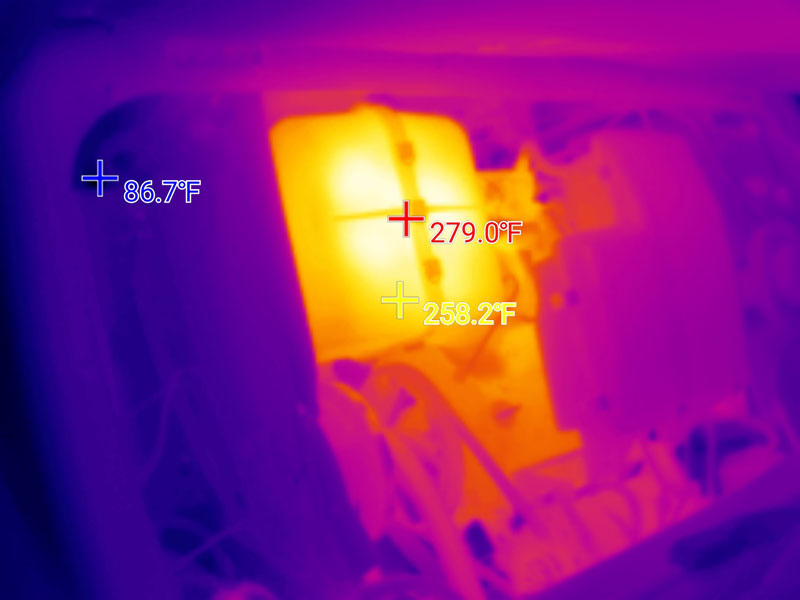
Here are four separate looks around the engine compartment using a highlighted square to isolate different items.
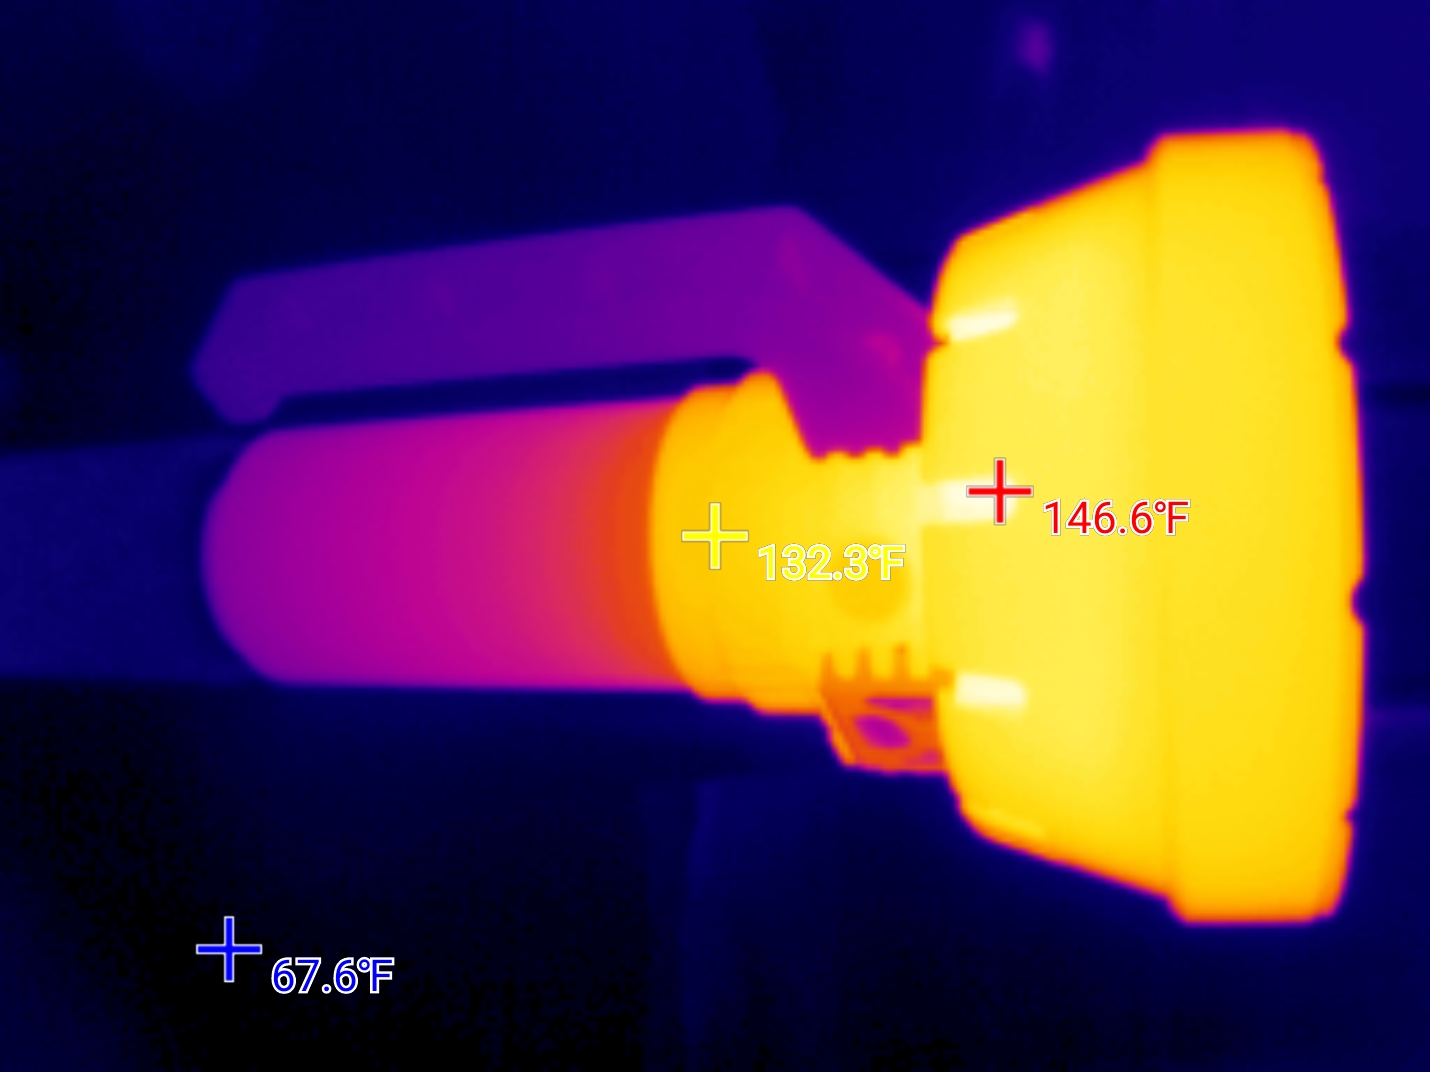
I am testing a flashlight from Imalent – the RS32 Polaris. Here are a couple of photos while it was kicking out 120,000 lumens of light, and then 25,000 lumens. I used the Iron palette for the first and Red Hot for the second.

In the specs, I mentioned the NETD (Noise Equivalent Temperature Difference) rating, and that this camera is rated to be able to differentiate between relatively small temperature changes. To test that I used two things. First, I used the wonderful Rest Evercool cooling comforter that currently resides on our bed. Second, I enlisted my trusty index finger.
I traced out a really poor interpretation of The Gadgeteer logo on the comforter with my index finger. While the image faded quickly, you can see that I “wrote” on the comforter, even though my finger contacted any point of the comforter for only a fraction of a second. That couldn’t have resulted in more than a fraction of a degree of temperature change yet the Teslong thermal imaging camera easily picked up the, dare I say, artwork.
I think that is impressive.
One issue I did have was what I’ll call flaky operation. Occasionally, when plugging in the camera, the app would open to a black screen. Pressing the camera reset button, or any button for that matter did nothing. If I unplugged the camera and plugged it back in, it would work just fine. Not a deal-breaker, but still odd.
What I like
- The small form factor and great carry case make it easy to use and carry
- Nice selection of color palettes and app features
- Nice photo and video capture features in the app
What I’d change
- The USB-C connector needs to be slightly longer to accommodate phones in cases, or at least supply an adapter
- Fix the app’s occasional flaky operation
Final thoughts
The Teslong thermal camera is a pretty slick little device. The thing that bugged me most about the Teslong thermal camera was having to remove my phone’s case every time I wanted to use the camera. $6.98 to Amazon and one day of waiting solved the problem. I purchased a two-pack of USB-C extenders.
Of course, that makes the entire solution a little more unwieldy, but it’s not like I’m walking around on vacation snapping photos. When I connect the camera, I’m on a specific mission, so this addition makes sense to me. I just wish Teslong included one with the purchase.
I wanted to use this to find some of the hidden critters in the trees around here. Unfortunately, we are pushing summer here in central Florida. That means that everything is hot, so finding a hot body in an equally hot tree will have to wait until the air gets cooler. Let’s see, it is early June, so…December. Yeah.
Until then, I’ll just have to be happy looking at really hot things if I want to look outside. If you are a home inspector, I can see how something like this could be a game-changer. It would easily allow you to identify home insulation issues and poor-quality or badly sealed windows and doors, based on heat differentials.
Price: $269.99
Where to buy: Amazon
Source: The sample of this product was provided by Teslong.

GMKtec G3 Pro Mini PC, Intel Core i3-10110U (Beats 4300U/N150) 16GB DDR4 (Dual Channel) 512GB PCIe M.2 SSD, Desktop Computer 4K Dual HDMI/USB3.2/WiFi 6/BT5.2/2.5GbE for Office, Business
(as of June 17, 2026 14:04 GMT -05:00 - More infoProduct prices and availability are accurate as of the date/time indicated and are subject to change. Any price and availability information displayed on [relevant Amazon Site(s), as applicable] at the time of purchase will apply to the purchase of this product.)
Gadgeteer Comment Policy - Please read before commenting
Hey guys do you have a thermal cam, that I can plug in to my DJI drone or Autel drones?.I know this will be a Big market. Please let me know and I’d be happy to test it..Thank you for your time.
Kenneth:
The Gadgeteer is an independent review site, not a manufacturer. Perhaps you should consider directing your inquiry to thermal camera manufacturers, not review sites.