REVIEW – Now that many people are working from home, portable data storage has become more important. And since you’re toting around that sensitive data, better make sure it’s secure. That’s exactly what DataLocker has set out to do – secure our data with portable drives like the DL4 FE 1 TB Solid State Drive (SSD).
After trying this portable security device, I came away feeling like my data was indeed secure, even from me at times. That is to say that when entering my password, the drive’s resistive touch screen did not always select the correct character even after carefully targeting my taps. But once unlocked, it was easy as pie to use.
What is it?
The DataLocker DL4 FE is a portable solid-state drive (it is also available as a hard drive) that comes in various sizes and uses hardware-based Advanced Encryption Standard (AES) 256-bit encryption to encrypt stored data and contains a common criteria EAL5+ validated secure microprocessor. It is also currently in the process of receiving a FIPS 140-2 Level 3 and Common Criteria Certification.
What are the Federal Information Processing Standards (FIPS)?
FIPS are standards and guidelines for federal computer systems that are developed by National Institute of Standards and Technology (NIST) in accordance with the Federal Information Security Management Act (FISMA)…These standards and guidelines are developed when there are no acceptable industry standards or solutions for a particular government requirement. Although FIPS are developed for use by the federal government, many in the private sector voluntarily use these standards. (nist.gov)
This Federal Information Processing Standard (140-2) specifies the security requirements that will be satisfied by a cryptographic module, providing four increasing, qualitative levels intended to cover a wide range of potential applications and environments. (nist.gov)
What are the Common Criteria?
The Participants in this Arrangement share the following objectives:
- to ensure that evaluations of Information Technology (IT) products and protection profiles are performed to high and consistent standards and are seen to contribute significantly to confidence in the security of those products and profiles;
- to improve the availability of evaluated, security-enhanced IT products and protection profiles;
- to eliminate the burden of duplicating evaluations of IT products and protection profiles;
- to continuously improve the efficiency and cost-effectiveness of the evaluation and certification/validation* process for IT products and protection profiles.
The purpose of this Arrangement is to advance those objectives by bringing about a situation in which IT products and protection profiles which earn a Common Criteria certificate can be procured or used without the need for further evaluation. (commoncriteriaportal.org)
What’s in the box?

- DL4 FE (I received the 1 TB SSD)
- Carrying case
- USB-C to USB-C cable
- USB-A to USB-C cable
Hardware specs
CAPACITIES
SSD: 1 TB, 2 TB, 4 TB, 7.6 TB, 15.3 TB; HDD: 500 GB, 1 TB, 2 TB
DIMENSIONS
L: 12.3 cm W: 7.7 cm H: 2.1 cm
L: 4.8’’ W: 3’’ H: .82’’
WEIGHT
.65 lb / 294 grams and up
PHYSICAL SECURITY
Kensington Security Slot™
Hardened internals and enclosure
CRYPTOGRAPHIC PROCESS
FIPS 140-2 Level 3 Device* certification pending, AES 256 Bit XTS cryptographic module
Integrates a Common Criteria EAL 5+ certified secure microprocessor
INTERFACE
USB-C on the device, compatible with USB 3.2, USB 2.0 (8 TB drives and under)
(USB-C to USB-A and USB-C to USB-C cables included)
TRANSFER SPEEDS
USB C 3.2: 150MB/s read, 100 MB/s write
USB 2.0: 40Mb/s read, 20MB/s write
STANDARDS AND CERTIFICATION
TAA Compliance
IP64 Certified
RoHS Compliant
FCC
CE
MANAGEMENT COMPATIBILITY
Microsoft Windows
OS COMPATIBILITY
Microsoft Windows, macOS®, Linux®, or any machine that supports a USB mass storage device.
PART NUMBERS
DL4-500GB-FE
DL4-1TB-FE
DL4-2TB-FE
DL4-SSD-1TB-FE
DL4-SSD-2TB-FE
DL4-SSD-4TB-FE
DL4-SSD-7.6TB-FE
DL4-SSD-15.3TB-FE
DEVICE LANGUAGES
English, French, German, Spanish
WARRANTY
3-year limited warranty
“*The DL4 FE has been designed for FIPS 140-2 Level 3 and is being tested by an accredited National Institute of Standards and Technology (NIST) lab. The product is in the process for certification and is officially listed by NIST. DL4 FE is also in the process to achieve Common Criteria cPP certification. The official listing as a Product under Evaluation by NIAP is expected in March 2021.”
Design and features
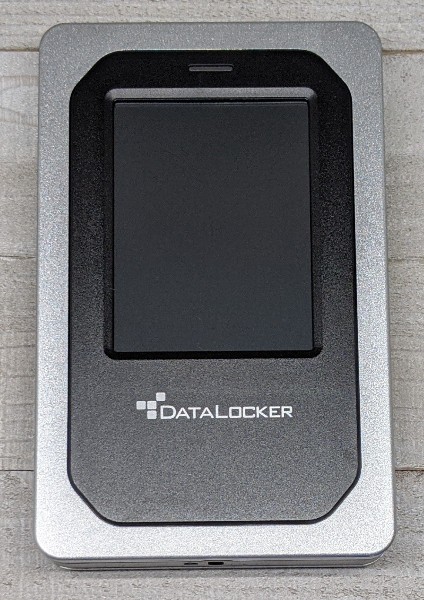
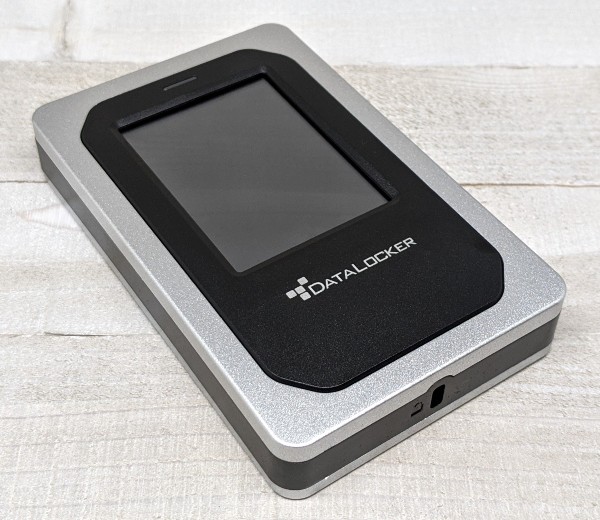
The DL4 FE portable solid-state drive (SSD) (1 TB size shown above) just looks like a security device. The edges and back of the drive are encased in metal. It also has a plastic face and a plastic band around the perimeter of the drive.
The drive has a resistive touch screen instead of a capacitive touch screen (cell phones use capacitive touch screens which use “the presence of conductivity such as the moisture of your finger or a capacitive stylus to take input”). The resistive touch screen allows you to use your finger, a retracted pen tip, a stylus, or a plastic card (among other things) to enter data on the screen, but you must tap the screen firmly which takes some getting used to.
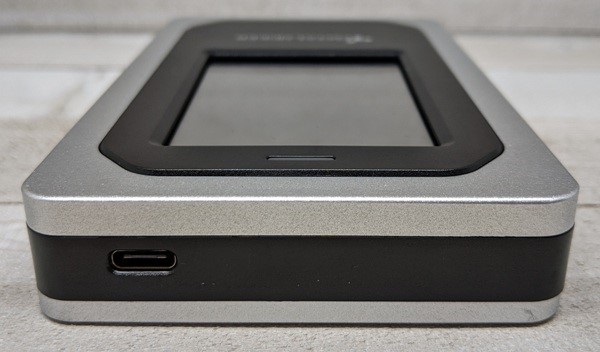
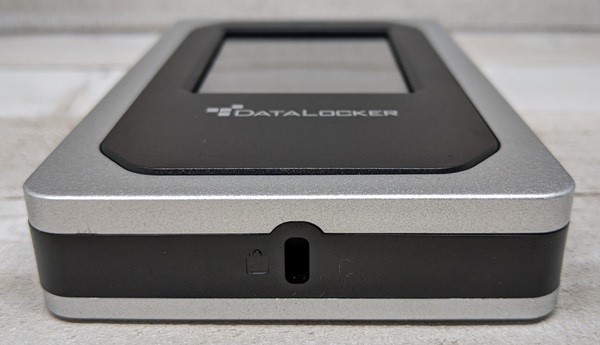
The top of the drive has a USB-C port and the bottom of the drive has a Kensington Security Slot just in case you have a Kensington cable lock to physically secure the SSD to an immovable object while you are away from the device.
Performance
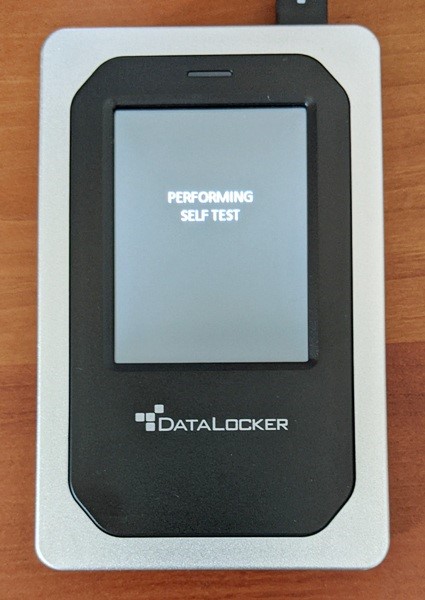 To use the DL4 FE drive, you use the USB-C to USB-C cable or USB-A to USB-C cable (both are included with the drive) to connect it to your computer. When you do this, the drive will power up and perform a self-test. And, if this is the first time you are using the dive, it will then prompt you to set up a password (the administrator’s password).
The default settings require that the password be at least eight characters long, though you may increase the required length in the settings for the drive (I will discuss the settings a little later). The instructions encourage the user to create a strong password made up of letters, numbers, and special characters.
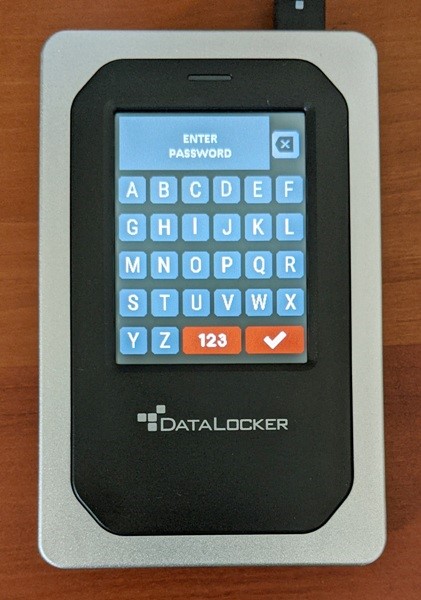
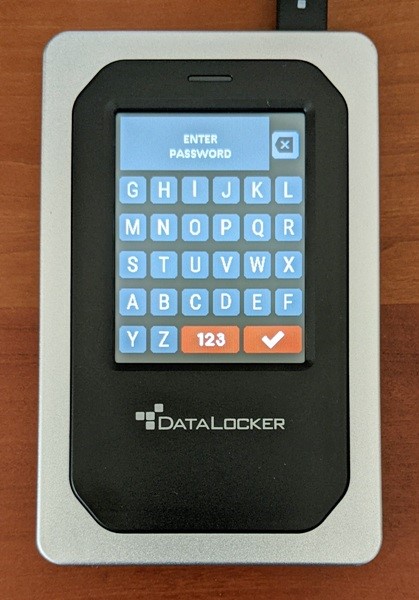
Each time you log into the drive, the touch-screen keyboard letters change position (the numbers do too) to prevent someone from trying to use fingerprint patterns or wear patterns to break into the device. The letters in each row stay the same but the rows are randomized. The photos above illustrate this security feature. It’s a nice feature but definitely increases the amount of time required for you to enter your password.
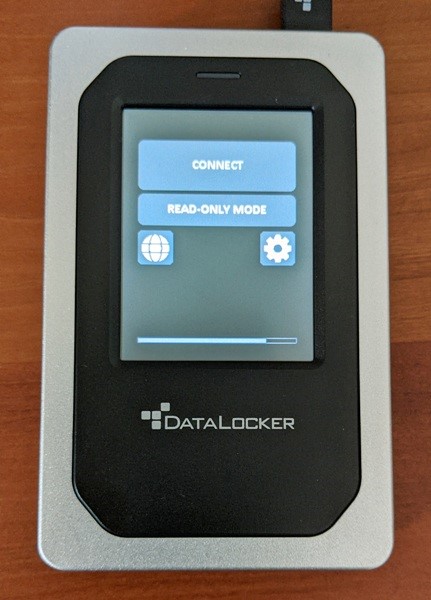
Logging in was a challenge, but more on that a little later… After logging into the device with the admin password, you’ll then see a “Connect” screen pop up as shown in the first photo above. You can tap on the “Connect” button to connect to your computer or if you don’t tap on anything, the drive will automatically connect to your computer after ten seconds.
Also on this screen is a “Read-Only Mode” button, a language button (the globe icon), and a settings button (the gear icon).
The “Read-Only Mode” is fairly self-explanatory.
Each tap on the globe icon rotates through four languages: English, French, German, and Spanish.
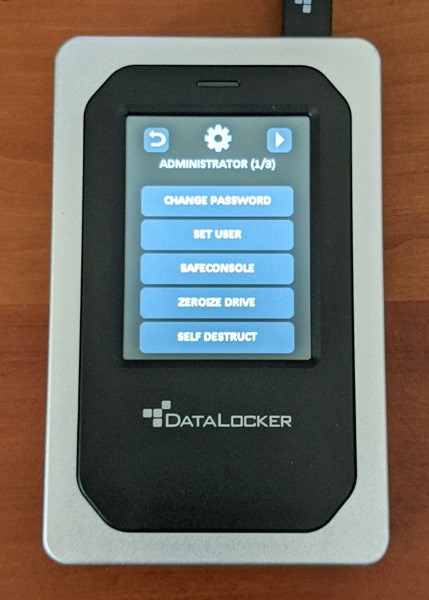
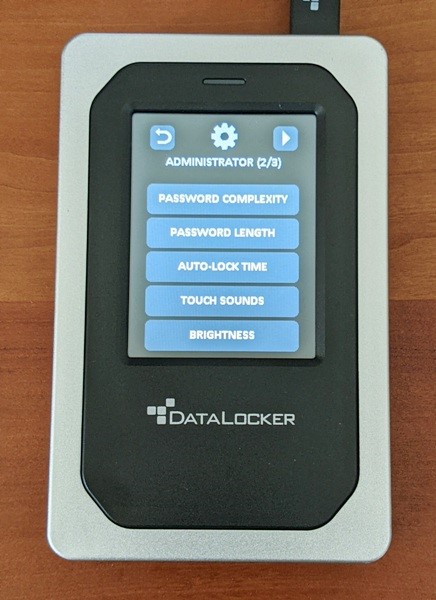
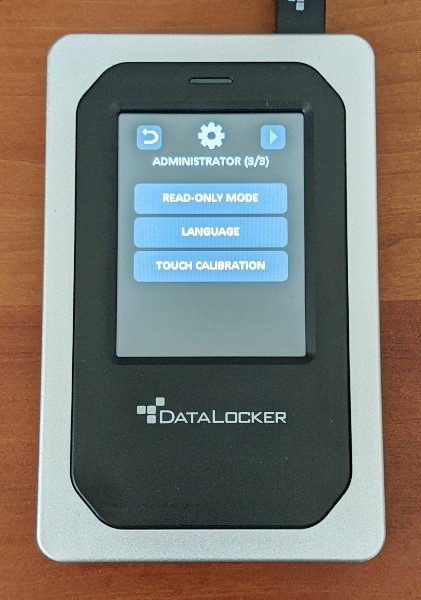
And last, by tapping on the gear icon, you can change the settings of the drive. You can change the following administrator settings:
- Change Password – Change the current administrator password
- Set User – Set up a user profile in addition to the admin profile
- SafeConsole – This enables remote management for the drive; available only to the administrator and requires a purchased license
- Zeroize Drive – Erases data
- Self Destruct – Configures the self-destruct methods (destroy the device or just delete the data)
- Password Complexity – Set whether or not to use letters, numbers, and special characters
- Password Length – Set the password length; minimum of eight characters
- Auto-lock Time – Set the drive’s idle time after which the device will lock
- Touch Sounds – Enable/disable touch screen sounds
- Brightness – Alter the brightness of the screen
- Read-Only Mode – Enable/disable read-only mode which restricts users from changing data
- Language – Select the preferred language (one of four languages) for the profile
- Touch Calibration – Calibrate the touch screen
Most of the settings are self-explanatory. But there are a few that need a little explaining.
Change Password – You can change your password using this setting.
NOTE: If you want to generate a Silent Kill-Code password, you can press and hold the “Change Password” button for five seconds. After doing this, you’ll see a message stating, “Silent Kill Code -This code is used to immediately initiate the self-destruct process”. Then tap on the “Ok”. You’ll then enter a silent kill-code password and confirm it by re-entering it.
Set User – In addition to the admin profile, you can set up a user profile (you can set only one):
From the administrator settings menu, tap on “Set User” > “Enable”, then back out of the settings. The drive then states, “User has been set”. You then connect the drive to your computer, lock and disconnect the drive, then power off.
When you re-attach your drive to your computer, it will give you the option to log in as “User” or “Admin”. If you select “User”, you will be prompted to create a password and confirm it, after which the user can connect the drive to his computer and use the drive but will have restricted access to the drive settings:
-
- Change Password
- Auto-lock Time
- Touch Sounds
- Brightness
- Language
SafeConsole – This tool is a central management console and allows an administrator to remotely manage DL4 drives. It requires you to purchase a license to use it. According to the documentation, “SafeConsole offers several key features including audit logging, anti-malware services (license sold separately), remote password reset, and more!” I do not have SafeConsole and so this review will not cover that feature.
Zeroize – According to the documentation, “Performing this action deletes all the data, removes the user and administrator passwords, and deletes the SilentKill Code. The Data Encryption Key (DEK) will also be wiped and regenerated. NOTE: Zeroize will retain the configuration set by the administrator.”
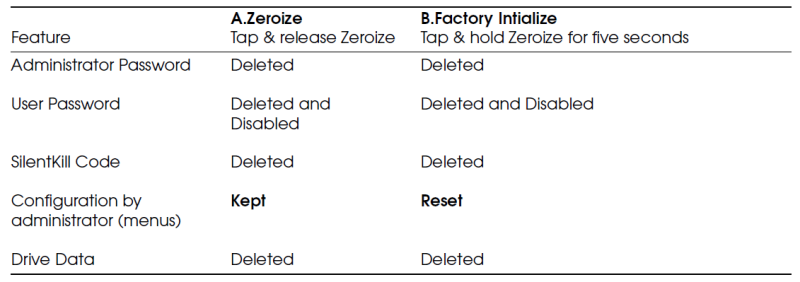 There are two types of Zeroize: Zeroize or Factory Initialize. How do you choose which to do? The above table will help you decide.
To Zeroize, you would tap on “Zeroize Drive” from the admin menu then follow the on-screen prompts. To factory reset the drive, you press and hold “Zeroize Drive” for five seconds after which you will see a “Factory Initialize” prompt.
Self-Destruct – You can set up the drive to delete all data or even physically destroy the drive if there is an attempted breach.
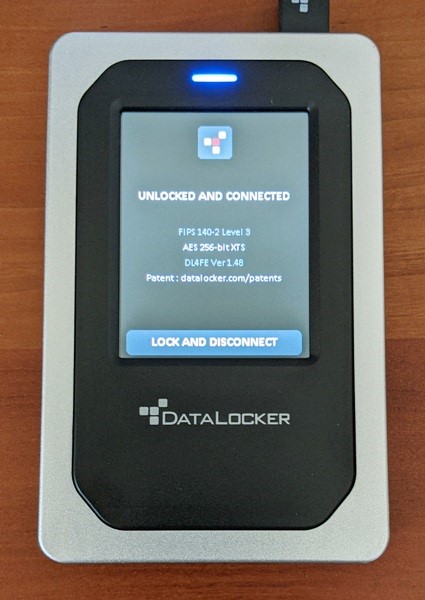

When the drive is connected to your computer, you can at any time choose to lock and disconnect the drive as shown in the first photo above. After which, you can choose to unlock it or power it off (shown in the second photo above). There is no power button on the drive. It powers up when connected to your computer. If you disconnect the drive from your computer, the drive locks thus protecting your data.
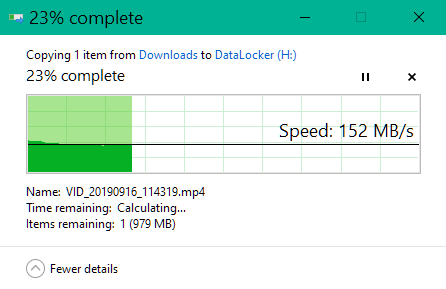

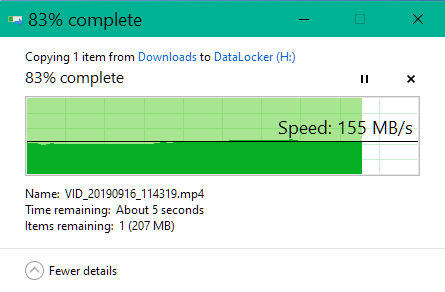
When using the USB-C to USB-C cable, the DL4 documentation states that you can get USB 3.2 data transfer speeds up to 150MB/s read and 100 MB/s write. The first screenshot above shows that I actually got 152 MB/s data transfer speed when transferring a 1.3 GB video file from my laptop to the drive.
When copying the data from the drive to my laptop, I saw even greater speeds as shown in the second screenshot above. It was so fast that I was taken by surprise and barely had time to grab the screenshot before the copying was completed.
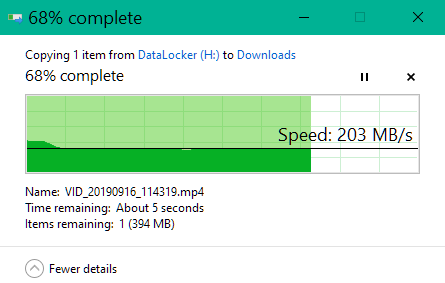
When using the USB-A to USB-C cable, the documentation states that you will get USB 2.0 data transfer speeds up to 40Mb/s read, 20MB/s write. Transfering the same 1.3 GB video file, I was able to transfer the file with much greater speeds: 155 MB/s when copying from my laptop to the drive, and 203 MB/s when copying from the drive to my laptop. I’m not complaining!
Now, let’s go back and talk about logging into the drive. Logging in is definitely the most challenging part of using the drive. As I tapped on the characters of my password using my fingertip, the drive briefly displayed an indicator (a small circular yellow fingerprint icon) to show me where I had touched the screen. It frequently looked as though I had selected another character entirely but I couldn’t be sure because there was no way to view the characters entered (for security purposes).
Thus, the very first time that I created an admin password (and even verified it) and went to log in, I had apparently entered an incorrect password even though I would swear that I had entered the correct one. I failed nine times to enter my password correctly. I was warned that self-destruct was imminent. On my tenth and final try, I slowly went to tap on the checkmark to log in, hoping that I wasn’t about to destroy the drive before I even got to try it out. What was about to happen? What does it look like for the physical drive to actually destroy itself? Well, here goes nothing… *Tap*
Phew!! No explosions, melt-downs, or even a smokey demise. Thankfully this was not a Mission Impossible self-destruct moment. The self-destruct feature was set by default to erase the data on the drive and not to physically destroy the drive.
Even typing slowly with the tip of a retracted pen didn’t help the problem (I used a pen to try to improve on the accuracy of my character selections without success). The delete key next to the password entry box often did not even register my touches at all. Perhaps this issue is particular to my device or perhaps I just need to get used to using a resistive touch screen.
What I like
- Very easy to use
- Security features
What I’d change
- The touch screen was frustrating to use – it frequently registered my touches incorrectly, such that it would select wrong characters as I typed in my password
Final thoughts
The DataLocker DL4 FE 1 TB SSD is a secure portable drive that uses hardware-based AES 256-bit encryption to encrypt the data stored on it. After logging into the drive, it was really easy to use and felt just like any other storage device when saving files to it, reading files from it, or copying files from it. The frustrating part of the drive is logging in. The resistive (not capacitive) touch screen frequently detected my character selections incorrectly. Because I couldn’t see the password I had entered, my login attempts failed frequently. Perhaps this is just an issue with me learning how to appropriately use a resistive touch screen. Anyway, once I logged in, it was really easy to use and had fantastic read/write speeds.
If you are a business looking for secure portable drives for your remote or traveling employees to use, then this seems like the right tool for you. It is in the process of receiving a FIPS 140-2 Level 3 and Common Criteria cPP Certification. Additionally, if you purchase the SafeConsole license, which is a central management console, you will be able to manage all of your DL4 portable drives remotely.
Price: $689.99 (much less on Amazon)
Where to buy: CDW.com and Amazon
Source: The sample of this product was provided by DataLocker.

Now retrieving an image set.
Google Review Tap Cards (3-Pack) by TapFive - Tap for Instant Reviews - All Phones Compatible - Reusable Smart Tap NFC & QR - Boost Business Reviews - Powered by TapFive (3 Card Pack)
(as of July 13, 2026 18:55 GMT -05:00 - More infoProduct prices and availability are accurate as of the date/time indicated and are subject to change. Any price and availability information displayed on [relevant Amazon Site(s), as applicable] at the time of purchase will apply to the purchase of this product.)
Now retrieving an image set.
Gadgeteer Comment Policy - Please read before commenting
I was initially doubting the work of A great man hackrontech @gmail com but I decided to gave them a try since what I wanted really
worth the risk but honestly this team was so amazing in less than1 hr I
was able to locate my wife’s location without asking her and all her
text messages with her call conversations keep coming to my phone , this
works like a magic so I will say u contact this team for professional
hacking service they are good at it
hackrontech @gmail com