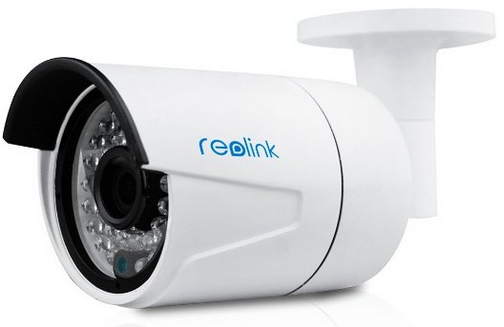
The ReoLink PoE IP RLC-410 Security Camera is a reasonably priced security camera with good quality day and night video capabilities, with a few caveats. It’s marketed as “DIY zero-configuration”, and it will work fine like that, but if you want to use the “advanced” features, or just like to explore, there are lots of configuration options.
Set Up
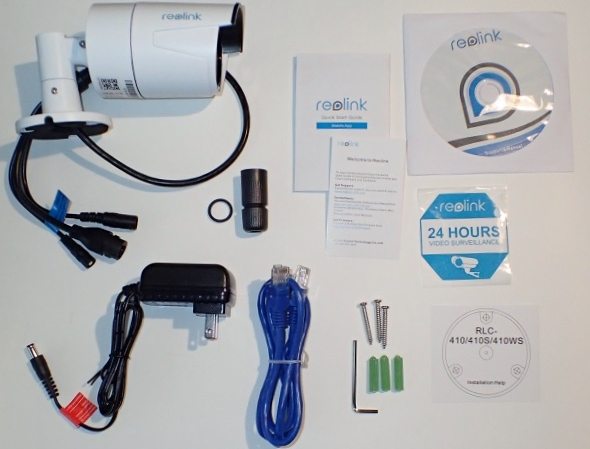
The ReoLink RCL-410 security camera comes with a 3.5 foot AC power adapter, a 1 meter network cable, 3 mounting screws, a Quick Start guide, a CD with the ReoLink Desktop client software, a security sticker and a mysterious black weatherproof guard and washer that doesn’t seem to fit anything. The cable from the camera terminates into inputs for Ethernet and the AC power adapter and a reset button.
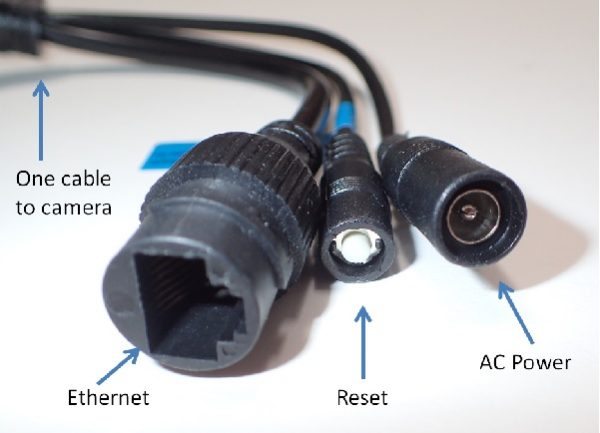
The ReoLink RCL-410 requires power and network connectivity. If your router supports PoE you can use a PoE (Power over Ethernet) connection to your router, which will supply both power and connection with one cable, otherwise you’ll need to use the supplied power adapter to a regular AC outlet and a wired Ethernet connection to your router. My home is pretty much wireless, so a wired connection to the router would require the ReoLink RCL-410 to be within cabling distance and an Ethernet cable to be strung. I originally set the camera up that way to test the software and connection. It worked well but I didn’t need or want security in that room. Since venturing into the attic or under the house to run cable is not something I willingly do, I solved my connection problem with a wireless WiFi extender with Ethernet capability. That works well but also requires AC power to the camera. With the wireless WiFi extender I could put the camera anywhere as long as it was close to an AC outlet and inside the house since my WiFi extender is “indoors only”.
The ReoLink RLC-410 direct connection to the router was easy. Setting it up with the WiFi extender wasn’t quite so easy. Before connecting with the WiFi extender, the camera must first be directly connected to the router for network identification. After the initial connection was made I was able to disconnect it and connect it using the extender. I had some WiFi extender problems that side-tracked me for a while before I got the whole thing working. As usual, the more layers & complexity, the harder it is to troubleshoot.
Viewing with Desktop Access
The ReoLink Client Windows Software is installed from the CD that is included in the box. Installation was a snap. The configuration options can be done from the desktop client or the phone or tablet app, available from the app store. If you want to explore the options you should consider reading the manual, there are lots of options and not all are intuitive. This is where you can set up the motion activation and email alert functions. There are a few oddities with the ReoLink desktop client. One thing that bothered me was the non-standard window sizing. The ReoLink Client window size is limited to 1024×768, 1280×1024, 1440×900, 1680×1050 or 100%. It does not allow the usual windows resizing by grabbing a corner or side and pushing or pulling. This seemed like an unnecessary limitation, besides being bothersome.
Motion Detection and Email Alerts
After a few tries, I was able to configure the email notification. They recommend using Gmail but they have instructions for Yahoo and Windows Live mail also. I’ve been using the Gmail 2-step authentication for additional security and had to turn that off before the ReoLink email notification would work.
With email notification, you can set up the Motion Detection alert to send a screen shot when a certain amount of difference is detected frame to frame. The software allows you to set the sensitivity level, the frame area, and the schedule for the Motion Detection alert.
This worked well once I got it going. But be sure to configure the sensitivity level appropriately so you don’t flood your in-box with emails. There is no option to alert via message, only emails.
Recording
There are lots of options when configuring video recordings. You can specify the resolution, frame rate, data-rate of each video stream (the higher the data, the higher quality of the images), audio inclusion, recording schedule, the path for saving the recorded file, the length of the recorded segment and more. You can configure any or all of the options, but you don’t have to. The ReoLink RLC-410 works well with the default configuration.
Picture Quality
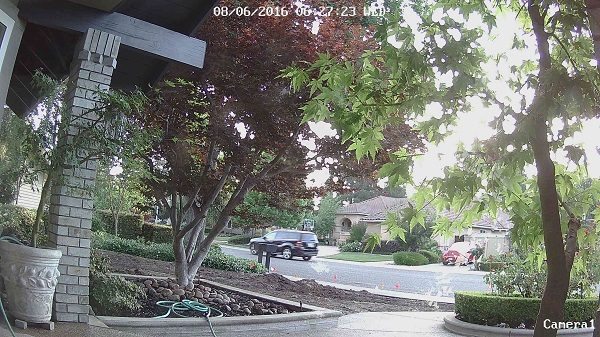
I thought the picture quality was quite good. I could see the wind blowing the leaves outside and read the clock on the wall across the room. I could not read the license plates of cars driving past. Thieves in my area all seem to follow the dark hoodie dress code, so I doubt facial recognition would be helpful unless it’s a friend (without a hoodie)
Night Vision
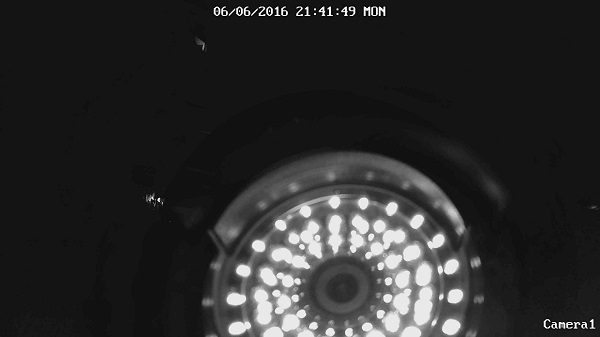
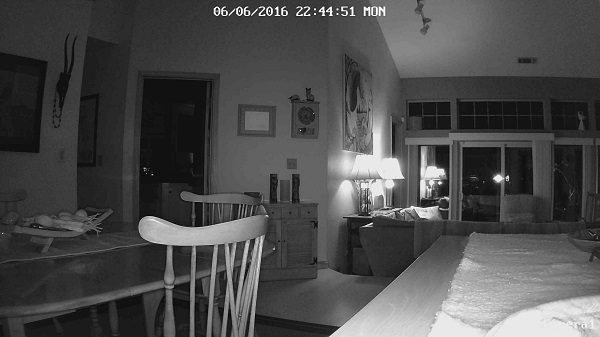
The night vision recording is black and white, but otherwise, the quality is reasonably good. However, with my setup, looking out the front porch window, the night vision didn’t work at all. The only thing I could see was the reflection of the infrared LEDs on the camera. For the night vision to work, either the camera has to be pointed inside or placed outside. Infrared night vision through a window does not work. I read about this problem with night vision dash cams, which were declared useless as well.
Playback
Playing back previous recordings is simple, but tedious. Each video snippet has to be added to the ReoLink Desktop Client playback list then played one at a time. The recording process automatically makes a new folder for each new day using a logical naming convention; 20160602, 20160603, etc., and stores all the recordings for the day in that folder. The recording is named with the device-name_from-date-time_to-date-time, ie; Camera1_20160604183348_2016060441833405.264. The .264 extension is widely used for security camera videos.
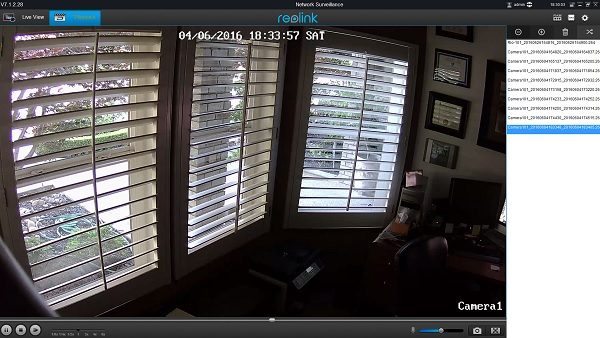
To find a specific event, maybe an unauthorized UPS delivered package removal, sometime between noon and 5 PM, you’d have to search through all 5 hours until you found the event (ie; the guy in a hoodie). You can speed up the playback; 2x, 4x or 8x, or slow it down; 1/8x 1/4x or 1/2x. Each video snippet must be manually launched; it does not flow from one to the next. The quality of the recording is just as good as the Live View.
Remote Access
I downloaded the ReoLink app on both my iPhone and iPad and was able to see the ReoLink Live View while away from home. The picture quality was just as clear as on the desktop client, though smaller. I could not access the recorded files that were saved on my desktop, but perhaps with some modifications, I could make that work. I was able to initiate a “record” and a “capture” from my iPhone and iPad, but the recording was stored on my device, not my desktop. Videos recorded on the iPhone or iPad are stored as .MP4 files. These were not as high resolution as the desktop stored files.
Conclusion
The ReoLink RLC-410 is a well-made, sturdy camera with lots of capability and features if you want to use them. For my purposes, there were several significant drawbacks. I don’t want to hassle with running extra Ethernet cable around my house and would much rather use AC power with a wireless network connection. AC is ubiquitous, Ethernet is not. The Wi-Fi extender was not as reliable.
The camera is advertised as waterproof, so it could be set up outside, but then you’d have to run a PoE Ethernet cable outside. Setting the camera inside looking out through a window is useless after sundown since all you see is the infrared reflection.
Also, I thought their Zero-configuration marketing was misleading. The email alerts and motion detection alerts are among the most useful and must be configured to work.
The ReoLink RLC-410 price of $74.99 (Amazon Prime) is reasonable, but considering the limitations, I think I’d rather spend the extra money and get a wireless camera that includes wireless access.
Update 06/17/16
Answers and comments from ReoLink
In the “Set up” part, the “mysterious black weatherproof guard” is used to put on to the cable when you use this camera for outdoor use, which can protect your cable from whatever weather it is.
You can’t directly read the license plate when a car past. But you can view the video playback and lower the speed, which allows you to see the license plate.
Infrared night vision through a window does not work in all of the cameras. It requires a high light level in the surveillance environment.
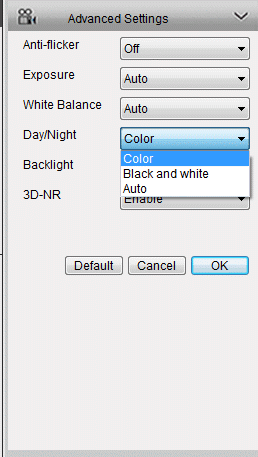
You can set up Advanced Settings in the client to view color images at night. See the below picture:
Source: The sample for this review was provided by ReoLink. Please visit their site for more info and Amazon to order.


Gadgeteer Comment Policy - Please read before commenting
My RLC-410W camera keeps asking for a second IP address when its connecting to the wifi, using a changing MAC address which is spoofed from nowhere. Why?