
REVIEW – I think Gen X and some Millenials are the last generations to own physical photos (I’m excluding those photos that you hang on the wall). I have about 5000+ old photos and have been dreading digitizing them. Sending them to a company to digitize all of them is too expensive and I worry that my photos might get lost or damaged in the process. Instead, I’ve been considering the Epson FastFoto FF-680W Wireless High-speed Photo Scanning System and recently got the chance to review it. Is it a good option for someone like me? I think yes – it saved me lots of money.
⬇︎ Jump to summary (pros/cons)
Price: $529.99
Where to buy: Epson and Amazon
What is it?
The Epson FastFoto FF-680W Wireless High-speed Photo Scanning System is an input device that captures images of all your physical photos and documents and saves them as digital files (JPG or TIFF only when using the FastFoto app).
What’s in the box?
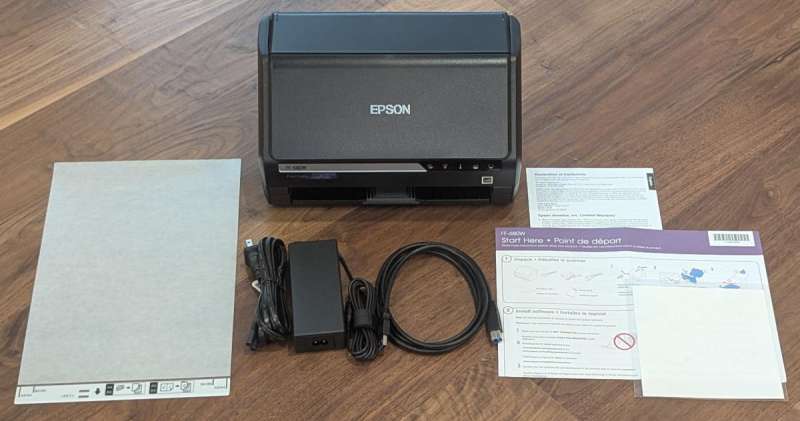
- Epson FastFoto FF-680W photo scanner
- Carrier sheet (for tiny photos)
- Power cord and AC adapter
- USB cable
- Warranty info and Quick Start Guide
- Microfiber cleaning cloth
Tech specs
- Scanner Type: Sheet-fed, one-pass duplex color scanner
- Photoelectric Device: 600 dpi/1 line CIS
- Optical Resolution: 600 dpi
- Color Bit Depth: 30-bit internal / 24-bit external
- Monochrome Bit Depth: 1-bit
- Grayscale Bit Depth: 10-bit internal / 8-bit external
- Scanner Features: Auto enhancement, Color restoration, Red-eye reduction, De-skew, Crop, Rotate
- Output Resolution: 50 to 1200 dpi
- Effective Pixels: 5,100 x 21,600 pixels (panoramic photo/long document up to 36″ at 600 dpi maximum)
- Light Source: 3-color RGB LED
- Photo Scan Speed (4″ x 6″ landscape): 80 ppm/160 ipm2 (300 dpi color)
- Document Scan Speed (Letter size): 45 ppm/90 ipm4 (300 dpi color)
- Humidity: 15–80% (no condensation)
- Operating Temperature: 41 ° to 95 °F (5 ° to 35 °C)
- Dimensions: 11.7″ x 6.7″ x 6.9″ (storage) (W x D x H)
- Weight: 8.2 lb (product only)
- Country of Origin: China
- Warranty: 1-year limited warranty in the U.S. and Canada
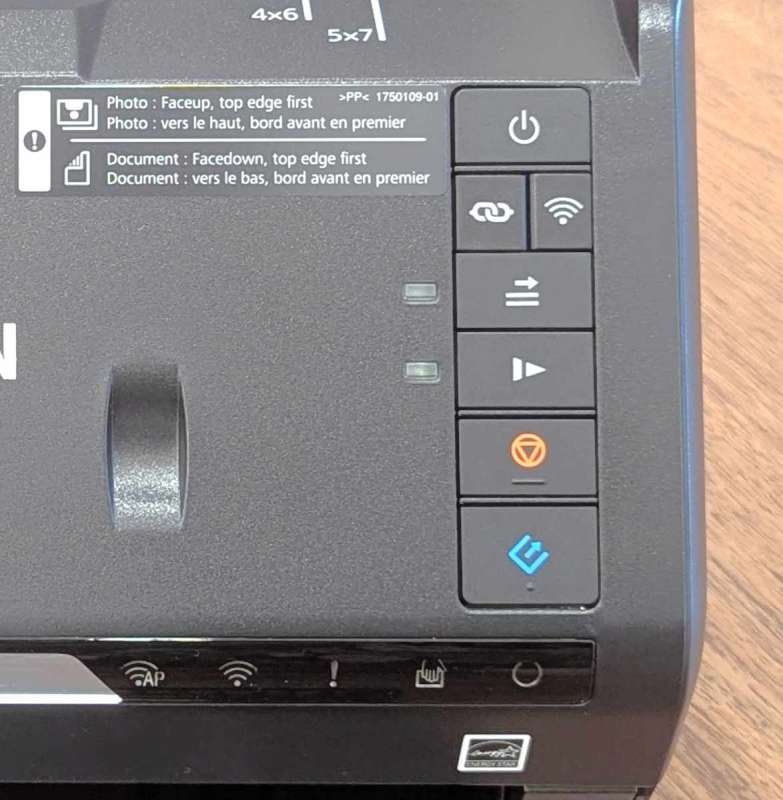
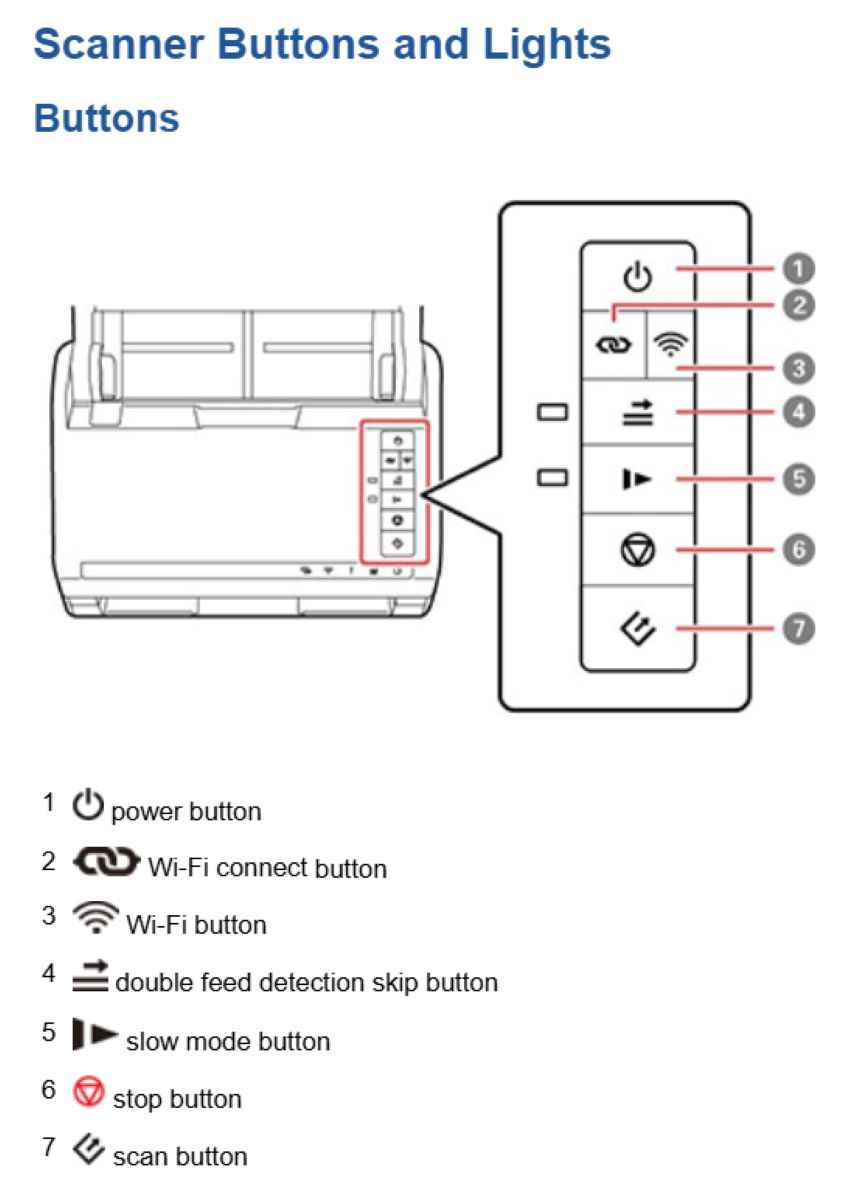
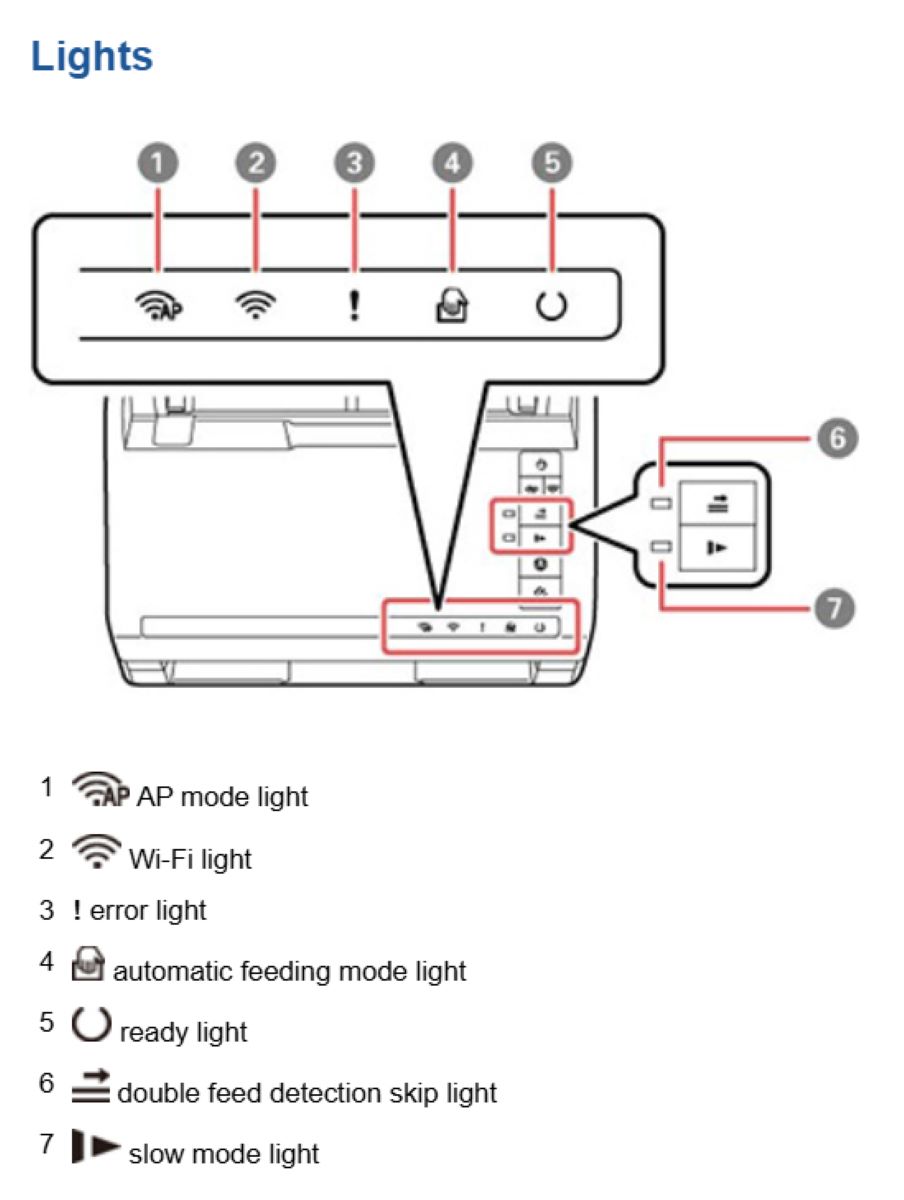
- Buttons: Power, Stop, Start, Wi-Fi Connect, Wi-Fi On/Off, Double-feed Detect Skip, Slow Mode
- Connectivity:
-
- Minimum System Requirements:
-
- Windows® 10 (32-bit, 64-bit)
- Windows 7 (32-bit, 64-bit)
- Windows 8/8.1 (32-bit, 64-bit)
- Mac® OS X® 10.11.x – macOS® 10.13.x
-
- Standard Connectivity:
-
- SuperSpeed USB 3.0
- Wireless 802.11 b/g/n6
-
- Minimum System Requirements:
-
- Scanner Details:
-
- Included Software:
-
- Second-generation Epson FastFoto Software
- Epson ScanSmart
-
- Included Software:
-
- Power:
-
- Power Consumption (USB Connection)
-
- Operating: Approximately 17 W
- Ready: Approximately 9.2 W
- Sleep: Approximately 1.2 W
- Off: Approximately 0.1 W
-
- Power Consumption (USB Connection)
-
- Power Consumption (Wireless Connection)
-
- Operating: Approximately 18 W
- Ready: Approximately 9.2 W
- Sleep: Approximately 1.4 W
- Off: Approximately 0.1 W
-
- Power Consumption (Wireless Connection)
-
- Automatic Document Feeder:
-
- Capacity: 36 Photos (Photo paper thickness < 0.23 mm), 100 Sheets (80 g/m2)
- Document Sizes:
-
- Paper Size
-
- Paper Size Minimum: 2″ x 2″
- Maximum: 8.5″ x 240″ (215″–240″ at 200 dpi maximum)
-
- Photo Size
-
- Wallet (minimum 2″ x 2″)
- 3″ x 5″
- 4″ x 6″
- 5″ x 7″
- 8″ x 10″
- Polaroid photos
- Panoramic photos (8.5″ x 36″ maximum)
-
- Document Size
-
- A4
- US letter
- Legal
- A3 (folded with Carrier Sheet)
- Carrier Sheet Maximum 8.5″ x 11.7″
-
- Paper Size
-
- Paper Weight:
-
- Photo: Thickness < 0.3 mm
- Document: 37 – 413 g/m2
-
-
Design and features
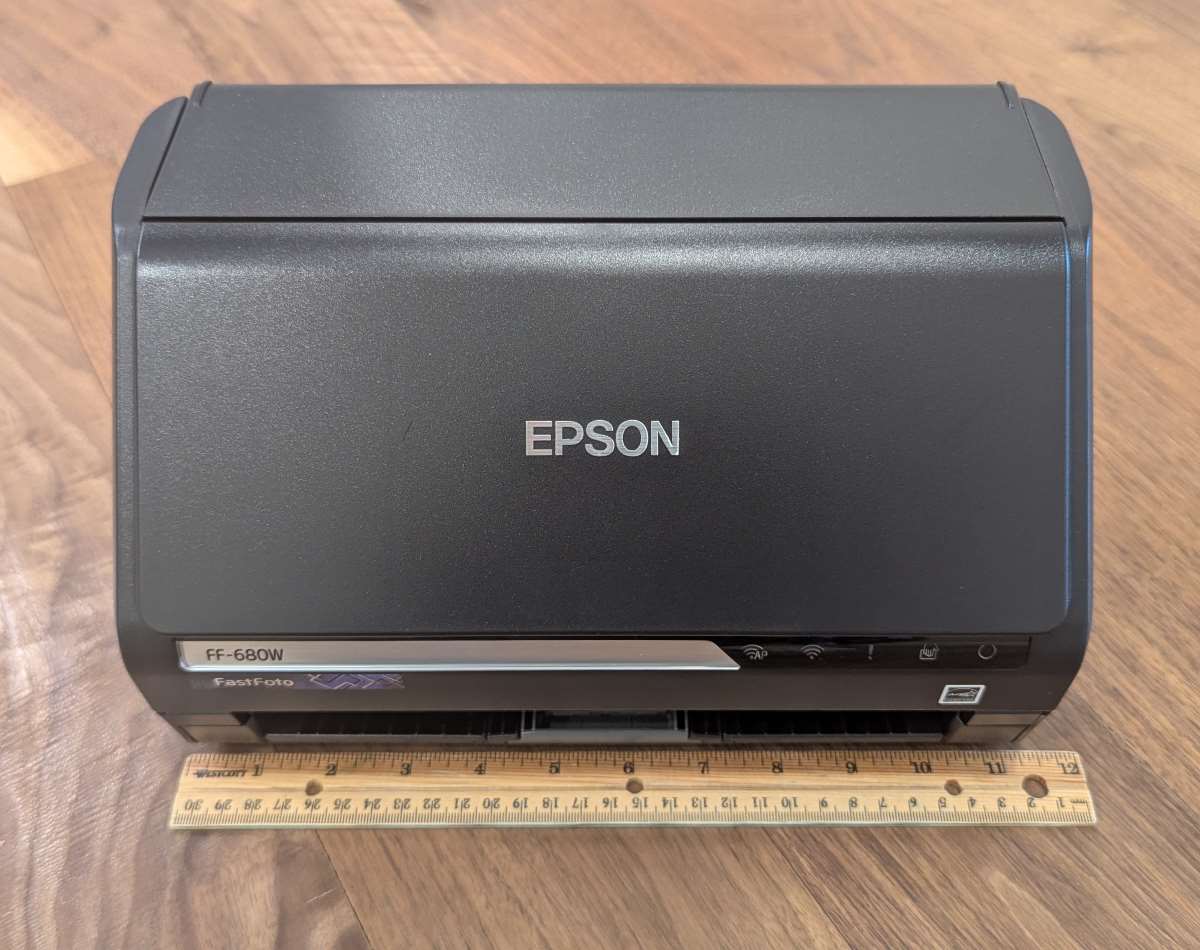
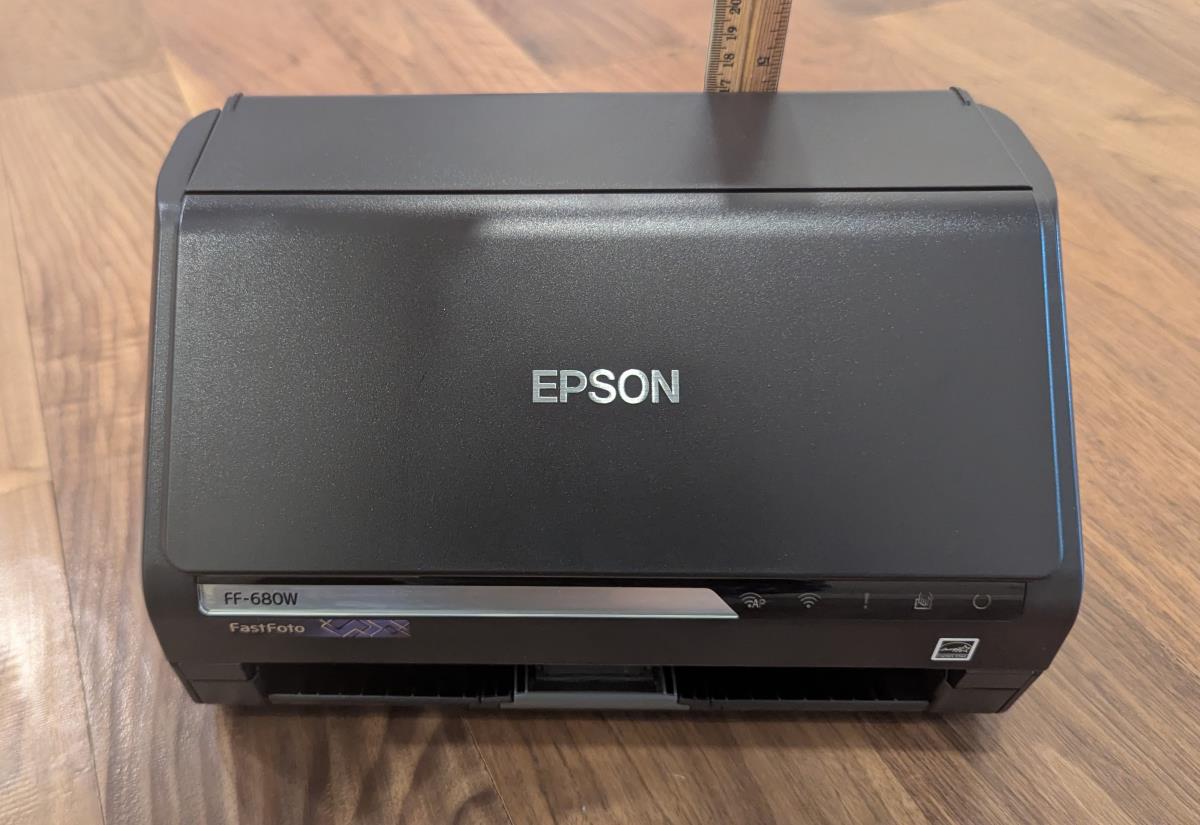
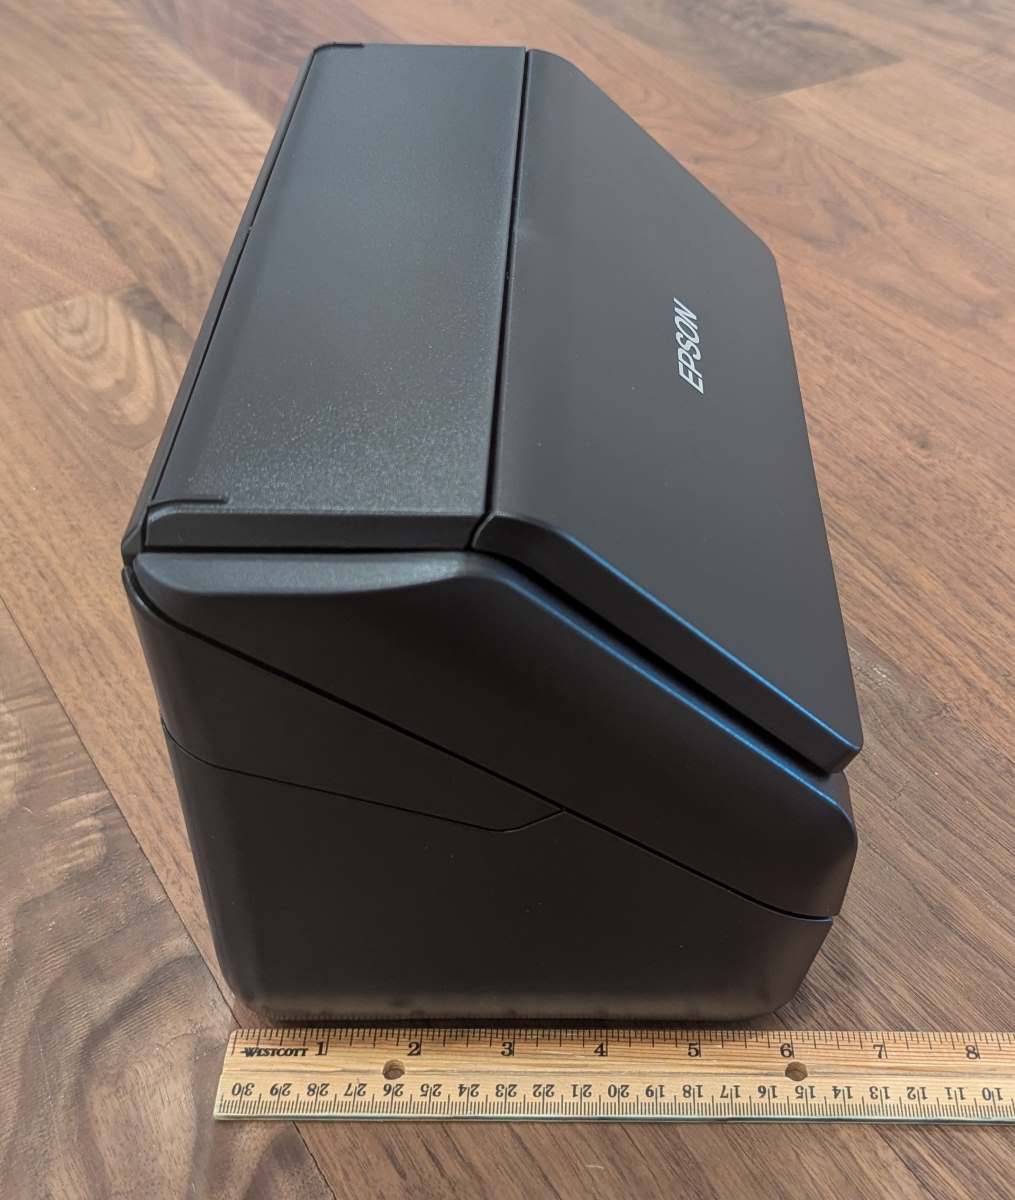
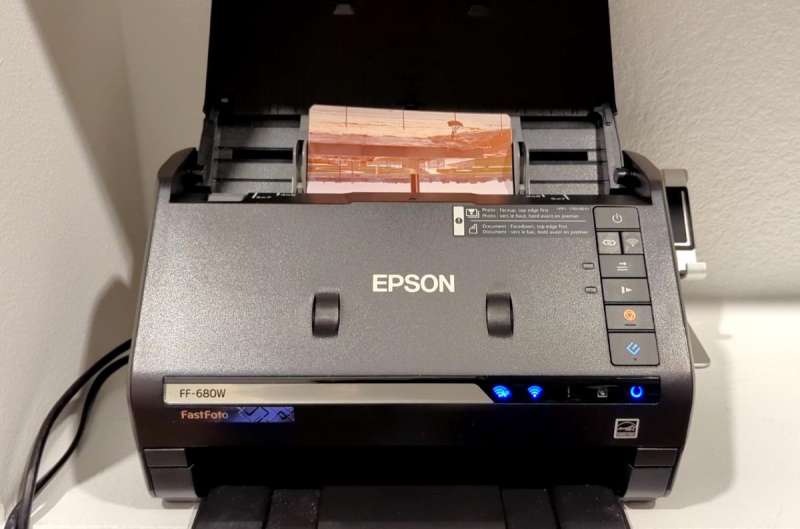
The Epson FastFoto FF-680W scanner measures 11.7″ W x 6.7″ D x 6.9″ H (when folded) and is made out of matte black plastic. When folded, it’s compact, stores easily, and is lightweight.
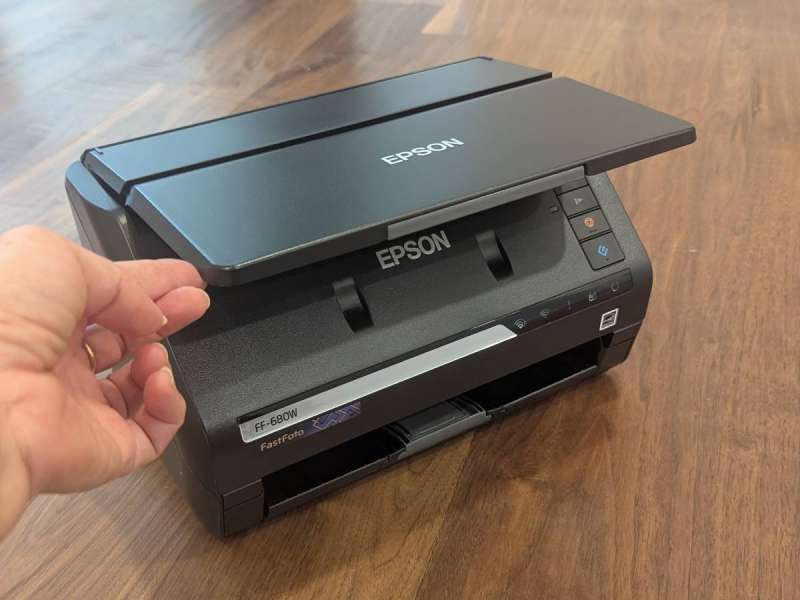
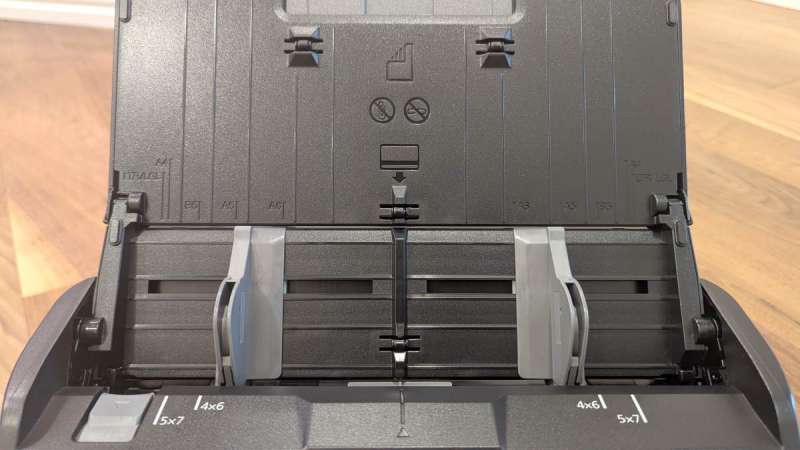
The input tray folds over the top of the scanner.
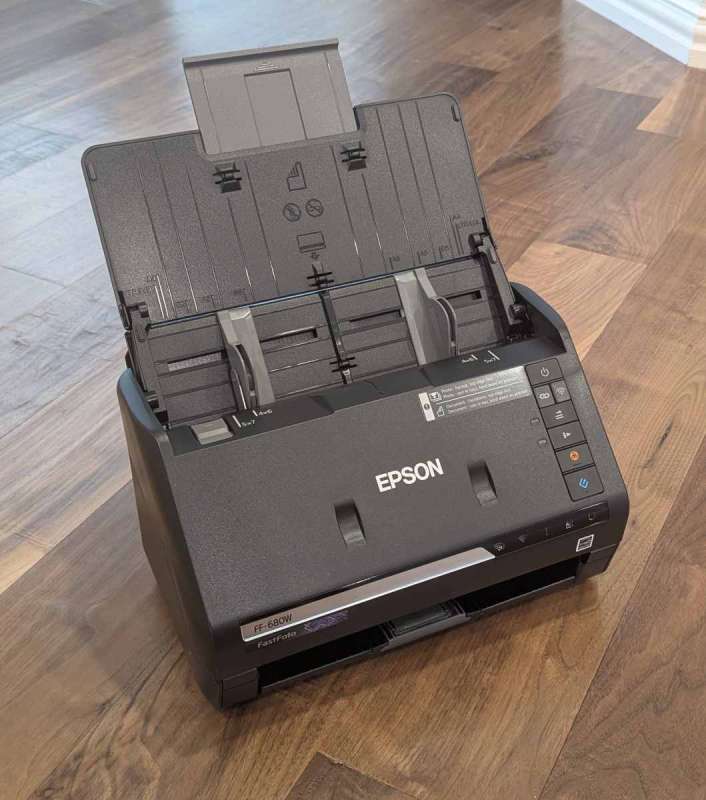
The input tray has an extension for longer photos and edge guides to help feed them into the scanner.

The output tray slides out from under the scanner.
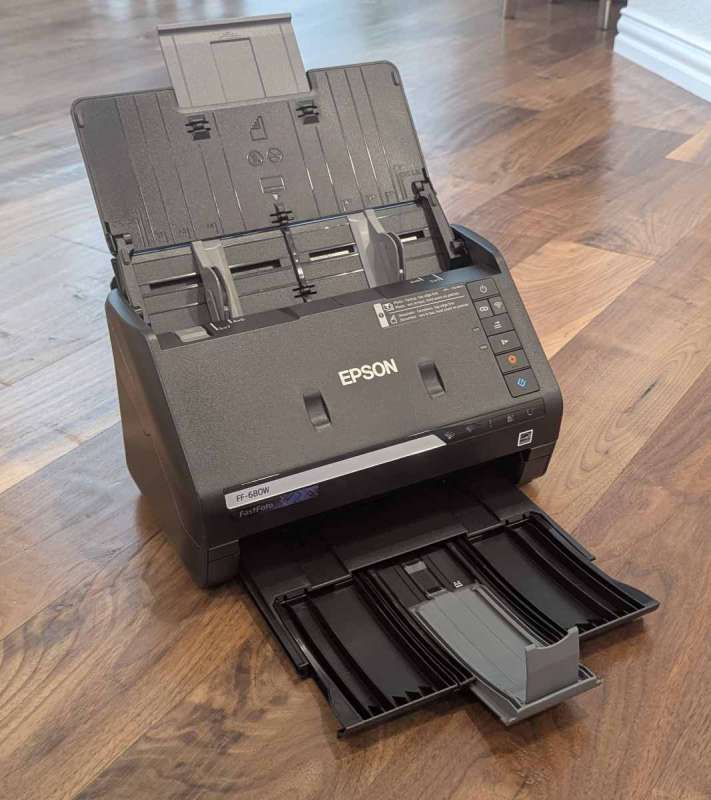
It too, has extensions to catch longer photos.
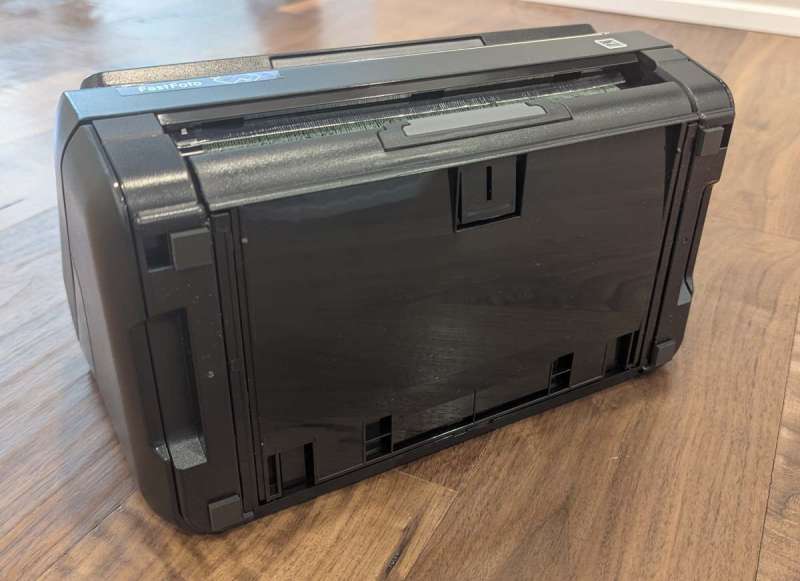
The bottom of the scanner has rubber pads to protect furniture and help keep the scanner in place.
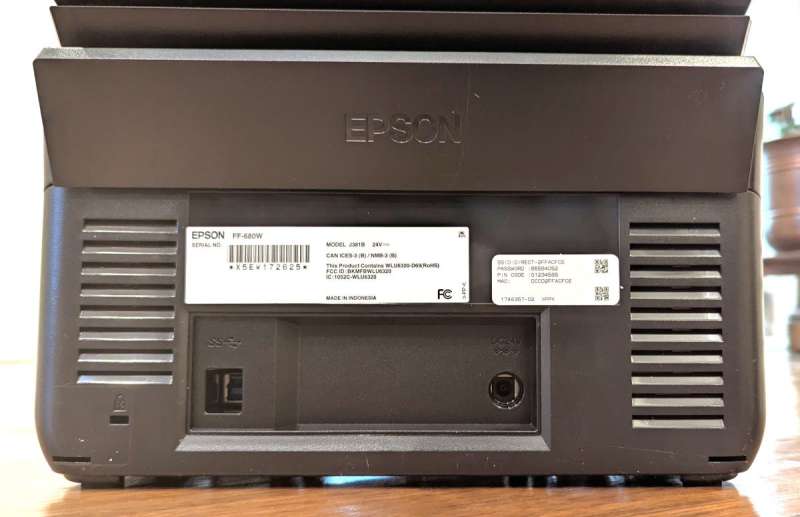
The back of the scanner has air vents, a USB port, and a power port.
The Epson FF-680W can scan wallet sizes (as small as 2″ x 2″), 3″ x 5″, 4″ x 6″, 5″ x 7″, 8″ x 10″, Polaroid photos, and panoramic photos (8.5″ x 36″ maximum).
You can scan directly from the scanner using the scan button, or from a computer or mobile device.
Setup
Mobile App Setup


I first downloaded the Epson FastFoto app on my phone. The app stepped me through the setup process.
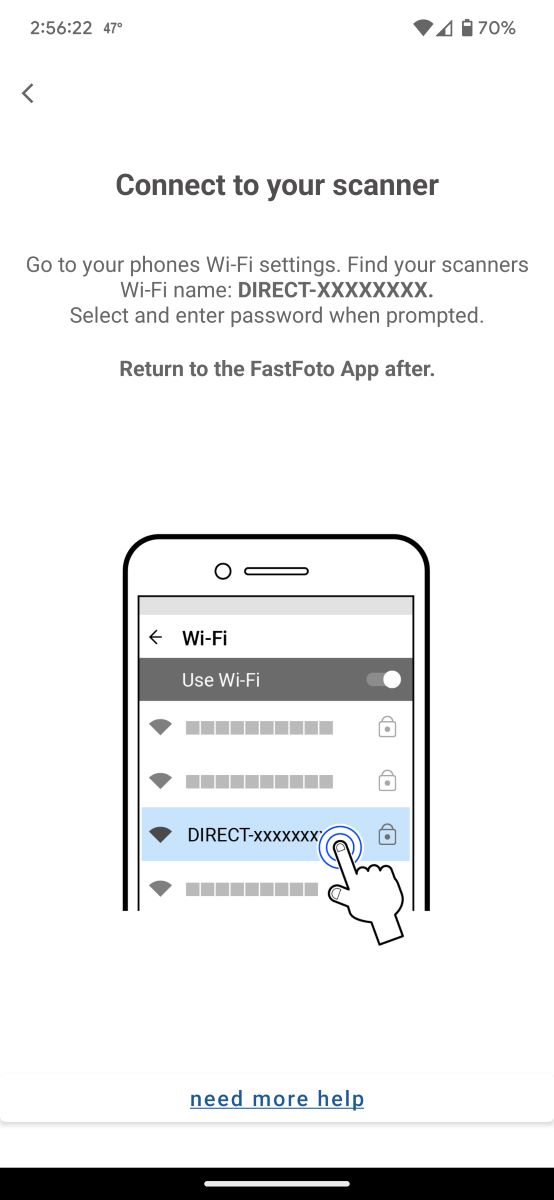
I powered up the scanner and enabled location permissions for the FastFoto app. The app didn’t find the scanner, so I pressed the scanner’s “WiFi” button and went to my phone’s WiFi settings. I tapped on the scanner in my WiFi settings (“Direct-XXXXXXXX”) and entered the password printed on the back of the scanner (second screenshot above).
I returned to the FastFoto app which informed me that my phone was connected to the scanner. I then entered my network’s WiFi SSID and password (third screenshot above).
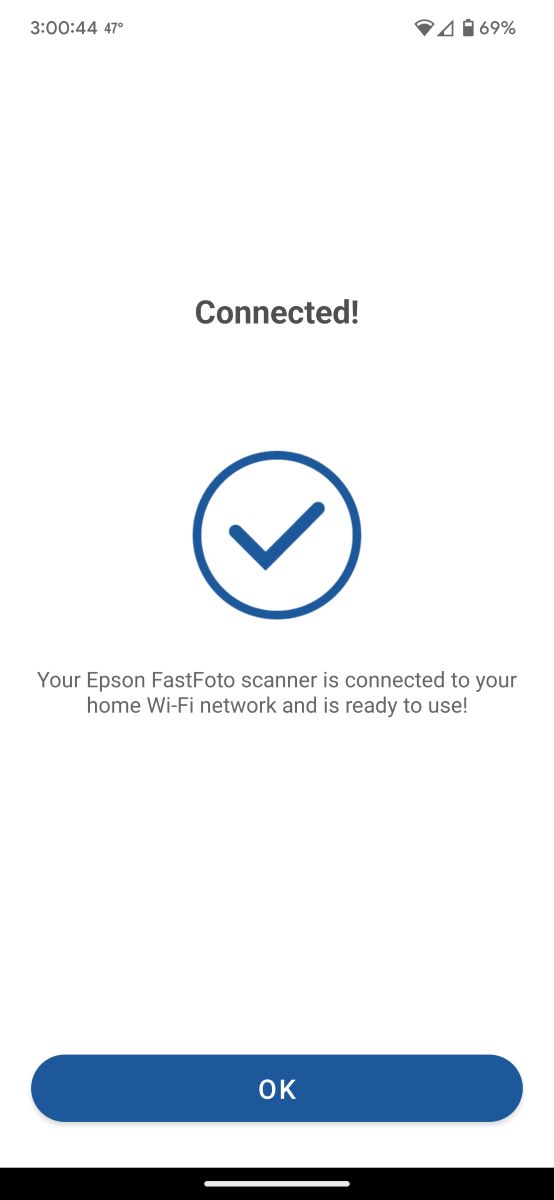
The app then stated, “The scanner you set up was not found” (fourth screenshot above). Great. But the next app screen said that my scanner was connected to WiFi and ready for use (last screenshot above). Huh? I guess it found the scanner?
Computer Setup
 I also set up the Epson FastFoto software on my laptop by downloading and installing the Epson FF-680W Drivers & Utilities Combo Package Installer from Epson’s website. Most of the installation was automated with only a few prompts calling for my input. I connected the scanner to my laptop using a USB cable and answered the prompts to complete the process. With every printer I’ve owned, I’ve always had to connect my laptop to the printer using a USB cable during the setup process even with the “Connect via wireless network” option selected.
Performance
Scanning using my laptop
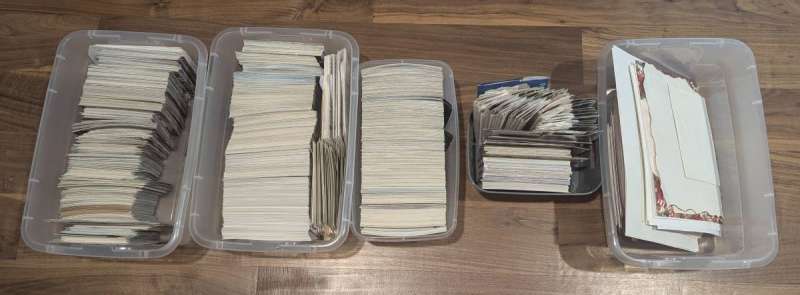
You can see from the picture above the decades of physical photos I’ve accumulated. Most had been in large bulky photo albums (“magnetic” and sleeve-type albums) that took up valuable storage space in my closet. I spent a few days just removing the photos from the albums. Ugh, what a chore. Removing them from the “magnetic” (sticky) photo albums tore some of them which made me hate having stored them in those albums even more. Finally, I was ready to start the scanning process.
I took a handful of photos (the autodocument feeder can handle up to 36 photos), placed them face up and upside down (top edge first) in the input tray, and adjusted the edge guides. If scanning multiple documents, you would place them face down, in portrait mode, with the top edge first in the input tray.
There were times when I scanned multiple-size photos or documents. To do this, I arranged them so each was centered in the input tray where the pickup rollers could grab them. The Epson documentation suggests arranging the photos such that the largest are placed at the back of the input tray. I didn’t always do that but still had success scanning my photos and documents.
I decided to use the Epson FastFoto Windows application first rather than the mobile app. The desktop application provides more features.
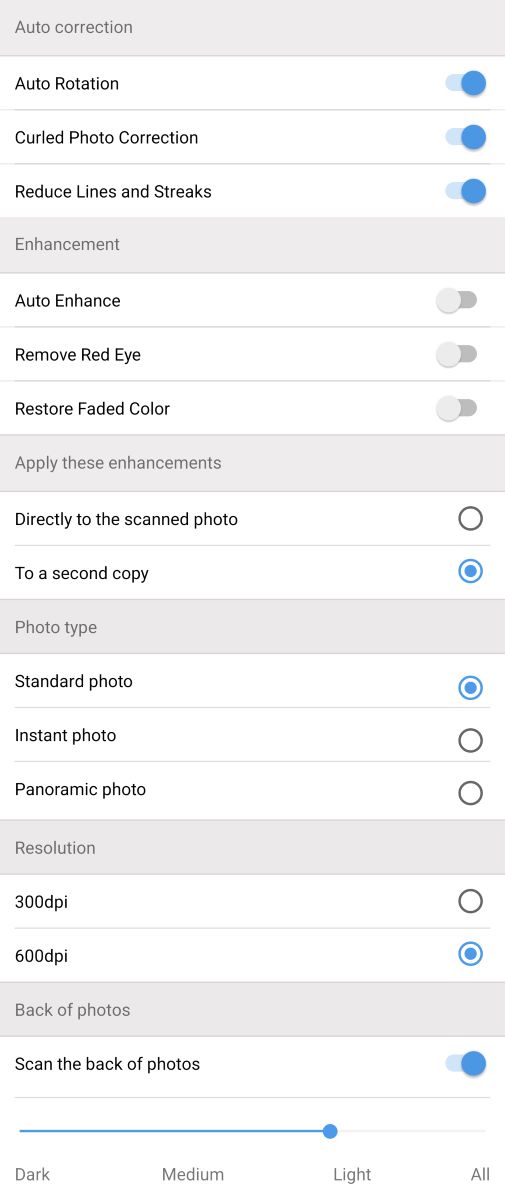
First, I checked the “Settings” to ensure the scanner captured the images to my specifications.
*Click on images to view a larger size.*
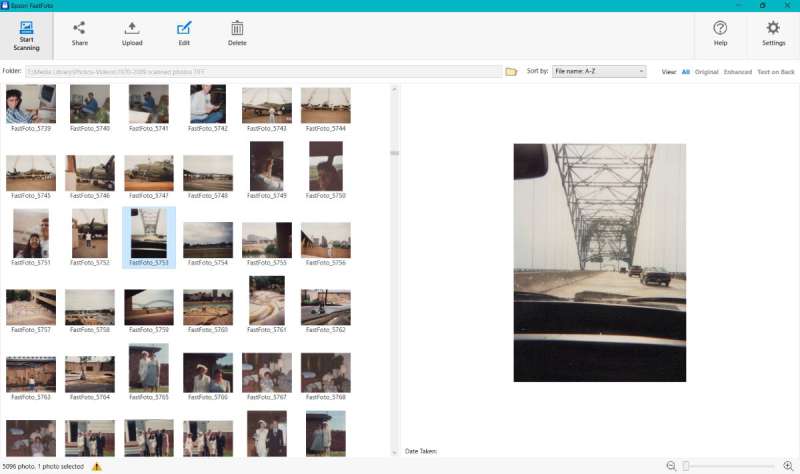
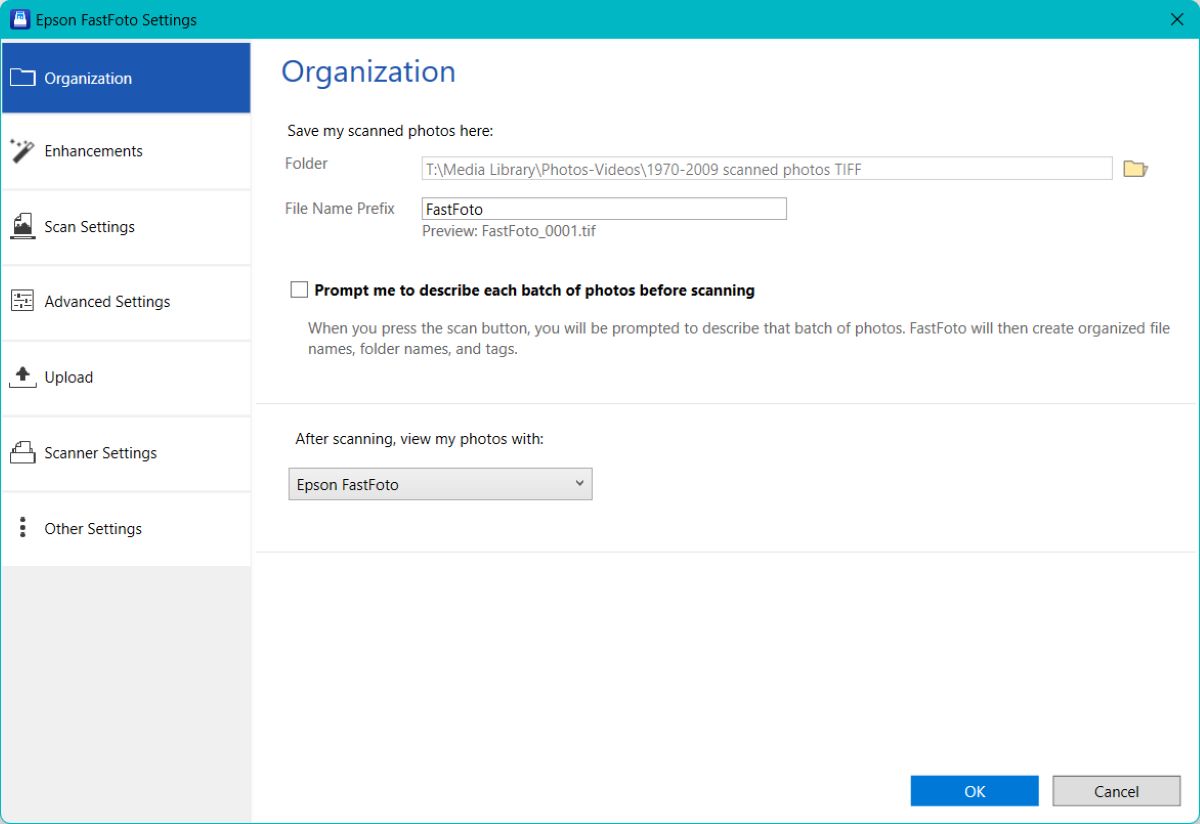
In the FastFoto application settings, I selected my network-attached storage to store all the scanned images (first screenshot above). I also kept the default file name prefix “FastFoto” because I was lazy and didn’t want to develop a naming system for 5000 different photos.
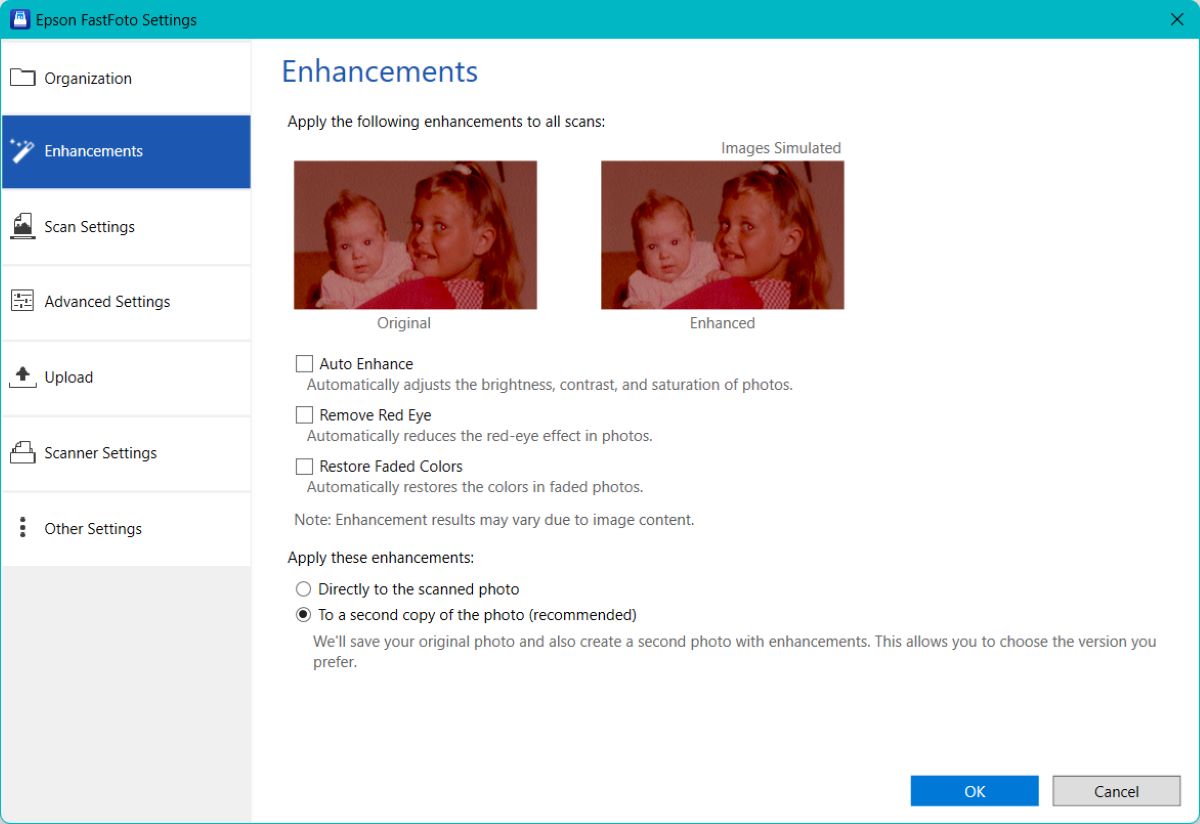
I decided to skip the “Auto Enhance”, “Auto Red Eye”, and “Restore Faded Colors” options (second screenshot above). I did a test run with these settings turned on and the enhancements turned out poorly so I decided to leave the scanned photos unaltered. I can always enhance them later using a much better photo editor. If you do decide to use the enhancements, be sure to check the box so that the adjustments are applied to a copy of the photo and not the original.
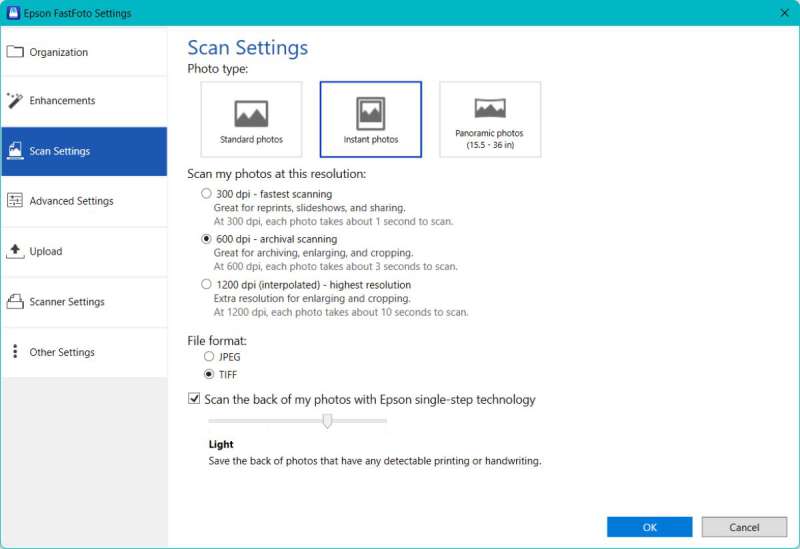
I then selected the resolution of the scans and checked the option to scan the back of my photos when there’s writing present (yes, this scanner is a color duplexing scanner – yay!!).
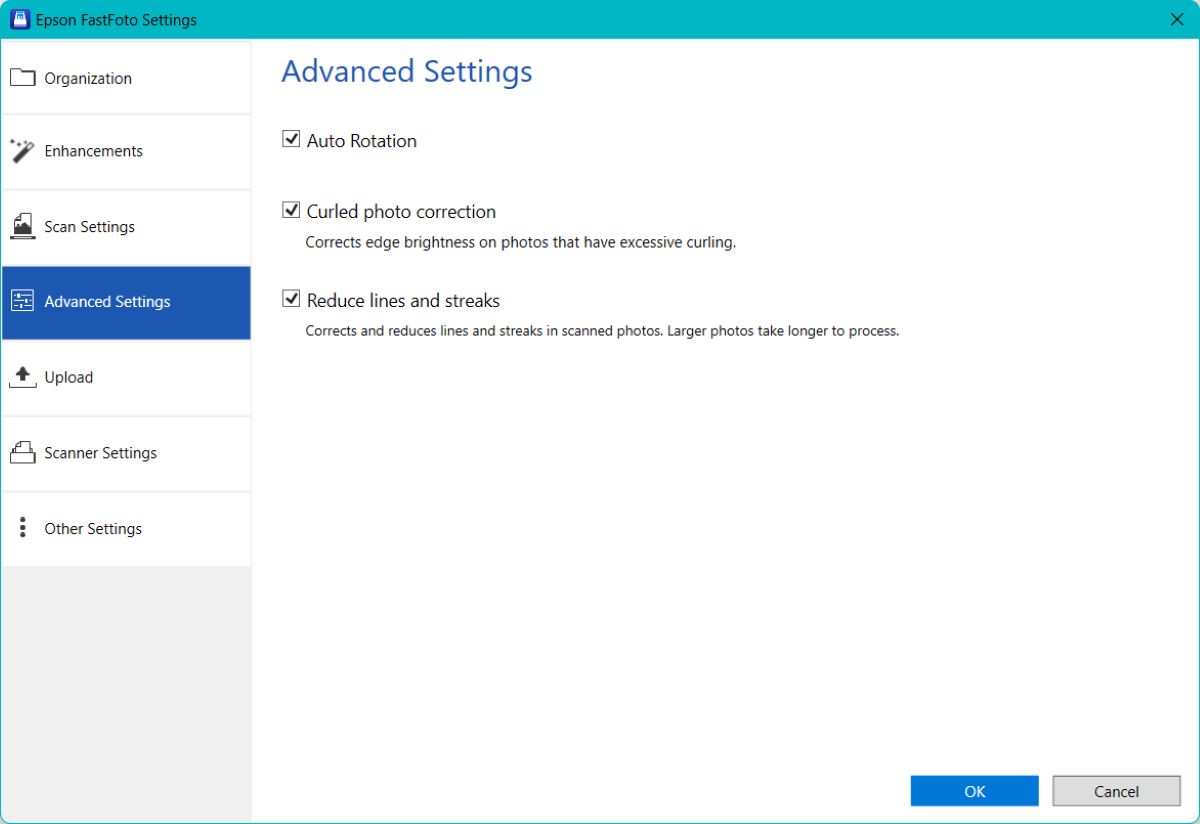
I also selected “Auto rotation”, “Curled photo correction”, and “Reduce lines and streaks” (first screenshot above).
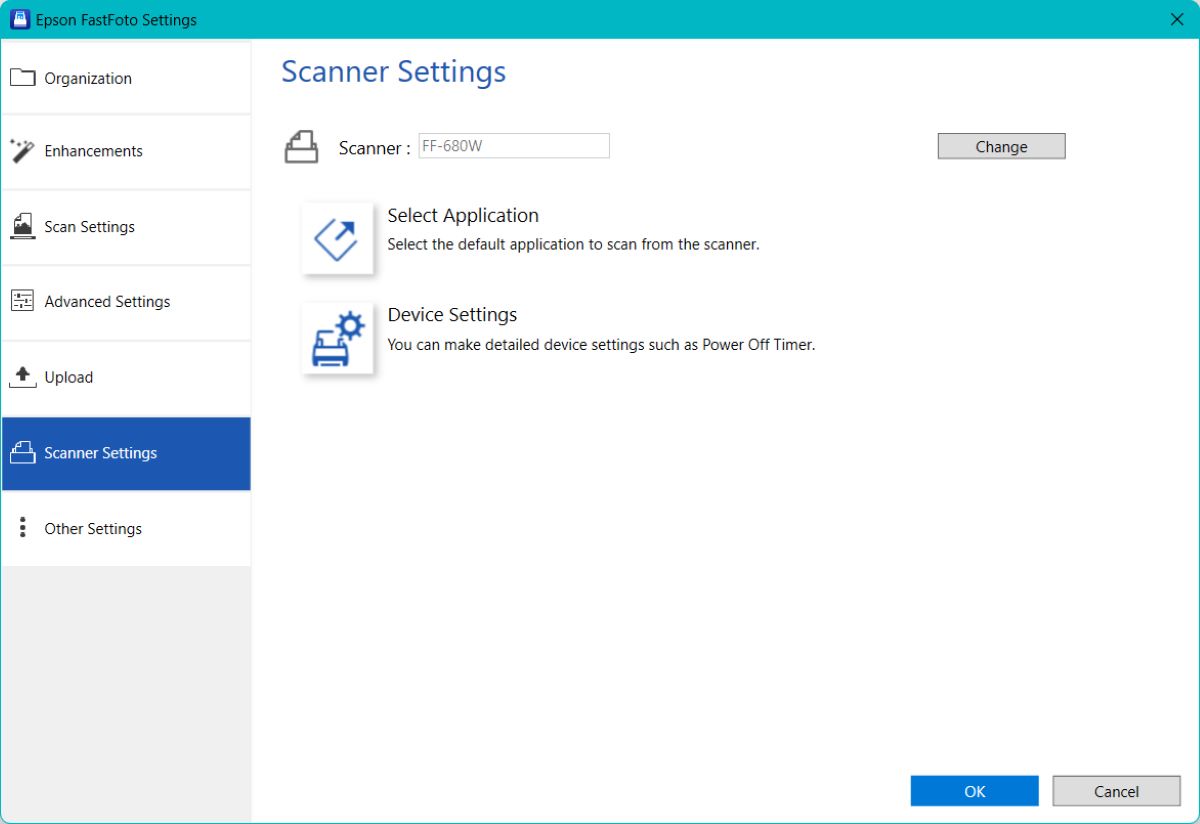
There are other settings available that I didn’t use like uploading to Dropbox or Google Drive, which application you want to run when scanning photos (e.g. Epson FastFoto vs. Epson ScanSmart; Epson FastFoto is selected by default), adjusting the “Power off” timer, or sending usage info to Epson.
I scanned all my photos twice, once using 300 dpi JPG settings which scanned quickly – less than one second per photo as shown in the video above…
…and then again using 600 dpi TIFF settings. The 600 dpi TIFFs scanned more slowly as shown in the video above.
The Epson FastFoto FF-680W scanner did well scanning almost all of my photos. It was so fast!! I had most of my 5000+ photos scanned in a day (300 dpi JPGs). The scanned images looked exactly like the photos which is precisely what I wanted. I even had a handful of Polaroids that scanned successfully (I had to adjust the settings from scanning a standard photo to a Polaroid).
The scanner also successfully scanned the backs of photos with writing on them. If the photos didn’t have anything on the back, the scanner didn’t scan them. Yay! In addition, I scanned several two-sided color documents without any problems (the scanner saves them as JPG or TIFF files only when using the FastFoto application).
The scanner can also scan non-embossed plastic cards. I scanned my driver’s license and insurance cards and wow, was it easy. They turned out great!
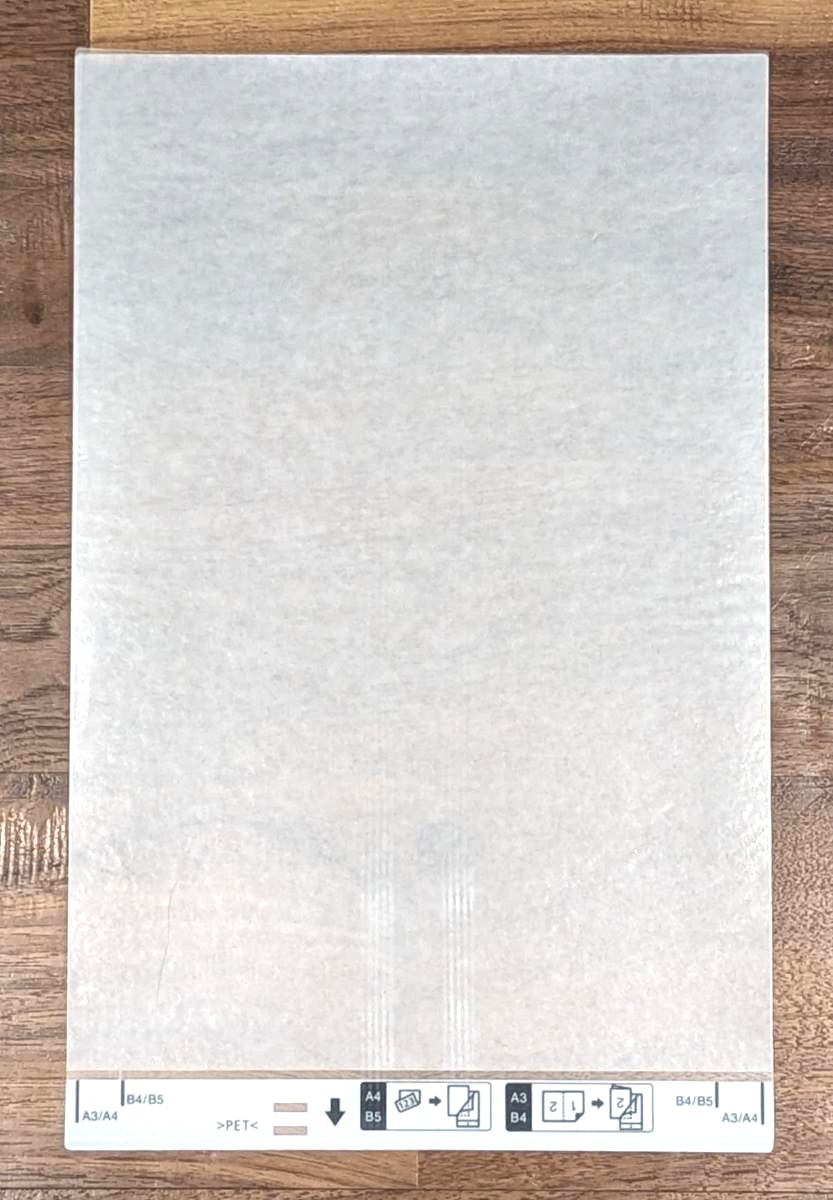
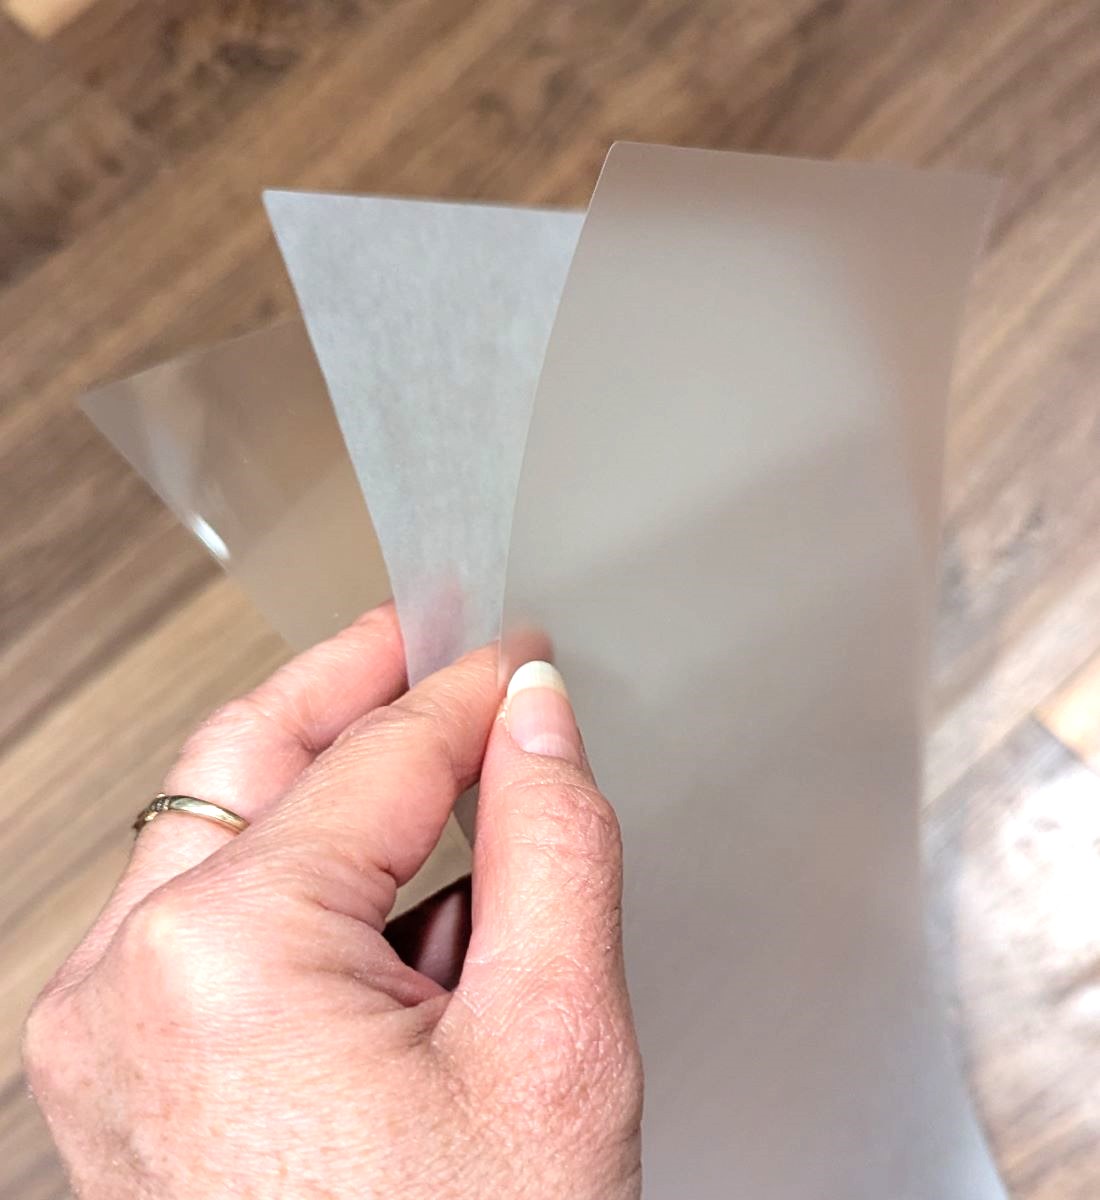
I had several tiny photos (1″ x 1.5″) that caused the scanner to jam. I suspected they would since Epson said the scanner scans only wallet size and larger. The tiny photos required that I place them individually in the carrier sheet (provided by Epson) to prevent them from causing jams.
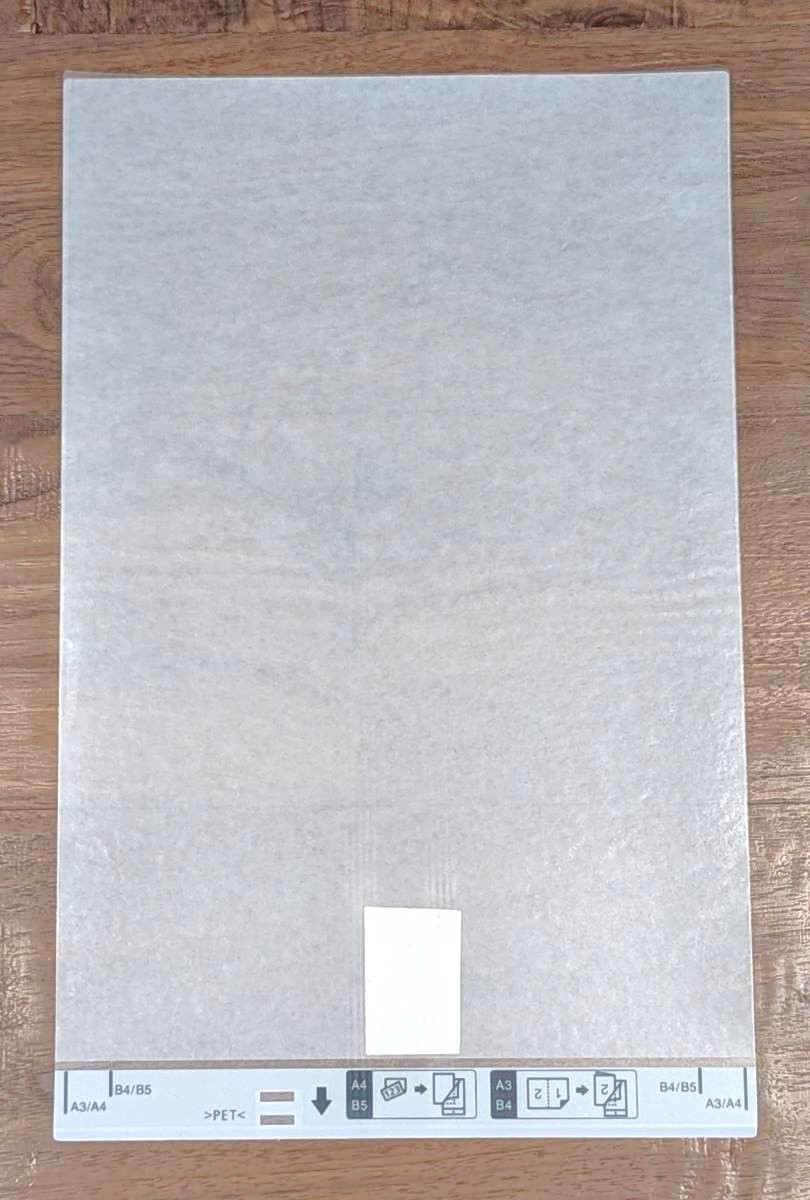
The carrier sheet is made up of three layers as seen in the second photo above. One layer looks like tissue paper sandwiched between two sheets of transparency-type plastic. The carrier sheet measures 8.5″ x 13.5″.
After some experimenting, I discovered I could also use an 8.5″ x 11″ transparency sheet cut into four smaller pieces as carrier sheets for tiny photos. However, the Epson documentation says not to use transparencies in the scanner, though I’m not sure why since the carrier sheet looks like it’s made up of transparencies. Anyway, I used double-sided tape to adhere the photo to the transparency sheet to scan. This worked well for me and was easier to use than the carrier sheet which is rather cumbersome for tiny photos.
I have some 10″ x 13″ photos that I, unfortunately, can’t scan because the scanner isn’t wide enough to accommodate them. If only the scanner was just a few inches wider. That’s so disappointing.
I also noticed that sometimes one photo stuck to another when scanning (not Epson’s fault). This was because there was “magnetic” sticky residue on those photos from the photo albums. Sometimes I was able to clean off the residue, sometimes I couldn’t. I really despise those “magnetic” photo albums.
It’s also important to note that the scanner doesn’t scan negatives. You need to purchase a higher-resolution scanner for those.
Scanning photos to JPGs at 300 dpi resulted in average file sizes of about 200-300 kB each, thus 5000+ photos were about 1.3 GB. Scanning photos to TIFFs at 600 dpi resulted in average file sizes of about 10-11 MB each, thus 5000+ photos were about 54.7 GB.
Scanning using my phone
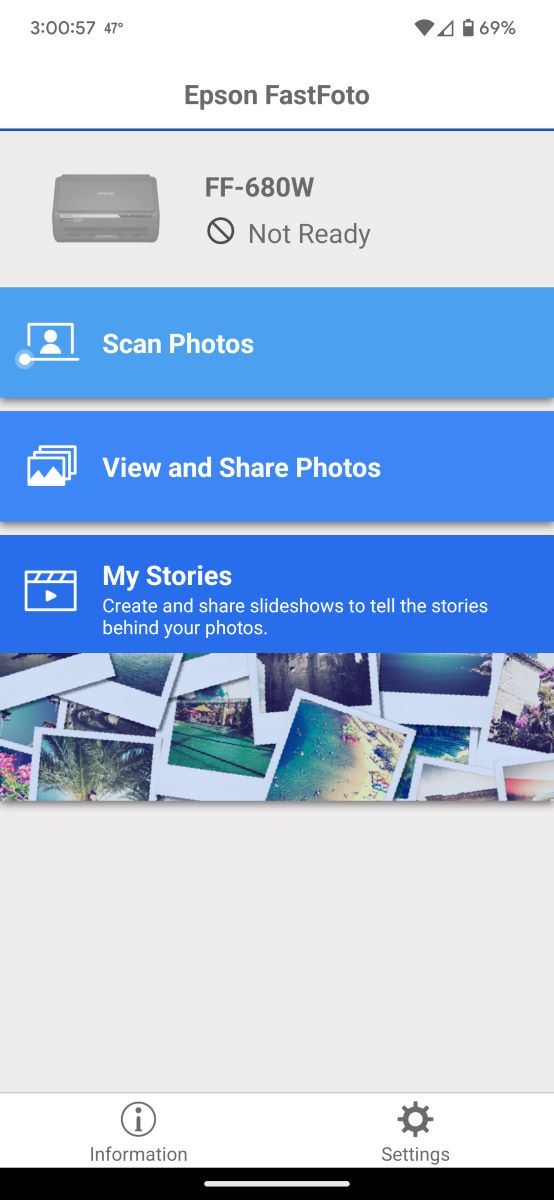
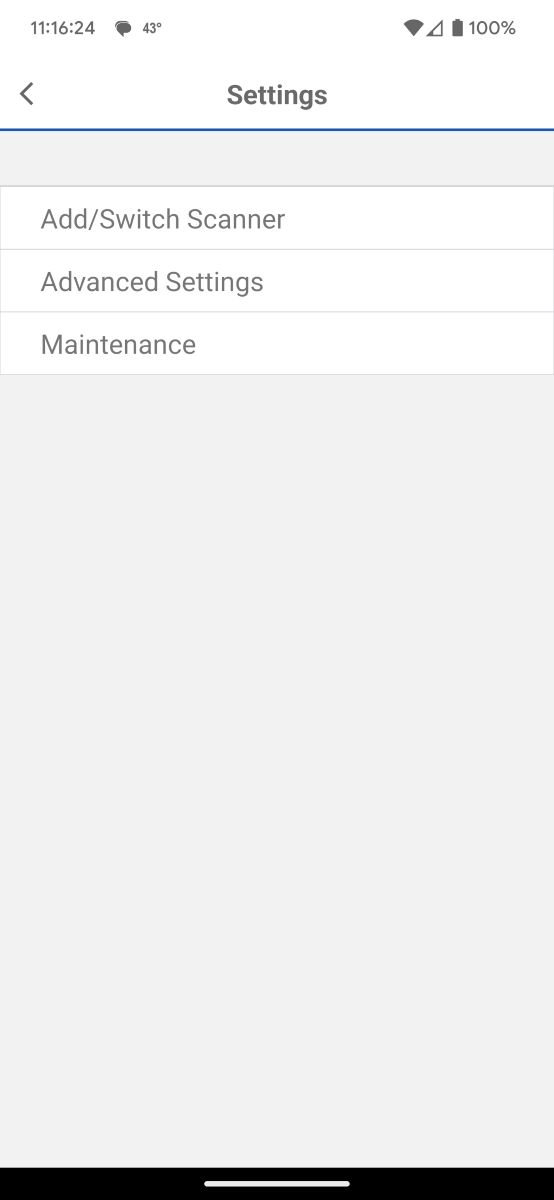
Using the mobile app on my Pixel 6 Pro phone was interesting. As you can see, the app shows in the first screenshot above that the scanner is “Not ready”. I attempted to resolve this issue by tapping the “Settings” button at the bottom of the app screen and then tapping “Add/Switch Scanner” (second screenshot above). However, my efforts were in vain. It still said that the scanner wasn’t ready.
I also checked the “Advanced Settings” which is where I can select “Auto rotation”, “Curled photo correction”, “Reduce lines and streaks”, enhancements, whether to apply the enhancements to the original photo or a copy of it, select a standard photo or polaroid or panoramic photo, the resolution (only 300 dpi or 600 dpi), and scan the back of photos when writing is detected.
However, I discovered that I couldn’t select where to save the scanned images. That was very disappointing.
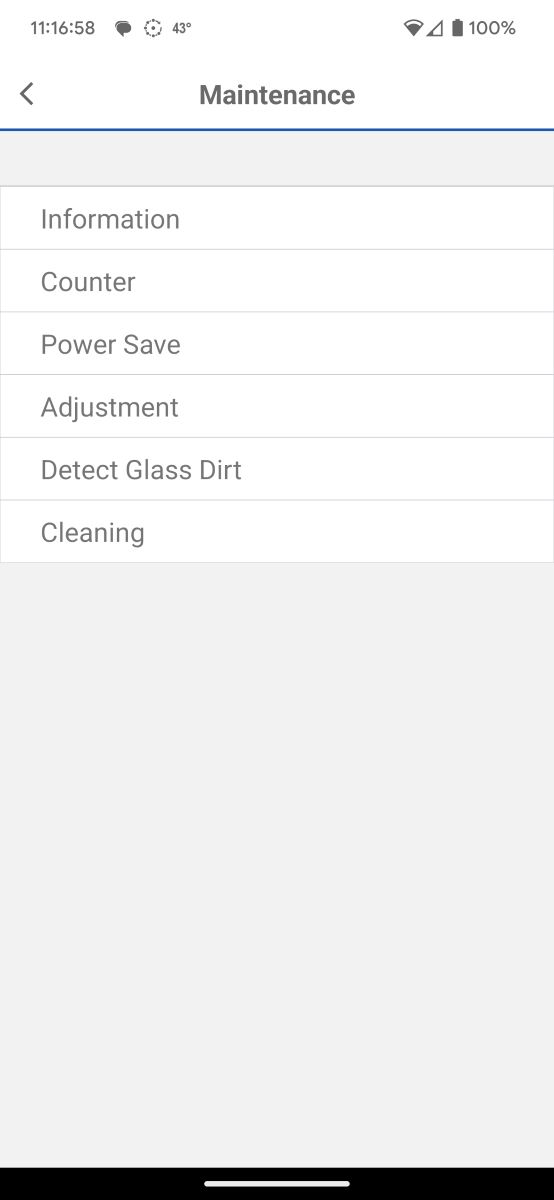
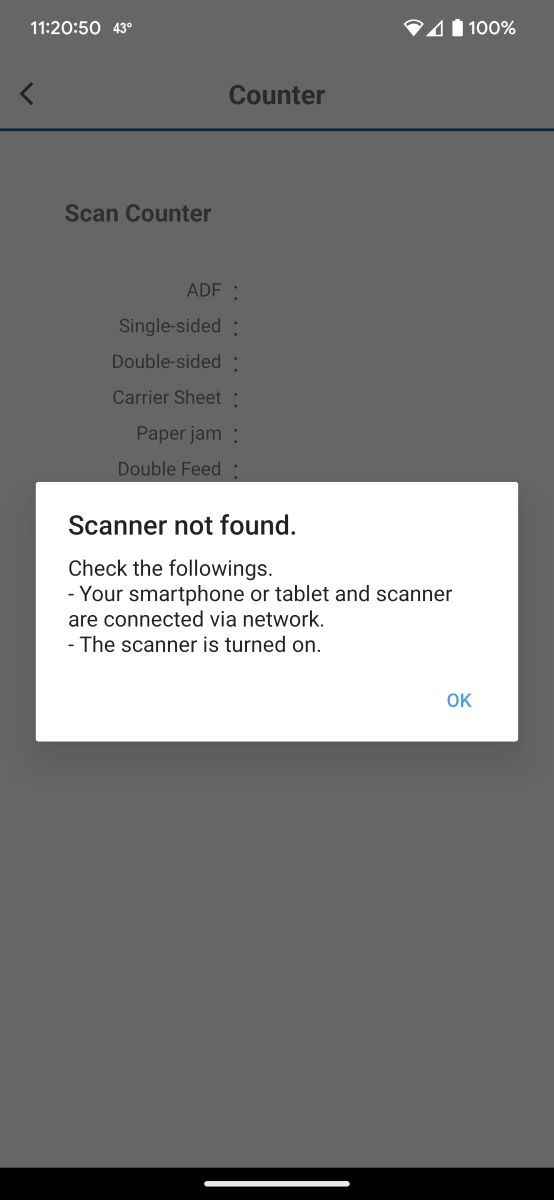
I then tapped “Maintenance” which is where I’m supposed to be able to view information about the scanner like the “Counter”, “Power save”, “Adjustment”, etc., but after tapping on any of those attributes, the app said, “Scanner not found”.

Even though the app said the scanner wasn’t ready, I thought I’d try to scan anyway. The scan was successful. Go figure.
So where did the app save my scans? It saved them in my DCIM folder > Epson FastFoto folder on my Pixel phone. It’s always super fun figuring out where an application saves files.
The scans looked exactly like the photos, which is what I wanted.
However, since I can’t specify a location to save my scanned images in the mobile app, I will be using the Windows Epson FastFoto application.
Scanning directly on the scanner using the scanning button
Lastly, I went to scan directly on the scanner using the scanning button. However, the error light flashed on the scanner and wouldn’t scan. I tried several troubleshooting measures suggested by the user manual and online searches without success. The only thing that worked was uninstalling and reinstalling the Epson FF-680W Drivers & Utilities Combo Package Installer from Epson’s website.
When installing it the first time, I must have selected the option to set up the scanner using the “Connect via USB cable”. The second time, I selected the “Connect via wireless network (Wi-Fi)” option to install it as a network scanner.
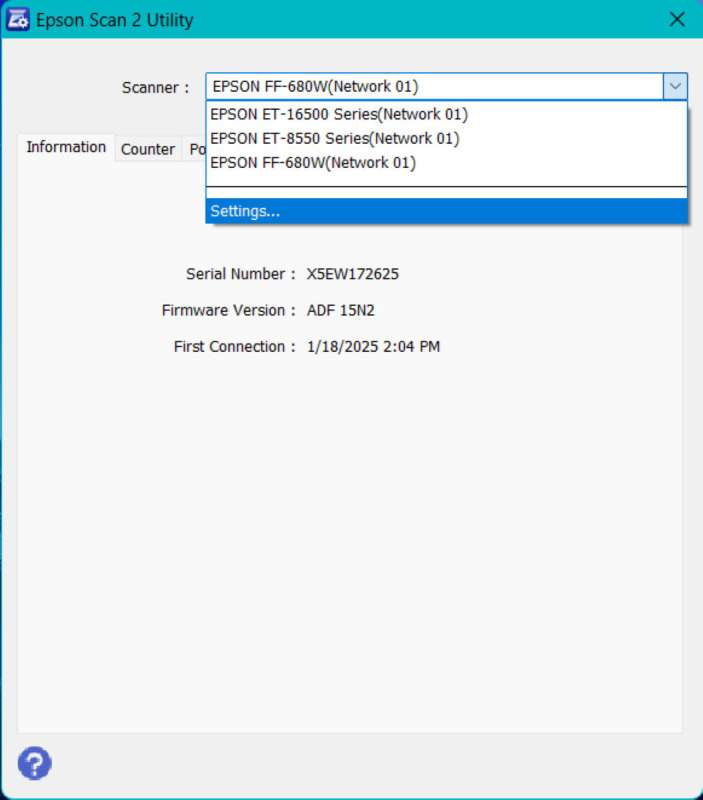
I then used the Epson Scan 2 Utility to delete the “old” scanner (still there from the first setup) and selected the “new” one. After that, I successfully scanned a photo using the scanning button.
When you press the scanning button on the scanner, it launches the Windows FastFoto application. From there, you finish the scanning process. I love this!
Final thoughts
The Epson FastFoto FF-680W Wireless High-speed Photo Scanning System is a color duplex scanner that quickly digitized my 5000+ photos. I scanned all of them within a day (300 dpi JPGs), and just to be safe, I scanned them again at a higher resolution (600 dpi TIFFs). It also scans Polaroids, two-sided color documents, and non-embossed cards well (saved as JPG or TIFF files only when using the FastFoto application).
I liked using the Epson FastFoto Windows application best because I could specify a location to save all my scanned photos (I saved them directly to my NAS). This is something I can’t do when using the mobile app.
I was disappointed that my 10″ x 13″ photos were too large for the scanner and that I had to use a carrier sheet for each of my tiny photos. Additionally, while the Epson FastFoto app allows you to apply basic enhancements (red eye removal, restoring faded colors, and auto enhancements), I didn’t particularly care for them. You’re better off using dedicated photo editing software like Photoshop, Gimp, etc. Moreover, the mobile app needs some work. Epson should address the “not ready” scanner status and allow the user to specify a location to save the scans.
That said, when you have thousands of physical photos to digitize, the Epson FF-680W wireless photo scanner is well worth the price. Many companies charge anywhere from around $250 per 1000 photos to upwards of $1200 per 1000 photos – so yeah, it saves lots of money!
What I like about the Epson FastFoto FF-680W
- It quickly scans large amounts of photos – one photo in less than a second (300 dpi JPGs)
- It scans at higher resolutions: 600 dpi JPGs or TIFFs – one photo per 2-3 seconds; interpolated 1200 dpi – one photo per 10 seconds
- It’s a color duplex scanner
- It doesn’t needlessly scan both sides of every photo; it will scan the back only if it detects writing
- The scanned images looked exactly like the photos
- It scans documents well but saves them as JPG or TIFF files only when using the FastFoto application
- It scans non-embossed plastic cards well
What I’d change
- Fix the scanner “not ready” status in the mobile app
- Allow the mobile app to specify a location to save scans
- Make the scanner wider to scan larger photos; I have some 10″ x 13″ photos I couldn’t scan
- Scan tiny photos without a carrier sheet (I had quite a few 1″ x 1.5″ photos that caused the scanner to jam, which I expected since the scanner documentation clearly says the smallest it scans without a carrier sheet is 2″ x 2″)
- Scan negatives (though that might not be possible)
Price: $529.99
Where to buy: Epson and Amazon
Source: The sample of this product was provided for free by Epson. Epson did not have a final say on the review and did not preview the review before it was published.
Check out these other scanner reviews!
- ScanMyPhotos photo scanning service review – Now I have great digital copies of pictures that won’t degrade over time.
- CZUR ET MAX Professional Book Scanner review
L39 Ultra Slim UV Protective Filter for Leica Q3 43 Q2 Camera with Moisture-Proof Case & Removal Tool 19 Layers Mulit-Coated UV Ultraviolet Filter 99.3% Light Transmission Water Oil Scratch Resistant
(as of June 20, 2026 08:22 GMT -05:00 - More infoProduct prices and availability are accurate as of the date/time indicated and are subject to change. Any price and availability information displayed on [relevant Amazon Site(s), as applicable] at the time of purchase will apply to the purchase of this product.)
Gadgeteer Comment Policy - Please read before commenting
Outstanding review Kathleen, thank you!
Have you ever experimented with the veteran and very praised Epson Perfection V600 Color Photo, Image, Film, Negative & Document Scanner?
Ricardo – Thanks for the positive feedback!
I haven’t ever used the Epson Perfection V600. I was aware of its existence and had heard great things about it, but since I had thousands of photos, I needed to be able to scan my photos in bulk. So even though the FF-680W doesn’t scan negatives, it does scan a bunch of photos at high speed. That was the only way I was ever going to complete my photo-digitizing task. I know myself, and if I was only able to scan 3-4 photos at a time on the V600, I was never going to do it. I just don’t have that kind of patience.
Have you used the V600? If you have, how do you like it and how well does it handle negatives?
Just purchased this scanner and tried to install it on Windows 11 Pro with no luck. Installed on a laptop with Windows 11 and no problems at all. Appears the drivers for Windows 11 Pro are not available.
Once going impressed with the features, ability to enhance photos, speed…
A great piece of equipment despite my initial install issues.
Ken – I wouldn’t have even thought that Windows 11 Pro would have a problem with the scanner. The scanner has been around for a while and so has Windows 11 Pro, so I wonder why Pro doesn’t have drivers for it by now. I’m glad you got it to work on your Windows 11 laptop. That would have irritating if you bought the scanner and couldn’t use it!
This thing is definitely a time saver. Got one several years ago but am just now using it now and scanning about 5000 photos a day. Two full days in with 10k photos scanned now and two of six totes worth of photos completed but I’d recommend the device for anyone trying to tackle a family backlog of photos sitting in a garage or attic.
Dan – I’m glad to hear that the scanner is working out well for you! It sounds like it’s perfect for the number of photos you have to scan. Flatbed scanners just don’t cut it with that kind of backlog. Thanks for leaving a comment! Your experience helps other readers determine if the scanner is right for them😊
Thanks so much for all these helpful details! Just purchased this scanner for the same reason (I have sooo sooo many photo prints!!) and I’m excited for this to be my solution to declutter. Curious about what you ended up doing with all your 5k+ prints? I’m not sure how to dispose of mine once they’re all scanned.
Anika – I’m so glad you found the review helpful! Scanning all my photos cleared up lots of space for me, and I love it!! I kept the physical copies of the photos for a couple of months after the review was posted, but then simply threw them away. I toyed with the idea of shredding them or burning them, but decided that was too much work.