REVIEW – Have you been looking for a hobby CNC (computer numerical control) machine to help you create awesome 3D designs on wood? Me too. When the TwoTrees TTC-450 Pro CNC Router Machine was offered to the Gadgeteer to review, I was allowed to try it out.
I discovered just how cool it is to create 3D relief carvings in wood. However, I needed to solve some issues when setting up the CNC and it was a huge challenge to use it as a newbie. There’s a daunting learning curve to overcome with all the different types of bits, settings, and software you need to learn to create anything.
This is a huge review, so I provided a Table of Contents with links to the sections. The review represents my journey into CNC machining. Because I was completely lost as to what to do initially, this “review/how-to” summarizes everything I did to test the TTC-450 Pro from start to finish.
*Click on images in this review to view a larger size.
Table of Contents
- What is it?
- What’s in the box?
- Hardware specs
- Design and features
-
- Setup
-
- Assembling the TTC-450 Pro CNC Router Machine
- Installing the 500W spindle motor (includes info not documented by TwoTrees (TT))
- Installing the CNC Vacuum Cleaner Monster (M1) Kit
- Installing the 4th Axis CNC Rotary Module Kit for TTC450/TTC 450 PRO (includes info not documented by TT)
- Installing the Windows driver (includes info not documented by TT)
-
- Performance
-
- Machine movement
- Material clamps
- Notes about bits, collets, “Feeds and Speeds”, and software
- Running the test files using Candle software (controller software) and a 30-degree V-bit
- Positioning and starting the spindle before carving my projects
- Using Easel – an all-in-one CAD/CAM/CNC control software
- Using Carveco Maker (CAD/CAM software) – rotary project
- TTC-450 Pro machine and accessories observations
-
- Setup
-
- What I like
- What I’d change
- Final thoughts
What is it?
The TwoTrees TTC-450 Pro CNC Router Machine is a device that uses bits as tools to carve designs on wood, MDF, plywood, resin, PVC, ABS, carbon fiber, acrylic, aluminum, and brass.
What’s in the box?
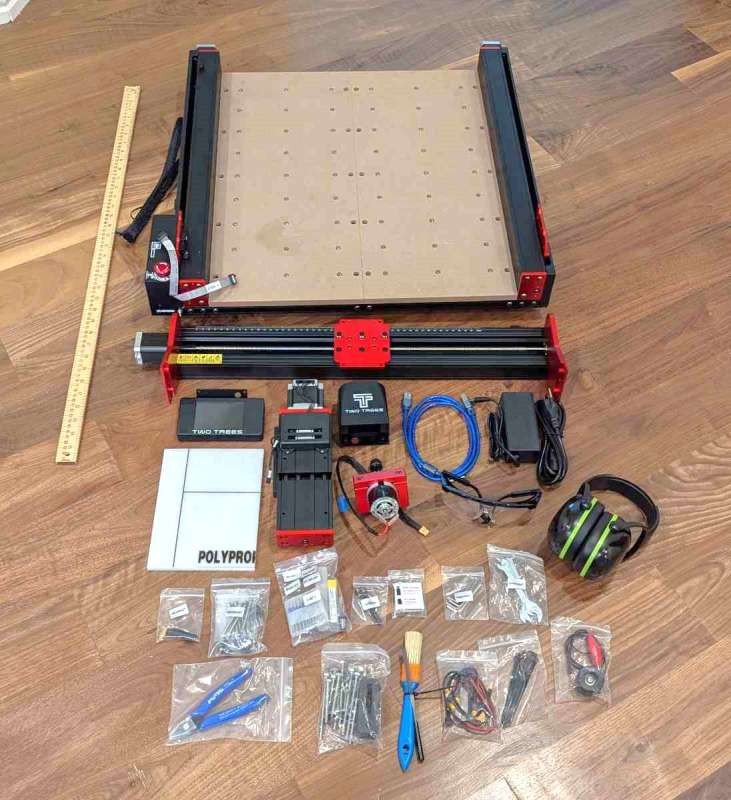
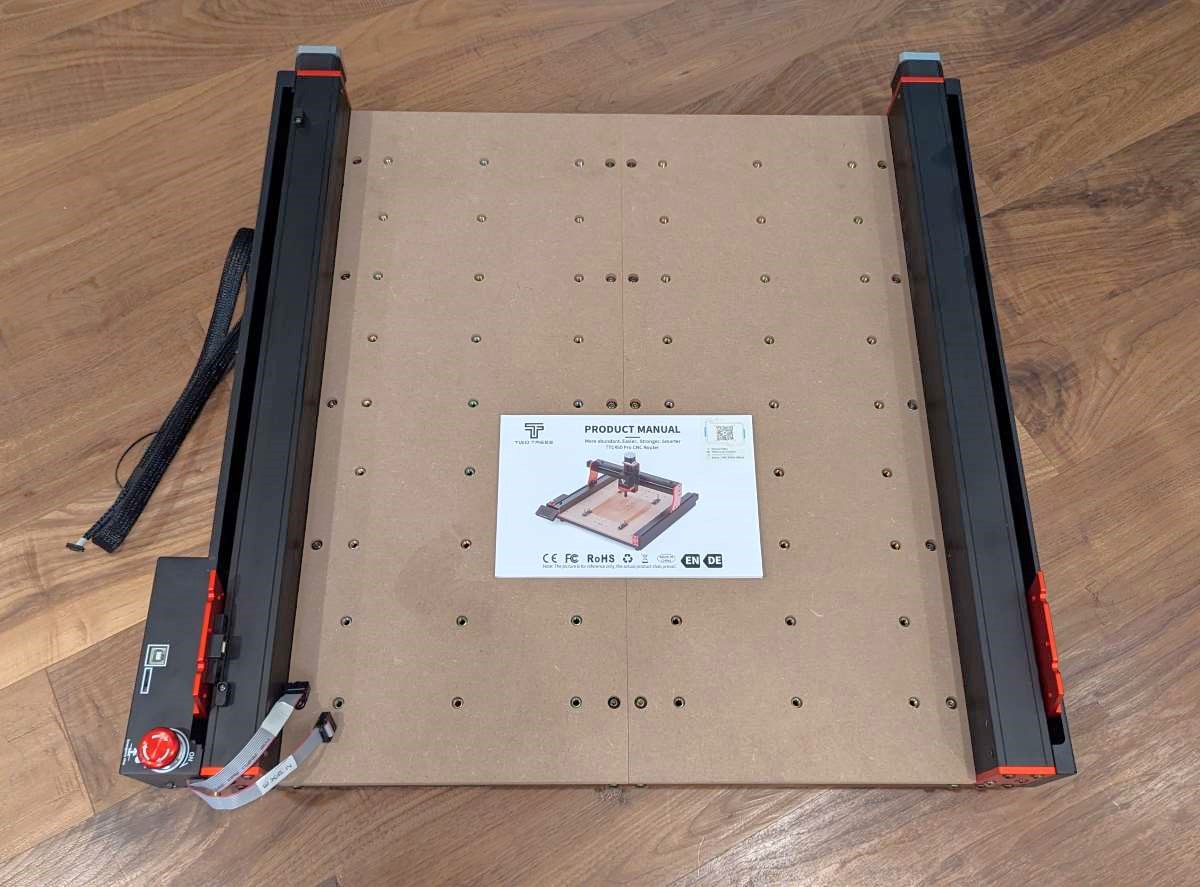
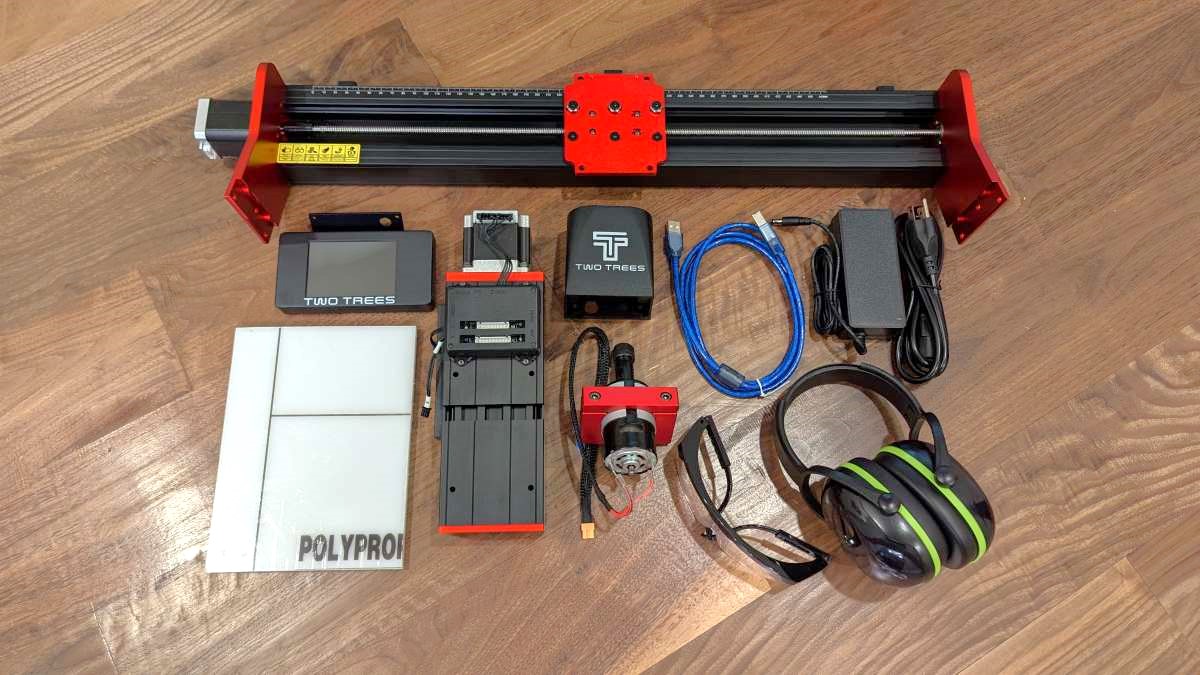
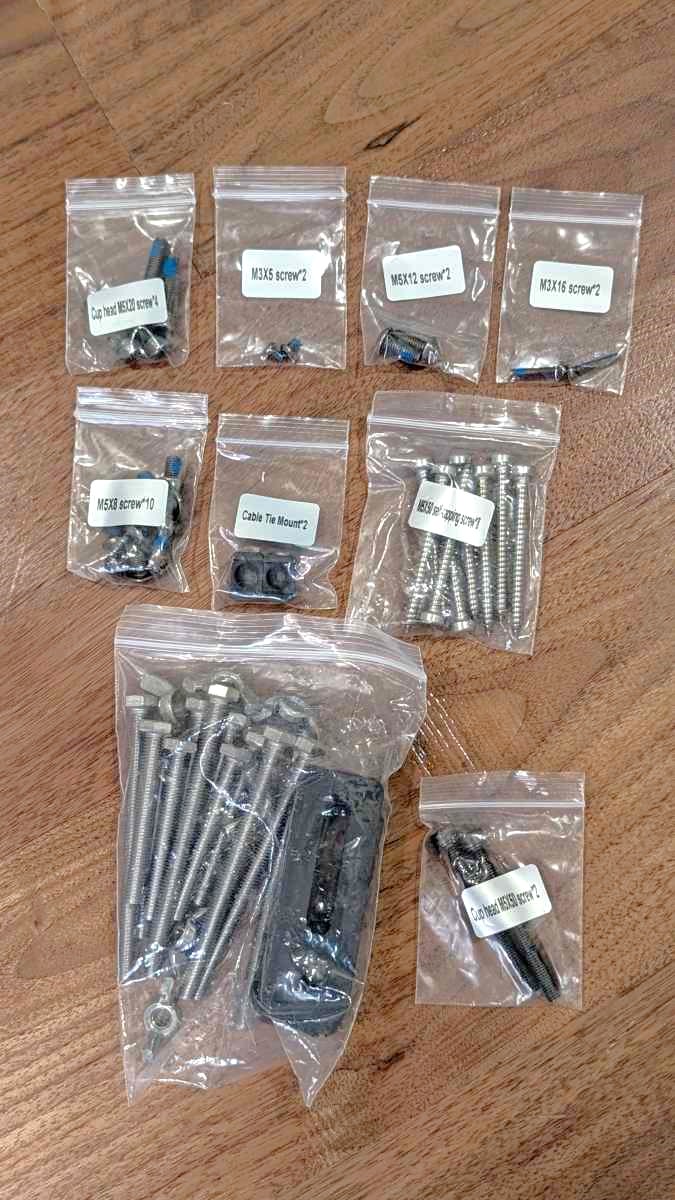
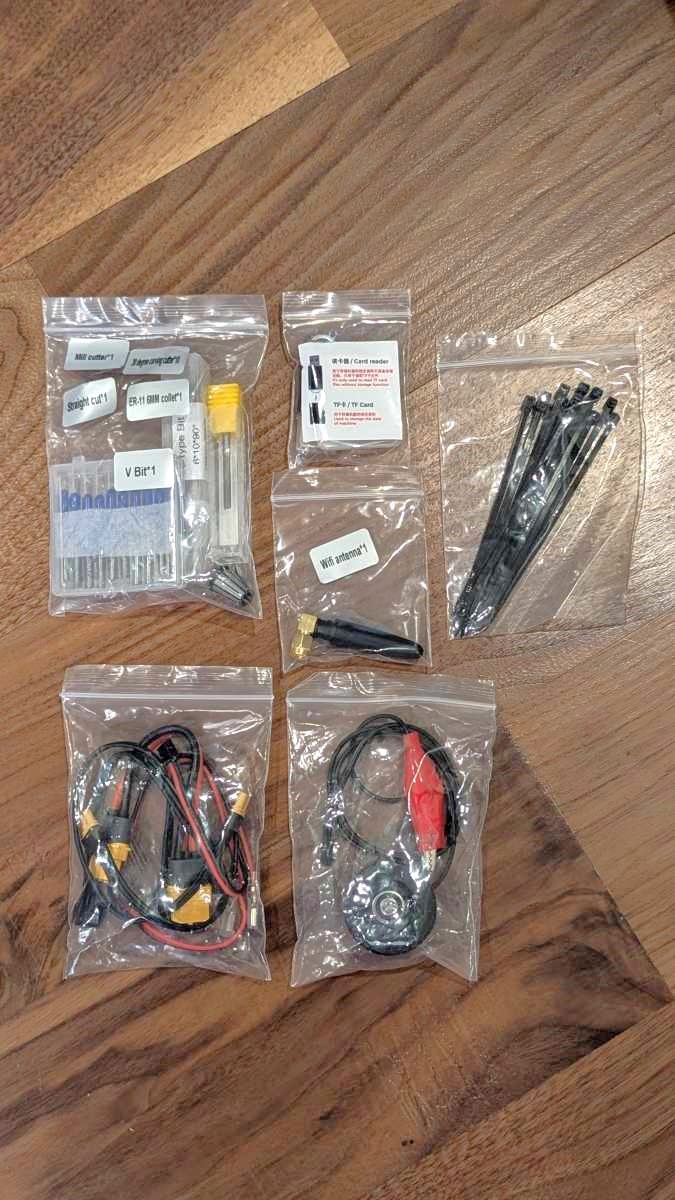
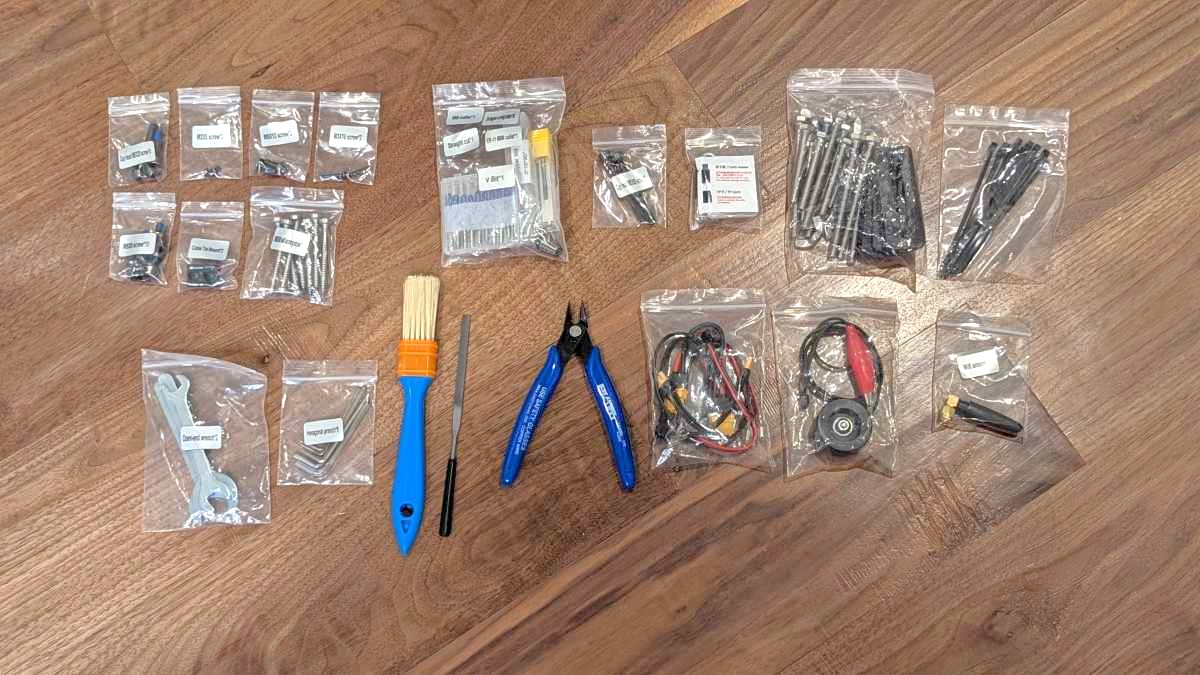
TwoTrees TTC-450 Pro CNC Router Machine (95% assembled):
Click to expand
- Base (460x460x80mm working space)
- X-axis assembly
- Z-axis assembly
- TS35 touchscreen kit
- Power adapter
- Power cable
- USB data cable
- 775 spindle motor (80W spindle motor)
- 775 motor chuck
- Probe
- Fixture (material clamps) – 6
- Protective glasses
- File
- Brush
- Oblique pliers
- Open-end wrench – 2
- Hexagonal wrench – 5
- TF card
- USB drive
- Polypropylene sheet
- ER-11 6mm collet
- Cable mount – 2
- Wifi antenna
- Nylon ties – 10
- Motor protection cover + motor cable
- V-bit – 1
- Mill cutter – 1
- Straight cut – 1
- 30-degree V carving cutter – 10
- M5x50 self-tapping screw – 8
- M5x8 screw – 10
- M3x5 screw – 2
- M3x16 screw – 2
- M5x12 screw – 2
- Cup head M5x12 screw – 2
- Cup head M5x20 screw – 4
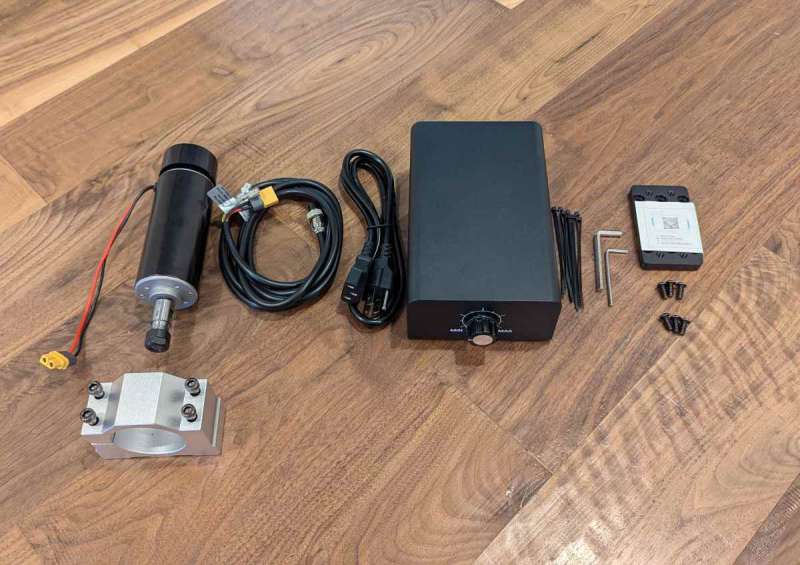
TwoTrees 500W high-speed air-cooled spindle motor kit (sold separately):
Click to expand
- 500W spindle motor (12000RPM, air cooled)
- Power cable
- Spindle motor power cable
- Spindle clamp with 4 screws
- Spindle mounting plate with 6 screws
- Allen wrenches
- Wire ties
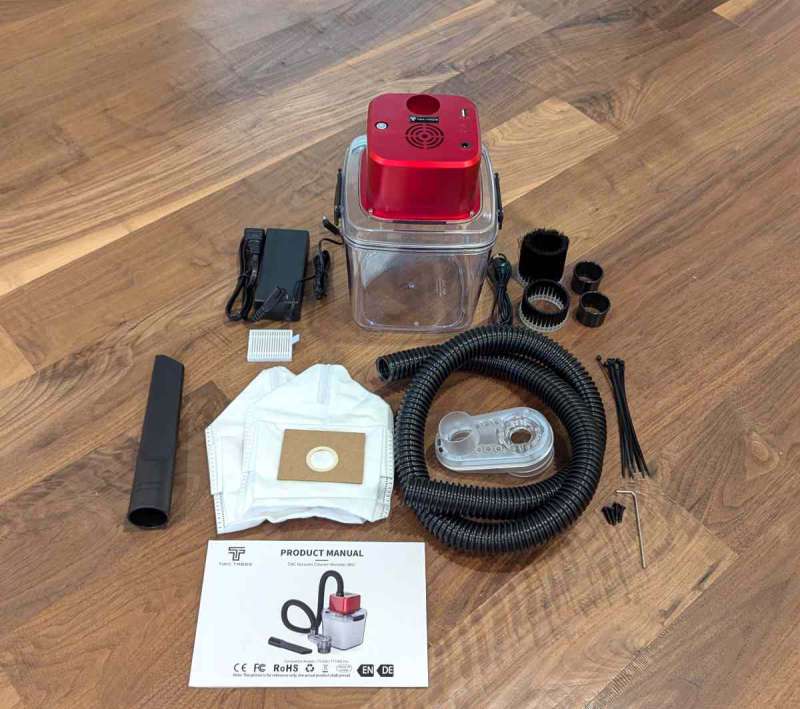
TwoTrees CNC Vacuum Cleaner Monster (M1) Kit (sold separately):
Click to expand
- Dust box (the main part of the vacuum)
- Transparent magnetic LED dust shoe
- Vacuum hose
- Vacuum crevice attachment
- Filter cartridge – 2
- Allen wrench
- USB-A to USB-C cable
- Nylon ties – 10
- Reusable vacuum bags – 2
- Brush head 50mm
- Brush head 25mm
- Sleeve adapter – 2 (attaches to the ends of the hose)
- Power cable
- M4x16 semicircular head screws – 4
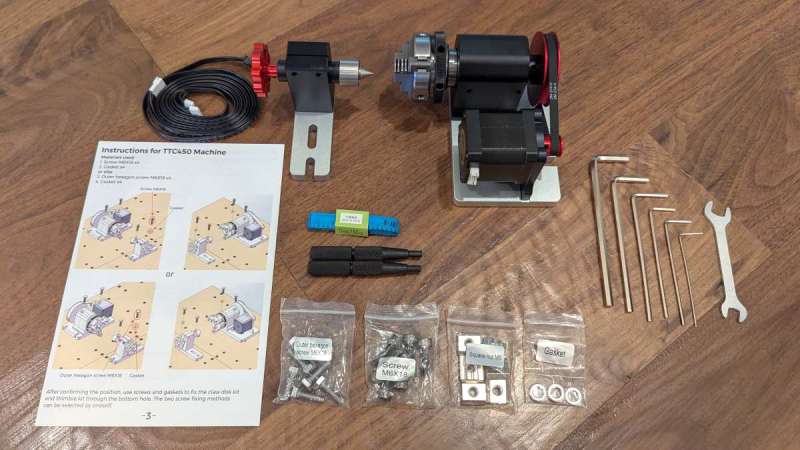
TwoTrees 4th Axis CNC Rotary Module Kit for TTC450/TTC 450 Pro (sold separately):
Click to expand
- Six-pin cable
- Four-pin cable
- Thimble module
- Claw-disc module
- Installation guide
- Tape measure
- Claw-disc wrench
- Six M6x18 hex-head screws (use open-end wrench on these)
- Six M6x18 screws (use Allen wrench on these)
- Six M6 square nuts
- Six washers
- Allen wrenches
- Open-end wrench
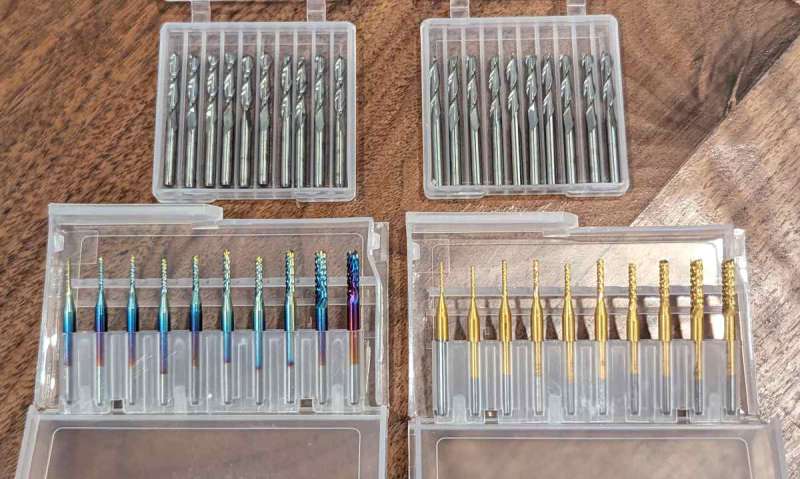
End-mill bits kit (sold separately):
Click to expand
- Ten 1/8″ (3.175mm) cut-diameter upcut bits 1/8″ (3.175mm) shank (the bit shank is the end of the bit that the spindle holds)
- Ten 1/8″ (3.175mm) cut-diameter upcut ball nose bits, 1/8″ (3.175mm) shank
- Ten multi-sized cut-diameter (0.6mm – 3mm) nano-blue coated end-mill bits, 1/8″ (3.175mm) shank
- Ten multi-sized cut-diameter (0.6mm – 3mm) nano-coated end-mill bits, 1/8″ (3.175mm) shank
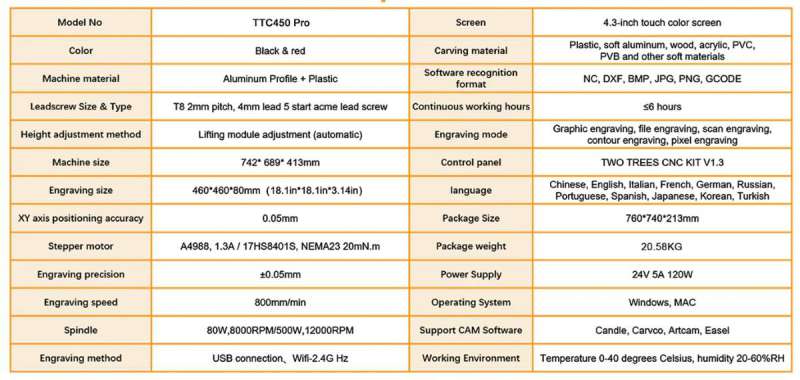
Hardware specs
Click to expand
Design and features
Setup
Assembling the TTC-450 Pro CNC Router Machine
I assembled the TwoTrees TTC-450 Pro CNC according to the assembly video.
I find assembly videos immensely helpful when putting together a device like this.
Because the video is clear, I will skip the details and broadly cover what I did to assemble the CNC.
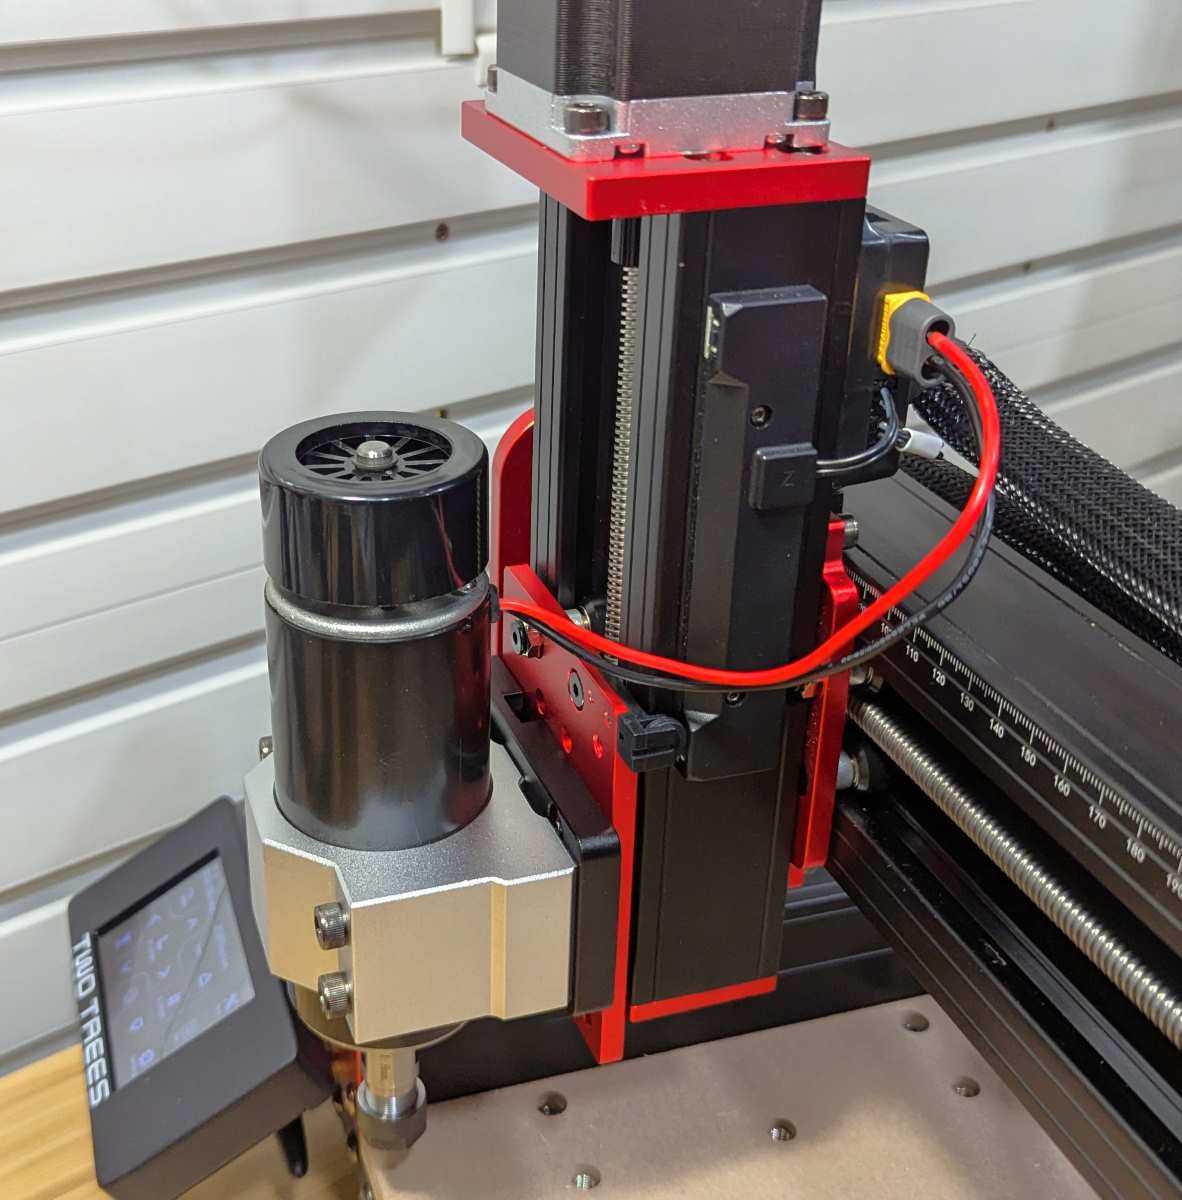
I installed the X-axis assembly on the CNC base and screwed the Z-axis assembly to the X-axis. I also installed the touchscreen control panel on the frame.
I affixed the 80W spindle motor to the Z-axis.
I then connected all the cables according to the installation video.
After assembling the CNC, I noticed four small cables left over. None of the videos or documentation explained them. Hmm, I wonder what those are for.
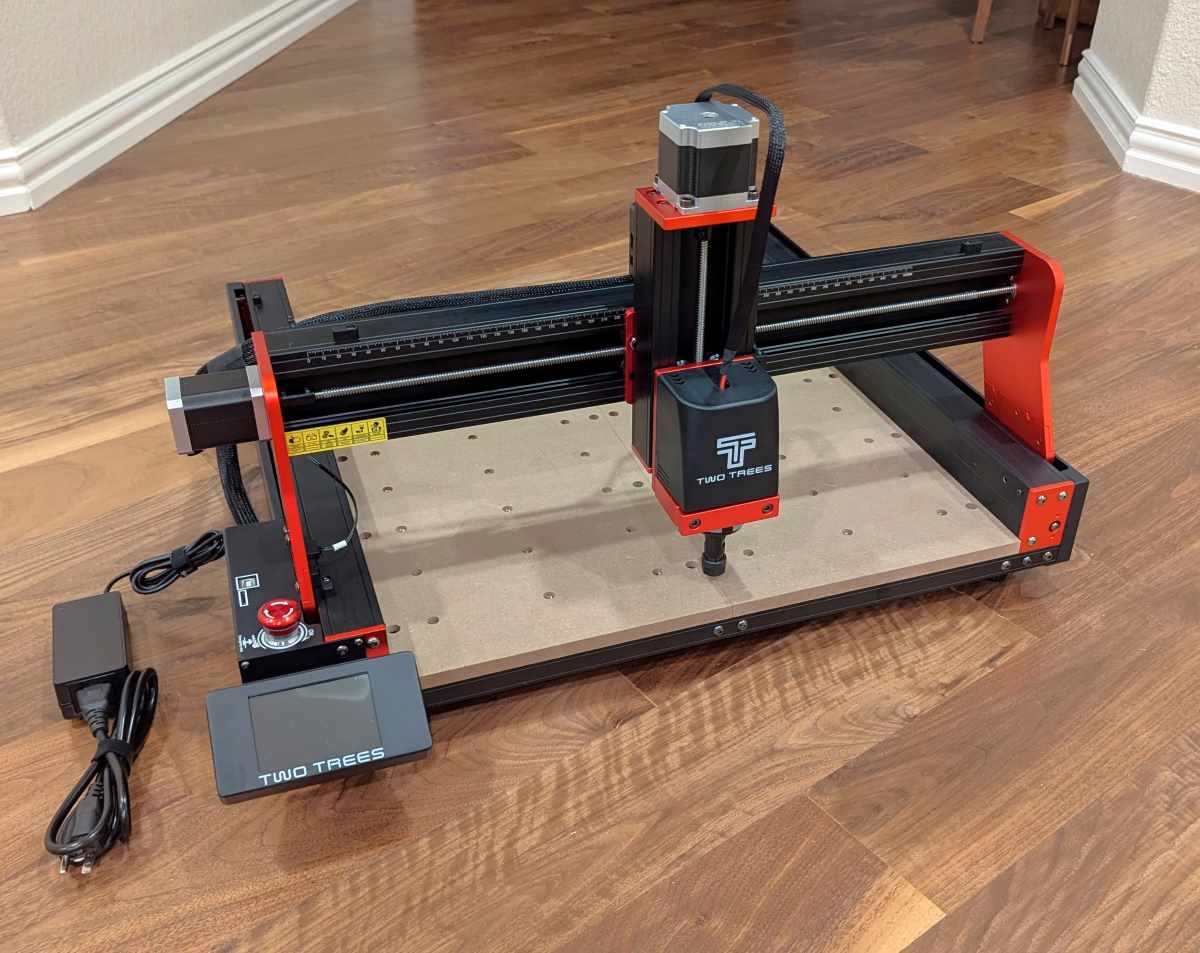
The CNC frame, the X-axis gantry, and the Z-axis are made of metal and are very robust and sturdy. Movement along the axes is accomplished by using screw bars instead of belts. According to the TwoTrees website, the TTC-450 Pro’s XY axis positioning accuracy is 0.05mm. It can be adjusted if needed by tightening or loosening a brass adjustment nut on the X-axis screw bar behind the Z-axis assembly.
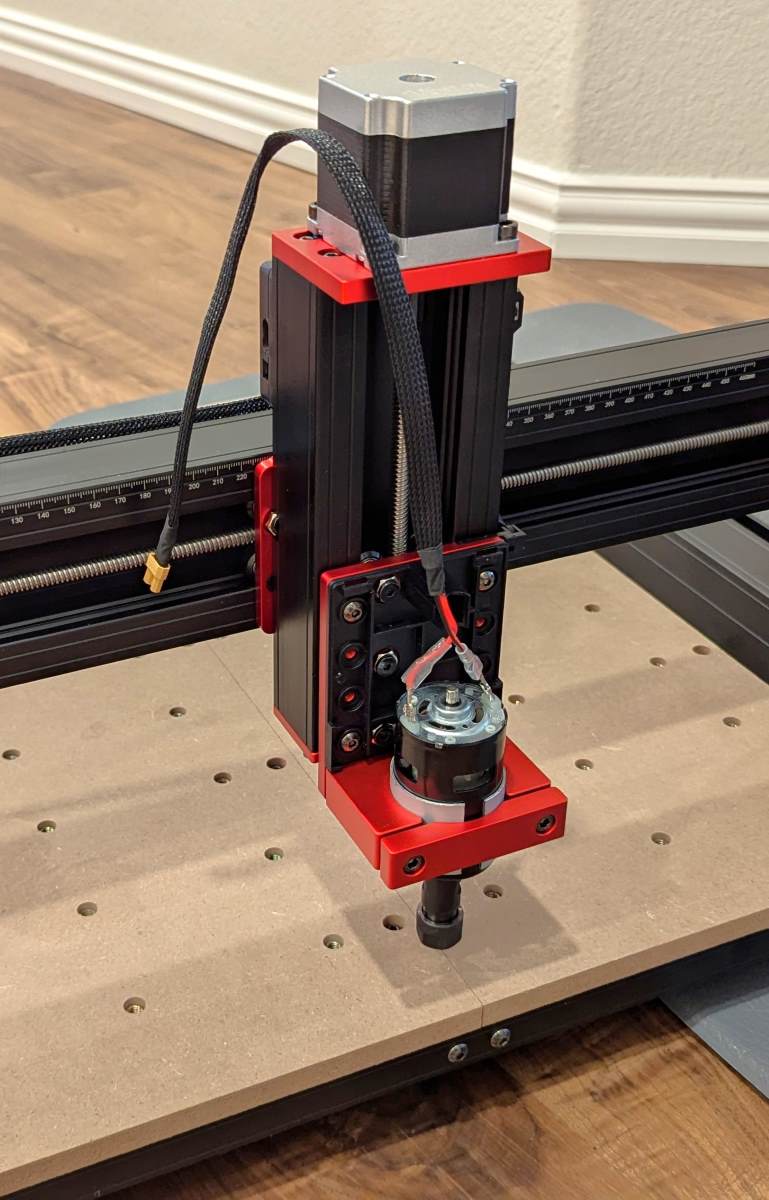
Installing the 500W spindle motor
When I received the 500W spindle motor in a later shipment, I removed the 775 spindle (an 80W spindle) and installed the 500W one on my machine.

Installing this spindle proved to be a bit frustrating. There was no documentation on installing it and connecting the cables to the CNC. I tried looking on TwoTrees’ YouTube channel, but only found videos for the older model CNC, which has a different design than the Pro.
I finally contacted TwoTress, and they sent me the correct video, which isn’t available on YouTube.
https://drive.google.com/file/d/1rdjUOf1-GES2HCo4CLPID7ZzqVjnxPXo/view?usp=drive_link
The above link is the 500W spindle motor installation video on the TTC-450 PRO.
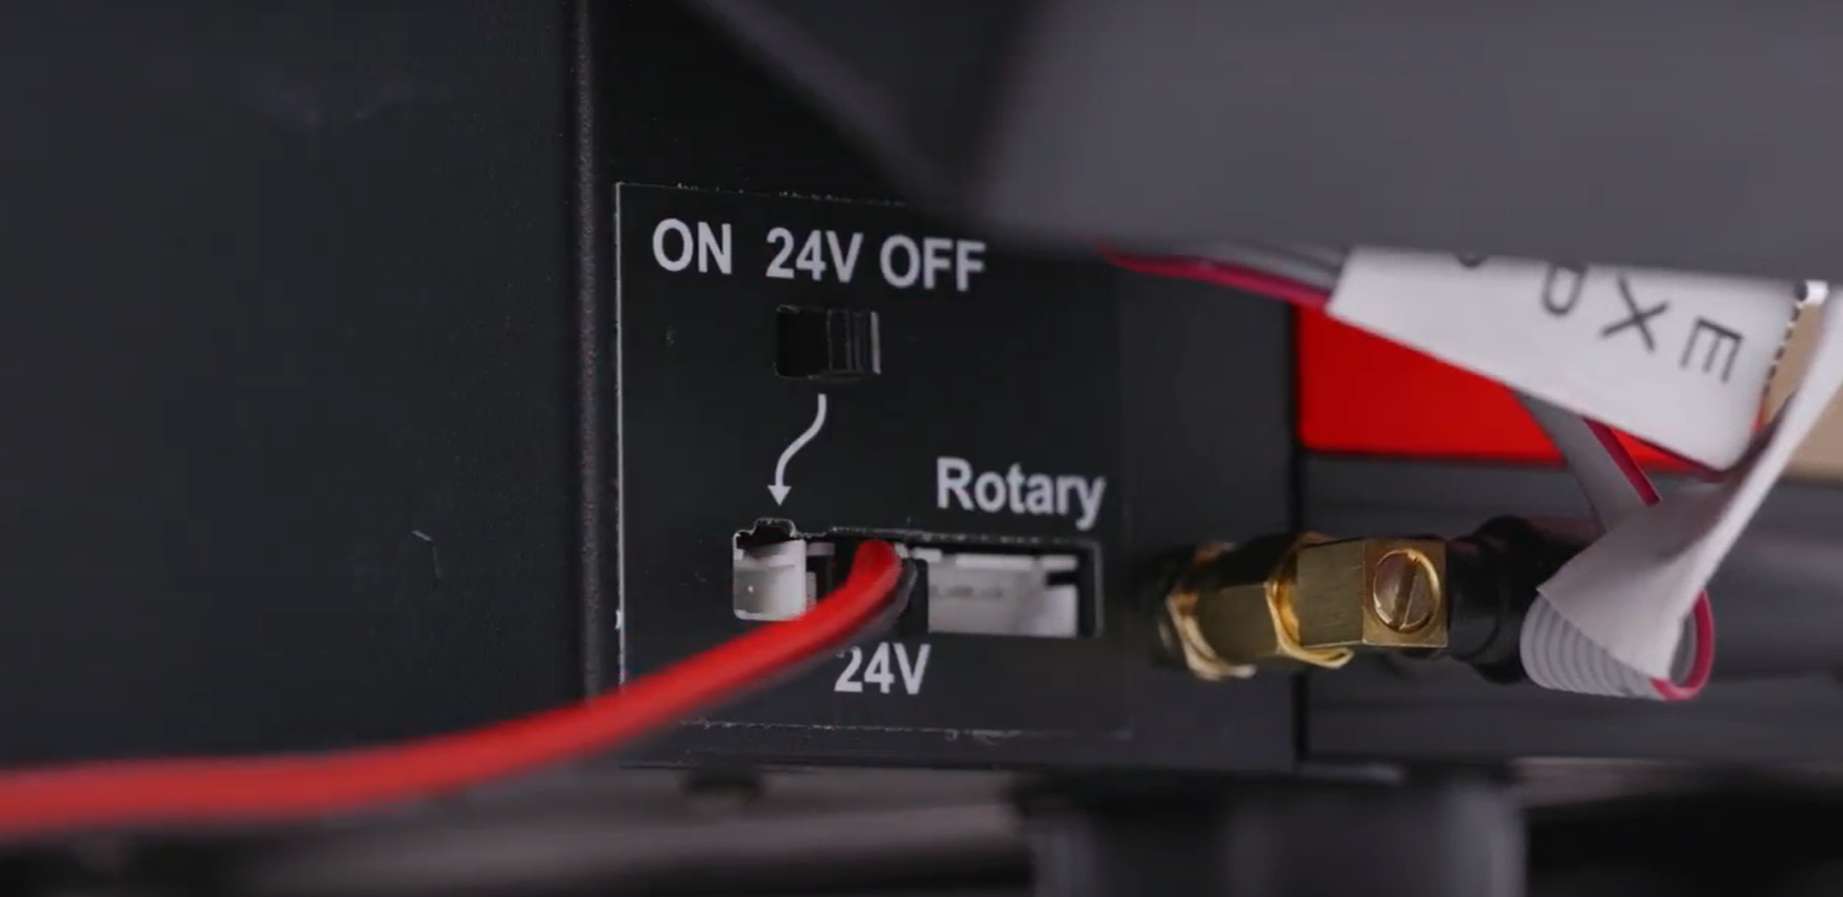
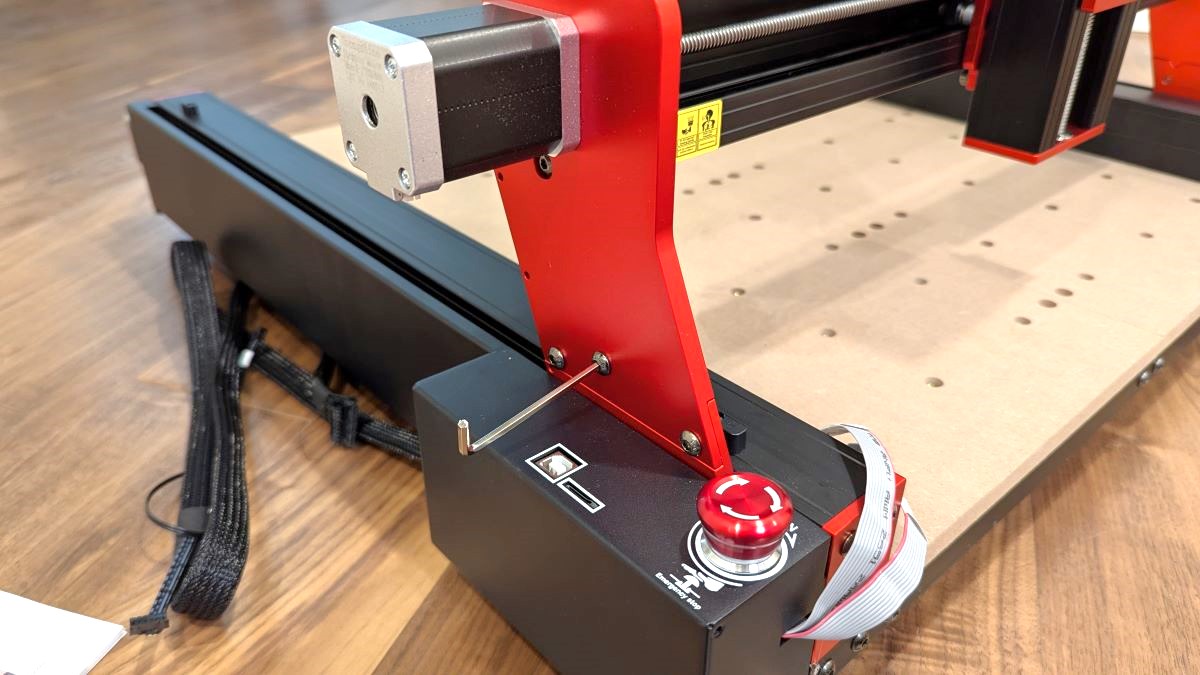
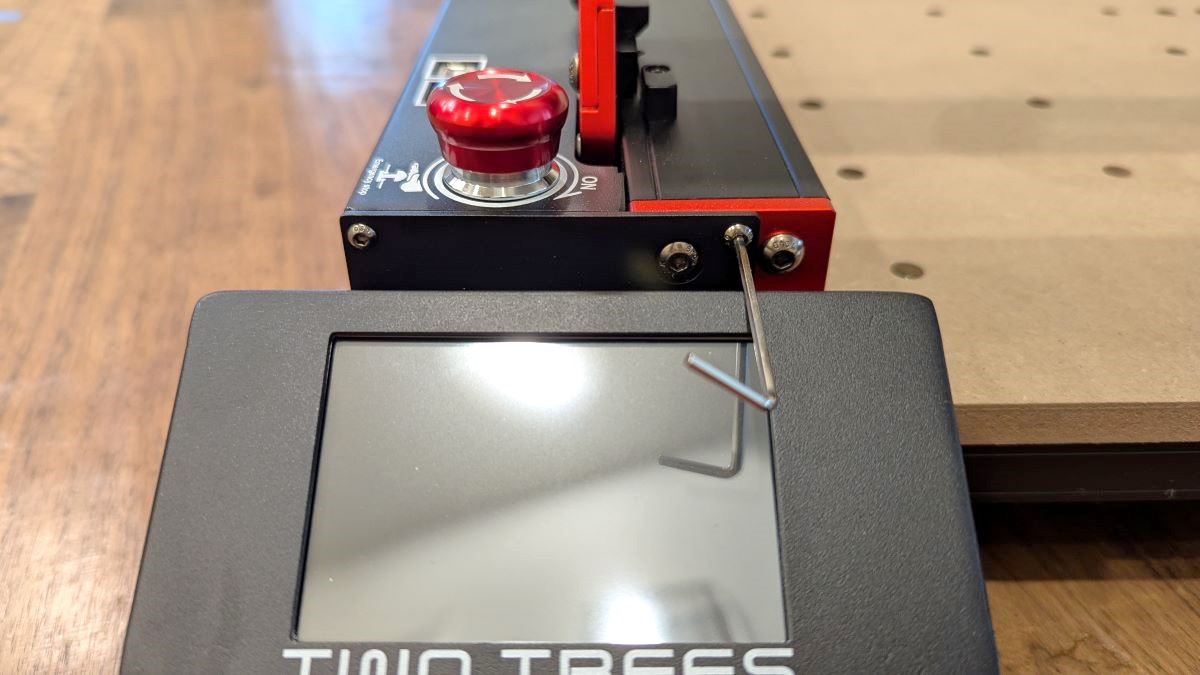
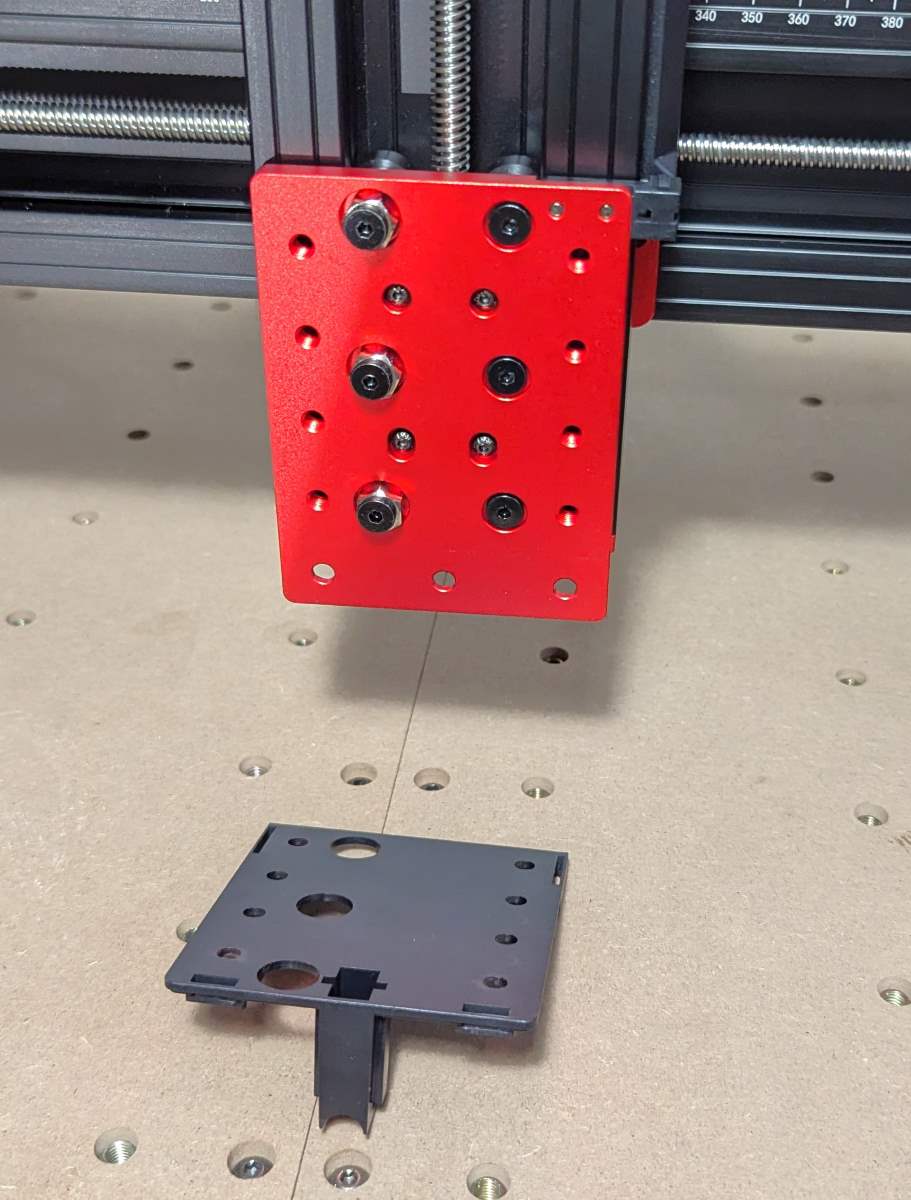
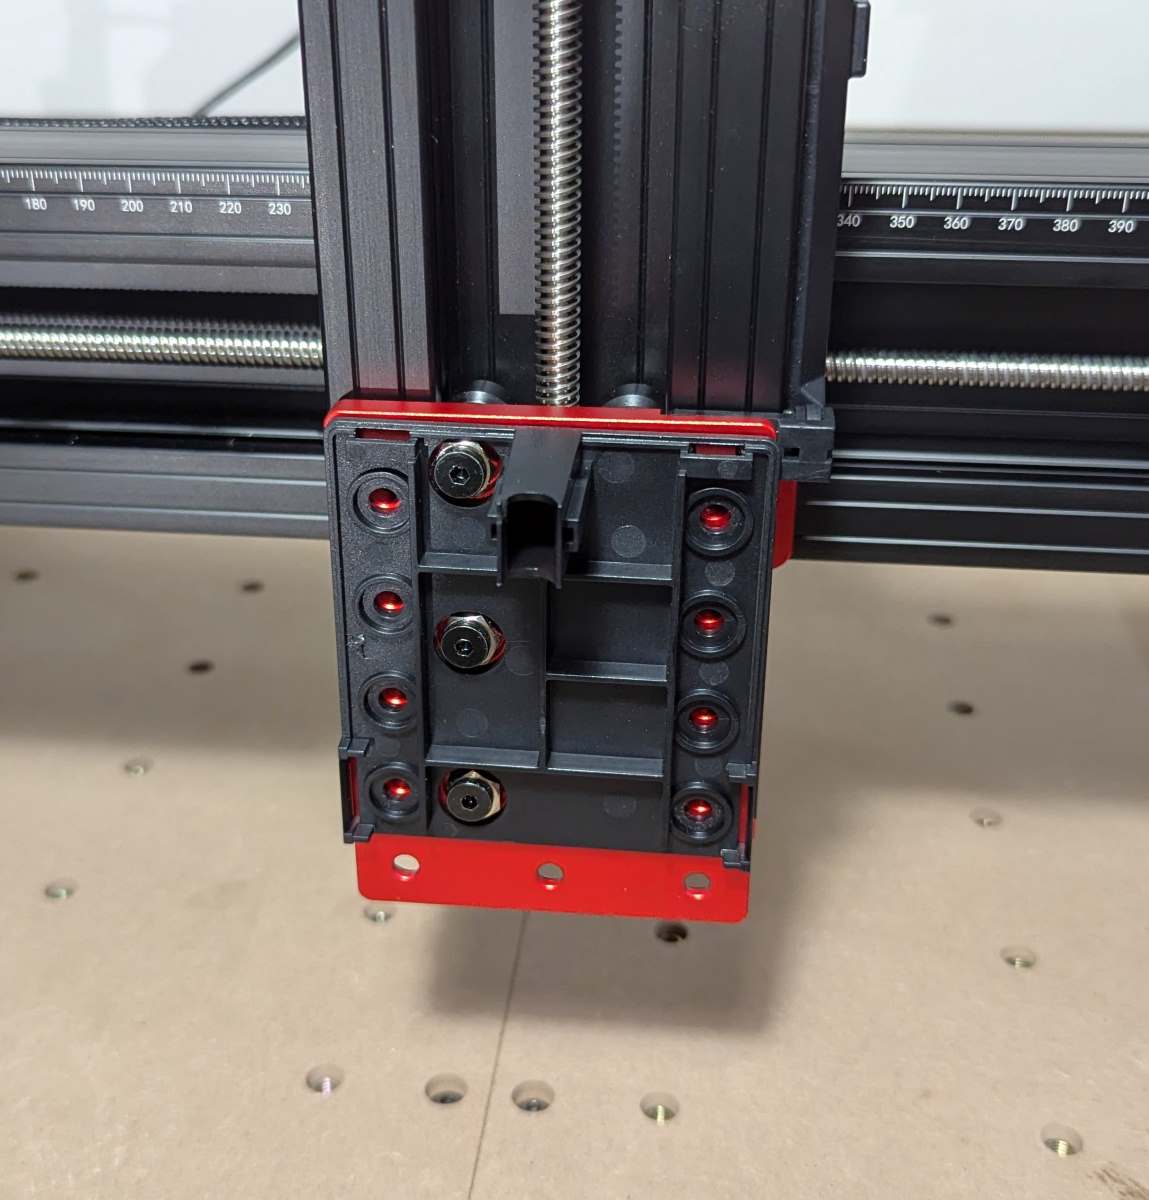
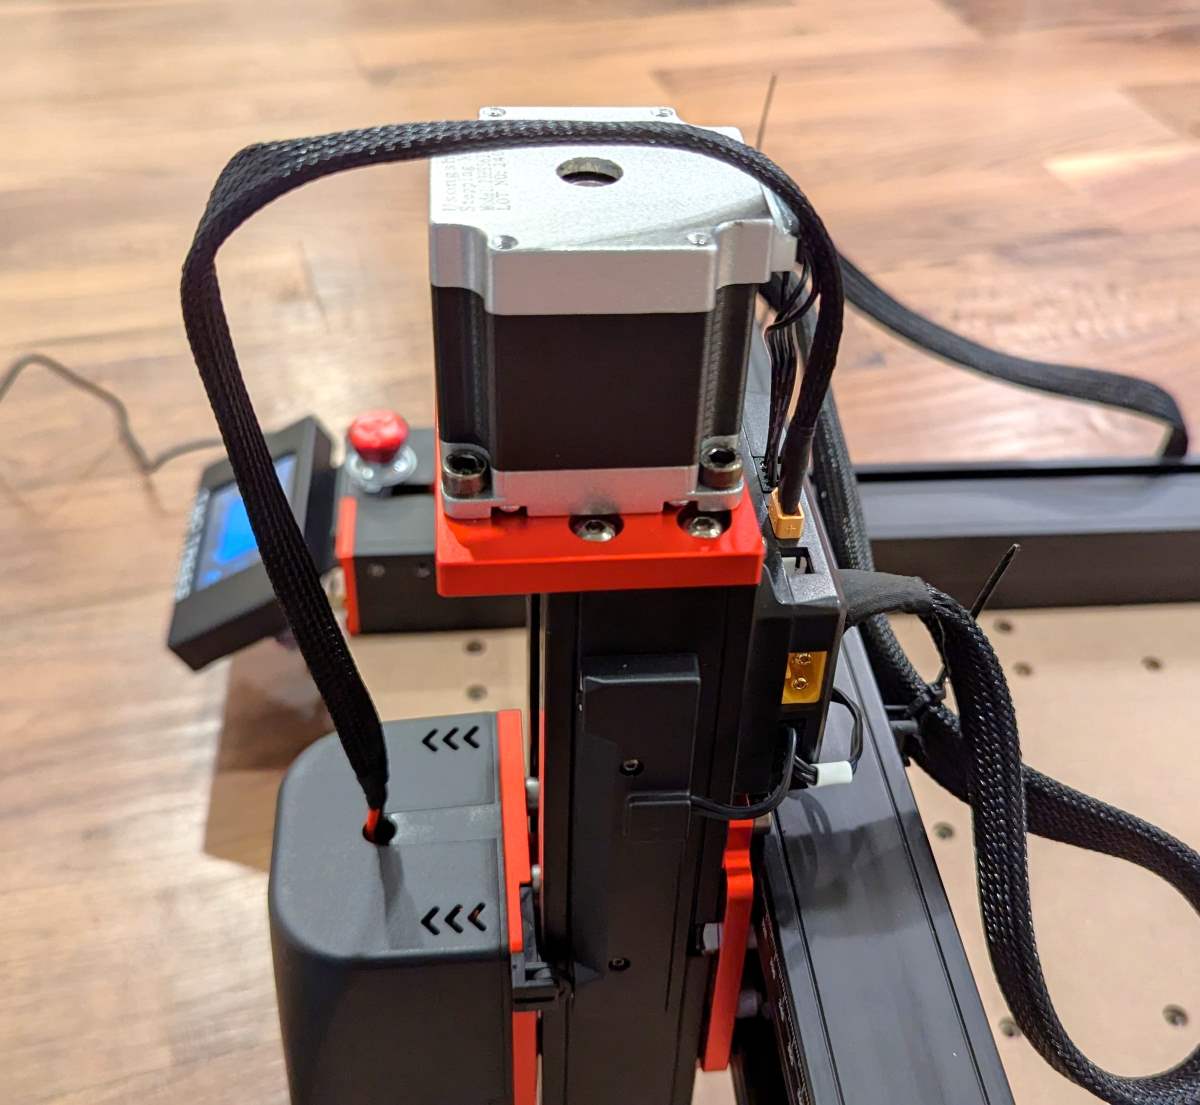
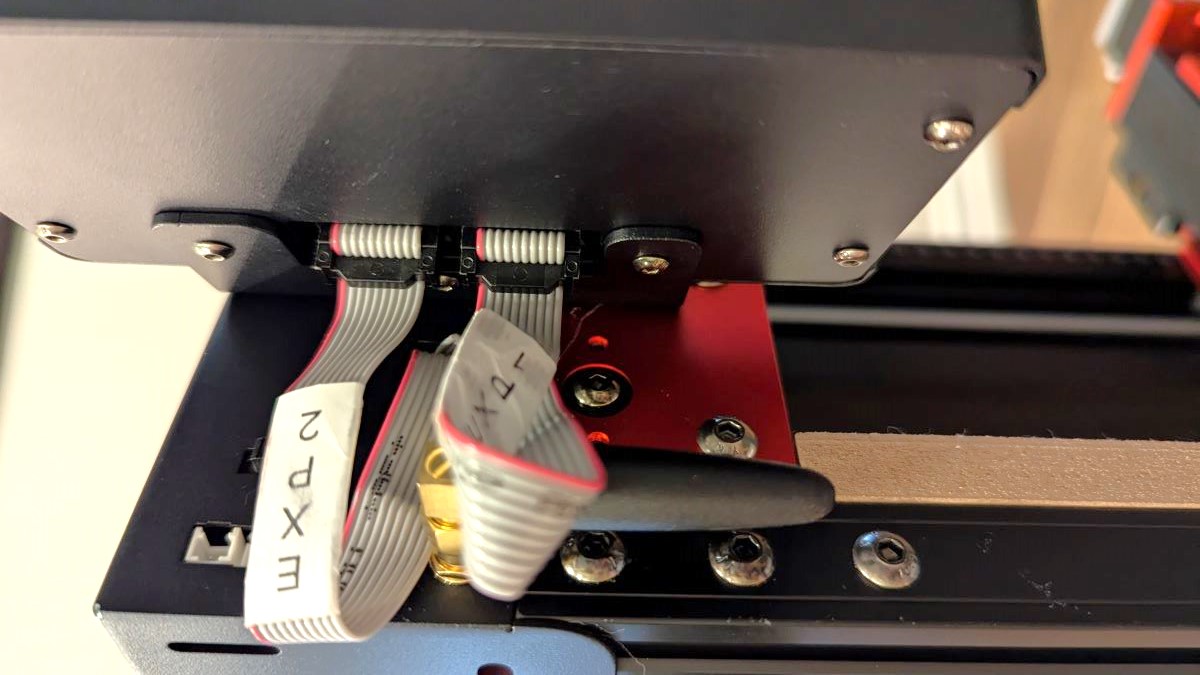
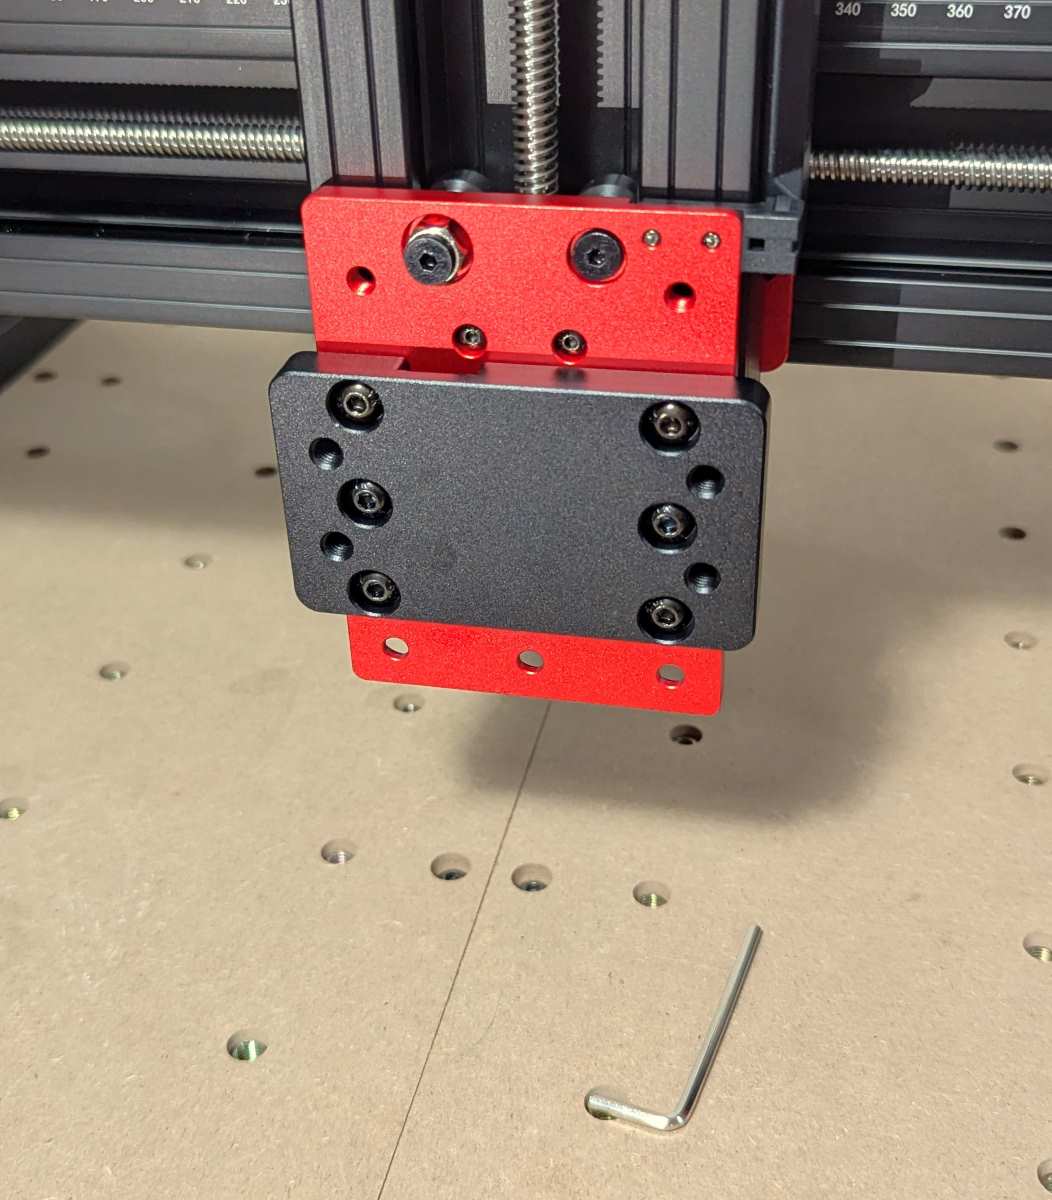
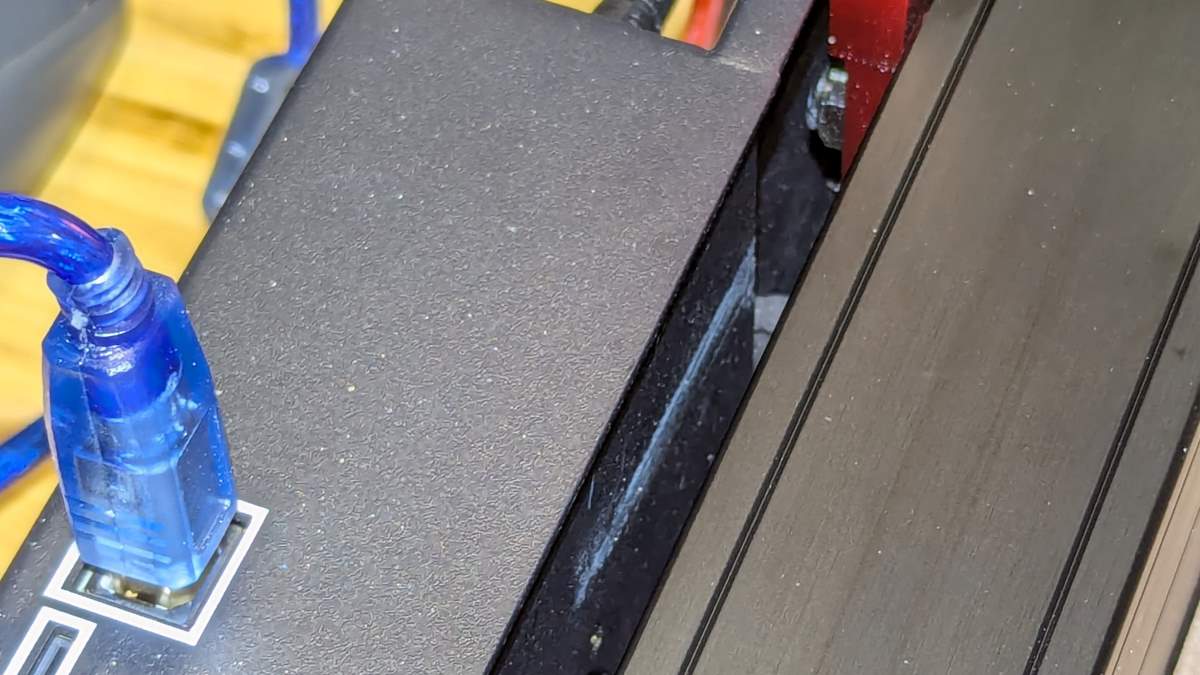
Another reason why it was a challenge to connect the 500W spindle cables was that my machine had no labeling on the front part of the control box underneath the touchscreen panel (my machine is the one pictured on the left above; the other is a screenshot from the TwoTrees installation video).
In summary, there are no spindle installation instructions available, the installation video isn’t posted on YouTube, and my machine isn’t labeled. It’s like TwoTrees tried to make this as difficult as possible.
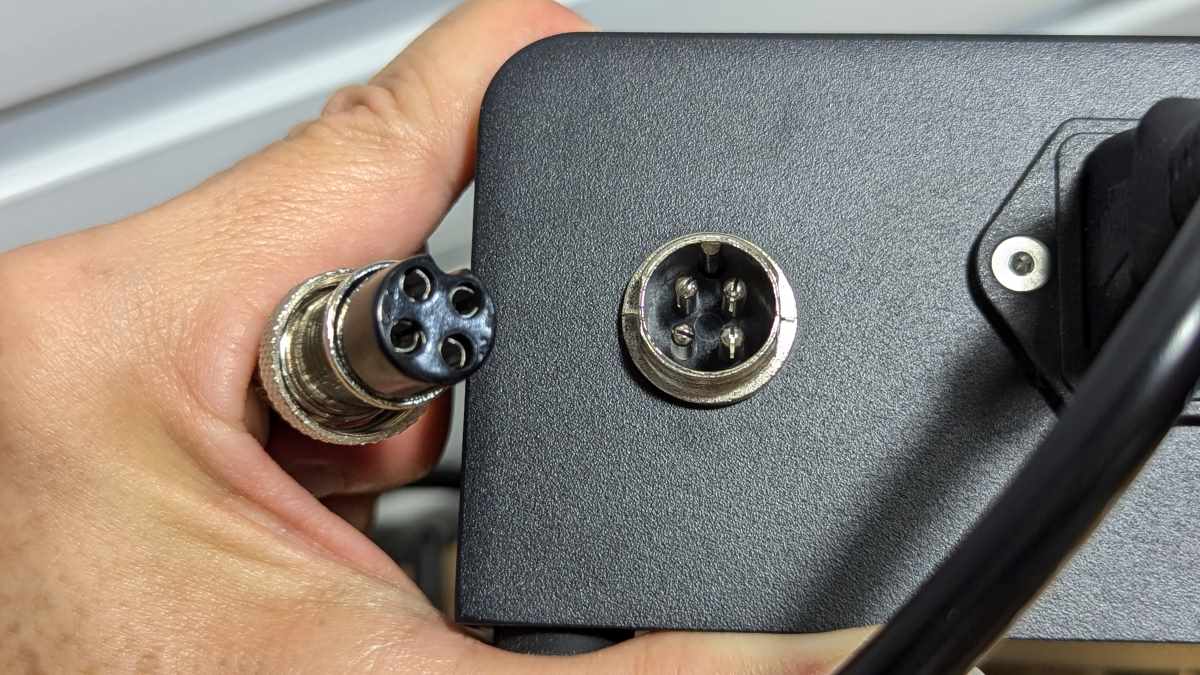
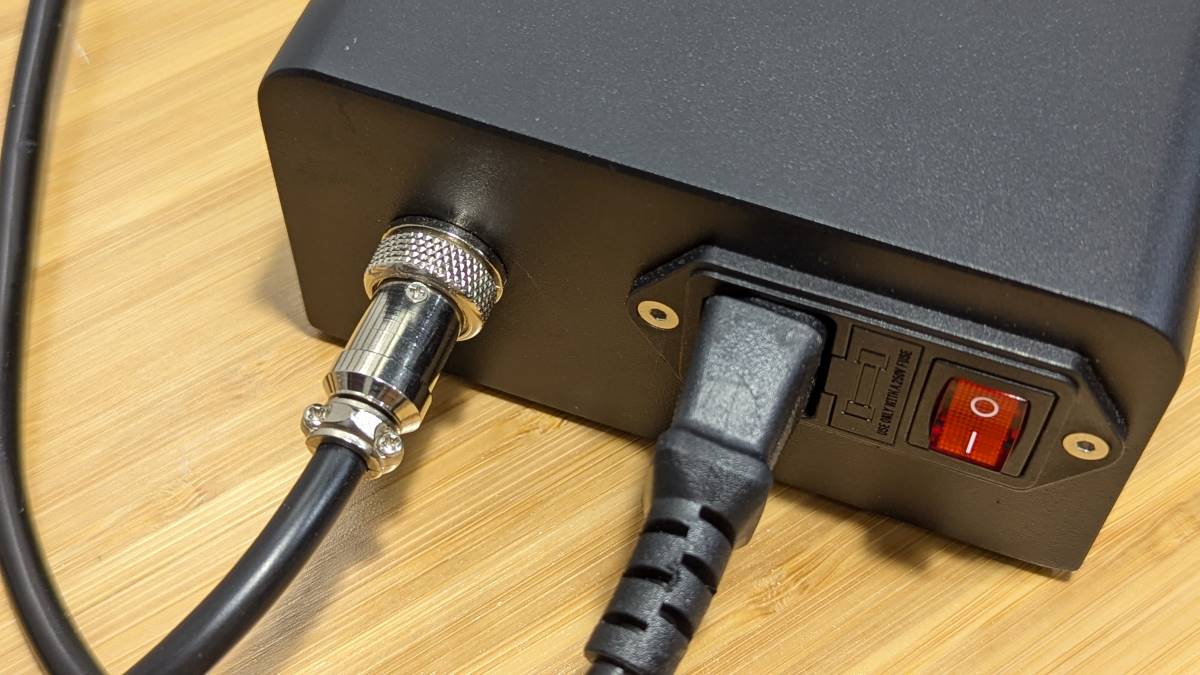
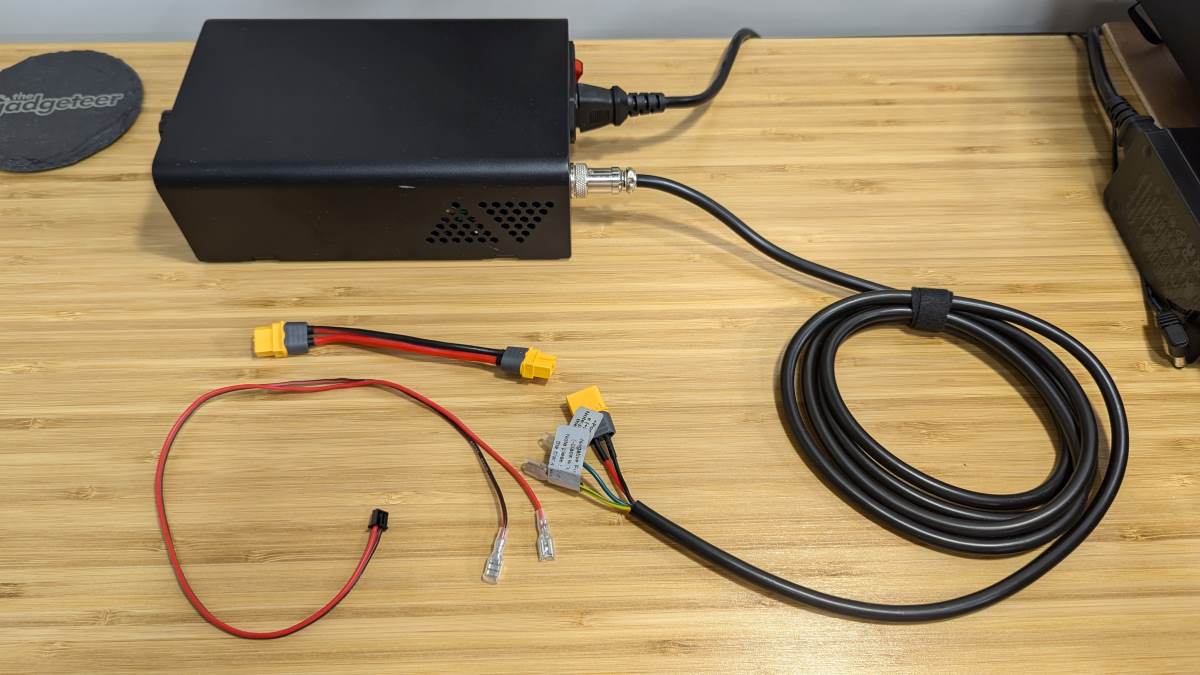
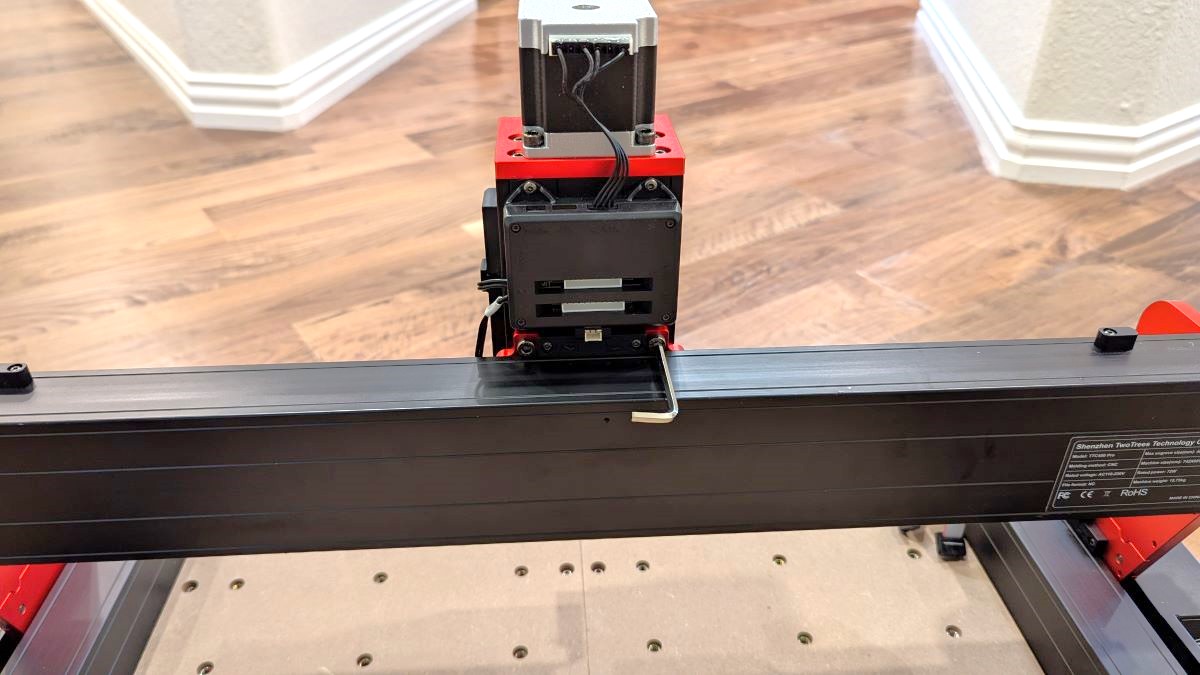
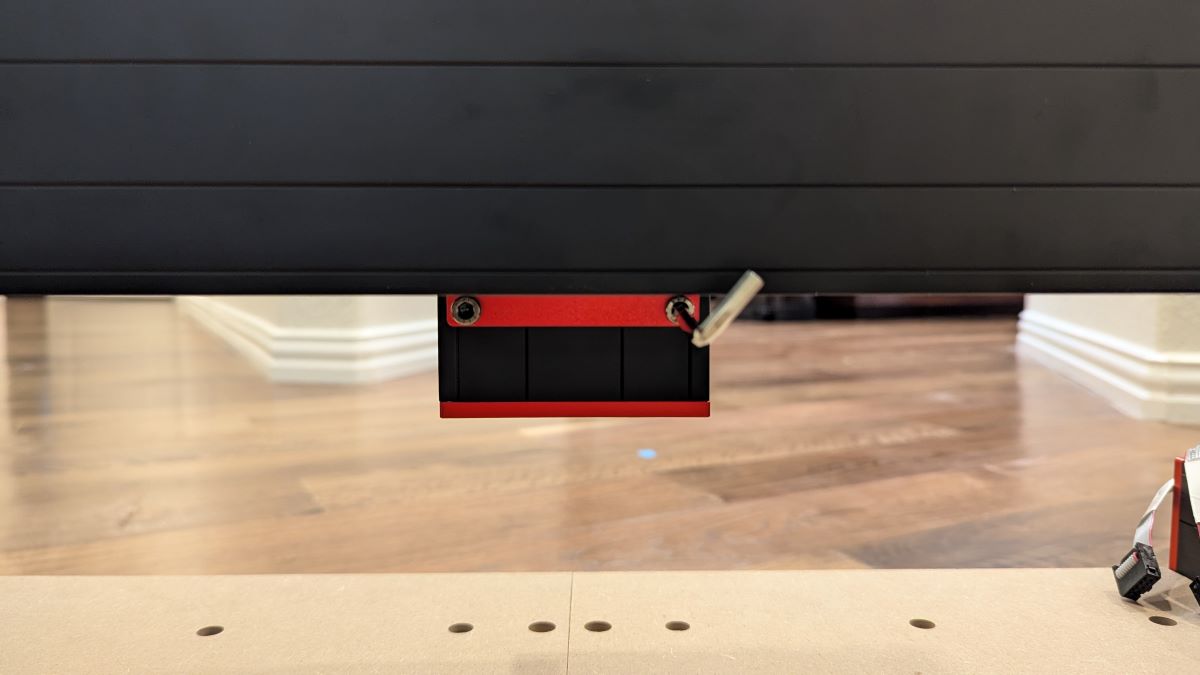
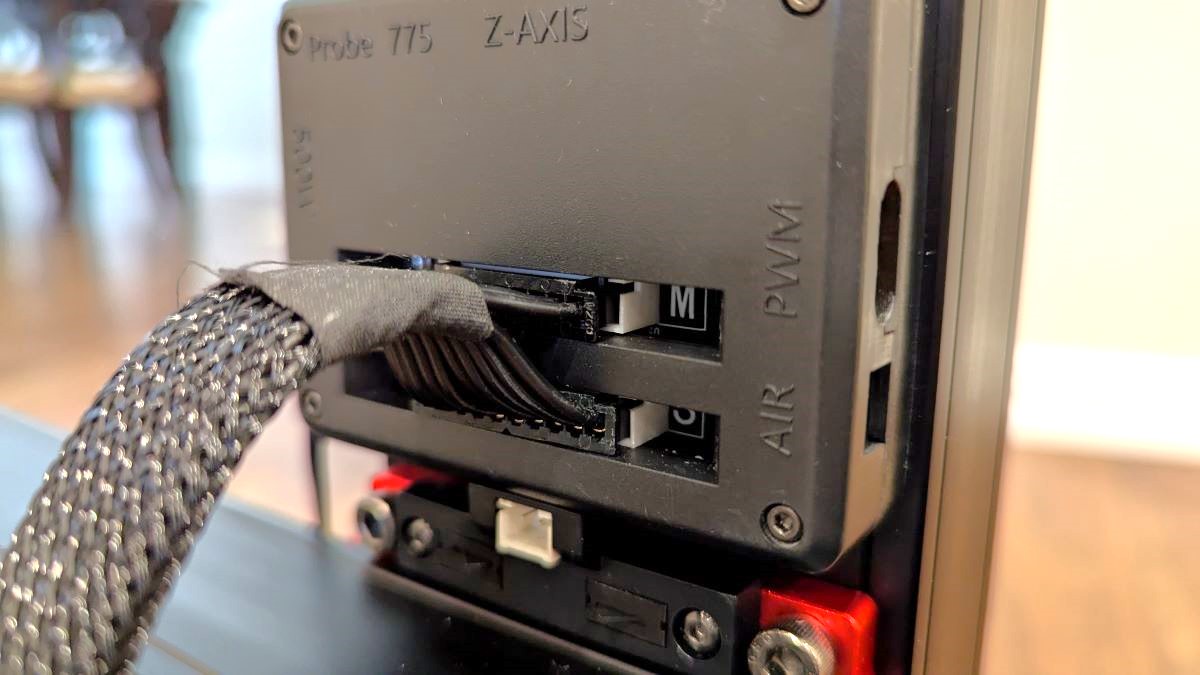
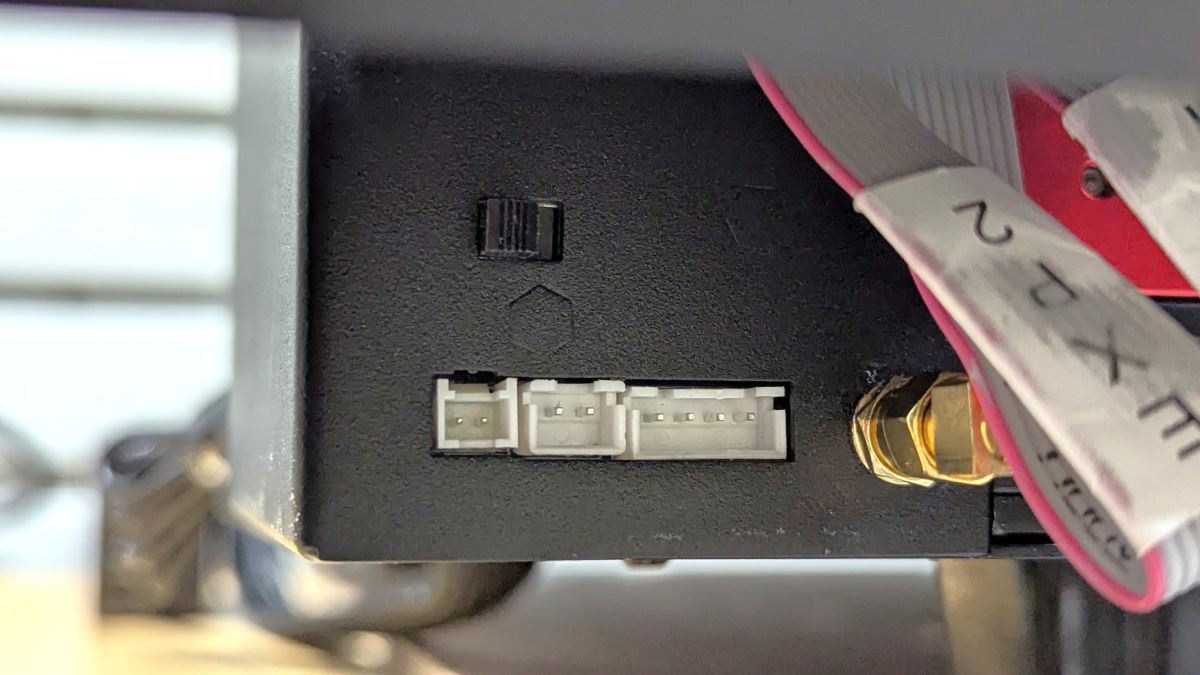
Here’s how I connected the 500W spindle cables. I plugged the spindle cable (the one already attached to the spindle) into the box on the back of the Z-axis (first photo above). I then plugged the AC power cable and a 4-pin spindle motor power cable into the spindle motor box (shown in the second and third photos above).
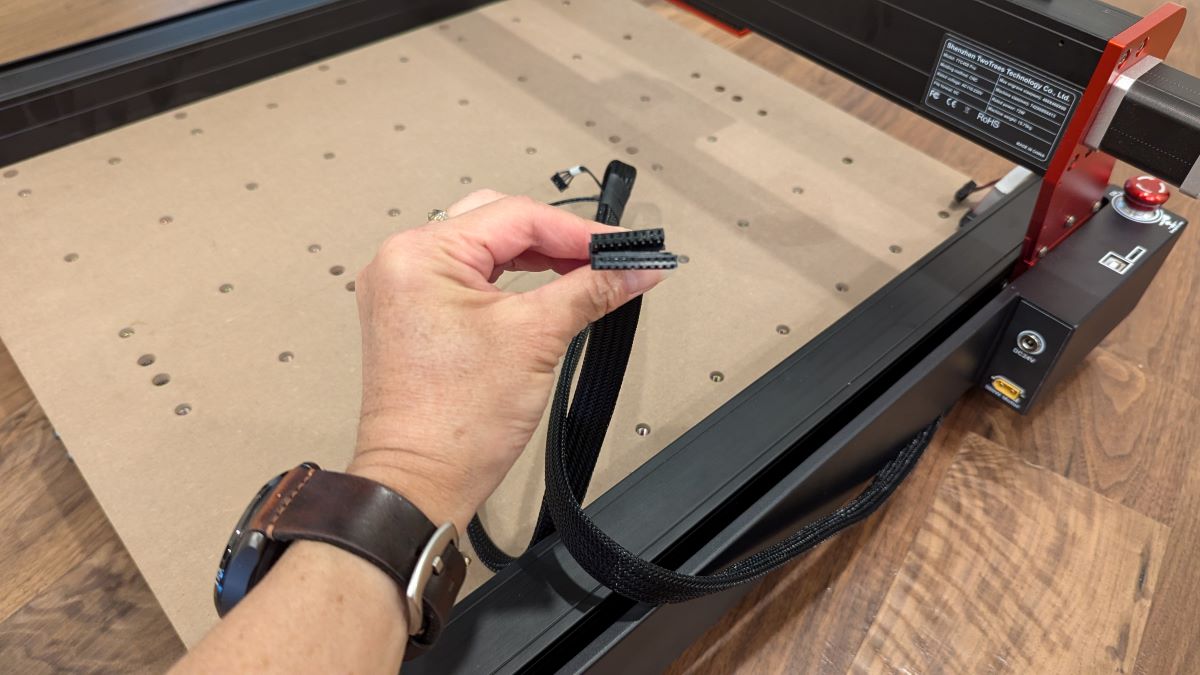
The opposite end of the spindle motor power cable has special connectors. Remember the small cables I had left over from the CNC assembly? I needed two of them to connect to the end of that cable (as shown in the last photo above). Since these small cables weren’t sent with the 500W spindle, it wasn’t at the top of my mind that I needed them for this.

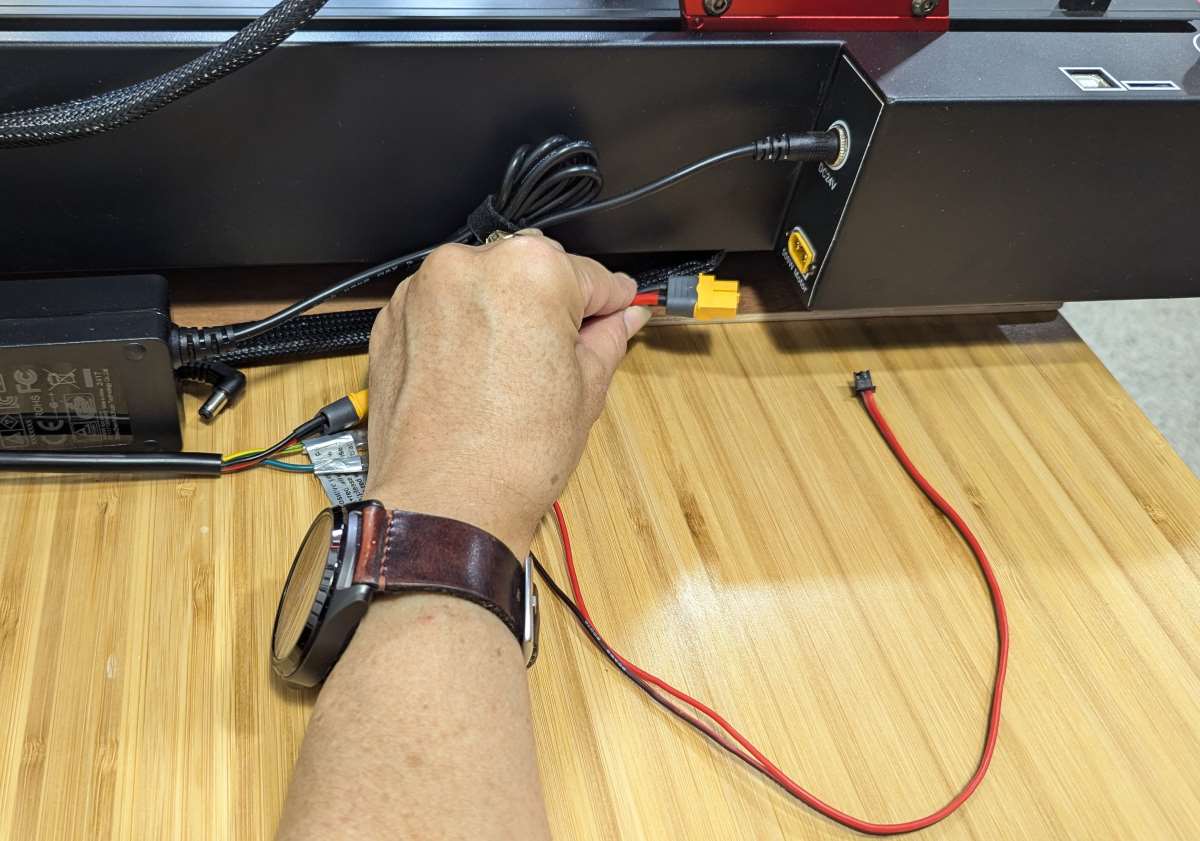

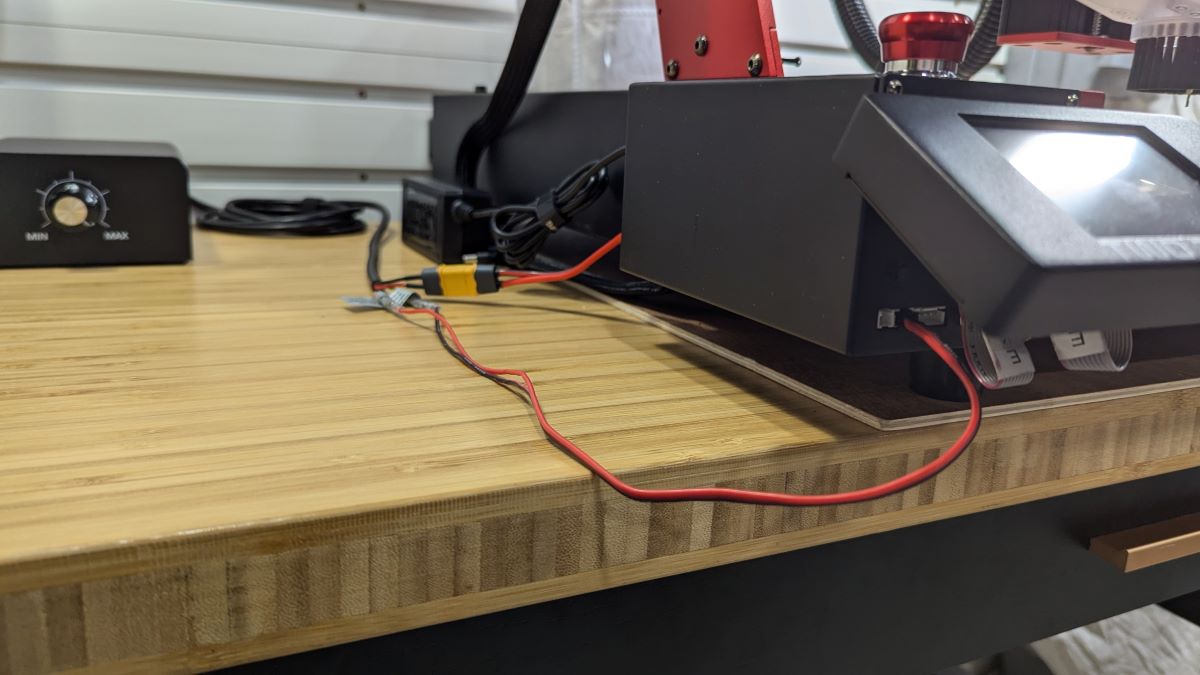
I matched the connectors and fastened them together (first photo above). I then plugged the ends into their proper ports on the control module (second and third photos above). The last photo above shows the spindle motor box and the associated connections.
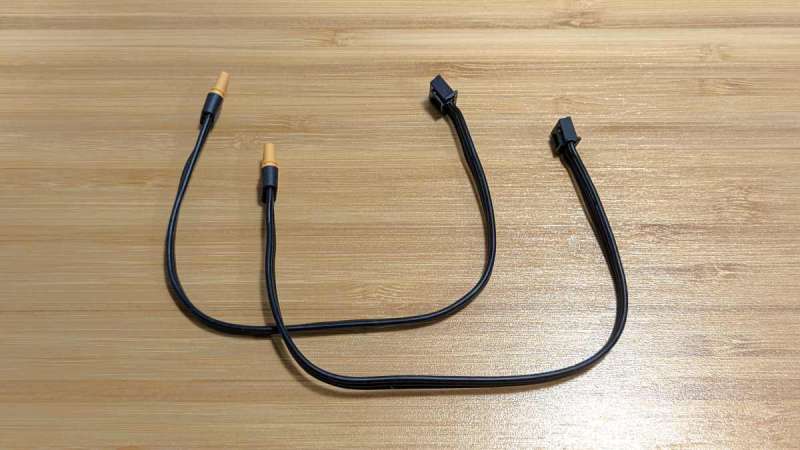
So, what are the other two small cables for? After searching and digging and searching some more (ugh), I finally found that they are for an optional 20W laser module. That may be important for some of you out there.
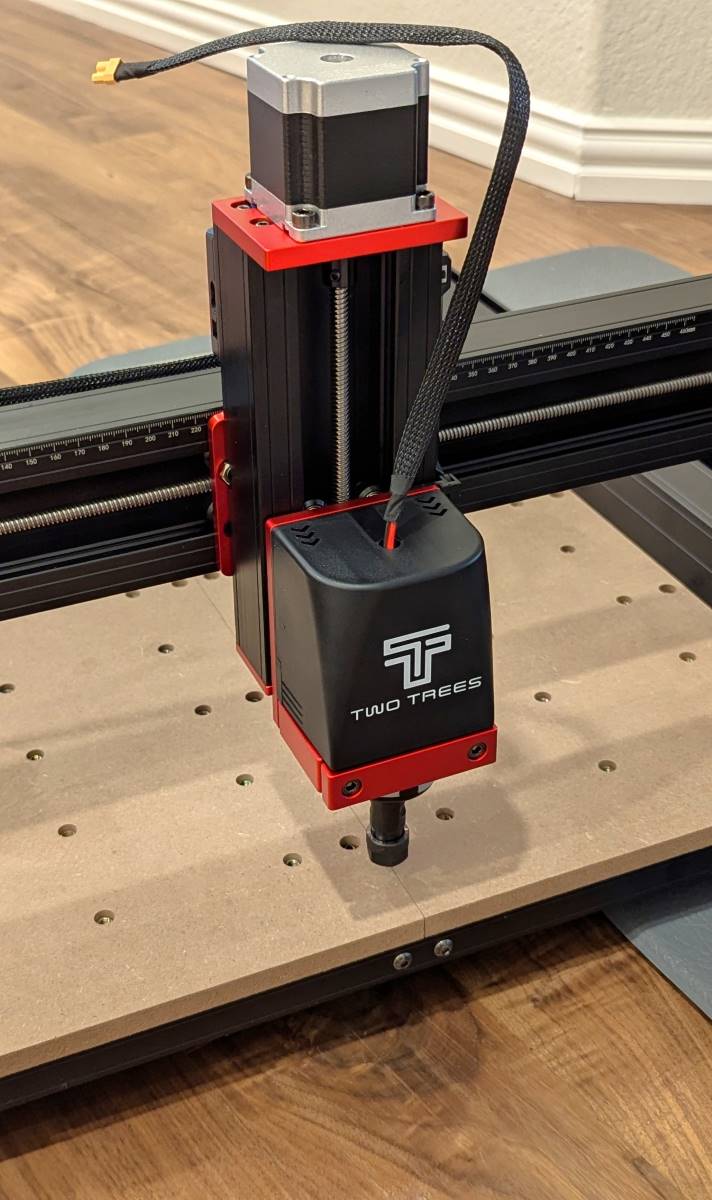
Installing the CNC Vacuum Cleaner Monster (M1) Kit (lol – that’s what they call it)
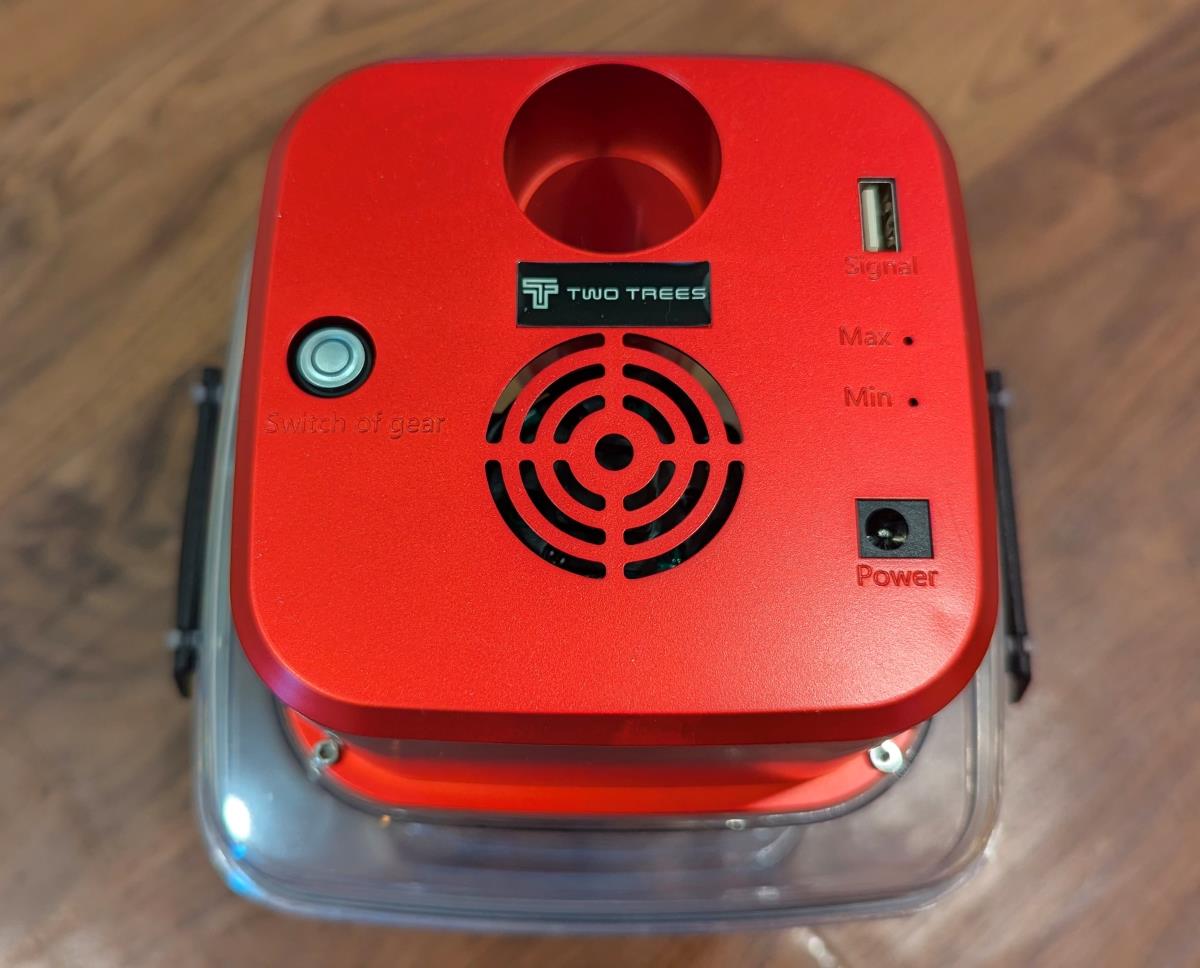
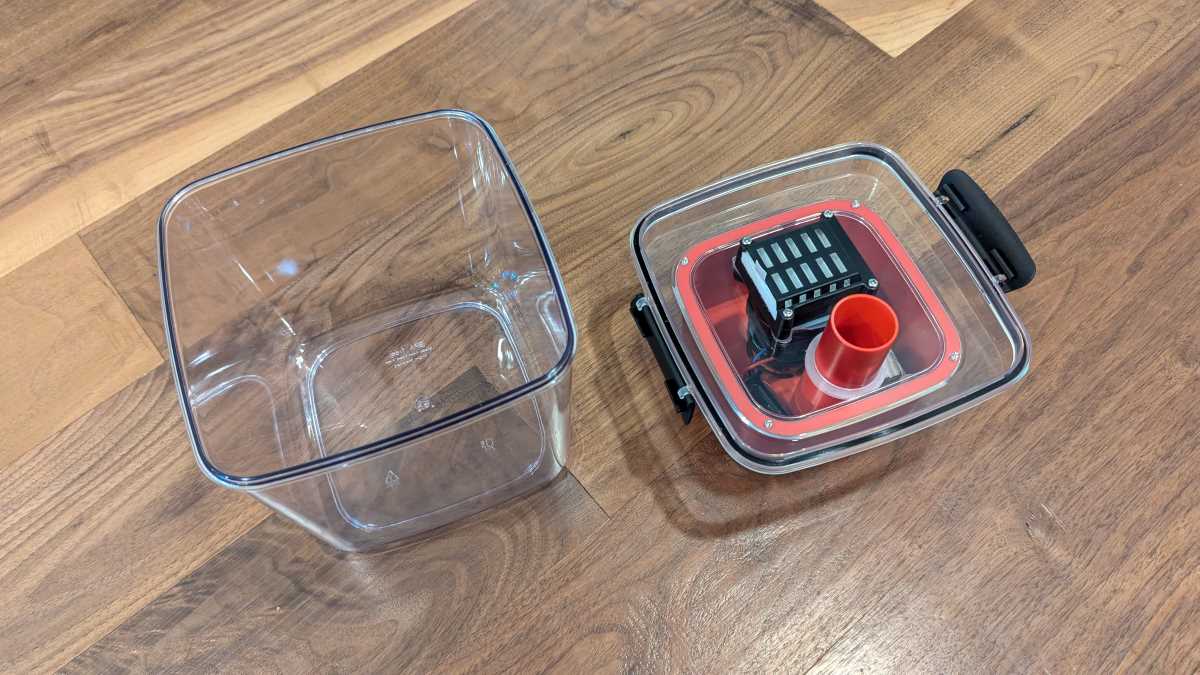

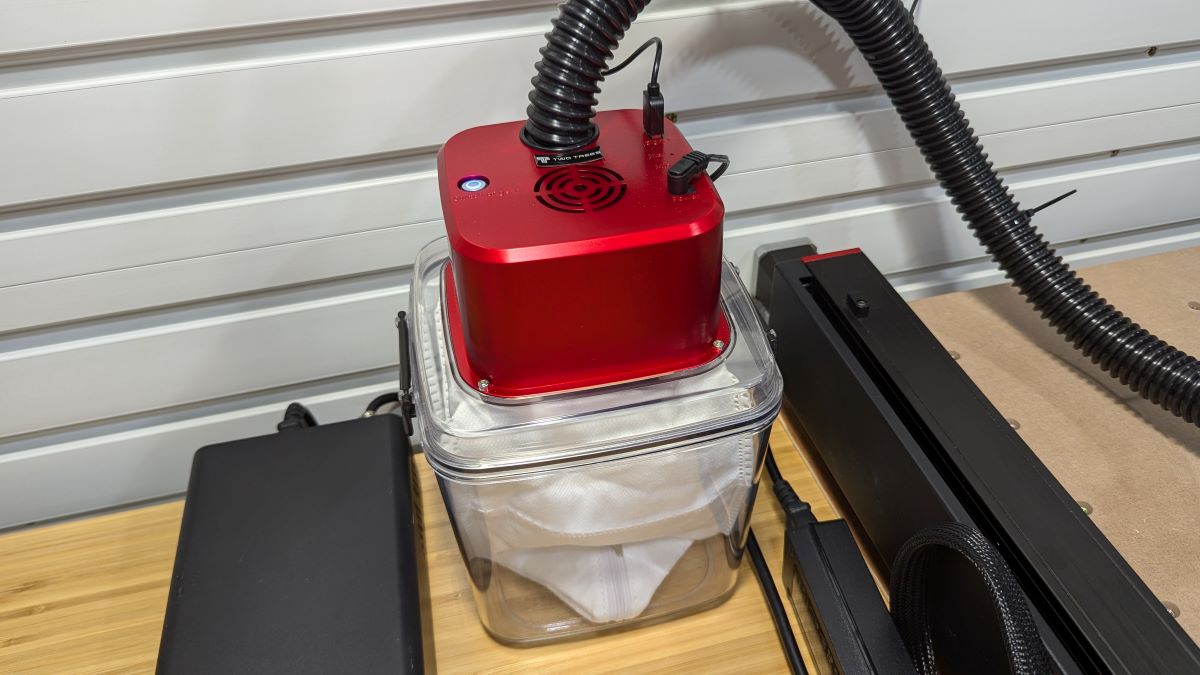
The TwoTrees CNC vacuum is a relatively small plastic desktop vacuum. On top is a power button, an area to attach the vacuum hose, fan vents, a USB-A port, and a power port (first photo above). The vacuum has two sections, a top and a bottom (second photo above). The top fastens to the bottom using two plastic handles opposite each other that flip down and snap onto the bottom. On the underside of the top is a tiny replaceable filter cartridge (third photo above). You install the vacuum bag inside the vacuum by sliding the opening on the bag onto the red hose opening on the underside of the top (third photo above).
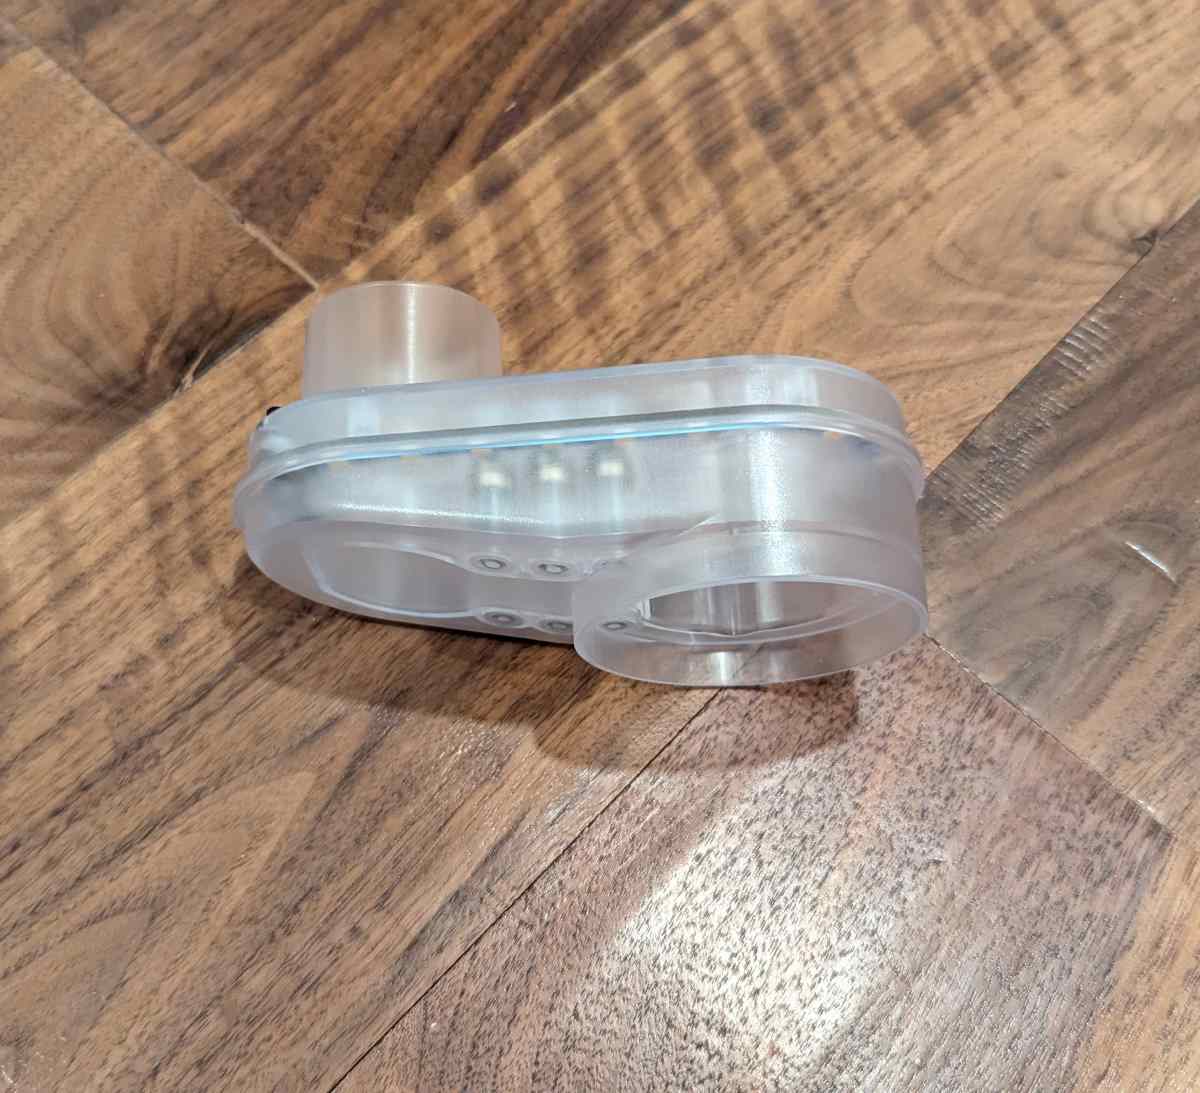
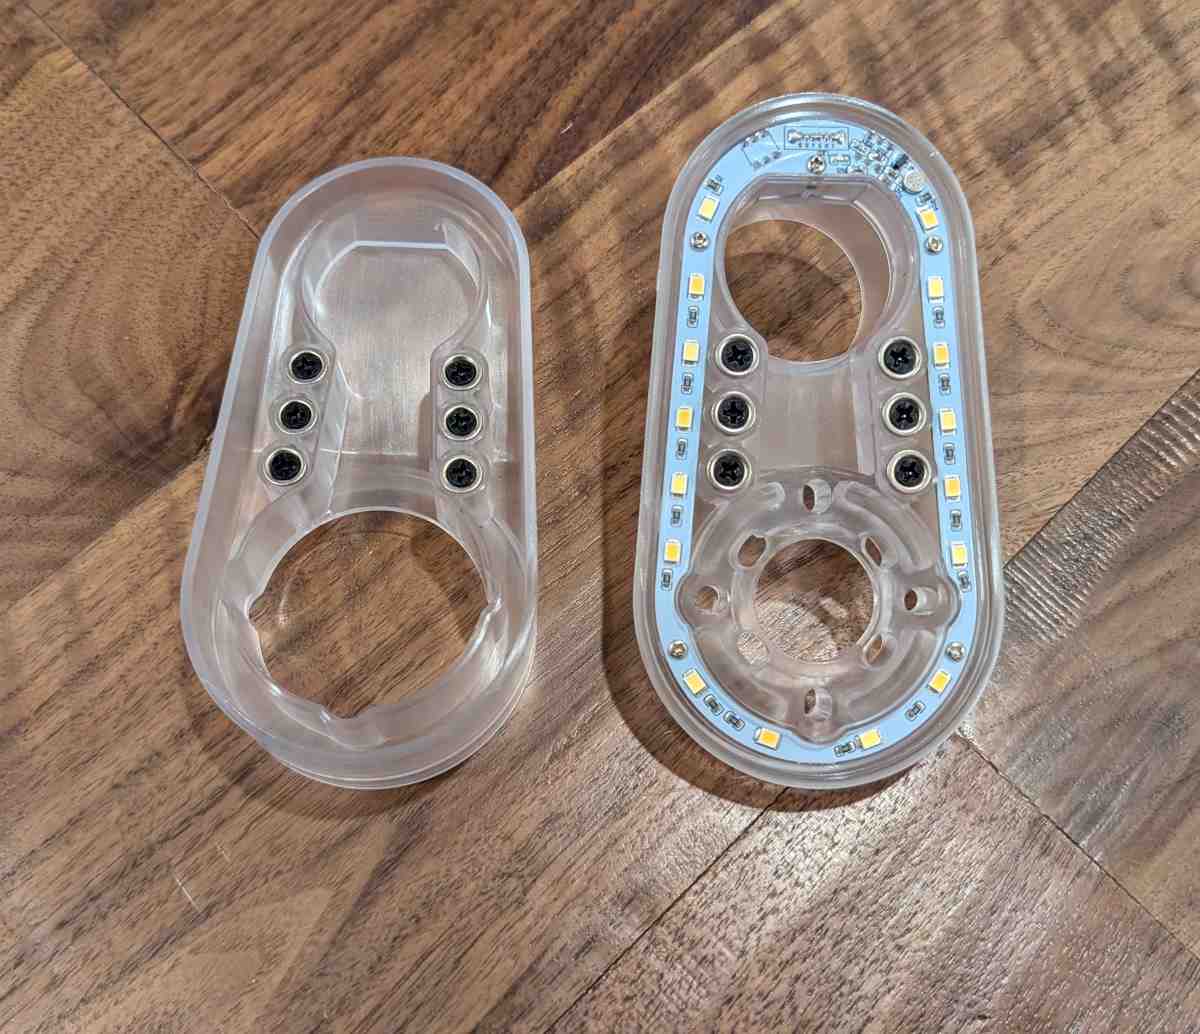
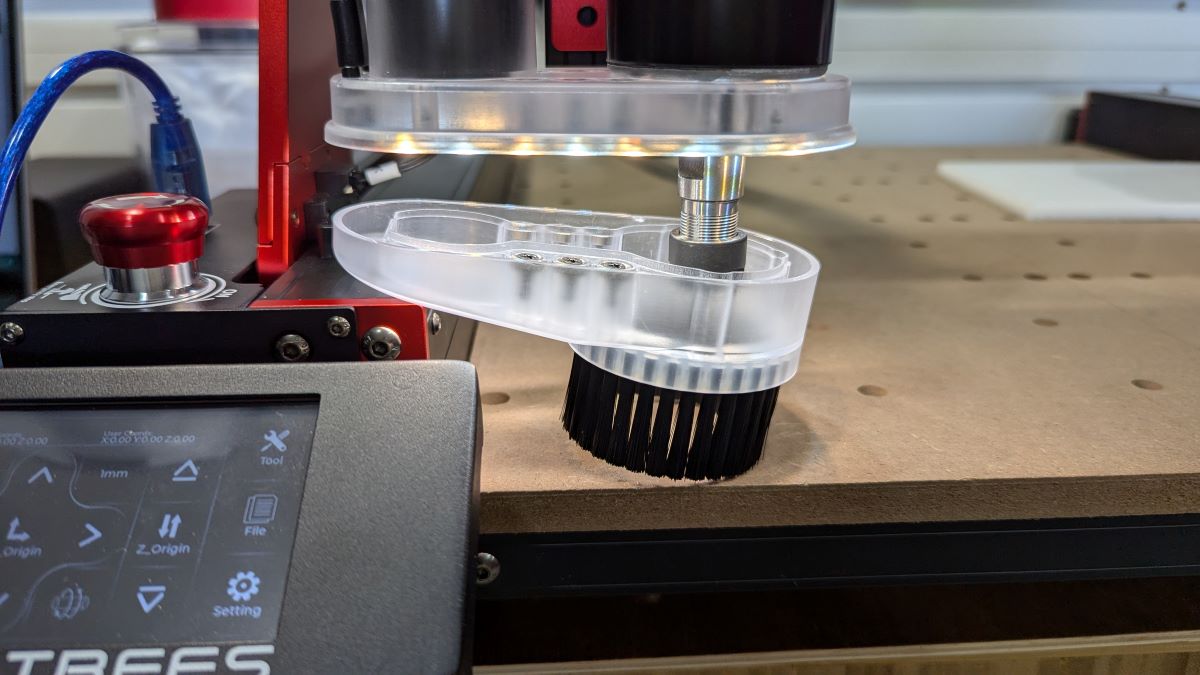
The vacuum kit includes a plastic dust shoe (fourth photo above). The dust shoe has two attachment areas, one for your TwoTrees spindle and the other for your vacuum hose. This device helps vacuum up debris from your carving projects, keeping your work area clean.
The top and bottom of the dust shoe attach magnetically. The top cleverly contains LEDs to illuminate your carving project (fifth photo above). I haven’t seen any other CNC dust shoes that include this feature, and it’s AWESOME!
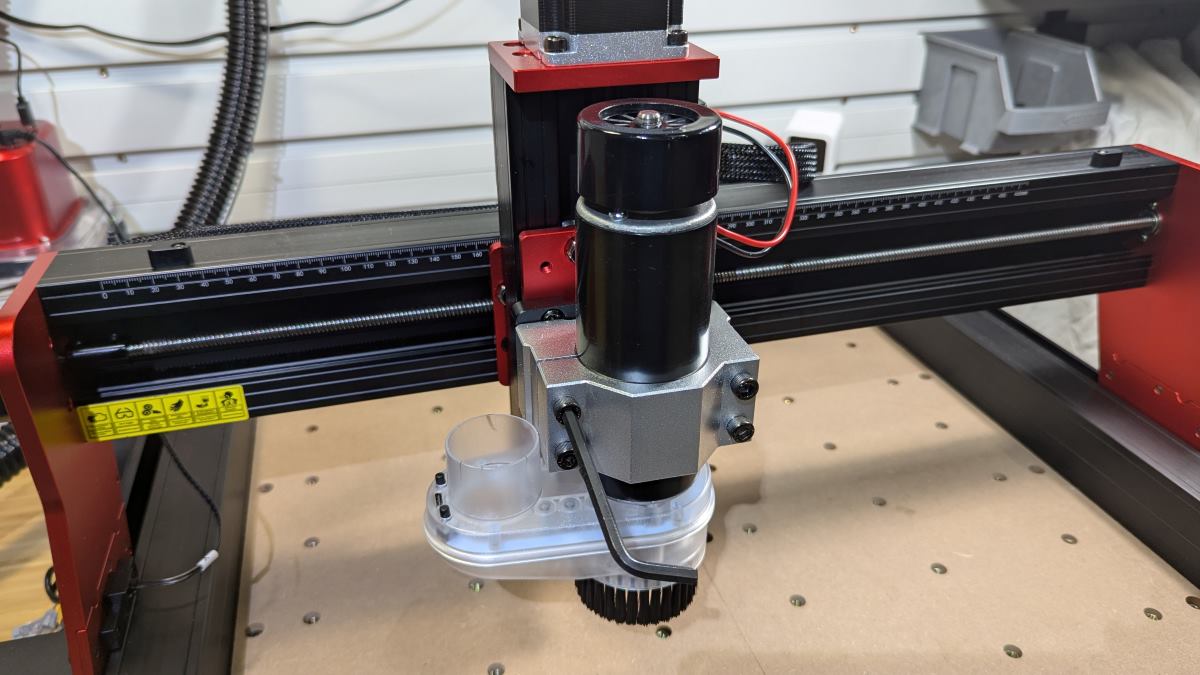
The top of the dust shoe attaches to the TwoTrees spindle using screws (first photo above). I then connected the vacuum hose and USB cable from the dust shoe to the vacuum and connected power to the vacuum (second, third, and fourth photos above).
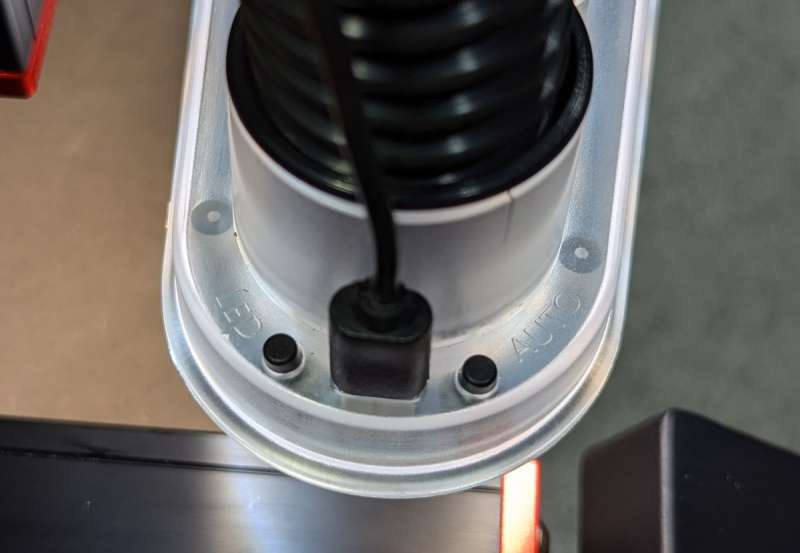
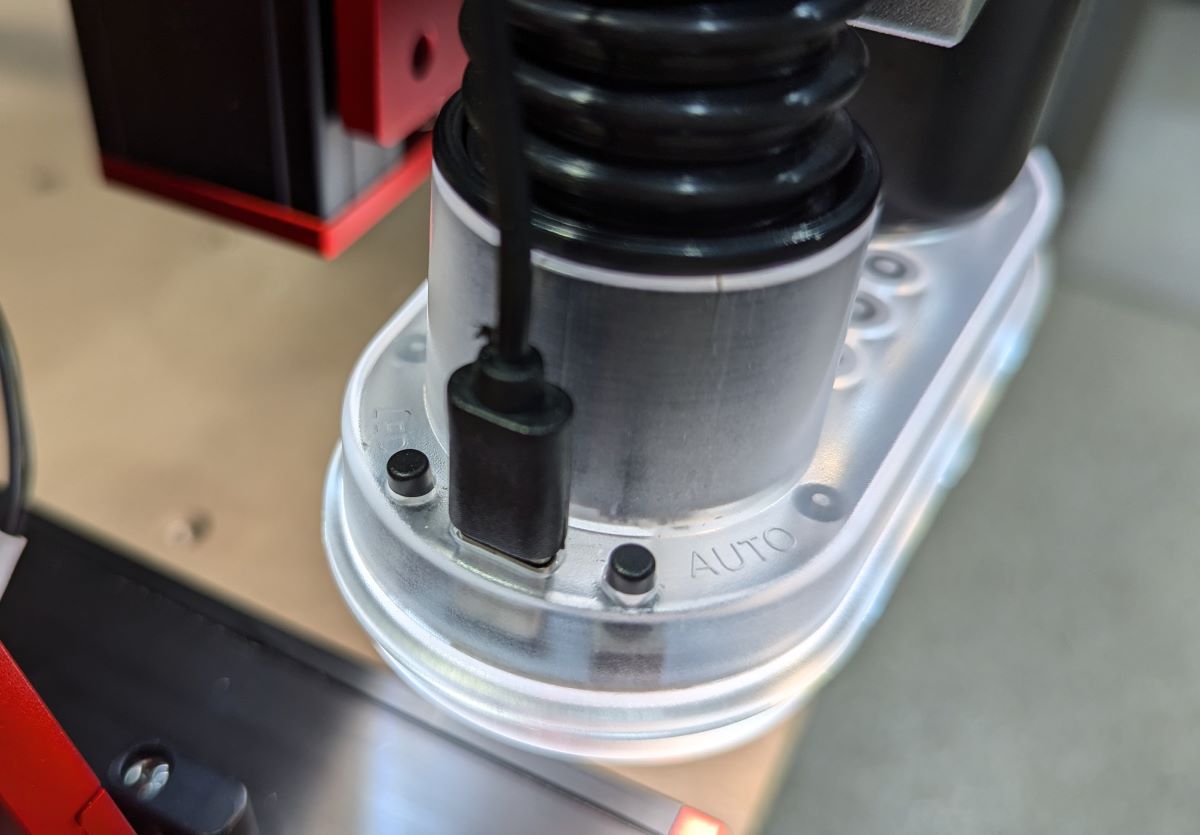
On top of the dust shoe are two switches/buttons (photo above). One controls the LED lights, and the other controls the automatic dust collection function. When the “Auto” button is pressed, the vacuum is supposed to start and stop automatically when a project starts and ends, respectively. Using the manual On/Off button interferes with the “Auto” feature, so if it doesn’t work, press the “Auto” button again to turn it off, unplug the vacuum’s power, then plug it back in, press the “Auto” button to turn it on, and it should function.
Installing the 4th Axis CNC Rotary Module Kit for TTC450/TTC 450 Pro
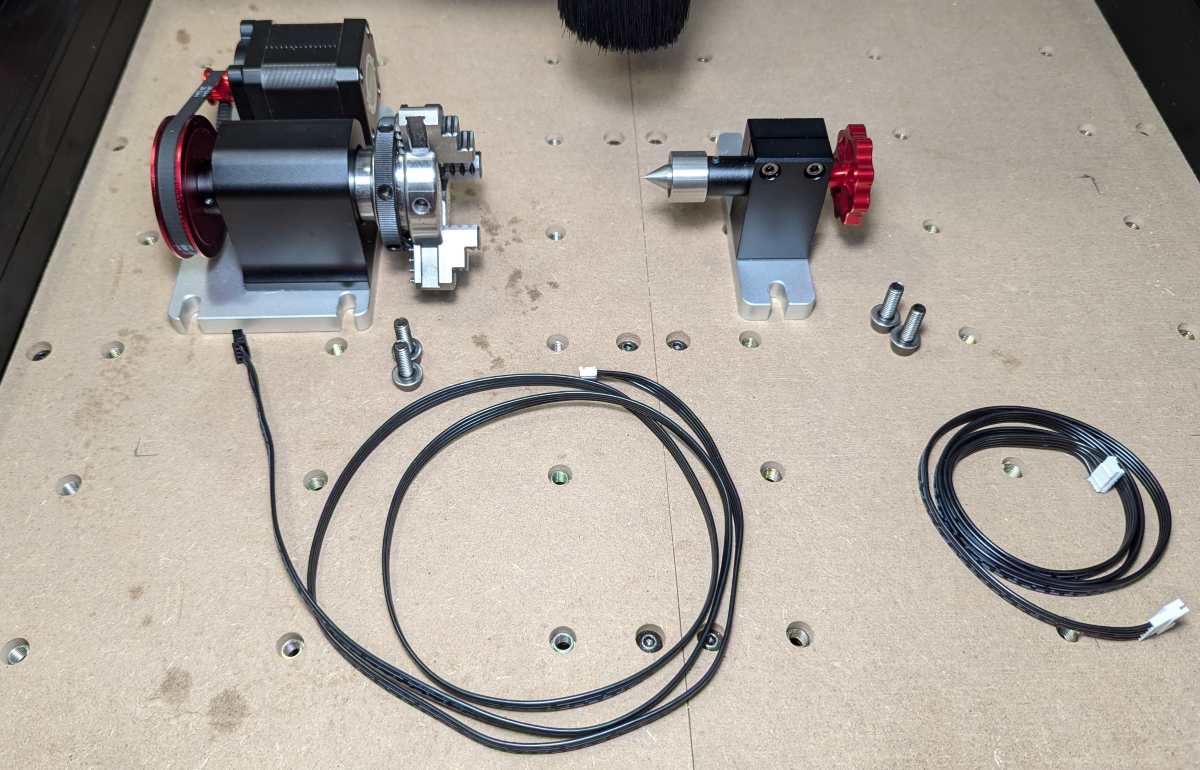
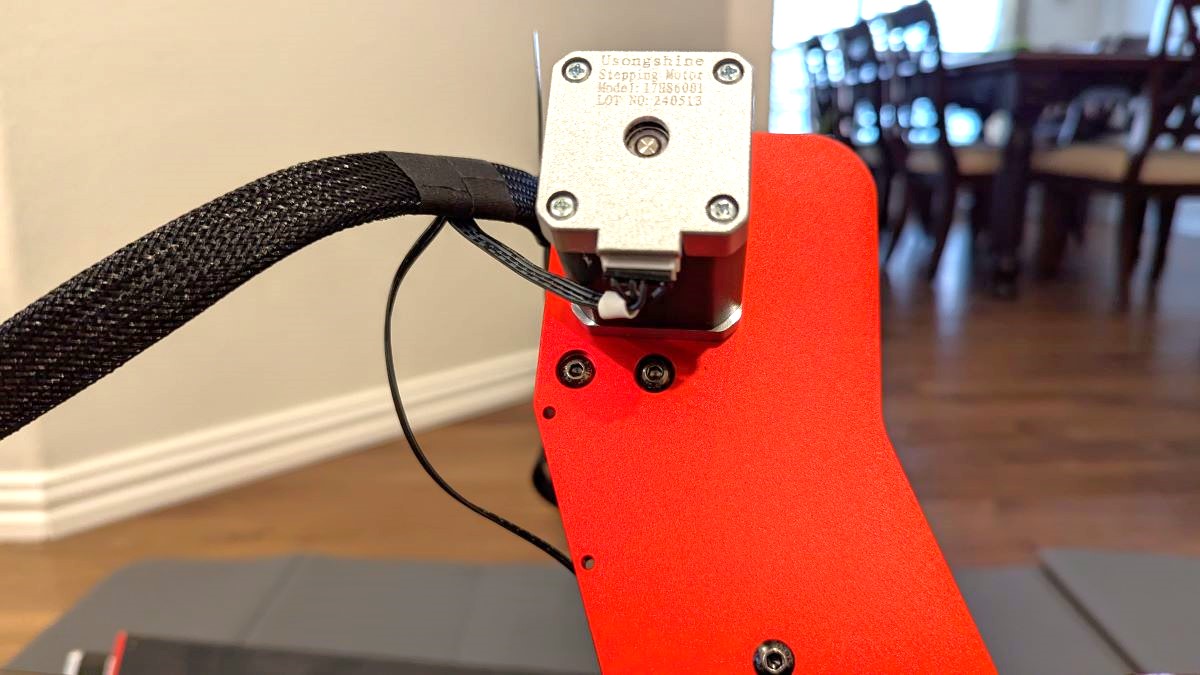
If you want to do a rotary project, you’ll need the TwoTrees rotary module. TwoTrees sends you several items with the rotary module kit. Most are screws, washers, square nuts, and two cables. You only need four screws, four washers, and one cable (the cable with one white four-pin connector and one black four-pin connector).
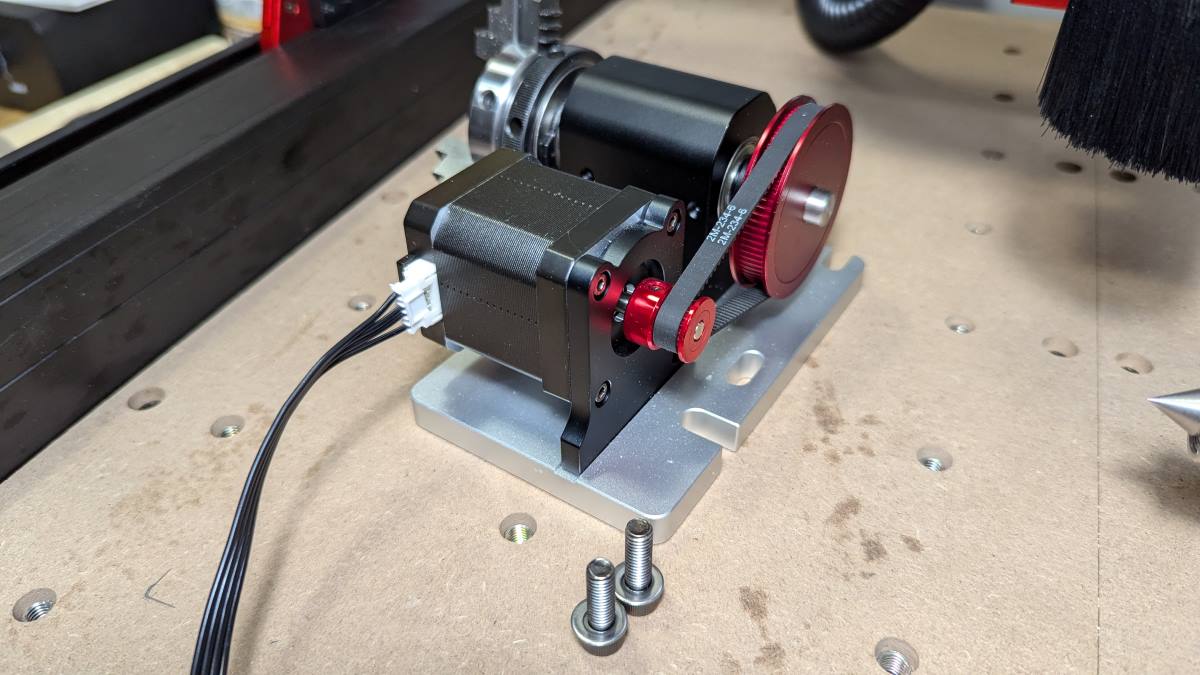
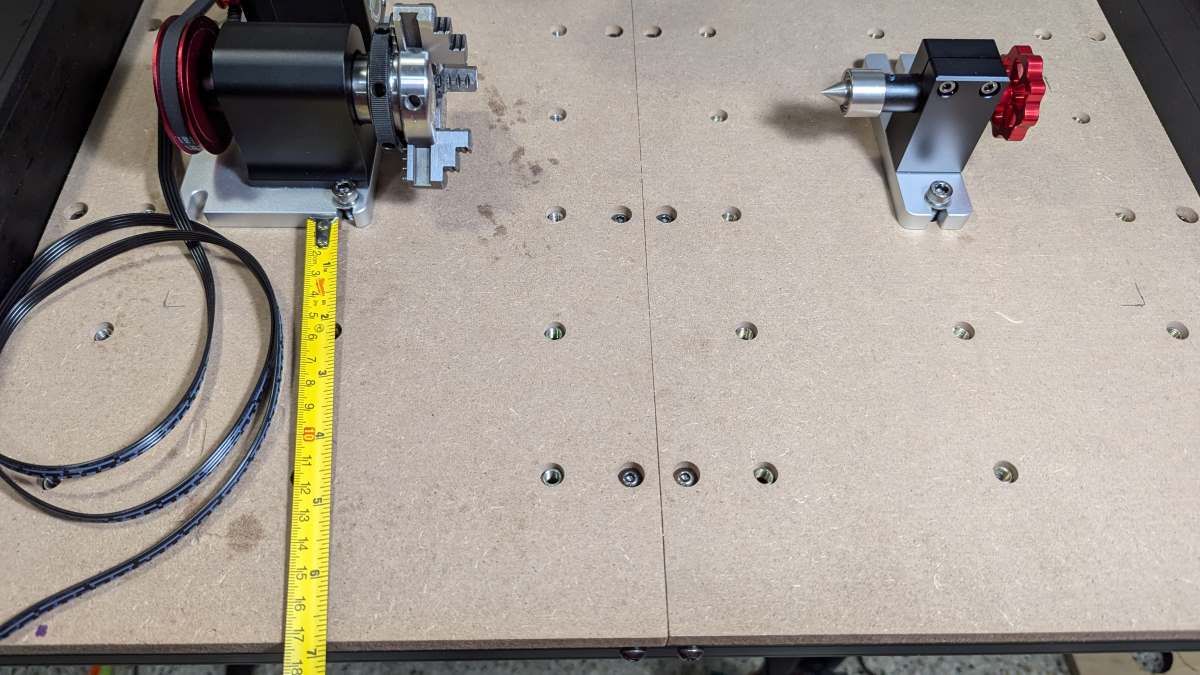
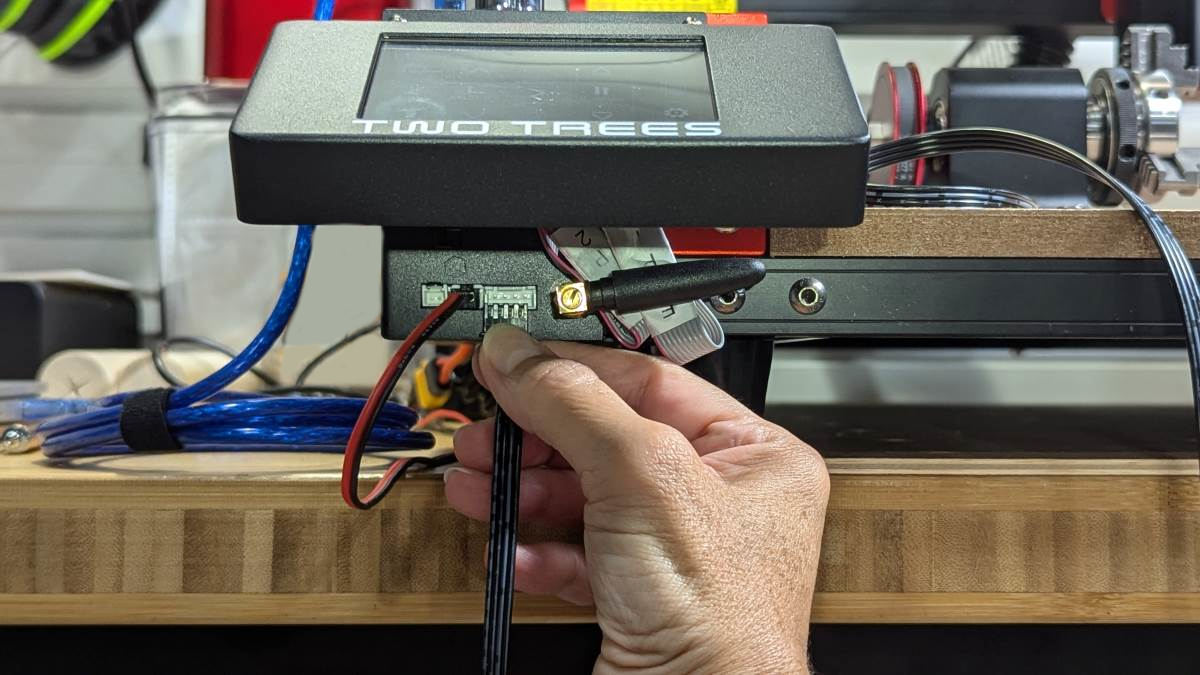
Using the four-pin cable, plug the white connector into the rotary stepper motor (second photo above). The claw end and the thimble (TwoTrees calls it this) end screw into the threaded areas on the wasteboard/spoilboard using two screws (with washers) each. They should both be the same distance from the edge of the CNC bed (third photo above). Lastly, plug the black four-pin connector into the rotary port under the touchscreen control panel. This port isn’t labeled on my machine, but I noticed the rotary port when connecting the cables for the spindle – it’s the four-pin port on the front of the control box under the touchscreen control panel.
Here’s a video of the rotary installation. I swapped the claw end and thimble end in the video. It is important to install it as I did in the video. If it’s installed differently, the carving results will be backward (I discuss this later).
The touchscreen control panel can now control the rotary module.
Installing the Windows driver
I needed to install the Windows driver to connect the CNC to my laptop. TwoTrees sent a TF card and a USB flash drive containing the CNC files. I tried the USB drive, and none of our computers could read it. I then tried the TF card and found a zipped file. Thank goodness they sent both options because you can’t download them from the website. I copied the zipped file to my laptop, extracted it, and hunted for the driver.
The driver is located in TF卡资料-TTC450Pro-A1 > 02- Install the software (安装软件) > ENGLISH > software(Window) > GRBL-En > driver > CH340SER.EXE. Oh boy, those Chinese characters are sure to be an issue…
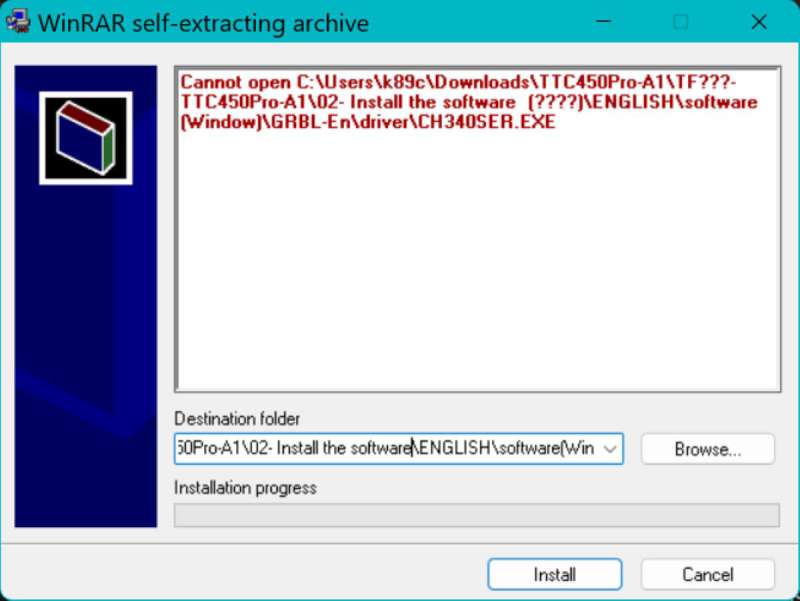
Sure enough, when I launched the executable, this is what I saw (screenshot above). I tried doing an internet search about the issue, looking for YouTube videos, and even deleting the Chinese characters, but I kept seeing the error. I had to contact TwoTrees’ technical support via WhatsApp for help.
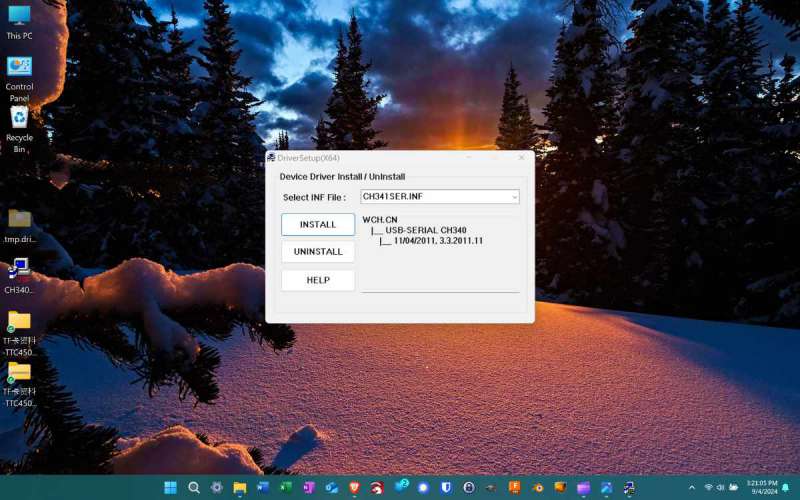
They told me to “drag the software installation package from the TF card to the desktop and then try to install it.” I dragged the .ZIP file to the desktop, extracted it, and then placed the CH340SER.EXE file on the desktop too (shown in the screenshot above) for the file to run properly, which it finally did.
This is the third TwoTrees device that I have reviewed, and there always seems to be something that needs to be worked out before I even get the machine running (Two Trees TTS-55 DIY Laser Engraving and Cutting Machine review – cutting things with light is awesome! and Two Trees TTS-20 Pro 20W laser engraver review). However, I will say that the build quality of their machines has certainly improved over time.
Performance
Machine movement
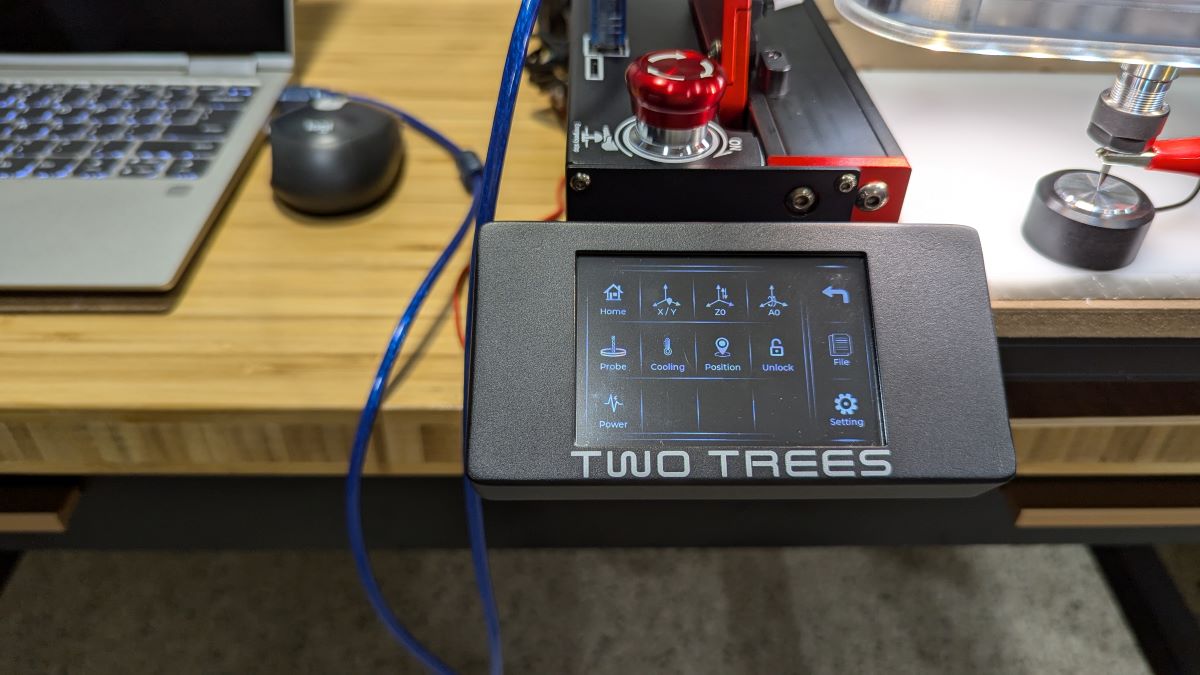
Whew, now I was able to start using the CNC. Using the machine’s touchscreen control panel, I tested the X, Y, and Z axes’ movements using the jogging controls.
All worked well, but I had one issue pop up on one particular day. The machine locks when you encounter a limit switch. Thus, there was one instance where I triggered the Z-axis limit switch while using the control panel and couldn’t keep the device unlocked to move the spindle away from the switch. Each time I unlocked it, the control panel detected the limit switch and locked it again. I couldn’t reach the Z-axis screw bar to manually move it out of the way because the spindle was impeding my access (I guess I could have taken it off, but I didn’t want to).
I had to install and use CNC controller software on my laptop (I used Candle – an open-source, free software provided by TwoTrees, which I will talk about later) to jog the Z-axis module away from the limit switch.
The machine has a “Probe” function that tells it how close it is to the carving material. But first, I needed to install a router bit.
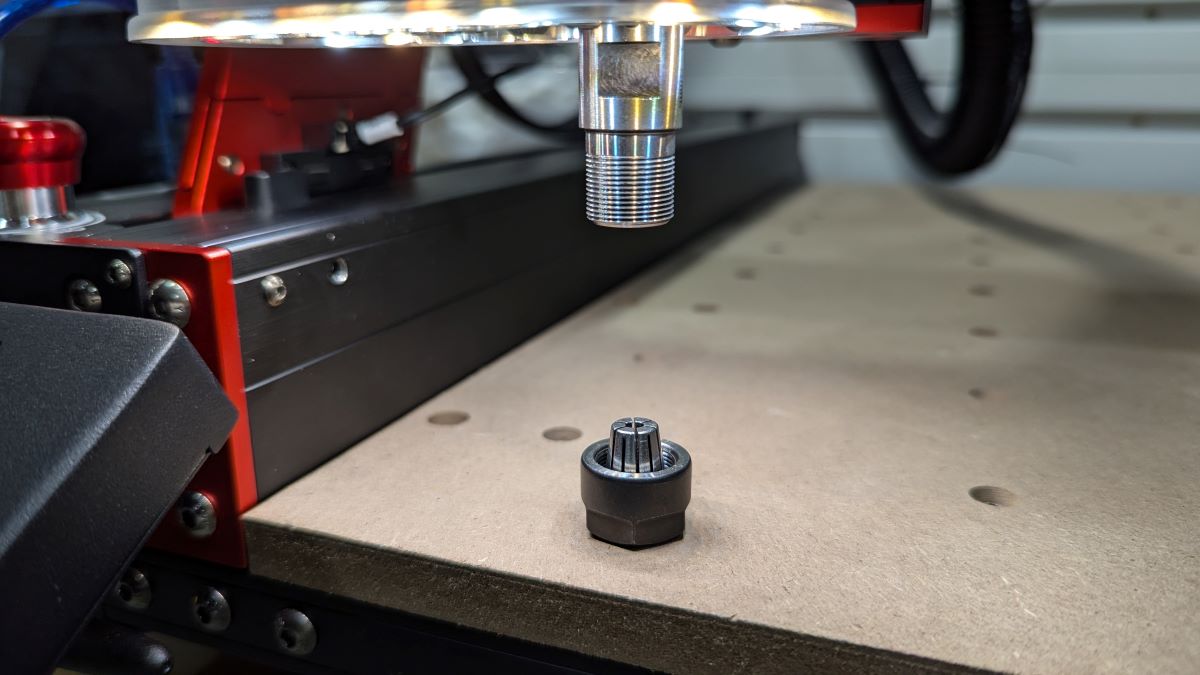
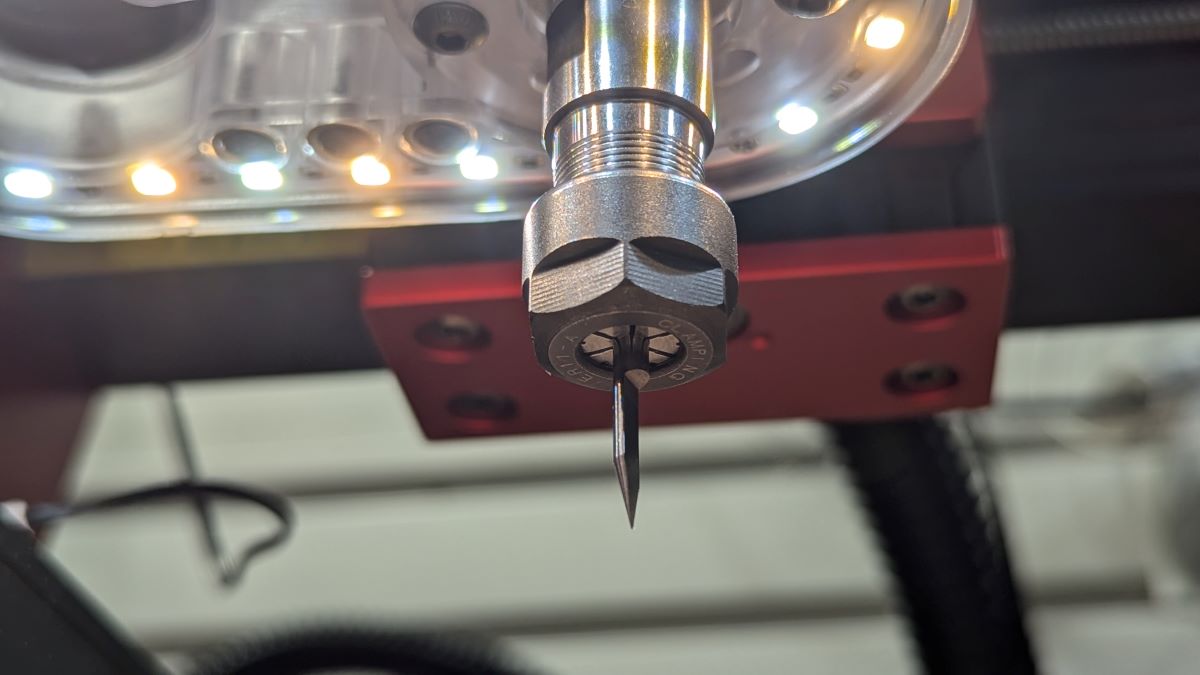
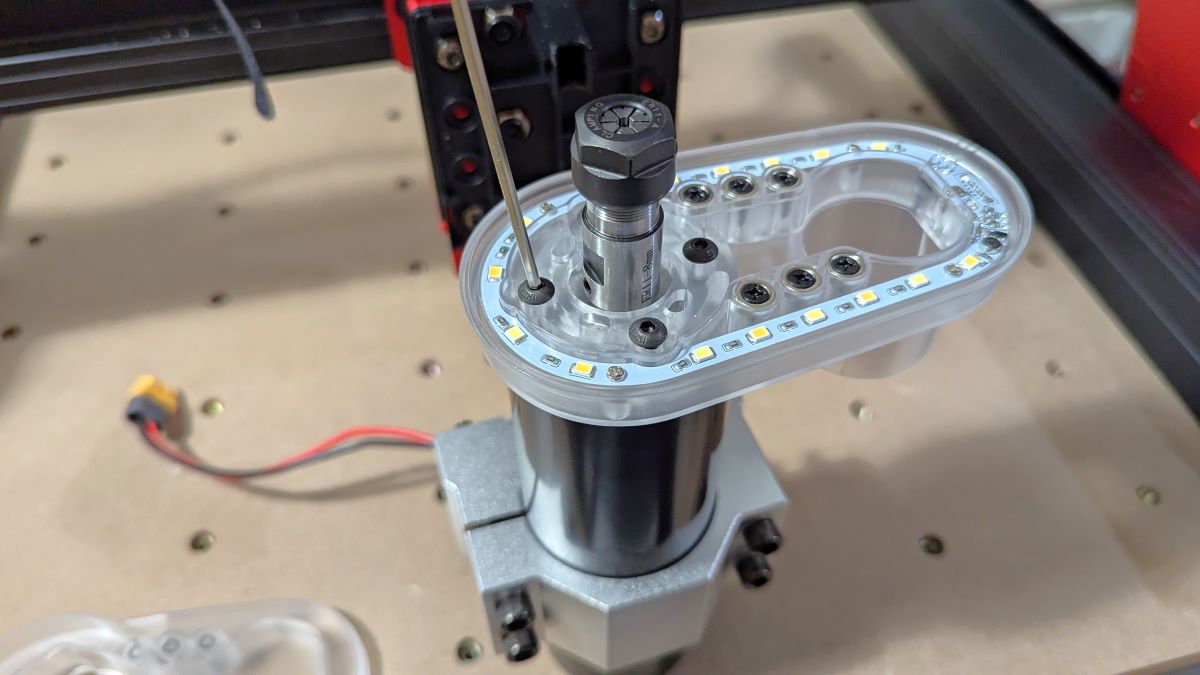
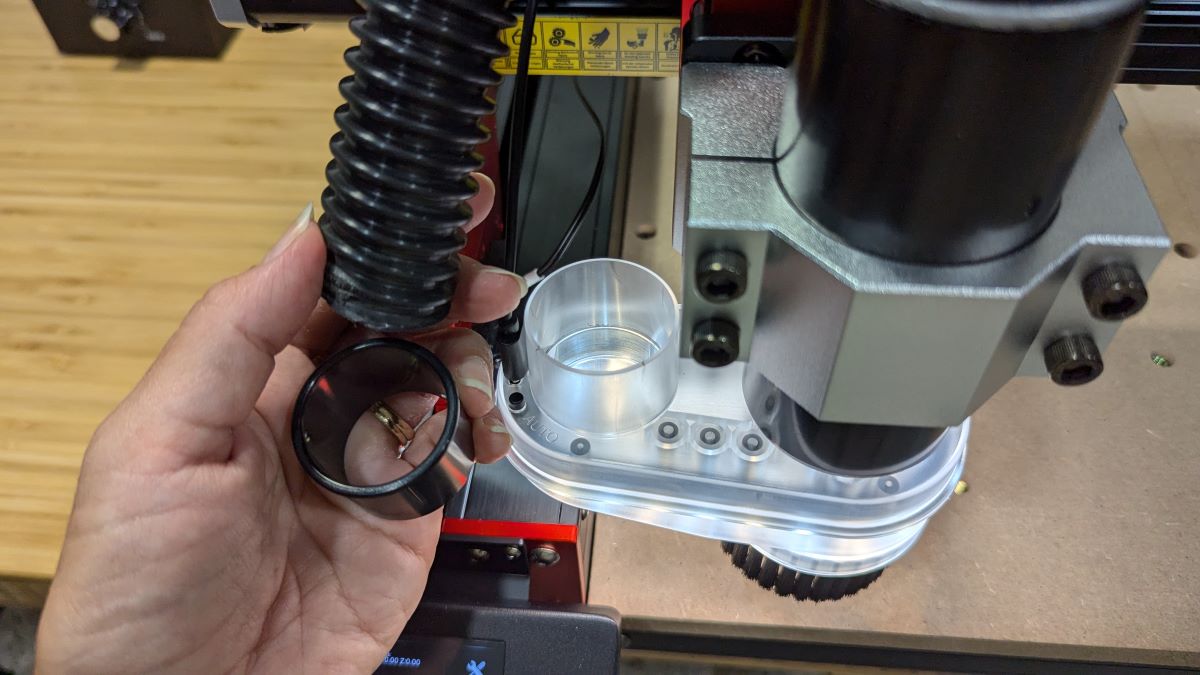
I chose to install one of the 30-degree V carving bits. I removed the bottom of the dust shoe and then proceeded to unscrew the collet nut a little too much so that it came off, but it revealed a 3mm ER-11 collet inside. I screwed it back on and inserted the bit into the collet until it stopped, then tightened the nut using open-ended wrenches (provided by TwoTrees). I decided to keep the bottom of the dust shoe off because the brush was blocking my view of the bit.

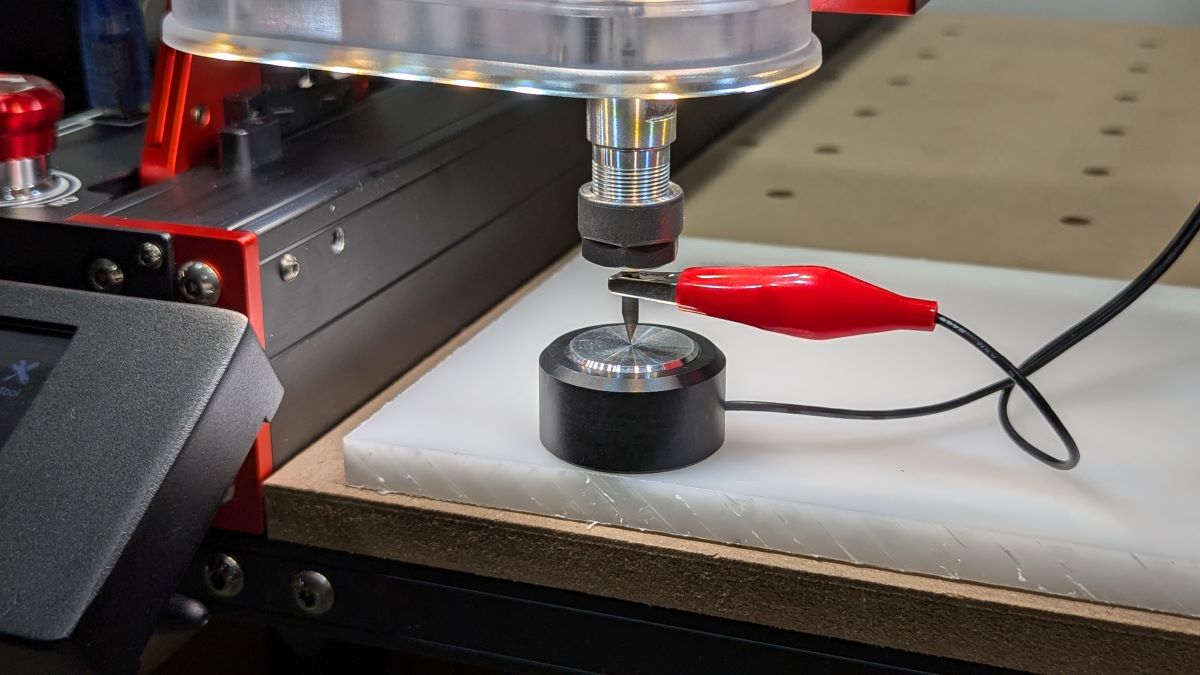
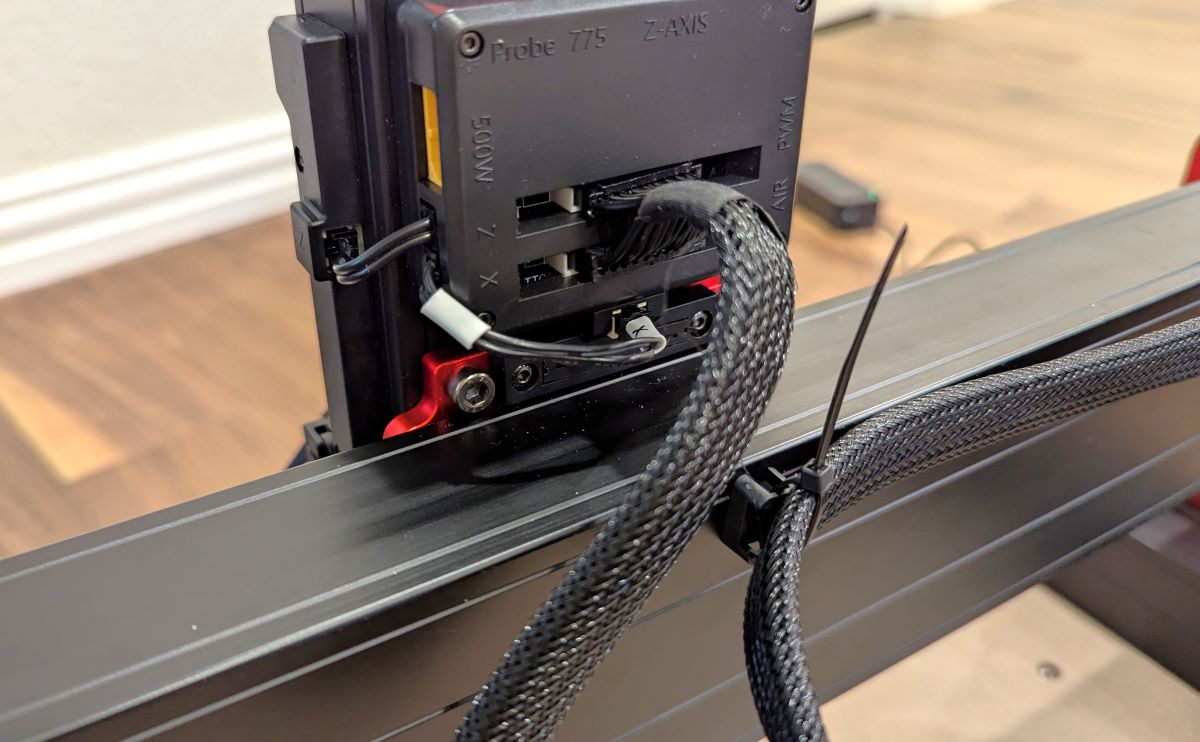
To start the probing process (lol), I inserted the probe’s connector into the “Probe” port on the black box on the back of the Z-axis (shown in the first photo above). I then clamped the alligator clip to the tip of the bit and set the probe under it.
Using the touchscreen control panel, I tapped on “Tools” > “Probe.” As the video above shows, using the touchscreen panel “Probe” function is rather a slow process, so I sped up the middle of the video 10x.
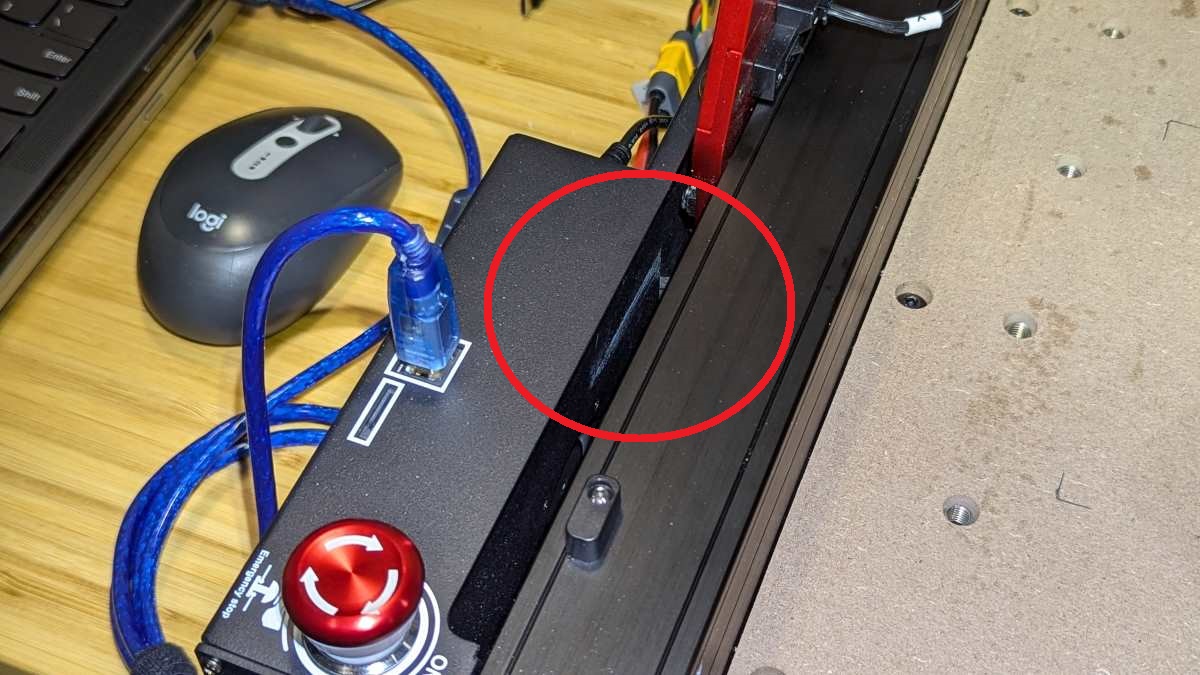
As I used the CNC, I noticed that when the left X-axis gantry arm moves toward the front of the machine, it scrapes against the control box wall (well, it actually scrapes against a plate that acts as a wall for the control box). One time it prevented the X-axis gantry from moving toward the front of the CNC. I tightened the screws for that plate and bent it away from the arm so that the gantry can move, but it’s still scraping.
Material clamps
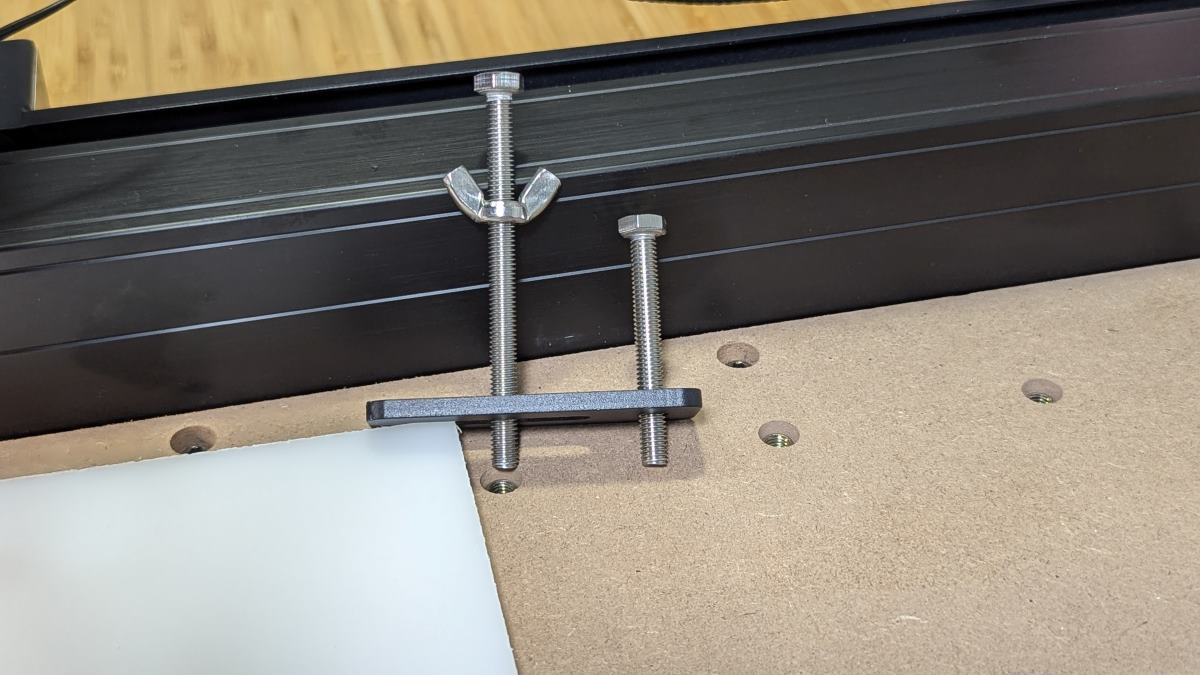

I clamped the test material (a polypropylene sheet provided by TwoTrees) to the workspace. TwoTrees sent six clamps. Each clamp consists of two bolts, a wingnut, and a thick black flat metal plate. The longest bolt has a wingnut threaded on it. That long bolt sits in a slot on the black plate where it moves freely. The short bolt is threaded into the black plate. You adjust the short bolt up or down so that the bottom of the plate is level with the surface of your material. Then, screw the long bolt into one of the threaded holes in the waste board (or spoilboard, which is the surface of the CNC base). Next, tighten the wingnut until the clamp is tight against the material.
The clamps are really sturdy and work well. They keep the material in place. My only complaint was that the dust shoe sometimes ran into the bolts because they were so long. With subsequent projects, I carefully positioned the clamps to avoid this issue.
Okay, so I had the machine set up and the material ready.
Next, had to learn how to run a test file, and to do that, I had to choose a bit to carve a test file. TwoTrees sent me the following bits:
- Ten 1/8″ cut-diameter 30-degree V carving bits
- A 1/8″ cut-diameter upcut double flute end mill bit
- A 1/8 cut-diameter straight-cut single flute end mill bit
- A 90-degree V bit
Bits. There’s a LOT to learn about bits – and sooooooo much more.
Notes about bits, collets, “Feeds and Speeds”, and software
About bits
Here’s what I understand so far about bits. Almost all of the following is from the YouTube video “CNC Router Bits – Everything You Need To Know Tutorial and Review” from IDC Woodcraft, an excellent source for CNC beginners. Some supplemental info is from the YouTube video “Upcut or Downcut CNC Bits | How and When to Use Them.
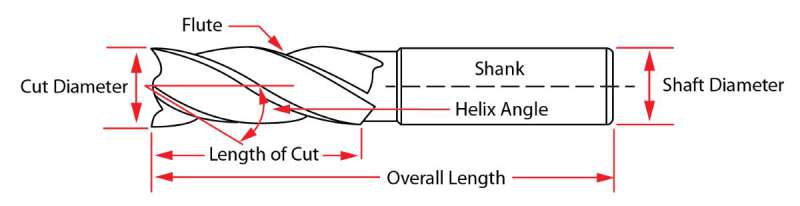
- Parts of a bit (from popularwoodworking.com):
-
-
- Cutting Diameter is the width of the cutting part of the tool
- Flutes are the cutting edges along the side of the mill or bit
- Length of Cut or “LOC “ is the length of the cutting area
- Overall Length or “OAL” is the length of the entire mill or bit
- Shank is the area of the mill that is clamped into the tool holder or collet.
- Shaft Diameter is the width of the shaft
- Helix Angle is the angle of the cutters from the longitudinal axis
-
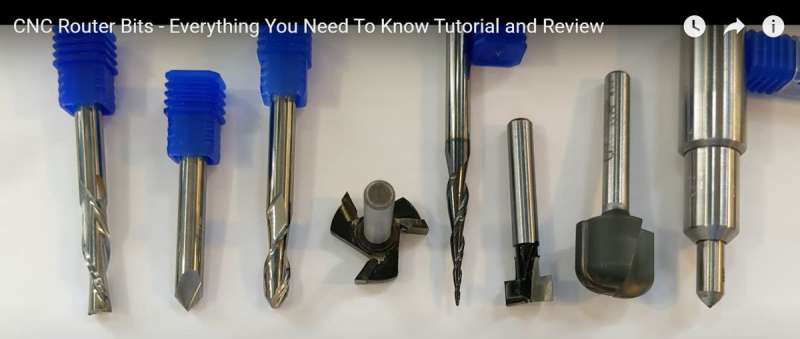
- Types of bits:
-
- End mills – side-cutting tools meant to cut a flat bottom
- V-bits – have pointed ends and are commonly used for lettering and details around lettering
- Ball-nose – an end-mill with a rounded tip to cut a curved bottom; can be used for lettering
- Surfacing bit – a very large end-mill; used for resurfacing/leveling your spoilboard surface or cutting out a lot of material all at once
- Specialty bits:
-
- Carving/tapered end-mill – used for carving 3D relief projects (provides a lot of fine detail)
- T-slot – cuts slots in the back of signs to hang them up
- Bull-cutter – has a radius like the ball-nose bits but is wider and has a flatter tip; removes a lot of material all at once but leaves a rounded finish at the bottom of the cut
- Engraving/drag bit – the spindle doesn’t turn on and doesn’t rotate but drags the bit across the surface of the material; used to etch designs on wood, glass, and metal
-
-
- The number of flutes on a bit
-
- A flute is the cutting edge of the bit
- The more flutes the bit has, the slower you’ll want to go, but the better the finish; often, the spindle spins so fast that two flutes are sufficient for most projects
-
- The orientation of the flutes
-
- Straight flute – the flute is straight
-
- Not used as frequently as other orientations
- It is used to cut larger chunks of wood out of the material at a time (unlike the following bits, which shave off wood or material)
-
- Upcut – has forward or right-hand spiral flutes (as the spindle rotates clockwise, the flutes rotate upward)
-
- As it cuts, the wood chips ride up the flute and are ejected or evacuated out of the top of the project’s surface
- The surface of the project will look very rough because the flutes rip through the wood in an upward direction, leaving wood splintered at the top of the cutting surface
- It requires sanding the top surface
- It leaves the bottom surface clean (if you’re cutting completely through the wood)
- It pulls up on the material, so clamp it down well
- It can plunge into the material, though it is advisable to use progressive steps to remove the material with each pass
- Good for thicker materials and plastics
- Bad for very hard and dense wood
-
- Downcut – has reverse or left-hand spiral flutes (as the spindle rotates clockwise, the flutes rotate downward)
-
- It makes the surface cuts of the project cleaner
- As it cuts, the wood chips ride down the flute toward the bottom of the cut and are left in the cut
- If you have multiple passes over the same area, the bit has to deal with all the wood chips left behind from previous passes, thus use a faster spindle RPM than upcut bits and slow the feed rate
- Don’t plunge straight down into the material; use small progressive steps when inserting the bit into the material
- It pushes the material downward, which is better when working with smaller material
- It’s good for thinner materials
- It’s good for wood
- It’s good for pocketing (cutting pockets into material)
- It’s not good for plastics or soft metals like aluminum (these will gum up the bit because the bit has to deal with the material shavings from previous passes)
-
- Compression – a combination of the upcut and downcut bits
-
- Hobby machines may not be able to obtain the depth and speed necessary to use compression bits
-
- Straight flute – the flute is straight
-
- Coating on the bits
-
- Coatings (electrically or chemically bonded to the bit) don’t add strength to the bit – they are heat barriers meant to make the bits last longer
- Different coatings include black oxides, cobalt, tungsten, and titanium
- Coatings add expense and may decrease the quality of your cut
- They don’t tend to be worth the added cost (according to IDC Woodcraft)
-
- Composition of the cutting edge of the bits
-
- Carbide steel has tungsten and a high level of carbon, giving it a high heat tolerance, tensile strength, and high abrasion resistance
-
- These bits last much longer (20-50x longer) than high-speed steel router bits
-
- High-speed steel has less of the components of carbide steel and is a lower grade of router bit material
-
- This material is used for drill bits to handle torque better
- Many Chinese-made bits use high-speed steel or even lower-grade steel, and the bits are thus inexpensive, don’t last long, and don’t produce high-quality results, but are good for practice
-
- Carbide steel has tungsten and a high level of carbon, giving it a high heat tolerance, tensile strength, and high abrasion resistance
-
About collets
If you are unfamiliar with CNCs and you’re not an engineer, then this might help you. I initially thought ER-11 was the actual size of the collet and that it held a particular bit-shank size, but no, no, no – I was so wrong. There’s a whole world of information about collets. All of the following information comes from MellowPine and Techniks.

- Collet – “A collet is a clamp-like holder that can exert a great force onto an object onto which it is tightened” (mellowpine.com).
- Collet nut – The collet clicks into a clamping nut, which in turn threads onto the end of your spindle. This system holds your tools/bits securely in place.
- Collet identification system:
-
- System size – The system size is the number after “ER”. The system sizes are 8, 11, 16, 20, 25, 32, 40, 50. The numbers represent the approximate outer diameter in mm of the collet at its widest point.
- Collet style – The collet style is the “ER” part of the identification. “ER” refers to a set of standards (ISO-15488, or in the marketplace DIN-6499).
- Bore size – The bore is the inner diameter (I.D.) or center area that holds the tool or bit.
-
- NOTE: There are other identifiers, but for my purposes as a CNC hobbyist, I focused on the system size, collet style, and bore size.
- There are sub-systems based on the collet bore size, meaning that there are different sizes of ER-11 collets.
-
- For example, a 1mm ER-11 collet will accommodate bits between 0.5mm to 1mm shank sizes. The ER-11 system includes sizes ranging from 1mm to 7mm, as well as 1/4″ and 1/8″ diameters.
- The TTC-450 Pro uses the ER-11 system-size collets. The two ER-11 collets that come with the Pro are 3mm and 6mm.
- If you buy imperial-sized bits for the TwoTrees CNC, you’ll need to purchase the appropriate ER-11 size collet (e.g. I needed to purchase a 1/4″ ER-11 collet to accommodate a 1/4″ shank bit I purchased. The 6mm collet that comes with the CNC is not large enough to hold a 1/4″ shank bit).
-
-
-
Feeds and speeds
In addition to understanding bits, it’s important to understand all the cut settings when using your computer-aided machining (CAM) software (I discuss CNC software in the next section). Knowing these will improve the outcome of your carved projects.
The cut settings are also referred to as “feeds and speeds” in CNC jargon. These include the feed rate and speed of the spindle.
- Spindle speed: “Spindle speed shows how fast your spindle turns. We define it as the number of revolutions (turns) your spindle makes in one minute (RPM).” (CNCSourced)
- Feed rate: “Feed rate shows how fast (the center of ) your bit is moving through your workpiece. Think of when you run a pair of scissors through paper or fabric. How fast you move your scissors is the feed rate.” (CNCSourced)
-
- The more intricate your carving design, the more conservative the feed rate you’ll want to use.
- There are formulas you can use to calculate the feed rate and speeds needed for a project
-
- Feed Rate = Spindle Speed * Chip Load * Number of flutes
-
- Chip load is the thickness of the material removed by each flute or cutting tooth of the bit. (Inventables, “Calculating Your Cut Settings: Basic Feeds and Speeds Information”)
-
- Feed Rate = Spindle Speed * Chip Load * Number of flutes
-
- You’re supposed to use the bit manufacturer’s feeds and speeds.
- NOTE: The first CAD/CAM software I used was Easel. I often started with Easel’s presets to guestimate the cut settings necessary for each bit type and size. When I felt they should be adjusted, I increased or decreased the settings using the preset as a guide.
-
- e.g. I decreased the 1/8″ preset feed rate when using a 1/16″ (1.5875mm) cut-diameter bit to avoid breaking the bit.
-
- I also used the Feeds and Speeds tables from IDC Woodcraft. NOTE: Clicking on that link will download the PDF file of the tables.
-
- Additional cut settings: In addition to feed rate and spindle speed, there are several other settings to consider. NOTE: The best source for your bit’s cut settings is from the bit’s manufacturer. The following information is from Learn Your CNC and Common CNC Terms:
-
-
- The bit’s cut diameter
- Number of flutes (a.k.a. teeth, cutting edges)
- Flute length
- Depth per pass (a.k.a depth per cut) – The depth the tool will cut on each pass in the z-axis. Suppose the depth per pass is set less than the material thickness. In that case, it will cut multiple passes until it reaches the final cut depth specified for that toolpath (general rule: it shouldn’t exceed half the cutting diameter of the bit).
- Step over – The offset or space between two tool paths; a smaller offset means there is more overlapping, which leads to a better surface finish but will take more time. The offset is expressed as a percentage of the bit diameter.
- Step down – Distance in the Z-axis that the cutting tool plunges into the material (focus is on the vertical distance).
- Plunge rate – The speed of descent of the spindle on the Z axis.
- The hardness of the material being used.
-
Software for CNCs
There are different types of software available to CNC machine users: CAD (creates models), CAM (creates the code that tells the machine how to make the model), and CNC control (sends the code to the CNC machine, which interprets it and runs it).
- CAD – Computer-aided design (CAD) software “is a technology commonly used in design to create detailed, precise, and interactive models of products.” (builtin.com). (e.g. Easel, Carveco Maker, VCarve Desktop, Blendercam add-on for Blender, FreeCAD, Autodesk Fusion (formerly Fusion 360), etc.)
- CAM – “Computer-aided manufacturing [or machining] (CAM) software is a tool/program that uses numerical control (NC) to create detailed instructions (G-code) that drive CNC machines.” (all3dp.com). (e.g. Easel, Carveco Maker, VCarve Desktop, Blendercam, FreeCAD, Fusion 360, Blendercam add-on for Blender, etc.)
- CNC control – GRBL control software communicates the code created by CAM software to your CNC machine. (e.g. Easel, Candle, Universal G-code Sender or UGS, etc.) “GRBL is free, open-source firmware that enables precise control of your CNC machine.” (all3dp.com).
Running the test files using Candle software and a 30-degree V-bit
I connected my laptop to the CNC using the blue USB-A to USB-B cable sent with my machine. I tried to connect the CNC to my WiFi, but every time I turned the machine off, I had to re-enter my WiFi password. It’s a long password, so I gave up using WiFi. What a shame.
To get you up and running, TwoTrees provides you with CNC controller software called “Candle” to run its test files (TF卡资料-TTC450Pro-A1 > 02- Install the software (安装软件) > ENGLISH > software(Window) > GRBL-En > grblControl > Candle > Candle.exe).
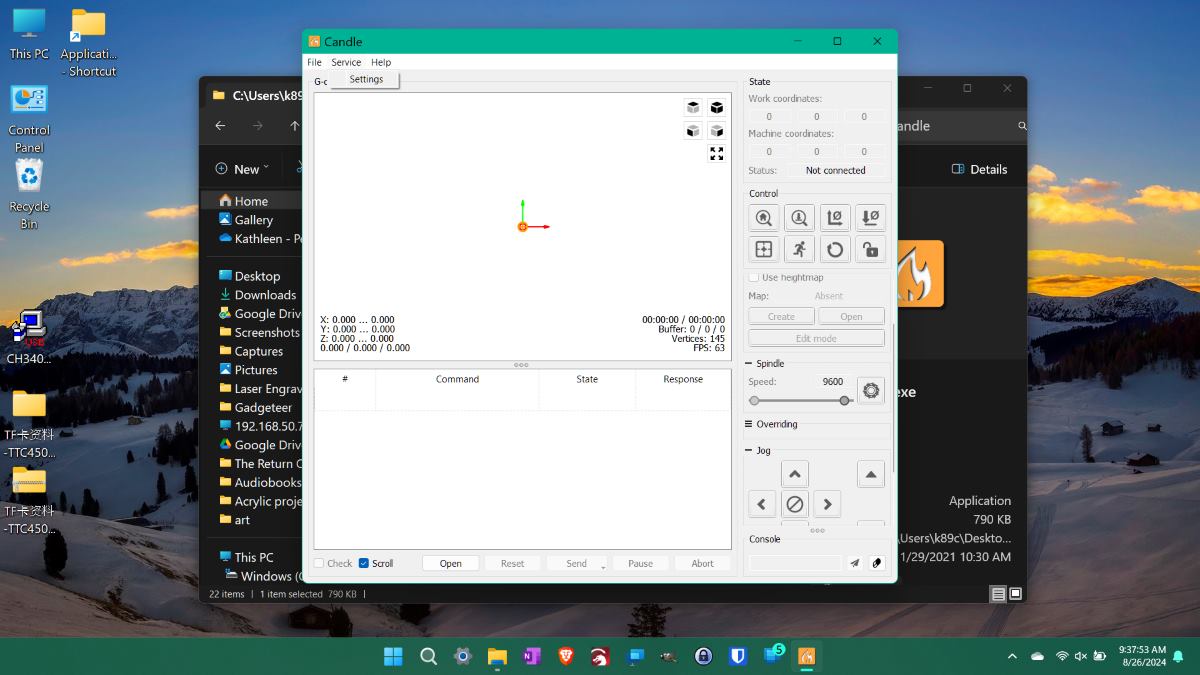
I installed and launched Candle. To connect your CNC to Candle, do the following:
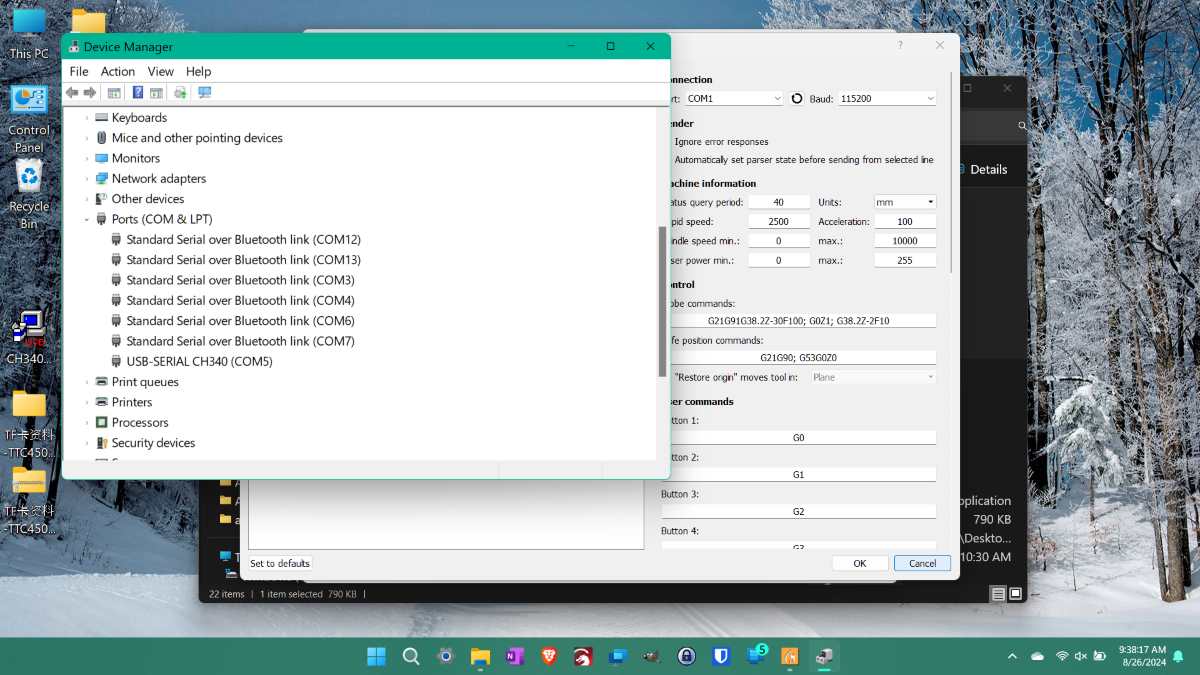
- Find your CNC port number (COM number) by right-clicking on Windows Start > “Device Manager” > “Ports (COM & LPT)” > “USB-Serial CH340” (second screenshot above)
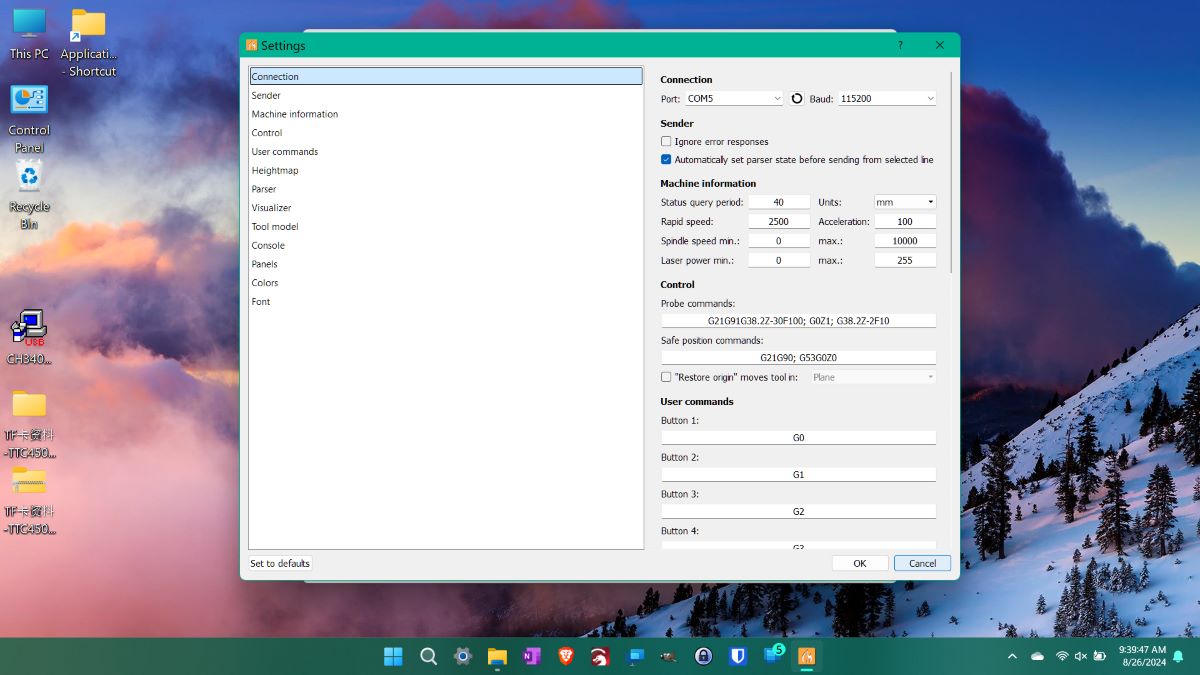
- Click on the “Service” menu item in Candle > Settings and enter the COM number in the “Port” text box (shown in the third screenshot above)
- Click the “Refresh” circle arrow next to the Port box to ensure Candle connects to your CNC
- Click “OK” at the bottom of the screen
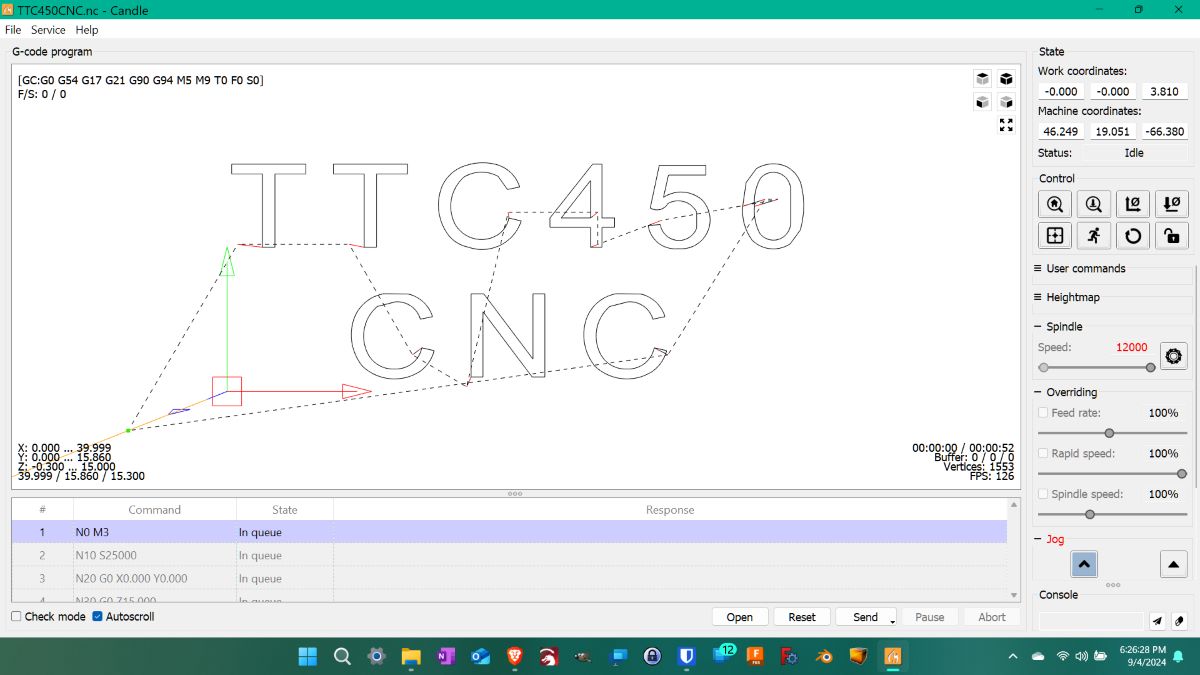
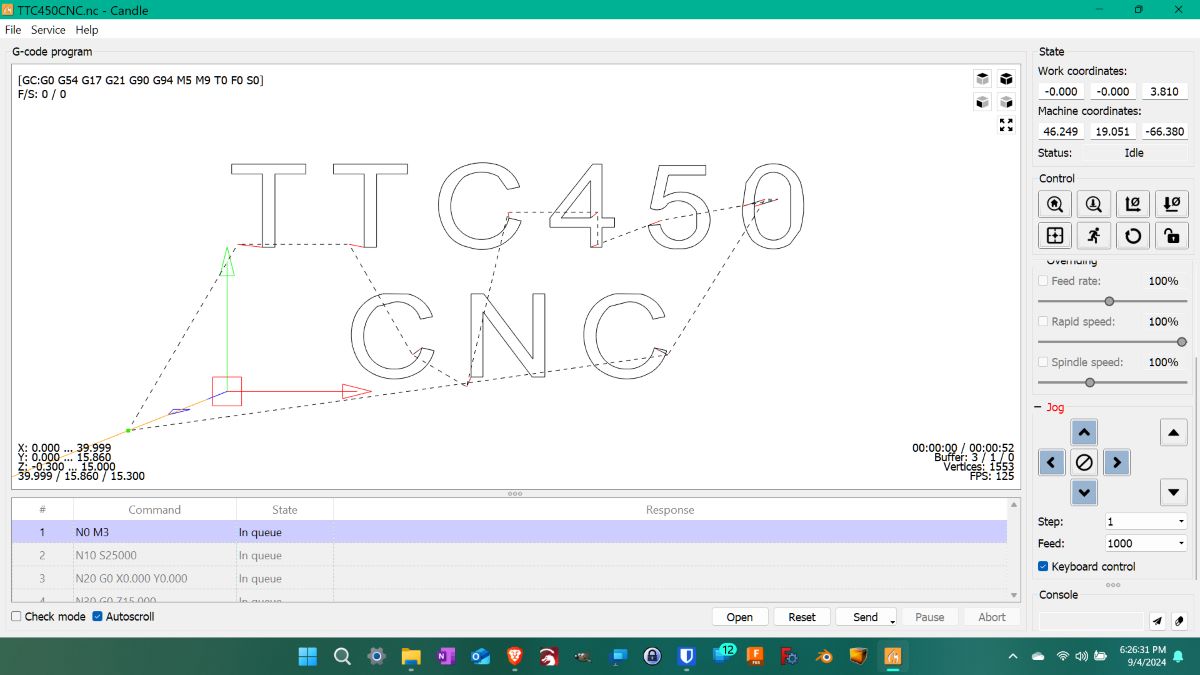
I then opened a TwoTrees test file. The screenshots above show the CNC controls in the right sidebar. Move your mouse to the middle of that sidebar, then scroll down to view and use the Jog controls for the CNC (second screenshot above).
At first, I had no idea what kind of bit I needed to use to run my first project. At the time, I didn’t know anything about bits. So, I decided to go ahead and use one of the 30-degree V-bits (or V-carving bit).

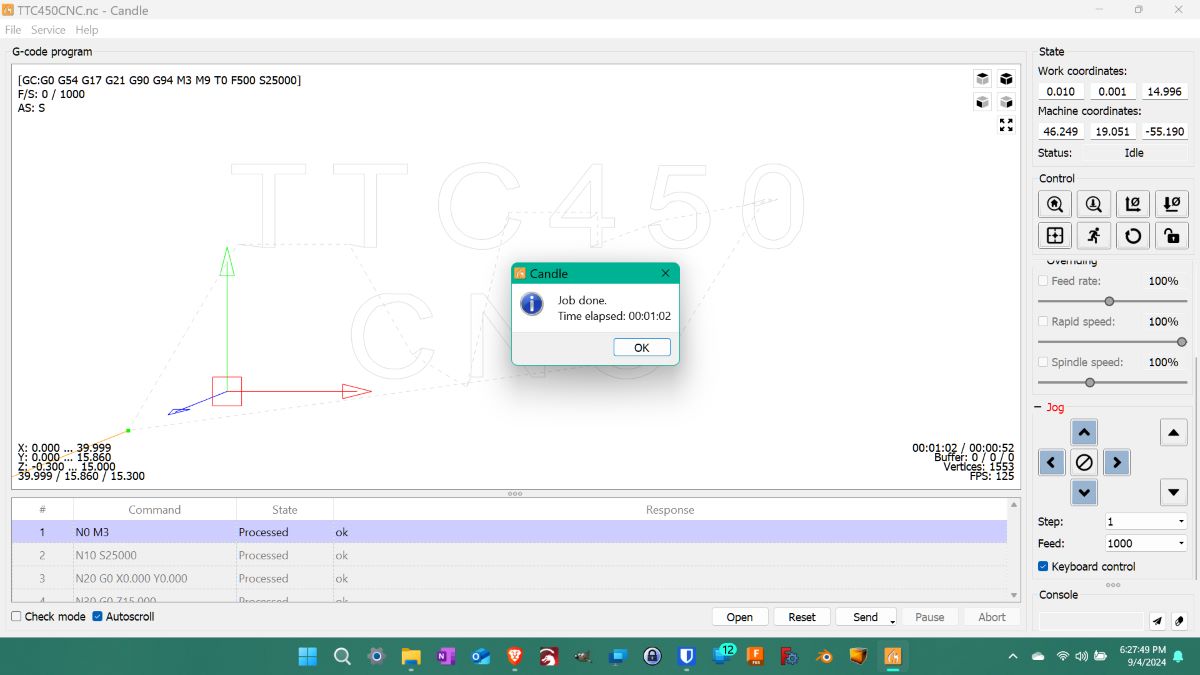
I clicked the “Send” button at the bottom right of the screen to run the carving (the third screenshot above). It finished in 00:01:02.
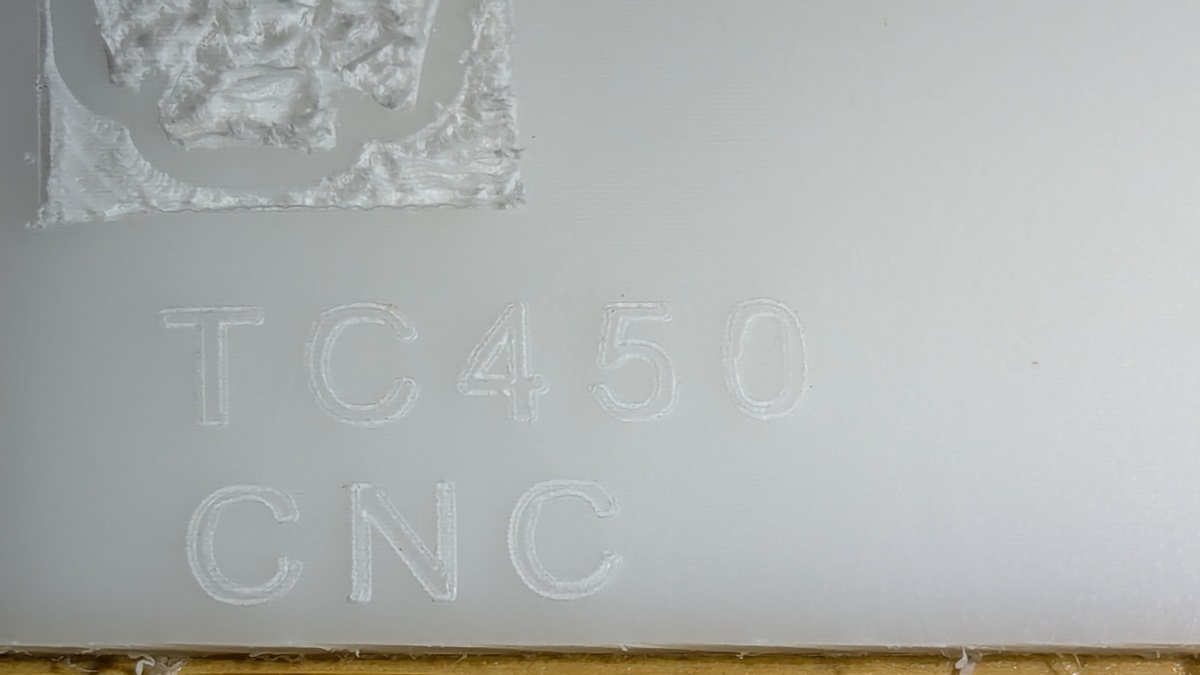
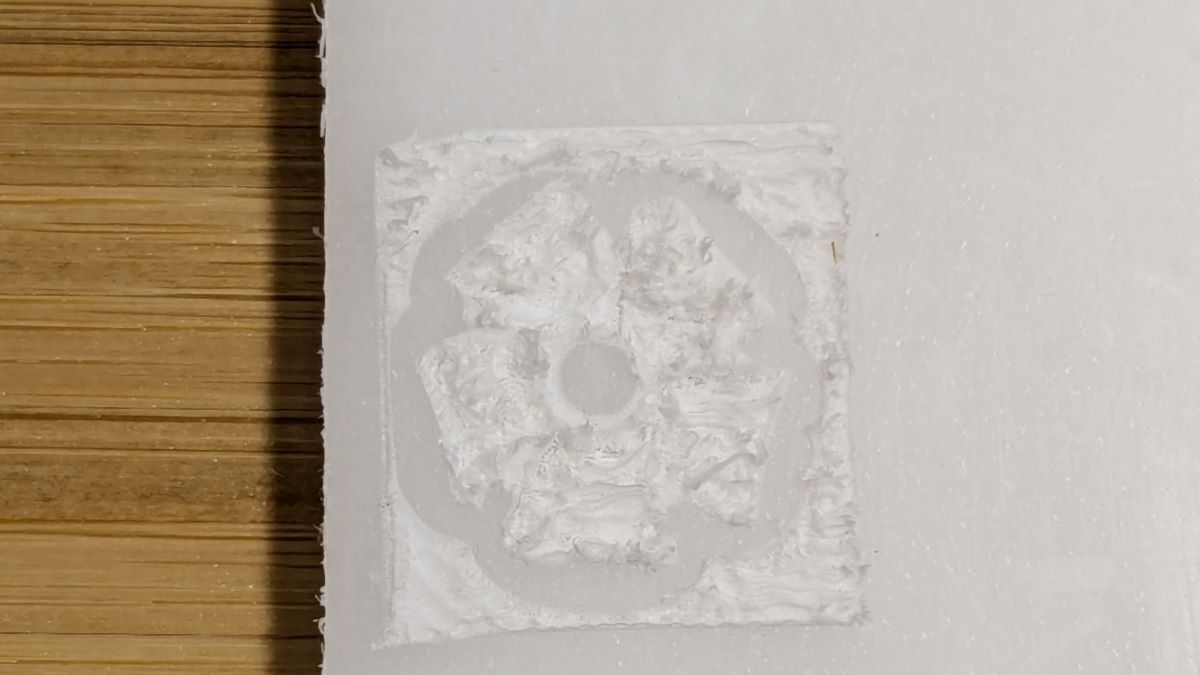
The first photo above shows that the bit didn’t quite hit the material to carve the first letter “T” of the “TTC-450 CNC”, but the rest came out fine. When I ran the second test file of a flower, it took quite a bit longer, and the result looked a bit rough.
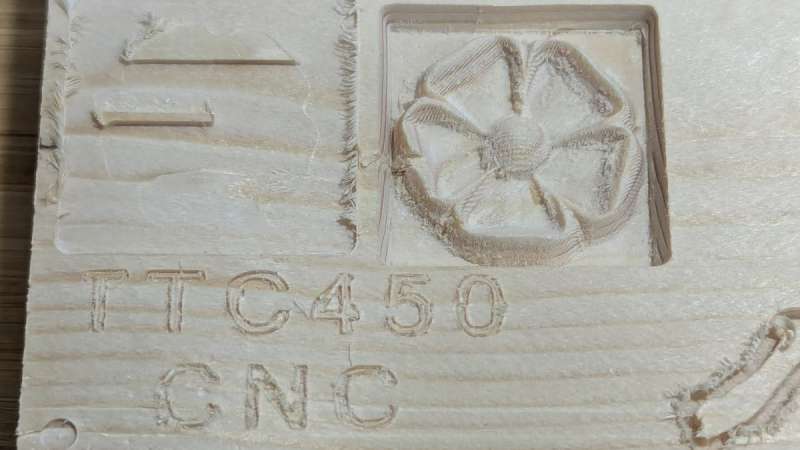
I ran the files again using the same 30-degree bit but with a solid piece of scrap pine. The results (the top right carving and the bottom carving in the above photo) were much better.
Positioning and starting the spindle before carving my own projects
Positioning the spindle over the starting point of my projects:
Before starting every project, I needed to move my spindle over the starting point of the material. This is the 0, 0, 0 positions for X, Y, and Z (the work position, I think it’s called). That starting point – whether it’s in the center, upper right corner, or lower left corner – is set using your CAM software. I set the lower left corner as my starting point for each project using my CAM software (Easel or Carveco Maker).
For each project, I moved my spindle over the lower left corner of my material, then lowered the Z-axis until it touched the material’s surface (this was easier than using the probe to get the correct distance from my material). I then zeroed the X, Y, and Z-axis coordinates in the controller software. Afterward, I elevated the spindle 1mm over the material so I could start the spindle without carving into the material. Zeroing the coordinates before elevating the spindle allows you to go back to those coordinates when you need to.
Starting the spindle:
I learned early on that I needed to manually start the spindle just before sending my projects to the CNC. To do this, I used either the spindle button on the touchscreen control panel on the CNC or the spindle button in the Candle controller software.
There is a command that you can enter in the console area of the controller software that turns the spindle on (“M03”). I tried this and it didn’t work for me. As I watched the code being processed in the controller software, I saw that the spindle starting code existed in the project files, but the TTC-450 Pro wasn’t responding to it.
Rather than dive into the issue, I decided to manually start the spindle before starting each project. This ensured that I wouldn’t drive the bit into the material without it spinning – yep, I did that.
Using Easel – an all-in-one CAD/CAM/CNC control software
Easel is an all-in-one CAD/CAM/CNC controller application and is easy to use. There’s a free version and a paid version. The paid version has a free 30-day trial after which it is $24 + tax per month, $233 + tax per year, or $599 + tax for 3 years. I used the free 30-day trial for new users to get started on most of my projects. The trial gives you access to some Pro features.
Next, I went on a hunt for 3D STL relief files. I found several free ones at Cults3D.com: an eagle, a labrador, baby Groot, a cat, a heart, and a butterfly.
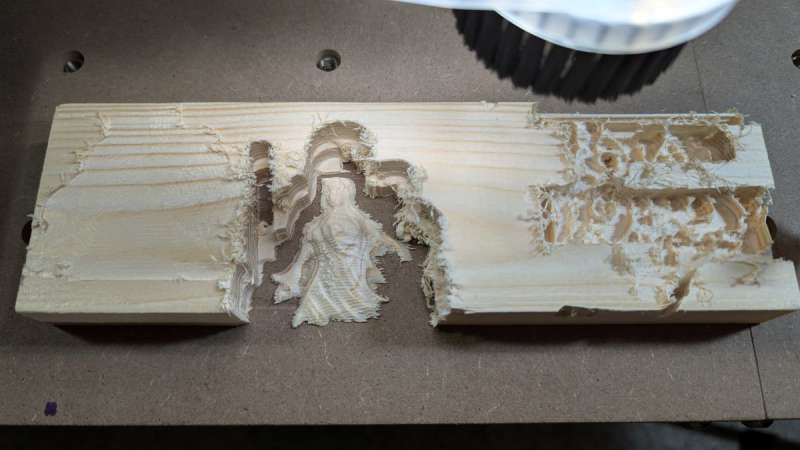
I ran a couple of my free 3D STL projects using one of the 1/8″ (3.175mm) cut-diameter upcut ball-nose bits that TwoTrees sent me just to see what it could do. And without really understanding all the Easel settings, I got the results my impatience deserves (lol).
So, it was time to slow down and learn how to use the application.
Easel settings – wood projects
*Click on images to view a larger size.
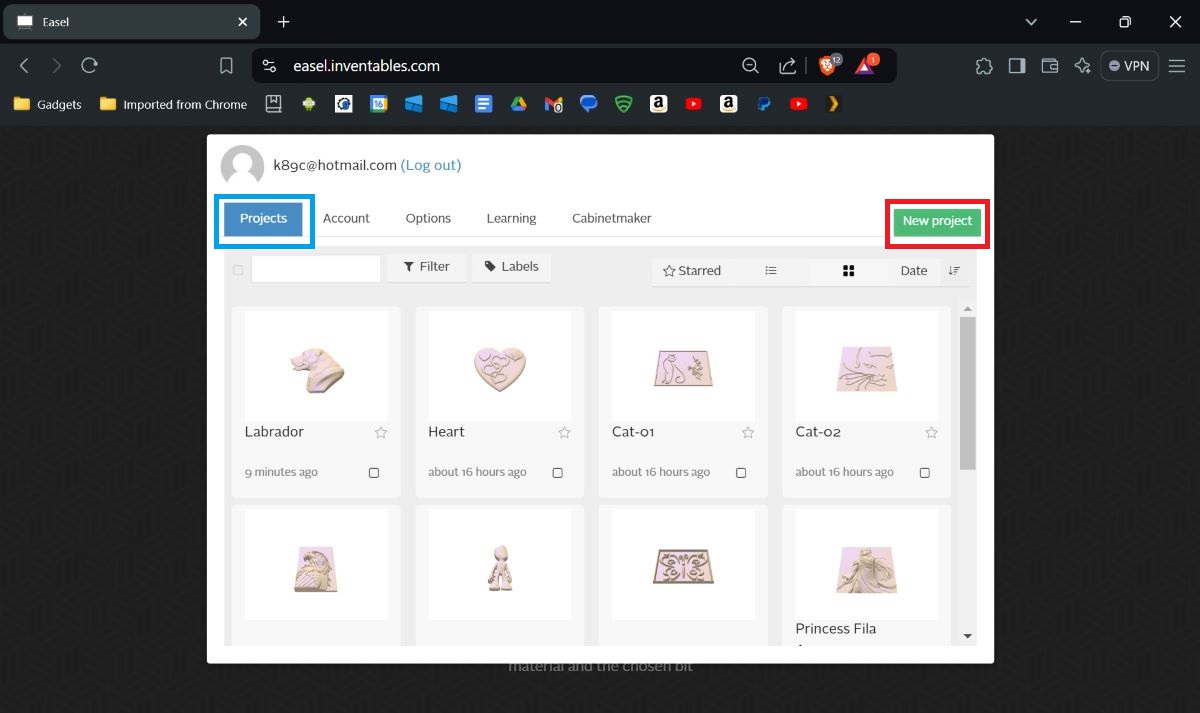
- When you first open Easel, you’ll see a list of previous projects to open, or you can select the green “New project” button in the upper right corner of the screen (first screenshot above). I opened a new project.
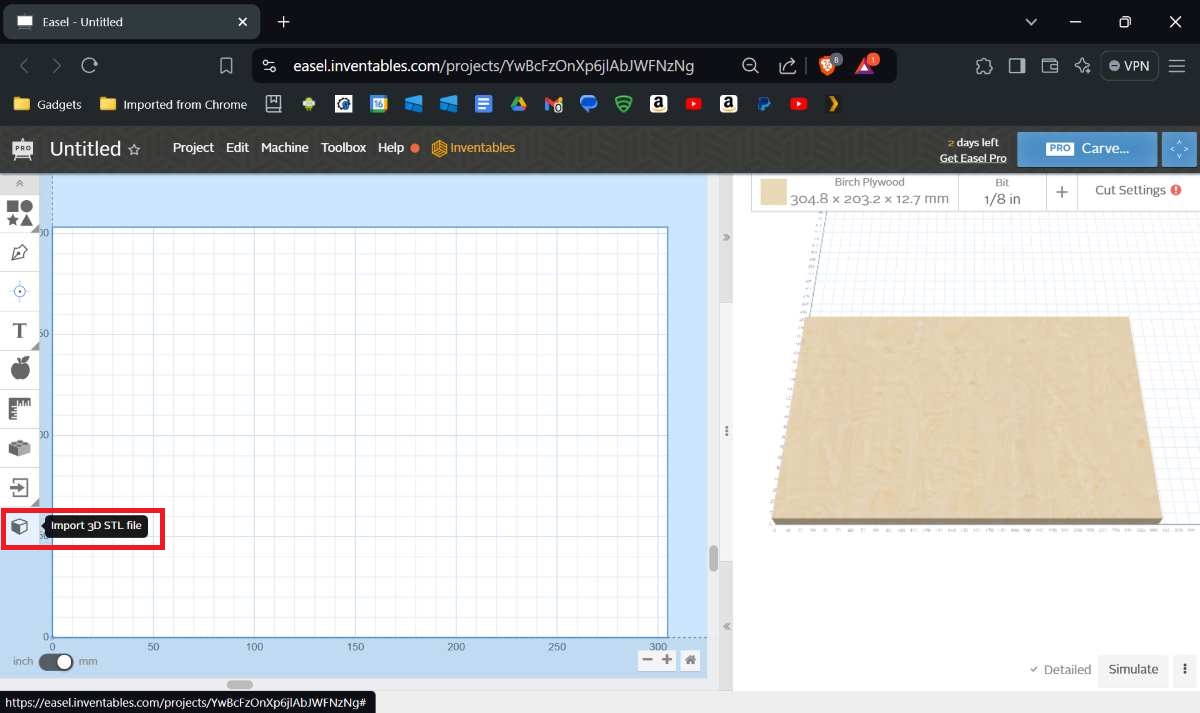
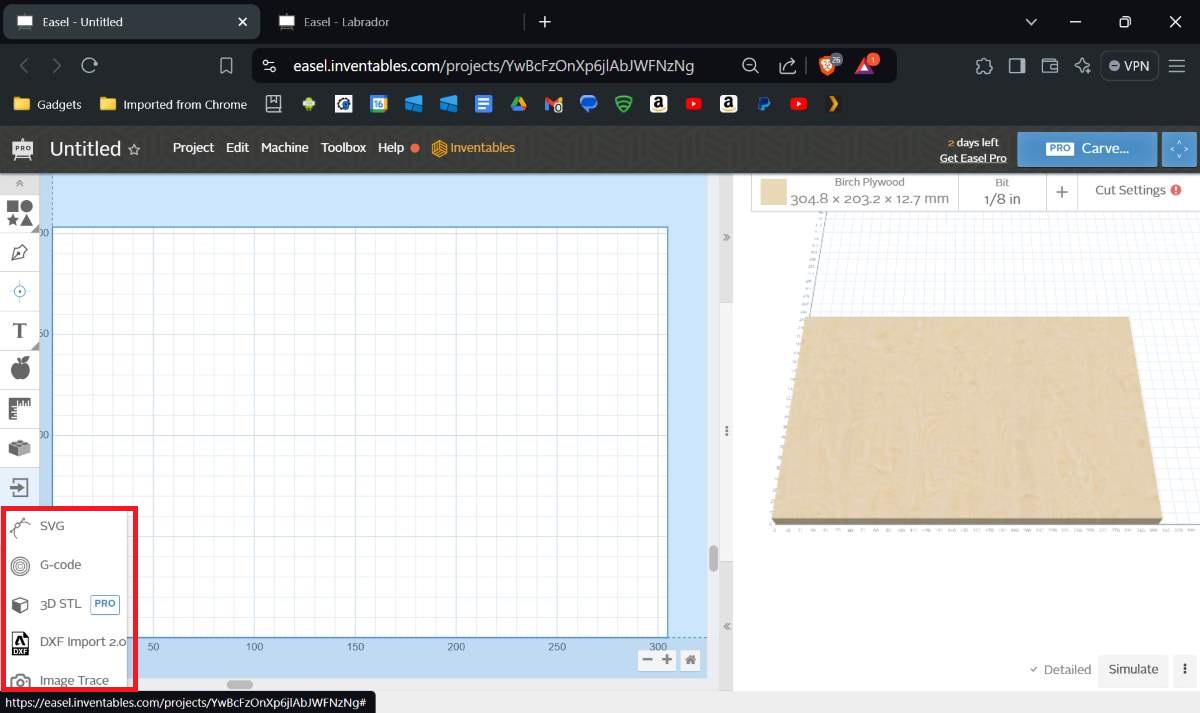
- Next, to import an .STL file, I clicked on the cube icon on the left of the screen (shown in the second screenshot above).
- You can select other file types to import, but I haven’t tried that yet (third screenshot above).
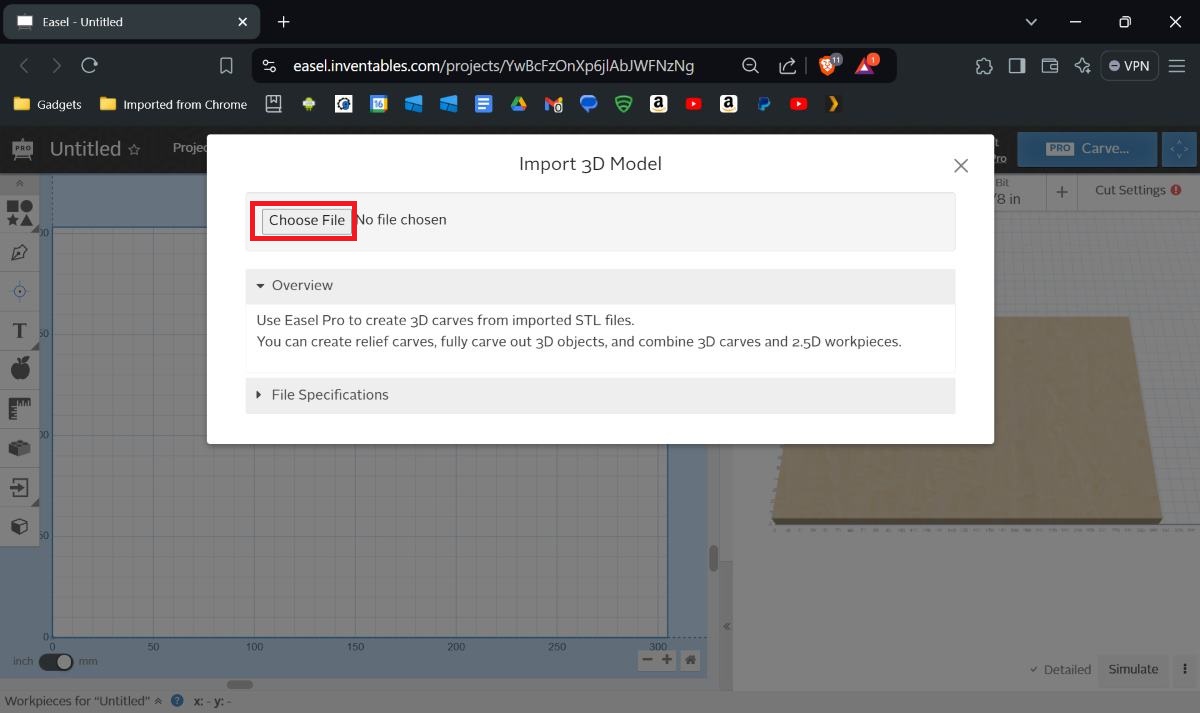
- I then selected one of my free STL files (fourth screenshot above).
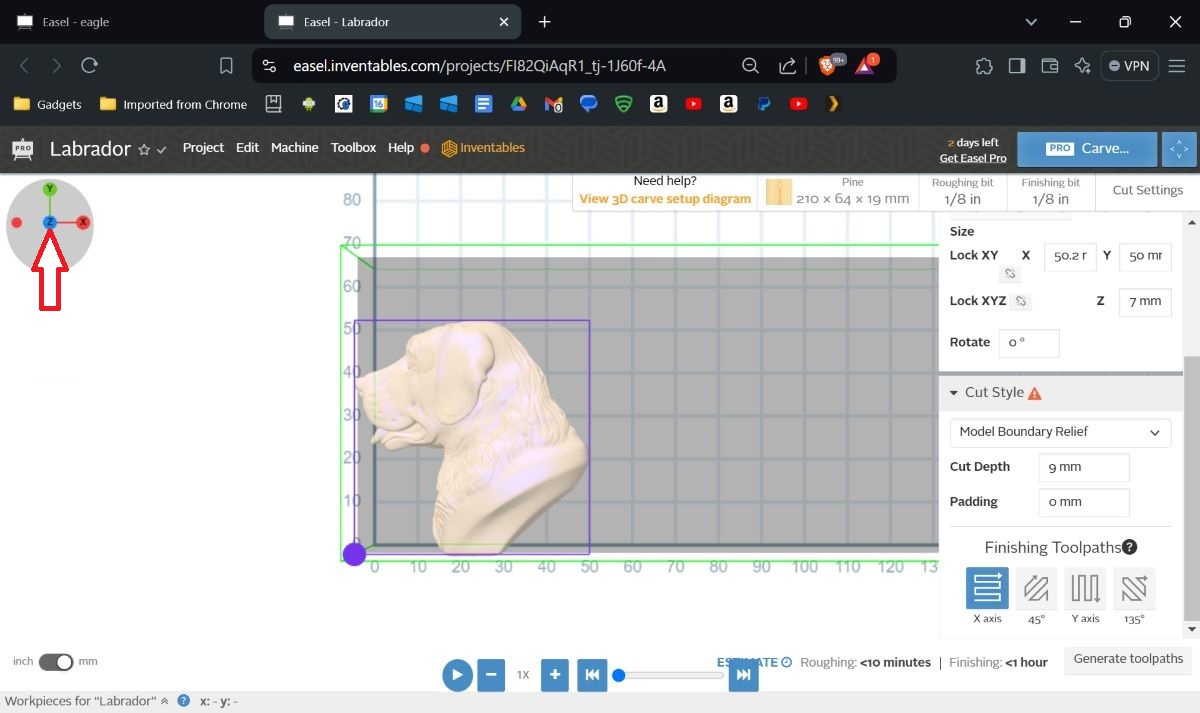
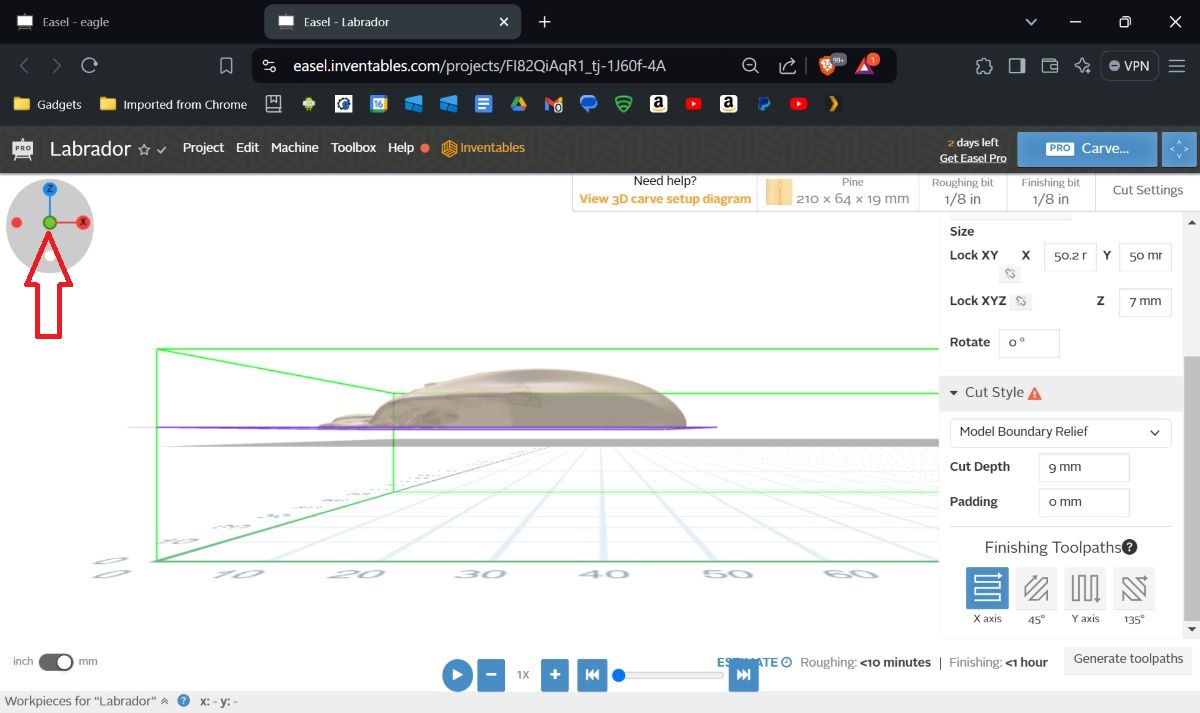
- When I opened Easel, one of the first things I wanted to know was how to rotate my project to view it from all sides. There’s a directional compass in the upper left corner of the screen. I clicked “Z” to view the top of the model (first screenshot above).
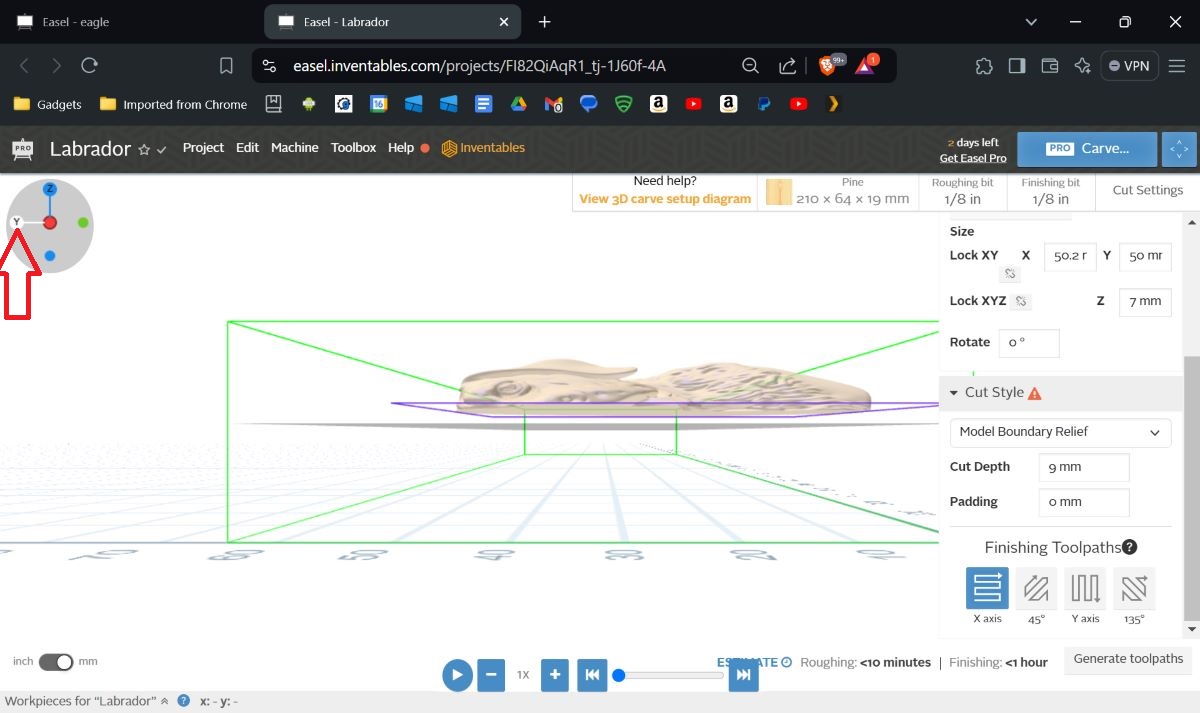
- I clicked “Y” to see a side view of the model (second screenshot).
- And I clicked “X” to view the bottom of the project (third screenshot).
I could also hold down the left mouse button and move my mouse around to rotate the view around the project. I could slide the project around to better view it within the computer screen by using “Ctrl” + left mouse button or “Shift” + left mouse button.
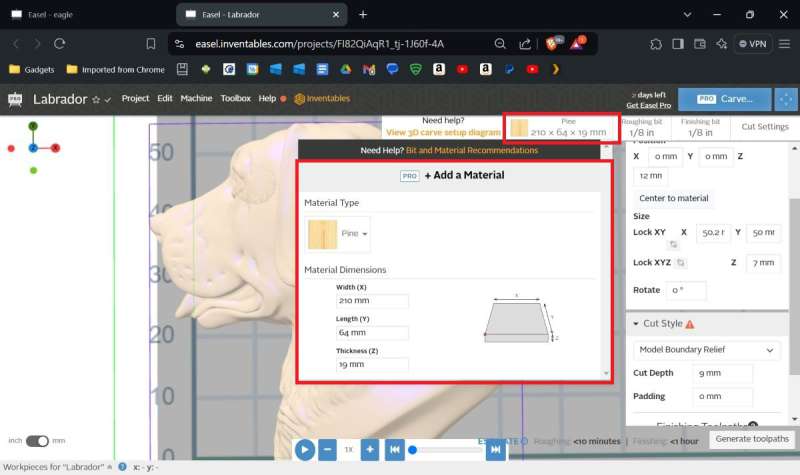
Next, I set up my material.
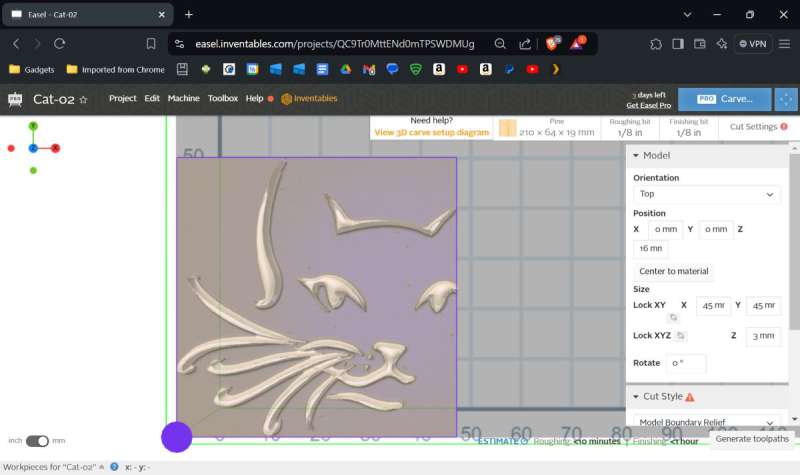
- Material type: I selected “Pine” and entered the size of my material X: 210mm, Y: 64mm, and Z: 19mm (first screenshot above).
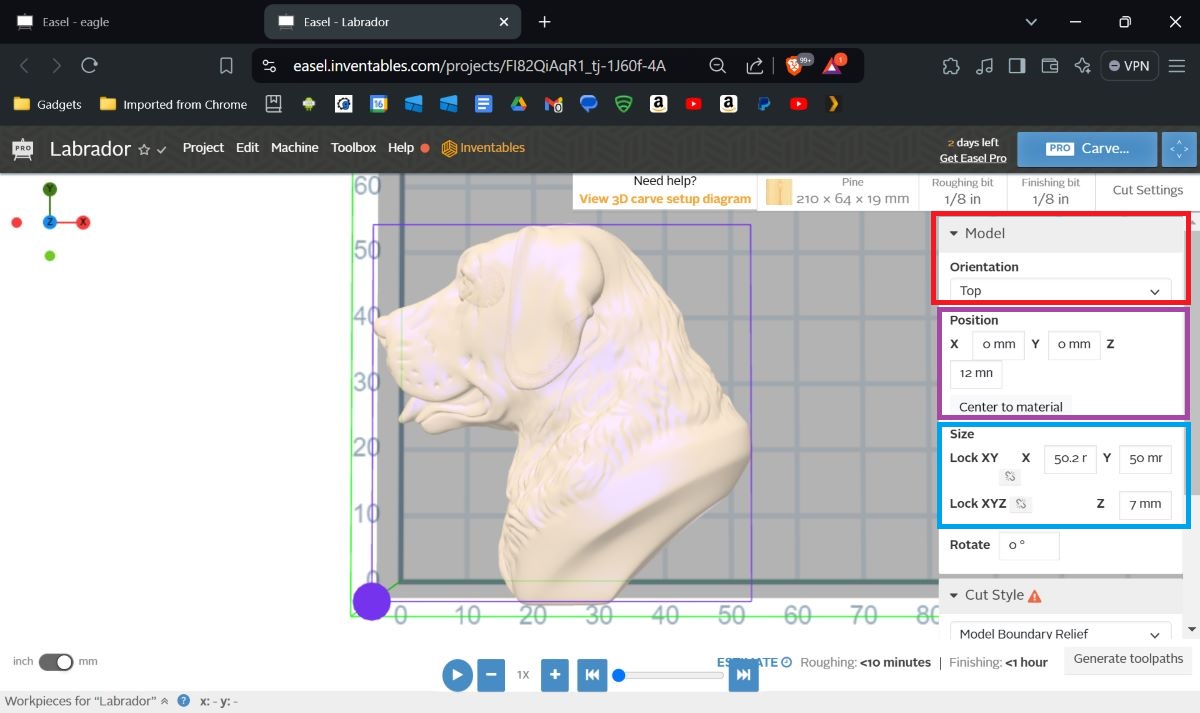
Then I learned to position the model on the coordinate planes.
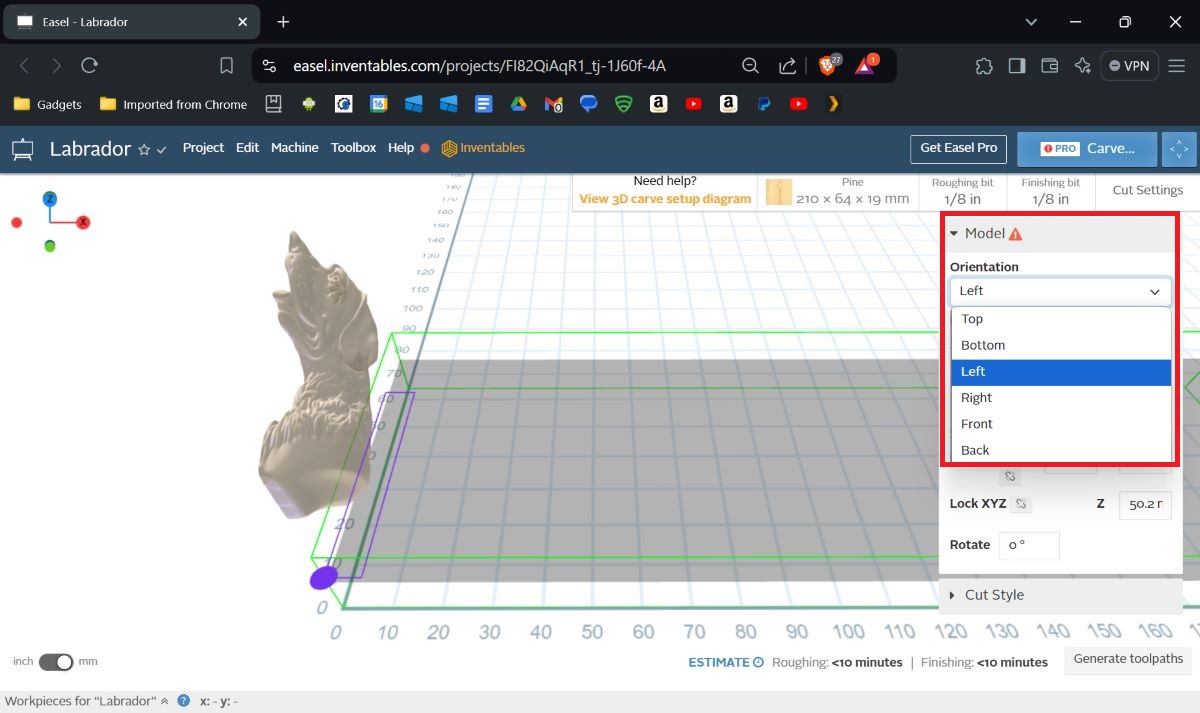
- Orientation – these selections position the model in different 3D orientations (red box in the first screenshot above).
-
- The model is in the “Left” orientation in 3D space (red box in the second screenshot).
-
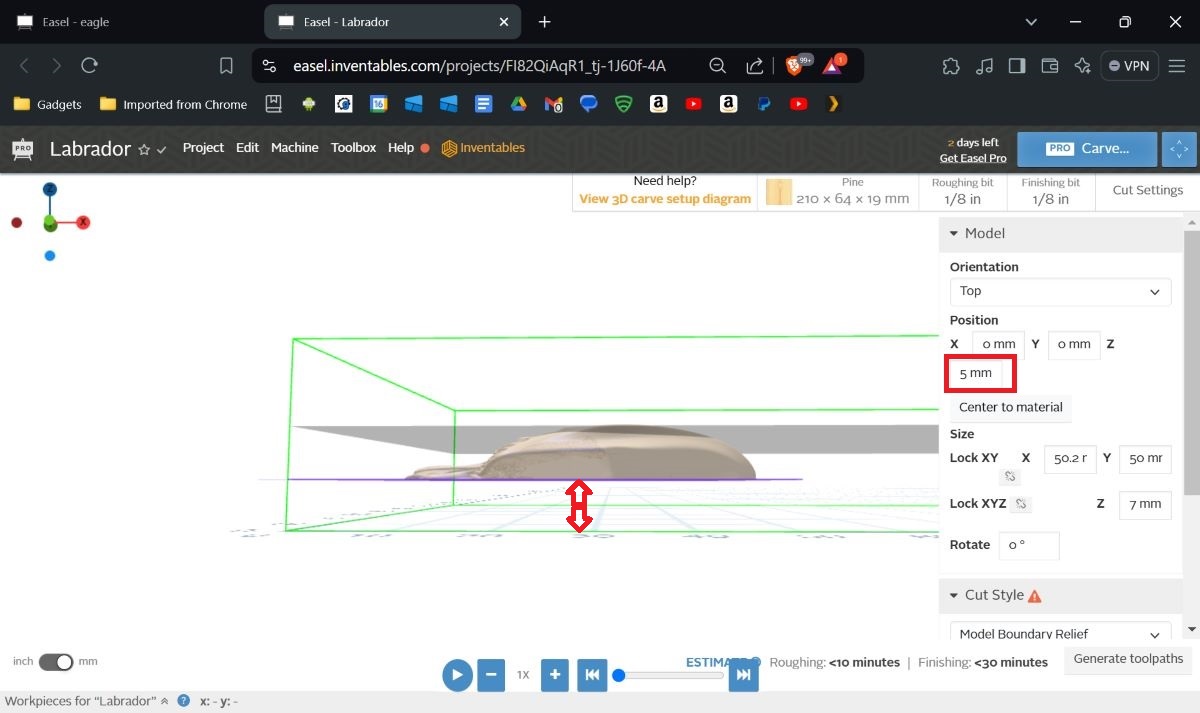
- Position – I originally entered 0, 0, and 0 for the X, Y, and Z coordinates (purple box in the first screenshot). I wanted the project to be located at the X: 0 and Y: 0 locations, but wanted to adjust the vertical location of my model within my material by altering the Z-axis.
-
- I tried 5mm for the Z-axis, which placed the model 5mm above the bottom of the material (third screenshot above); by adjusting the Z-axis position, I could position the model up or down in the material.
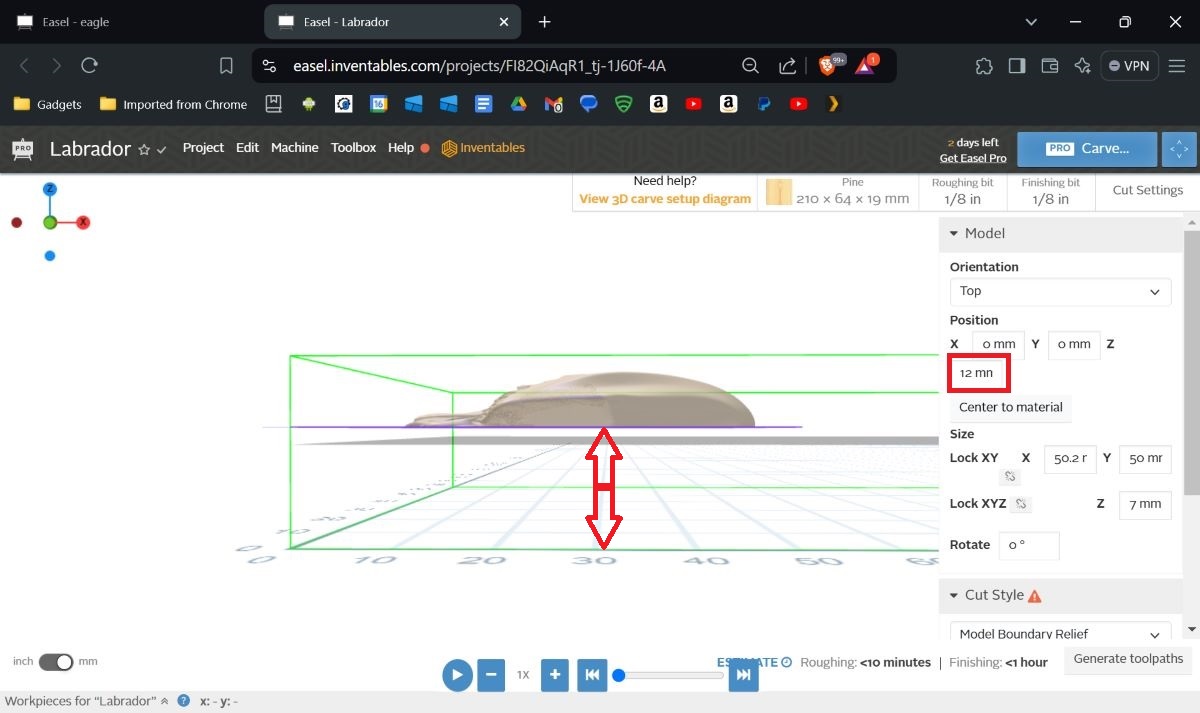
- I settled on 12mm for the Z-axis, which placed the model 12mm above the bottom of the material (fourth screenshot above).
- My material thickness was 19mm. By setting the model 12mm up from the bottom of my material, that meant that I had 7mm left from the bottom of the model to the top of the material.
-
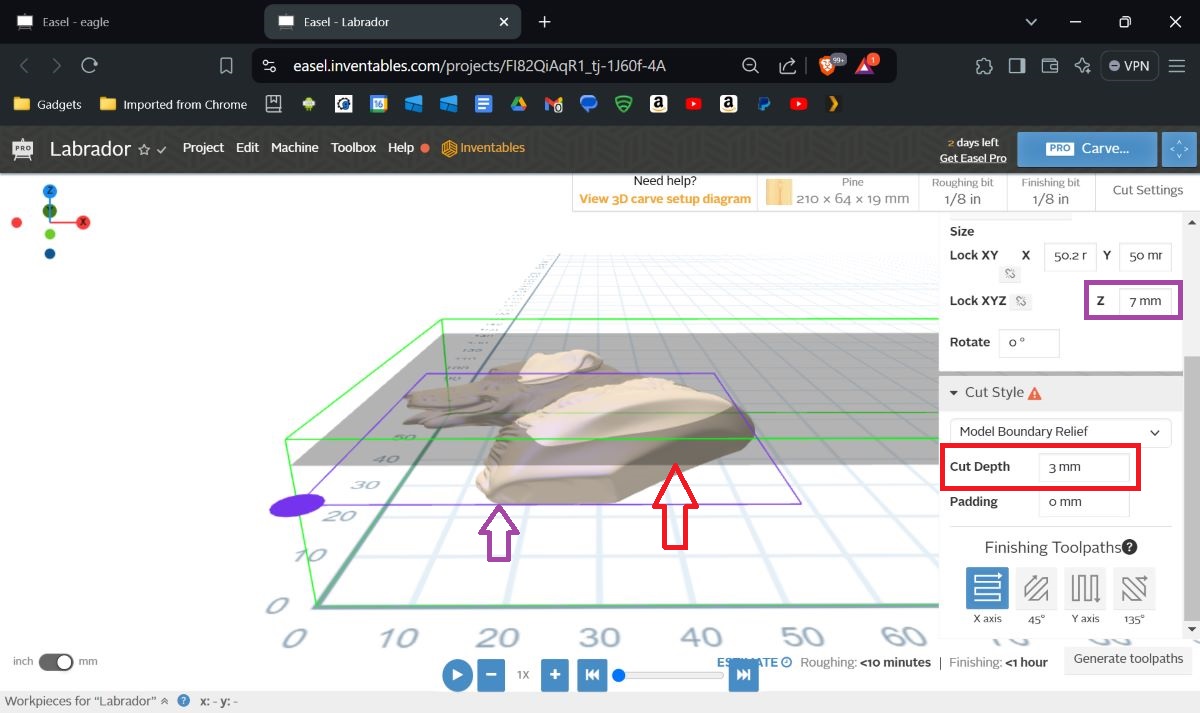
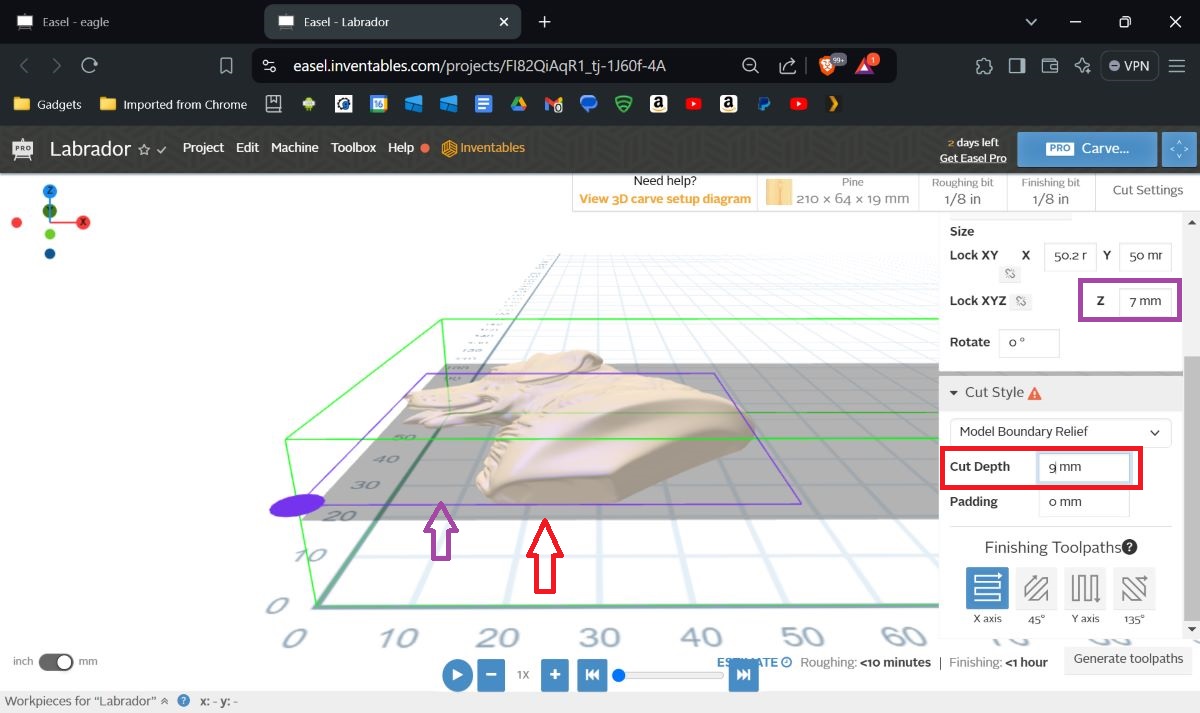
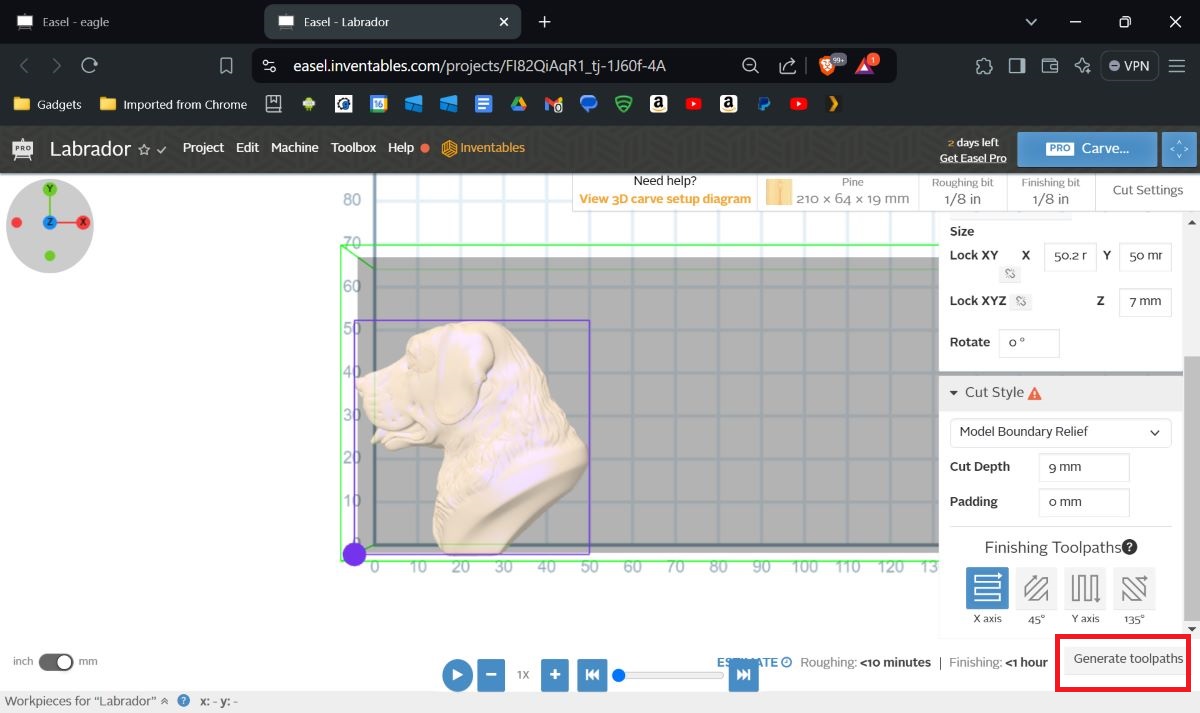
Next, I learned how to position the cut depth in relation to the model’s depth (7mm) in the material.
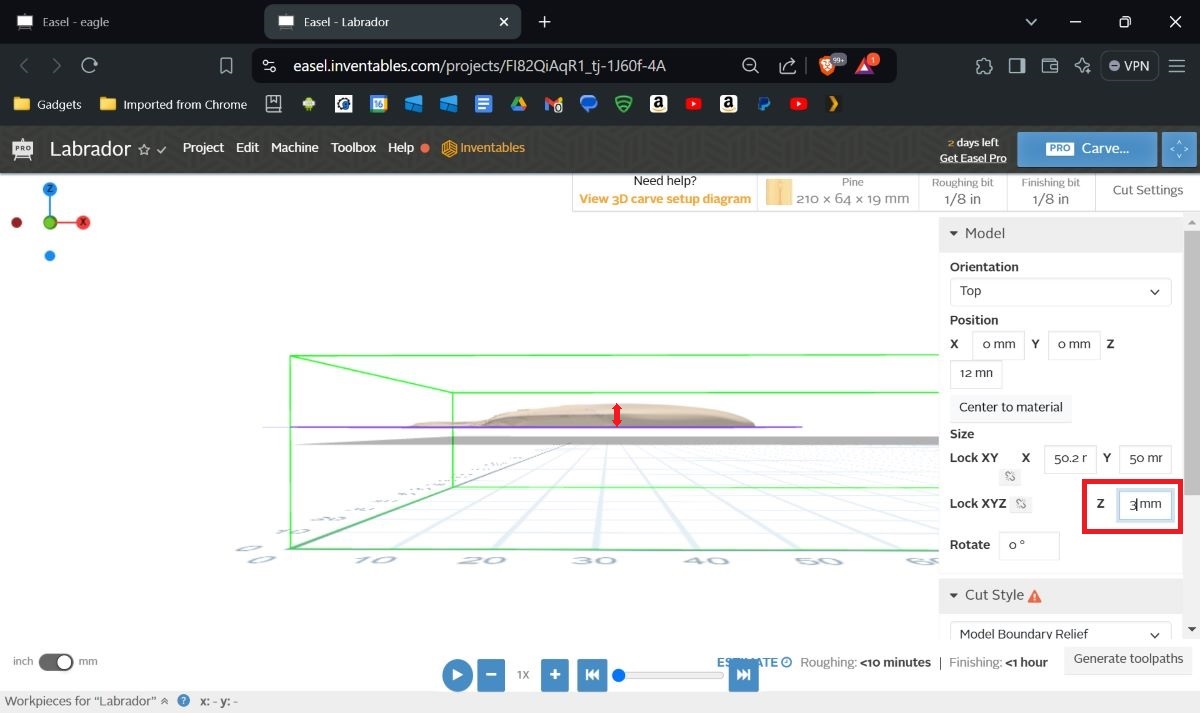
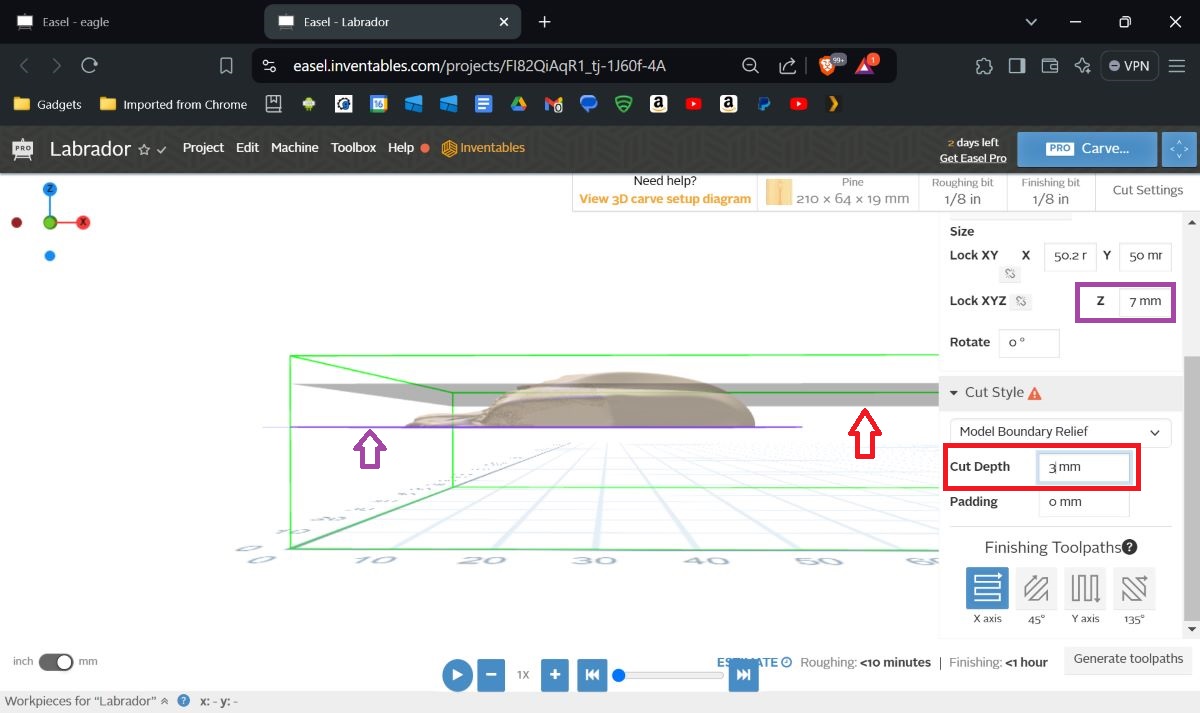
- Size – Z-axis: I could adjust the model’s thickness or depth, which I entered as 3mm initially (red box in the first screenshot above), then finally settled on 7mm (red box in the second screenshot above).
- Cut depth: I then entered different cut depths to see which would carve the full top portion of the model.
-
- The bottom of the model is shown in Easel by a purple square. I added purple arrows to illustrate where it was (second and third screenshots above).
- The 3mm cut depth is shown as a gray plane in Easel, which I point out with red arrows above (second and third screenshots above).
- The second and third screenshots above show that I had too shallow a cutting depth (3mm) to fully carve the model.
- The fourth screenshot above shows that by entering a deeper cut depth of 9mm, I was able to capture and carve the full relief (notice that the 9mm cut depth is actually deeper than the model’s 7mm depth by a couple of mm).
-
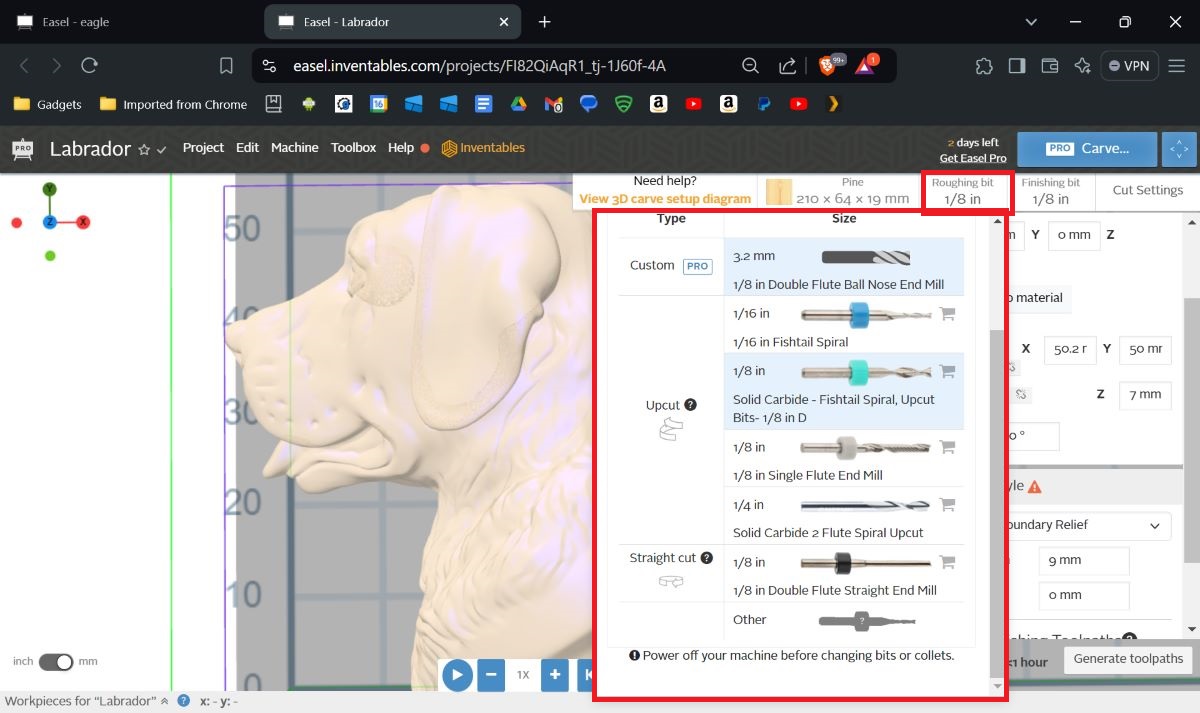
Next, I went through the rest of the Easel settings and set them up. Since I already entered my material settings, I just needed to finish the others.
- Roughing bit: I selected my roughing bit; roughing bits clear out material quickly (second screenshot above).
-
- NOTE: if the bit I wanted to use was missing, I could add a custom bit (one where I entered all the bit’s characteristics) or select one of the preset bits from an additional list.
-
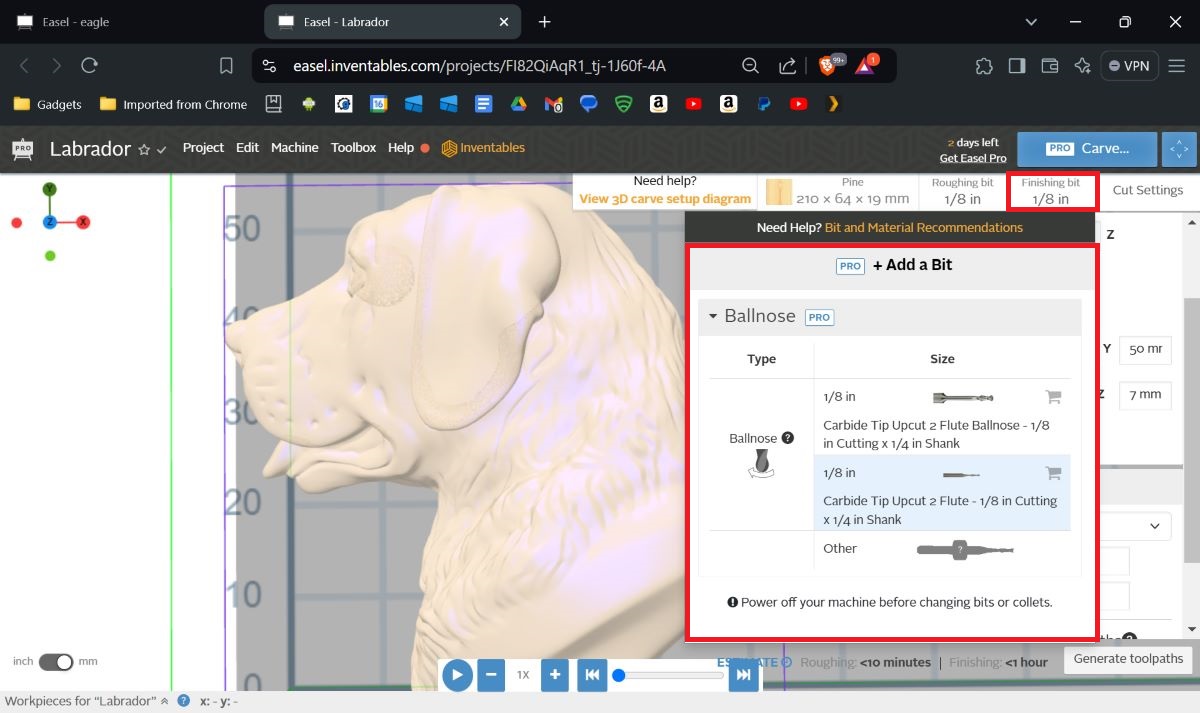
- Finishing bit: I selected my finishing bit; finishing bits carve the details and clean up the roughing cuts (third screenshot above).
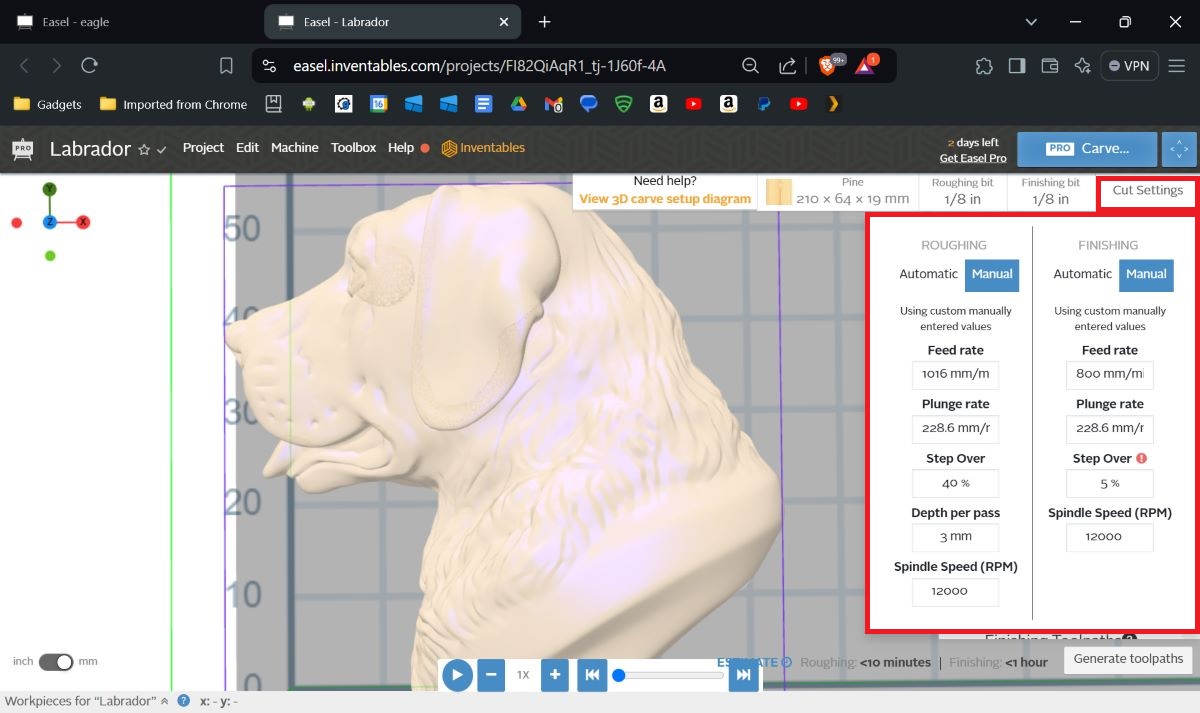
- Cut settings: The information entered here was Easel’s suggestions based on my selections of material and bits (fourth screenshot above).
-
- Feed rate
- Plunge rate
- Step-over
- Depth per pass
- Spindle speed RPM
- NOTE: I usually used the “Automatic” cut settings except when I had a very small bit where I wanted to slow the feed rate of the router passing through the material so that my bit wouldn’t break, at which point, I used the “Manual” cut settings. What did I base my new settings on? I looked at Easel’s settings for an 1/8″ (3.175mm) cut-diameter bit and since I was using a 1/16″ (1.5875mm) cut-diameter downcut single flute end mill bit, I reduced the rate arbitrarily from 1000mm/min to 800mm/min so that the machine wouldn’t push the bit too quickly through the material and possibly break it.
- NOTE: I purchased the 1/16″ (1.5875mm) cut-diameter downcut single flute end mill bit from Amazon as none of the 40-piece bit kit from TwoTrees contained any downcut bits (disappointing).
-
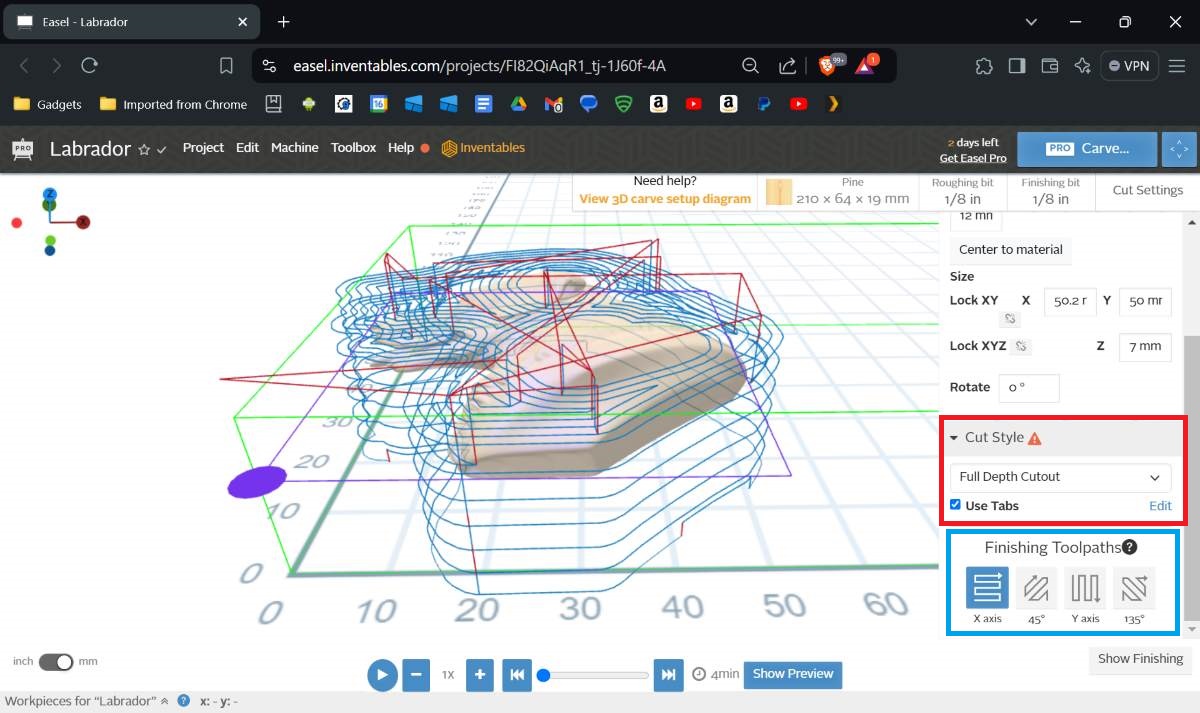
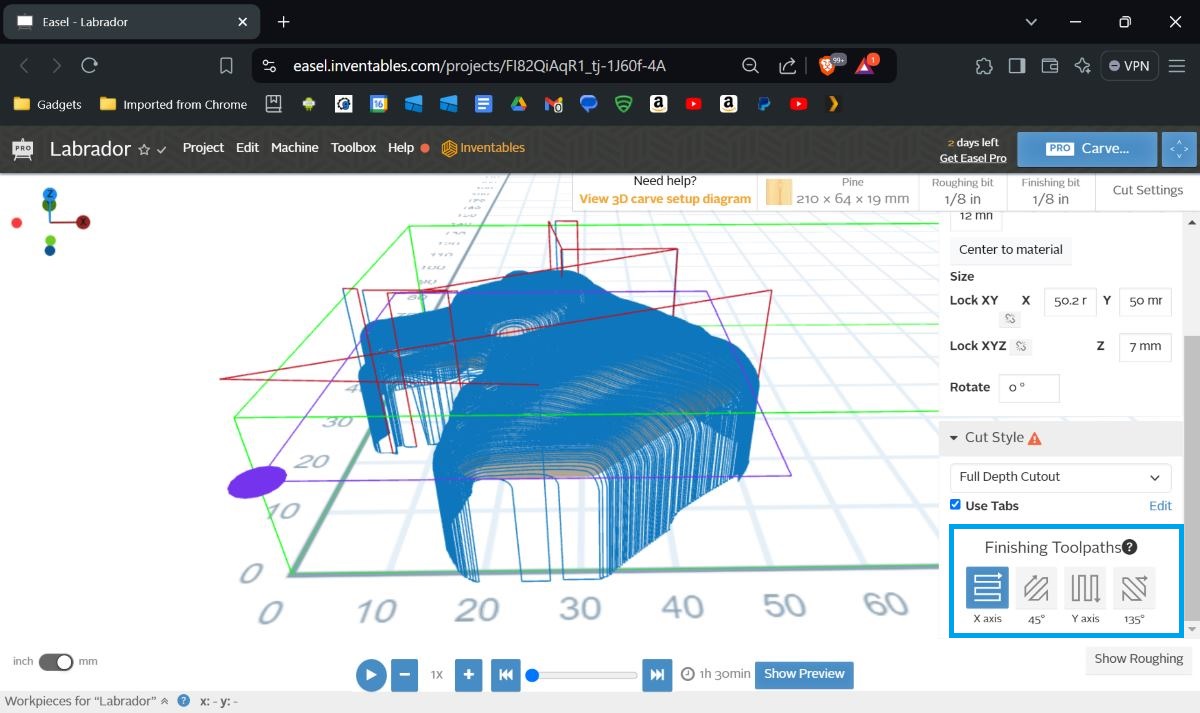
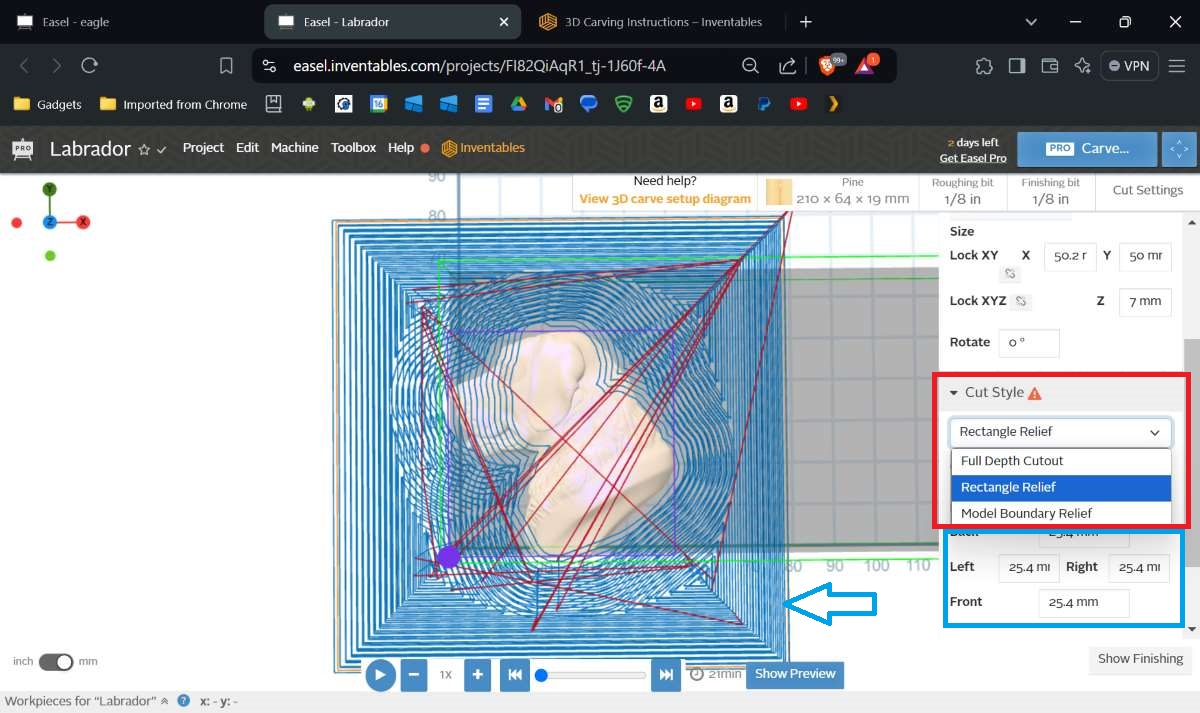
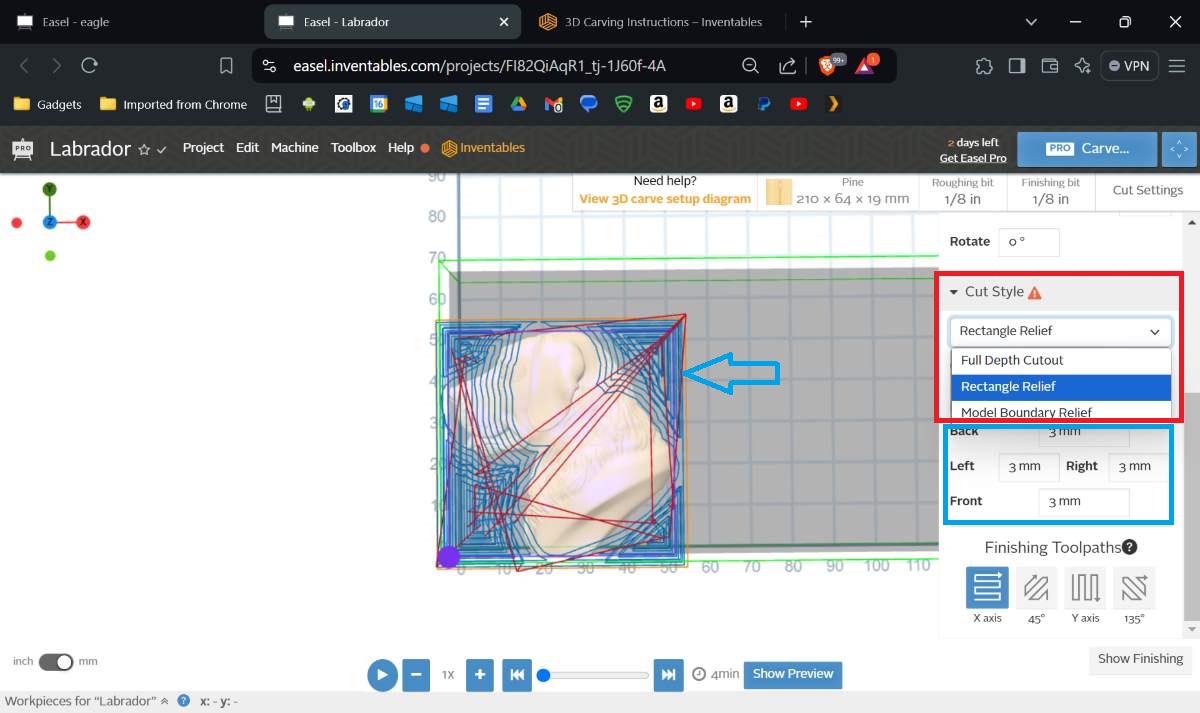
Cut Style: There are three cut styles to choose from. To visualize the differences, I selected each and then generated the tool paths (red box in the first screenshot above).
- Full-Depth Cutout: This setting uses the model’s border as the boundary to cut the model out of the material completely.
-
- The second screenshot above shows the roughing passes
- The third screenshot above shows the finishing passes
-
- Rectangle Relief: This setting places a rectangular boundary around the border of the model
-
- The fourth screenshot above shows the rectangle extending out 25.4mm away from the border of the model
- The fifth screenshot above shows the rectangle extending out 3mm away from the border of the mode
-
- Model Boundary Relief: This setting uses the model’s border as the boundary, but doesn’t cut through the material
-
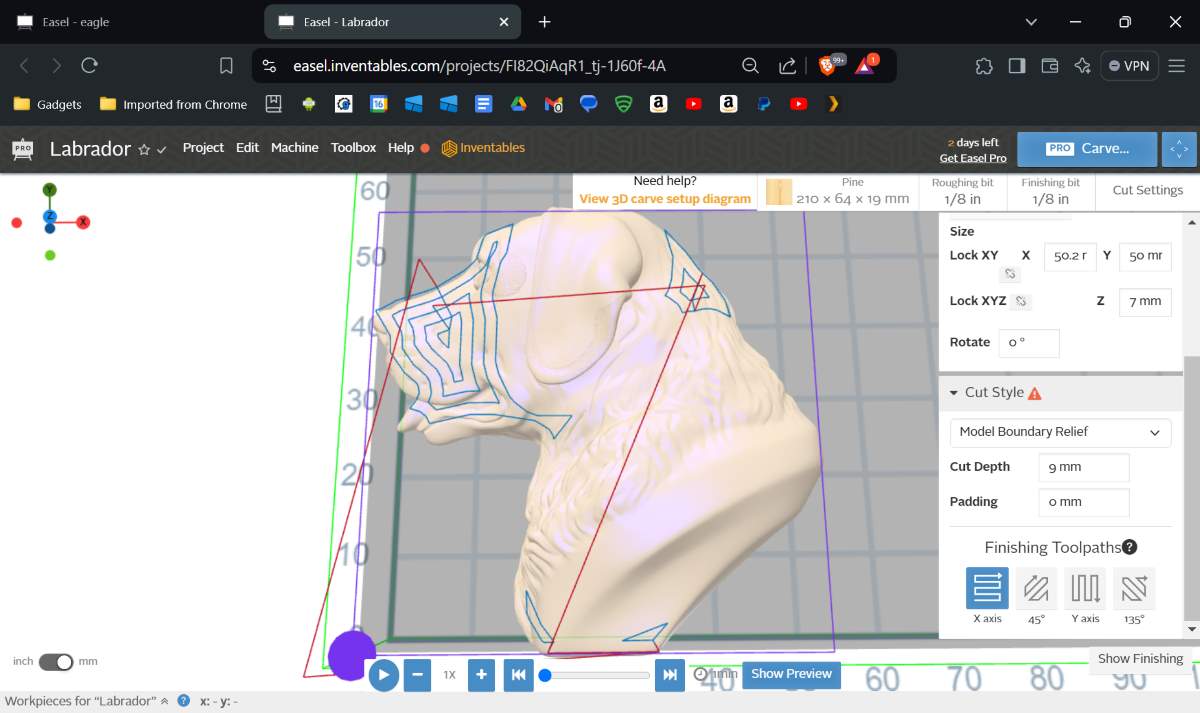
1. Model boundary relief; roughing pass 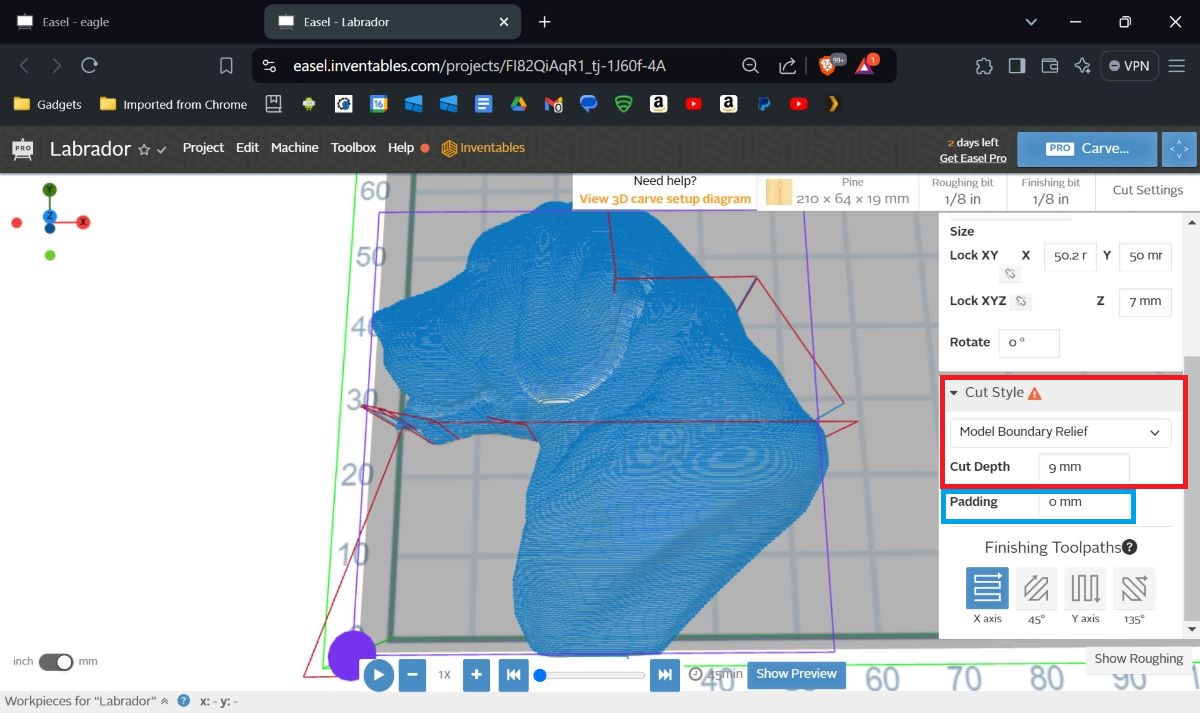
2. Model boundary relief; finishing pass; no padding 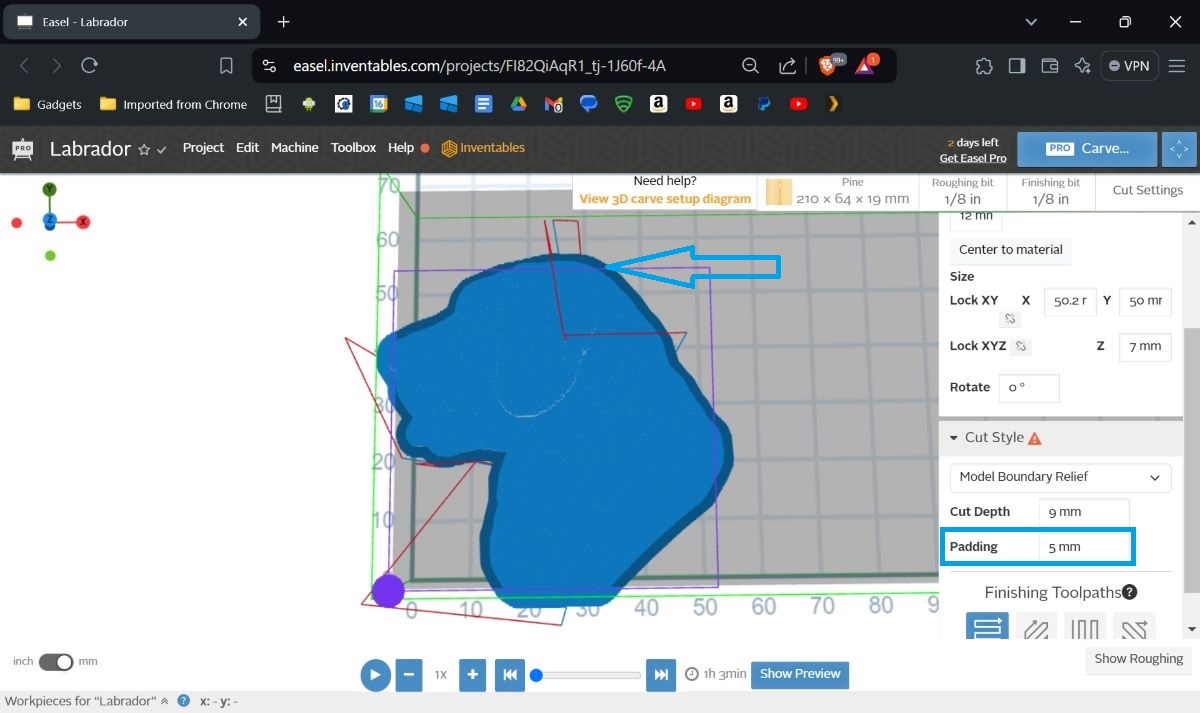
3. Model boundary relief with 5mm padding - The first screenshot above shows the roughing passes
- Padding: I could add padding around the model’s boundary.
-
- The second screenshot above shows the finishing passes with 0mm of padding (enter your desired value in the blue box shown in the second screenshot)
- I entered 5mm of padding (the dark blue border around the model in the third screenshot above) so that the CNC would carve 5mm more material away from the border of the model.
-
-

To get the kind of detail that I wanted, I manually entered a slower feed rate because I was using a 1/16″ (1.5875mm) cut-diameter downcut single flute bit that I didn’t want to break and I decreased the “Step-over” to 5% which means that each pass overlaps with other passes by 95% (i.e. each time the bit moves to cut a new area, it only cuts away 5% new material; the other 95% of the material was already cut away in a previous pass).
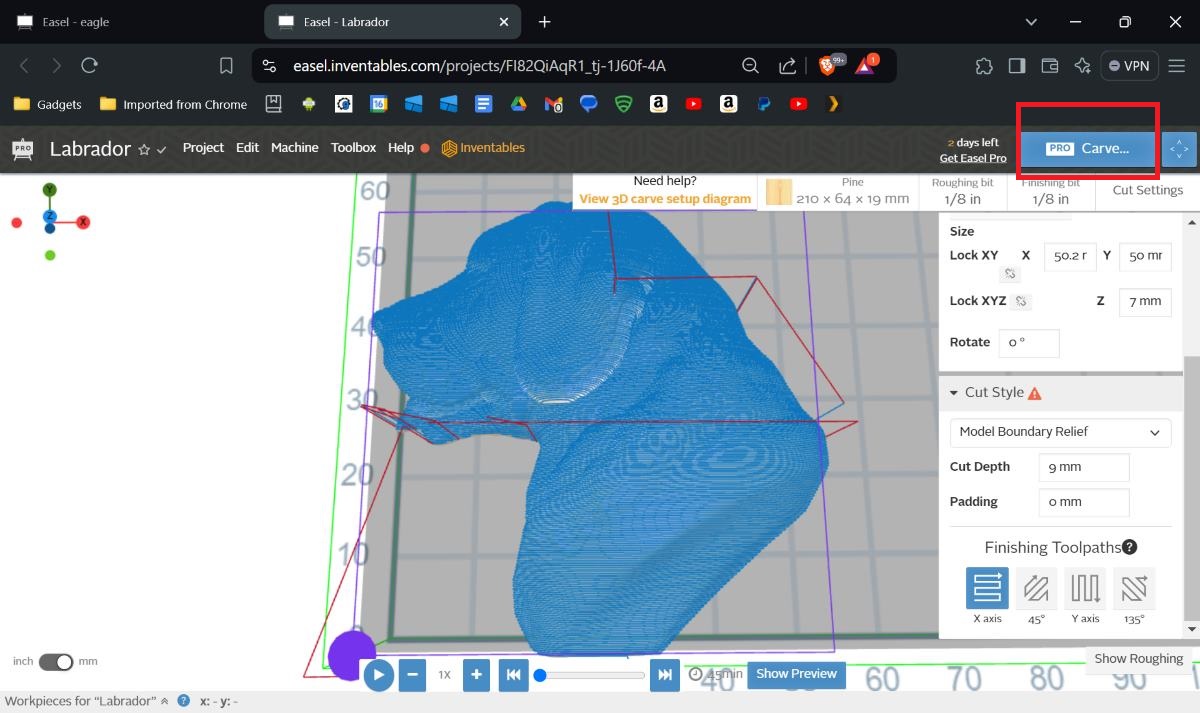
When I finished setting up my project in Easel, I clicked the blue “Carve” button in the upper right corner of the screen (red box shown in the first screenshot above).
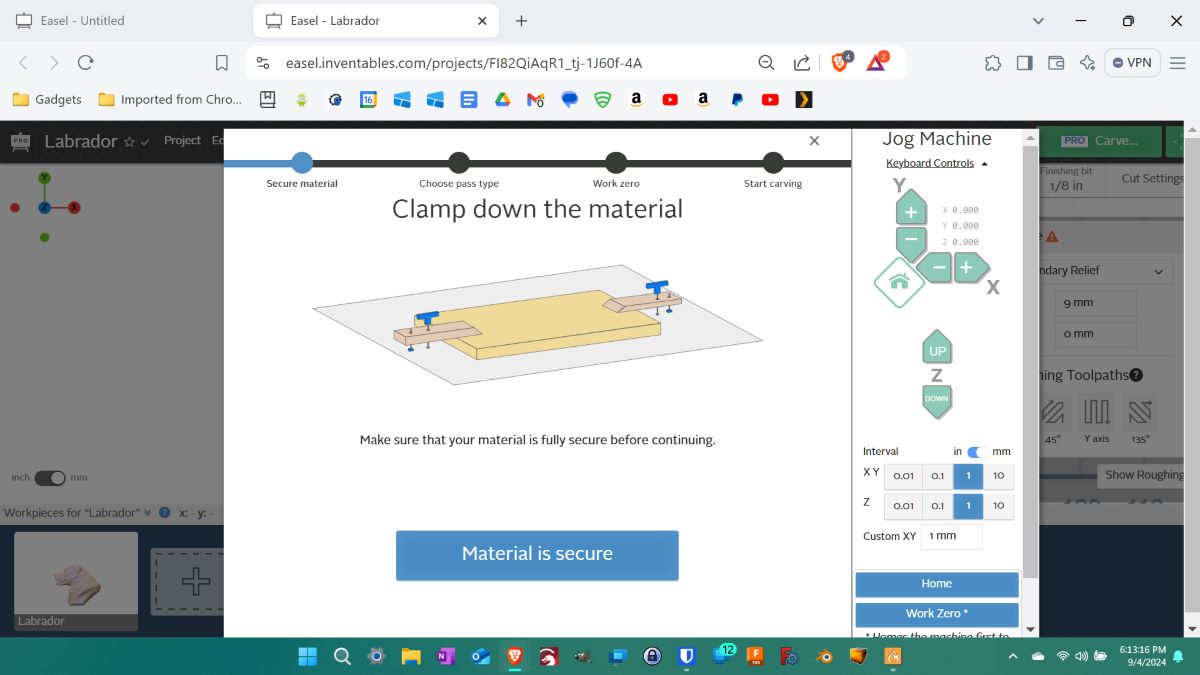
Easel then stepped me through the process to make sure I was ready to carve my project.
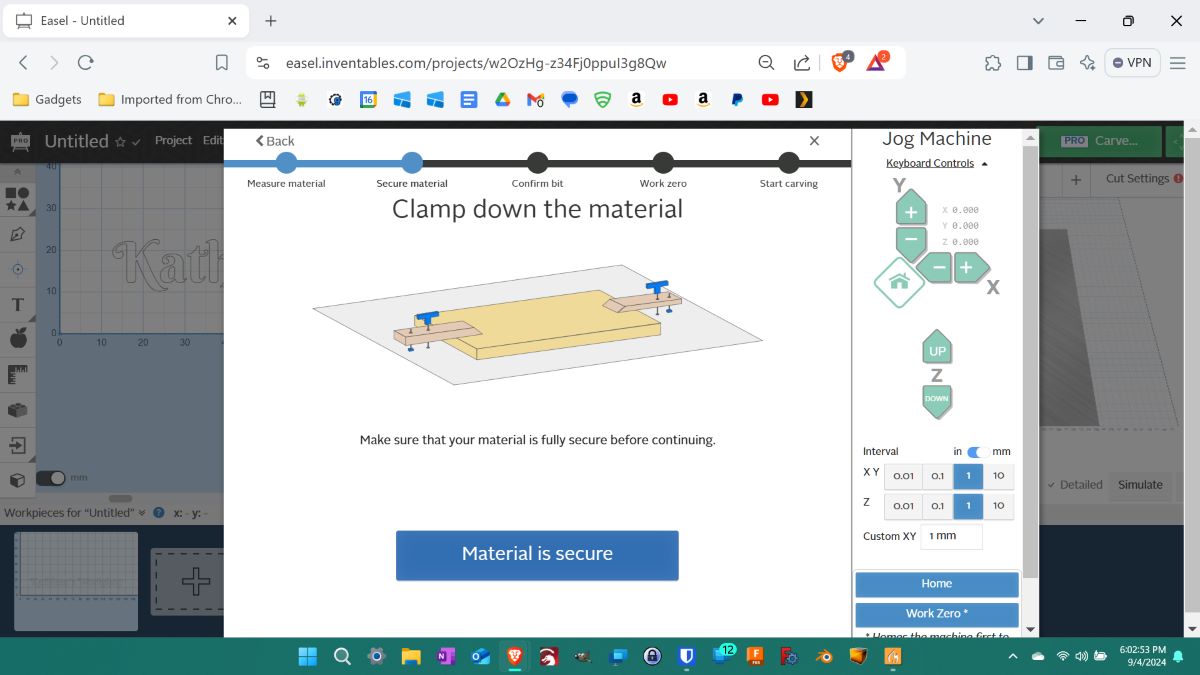
- Clamp down the material: Check to see that your material is secured to the spoilboard (the base of the CNC).
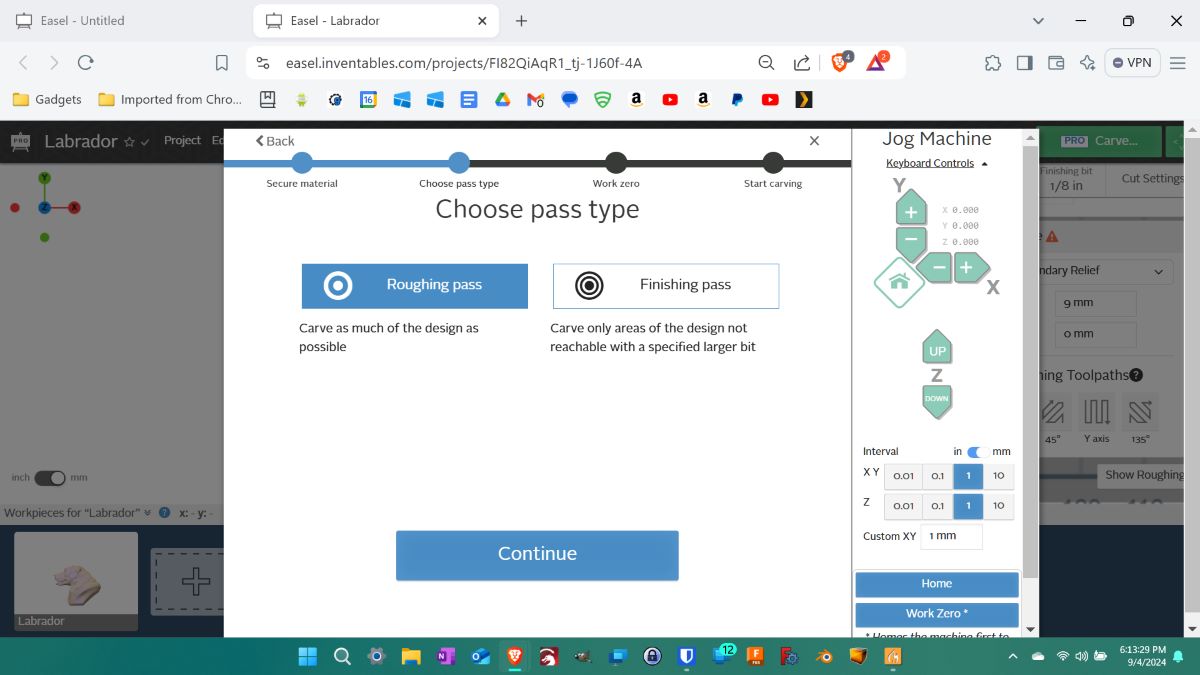
- Choose pass type: Choose either the roughing or finishing pass.
-
- NOTE: You first choose “Roughing”, then, when Easel has completed this run, switch out your bit, run Easel again, and this time select “Finishing”.
-
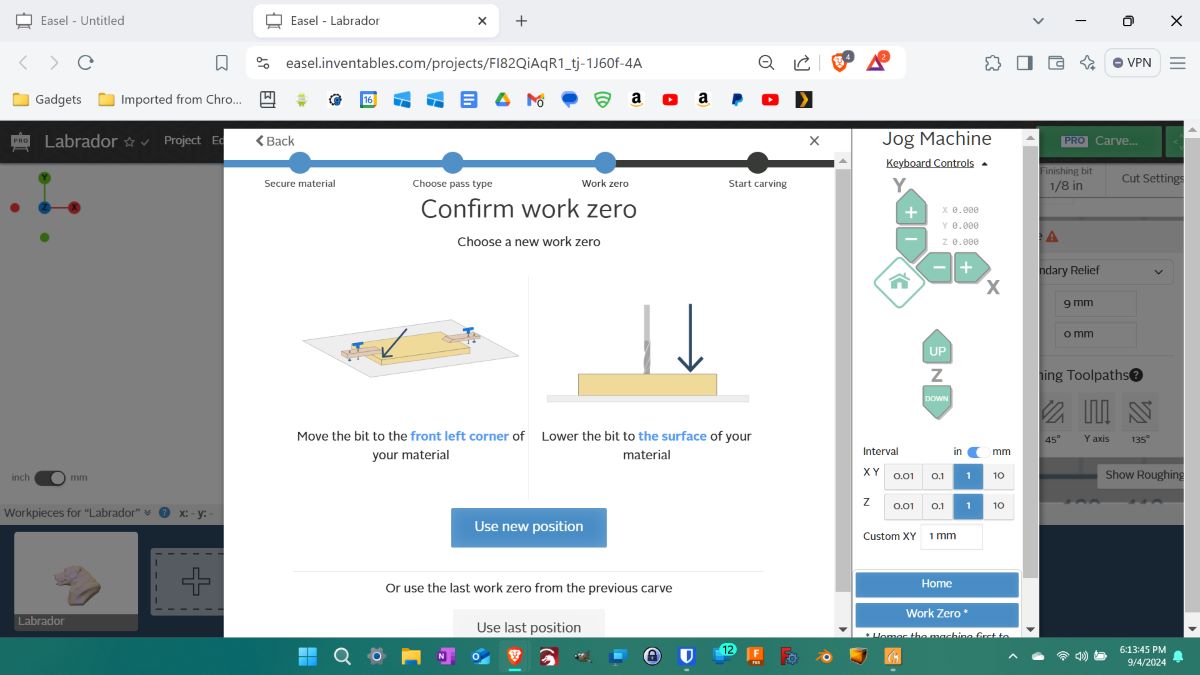
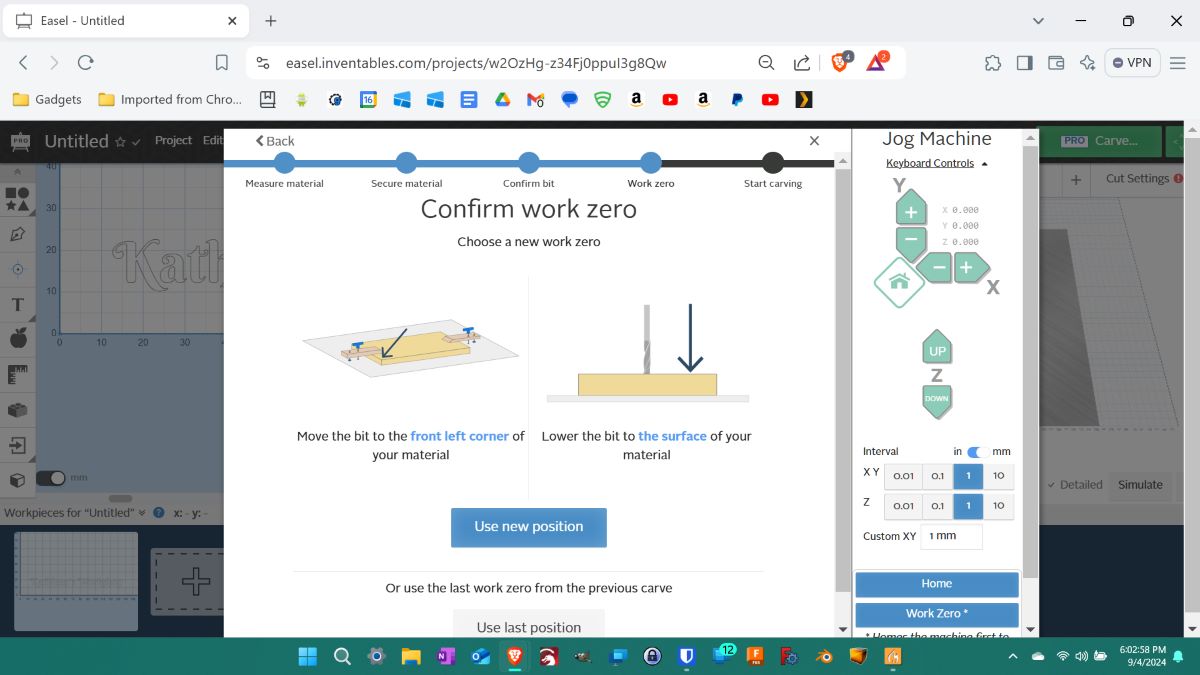
- Confirm work zero: Move your router bit (I used a 1/16″ (1.5875mm) cut-diameter down-cut single flute bit), using the jogging controls to position it over the material at the starting point of the project. Lower the bit to the surface of the material, and click the “Use new position” button.
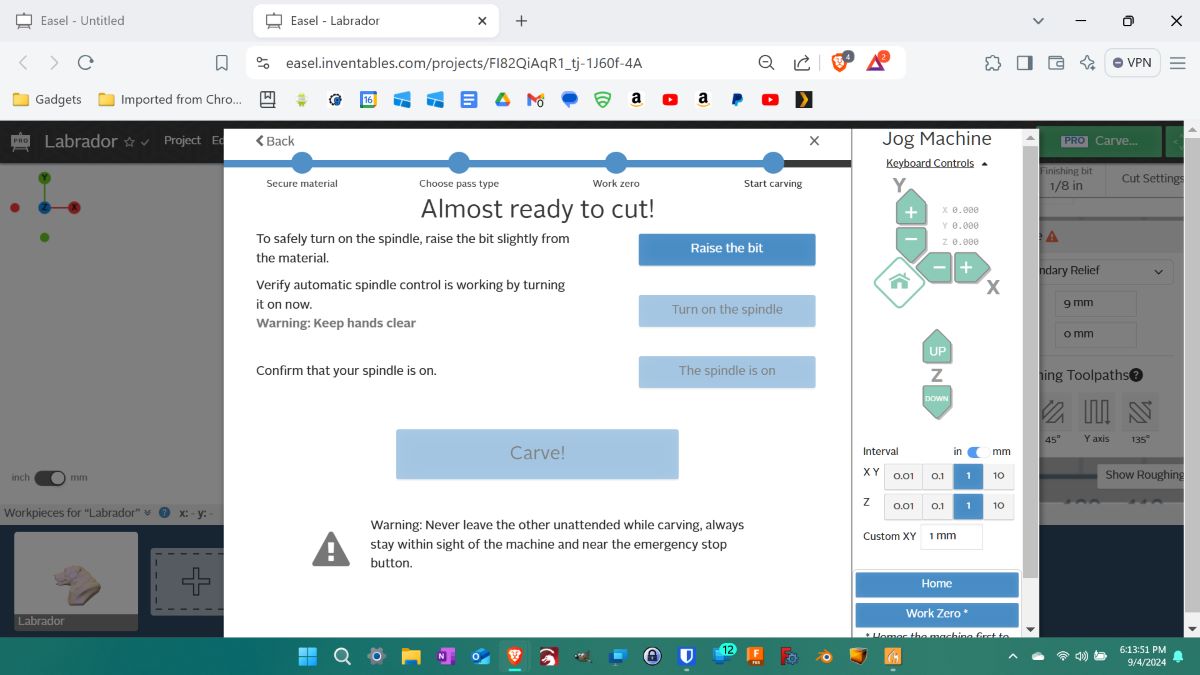
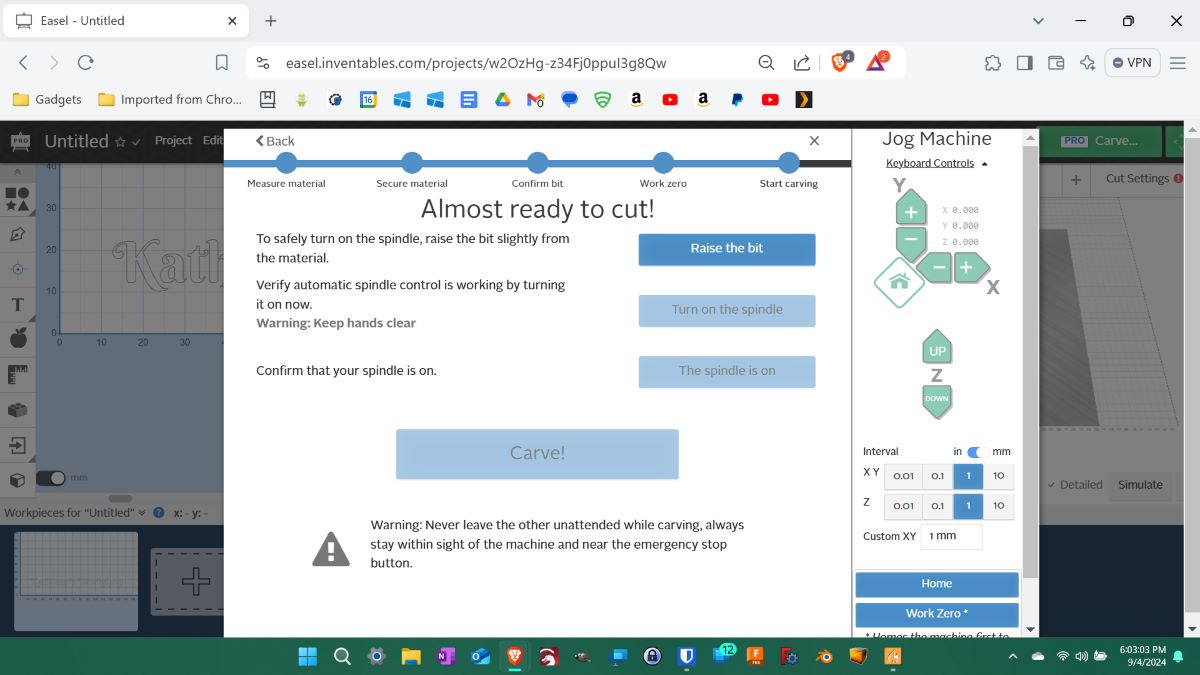
- Almost ready to cut: You go through the steps of raising the bit, turning on the spindle, verifying that the spindle is on, and clicking the blue “Carve” button.
Easel carving results – wood
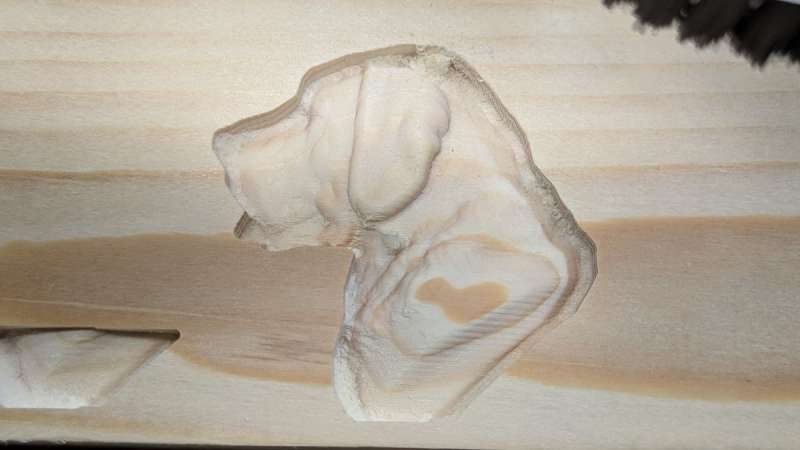
Yeah, now that’s more like it! Here are my Easel settings for the Labrador carving shown above:
- Material type – I selected “Pine” and entered the size of my material – X: 210mm, Y: 64mm, and Z: 19mm
- Position – X: 0mm Y: 0mm Z: 12mm
- Size – X: 50.2 mm Y: 50mm Z: 7mm
- Cut depth – 9mm
- Roughing bit – 1/8″ (3.175mm) cut-diameter upcut double flute 1/8″ (3.175mm) shank end mill
- Finishing bit – 1/16″ (1.5875mm) cut-diameter downcut single flute 1/8″ (3.175mm) shank end mill
- Cut settings
-
- Roughing (I used the “Manual” setting instead of “Automatic”)
-
- Feed rate: 1016mm/min
- Plunge rate: 228.6mm/min
- Step-over: 40%
- Depth per pass: 3mm
- Spindle speed: 12000
- (I changed the Depth per pass to 3mm and left the other settings)
-
- Finishing (I used the “Manual” setting instead of “Automatic”)
-
- Feed rate: 800mm/min
- Plunge rate: 228.6mm/min
- Step-over: 5%
- Spindle speed: 12000
- (I reduced the feed rate from the default to 800mm/min and reduced the Step-over from 12% to 5% for more detail)
-
- Roughing (I used the “Manual” setting instead of “Automatic”)
-
- Cut Style: Model Boundary Relief, no padding
I also carved a cat relief. I did this several times using different bits and different Easel settings.
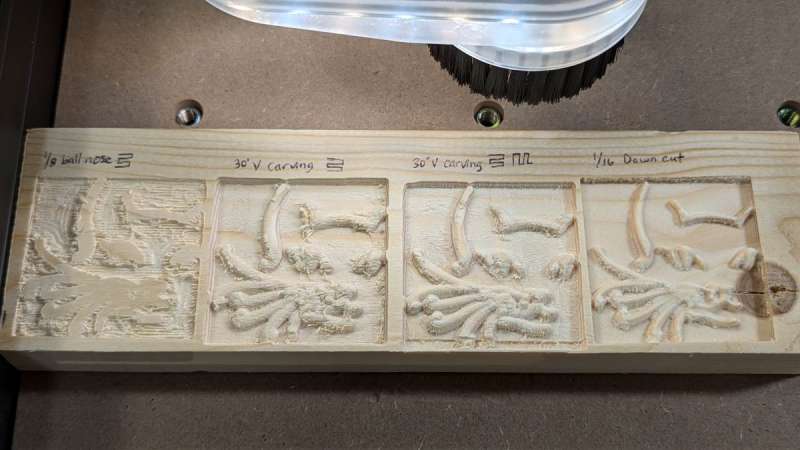
- The first relief on this pine block was done using a 1/8″ cut-diameter upcut double flute ball nose bit, but the cut depth was too shallow.
- The second relief was cut using the same bit but with a deeper cut depth.
- The third relief was cut using the same bit and cut depth as the second, but this time I used a horizontal zig-zag path, then ran it again using a vertical zig-zag path. The result was still rough-looking because I was using an upcut bit.
- The fourth relief was cut using a 1/16″ (1.5875mm) cut-diameter down-cut single flute bit, which produced a much cleaner result.
Here’s an example of one of my relief carvings of a hawk/eagle. I used a 1/8″ (3.175mm) cut-diameter upcut ball nose bit for roughing and a 1/16″ (1.5875mm) cut-diameter down-cut single flute bit for finishing. I changed the feed rate to 800mm/min and a Step-over of 5%.
Easel settings – aluminum project
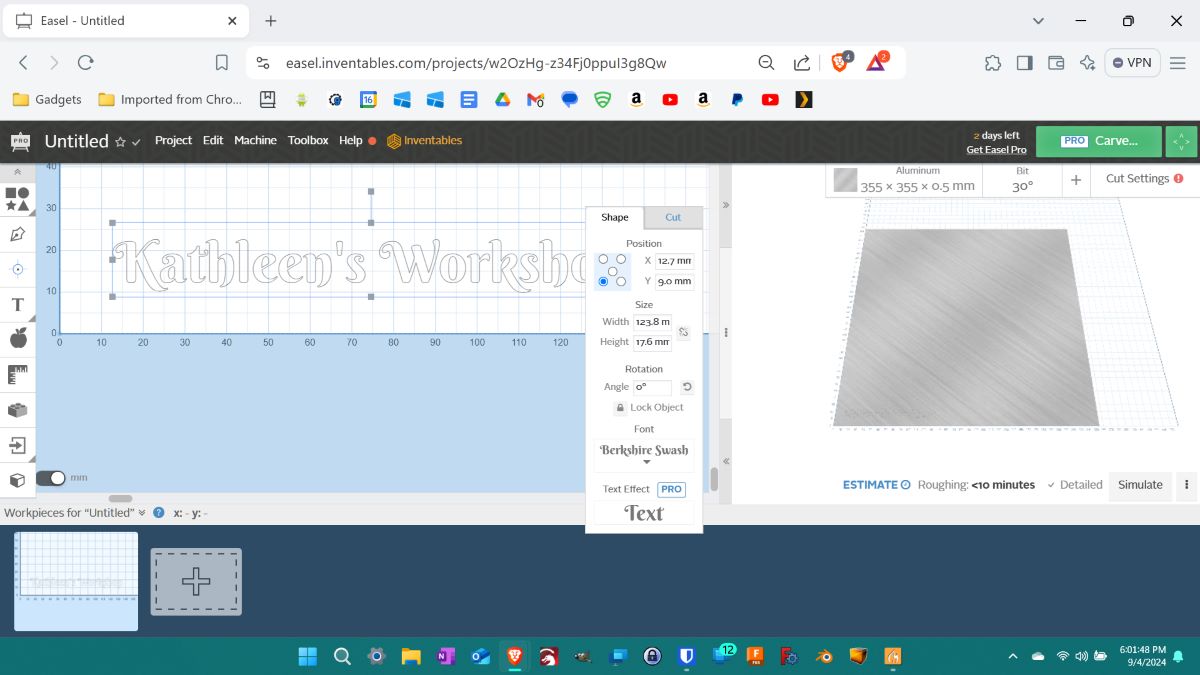


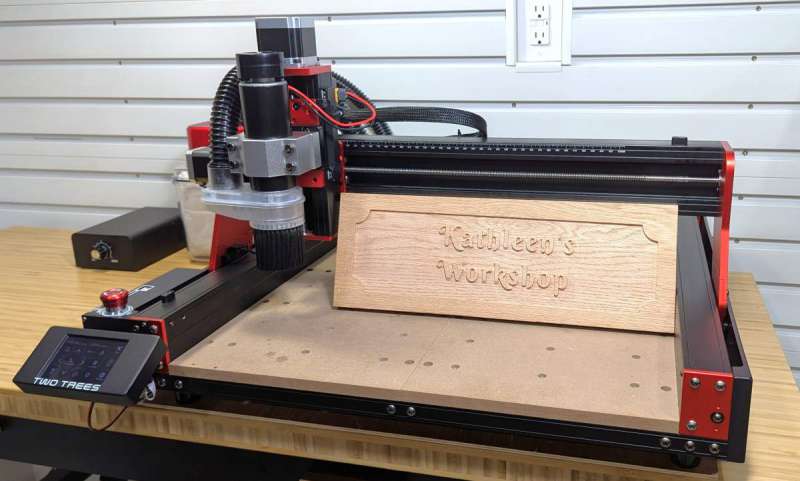
Next, I created a simple design to carve on aluminum. I entered the text, “Kathleen’s workshop” and set up the following.
- Shape tab: When I click the text, a window pops up with two tabs. The “Shape” tab allows me to change the shape of the carve (I didn’t change any shape settings).
- The “Cut” tab: This tab allows me to change the cut depth (I didn’t change this) and whether to carve on the inside of the letters, the outside of the letters, or a “pocket,” which I think fills in the letters by carving out material but not cutting the letters out. I chose to cut the outside of the letters.
- Add a Material: I entered my material type, aluminum, and its size – X: 355mm, Y: 355mm, Z: 0.5mm (third screenshot above).
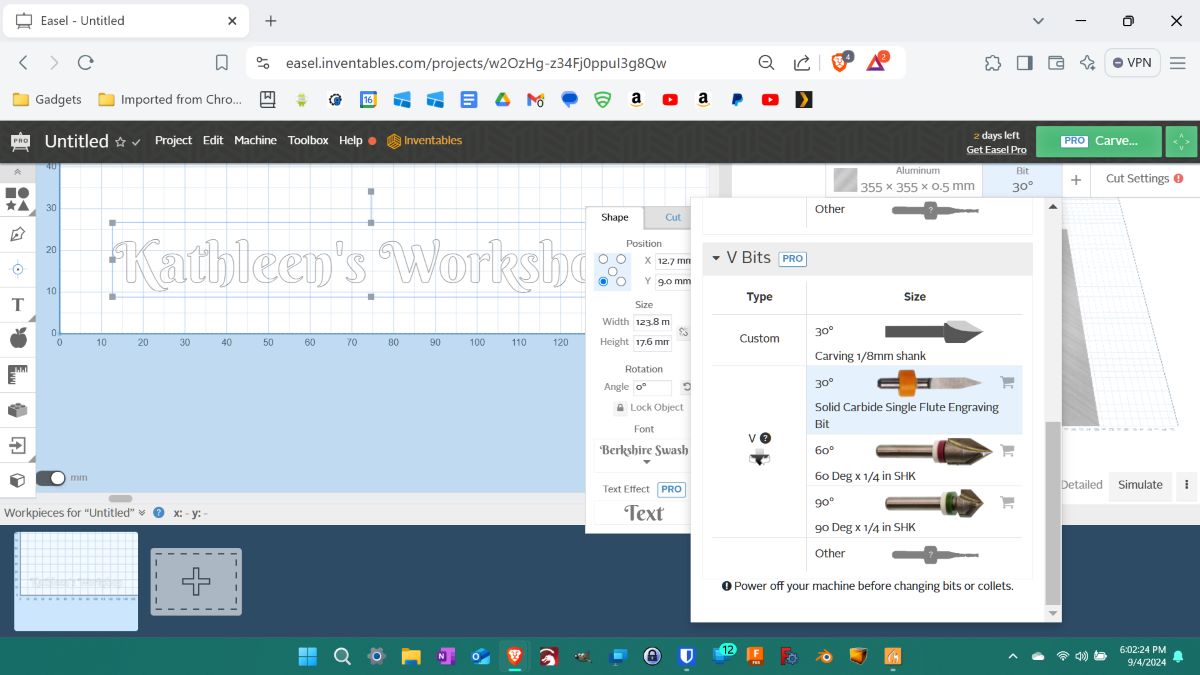
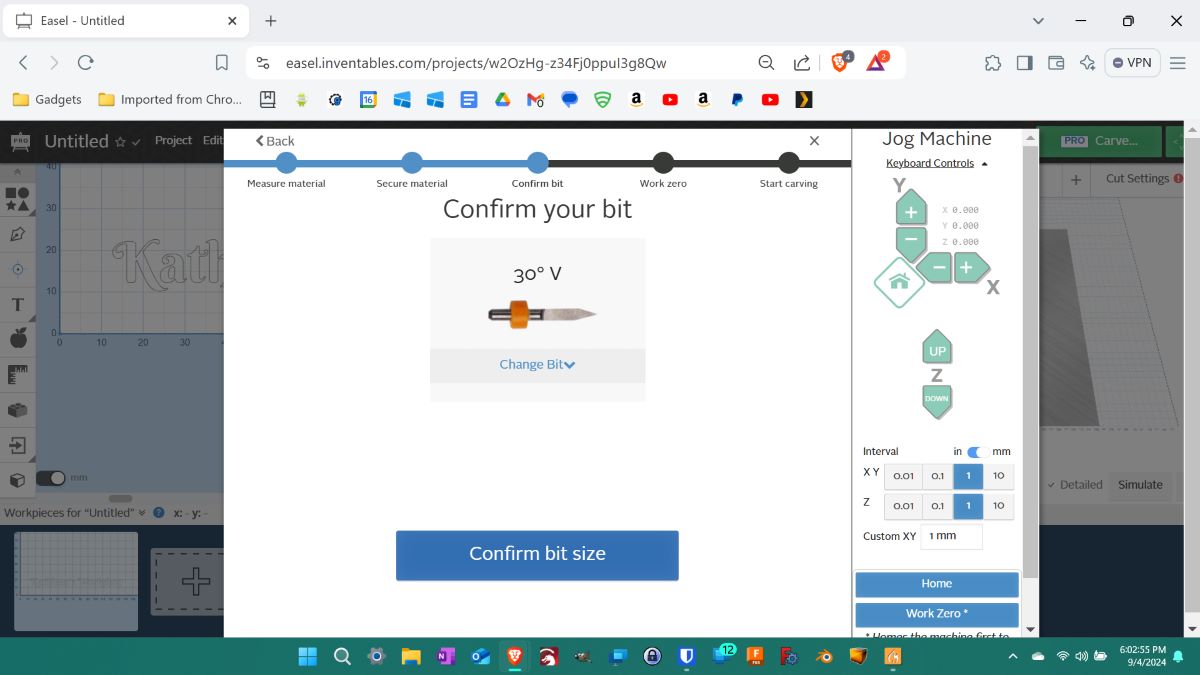
- Bit: I selected my bit – a 30-degree V-bit (fourth screenshot above).
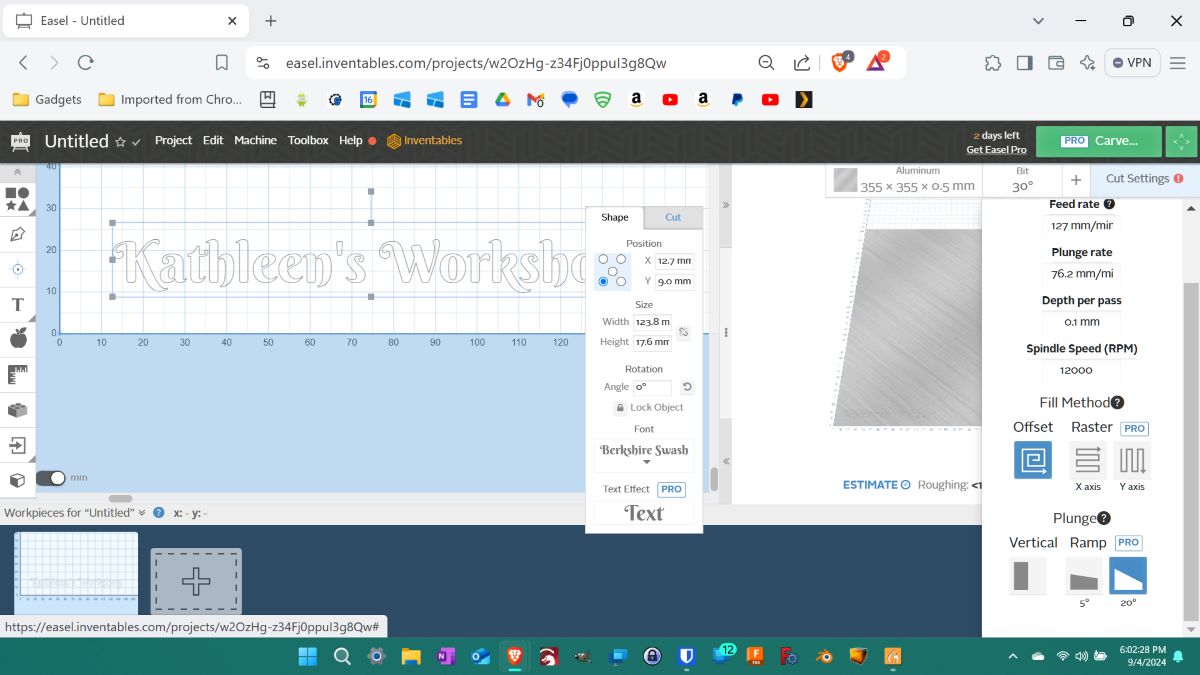
- Cut Settings: I left Easel’s “Cut settings” (fifth screenshot above).

When I clicked”Carve”, Easel took me through the process of checking to see if I was ready to carve my project.
- Measure the material – I double-checked the thickness of my aluminum sheet using digital calipers, which was 0.5mm; this measurement must be the exact thickness of the material.
- Clamp down the material – I clamped my material down on top of a sheet of cardboard to elevate it because the aluminum was so thin that I couldn’t lower my Z-axis enough to touch the aluminum sheet – it stopped several millimeters short above the aluminum. There was a soft limit set for the Z-axis that I was unaware of until much later.
- Confirm your bit – I saw other YouTube videos carving aluminum with V-bits, so I used my 30-degree V-bit.
- Confirm work zero – I moved my bit over to the left front corner of the material and set that as my “Work Zero.”
- Almost ready to cut! – Easel raised the bit and turned on the spindle; then I verified the spindle was on and clicked “Carve”.
Easel carving results – aluminum
I sprayed the carving area with WD-40 to lubricate the bit because I read that the router runs better on metal when lubricated and avoids heating the bit from friction and possibly destroying it or even the spindle.
Because I placed cardboard under my aluminum sheet to elevate the material so the router could reach it, clamping it down caused the aluminum sheet to bow slightly in the middle because the cardboard wasn’t rigid and flat after clamping the material. Thus, during the carving process, the bit started cutting out the letters in the middle of the sheet instead of carving them into the metal. At that point, I stopped the project. It was doing rather well before that point. I like how it carved the first few letters. Note to self: use rigid material to clamp the aluminum and maybe use double-sided tape to secure the project to the surface in addition to using the clamps.
Using Carveco Maker (CAD/CAM software) – rotary project
Easel doesn’t do 4th-axis projects (projects using a rotary module). So I had to learn another CAD/CAM application that does. It was between Carveco Maker and VCarve Desktop (Blendercam, an add-on for Blender, is rotary capable but doesn’t have many tutorials). I decided against VCarve Desktop because its trial version only allows you to carve its sample projects to see if it works with your CNC. If it does, it costs $349 for a perpetual license. A perpetual license means you own it. Vectric, the makers of VCarve state, “Any major version of the software released within 12 months of you purchasing the software is supplied free of charge. Minor updates are always free to anyone who has the same major version.”
I decided to go with Carveco Maker. It has a subscription for $15 per month or $180 per year. You can purchase the perpetual license for Carveco Maker Plus for $1200 with upgrades for one year. I went with a monthly subscription to Carveco Maker for now.
- To open a new rotary project you must go to the “File” menu > Rotary Model (first screenshot above).
- Enter the diameter and length of your cylinder, making accommodations for the rotary claw, and select the correct metric or imperial units (second screenshot above). NOTE: Carveco doesn’t work with rectangular rotary material, only cylinders.
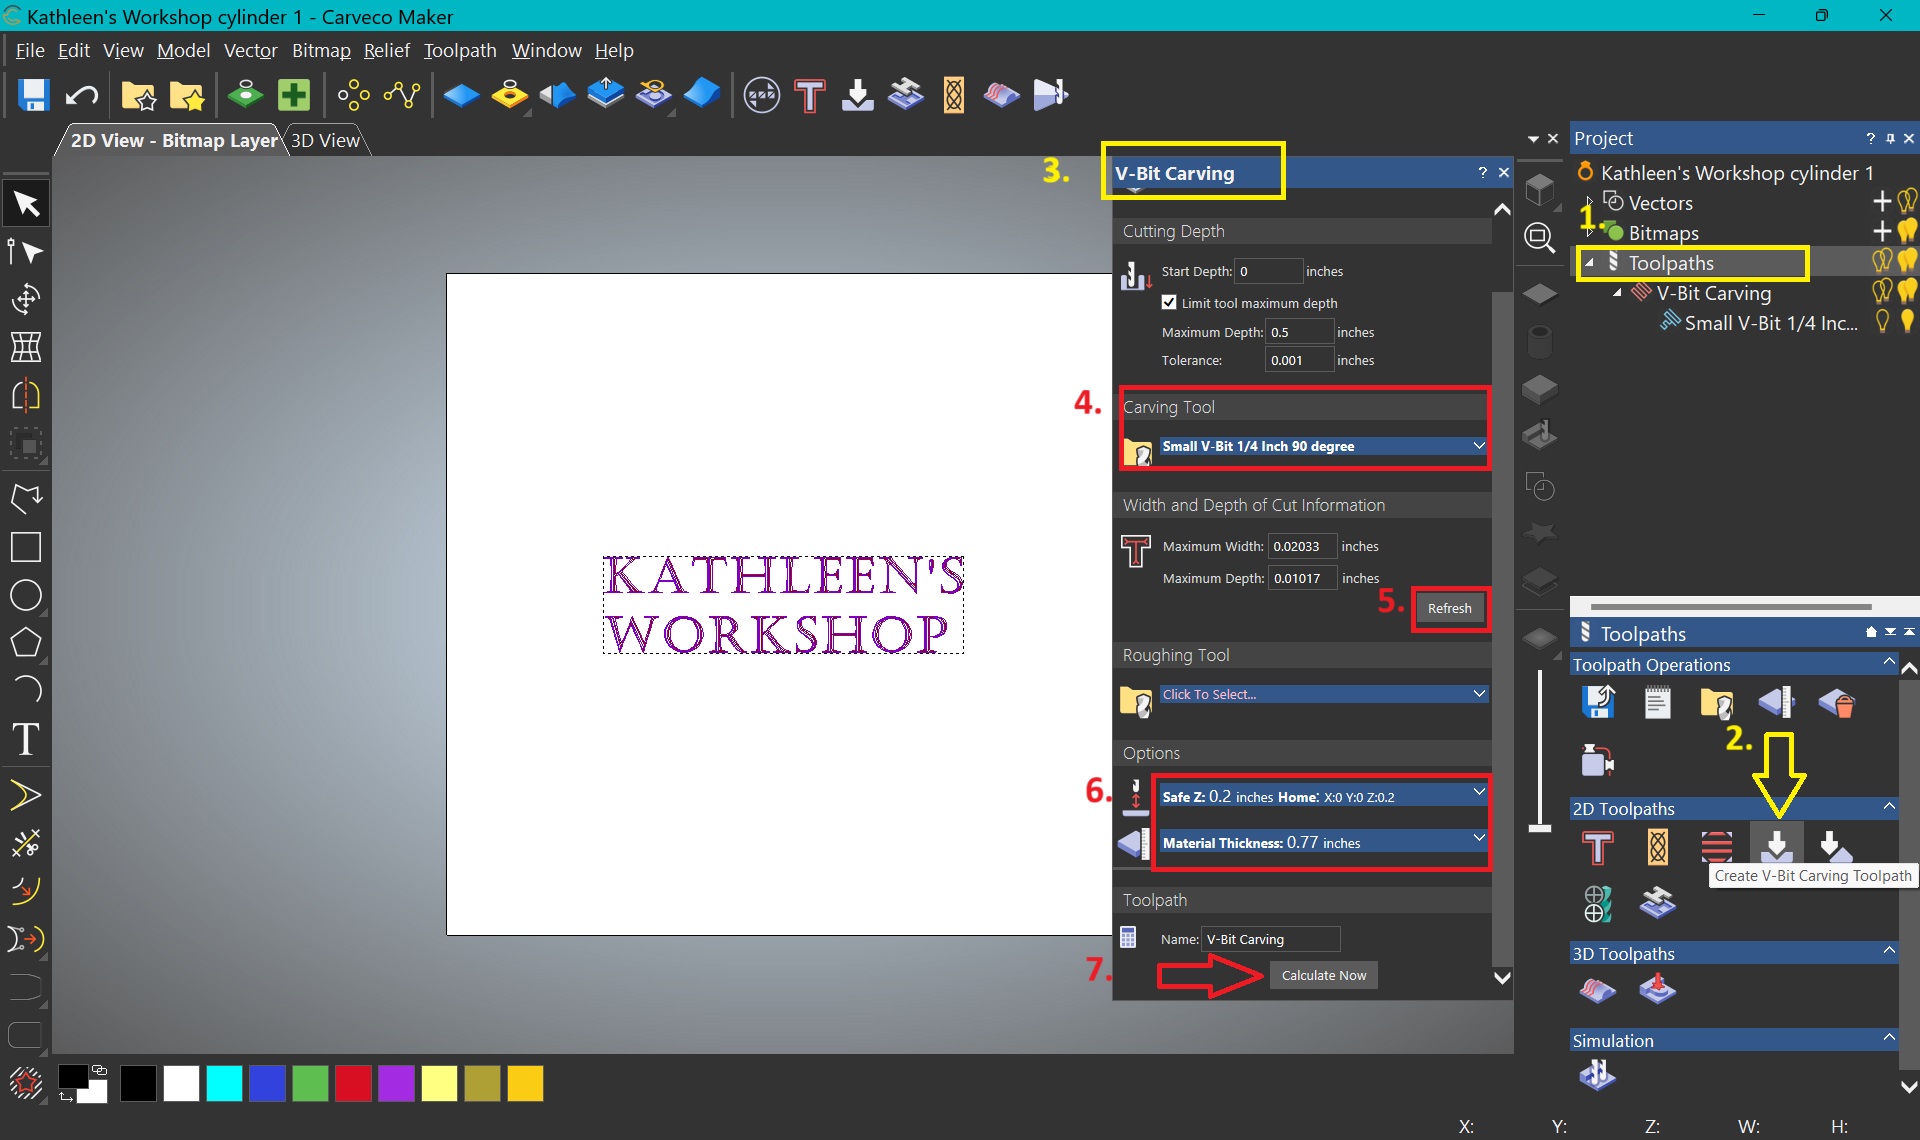
- I clicked on the “2D View – Bitmap Layer” tab to do my designing (shown in the upper left yellow box in the third screenshot above). I then clicked the “T” icon from the column of icons on the left side of the screen, selected the type of font I wanted and its size, and then clicked the “Create” button at the bottom of the right sidebar.
- I then numbered the steps (see 1-7 shown in the fourth screenshot above) that I took to set up the carving.
-
- I clicked “Toolpaths” in the right sidebar under “Project”.
- I clicked the “Create V-bit carving toolpath” icon.
- The “V-bit Carving” menu pops up.
- I selected my carving tool as a “Small V-bit 1/4-inch 90-degree Bit”.
- I clicked the “Refresh” button, which calculates the values automatically.
- Under the “Options” section of the “V-bit Carving” menu, I selected a Z-axis height for when the Z-axis moves between carving (0.2 inches). I also entered the correct material thickness settings (0.77 inches).
- I clicked on the “Calculate Now” button to calculate the tool path needed for carving the text.
-
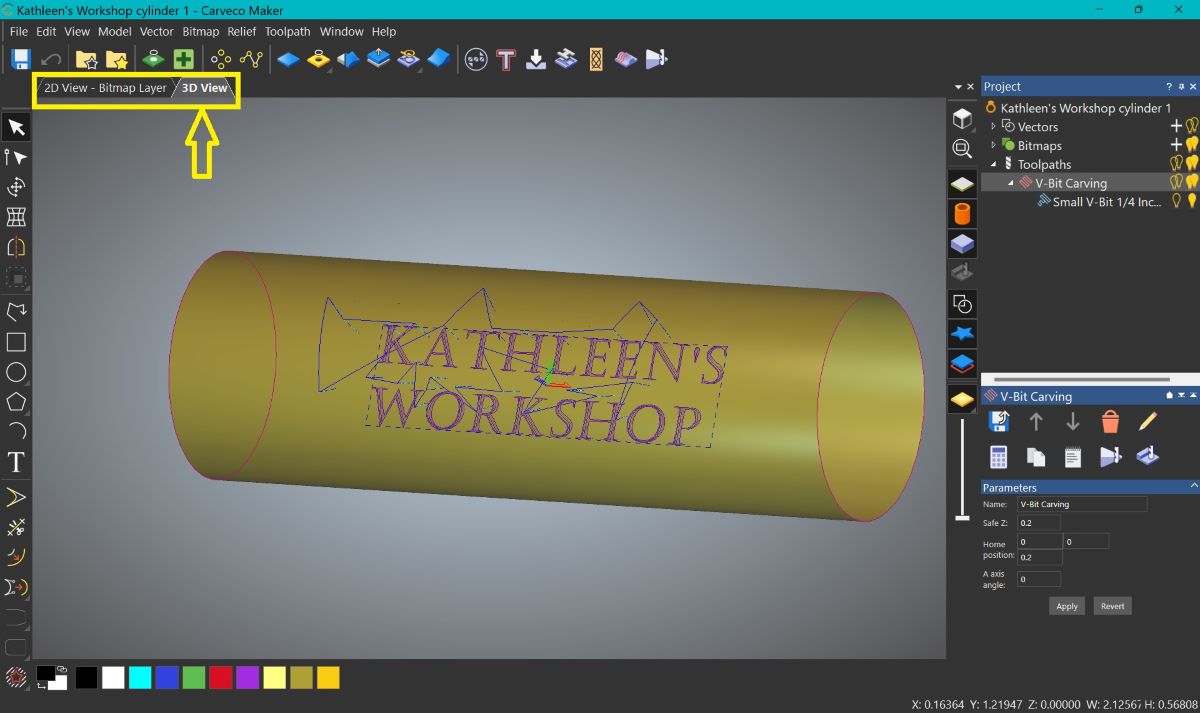
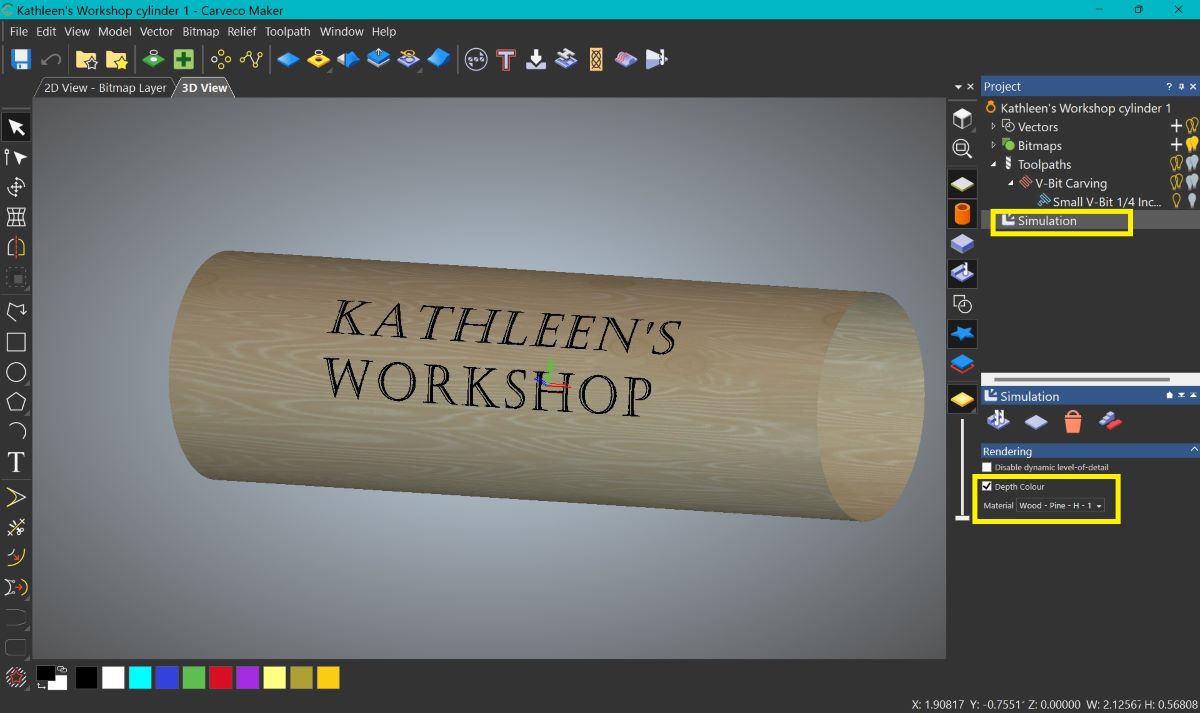
- To simulate what the carving will look like, first click the “3D-View” tab (see yellow box in the first screenshot above).
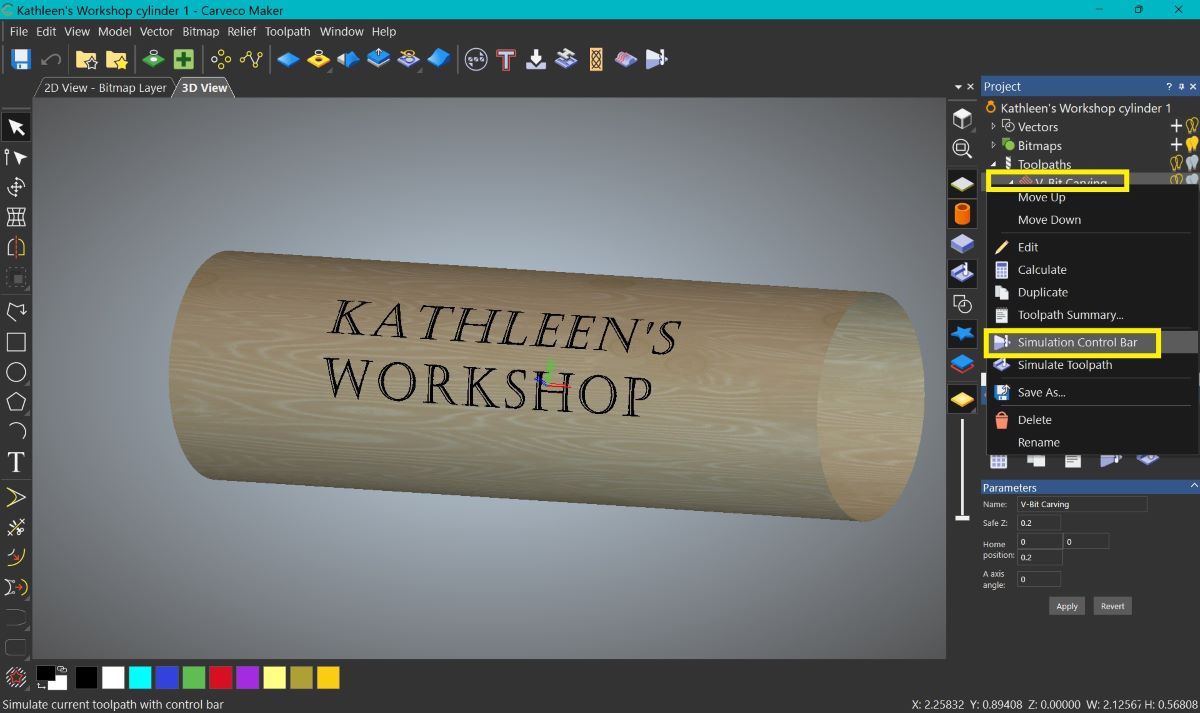
- Right-click “V-bit Carving” under the “Project” sidebar and click “Simulation Control Bar” (see the yellow boxes in the second screenshot above).
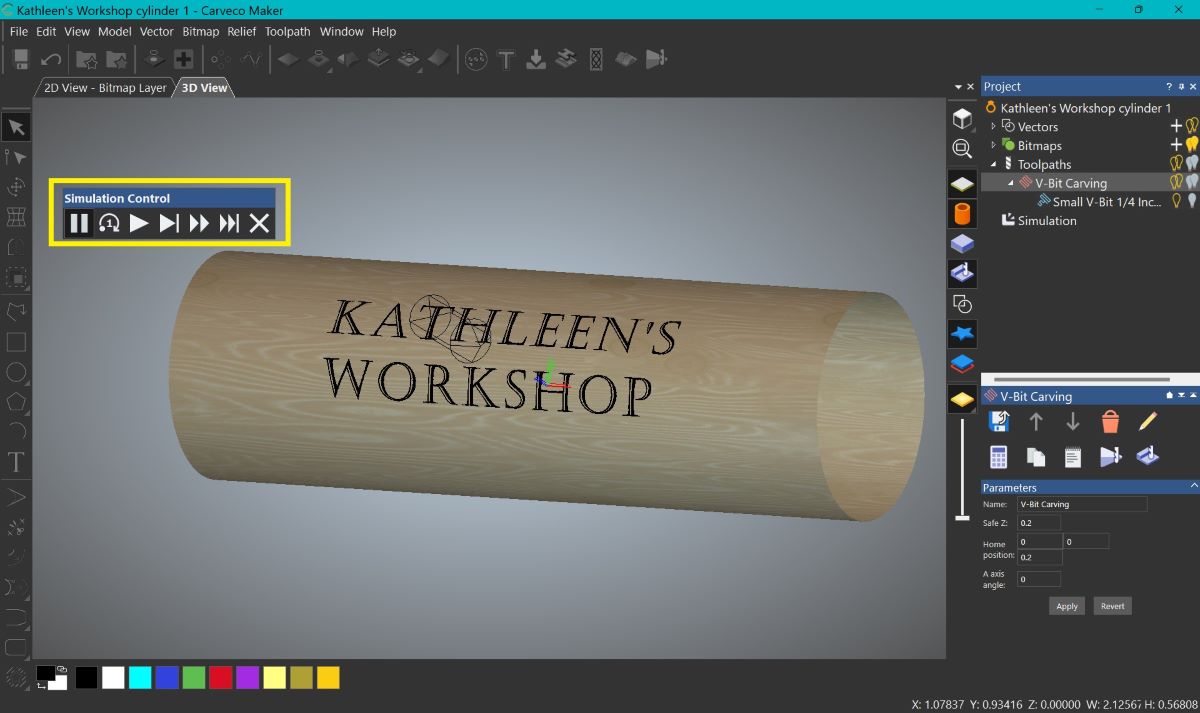
- Click the “Play” button to view the simulation (see simulation controls in the yellow box in the third screenshot above).
- To see a preview of what the carving will look like using a specific material like pine, for example, click “Simulation” under the “Project” sidebar (see the yellow boxes in the fourth screenshot above).
-
- Select “Depth of color” and the material that you are using.
-
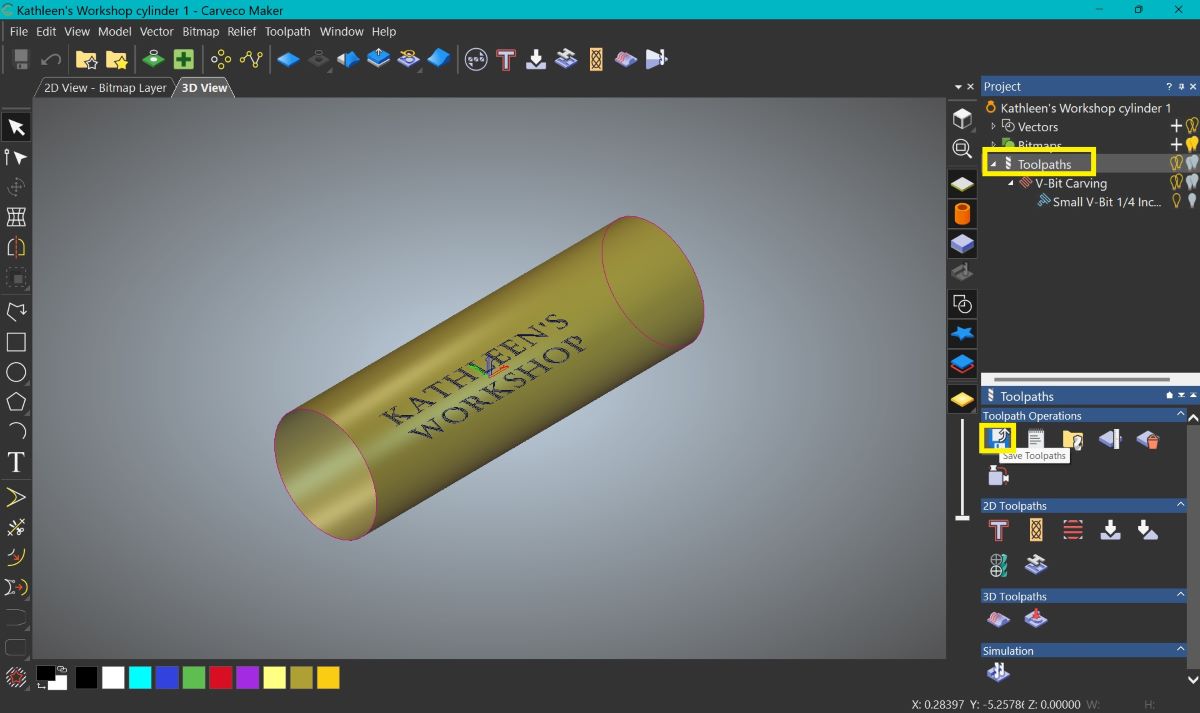
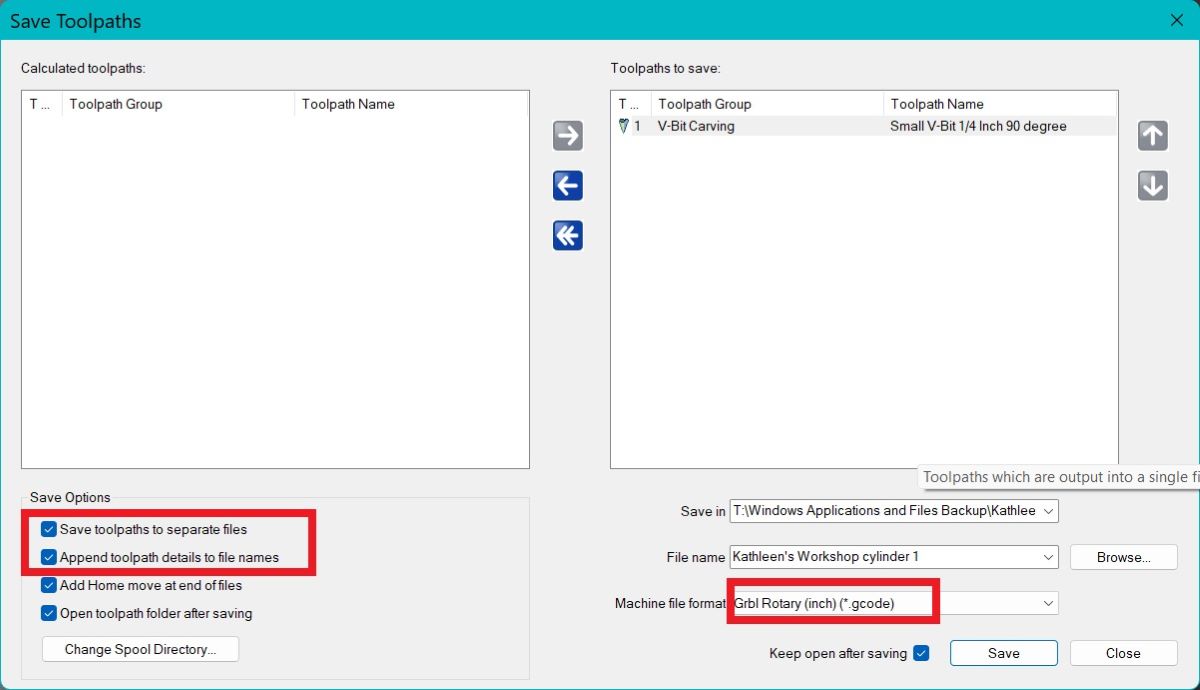
- To save your toolpaths, click “Toolpaths” under the “Project” sidebar (see the yellow boxes in the first screenshot above).
- Be sure to check the checkboxes for “Save toolpaths to separate files” and “Append toolpath details to file names” when you use more than one tool.
-
- Also, be sure to select the correct post processor under “Machine file format” – for the TTC-450 Pro machine, it was “Grbl Rotary (inch) (.gcode)” (see red boxes in the second screenshot above). Now you can open the file(s) using controller software like UGS or Candle.
-
Carveco carving results – pine
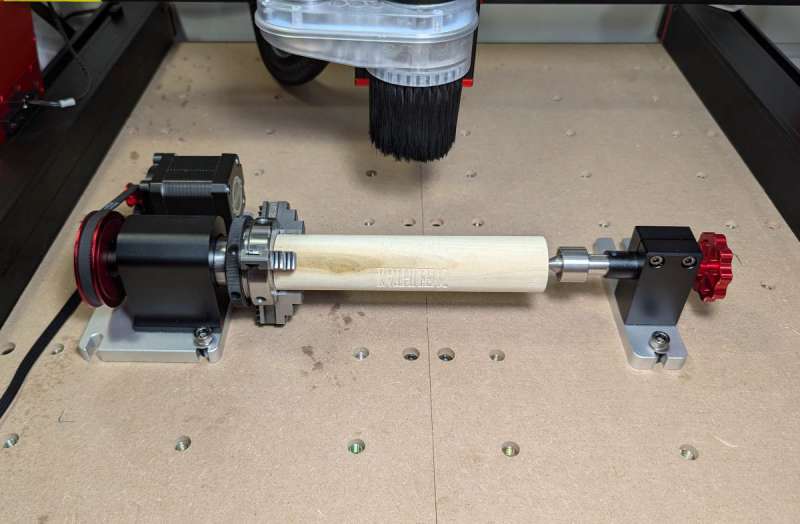
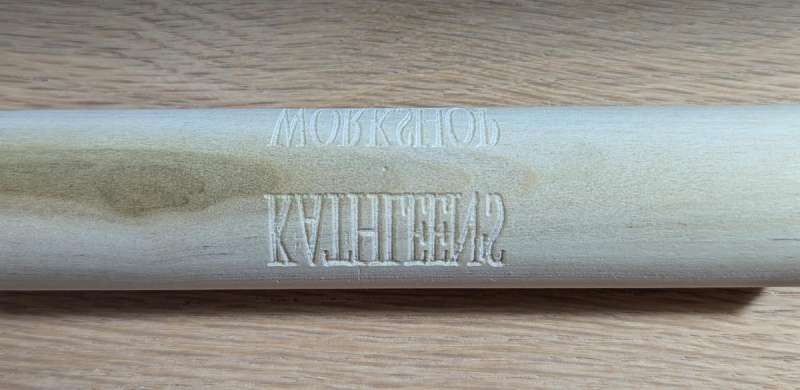 Here are the results of my simple cylinder project. The rotary module worked, but the carving was inverted. I contacted both Carveco and TwoTrees about this issue.
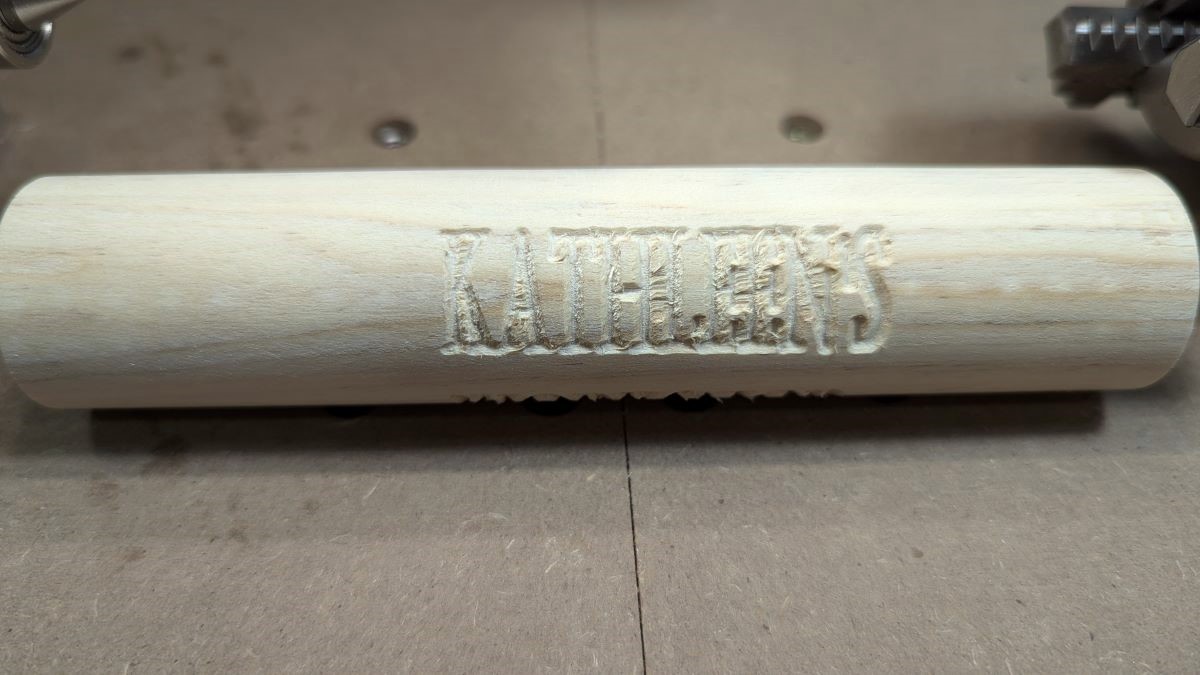
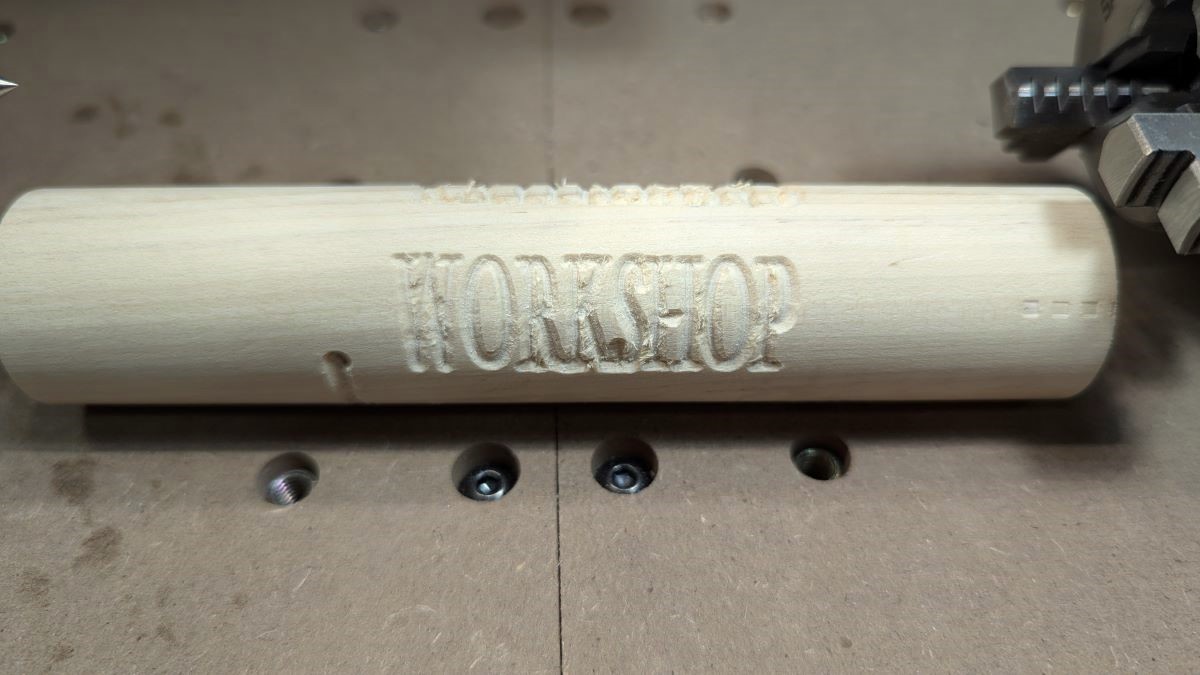
TwoTrees suggested I place the claw on the right side of the CNC instead of the left and it worked!
Here’s the video of the rotary carving.
Another Carveco carving – oak
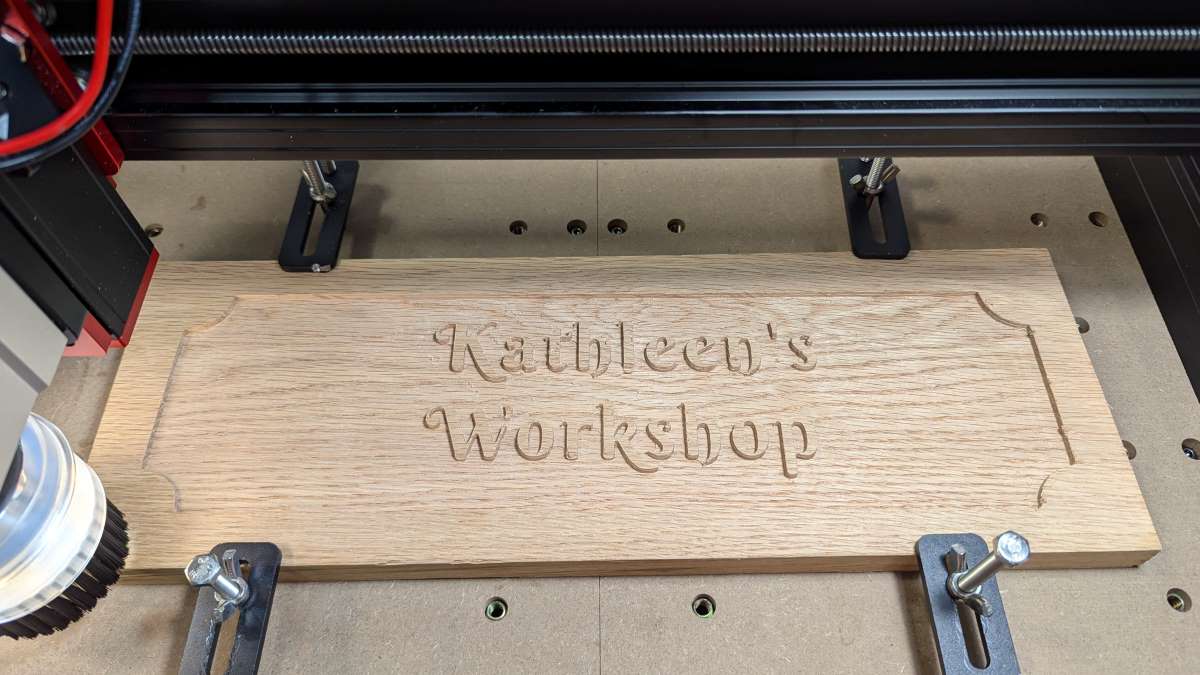
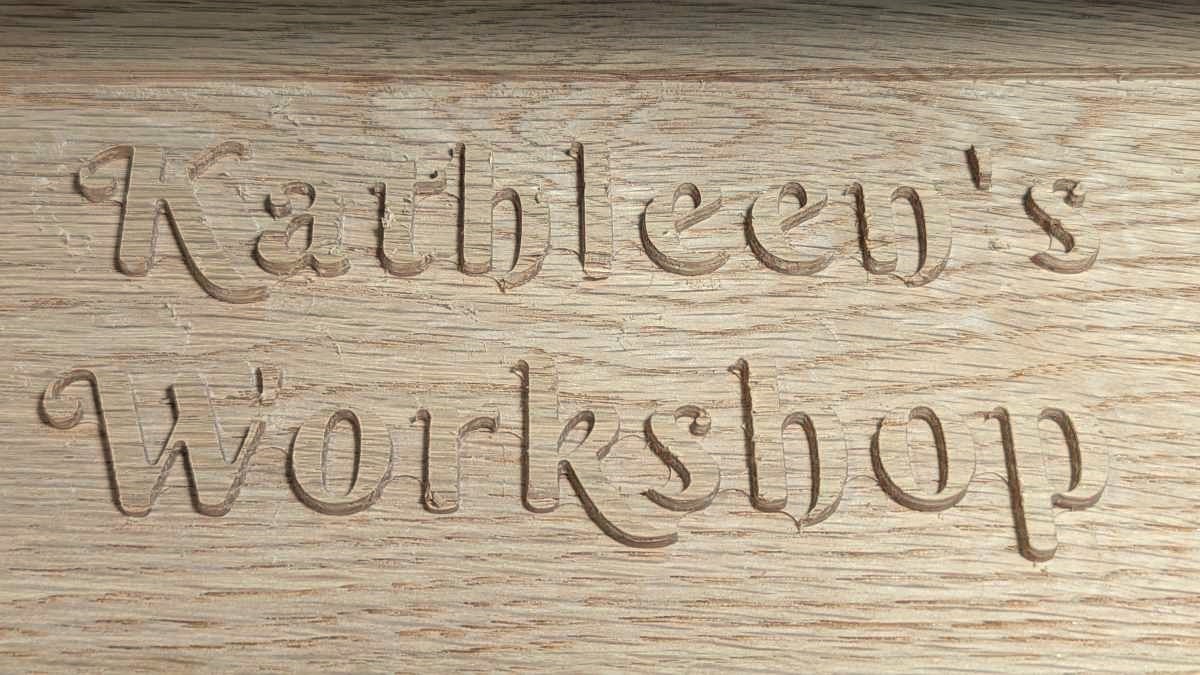
Here is one of my latest projects carved on oak. Yeah, I need a lot more practice.
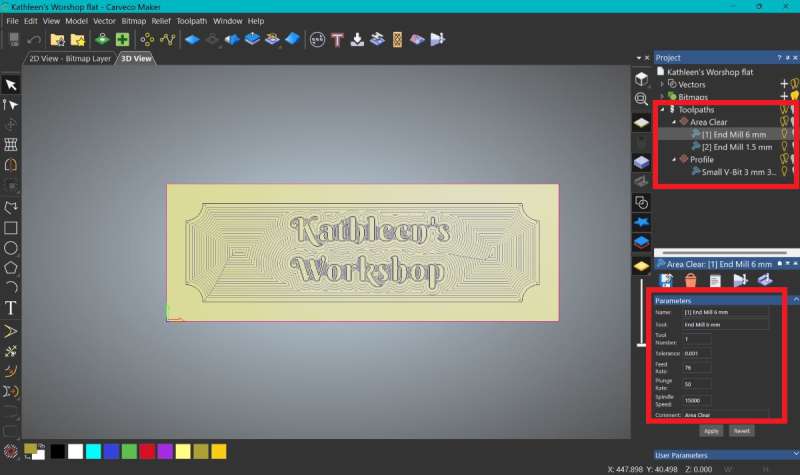
I used Carveco Maker to create the design and the toolpaths. I used a 6mm cut diameter downcut end mill and a 1.5mm cut diameter downcut end mill, and lastly a 3mm cut diameter 30-degree V-bit.
TTC-450 Pro machine and accessories observations
Vacuum tests
After learning how to use the CNC, I noticed that the vacuum hadn’t automatically started. Initially, I assumed the vacuum would turn on when the spindle began running and would stop when the spindle stopped. I pressed the Auto button and then turned on the spindle using the touchscreen panel, but the vacuum didn’t start. I turned off the “Auto” button, unplugged the vacuum (the manual says to do this for the auto feature to work), plugged it back in, pressed the “Auto” button, turned on the spindle, and still nothing happened.
So, I reached out to technical support again. I showed them videos of the issue, and they told me to step through that same process again, only this time, try to carve a file. The test engineer said, “The automatic dust collection function requires the machine to sense vibration and significant noise.”
I later carved one of the test files, but the vacuum still didn’t start automatically.
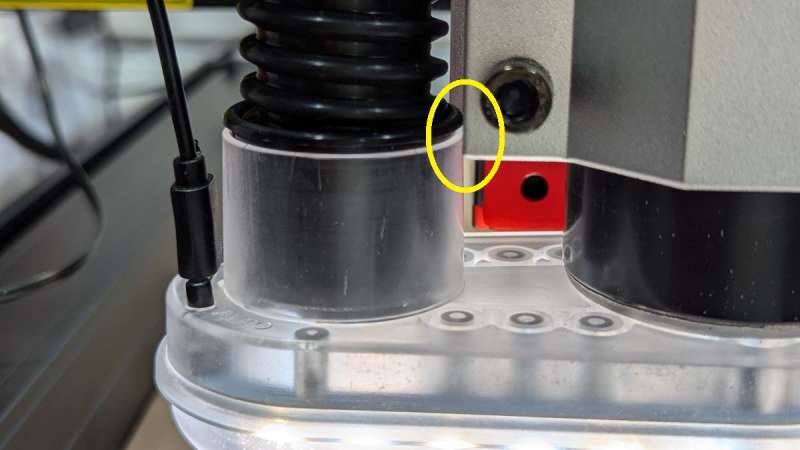
A day later, I had an idea. I adjusted the spindle height within its clamp so that the vacuum hose port on the dust shoe touched the spindle clamp (shown in the yellow circle in the photo above). Voila! The vacuum came on automatically when I ran a test file and shut off automatically when it finished!! YAY!! Remember that if you want the automatic dust collection feature to work. The only problem is there’s a second or two between the project starting and the vacuum turning on, thus leaving the initial wood shavings scattered over the CNC. Other than that, it works like a charm! I love it! It keeps my workplace clean.
The addition of the vacuum is a must, in my opinion. It drastically reduces the amount of wood chips and dust when carving my projects. I usually turn it on manually to catch the initial wood shavings that the “Auto” feature doesn’t. I also love the dust shoe LEDs, which shine light on my projects.
Machine observations
Using the TwoTrees TTC-450 Pro CNC Router Machine was quite a laborious task, mostly because I went into it not knowing anything about CNCs. The machine itself is robust and sturdy. Carving 3D reliefs was really cool, and it ran fine until just recently. Now, when I start the 500W spindle using the touchscreen panel, it just sits there. It requires me to manually turn the top of the spindle to get it started. Additionally, my machine has recently been disconnecting from the controller software, which causes the project to stop mid-carving with the spindle still running. I guess I have to reach out to TwoTrees technical support again.
In addition to my current spindle issue and the CNC disconnecting from the controller software, there were several other important issues that I encountered. I was able to solve most of them with the help of TwoTrees’ technical support via WhatsApp (+86 177 2282 6689). These included the following:
- There’s a lack of adequate documentation for installing the 500W spindle and rotary module, specifically the cables.
- The front of my CNC control box isn’t labeled, and this is where the 500W spindle and rotary module plug in.
- I needed to drag the driver installation file to the desktop to successfully install the Windows driver.
- The WiFi password didn’t save.
- There were soft limits in the TTC-450 Pro code that interfered with some carves, so I had to get rid of them by entering “$20=0” using the Console in the controller software.
- I also noticed that the left X-axis gantry arm scrapes against the control box wall.
- The rotary wheels used to tighten the claw bind up, so there’s an issue with how well the parts are machined.
- The rotary claw needs to be installed to the right of the rotary thimble to carve correctly.
Additionally, if you’re new to CNC machining, there’s a great deal of technical knowledge that you need to have to create decent results.
What I like about the TwoTrees TTC-450 Pro CNC Router
- I love being able to carve 3D reliefs on wood
- The machine is robust and sturdy
- The 500W spindle is nice to have to carve your projects faster
- I love the attached vacuum – it helps keep my workspace clean
- I love the LED lights on the dust shoe – it provides light over my carving project (I haven’t seen any other dust shoes that have that feature)
What I’d change
- I needed to drag the driver installation file to the desktop to successfully install the Windows driver
- The 500W spindle motor is sold separately (I wish it came with the TTC-450 Pro by default)
- The 500W spindle motor installation needs documentation and an installation video posted on YouTube
- The CNC machine was missing a label on the front of the control box under the touchscreen panel where the spindle and rotary cables connect
- The vacuum’s auto-start feature needs to detect vibrations to activate; thus, the dust shoe must touch the spindle clamp (this should be noted in the documentation)
- The WiFi password doesn’t save on the machine – you need to enter it every time you power on the CNC
- When I triggered the upper Z-axis limit switch, I couldn’t keep it unlocked to move the Z-axis away from the limit switch without resorting to using a laptop with CNC controller software (this happened only one day)
- There were soft limits in the TTC-450 Pro code that interfered with some carves, so I had to get rid of them (I entered “$20=0” using the Console in the controller software)
- The left X-axis gantry arm scrapes against a plate inside the CNC control box that protects the motherboard
- The rotary wheels used to tighten the claw bind up, so there’s an issue with how the parts are machined to work together
- Recently, when I turn on the 500W spindle, it needs me to give it a turn manually before it starts up
- Recently, the machine has been disconnecting from the controller software, which stops the carving in the middle of the project
- The 40-piece bit kit isn’t worth it – there are no downcut bits included, which is key to finished-looking reliefs
Final thoughts
I used the TwoTrees TTC-450 Pro CNC Router Machine to carve some cool relief projects. The machine is robust and sturdy and the attached vacuum is a wonderful accessory (sold separately) because it significantly decreases the amount of wood chips and dust created when carving.
However, I’m conflicted about the TTC-450 Pro because of the issues I encountered. I solved most of them with the help of TwoTrees technical support, but as I continue to use it, new issues seem to crop up like the 500W spindle not wanting to start without my help and the machine disconnecting from the controller software causing the project to stop carving (this might be due to the vacuum running on the same circuit – just a guess).
There’s also an incredibly steep learning curve because I had no prior knowledge of CNC machining. The pressure to learn a huge amount of information was amplified due to being on a deadline to publish this review. If you are a newbie and have ample time, you might not feel as overwhelmed as I was.
If you decide you’d like to try it, the TTC-450 Pro seems like a decent hobby machine. I highly recommend the vacuum cleaner kit to keep your work area clean. And when it works, having the 500W spindle motor makes quicker work of your projects than the 80W spindle that comes with the Pro. I would hold off on the 40-piece bit kit – it doesn’t include any downcut bits, which is key for producing finished-looking reliefs on wood (I had to purchase my downcut bits from Amazon). Lastly, the rotary module might be for those who are more experienced/comfortable with CNC work.
Prices:
- $599.00 for the TTC-450 Pro from TwoTrees
- $129.00 for the 500W spindle kit from TwoTrees
- $99.00 for the vacuum kit from TwoTrees
- $129.00 for the 4th axis module kit from TwoTrees
- $54.00 for the 40-bit kit from TwoTrees
- $609 for the TTC-450 Pro from Amazon
- $125.10 for the 500W spindle from Amazon (price includes 10% discount)
Where to buy: TwoTrees, Amazon
Source: The sample of this product was provided by TwoTrees. TwoTrees did not have a final say on the review and did not preview the review before it was published.

Google Review Tap Cards (3-Pack) by TapFive - Tap for Instant Reviews - All Phones Compatible - Reusable Smart Tap NFC & QR - Boost Business Reviews - Powered by TapFive (3 Card Pack)
(as of June 26, 2026 19:20 GMT -05:00 - More infoProduct prices and availability are accurate as of the date/time indicated and are subject to change. Any price and availability information displayed on [relevant Amazon Site(s), as applicable] at the time of purchase will apply to the purchase of this product.)
Gadgeteer Comment Policy - Please read before commenting
Hey Kathleen, Wow ! this has to be the most detailed review I think I have ever seen. I had purchased the TTC-450 earlier but have not assembled it (was a bit daunting and I was busy on other things) and then I saw the TTC 450 Pro had come out. So I will sell the TTC 450 (minus the 500w spindle) to a friend and I have purchased the 450 Pro which should be delivered in a day or two. After your review I have also purchased the mini monster vacuum kit. I am new to CNC so I am looking forward to the challenge…I am familiar with 3D Printers and Laser engravers and have a few of them. Thanks for the review, it will help a lot to get me going.
Graham – It is quite the beast of reviews, isn’t it? Even though there’s a lot of information here, I’m still a novice and I’m sure there’s so much more out there to learn. But hopefully, the information provided is enough to get started with CNC machining.
I hope you have success with your TTC-450 Pro. I also hope you like the vacuum. I found that manually powering on the vacuum before starting a project worked best, rather than using the vacuum’s automatic start feature. The automatic feature needs to detect vibrations from the CNC machine when carving the material; thus, by the time the vacuum starts, there are already material shavings everywhere.
Good luck!😊
Excellent review, thank you.
I have just bought the same model and experienced some of the issues you had, however, I learnt on manual machines as an apprentice many years ago so had some knowledge.
The machine is a great hobbyists machine and upgrading the spindle to at least 500w is a must.
Kind regards
Ian
Ian – I thought I responded to your comment, but apparently I didn’t. Apologies! I agree with you that the TTC-450 Pro is good for hobbyists, and upgrading to the 500W spindle is a must. Thank you for taking the time to comment!
wow! You are a lifesaver. I got the 450 Pro and then added the 500 watt motor. What a pain that was. Until I ran across your review. Excellent write up and nice touch adding photos along the way. All is good now 🙂
Claude – I’m so glad that you found the review helpful! Thanks for your kind comments and good luck with your CNC!
I do not t hav e one but seriously considering a smaller version coming out on kic
Kstarter tomorrow. I have saved this and hopefullly all problems that you pointed out have been fixed. You’ve done a great job with your instructions even for someone who has not even seen a concern machine
Darlene – thanks for the compliment! Good luck with your Kickstarter machine (if you purchase it)!
Interesting and detailed review! Not even a review, but instructions for use! Details about the operation of the vacuum cleaner and processing technology were especially interesting. Machine manufacturers need to read the review and take an example, as well as take into account the author’s comments. The author – creative success! Readers – new reviews.
Yuri – thanks for taking the time to leave a comment. I hope the review was useful to you!
Kathleen: I have a ttc450, not the pro. I also am having problems with the spindle stopping during a design. Motor keeps running, but no movement. How was your problem solved? Thanks.
Danny
Danny – This was such a time-intensive review that since posting it, I haven’t touched my CNC. I will though. I will contact Two Trees to see what they suggest about the issue and let you know what I find out in a few days.
Merci Kathleen pour toutes ces infos que TwoTrees se devrait de pouvoir donner à la base…. mais il n’en est rien… même le WIfi est un grand mystère pour savoir à quoi il sert. J’ai tout l’ensemble (450 pro, moteur 500w, Aspirateur et moteur rotatif…) et des mois ou je n’avance qu’à petit pas pour l’utilisation. Ils auraient pu au moins sortir un logiciel permettant d’utilisation en 2D, cerve et rotatif, au moins de base… car cela coute très cher après . Pour les arrêts du moteur, j’ai lu ailleurs que la solution simple était en fait de mettre à jour le firmware….. 🙂
Phrenq – Thank you for leaving a comment, especially about how a firmware update may solve the motor/machine-stopping issue. I’ll look into it!
Thank you. Your input is greatly appreciated.
Danny – I contacted Two Trees Technical Support via Whatsapp (+86 177 2282 6689) and sent them a video of my 500W spindle problem.
Here’s a link to the video to see if you are experiencing the same thing: https://drive.google.com/file/d/11SHKE6PgdgcXgcrcDEhMV7FZ7TVIOce6/view?usp=drive_link
They responded, “This may be because the spindle rotor is eccentric and requires external force to start”. They then said that the spindle needs to be replaced. So if you are experiencing the same problem and your spindle is still under warranty, they will replace it for you.
I hope this helps. Good luck!
Thanks for the info. However, mine starts okay, but it stops cutting during the design at various times. Waiting on reply from two trees on this.
Danny – I have had your issue too, but it was so sporadic. I’ll try to run a few projects to see if I can replicate the problem and catch it on video to send in to technical support. It may take a while for the issue to pop up again. It’s as though the machine loses connectivity with the software on my laptop, but I’m using a USB cable. I guess I can try to swap the cable – when it happens again. Anyway, I’ll keep you updated.
If you find an answer before I do, please share it – I would love to know!!
Nice to see a female doing a review. Can you tell me if we can use some of the free software out there with these machines?
Thanks, I’m glad to see a realistic review where everything is not perfect
Deborah – The software that I used with this CNC is software you can use with most hobby CNCs (I think – I’m not an expert). Most CAD/CAM applications are not free and can be quite expensive. However, there are many free CNC controller applications available to choose from.
Hello Kathleen I’ve just got to say this review is really good I will be going back to it alot as I begin to work with my tt450pro. I was curious about the 4th axis I am using vcarve as my model program and I’ve found that when I upload anything from vcarve to candle it almost seems like the sizing gets shorter in candle and I was testing out a 4th axis project and the z axis almost seemed to not move at all. I haven’t tested this product with wood yet because I’m worried about messing something up and potentially breaking the unit. So I was wondering if there’s any changes I need to make in the candle software or the actual units software?
Jaydin – Unfortunately, I don’t know what to do to correct the sizing between the design in the design software versus the carving. I had such difficulty just getting the machine to carve my design correctly (not backward) that I didn’t tackle the skewed nature of the carving (for me the letters in my design came out taller than I wanted). You may want to contact Vectric support https://www.vectric.com/support/contact-us/
If you figure out how to correct this, please let me know! I would love to hear how you did it! Good luck!
Hi, Kathleen. Love your review. I know you published this awhile ago, but I’m new to two trees 450 pro and I’m having a hard time with the e new 20w laser module I just bought. There is literally no documentation for installing it. Your article was the first that has even mentioned it or the extra cables. Can you direct me to any information you have with regards to this?
Thanks for any help you can provide.
Vicki
Victoria – Unfortunately, I don’t have the 20W laser module to be able to tell you how you can connect it to the CNC. I remember searching for information on the internet about the extra cables and what they are for, but I don’t remember where I found it. If you could share a link to some photos of the laser module ports, I might be able to help, but I’d be guessing.
If TwoTrees provided better documentation, especially for the basic installation of the accessories, they might sell more machines…
Victoria – I just found this TwoTrees info about the 20W laser module:
https://wiki.twotrees3d.com/en/CNCEngravingMachine/TTC450pro/Switch-to-laser-mode
Let me know if this was what you needed…
Impressive!
I mostly do cutouts of wood figures and attach led lights behind, as a hobby. I was doing it all manually with a keyhole saw and sandpaper, but I faced some issues with inner holes and small details in complex works, that were impossible to do manually with my saw.
I decided to buy the TTC450 with the 500W spindle and the vacuum. I assembled the machine with the default 80W spindle and I tried my first dachshund dog last Sunday. I still need to change the spindle and the vacuum. I understood there is a lot to learn. It is not like a printer where you send the file and get the result out of the box. So, I started googleing to learn about bits and speeds, and found your incredible article. Your review is so deep and complete. It is very helpful for newbies like myself.
Kudos for you, Kathleen!
Alex – I’m so glad to hear that you found the review helpful! This was the most challenging review I have ever done, and I figured that I’d post about my complete experience with the TTC-450 Pro.
I, too, would have appreciated help getting the machine set up and running in order to complete my first few projects. However, since there isn’t anything out there that details the step-by-step process, I figured that new CNCers (is that a thing?) would appreciate knowing all the steps and the problems involved (and how I addressed them) to be able to complete their first project with the help of this post.
Thanks again for taking the time to leave a comment, and good luck with your future CNC endeavors! 😁
Awesome inputs !
Hi. I have recently purchased a TTC 450 pro with 500W spindle upgrade and 4 th axis. If you think information is scares then try the new model. I am very impressed with all the upgrades they made from previous model. They really do listen to reviews and follow fix.
The only problem I have is figuring out all the changes and the way things work now because their are no videos on this model. I thought to approach you to ask them if you could do a review on the new one and help our community with the changes. i would like to help but my 55 year old brain is a bit slow for all this and is why we need someone like you to help. please !
Johan – I’m unsure of which upgrades or new items you have that weren’t covered in this review. This review covers the TTC-450 Pro, 500W spindle, and the rotary accessory (4th axis). If you could clarify, I might be able to help.
Thanks Kathleen, I join the other commenters above and appreciate your effort in creating this material.
Additionally, it wood much appreciated if you can share with us how to setup a WiFi connection.
Thanks in advance.
codrut