REVIEW – Laser Engraving is fun. I discovered this after reviewing the Two Trees TTS-55 laser engraver. However, that engraver uses only a 5W laser which needed to do 11-15 passes to cut through 6mm basswood. So, when the Two Trees TTS-20 Pro 20W laser engraver came up for review, I wanted to see how well the 20W laser would cut through the same wood.
I found that it was powerful and fast and could cut 6mm basswood in one pass, but I needed to clean two of the lenses after only a handful of uses to get clean cuts.
What is it?
Two Trees manufactures FDM 3D printers and DIY laser engravers and the Two Trees TTS-20 Pro is a 20W do-it-yourself (DIY) diode laser engraver and cutting machine.
Precautions:
- Always wear laser safety glasses!
- For the TTS-20 Pro, you need to have glasses that block 450±5 nm light.
- I used my FreeMascot OD 6+ 190nm-490nm Wavelength UV light / Violet & Blue Laser Safety Glasses (CE EN207 certification – European laser eyewear standards for laser safety eyewear) that I purchased from Amazon when I reviewed the TTS-55 laser engraver.
- Although Two Trees provides you with safety glasses, I have heard some complaints about how those green safety glasses don’t block the 450 nm range (they only block much higher wavelengths).
- Never leave a laser engraver/cutter unattended when it is in use – it is a potential fire hazard.
- Protect your table by placing a sheet of metal, honeycomb laser bed, etc. under your engraving/cutting material to prevent damage to your table.
- Use caution when engraving or cutting on reflective materials – reflected laser light can damage your eyes.
What’s in the box?
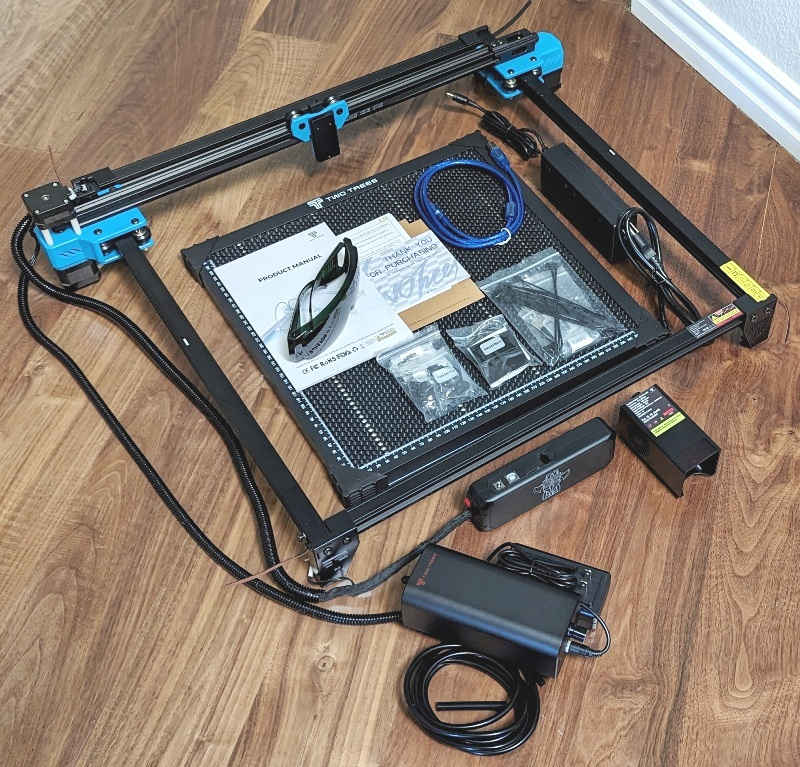

- Pre-assembled TTS-20 Pro aluminum frame with gantry, motors, belts, legs, and wiring installed
- Honeycomb bed (working area 350 x 350mm) with a protective metal sheet, material hold-down pins, rubber pads
- Product Manual
- Laser safety glasses
- Thank you card
- Kraft cardboard
- USB cable (USB-A to USB-B)
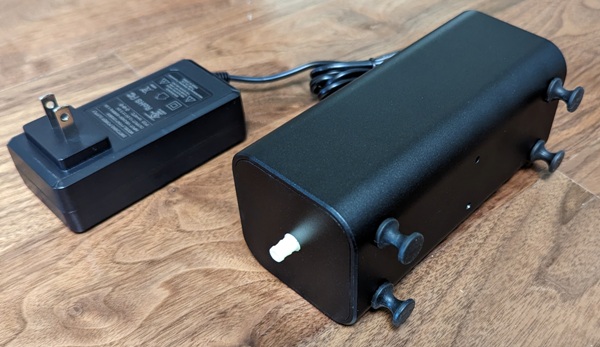
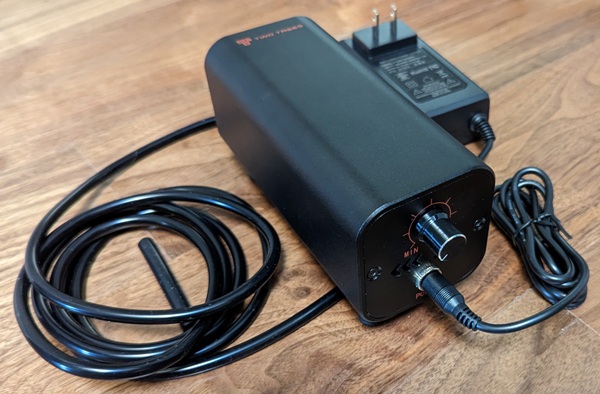
- Power adapter and power cable
- Air assist with air tubing and power adapter (adjustable airflow 10-30L/min.)
- Master control box
- 20W laser module
- Spare laser lens
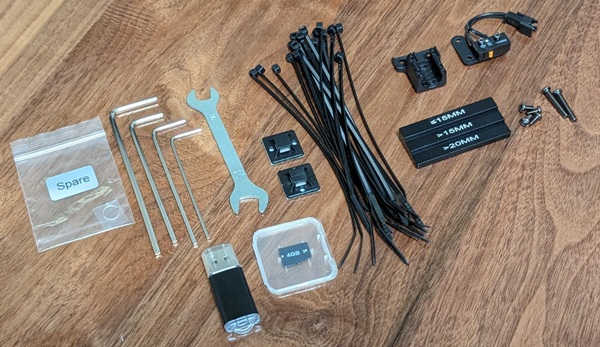
- Allen wrenches (hex keys)
- Open-ended wrench
- Wire guides
- Wire ties
- Bellows mount (or conduit mount)
- X-axis end stop (or limit switch)
- Fixed-thickness plate (laser focusing guide)
- Screws
- USB flash drive and TF card (contains software and sample engraving/cutting files)
Hardware specs
- Model: TTS-20 PRO
- Machine Dimensions: 695*620*125 mm
- Machine Weight: 3.2 kg
- Engraving Area: 418*418 mm
- Laser Wavelength: 450±5 nm
- Engraving Accuracy: 0.1 mm
- Advice for engraving speed: 10000 mm/min
- Operating System: Mac, Windows
- Fabrication Material: Aluminum Profile + Plastic Parts
- Electrical Requirement: 24V 4A DC
- Motherboard: 32bit
- Laser Power: C20000mW
- Supported File Formats: NC, BMP, JPG, PNG, GCODE, ETC
- Supported Software: LaserGRBL (Windows), Lightburn
- Power Type: USA / EU Plug (Optional)
- Software Supported Languages: Chinese, English, Italian, French, German
- Working Environment: RHTemperature 5-40℃, Humidity 20-60%RH
- Interface: USB Connection to PC, TF Card (APP, Webpage control)
- Engraving Materials: Wood, Plastic, Paper, Leather, Sponge Paper, Alumina
- Engraving Mode: Image carving / Text carving / Scanning carving / Contour carving / Pixel carving
Design and features
Assembly
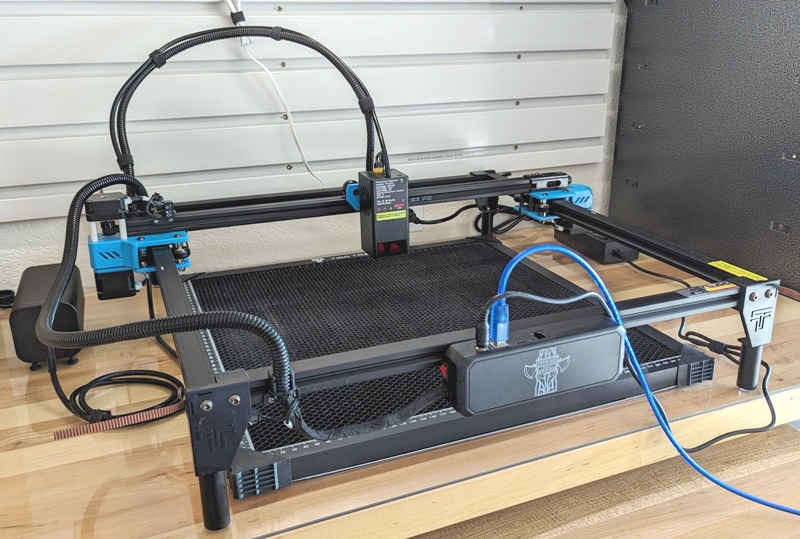
The Two Trees TTS-20 Pro laser engraver came to me “98% pre-assembled”. The rest of the assembly was really easy. I installed the master control box, bellows mounts (conduit mounts), the X-axis limit switch, and the laser module. I also plugged in the cables to the motors, limit switches, air assist, and laser head. That’s it. If you want to see how to assemble the TTS-20 Pro, see this video by Two Trees.
Design
The following are the parts that make up the TTS-20 Pro laser engraver:
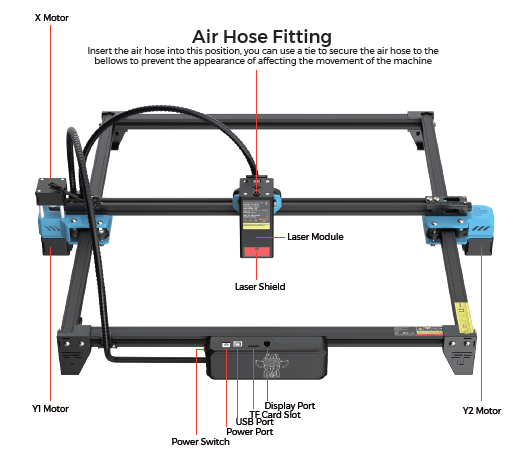
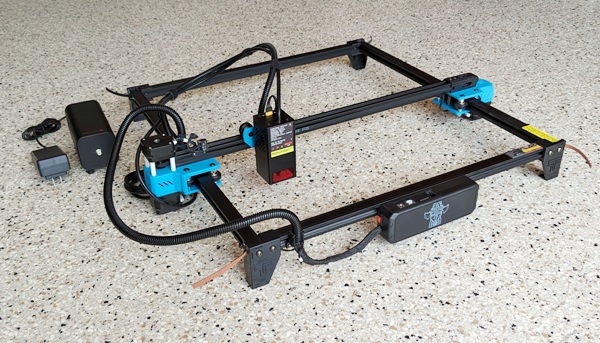
The Two Trees TTS-20 Pro laser engraver has a large lightweight aluminum frame with a working area of 418 x 418mm (external dimensions: 695 x 620 x 125 mm). It also has a 20W laser module, two Y-axis motors, plastic feet, a master control box, and an air assist.
It has an accuracy of 0.08 mm and the documentation suggests using a maximum engraving speed of 10000 mm/min.
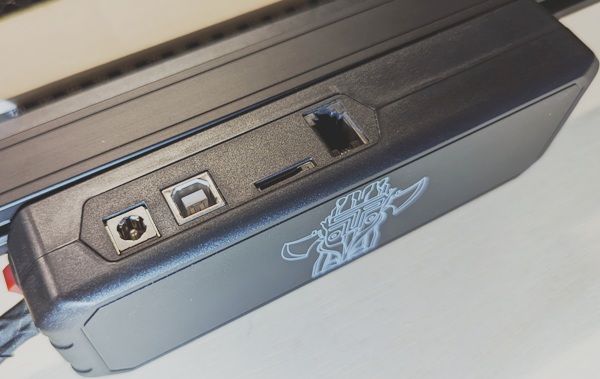
The master control box has a red power switch on the side and located on top of the box are the DC power port, a USB-B port, a TF card slot, and another port they call a “display port” which was not used.
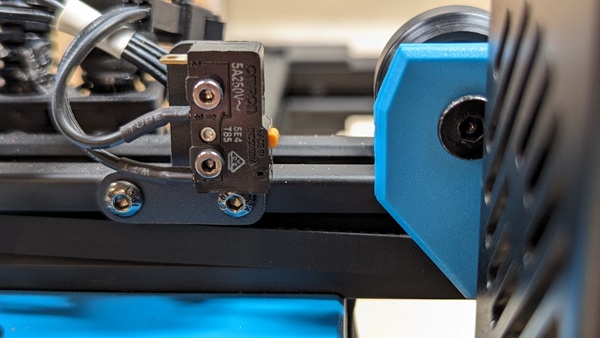
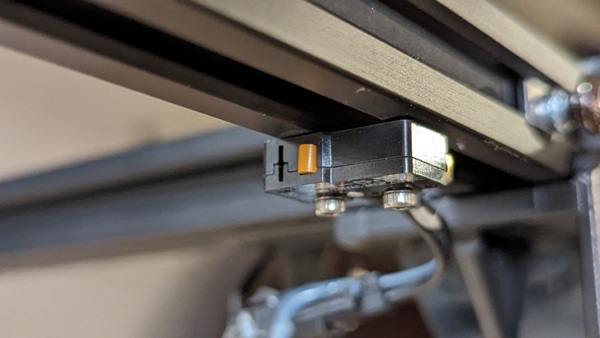
The addition of X and Y limit switches is nice so that the laser module stops when it approaches the boundaries.
The TTS-20 Pro comes with an air assist which improves the cutting performance of the laser engraver and also helps to keep the laser’s lens cleaner.
The air assist pump provides a 10-30L/min adjustable airflow and has rubber feet to absorb vibrations.
This is such a wonderful addition. I would say that an air assist is an integral part of a laser engraver because it has such an impact on the quality and efficiency of the engraver.
When cutting, it helps keep your cuts clean and can help decrease the number of passes required to complete a cut. You will want to turn off the air assist when engraving to obtain clear, precise details.
However, because it has its own power supply independent of the laser engraver, the air assist that comes with the TTS-20 Pro has to be manually controlled. If an air assist’s power cable is integrated into the power of the engraver, Lightburn can automatically control it for each of the layers of your project.
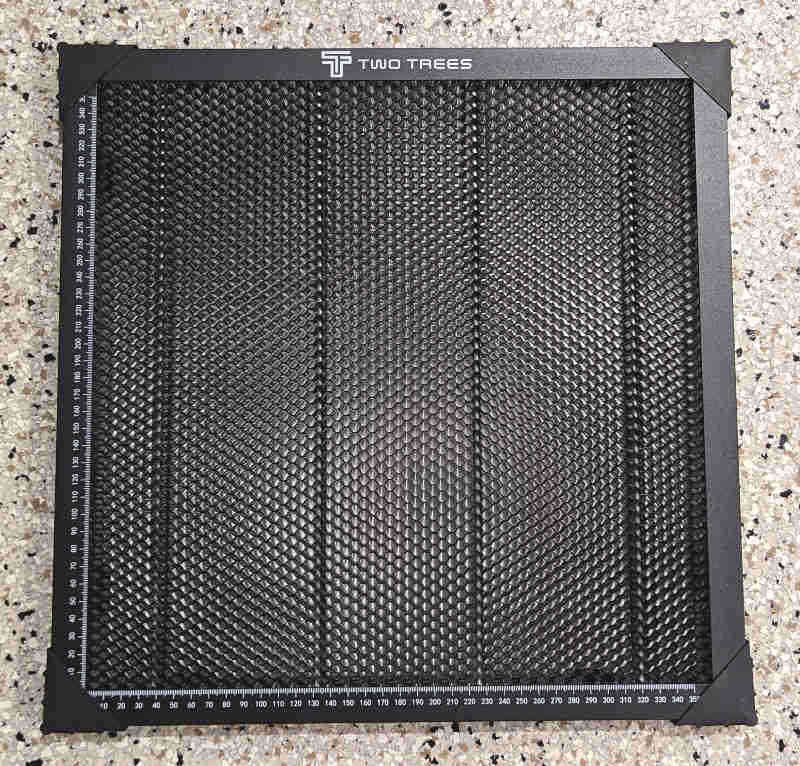
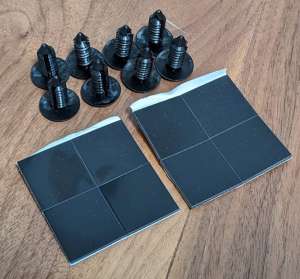
The engraver also comes with a honeycomb bed and honeycomb accessories. The honeycomb bed is smaller than the work area, but it’s still nice to have. The hold-down pins are plastic but fit nicely in the honeycomb holes to hold your project material in place. The rubber pads are to help prevent the honeycomb from slipping around on the metal sheet.
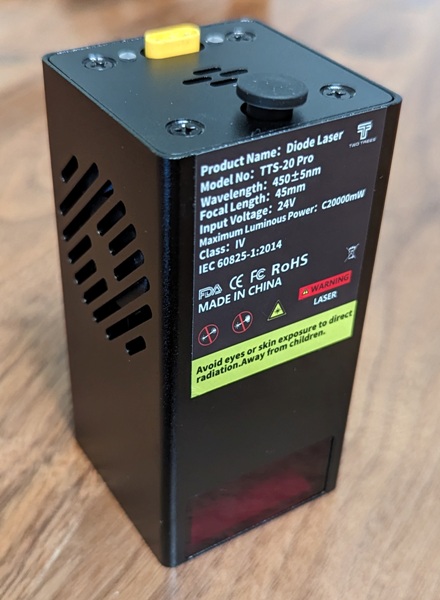
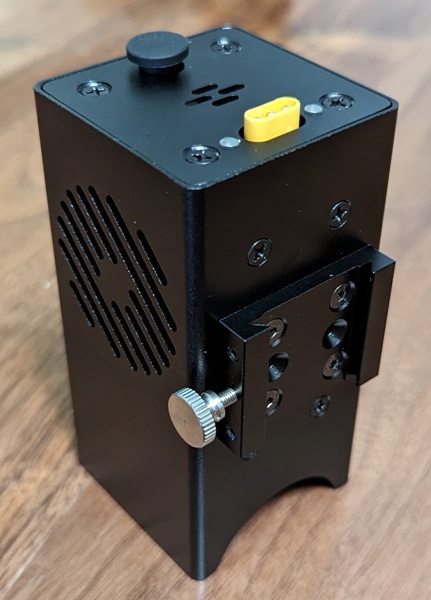
Having a 20W laser on this laser engraver is a big plus. The laser module has an orange acrylic window to help shield your eyes from the laser; but even so, I make sure to wear my safety glasses.
The screw on the back of the laser module is used to adjust the laser up or down to get the correct laser focus for your project.
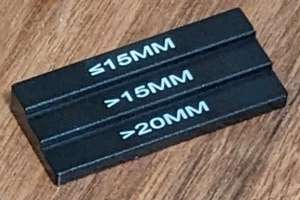
To get the correct focal length, Two Trees provides you with a “fixed-thickness platform” or laser focusing guide. You can adjust the laser module’s height to one of three levels depending on the thickness of your engraving/cutting material: less than or equal to 15mm, greater than 15mm, or greater than 20mm.
The TTS-20 Pro can connect to your home WiFi using the MKSLaserTool application. The MKSLaserTool also allows you to identify the engraver’s IP address.
Once connected, you can wirelessly send projects to the laser engraver and avoid having to physically connect it to your computer using a USB cable to send then engraver your projects.
Knowing the IP address of your engraver also allows you to use the MKSLaser app on your phone or a web app. Unfortunately, I was unable to connect the TTS-20 Pro to WiFi, and am still waiting to hear from Two Trees about what might be the problem.
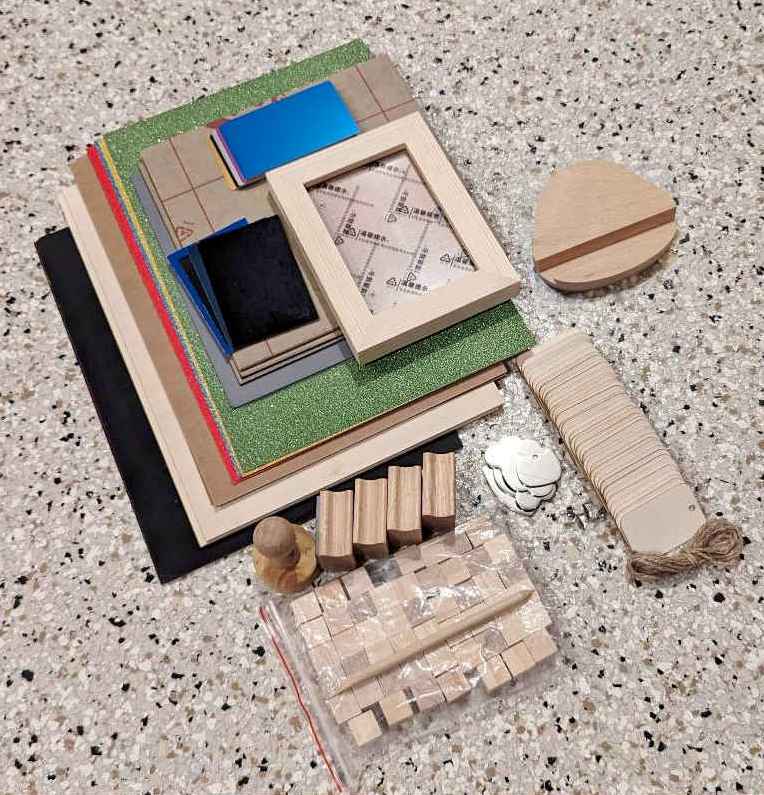
Two Trees sent me a package of engraving and cutting materials to test the TTS-20 Pro. Included are a wooden frame, aluminum business cards, card-sized cardstock, acrylic sheets, rubber stamp material, glitter card stock, Kraft paper, 3mm basswood sheets, black marking paper (scratch off to uncover multicolored background), square wooden stamps, round stamp, stainless steel tags, plywood tags, wood cubes, wood pencil tool, and a beech phone stand.
Setup
Getting started
After assembly, I connected the TTS-20 Pro to my laptop using the USB-A to USB-B cable. I already had the Lightburn software that I needed to start engraving/cutting. You can also use LaserGRBL (which is free), but I like Lightburn so much better and I think it’s well worth the one-time payment of $60.
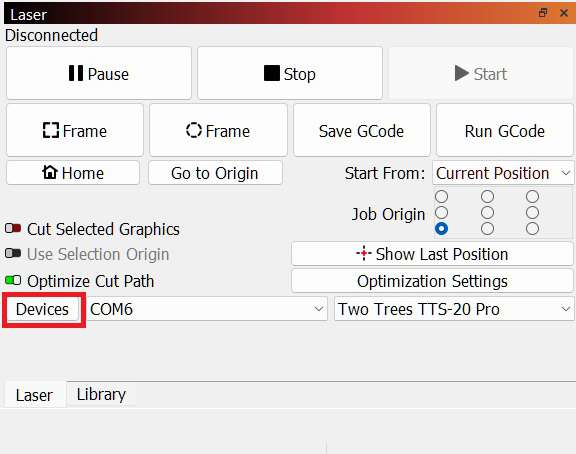
After opening Lightburn, I first added my new laser by clicking on “Devices” as shown above, and selecting the following:
- (“Devices” >) “Find my laser” >
- Select “GRBL (419 x 419mm) at COM 8 115200 baud, Type: GCode, Connection: Serial/USB” [pay attention to the COM PORT NUMBER here – you’ll need to know this later] >
- Click on “Add Device” >
- I renamed it “Two Trees TTS-20 Pro” when asked what I wanted to call it >
- I left the dimension of the work area as the default “419 x 419mm” >
- I left the origin of my laser as the default, but turned on “Auto home on startup” >
- Finish
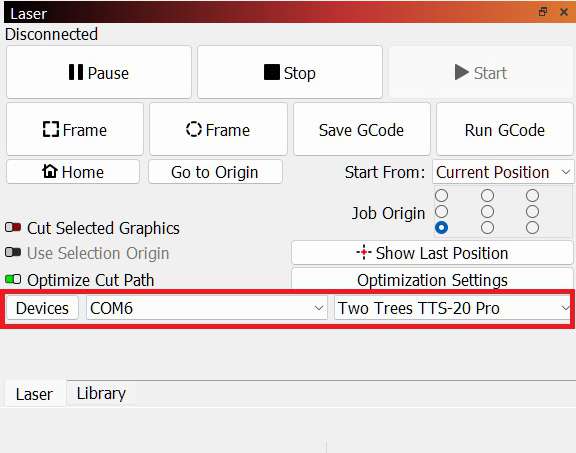
Now whenever you launch Lightburn, in the laser control section, you’ll need to select from the dropdown list (next to “Devices” and “COM”) the “Two Trees TTS-20 Pro” and make sure the correct COM port is selected.
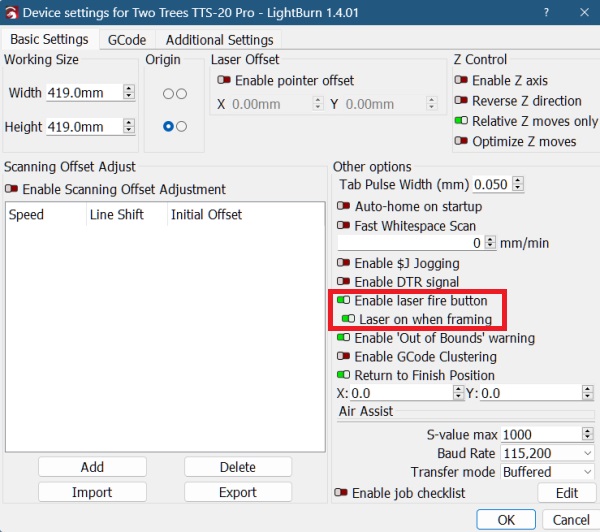
There was one other thing that I wanted to set up before using the laser engraver. I wanted to make sure that the “Laser fire button” was enabled so that I could view the laser on my engraving material to position it correctly.
You can do this by going to “Edit” > “Device settings” > toggle on “Laser fire button” > and clicking “OK” (shown in the screenshot above). You can also make sure that “Laser on when framing” is toggled on. These settings are really helpful for accurate laser positioning.
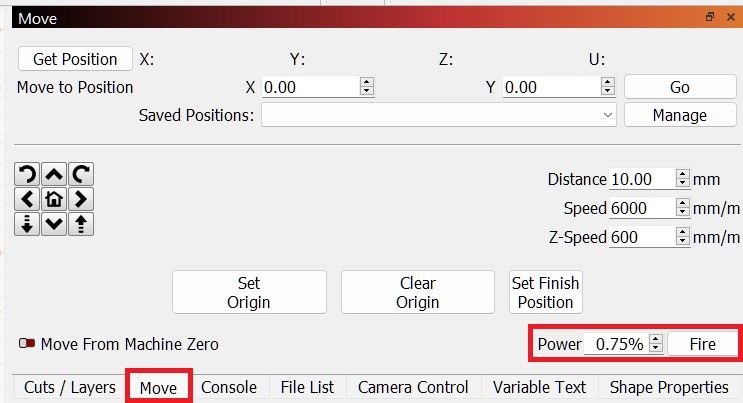
To position your laser over your material, click on the “Move” tab in Lightburn, set the laser to a low-power setting, and click on the “Fire” button (shown in the screenshot above). After clicking on the “Fire” button you will be able to see the laser on your material.
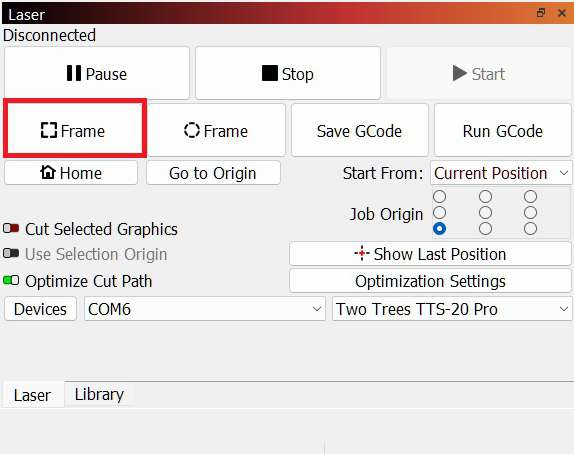
To see if your laser is centered over your material, you’ll want to click on the “Frame” button. After clicking on “Frame”, the laser traces the outer boundaries of the engraving/cutting project.
Performance
Laser engraver USB connection tests
I set up the TTS-20 Pro in my garage because I knew that there would be smoke and fumes produced from engraving and cutting my projects.
In the photo above, you’ll notice that I elevated the frame of the TTS-20 Pro with some leg extensions (black cylinders, not included with the engraver). In the past, I’ve had material that was larger than the frame and I wanted to make sure that the material would fit under the Y-axis motors. As it turns out, I didn’t need the extensions and ended up removing them.
After setting up the engraver in my garage, I connected it to my laptop using the USB-A to USB-B cable provided by Two Trees. The laser engraver can also be connected to my home WiFi, but I’ll get to that later.
Before I started the engraving or cutting, I put on my laser safety glasses.
Materials Test
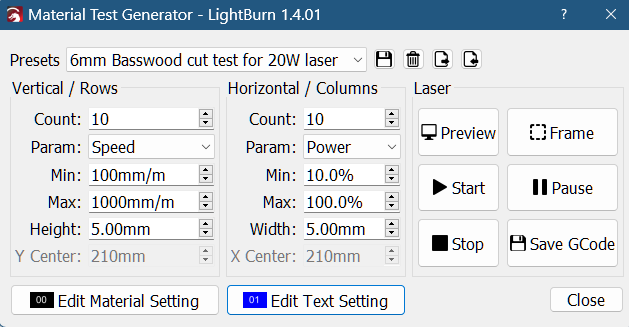
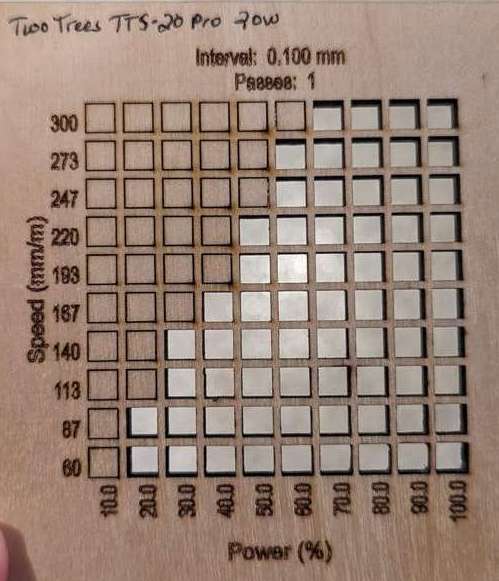
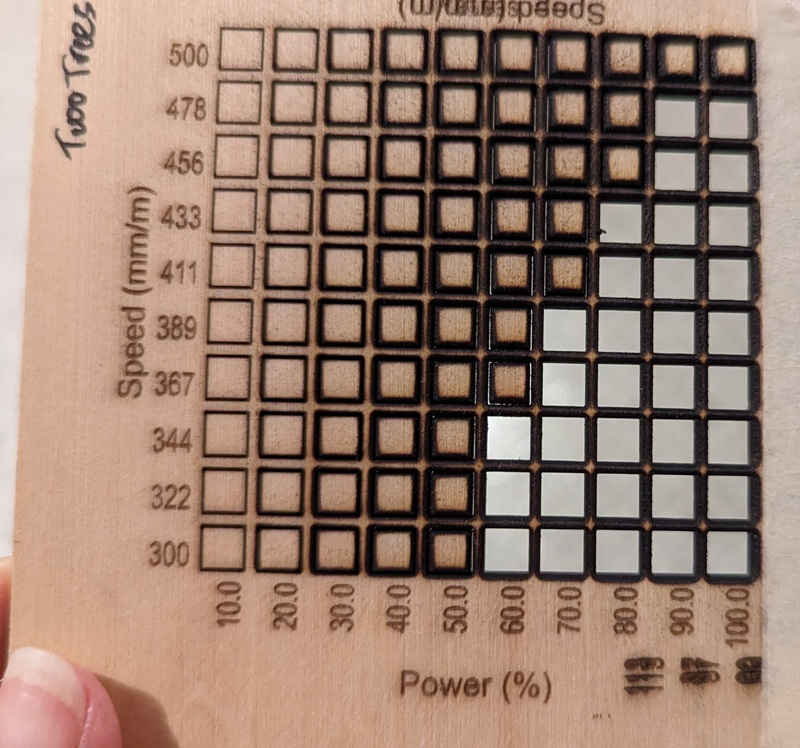
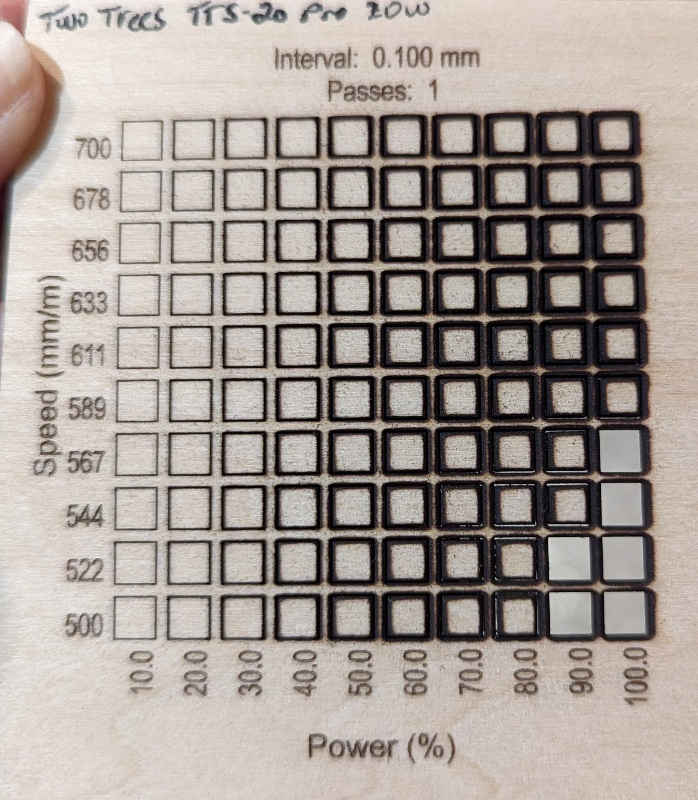
Whenever I receive a new laser engraver, the first thing I do is perform cutting and engraving tests for my materials so that I can identify the correct speed and power settings to use for each.
Lightburn makes performing the materials tests pretty easy. By going to Laser Tools > Material Test, I can enter the number of rows and columns under “Count” as shown above, which parameters to use (Speed, Power, Interval, and Passes), the minimum and maximum speeds, the size of the cut, the text label settings, etc.
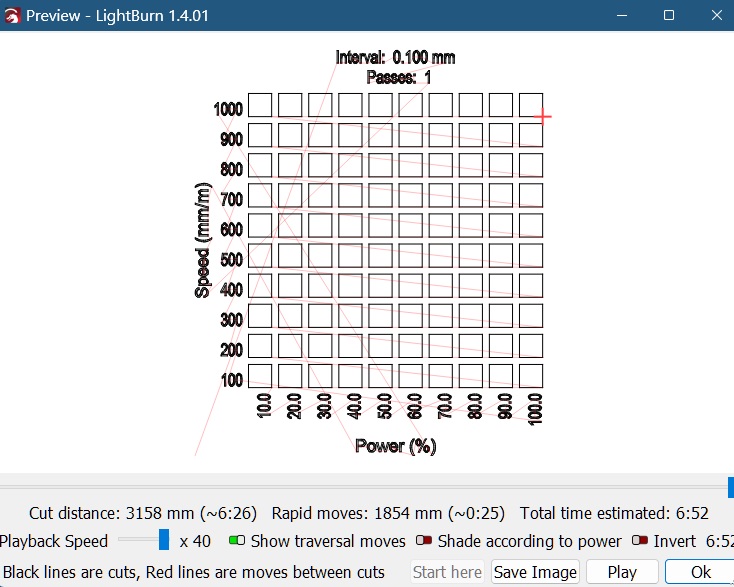
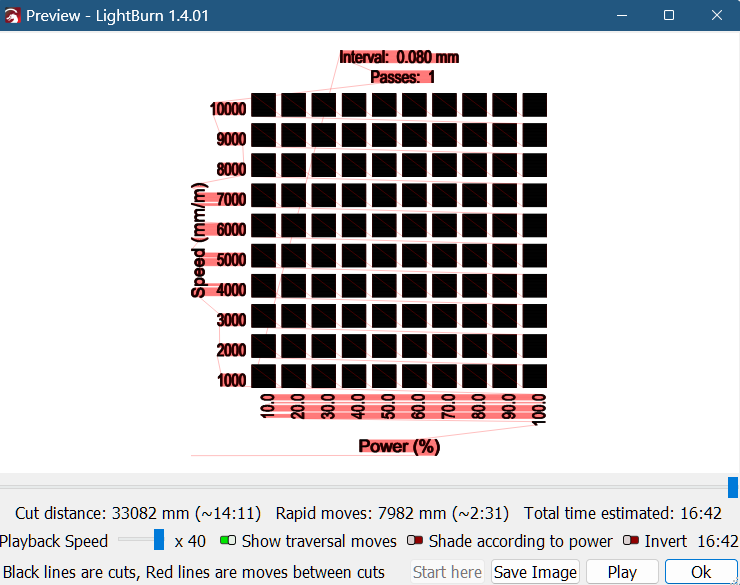
The above is a preview of the cutting and engraving tests.
Engraving and Cutting Results
Image engraving settings
When you open an image file like a PNG, JPG, BMP, etc., (images made up of pixels), several settings need to be changed for the engraving to look like the image.
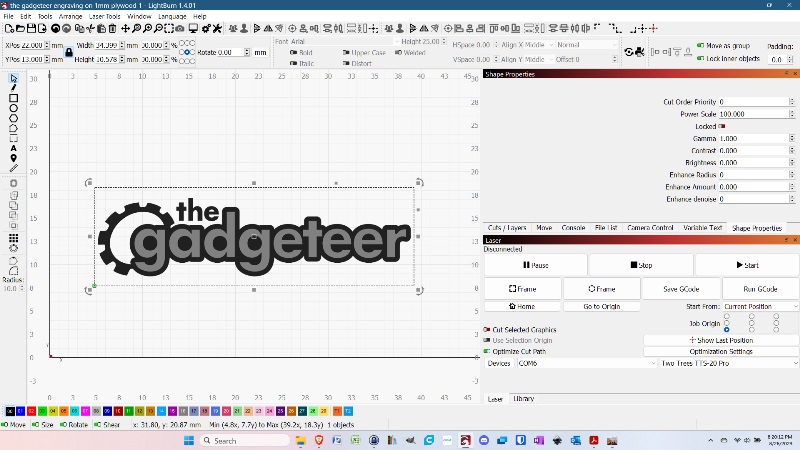
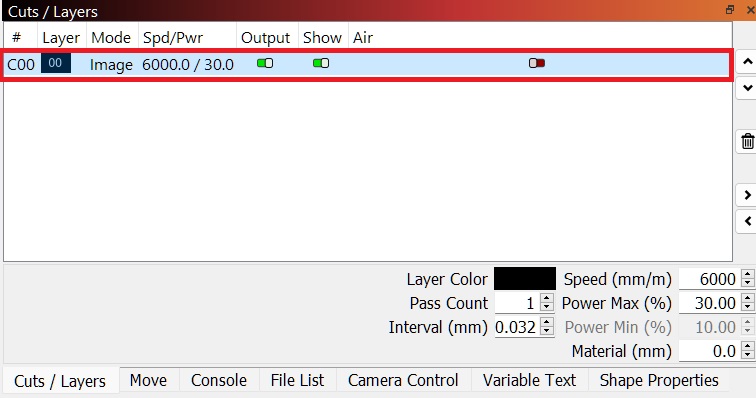
Once you’ve opened up the image file you want to engrave, on the “Cuts/Layers” tab, you’ll need to double-click on the Image layer shown in the red box above to alter some of those settings.
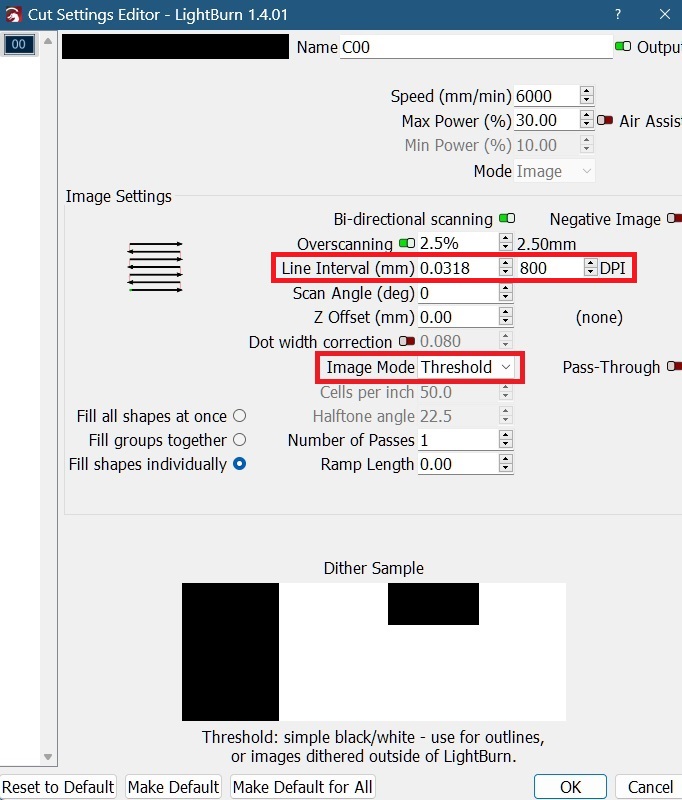
Here, you can change the DPI settings (which change the “Line interval” settings) and the “Image mode”. When engraving photos, the higher the DPI does not necessarily mean the better the quality of the engraving. Many times, you’ll need to set this to 300 DPI or less to get the best result.
The image mode also has a great impact on how well the engraved photo turns out. It’s been my experience that the “Jarvis” image mode is the best arrangement of dots that create a more photo-like quality in the engraving.
Several other settings often need changing to get your image to look its best. You can find those settings in the “Shape properties” tab or “Adjust image” settings.
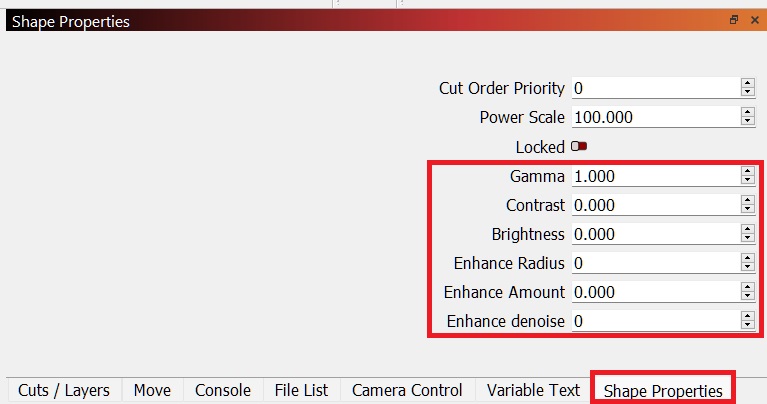
In the “Shape Properties” tab, you can adjust the image’s gamma, brightness, contrast, enhance radius, enhancement amount (these increase the sharpness of the image), etc.
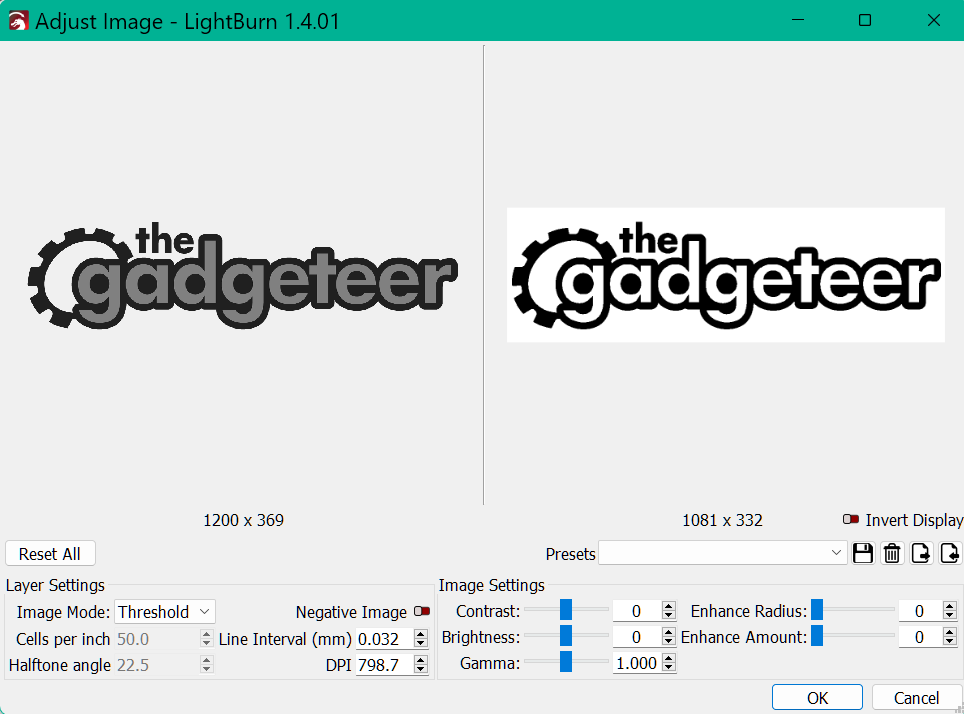
You can also alter those same settings by going to “Tools” > “Adjust image”. Here you can see how your changes affect the image.
Basswood ply results
I engraved the Gadgeteer logo image on 1mm basswood. I didn’t change any of the “Shape Properties” (or “Adjust image” settings).
Instead, I altered the speed (mm/min.), power settings, and image mode. To do this, I double-clicked on the image layer.
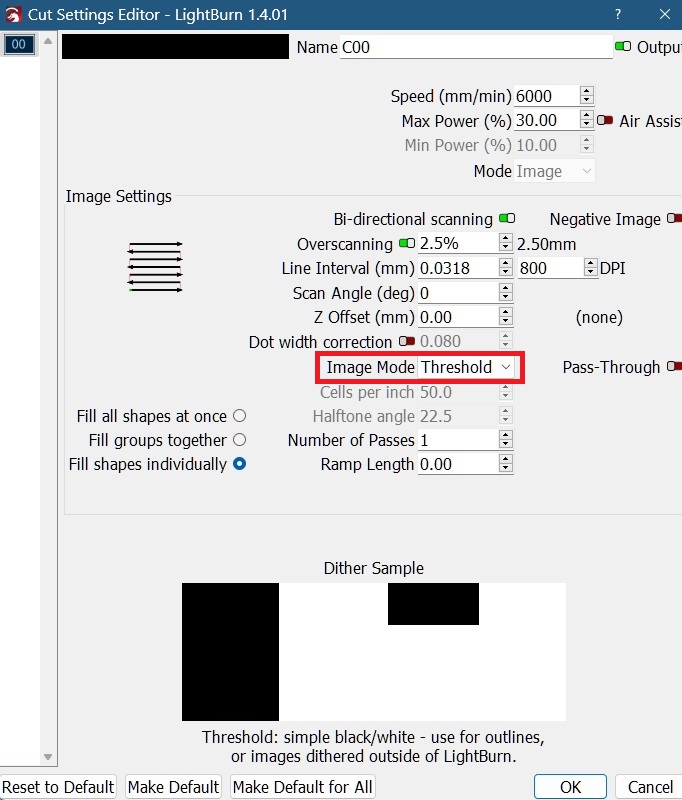
Here, I changed the speed and power and changed the Image Mode to “Threshold”.
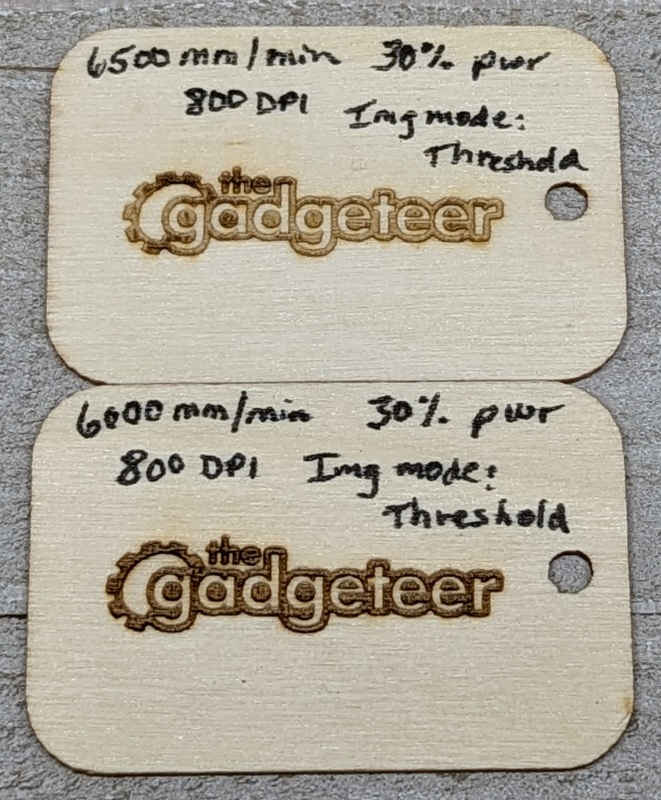
- Top photo: 6500 mm/min engraving speed, 30% power, time to engrave: 1:30 (min:sec)
- Bottom photo: 6000 mm/min engraving speed, 30% power
3mm Basswood

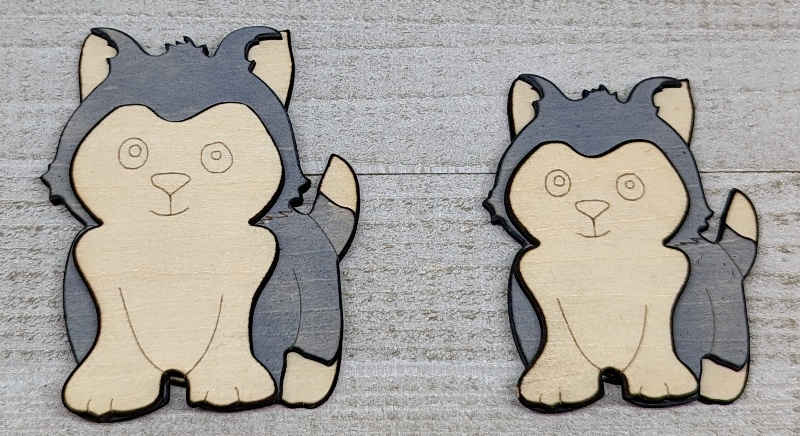
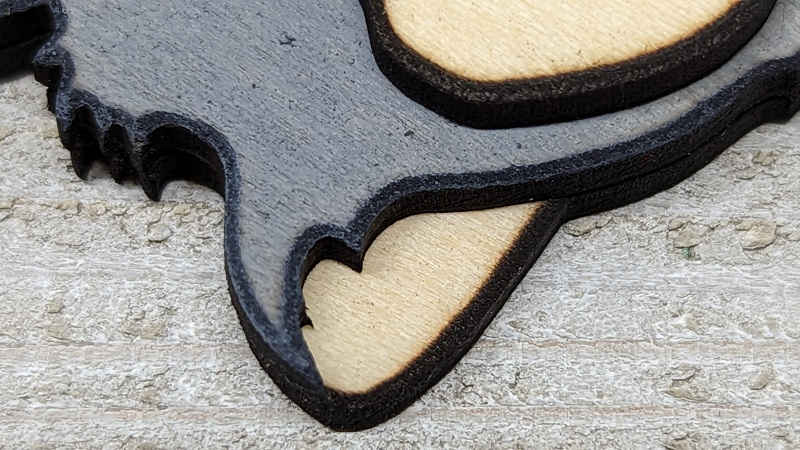
I did this layered engraving/cutout of a cute dog last of all the projects I used the TTS-20-Pro on. I cut two different sizes. Both sizes of the dog cutouts used the following settings:
-
- Cuts: 300mm/min. at 100% power
- Engraving (the face): 5500mm/min. at 60% power
While working on this project I noticed how scorched the surface of the wood was (see the third screenshot above).
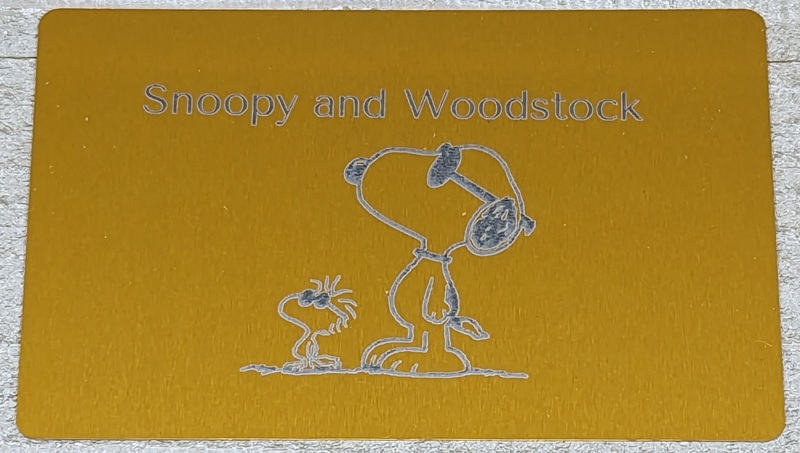
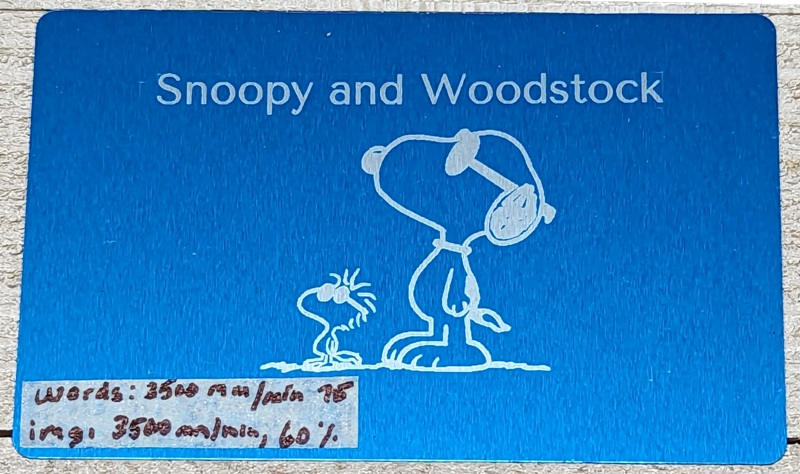
Aluminum business cards
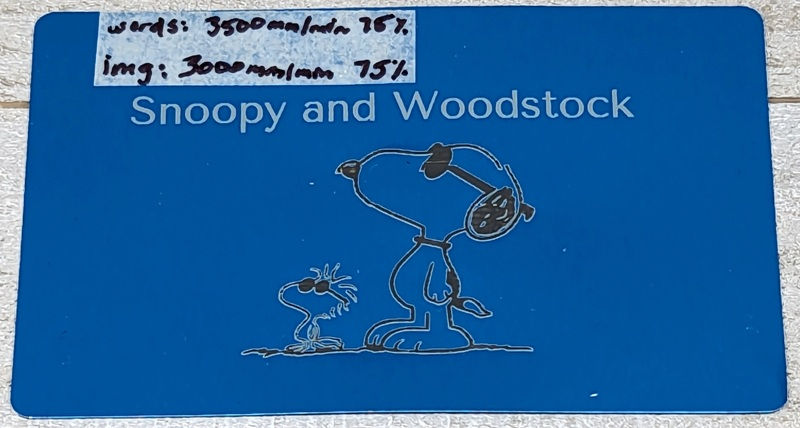
- First business card
- Snoopy and Woodstock image engraving: 3000mm/min. at 75% power
- Line engravings (text): 3500mm/min. at 75% power
- Center business card –
- Snoopy and Woodstock image engraving: 3500mm/min. at 60% power
- Line engraving (text): 3500mm/min. at 75% power
- Last business card (this card is mislabeled in the photo above; it should be on the middle business card)
- Snoopy and Woodstock image engraving: 4000mm/min. at 30% power
- Line engravings (text): 3500mm/min. at 60% power
Stainless steel
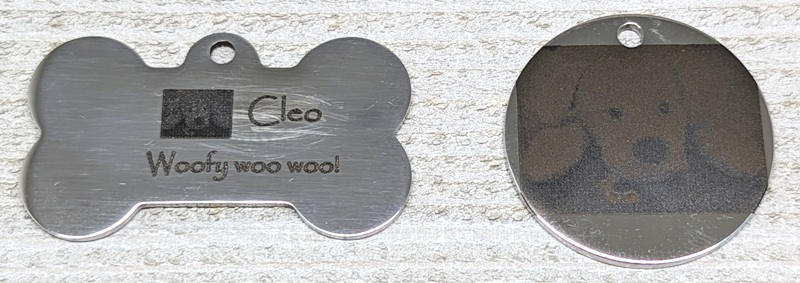
- Dog bone tag:
- I think the final settings were something like 300mm/min at 90% power for the image and the words.
- I first used 50mm/min. at 100% for the image and 30mm/min at 100% for the words on the reverse side of the tag, but the speeds were way too low and the power too high so it turned out very dark.
- Round tag image engraving:
- 1100mm/min. at 90% power
Positioning the tags under the laser was very time-consuming. The tags are small and the laser module covers them up almost completely making it difficult to see if the laser was adequately placed over the tag. I had difficulty seeing if the design was too big or too small for the tag. And centering the tag under the laser was even more difficult because I couldn’t see. I spent a lot of time framing the design to get it right.
Glass

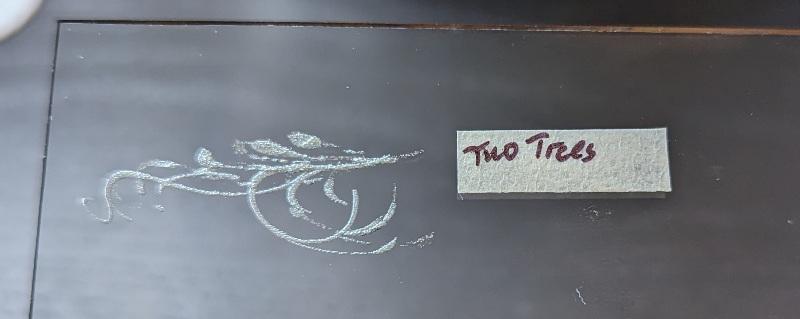
- Engraved olive branch image:
- 1200mm/min. at 45% power (the photo above shows the frosted engraved glass)
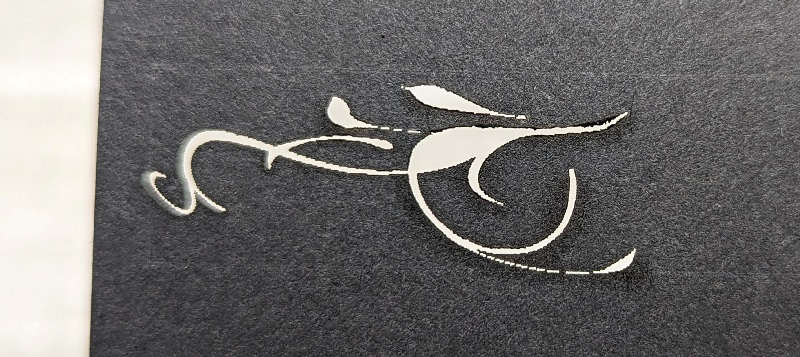
I used black card stock placed underneath the glass instead of coating the glass with tempera paint. So the above photo is actually what the laser engraver cut out on the card stock when engraving the glass.
Laser engraver WiFi connection
Using MKSLaserTool
Two Trees provides you with a desktop application called MKSLaserTool that connects the Two Trees TTS-20 Pro laser engraver to your home WiFi network and finds its IP address. Once connected to your home’s network, you shouldn’t need the application unless you need to update your engraver’s firmware or can’t remember your engraver’s IP address. You can also find your laser engraver’s IP address using your router’s web or phone app.
I installed the MKSLaserTool on my laptop. This time the installation file was NOT in Chinese like the file I received when reviewing the TTS-55 laser engraver.
Unfortunately, I was unable to connect my engraver to our home WiFi.
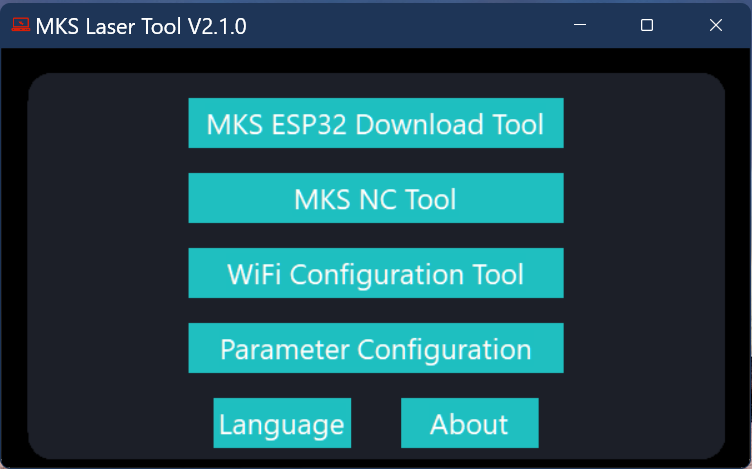
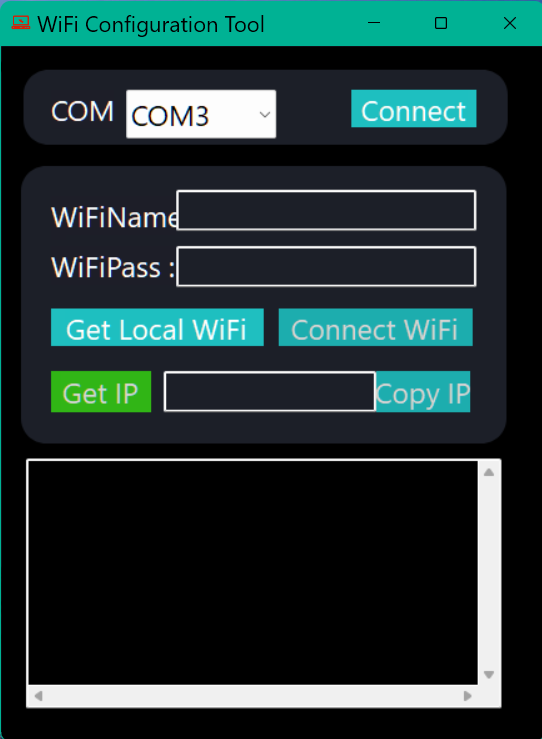
The process to connect the engraver to WiFi using the MKSLaserTool is as follows:
- Launch the MKSLaserTool application and then click on “WiFi Configuration Tool”
- Enter your WiFi name and password and then click on “Connect WiFi”
- Once connected, click on “Get IP”
Knowing the IP address allows you to enter it in the MKSLaser app on your phone as well as the laser engraver web app (by entering the IP address in your browser’s URL)
Using MKSLaser app
If you’re lucky enough to connect your TTS-20 Pro to your WiFi network, you can use the MKSLaser app to create and send projects wirelessly to the engraver. Don’t confuse the MKSLaser mobile app with the MKSLaserTool for desktop. The mobile app is used to create engraving and cutting projects and send them wirelessly to your engraver; while the MKSLaserTool for desktop is meant to help you update your laser engraver’s firmware and connect the engraver to your home WiFi network.
Since I wasn’t able to connect my engraver to WiFi, I couldn’t use the app. However, I used it in the past with the TTS-55 so I’ll give you a brief description of the app.
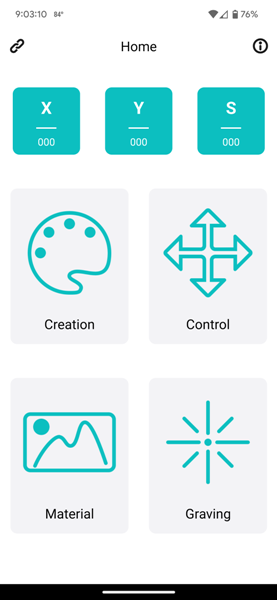

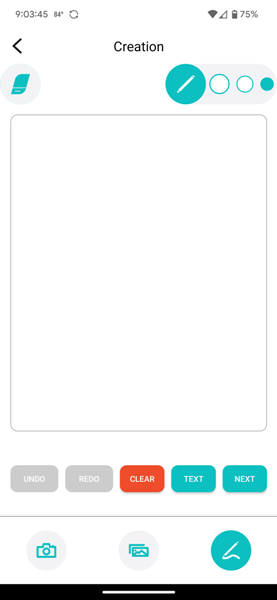
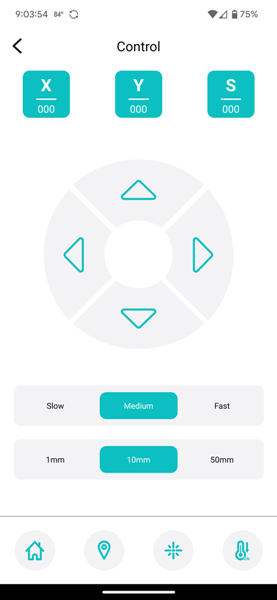
To connect the mobile app to the laser engraver, you need to click on the link icon in the upper left corner of the MKSLaser app homescreen (left screenshot above), and on the next screen, enter the laser engraver’s IP address and click on Connect (second screenshot above).
Because the Creation, Control, and Material sections (see third, fourth, and fifth screenshots above) of the MKSLaser app are rather rudimentary, I will be using LightBurn for all my projects. Thus, it didn’t bother me not being able to use the app with the TTS-20 Pro.
Laser problem
Like the TTS-55, I ran into a problem with the laser. I had run the laser several times and recently noticed that it wasn’t cutting as cleanly as it was initially.
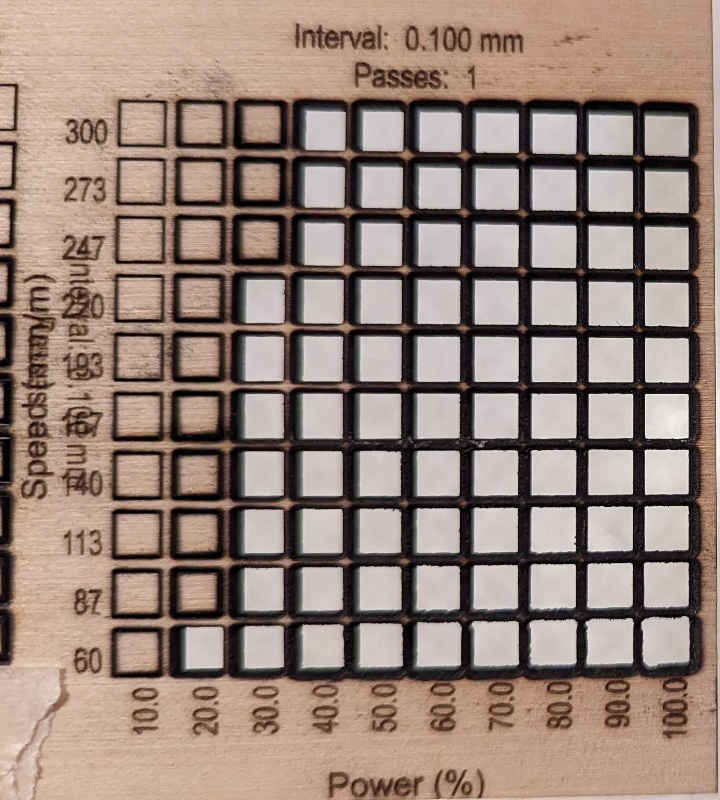
When the engraver was cutting the wood for a project, I noticed that the surface of the wood that I was working with was scorching. I ran another material-cutting test (right photo above) and compared it to my initial material-cutting test (left photo above).
I even increased the speed of the laser module but this didn’t help. I still had a lot of scorching on the surface and now it wasn’t cutting completely through.
I contacted Two Trees customer service about this issue. They instructed me to clean the lens with rubbing alcohol and I did, but was still having problems. They then instructed me to clean the lens under the lens I had just cleaned. That did the trick.
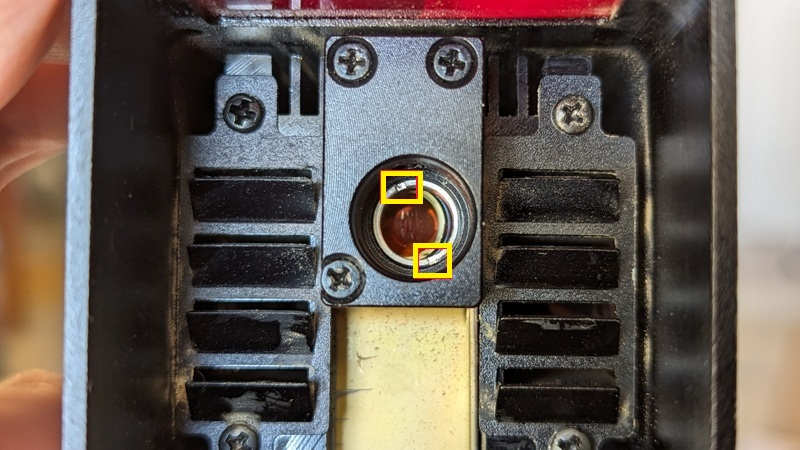
Taking out the lens to clean both sides of it as well as the lens underneath takes about 5-10 minutes. This requires a bit of dexterity because the lens and the ring that keeps it in place are small. To remove the ring, you need to insert something small and pointy enough into the two tiny indentations on the ring to unscrew it (see the yellow boxes in the above photo). This was super duper fun. Be careful not to lose the ring or the lens while cleaning!
Troubleshooting this problem with Two Trees took several days. It took them a few days to reply to me each time I had something to say. I was using WhatsApp to text them and their hours are late at night since they’re in China and I’m in Texas. I am currently waiting to hear from them about why I am having problems connecting the engraver to WiFi.
What I like
- It has a 20W laser that engraves and cuts much faster than the TTS-55 which has a 5W laser
- It came with an air assist
- It came with a honeycomb bed and honeycomb bed accessories
- It was 98% assembled when it arrived
What I’d change
- I couldn’t get it to connect to WiFi (it would be nice to send projects wirelessly to the engraver)
- The laser lenses got dirty quickly and needed cleaning
- It’s very difficult to accurately position the material you wish to engrave or cut (positioning tools would be nice)
- It requires manually adjusting the laser focus
- It doesn’t come with an enclosure thus, thus it should be used in a workshop/garage to avoid getting smoke or dangerous fumes in the house
Final thoughts
The Two Trees TTS-20 Pro laser engraver and cutter was powerful and fast. The engravings and cuts were precise and detailed.
I had success in cutting and engraving several materials. It cut and engraved several of my 1-6mm basswood projects well. When engraving on glass, I needed to make the glass opaque so I used a black piece of cardstock under the glass so that the laser light wouldn’t pass straight through. The engraving turned out well. And, with a 20W laser, I had enough power to engrave on stainless steel without coating it with something first. It actually etches my designs into the steel.
One of the issues that I had was getting the engraver to connect to my WiFi to test the MKSLaser app on my phone or the web application. I’ve contacted Two Trees and am waiting to hear back from them about it.
I had another notable issue with the engraver. The lens as well as the lens beneath that lens got dirty very quickly and needed to be cleaned. When dirty, the engraver didn’t cut well. It scorched the surface of the wood I was cutting. Thankfully the cleaning seemed to help.
I liked using the Two Trees TTS-20 Pro and appreciated the addition of an air assist and honeycomb bed. However, I noticed that I spent a significant amount of time trying to position the laser on my material, so adding an automatic positioning tool would be helpful. And it seemed odd to me to have to clean two lenses after just a few uses. Taking out the lens to clean both sides as well as the lens underneath takes about 5-10 minutes and requires a bit of dexterity because the lens and the ring that keeps it in place are small.
I’m on the fence about whether to recommend the Two Trees TTS-20 Pro. I like using it and it comes with some great tools, but I forsee having to clean the lens more frequently than I expected and I couldn’t send my projects wirelessly to the engraver.
Price: $669.00
Where to buy: Two Trees (save $80 with code: NB80 expires 11/22/2023) and Amazon
Source: The sample of this product was provided by Two Trees.

Zip Ties Assorted Sizes(4”+6”+8”+12”), 400 Pack, Black Cable Ties, UV Resistant Wire Ties by ANOSON
(as of June 20, 2026 14:11 GMT -05:00 - More infoProduct prices and availability are accurate as of the date/time indicated and are subject to change. Any price and availability information displayed on [relevant Amazon Site(s), as applicable] at the time of purchase will apply to the purchase of this product.)
Gadgeteer Comment Policy - Please read before commenting
Hi. I recently bought one of this machine you described. The lens problem is really disgusting but I’m trying to find spare lenses and here is where I found a bigger problem. No response I’m any platform not any information about the reference of the piece ( I’m talking about the small one).
Could you help to find some information to buy the lenses kit?
Please!
Carlos – I can’t find any spare lenses either. But here is their tech support contact info (I’ve been able to get some support through Whatsapp):
https://twotrees3d.com/support/technical-support/
https://www.twotrees.com › supports › chat-support
Office Tel: +86 (755) 23987110
Whatsapp: +86 13380799188
https://twitter.com/TwoTrees3d_
https://www.facebook.com/twotrees3d
Tech support is woeful at best. I chose this laser because connecting via wifi is just way more convenient.
My email to the support link above:
Hi I use linux and Mac computers, how do I join the tts-20 PRO to my wifi network. I do not have a windows machine to use?
The response:
Thanks for your message! We’ll be with you as soon as we can.
If you prefer not to wait, we’ll follow up via the contact info you provided.
Tracking order: ###REDACTED###
Support Email: [email protected]
Kinda useless……