REVIEW – I’ve reviewed a handful of diode laser engravers, and while they engrave and cut many materials well, they have difficulty engraving and cutting clear materials, which is something I’ve been wanting to do. Diode laser light (~455 nm) passes right through clear material and therefore needs a black coating to successfully engrave these materials. However, CO2 laser light (10,600 nm) can engrave glass and acrylic. So, when the OMTech Polar Lite 55W Desktop CO2 Laser Engraver and Cutter came up for review, I was excited to be given the chance to review it.
How did it do? There were some initial issues that I had to iron out before using the engraver, but it handled my acrylic projects with ease! It also handled stone, wood, paper, glass, and slate well, but it had some difficulty with leather.
⬇︎ Jump to summary (pros/cons)
Price: $1799.99
Where to buy: OMTech, Amazon
Table of Contents
- What is it?
- What’s included?
- Tech Specs
- Design and features
-
- Assembly, installation, setup
- Performance
-
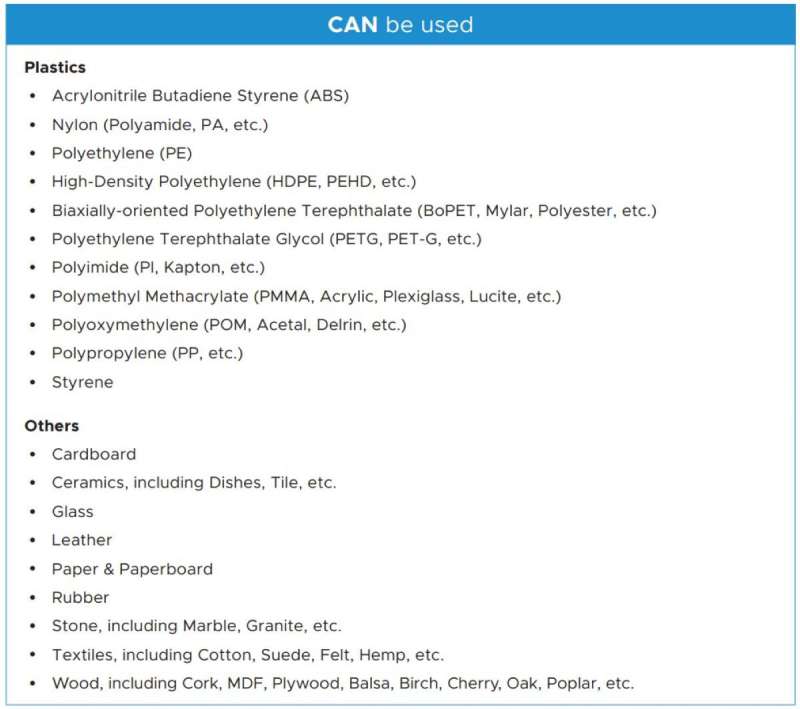
- What can be used
- What CANNOT be used
- Average engraving settings
- First projects – 6mm acrylic
- Wood-project issue
- Z-axis issue
- Lid hinge-pin issue
- Laser head cover issue
- Wood-project issue continued
- Corrected settings for early projects
- Latest 6mm acrylic project
- Stone project
- Slate project
- Ceramic coaster project
- Glass project
- Cardstock project
- Leather project
-
- Final thoughts
- What I like
- What needs to be improved
-
What is it?
The OMTech Polar Lite 55W Desktop CO2 Laser Engraver and Cutter is a machine that uses highly focused light energy to create precise designs on materials such as wood, glass, acrylic, stone, etc.
Precautions:
- Always wear laser safety glasses!
- For the OMTech Polar Lite 55W Desktop CO2 Laser Engraver, you need to have glasses that block 10,600nm light.
- I used FreeMascot OD 6+ 9000nm-11000nm / 10600nm Wavelength CO2 Laser Safety Glasses (EN207: 1998 + A1EN207: 1998 + A1: 2002 approved (European laser eyewear standards for laser safety eyewear) that I purchased from Amazon; these fit over my glasses.
- Never leave a laser engraver/cutter unattended when it is in use – it is a potential fire hazard.
- Always check the coolant fluid level before each use to ensure the CO2 laser tube is adequately cooled, or you risk cracking the tube.
- Use caution when engraving or cutting on reflective materials – reflected laser light can damage your eyes.
What’s included?
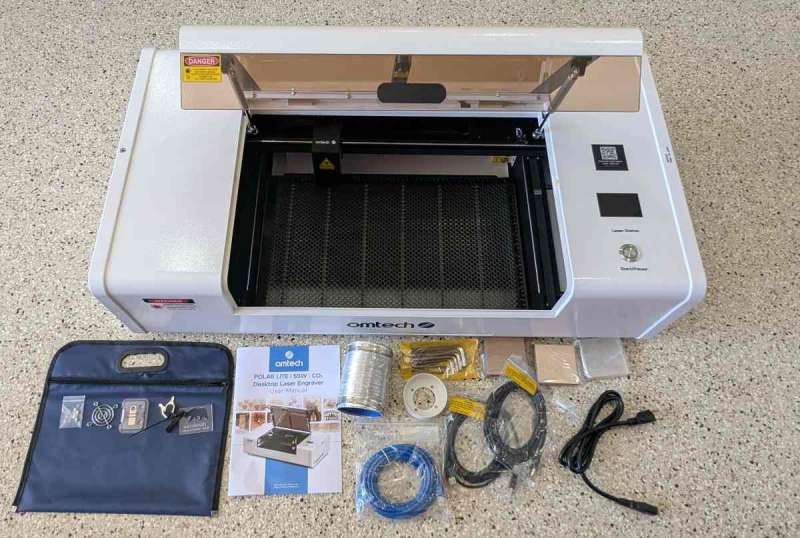
- Polar Lite 55W Desktop CO2 Laser Engraver
- Blue zipper pouch to hold accessories
- 110V/20A fuses (2)
- Exhaust hose grate
- USB drive with engraving software
- Laser keys (2)
- User manual (it’s a quick-start guide)
- Exhaust hose with 2 hose clamps
- Hex wrenches
- Hose adapter
- Flat-head screws (4) (located on the exhaust port)
- 5 m Ethernet cable
- 1.5 m USB cables (2) (USB-A to USB-A)
- 1.5 m power cable
- Cardboard blanks
- Wood blanks
- Acrylic blanks
Tech specs
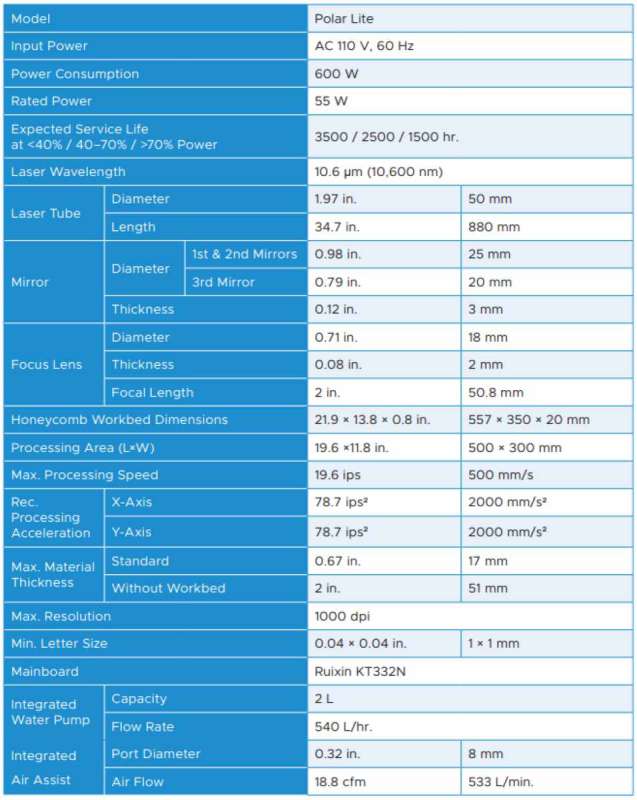
- Rated Power: 55W
- Standard Processing Area: 20.1 x 11.8 in. (500×300 mm)
- Front & Rear Pass-Through: 15.8 x 0.3 in. (400×7 mm)
- Max. Material Thickness: 0.7 in. (17 mm)
- Max. Material Thickness (Without Workbed): 2 in. (51 mm)
- Est. Laser Service Life: 11000 hr.
- Product Dimensions (L*W*H): 41.1 × 22.2 × 11.0 in. (1045 × 565 × 280 mm)
- Package Dimensions (L*W*H): 46.5 × 25.6 × 14.8 in. (1180 × 650 × 375 mm)
- Max. Processing Speed: 19.6 ips (500 mm/s)
- Max. Resolution: 1000 dpi
- Mini. Letter Size: 0.04 x 0.04 in. (1×1 mm)
- Water Chiller Capacity: 0.5 gal. (2 L)
- Flow Rate: 142 gph (540 L/h)
- Camera Resolution: 5MP
- Accuracy: ±0.0008 in. (±0.02 mm)
- Air Assist Port Diameter: 0.3 in. (8 mm)
- Air Flow: 282 cfm (480 m³/h)
- Data Transmission: Wifi, USB Cable, Ethernet Cable
- Provided Operating Software: RDWorks
- Compatible Operating Software: LightBurn, RDWorks
- NOTE: Use CO2 laser coolant (special laser-safe coolant or use distilled water); coolant temp should never exceed 107 degrees F
- Certification: CE, FDA
- Net Weight: 90.4 lb. (41 kg)
- Warranty: 24 Months
Design and features
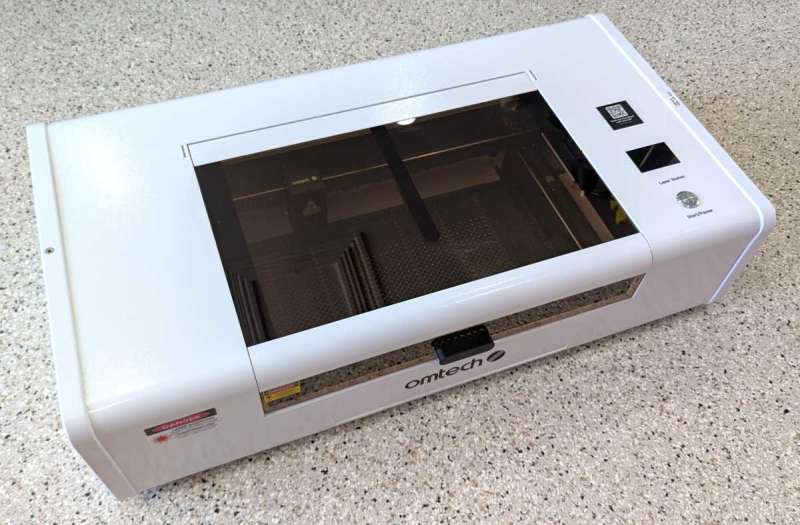
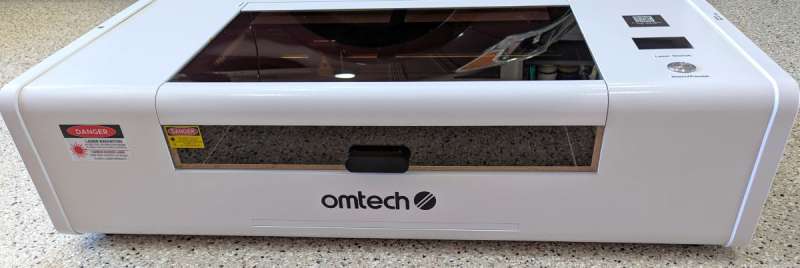
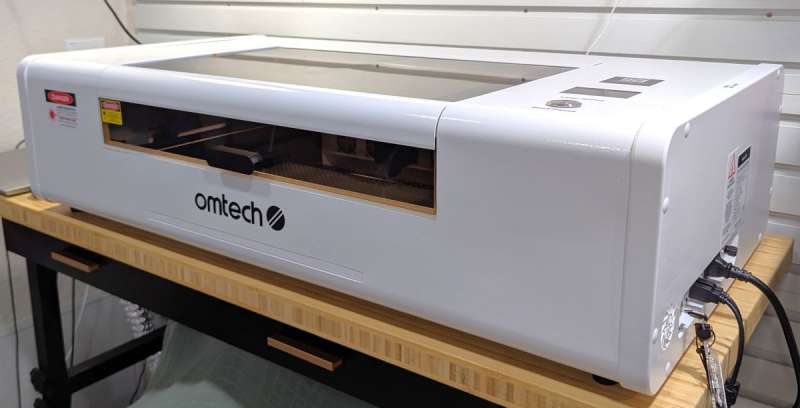
The OMTech Polar Lite 55W Desktop CO2 Laser Engraver and Cutter appears well-made and is fully enclosed in a metal cabinet. This is a big machine measuring 41.1″ L × 22.2″ W × 11.0 ” H (1045 × 565 × 280 mm) and weighing 90.4 lbs. (41kg), so be sure to place it on a sturdy work surface. You also need to make sure you have a room to put it in and use it.
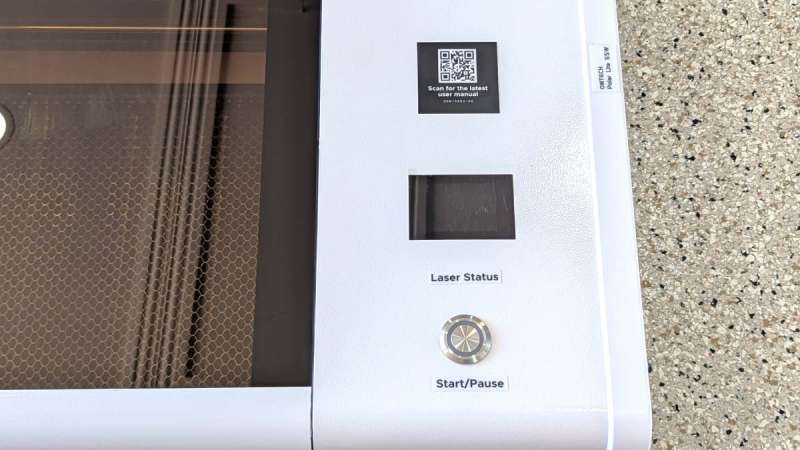
The top of the engraver has a Start/Pause button, an LCD screen to display the coolant temperature and mA used, and a QR code to scan to retrieve the User Manual.
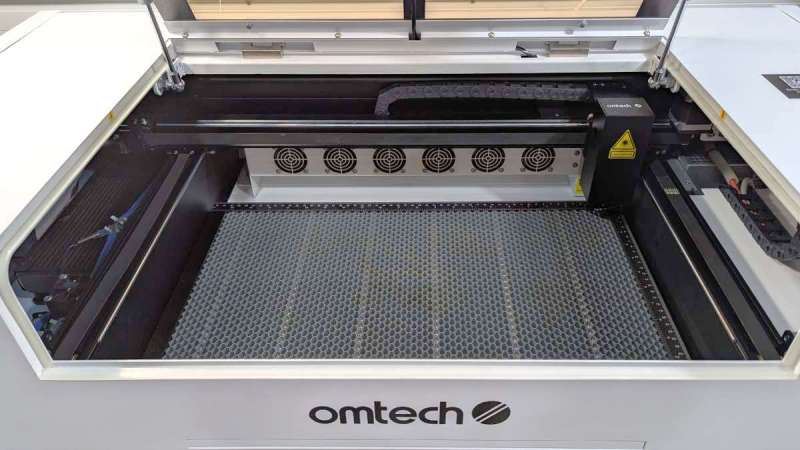
Opening the lid, you quickly see the bank of fans at the back of the engraver to collect the fumes and vent them outside of the machine. You can also see the Y-axis belts and rails, the X-axis gantry, the X-axis belt and rail, and the laser head module.
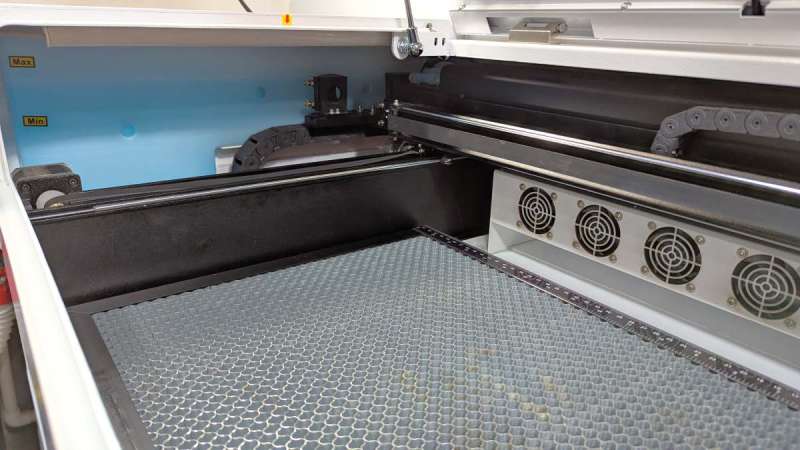
The left side of the machine has the coolant system. It arrived full and ready to use. You need to check the coolant level to make sure it is 2/3 full such that the CO2 laser tube will always be cooled. If the coolant is too low or is not flowing properly, the CO2 laser tube will crack. The CO2 tube is located behind a black metal enclosure just behind the X-axis (behind the chain-like channel containing and protecting the machine’s cables as the laser head moves).
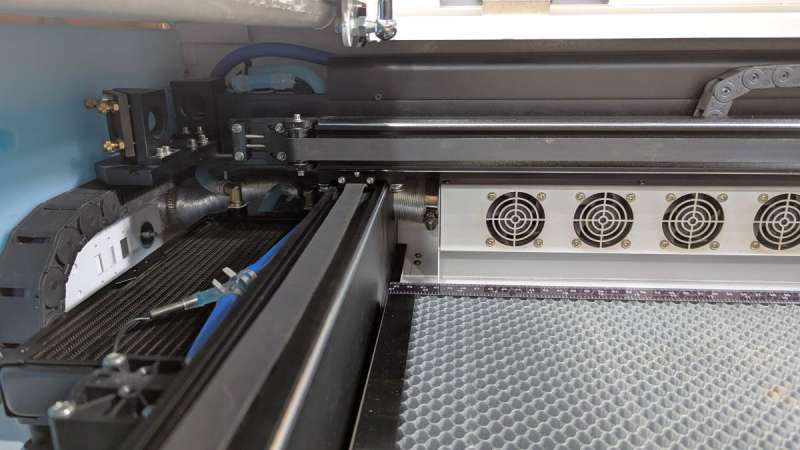
The above photo shows the blue coolant system tubes and the exhaust ventilation system.
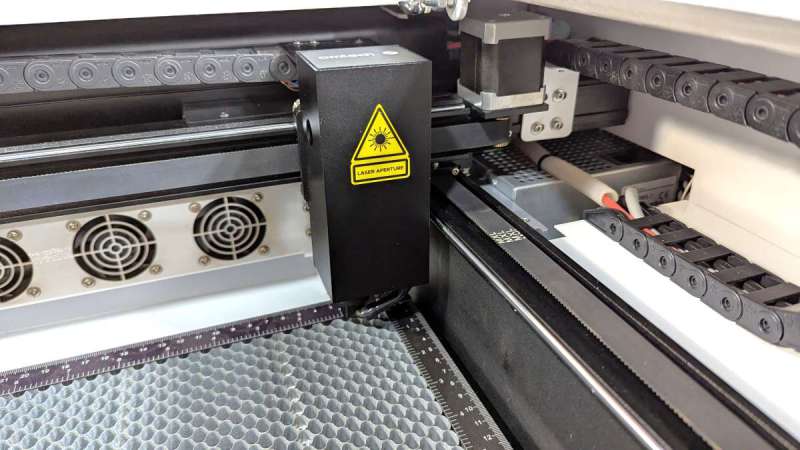
The laser head is housed within a black metal box. Also within the box is an automatic air-assist.
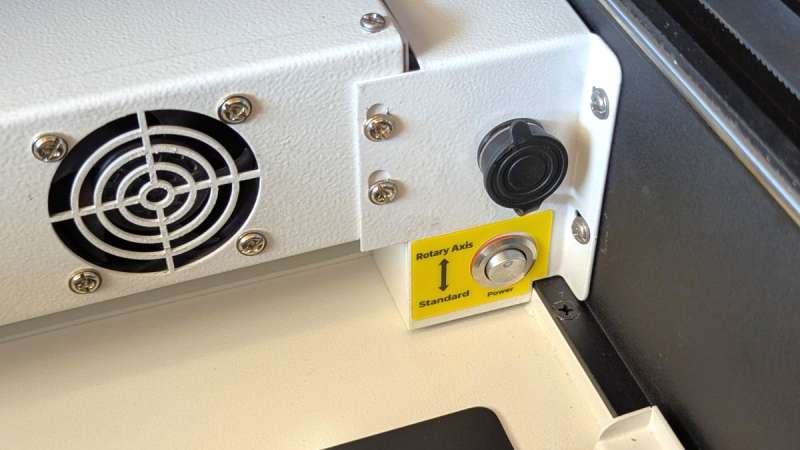
If you move the laser head out of the way, located at the back on the right side of the machine is a switch that, when flipped up, allows the machine to work with a rotary accessory (sold separately).

The Polar Lite has a large-item pass-through port. If you have an oversized project, you can remove the four screws that hold the pass-through panel in place. Unfortunately, there doesn’t seem to be a conveyor belt accessory that would help you to automatically feed your oversized project through the machine to complete it. I guess you have to complete the project in phases by manually feeding the material through the port.
The front of the machine also has a pass-through panel that would need to be removed to accommodate an oversized project.
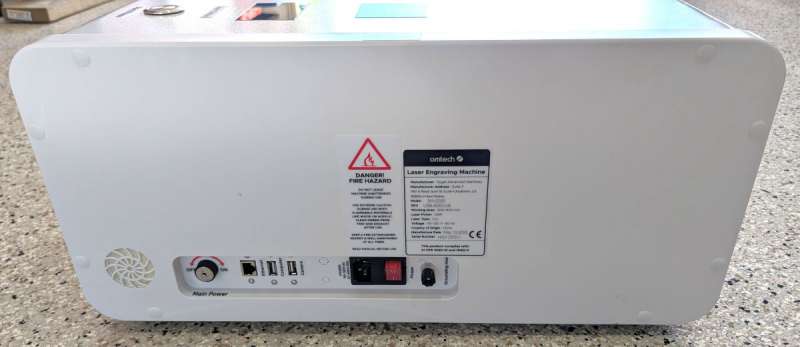
The side of the Polar Lite has a vent for the air assist and all the machine’s ports.
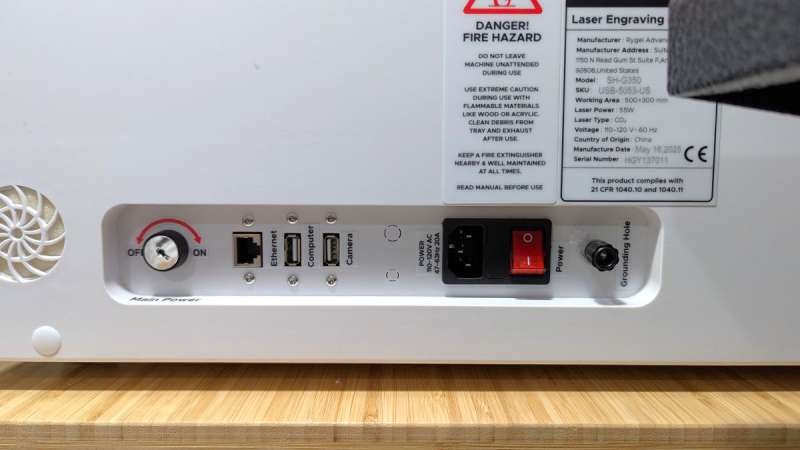
There is an On/Off keyed switch, an Ethernet port, a USB computer port, a USB camera port, a power port, a red rocker power switch, and a grounding port (only necessary if the outlet you plug the machine into isn’t properly grounded).
It is also important to note that the user manual states that this machine should have a 20A outlet to plug into, and it should be the only thing on that circuit. Thank goodness I have a handy husband who installed exactly what I needed.
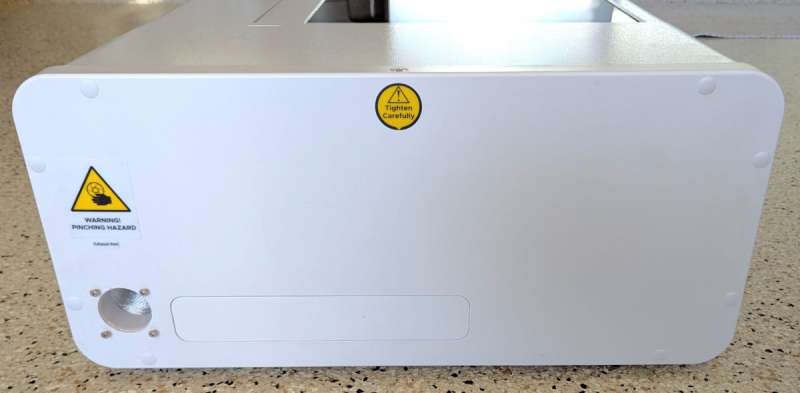
The other side of the Polar Lite has the exhaust vent port.

The bottom of the machine is essentially a super-large heat sink. The large black center rectangle is material that can be removed from inside the engraver, in case you want to engrave much thicker material. The user manual states that you would need to find a non-reflective base to place your material on and place the machine on risers for this, but it can be done.

The far left side of the machine contains a couple of fans for cooling.
The lid of the Polar Lite contains a fish-eye camera.
If you need to add coolant, there’s a fill port available. You apparently need a wash bottle to fill it (or a small funnel).
If the coolant becomes dirty and needs to be changed, there is a drain port on the left bottom of the machine.
Assembly, Installation, Setup
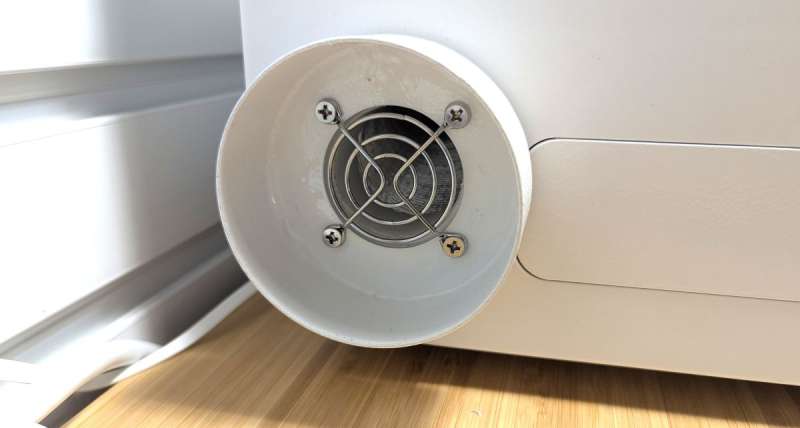
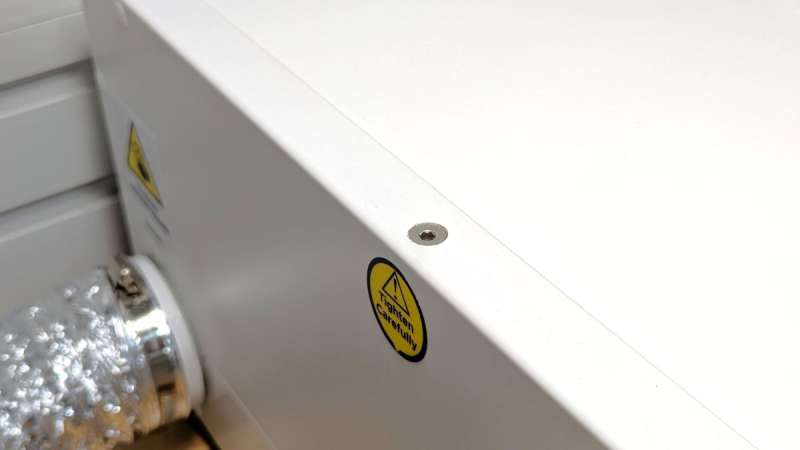
All of the smoke and fumes from your projects are collected by the internal exhaust fans and vented to the left side of the machine.
The only thing you need to assemble on the Polar Lite is to attach the vent hose. Simply screw the hose adapter to the side of the machine with four screws…
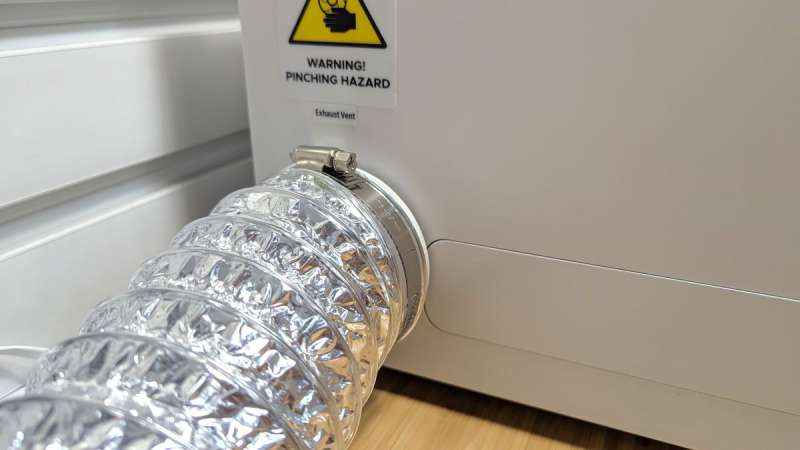
…and attach the hose using the hose clamps. The exhaust hose vents the fumes away from your work area (I have mine attached to an air purifier at the other end).
Here is the Polar Lite set up in my garage. It takes up almost the entire length of my table.
LightBurn setup

The Polar Lite user manual instructs you to call technical support if you want to use LightBurn to connect to the engraver. Thankfully, OMTech has a U.S.-based customer/technical support number located in California. That’s fantastic!
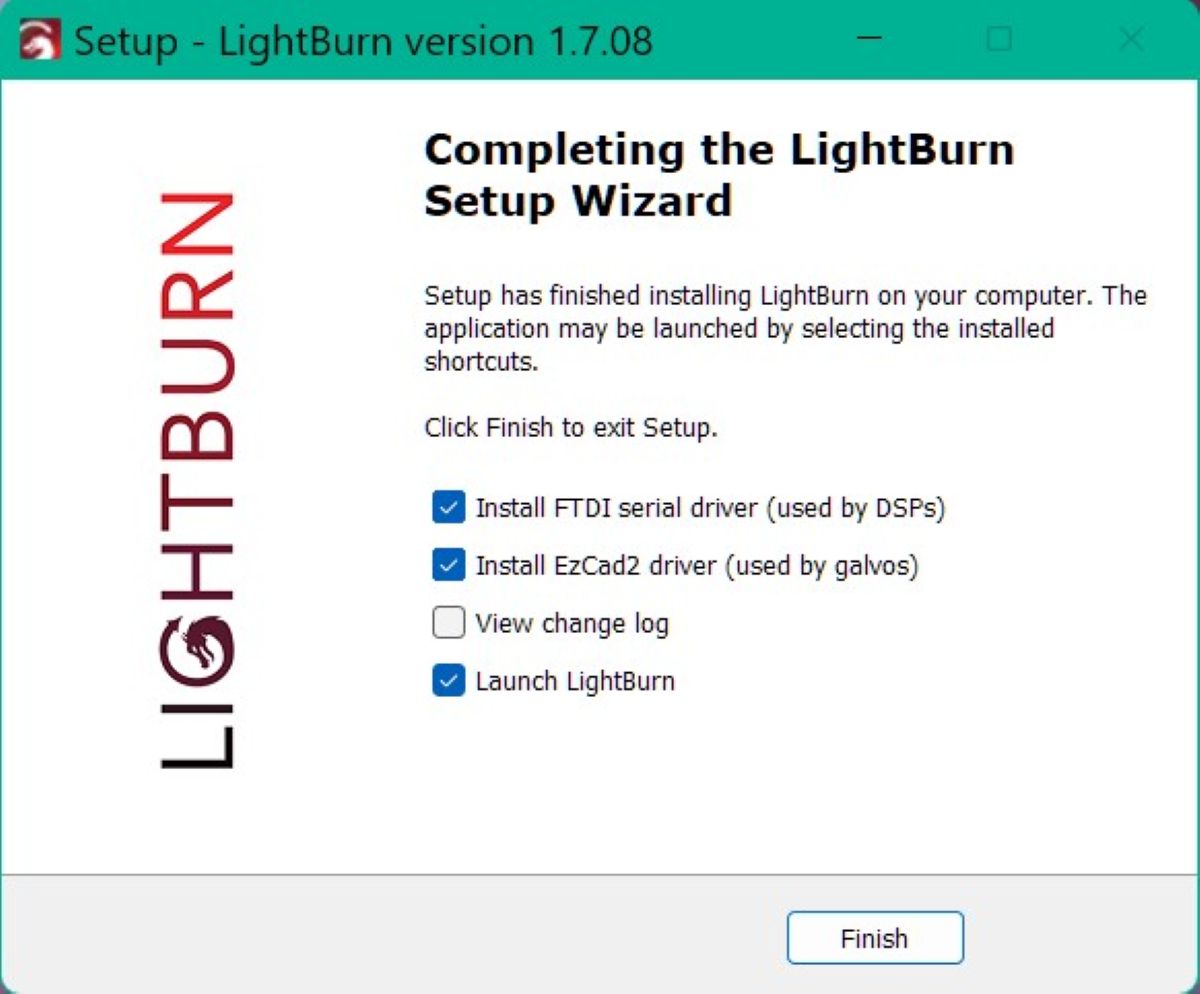
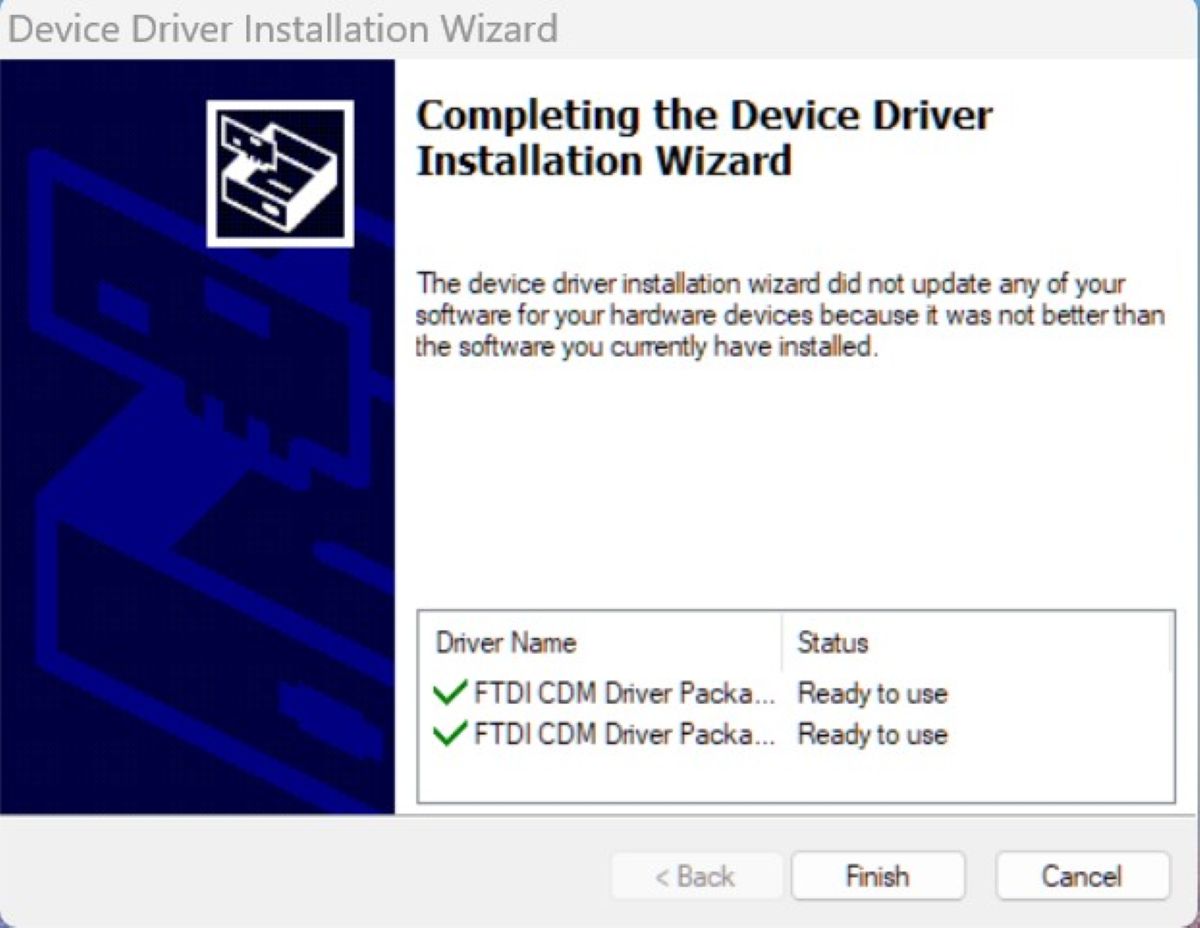
After calling, I found that to use LightBurn with a CO2 laser engraver like the Polar Lite, you need to purchase LightBurn Pro, which is $100 (this software is so awesome, it’s well worth the purchase). After which, you need to install the FTDI serial driver (for CO2 laser engravers).
If you already have LightBurn, how do you install this driver? Just run the LightBurn installation file again, and as you step through the process to reinstall LightBurn, a checkbox option will come up that allows you to select the FTDI serial driver. There is another checkbox option, the EzCad2 driver, that you can check too if you think you might get a fiber laser engraver in the future.
Once the driver is installed, you’ll need to add the Polar Lite to the devices LightBurn can connect to. Under the “Laser” tab on the right side of the LightBurn screen:
- Click the “Devices” button >
- Click the “Create Manually” button >
- Select “Ruida” and click the “Next” button >
- Select “Serial USB” and click the “Next” button >
- Enter a name for the engraver, select “mm/s” under “Machine Units”, enter “500”mm for the X-axis and “300”mm for the Y-axis, and click on the “Next” button >
- Click on “Rear right” for the origin of your laser and click on the “Next” button >
- Click on the “Finish” button.
At this point, I used the two USB-A to USB-A cables to connect the engraver’s camera and the engraver to my laptop. I then tested the laser head movement along the X and Y axes by clicking on the X and Y axes’ buttons in LightBurn (under the “Move” tab). They worked well.
NOTE: Some CO2 laser engravers require you to calibrate the mirrors because they can move during shipment. I asked OMTech tech support about this, and they informed me that it is not necessary for this machine. They already pre-calibrate them before shipment. I guess they are rigidly mounted; otherwise, they would move when shipped.
Camera setup issue
I thought I was ready to go, but a flawless setup process has never been my experience with engravers. I went to set up the camera in LightBurn (Window > Camera Control > right-click in the camera control area to upload the camera configuration file provided by OMTech on a flash drive), but I couldn’t see the view of the laser bed through the camera. So I called OMTech technical support again.
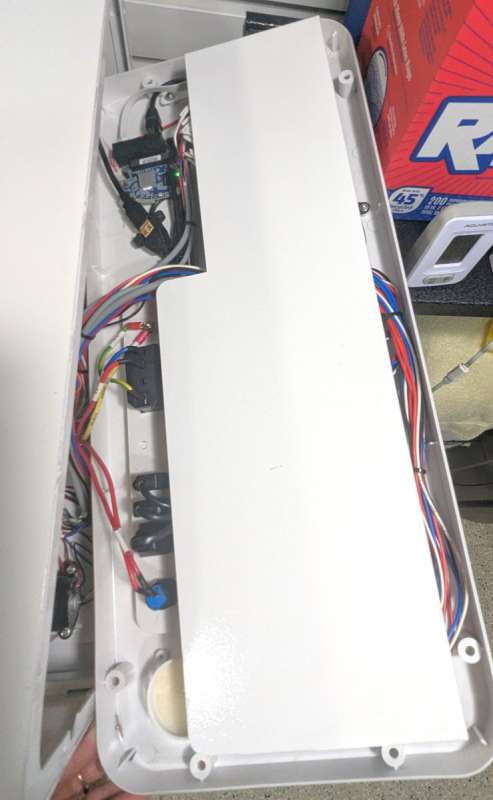
I had to remove the right side panel of the machine to check the camera connection.
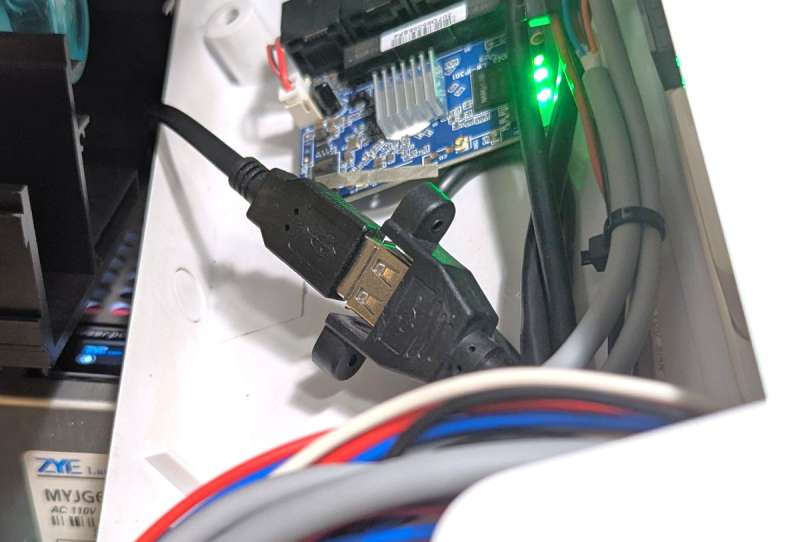
Yep, it was disconnected. After connecting it, the camera worked (the USB connection shown above).
Y-axis limit switch issue
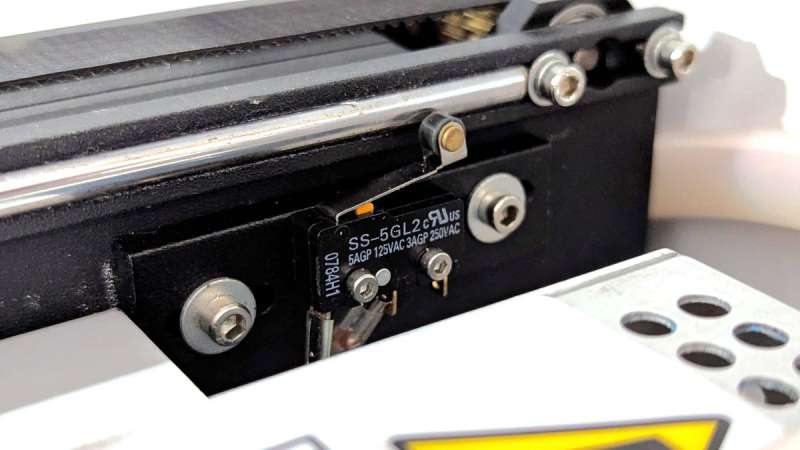
While I had tech support on the phone, I also asked why the engraver vibrated loudly when homing after every time I turned on the machine. We found that the Y-axis limit switch wasn’t triggering when the X-axis gantry moved toward the back of the machine (homing position is in the upper right quadrant). To fix this, I loosened the limit switch screws and slid it forward toward the front of the laser engraver. The limit-switch screws sit in elongated holes that allow for adjustment forward and backward. All fixed!
WiFi connection (useless for me)
I decided to try and connect to the laser engraver via WiFi. The machine is set to use 192.168.1.100. For me to connect to it, I needed to change my laptop’s IP address (my internal network uses 192.168.50.xxx). To do this on a Windows computer, I needed to click on “Start” > search for “View network connections” and click on it > right click on the WiFi connection and select “Properties” > double click on “Internet Protocol Version 4 (TCP/IPv4) > select the “Use the following IP address” radio button > enter an IP that starts with 192.168.1.xxx, where xxx is not 100 or 47).
Requiring me to change my laptop’s IP every time I want to wirelessly connect to the engraver seems ridiculous. This connection is only a connection between my computer and the engraver, and means that I would be disconnected from my home network. I wish the Polar Lite used Bluetooth like my Sculpfun S30 Ultra diode laser engraver. I guess I have to be happy with a wired USB connection between my laptop and the engraver. *Sigh*
Okay, so now I’m ready to use the engraver.
Performance
What can be used
However, before I started on any projects, I checked what materials are safe to engrave on and what materials aren’t.
What CANNOT be used
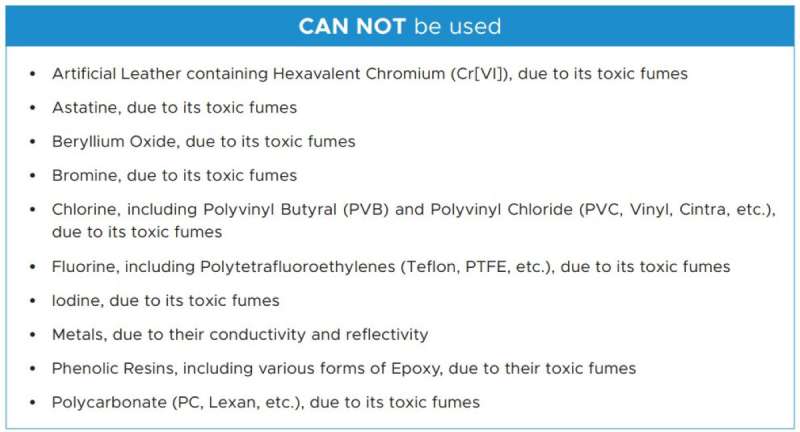
The above materials should NEVER be used. They create toxic fumes or are too conductive and reflective.
Average engraving settings
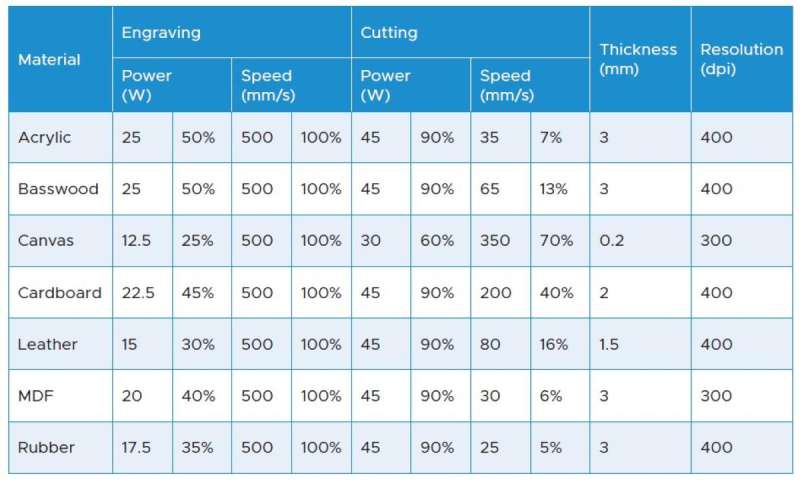 To get started, I used the above info found in the user manual to suggest what settings to use for my projects.
First projects – 6mm acrylic
One of the very first projects I eagerly started was on a 6mm acrylic sheet. I had to know how well the Polar Lite would handle a thick piece of clear material. My acrylic was twice as thick as the example given in the “Average Engraving Settings”, so I’d have to adjust.
I used the following settings for this engraving and cutting:
- Engraving: 500mm/min, 15% power
- Cut: 50mm/min, 40% power, 3 passes
- ~5 hours to complete
This project took about five hours to complete. I was surprised that it took so long, but I let it run.
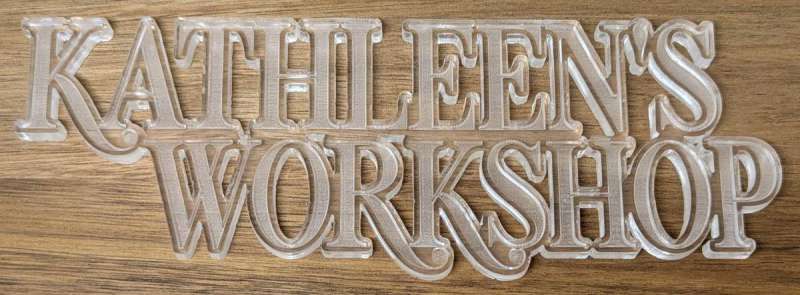
The results are REMARKABLE! I LOVE it!!! So I ran another 6mm acrylic project.
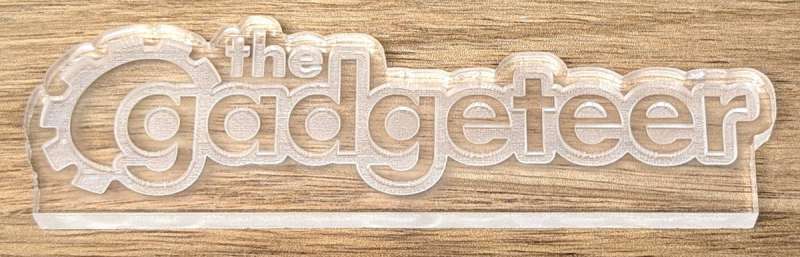
For the “gadgeteer” project, I used the following settings:
- Engraving: 500mm/min, 15% power
- Cut: 50mm/min, 40% power, 4 passes
- ~1 hour to complete
Again, the results were SPECTACULAR – I loved it!!
Wood-project issue
 Next, I thought I’d run a simple project on 3mm basswood. Here are the settings:
- Engraving: 500mm/min, 11% power
- Cut: 400mm/min, 40% power
What I found curious was how scorched the results were. Why? I tried a couple of other wood projects, but the results were the same. I couldn’t figure it out, so I called technical support.
Z-axis issue
Tech support thought maybe there was an issue with the focal length. While adjusting the focal length using the “Focus Z” button under the “Move” tab in LightBurn, a new issue presented itself – the Z-axis froze. Ugh.
So, I removed the laser head cover to investigate this problem. Removing the cover proved to be quite a chore. The user manual says that the cover is magnetically held in place. NOPE. And there are no screws holding it in place. It appeared that the cover is held in place using grooves.
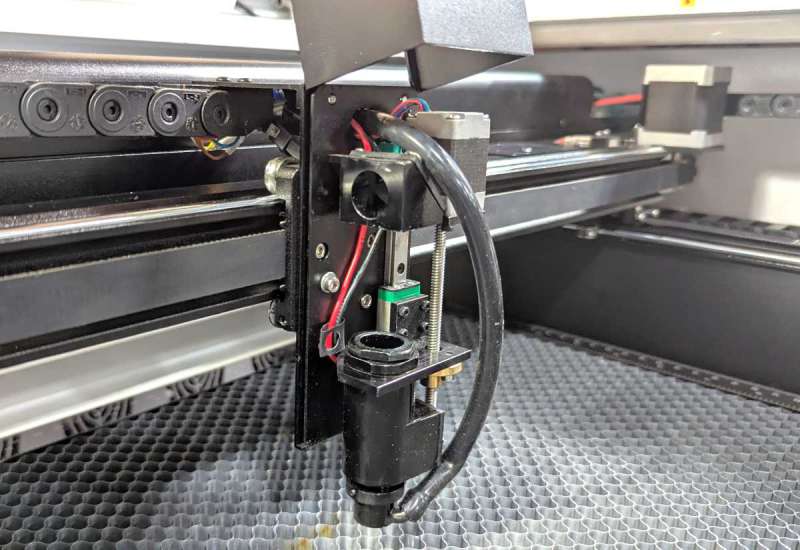
I tried sliding the cover up, and it moved a little, so I was on the right track. I eventually had to use a GREAT DEAL of force to pull the cover off, but eventually it came off. It was a tug of war between me and the laser head cover. I won. Barely.
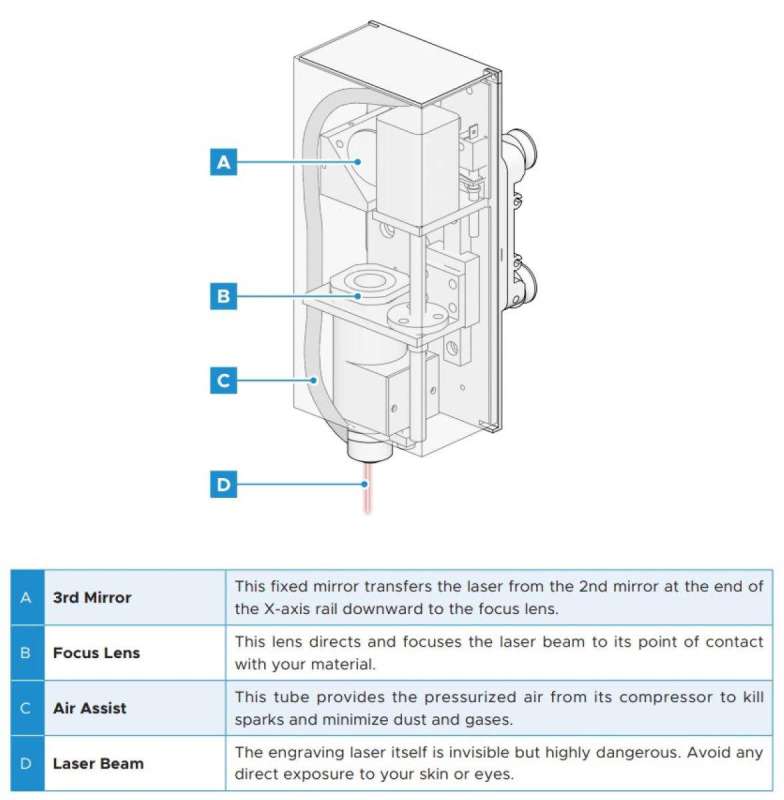
With the cover removed, you can see the third mirror (the first two mirrors are on the left of the machine near the coolant tank), the laser focusing lens opening, and the automatic air assist, which blows away debris and helps keep the laser lens cleaner.
Tech support suggested I try to identify any continuity issues with the Z-axis motor by using a multimeter. I did this with the help of my husband, who is incredibly handy and has all the know-how and tools to do whatever I need. Anyway, I tested for issues, and this wasn’t the problem.
I decided to try and manually rotate the Z-axis lead screw with my fingers to free the laser head. It took some doing, but I was able to unseize it. I then used some silicone lubricant on the lead screw to keep it from seizing again. Fixed.
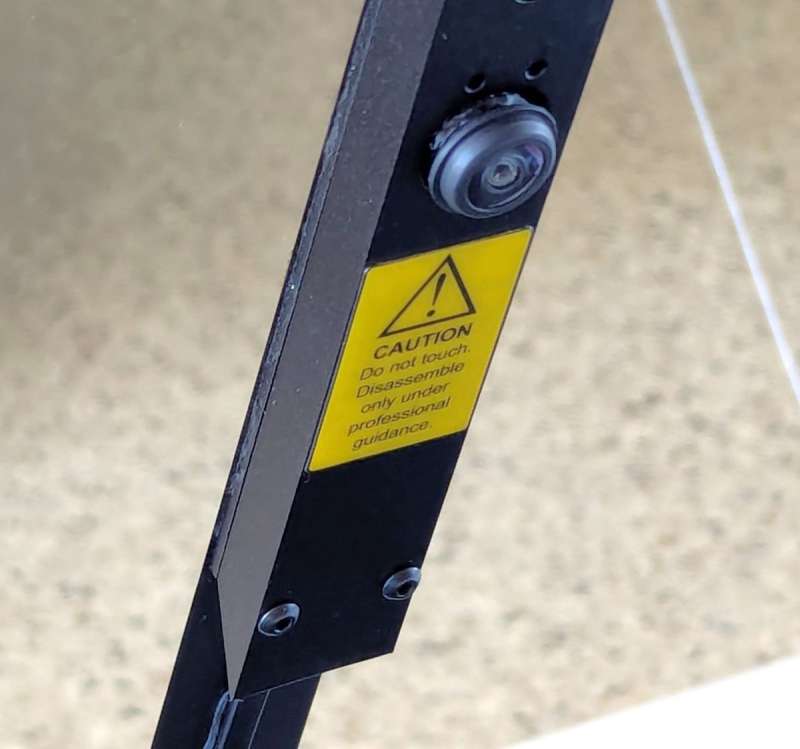
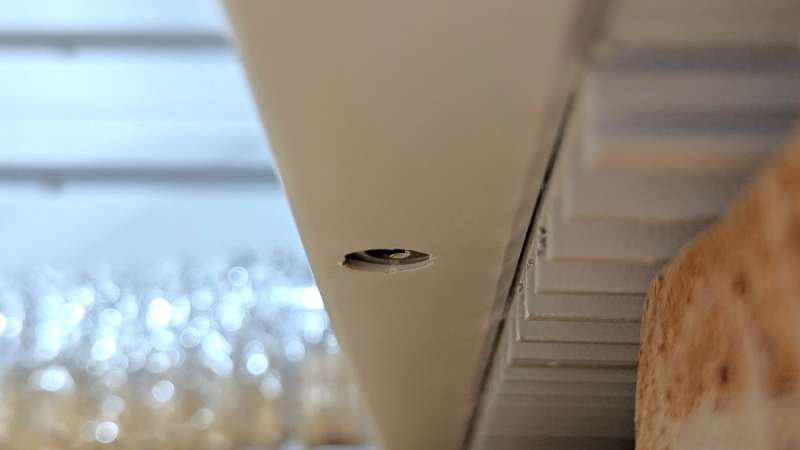
Lid hinge-pin issue
I started to put the laser head cover back on, got distracted doing other things, went to close the lid of the engraver, and because the laser head cover wasn’t on completely, it popped the lid off its right hinge. How did that happen?
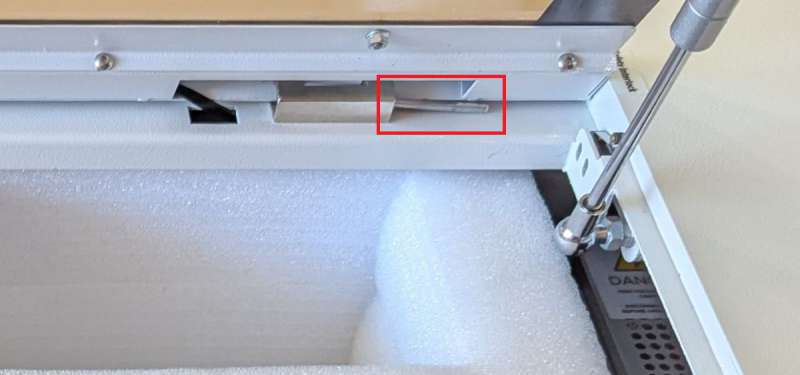
That’s when I discovered that the right hinge pin was lying outside the hinge when the engraver was shipped to me. I put the lid back into place and used needle-nose pliers to slide the pin into the hinge where it belonged. Fixed.
The left side hinge had its pin properly in place.
Laser head cover issue

Now I was ready to put the cover back on the laser head. However, I had trouble getting it to slide back into place. It was binding up at the Z-axis motor. Hmm, what to do, what to do…
I eventually decided to try and pry apart the sides of the cover. This was really tough to do because it’s made of a very rigid metal. After a few tries, the cover finally slid more easily into place.
Now, back to the original wood project issue.
Wood-project issue continued
Scorching. Perhaps you already noticed what I did, but this issue was my fault. I neglected to switch the device settings in LightBurn from mm/min to mm/s (Laser Tools > Device Settings > “Dimensions/Units” tab > under “Machine units” section and the “Better for CO2/galvo” section, select the “mm/s” radio button). My brilliance is blinding. 😬I don’t recall having to do this in the past, and all my diode laser engravers use mm/s.
Corrected settings for early projects
So the settings for the projects above were actually the following:
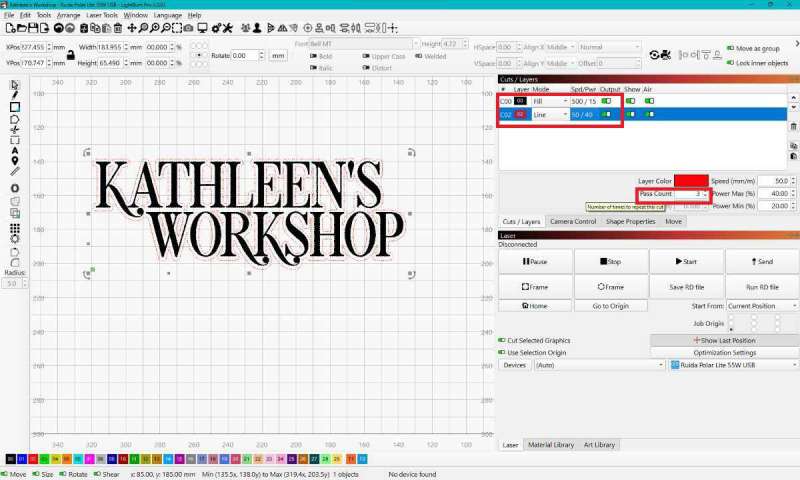
The “Kathleen’s Workshop” 6mm acrylic project:
- Engraving: 8.3mm/s, 15% power
- Cut: 0.8mm/s, 40% power, 3 passes
- ~5 hours to complete
The “gadgeteer” 6mm acrylic project:
- Engraving: 8.3mm/s, 15% power
- Cut: 0.8mm/s, 40% power, 4 passes
- ~1 hour to complete
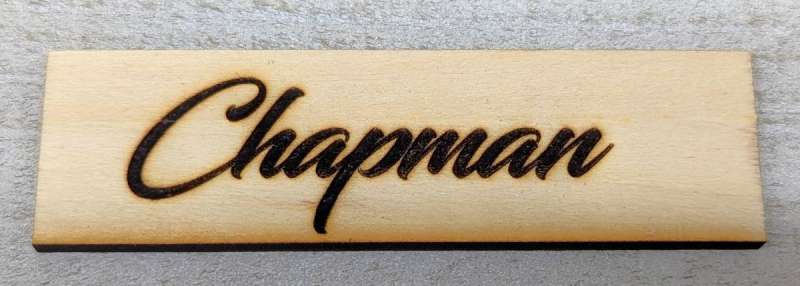
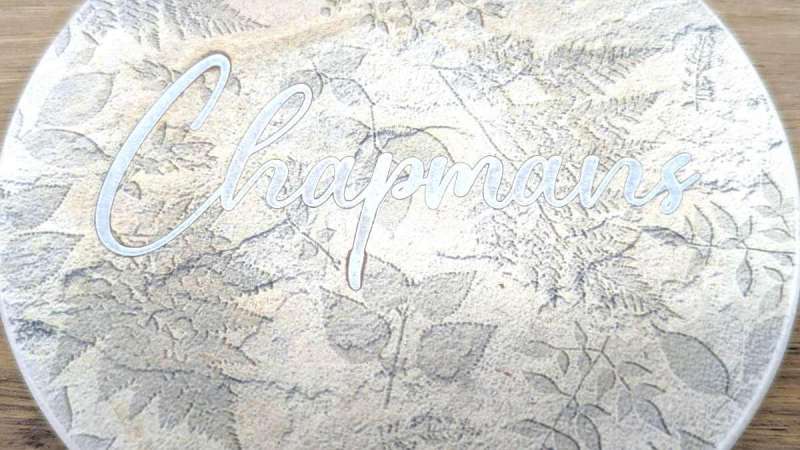
The “Chapman” 3mm basswood project:
- Engraving: 8.3mm/s, 11% power
- Cut: 6.7mm/s, 40% power
- ~few minutes
Latest 6mm acrylic project
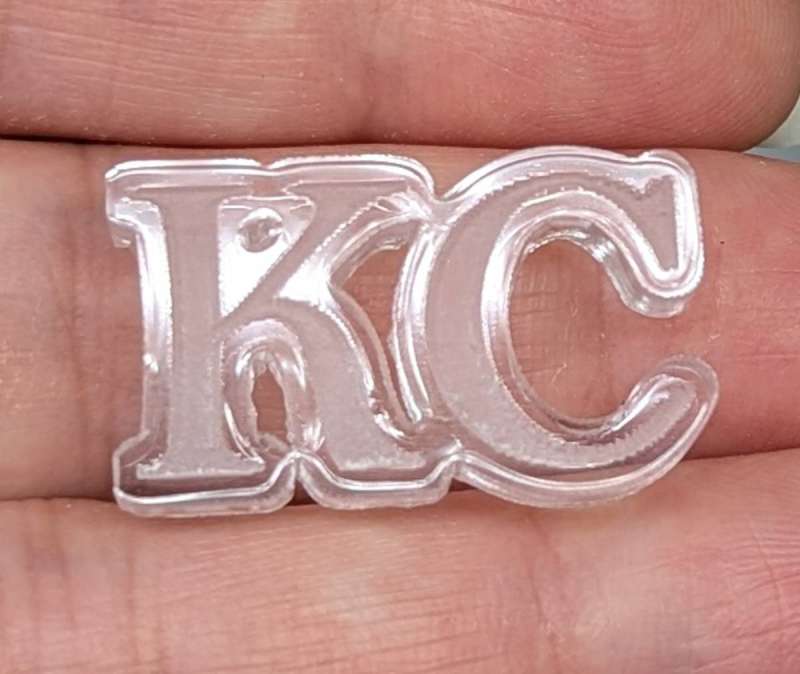
After discovering why my first 6mm acrylic projects took so long (I used mm/min instead of mm/s), I had to adjust my settings for future projects. The above “KC” 6mm acrylic project took only about five minutes:
- Engraving: 400mm/s, 50% power
- Cut: 1mm/s, 70% power, 2 passes
- ~5 minutes to complete
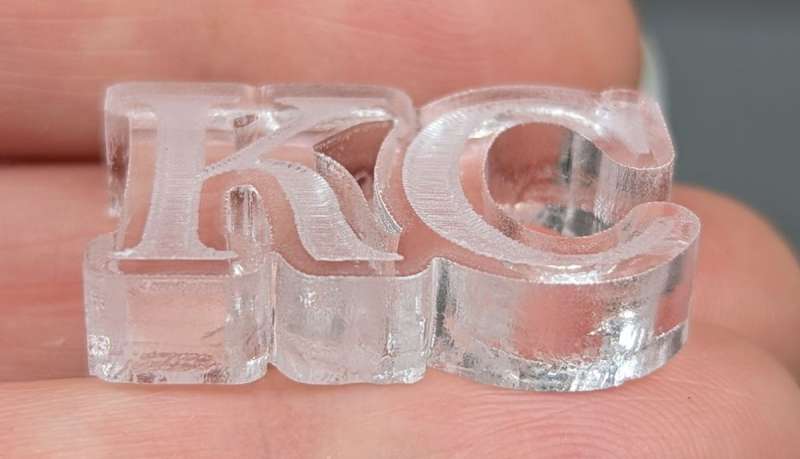
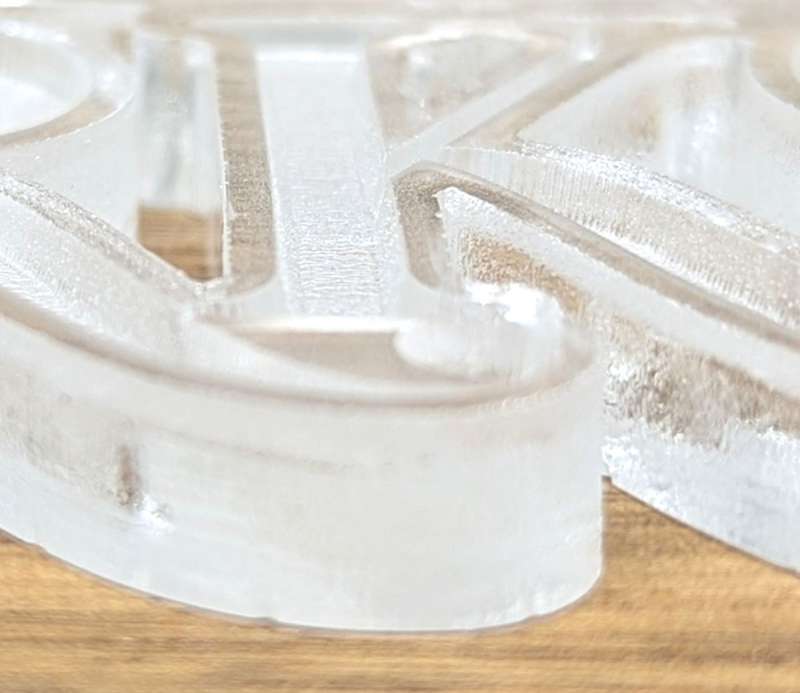
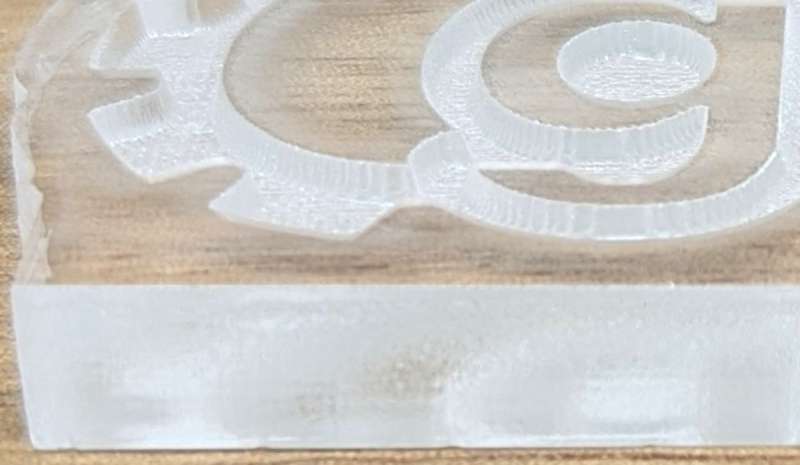
Nice edges!
Stone project
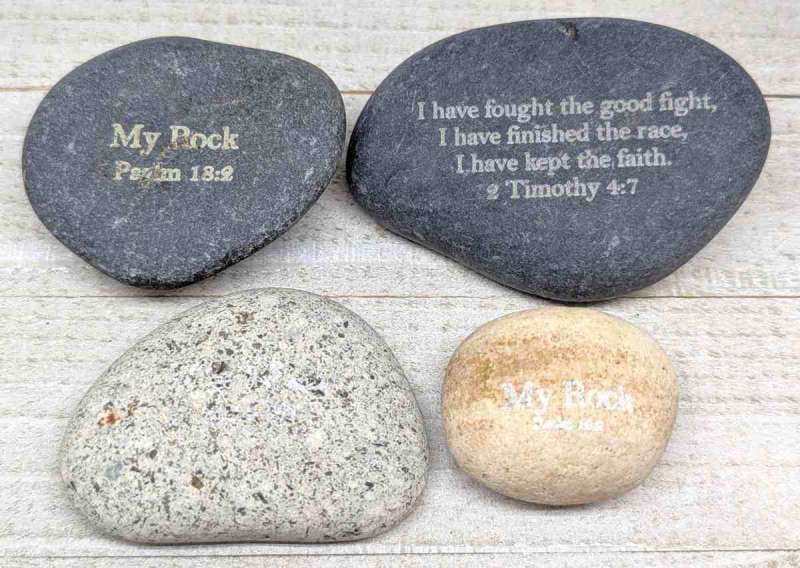
I then tried engraving on some stones:
- Engraving: 50mm/s, 70% power
- ~1-3 minutes to complete
I discovered that even though I was able to engrave on granite (the white speckled stone above), there’s no contrast in the lower layers of the rock for you to be able to see it.
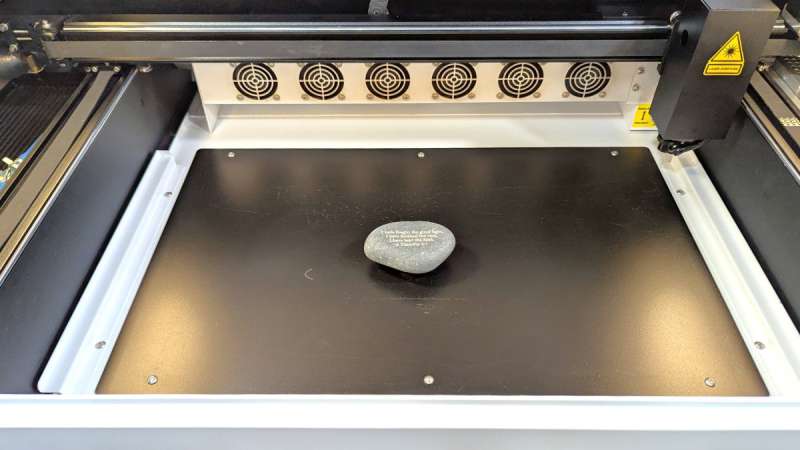
Some of the stones I selected were too thick to fit under the laser head, so I had to remove the honeycomb bed to engrave them.
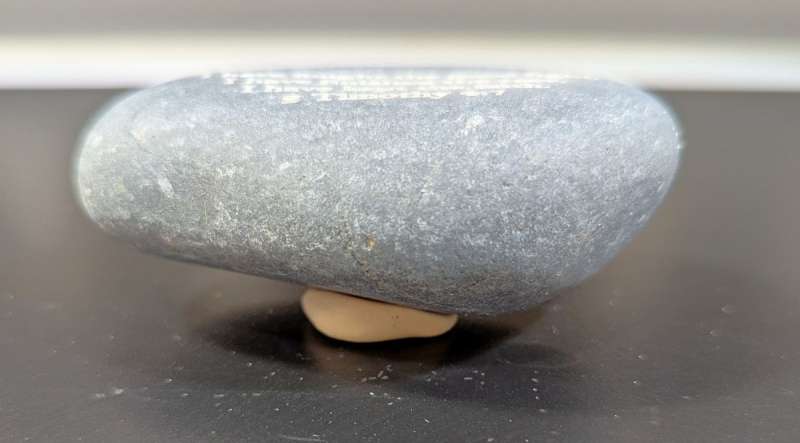
And to hold the stones in place while engraving, I used “Simply Tacky” (purchased from Hobby Lobby). I’m sure Play-Doh would work great too.
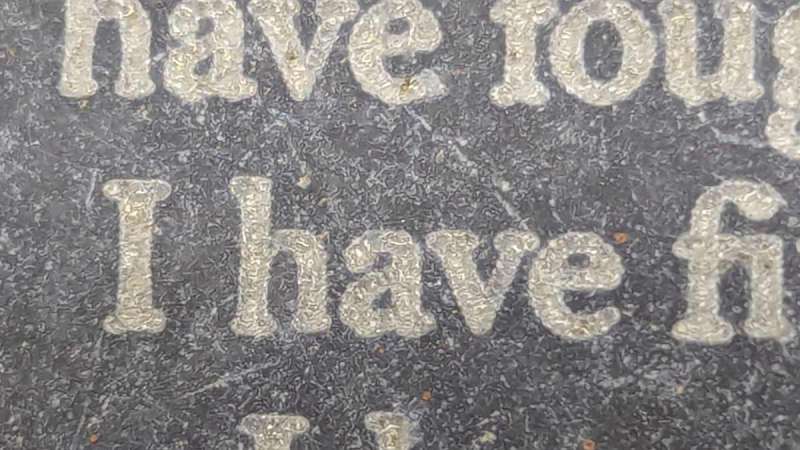
The engravings turned out really well on the other types of stone (other than granite).
Slate project
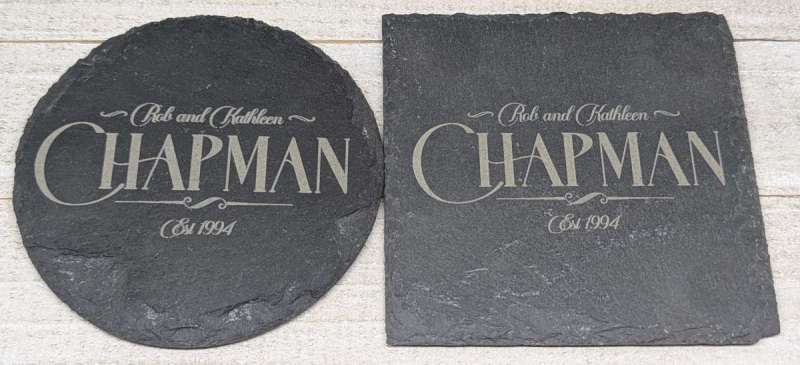
I tried some projects on slate coasters. When I first ran the project, the engraving seemed a little blurred (round coaster), so I slowed down the speed, which improved the results (square coaster):
- Engraving: 100mm/s, 20% power
- ~4 minutes to complete
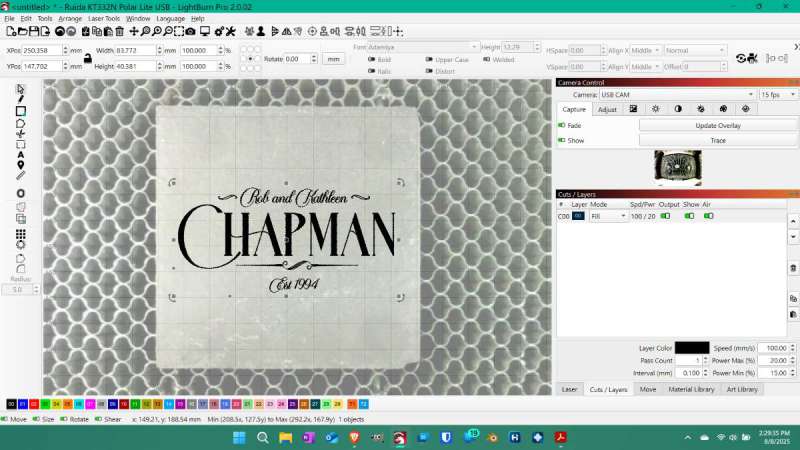
I had a decent amount of success when using the camera to place my designs on the material. Even though I imported the camera calibration file into LightBurn, I found I still needed to run the “Calibrate Camera Alignment” tool (Laser Tools > Calibrate Camera Alignment) to increase the placement precision of the engraving.
I found that as long as I ran my projects in the center of the workspace, I had decent success. If I tried placing my material along the edges of my workspace, it was more problematic. I also framed all my projects just to make sure the placement was to my liking.
Ceramic coaster project
I had some old Thirsty Stone ceramic coasters that I thought I’d try to engrave on as well. It turned out well.
- Engraving: 500mm/min (8.3mm/s), 30% power
Glass project

I ran a “Rossi” engraving on glass, too:
- Engraving: 30mm/s, 15% power
- ~3-4 minutes to complete
The user manual suggests that you use “high power and low speed” for glass. Thus, I started using 30mm/s and 45% power but quickly discovered that 45% power was way too high, and I feared that the glass would break. It didn’t, but I was worried. Thus, I eventually landed on 15% as an ideal power setting for 30mm/s speed.
Look at how BEAUTIFULLY the engraving turned out!
Cardstock project
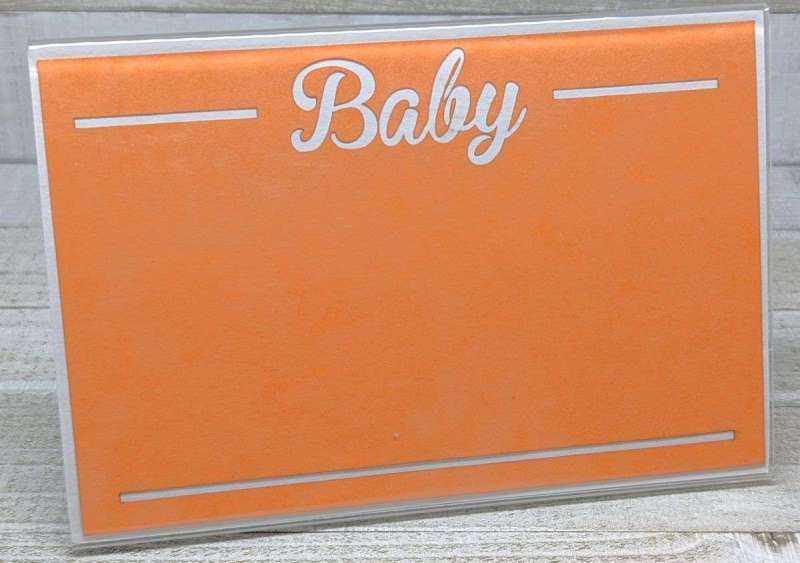
I used the Polar Lite to cut stencils out of cardstock:
- Cut: 100mm/s, 20% power, 3 passes
- ~1 minute to complete
The stencils turned out excellent!
Leather project
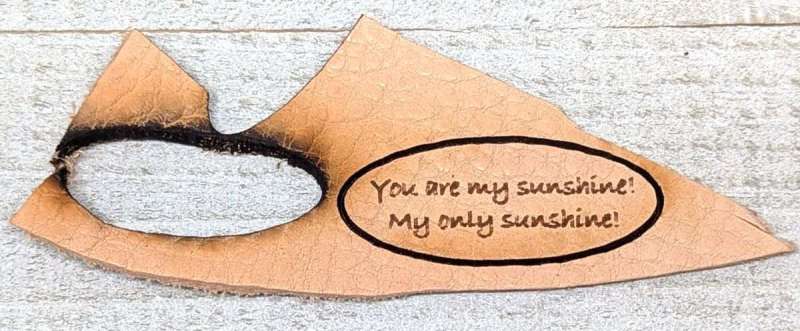
The only projects that I had difficulty with were those on leather. Engraving on leather turned out fine, but when trying to cut it, the laser ended up scorching it. I tried faster speeds with lower power and multiple passes, but in all scenarios, a successful cut always seemed to scorch the material.
- Engraving: 250mm/s, 20% power
- Cut: 50mm/s, 45% power
- ~<1 minute to complete
Final thoughts
The OMTech Polar Lite 55W Desktop CO2 Laser Engraver and Cutter is a wonderful laser engraver. There were several issues I had initially (disconnected camera, Y-axis limit switch not detected, wood projects were scorched, Z-axis seized, the lid’s right hinge pin wasn’t inserted, the laser head cover was difficult to remove), but all were resolved. What’s most exciting is that I was able to obtain fantastic engraving and cutting results on 6mm acrylic! I also obtained beautiful engraving results on glass. These successes were thrilling and exactly what I was looking for in a CO2 laser engraver.
However, CO2 laser engravers are really expensive, and this one is no exception. The Polar Lite is $1799.99. I don’t know about you, but I don’t normally spend that kind of money on a hobby. Though if you think you would use the machine all the time or need a CO2 engraver for a small business, then I can recommend the Polar Lite. It was such a treat being able to create designs on clear material with ease, which is something diode laser engravers have difficulty with.
What I like about the OMTech Polar Lite 55W Desktop CO2 Laser Engraver and Cutter
- Beautiful engraving and cutting results on 6mm acrylic
- Equally beautiful engravings on glass
- Engraves well on wood, stone, slate, ceramic coasters, and cardstock
- Customer and technical support are located in the U.S. and are a fantastic help
What needs to be improved?
- It’s expensive
- Camera quality is not as nice as I was hoping
- Improve quality control to check for working cameras, easy removal of the laser head cover, functional Z-axis, functional limit switches, and the existence of pins in the hinges that hold the engraver’s lid in place
- No conveyor accessory to automatically feed oversized projects through the pass-through port
- I would prefer a Bluetooth connection instead of a WiFi connection
- Leather was challenging to cut well without scorching the material
- Rotary attachment is sold separately
Price: $1799.99
Where to buy: OMTech, Amazon
Source: The sample of this product was provided for free by OMTech. OMTech did not have a final say on the review and did not preview the review before it was published.
Check out these other engraver reviews!
- xTool P2S 55W Desktop CO2 Laser Cutter review – A laser cutting and engraving dream machine
- xTool P2 smart desktop 55W CO2 laser cutter and engraver review – This is a game changer!

Zip Ties Assorted Sizes(4”+6”+8”+12”), 400 Pack, Black Cable Ties, UV Resistant Wire Ties by ANOSON
(as of April 12, 2026 18:38 GMT -05:00 - More infoProduct prices and availability are accurate as of the date/time indicated and are subject to change. Any price and availability information displayed on [relevant Amazon Site(s), as applicable] at the time of purchase will apply to the purchase of this product.)
Gadgeteer Comment Policy - Please read before commenting
I’m getting an error message below temperature, could you help?
Charles – According to the User Guide on page 52:
“If the display screen shows the following two errors, deal with the problems in these ways:
[red exclamation point below the temperature] – The water temperature is too high. Power off the engraver using the laser key and the main power switch. Wait about 10 minutes for the water temperature to drop. Restart the machine.
[red exclamation point below the temperature and one below the current/amperage reading] – The laser power source is broken. Contact customer service for a replacement. Do not attempt to repair it yourself. Replacement must be performed by certified technicians or under professional guidance.”
If you need additional help, please contact OMTech support:
+1-947-438-4949
+1-949-506-3949
[email protected]
What is the dot size of the omtech polar lite 55w co2 laser engraver?
David – According to the OMTech Polar Lite website Q&A:
“Question : What is the beam size of Polar Lite 55W?
Answer: It depends on the testing material. For white cardstock, the test value is ±0.2 mm.”
And according to the Polar Lite specs: “Engraving Accuracy: ±0.02 mm”.
That’s all I could find to try and answer your question. if you need further clarification, please contact OMTech support:
+1-947-438-4949
+1-949-506-3949
[email protected]
That is not consistent with the industry specs provided. A laser’s spot size is based on the output of the laser and not the burn diameter.
So I see you had trouble with the wifi. I ended up ditching the wifi as well but I used ethernet and setup a lan on the same network. So now I don’t have to deal with the usb cord being in the way. I also setup the camera on the network so that is also basically wireless. I am curious though how you got such a deep scorch with 500mm/sec and 11% power. I tried that and barely see it at all. Also your article says mm/min which is very wrong. I’ve been trying to get a good scorch but I’m not getting it sadly. If I want dark it usually is just engraving.
I noticed you catched your mistake later but the settings still burn right through cause it’s moving too slow. I did get a nice scorch finally with 50/mm sec Speed/
11% Power. I love the laser but I am not happy with the camera alignment. It’s is very challenging to get it right.