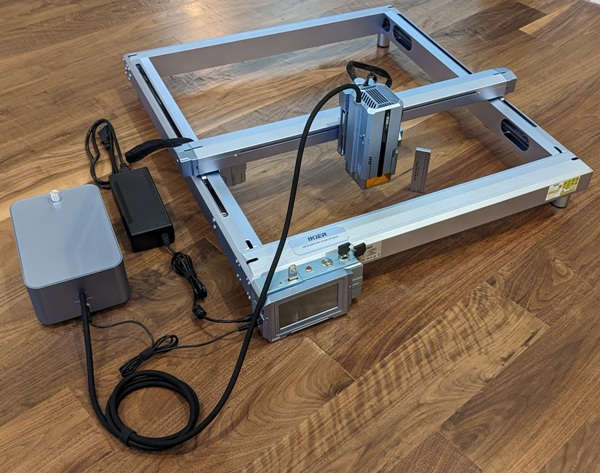
REVIEW – After reviewing a few laser engravers, I’ve discovered some features that are important to me: an automatic air assist, autofocusing, and an easy way to position the laser over my material. When the iKier K1 Pro Max came up for review, I was eager to try it because it has all of the above. After using it over the past few weeks, I’ve found that these features make engraving so much easier; I only wish it had Bluetooth to send jobs wirelessly.
What is it?
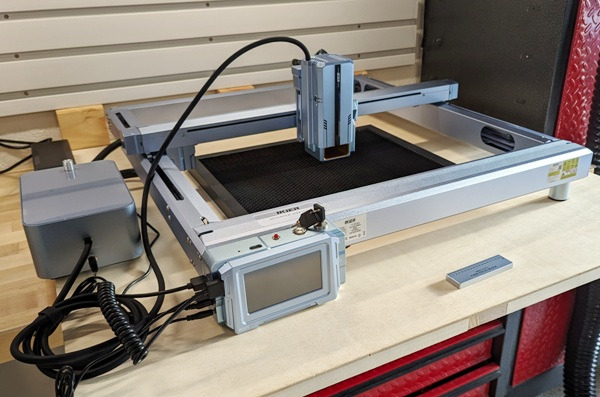
The iKier K1 Pro Max is a 24W/48W do-it-yourself (DIY) diode laser engraver and cutting machine that uses blue light at a wavelength of 455 ±5nm to engrave and cut. It also has a switch to quickly change the power output of the laser when engraving (24W) or cutting (48W). Additionally, it has automatic air assist, autofocus, auxiliary positioning, and auto-sinking features.
- Always wear laser safety glasses!
-
- For the iKier K1 Pro Max diode laser engraver, you need glasses that block 455±5nm light.
- I used my FreeMascot OD 6+ 190nm-490nm Wavelength UV light / Violet & Blue Laser Safety Glasses (CE EN207 certification – European laser eyewear standards for laser safety eyewear) that I purchased from Amazon when I reviewed the TTS-55 laser engraver.
- Although iKier provides you with safety glasses, I have heard some complaints about how those green safety glasses don’t block the 450 nm range (they only block much higher wavelengths).
-
- Never leave a laser engraver/cutter unattended when it is in use – it is a potential fire hazard.
- Some materials are not safe to engrave or cut because of the dangerous fumes or they can damage your engraver.
- Use caution when engraving or cutting on reflective materials – reflected laser light can damage your eyes.
- Protect your table by placing a sheet of metal, honeycomb laser bed, etc. under your engraving/cutting material to prevent damage to your table.
What’s in the box?
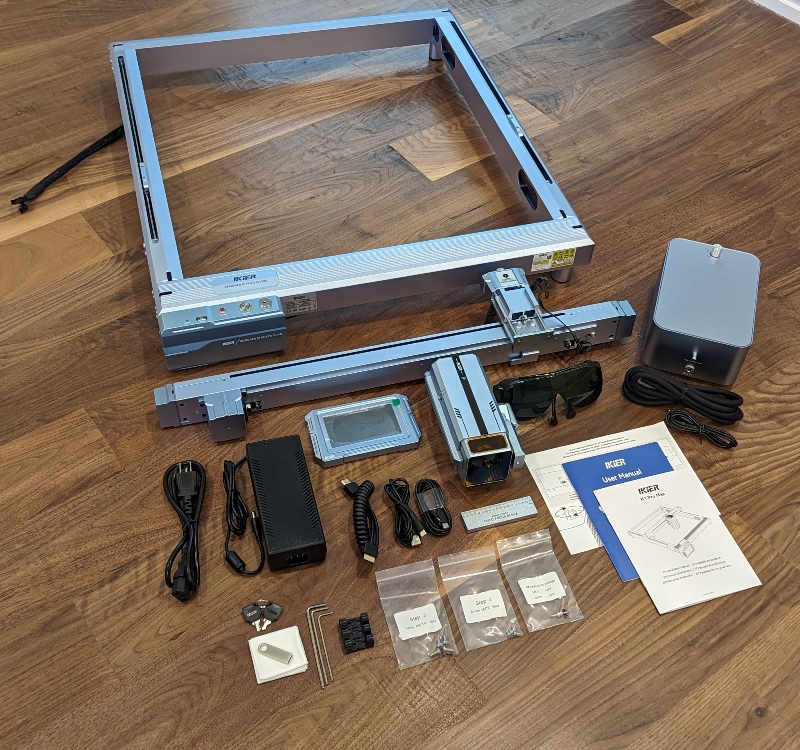
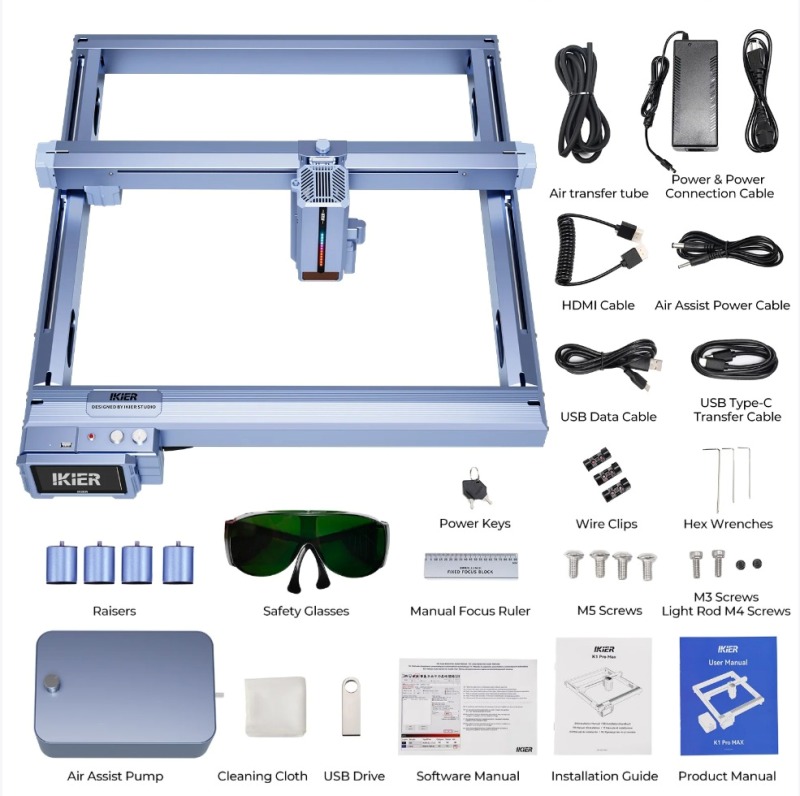
- iKier K1 Pro Max frame and control box
- X-axis rail
- Touchscreen panel
- 24W/48W laser module and shield
- Laser safety glasses (not certified)
- Automatic air assist pump, air hose, and power cable
- iKier K1 Pro Max power cable and power supply
- HDMI cable
- USB-A to USB-C cable
- USB-C to USB-C cable
- Manual focus ruler
- Assembly manual
- User manual
- Air assist guide
- Keys
- USB flash drive
- Cleaning cloth
- Allen wrenches
- Wire clips
- Bags containing screws that are labeled as “Step 3, Step 5, and Spare parts”
Hardware specs
- Brand: iKier
- Model: K1 Pro Max 48W / 24W
- Engraving Size: 410mm*410mm
- Electric Power: 220W
- Laser Power: 44-48W, 21W-24W
- Spot Size: 0.08mm*0.1mm (24W) 0.1mm*0.15mm (48W)
- Engraving Precision: 0.01mm Engraving Accuracy
- Laser Focal Length: 40mm
- Laser Wave: 455±5nm
- Focusing method: Autofocus or Manual, and add Infrared Positioning
- Advanced Z-Axis: Automatic Sinking During Cutting
- Operating Systems: Windows, macOS, Android, iOS
- Control Software: LightBurn, LaserGRBL
- File Types: SVG, DXF, JPG, JPEG, PNG, BMP, TIF, CR2, etc.
- Connecting Interfaces: USB, WiFi
- Motherboard: 32-bit Control Board with WiFi
- Control Terminal: 4.3 inches
- Input Voltage: AC100-240V, 50/60Hz
- Output Voltage: DC 24V, 5A
- Machine Net Weight: 12kg
- Packing Weight: 13kg
- Equipment Size: 650mm*750mm*222mm
- Packing Size: 780mm*500mm*153mm
- Certification: CE, FCC, RoHS, FDA
Design and features
The iKier K1 Pro Max laser engraver arrived mostly assembled. All I had to do was install the X-axis rail, slide the laser module onto its Z-axis mount, affix the touchscreen panel to the control box (it’s attached magnetically), and plug in all the wiring.
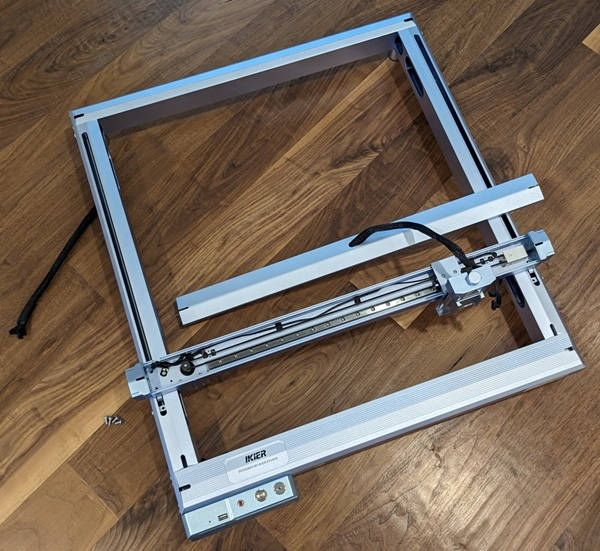
The above shows the stages of the assembly:
- Removing the X-axis rail cover and installing the X-axis rail on the frame
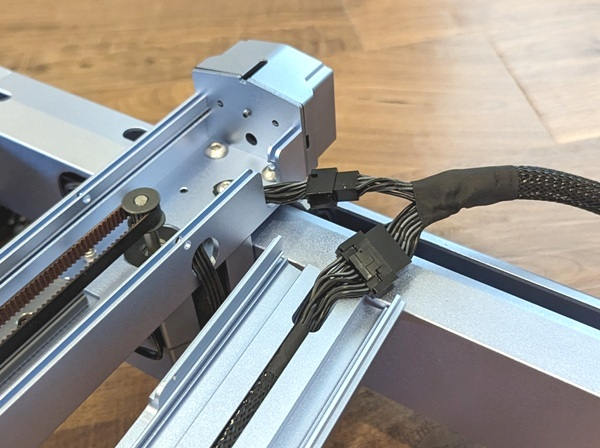
- Connecting the wiring
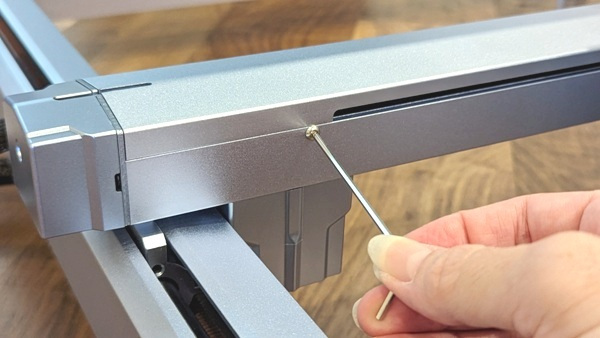
- Installing the screws of the X-axis rail cover
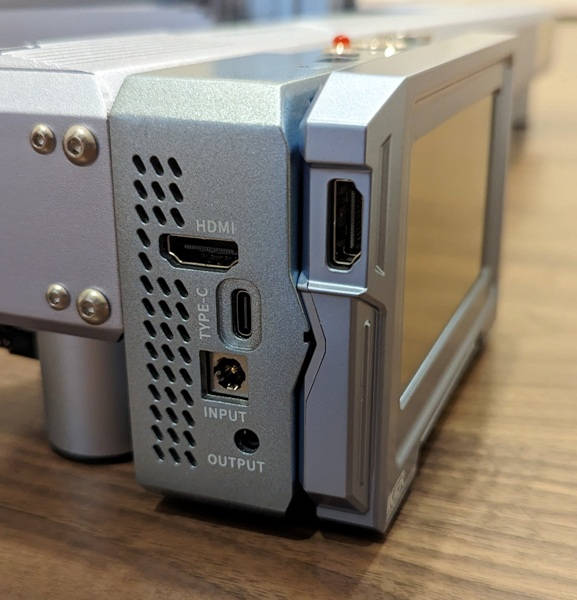
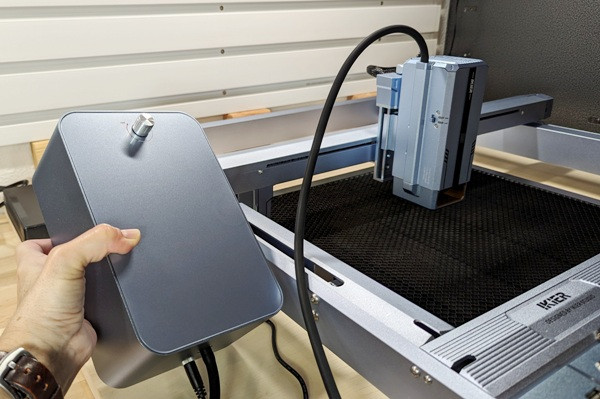
The touchscreen panel attaches to the control box with magnets. You need to use the HDMI cable provided to connect the control box to the touchscreen panel. This makes it easy to detach if you want to hold it and use it.
The control box has the following ports located on the side as shown in the center photo above: an HDMI port, a USB-C port to connect to your laptop, a DC power port, and an air-assist power port.
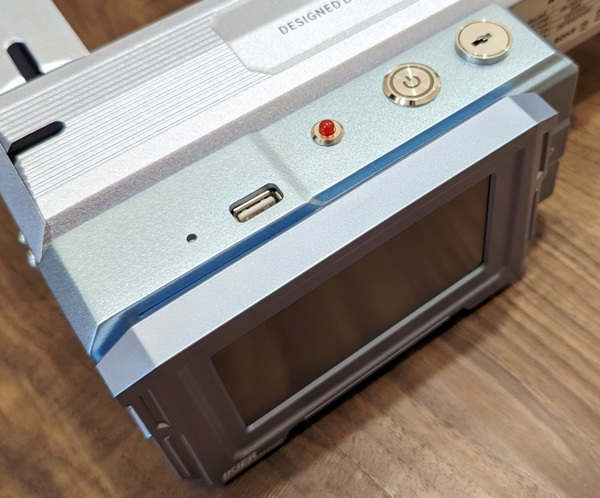
The top of the control box has the following (last photo above): a USB-A port for a flash drive, a warning light, a power button, and a keyed security lock.
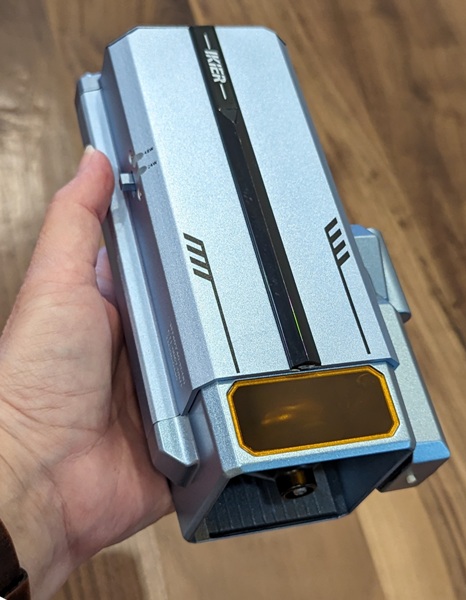
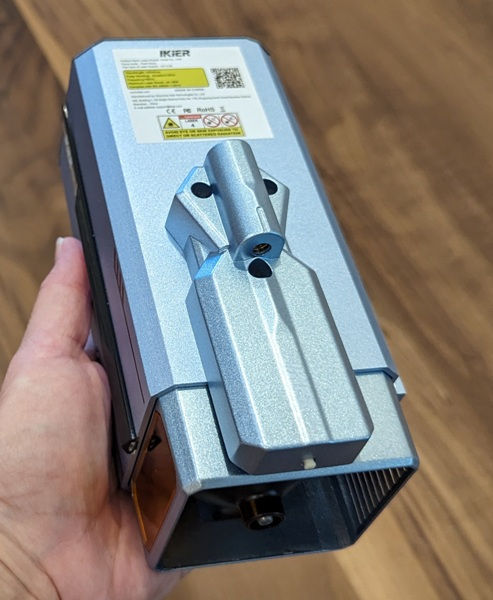
The laser module is large and heavy and has an orange acrylic shield to help protect your eyes from the laser (I still wear my laser safety glasses).
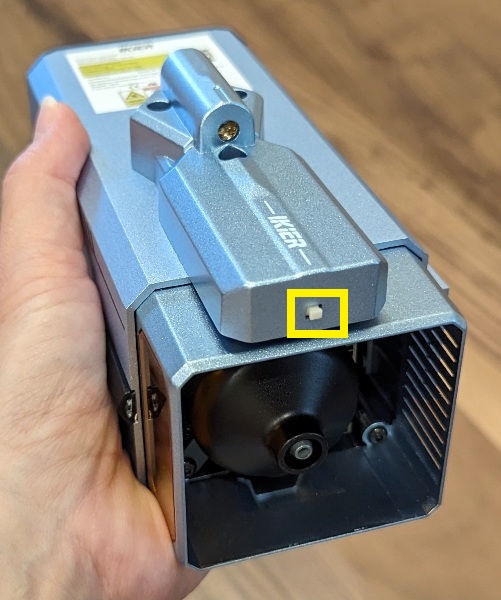
Under the laser module, you can see a limit switch (shown in the third photo above in the yellow rectangle). It uses the switch to tell when it has touched the surface of your material and then the Z-axis motor adjusts the module to the correct focal height.
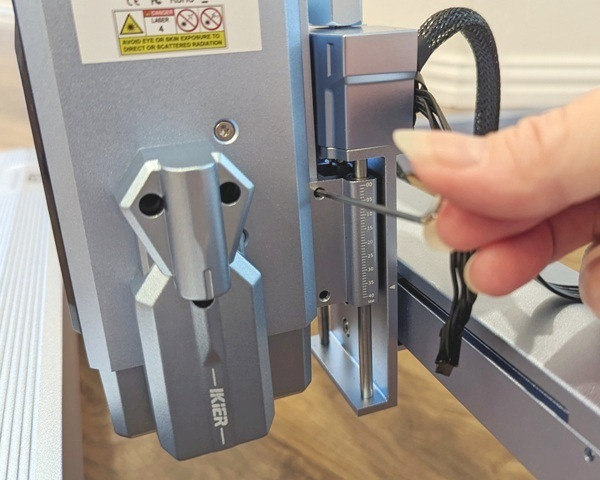
The Auxiliary positioning infrared laser is attached to the side of the engraver’s laser module as shown in the third and fourth photos above.
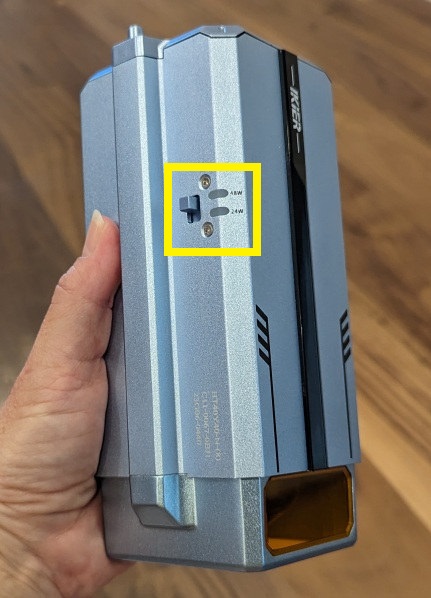
The iKier K1 Pro Max has a switch that you flip to change the output power of the laser (shown in the fifth photo above in the yellow rectangle).
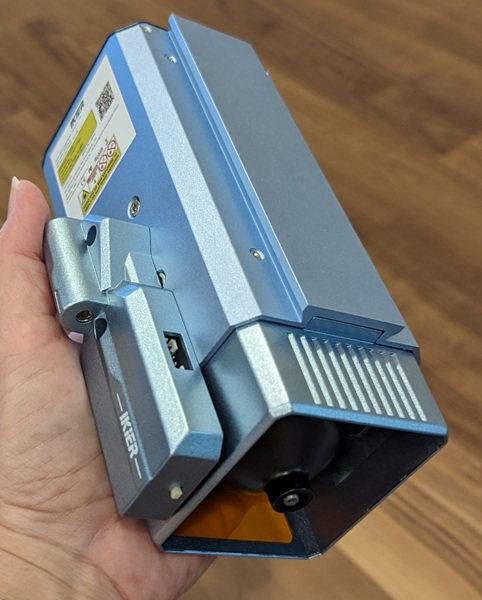
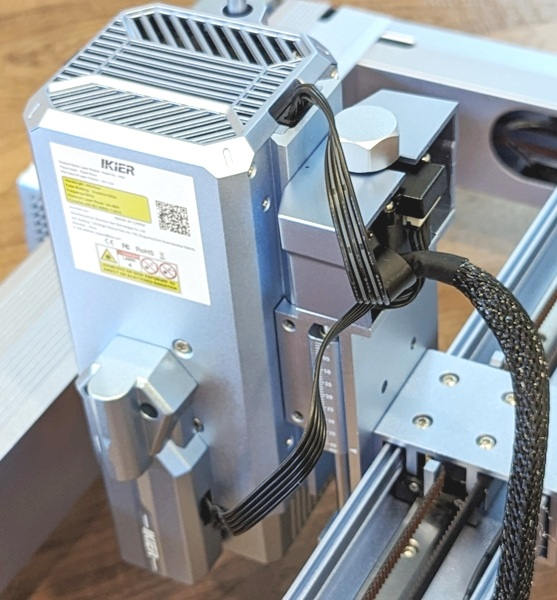
The back of the laser module shown in the first photo above slides into the Z-axis mount as shown in the second photo above. You tighten two small screws with an Allen wrench to hold the module in place. You then connect the cables to the laser module.
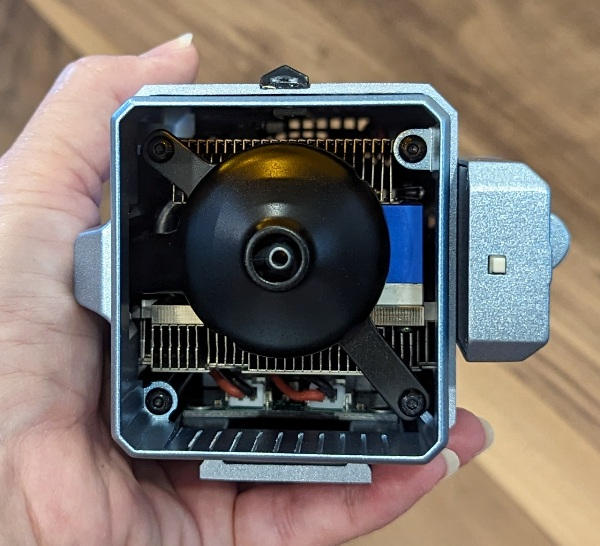
One thing that surprised me was how large the automatic air assist is. It makes my other air assists look meager in comparison.
The iKier K1 Pro Max laser engraver is well-built and looks and feels robust and sleek. It has a beautiful light blue aluminum frame with a 410 x 410mm working area. There are two limit switches for the X-axis, two for the Y-axis, and two for the Z-axis. The X and Y-axes use bearings and sliders to move the laser module instead of wheels.
This laser engraver has 5 wonderful features that make it stand out in my mind: a switching 24W/48W laser module, an autofocusing Z-axis, an automatic air assist, an auxiliary positioning infrared laser, and automatic sinking when cutting.
- Power switching (24W/48W laser module): The feature allows you to change the amount of power needed to engrave material (24W) or cut it (48W) with the flip of a switch.
- Automatic air assist: The air assist’s power cable is plugged into the control box so that when the laser engraver is connected to LightBurn, LightBurn can automatically turn it on or off according to the settings I use.
- Autofocus: The Z-axis is motorized so that you can adjust the height of the laser module to the correct focal length automatically with the click of a button that you set up in LightBurn.
- Auxiliary positioning: The Auxiliary positioning infrared laser is attached to the side of the engraver’s laser module. When the laser engraver is powered on, the infrared laser emits a red crosshair pattern on your material. When you properly calibrate it, you can position your material under that laser, and with the click of a button that you set up in LightBurn, the laser head will move to that precise position.
- Automatic sinking: The Automatic sinking feature helps you to cut thicker materials. The Z-axis motor lowers the laser head with each pass over your material so that the focal spot descends into the material until it is cut all the way through. You still have to figure out how many passes it will take to cut the material, but this feature makes it possible to cut up to 20mm thick wood.
Setup
Getting started
After assembly, I connected the iKier K1 Pro Max to my laptop using a USB-C to USB-C cable. You can also connect the laser engraver to WiFi, but you can only use the WiFi feature with a very rudimentary engraving app which I decided not to use. Bluetooth would be a much more handy feature and would allow me to connect the engraver to my computer and then send projects to it wirelessly via LightBurn. The Sculpfun S30 Ultra laser engraver that I reviewed has this feature. I miss not having it on the iKier.
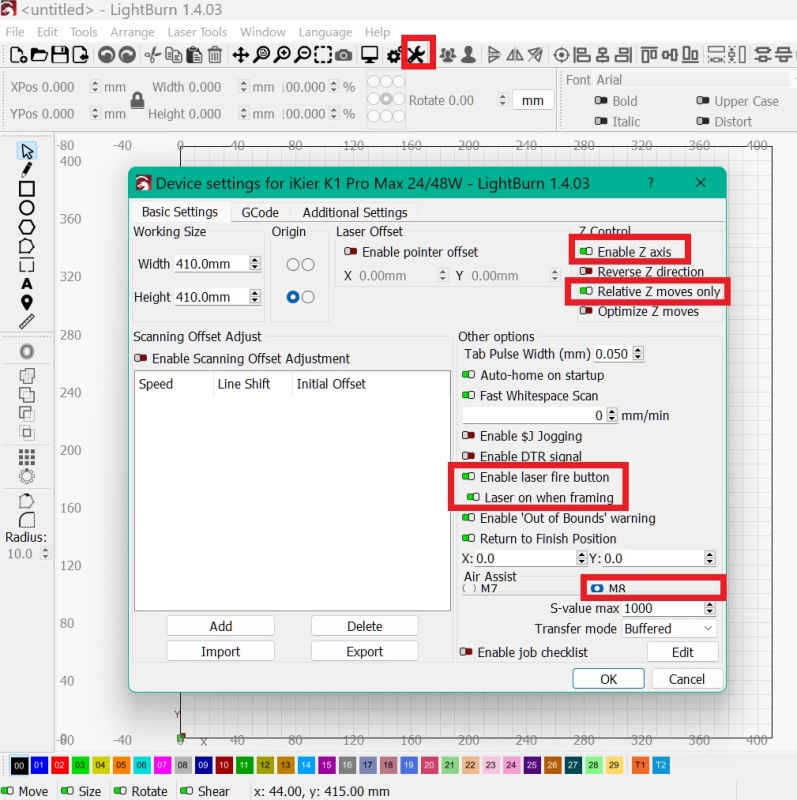
Before doing anything with the iKier K1 Pro Max diode laser engraver, I wanted to make sure that certain device settings were turned on to be able to use the aforementioned features of the machine. To do this, I went to the “Edit” menu > “Device settings” and toggled on everything that is shown in the red boxes above. The Z-axis control settings are important for autofocusing, the laser fire button is important to see where the laser is on your material to position it properly, and the M8 selection is important for using the automatic air assist.
Autofocus
One of the nice features of the iKier K1 Pro Max is that it will autofocus the laser for you. The above video shows it in action. I had to set up a custom “Autofocus” button in LightBurn by doing the following (iKier’s instructions weren’t very clear):
- Click on the Console tab in the upper right side panel in LightBurn (if you don’t see it, go to the Windows menu and make sure the Console is checked)
- Right-click on any one of the “Macro” buttons
- Label the button “Autofocus”
- Enter “[ESP500]” (without the quotes) in the “Macro contents” box
- Click on “OK”
Automatic-sinking cuts
The auto-sinking feature comes in handy when using the iKier laser engraver to cut thick materials which require more than one pass to cut. It adjusts the laser module down after each pass…
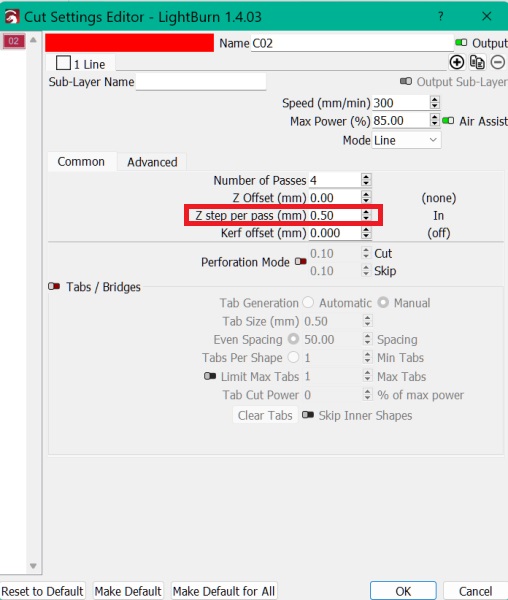
…according to whatever you set in LightBurn (as shown in the layer’s cut/engraving settings above). This ensures that the focal point reaches deeper into the material being cut with each pass thus making it possible to cut thicker items.
The above video shows how well it works, but notice the scorched edges around the wood I cut. I used the 24W setting on the laser module to accomplish this cut. When I tried using the 48W setting, the underside of the wood was catching fire – yikes! Never leave your engraver unattended…
- 20mm pine wood cut – 24W switch setting on the laser module (NOT 48W), 300mm/min., 85% power, 4 passes
Auxiliary positioning
The auxiliary positioning feature uses the infrared laser attached to the side of the laser head to help you position your material. I performed a calibration of this positioning tool using the laser’s touchscreen panel as shown in the video above and summarized below:
- Tap on “Settings” on the iKier laser engraver’s touchscreen panel
- Go to the second page
- Tap on the arrow next to “Auxiliary positioning”
- Tap on “Mark the current position” (make sure you have something under the laser to mark)
- Tap on the up/down and side arrows to position the cross hairs of the infrared laser over the marking created by the laser module
- Tap on “Confirm”
- Go back to the home screen
I then set up a custom “Auxiliary positioning” button in LightBurn by doing the following:
- Click on the Console tab in the upper right side panel in LightBurn
- Right-click on any one of the “Macro” buttons
- Label the button “Auxiliary Positioning”
- Enter “[ESP501]” (without the quotes) in the “Macro contents” box
- Click on “OK”
Performance
I set up the iKier K1 Pro Max in the garage because it creates smoke and fumes and doesn’t come with an enclosure or any air-filtering accessories.
Engraving and Cutting Results
Aluminum business cards
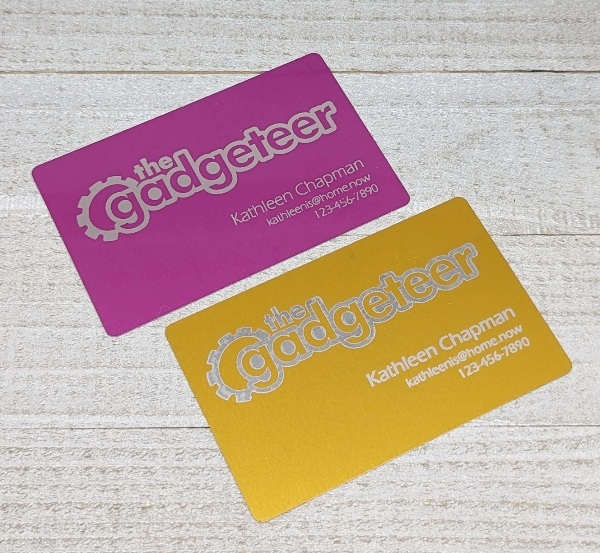
Having engraved aluminum business cards before using different laser engravers, I’ve had the best success with those that are painted darker colors. I found this to be true when using the iKier laser engraver on aluminum business cards.
The pink card turned out the best because the laser burns away the paint on the card creating enough contrast between the silver aluminum engraving and the untouched pink areas of the card.
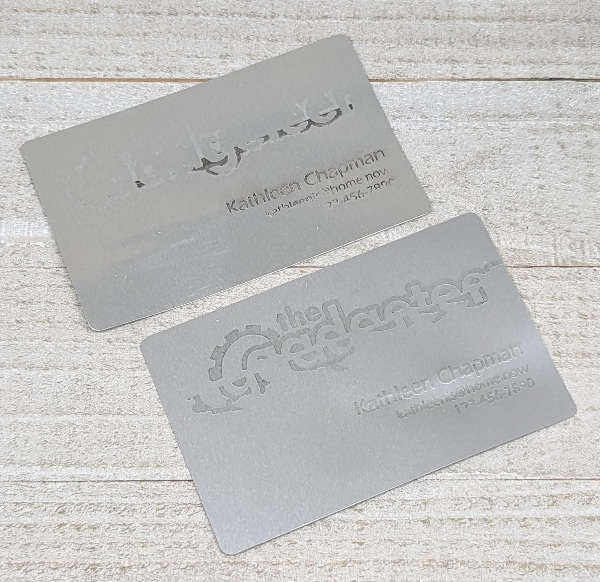
I tried higher power settings and slower speeds for the gold card and the plain aluminum cards to see if the laser would create a different color on the metal. Unfortunately, this didn’t work well. The engraving on the lighter-colored cards is difficult to read; there’s not enough contrast. The engraving on the plain aluminum cards came out dark in some areas, light in others, and completely blank in some spots. One of the cards even shifted while being engraved possibly because of warping.
The engraving speed and power settings for the pink and gold cards are as follows:
-
-
- Pink card – “the gadgeteer” image: 4000mm/min., 30% power; text: 3500mm/min., 60% power
- Gold card – “the gadgeteer” image: 4000mm/min., 40% power; text: 3500mm/min., 70% power
-
Stainless steel
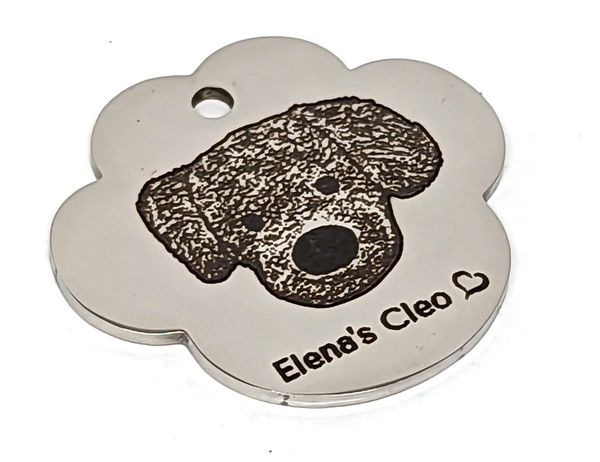
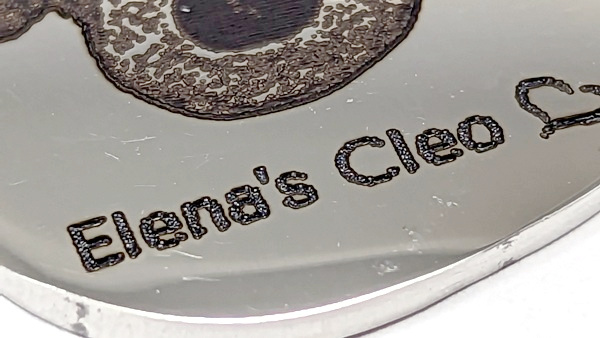
I engraved the stainless steel keychain/tag above. I think it turned out rather well even though I probably could have decreased the power some and increased the speed a little so that the engraving would have been lighter.
When I engraved the tag above, I positioned this manually. Since the laser module is rather large, it impeded my view of the laser on the material. I framed it several times and was off on the first engraving, but the second engraving was centered nicely.
-
- Image engraving – 1800mm/min., 45% power
- Text engraving – 900mm/min., 65% power
I have since engraved other things on small stainless steel tags using the auxiliary positioning feature which makes this process soooo much faster and easier!! I love it!
Basswood
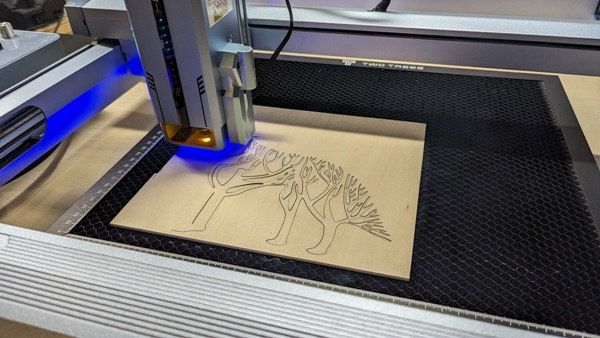

I found a wolf design that I liked on 3axis.co which I cut out of 3mm basswood. I then found some clipart images with mountains and trees, traced them, and then cut them out of 3mm basswood. I’m pleased with how it turned out.
- Cut – 300 mm/min, 45% power, 1 pass
Clear acrylic
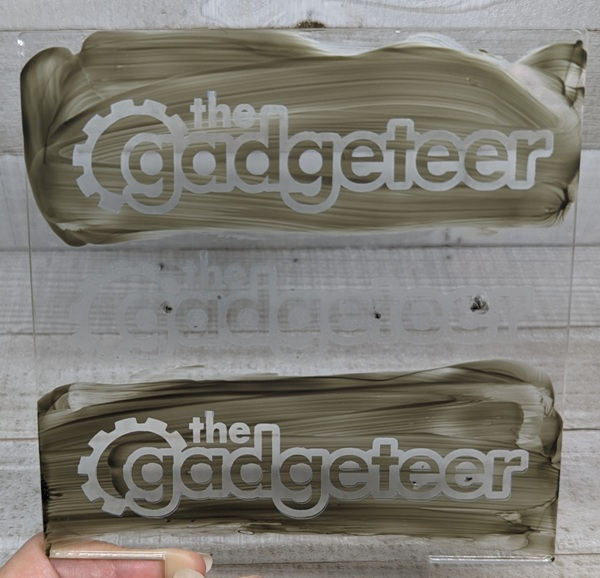
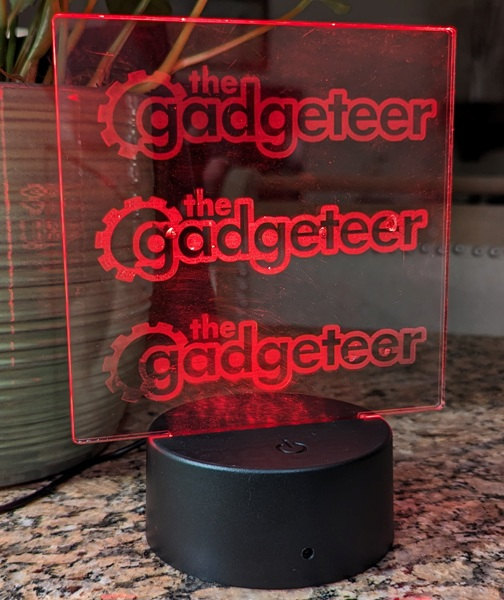
To laser engrave on glass or clear acrylic, you need to coat it with something to absorb the laser energy, otherwise, the laser light energy would pass right through the transparent material. I used matte black tempera paint and coated the acrylic with it using my finger. This seemed sufficient to accomplish the engraving. I chose to engrave on the upper side of the acrylic where the paint was.
You could also use black card stock or sheet metal painted grey or black and place one of these items under the glass or acrylic. You just have to remember to flip your image around because you’ll be engraving on the underside of the glass or clear acrylic and not the upper side.
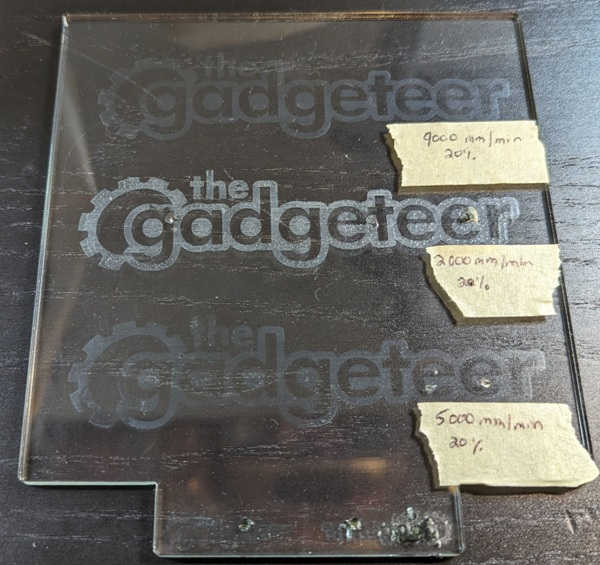
I noticed that while engraving acrylic at 2000mm/min. at 20% power, there was some popping going on in the plastic. The speed was either too slow or the power too high. I had a little more success when I increased the speed.
The second and third photos above show the results after washing off the tempera paint with soap and water.
- Top “the gadgeteer” image engraving – 7000mm/min., 20% power
- Center “the gadgeteer” image engraving – 2000mm/min., 20% power
- Bottom “the gadgeteer” image engraving – 5000mm/min., 20% power
Cardstock
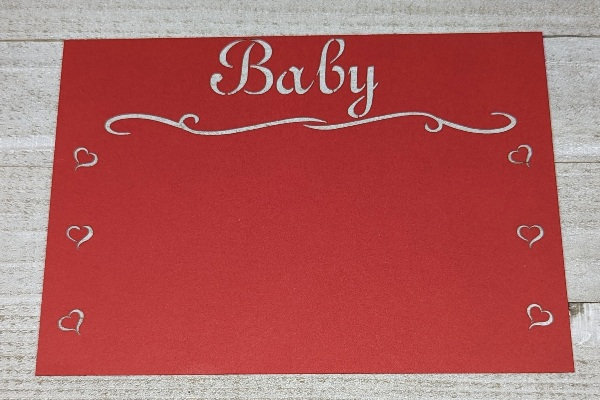
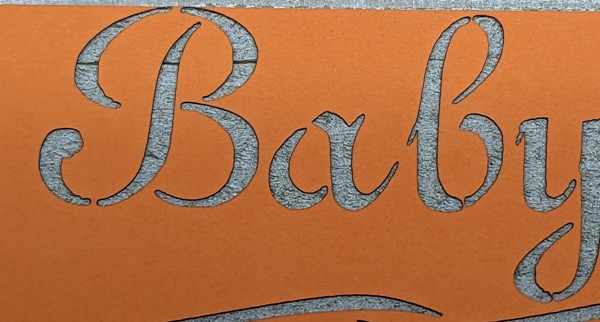
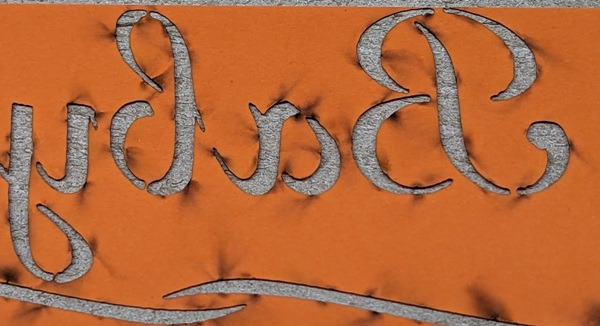
Cutting cardstock with a laser engraver is a cool way to create stencils. Using the air assist is key to avoiding charring the upper side of the paper. The back side of the card stock still shows some charring, and it smells like a campfire, but it looks good!
- All cuts – 2500mm/min., 90% power, 1 pass
Ceramic and Slate coasters
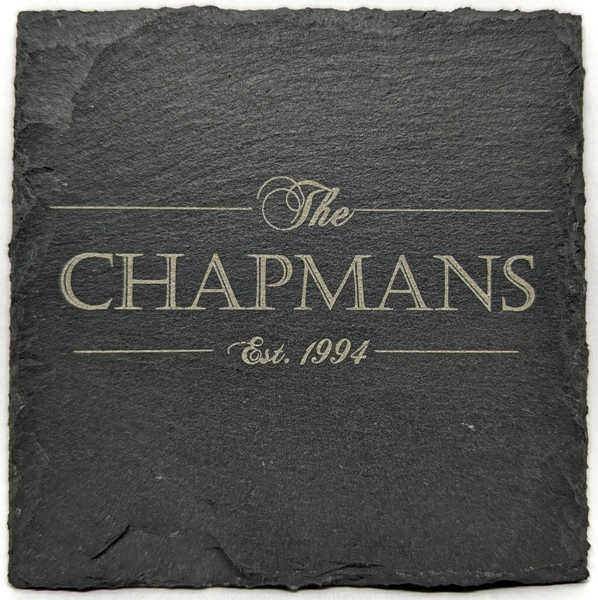
Engraving slate coasters was fun. I am so pleased with the results. The engraving is a lighter color than the untouched slate which is a cool effect.
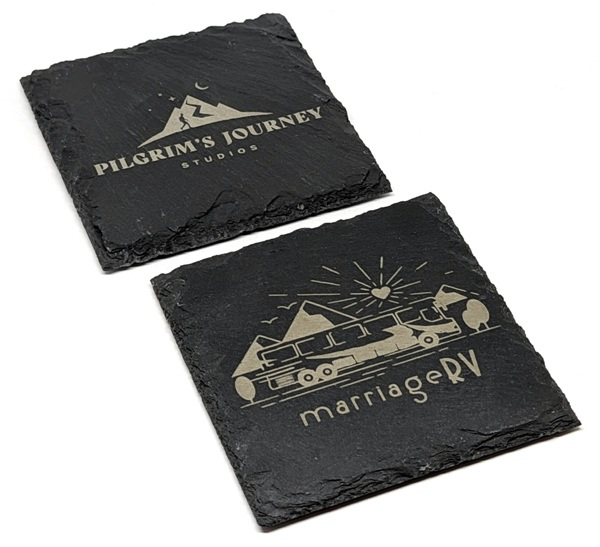
My brother makes videos for a church marriage ministry (Re|engage) that he is involved in. He calls his studio, “Pilgrim’s Journey Studios” and also started a marriage ministry with his wife called MarriageRV. I traced the logos of both and engraved them on the above slate coasters. I plan to surprise them with their personalized coasters.
Here are the settings I used to engrave all of the slate coasters shown above:
- 2500mm/min., 25% power
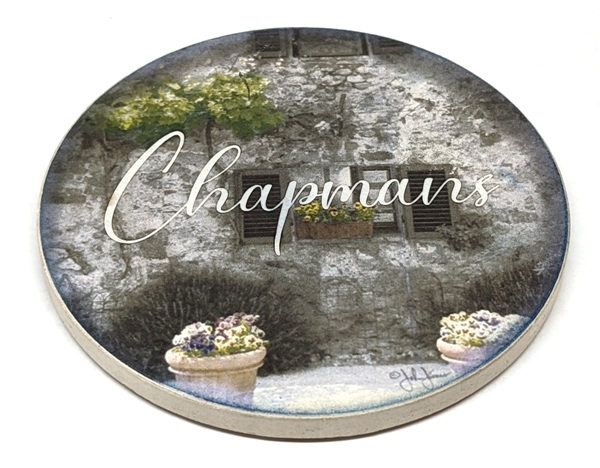
I also tried my hand at engraving some Thirstystone coasters that I have. I was pleasantly surprised with the results. The engraving has a nice depth to it, which is exactly what I wanted.
- “Chapmans” engraving – 500mm/min., 30% power
iKier K1 Pro Max quirky stuff
There was one day when I experienced several quirks with the autofocus, the auxiliary positioning, and LightBurn saying that the machine was still busy when it wasn’t.
First, after framing a project on this one particular day, I used the Autofocus button. Instead of adjusting to the correct height, the Z-axis motor continued to raise the laser module until it hit the upper Z-axis limit switch and then stopped. When I clicked on the Autofocus button the second time, it responded correctly.
Then, I used the auxiliary positioning button and framed the project. When I started the job, the engraver started in a completely different area than it should have started. I checked things like the job origin, current position vs. absolute coordinates, etc., and was still having the problem.
Lastly, after running several projects that day, LightBurn said the machine was busy even though the jobs had been completed and the laser had stopped firing and had returned to its finished position. I had to click on the stop button in LightBurn to get it ready for the next job.
I haven’t had any issues with these things since that day. So, yay! These features make the iKier K1 Pro Max my favorite laser engraver to date.
What I like
- It arrived mostly assembled
- The laser module has a 24W/48W switch so you can use 24W to engrave and 48W to cut thick materials
- It came with an automatic air assist that can be controlled in Lightburn
- You can autofocus or manually focus the laser
- It has an automatic sinking feature that lowers the height of the laser with each pass when cutting thick material
- The auxiliary positioning feature helped me position the laser correctly and quickly over the material
- It has a decent-sized working area
- I’ve loved the engraving and cutting results
What I’d change
- It doesn’t have Bluetooth
- An enclosure and air filter/purifier are sold separately thus the engraver should be used in a workshop/garage to avoid getting smoke or dangerous fumes in the house
Final thoughts
The iKier K1 Pro Max 24W/48W laser engraver is now my favorite laser engraver. It has a decent-sized work area (410mm x 410mm), and I love all of its features: the 24W/48W switch, the autofocus feature, the auto-sinking cut feature, the auxiliary positioning feature, and the automatic air assist. I was able to produce beautiful results on a variety of materials like wood, clear acrylic, cardstock, aluminum, stainless steel, and slate. I was even able to cut a 20mm pine board using the auto-sinking feature.
One thing I wish the iKier K1 Pro Max had was Bluetooth connectivity like my Sculpfun S30 Ultra. I want to be able to power up the laser engraver and have it connect to my laptop immediately so that I can send my projects to it via LightBurn without having to mess with cables or flash drives.
There were a couple of quirks with the autofocus, aux positioning, and the machine being busy after completing the job a few times. However, all these issues showed up on a single day and I haven’t experienced them since. All the features work perfectly and make using this laser engraver a joy!
Price: $1699.00 at iKier or $1499.99 at Amazon (with the $500 Amazon coupon)
Where to buy: iKier or Amazon
Source: The sample of this product was provided by iKier.

Google Review Tap Cards (3-Pack) by TapFive - Tap for Instant Reviews - All Phones Compatible - Reusable Smart Tap NFC & QR - Boost Business Reviews - Powered by TapFive (3 Card Pack)
(as of June 21, 2026 22:59 GMT -05:00 - More infoProduct prices and availability are accurate as of the date/time indicated and are subject to change. Any price and availability information displayed on [relevant Amazon Site(s), as applicable] at the time of purchase will apply to the purchase of this product.)
Gadgeteer Comment Policy - Please read before commenting
I just received this week my Ikier K1 48/24 volt and setting it up. My only complaint is that the information provided was lacking. However, having found your posy answered most all my questions. I will have to print this out and keep it with the Laser as a quick reference. Thanks also for the tip on the eye protection! I wanted to buy another pair and now may just replace those with the one you recommended and get a couple.
Terry – Thank you so much for taking the time to leave a comment and for your positive feedback! I often debate about whether or not to include “how to” information and the equipment that I use. Most reviews don’t include that info, but it’s info I like to see in reviews when I read them, so I include it in mine. Your comment was encouraging and thus, I will continue to add that info in my reviews! 😁
I had some issues using an older Mac Pro so I switched to a newer Lenovo workstation running window 11 and all the issues disappeared. I’m getting awesome results. Again thanks for sharing your post it was very helpful.
Terry – I’m so glad you got it to work for you! 😁
Great post , nice useful information made the Light burn setup easy, thanks.
John – I’m glad the review was helpful to you! 😁
Hallo Kathleen
Ich heiße Hermann, bin 58 Jahre und aus Deutschland
Durch Zufall bin ich auf deinen Bericht gestoßen da mein Atomstack A20 pro leider defekt ist und ich auf der Suche nach einem neuen Laser bin.
Der iKier mit 48 Wat hat mir bei meiner Suche auch sehr gut gefallen nur die vielen negativen Rezensionen haben mich etwas gestört daher suchte ich jetzt nach einem vernünftigen Testbericht über den iKier denn youtube bietet zwar einige Videos aber wirklich überzeugend war keines dieser Videos.
Dein Test hingegen mit den unterschiedlichen Bildern, den jeweiligen verwendeten Leistungsangaben zu den Projekten und vor allem wie du geschrieben hast, hat mich sehr begeistert.
Man liest dass Du einfach, wie ein normaler Anwender den iKier getestet hast und das auch genau so an uns User vermittelt hast wie es eben wirklich ist wenn man mit solch einem Laser arbeitet.
Ich kenne dich nicht, habe aber während des Lesens deines Berichtes vertrauen zu deinen ehrlichen Aussagen aufgebaut.
Ich denke, wenn der iKier kein gutes Gerät währe hättest du das in deinem Bericht genau so ehrlich an uns mitgeteilt.
Es gibt mittlerweile, seit deinem Bericht schon wieder ein paar neuere Modelle an Lasern von verschiedenen Herstellern die sicher auch gut sind aber aufgrund deines Berichtes werde ich mir jetzt doch als neuen Laser diesen iKier zulegen.
Danke, für deine Zeit, deine Mühe und die viele Arbeit die Du in solche Tests investierst um uns Usern eine Kaufentscheidung zu erleichtern.
Hermann
Hermann – Wow, that’s such high praise! It was so encouraging to me! Thank you so much for taking the time to leave such a detailed and thoughtful comment. Yes, you are correct – I report ALL my experiences (positive and negative) in all my reviews. I really hope you like your iKier laser engraver as much as I do, especially since you trusted my review to help you make your decision to purchase it! Let me know what you think when you receive it 😁