REVIEW – A while back, I got to review the LaserPecker 3 fiber laser engraver. It was my first dip into the laser engraver world. I was excited to get a chance to engrave all sorts of materials, but then I found out there was a limit to what a fiber laser could engrave due to a host of reasons. Next, I got the chance to review a diode laser which was closer to what I wanted to work with, but it too had its limitations. Now we have the Laserpecker 4 engraver which combines both a fiber laser and a diode laser into one compact unit. This means that I can now engrave all the different materials I want with one unit. But is it any good? Read on to find out.
What is it?
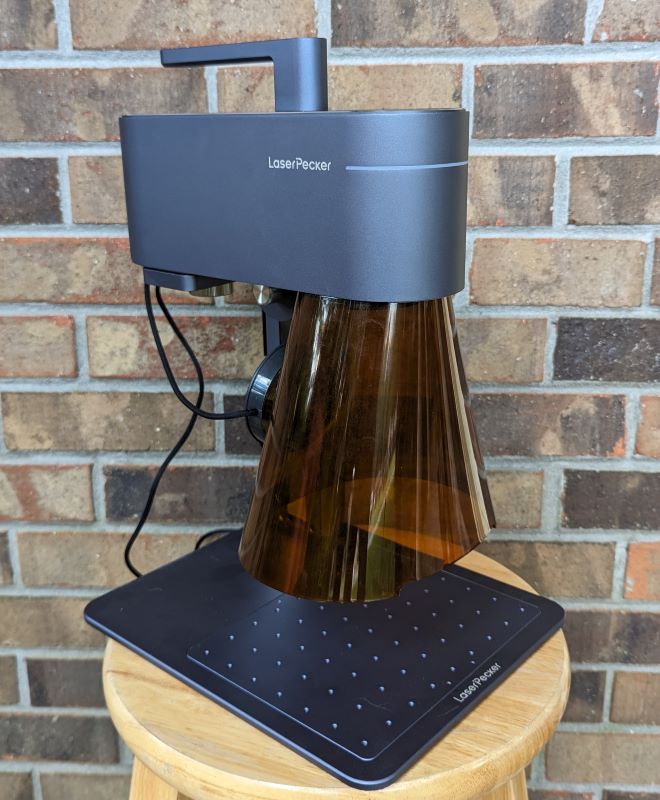
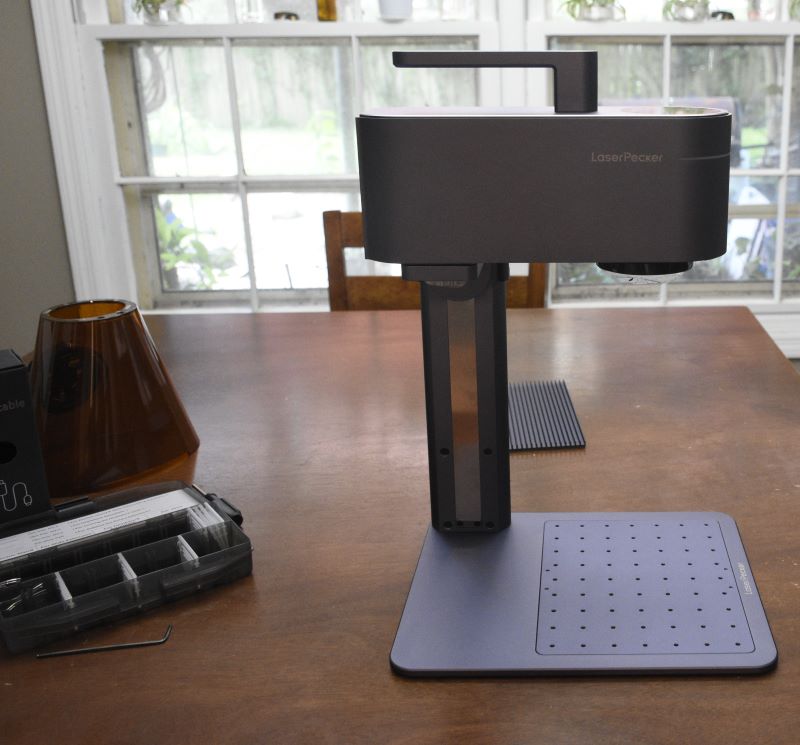
The LaserPecker 4 is a compact, portable dual-laser engraver that can engrave on almost any material. It has a 450nm diode laser and a 1064nm infrared laser.
What’s in the box?
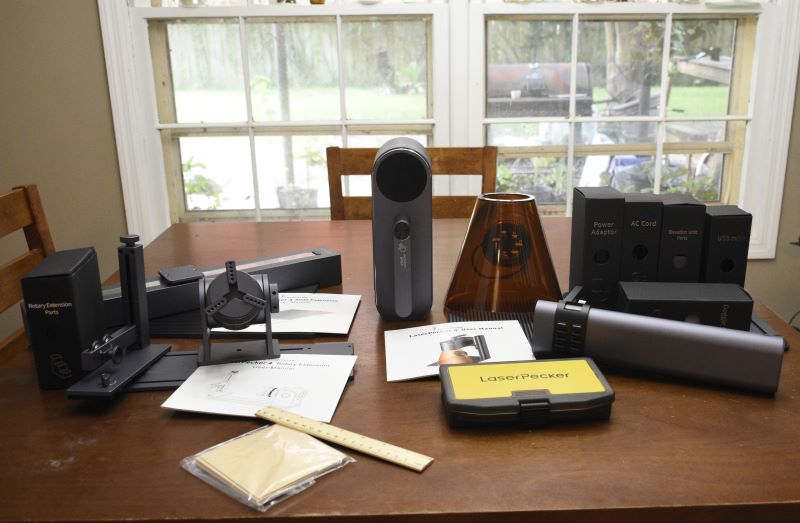
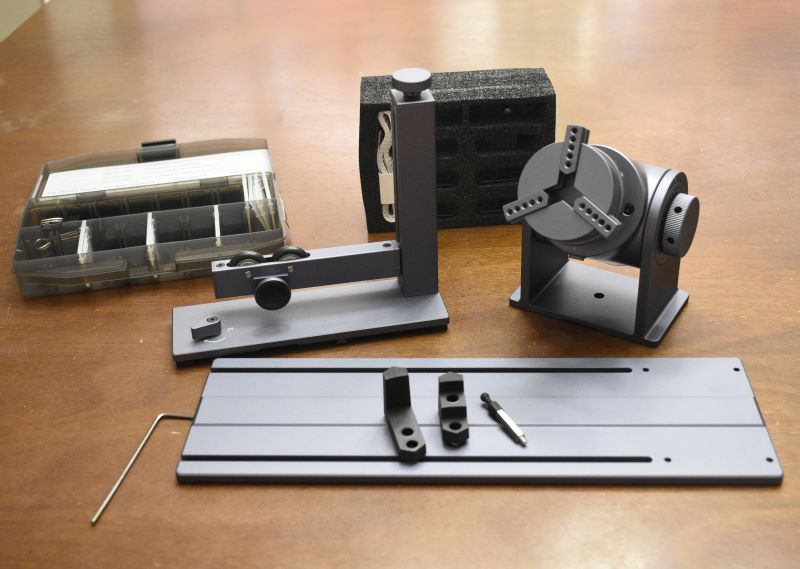
LaserPecker 4
- Laser head
- Electric stand
- Protective shield with fan
- Power adaptor
- Goggles
- USB C to USB C cable
- USB C to USB A cable
- Toolkit
- Materials pack
- Elevation unit
Rotary extension
- Rotary head
- Sliding roller support
- Base
- USB cables
Slide extension
- Base
- Platform
- USB cables
Hardware specs
Laserpecker 4
- Weight: 4.75kg
- Laser type: 2w 1064nm fiber laser, 1ow 450nm diode laser
- Working area: 160 x 120mm, with slide extension 160 x 300mm
- Speed: up to 1200 mm/s
- Cutting width: <5mm
- Connectivity: USB and Bluetooth
- File format: G-code, JPG, PNG, BMP, SVG, DWG, DXF
- OS: Win 10, Mac OS 10, IOS 9.0, Android 6.0
- Software: Laserpecker Design Space and Lightburn
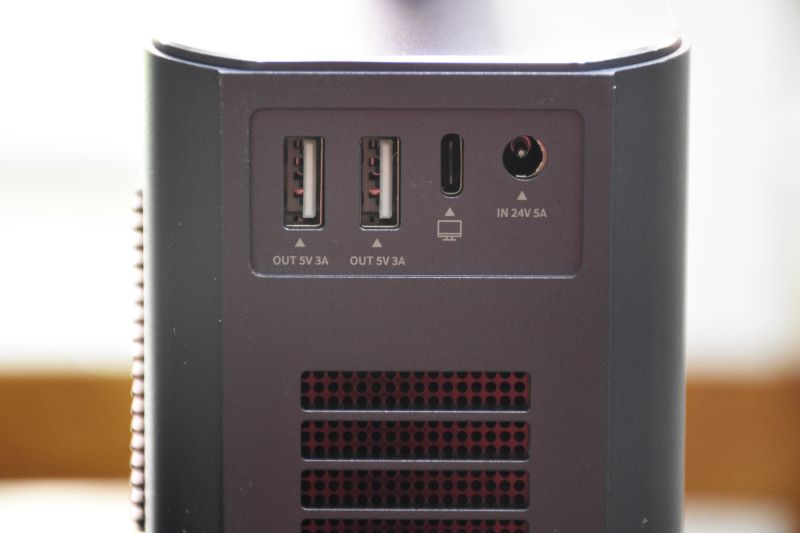
- Power: 24V 5A
Design and features
The LaserPecker 4 engraver is, as far as I know, the first and only laser engraver to include both a fiber and diode laser into a very compact and easily portable unit. Because it has both lasers built-in, you can now engrave and cut tons more materials with a single machine. On their website, LaserPecker lists the following: wood, bamboo, acrylic, leather, paper, cloth, felt, corrugated paper, plastic, bones, anodized aluminum alloy, dark glass, shale/tile/cement, metal, stainless steel, iron/bronze, ceramic, plastics, food, and fruits. Not sure why you’d want to engrave the latter two, but then I’m not the most imaginative person. I will say I have been able to engrave and/or cut cardboard, chipboard, pine wood, thin plywood, clear glass with some prep, leather, metal, and plastic. The best part is to be able to do all of them without having to swap out between different units to do so. I’ve got limited space so I can’t have two different setups standing by.
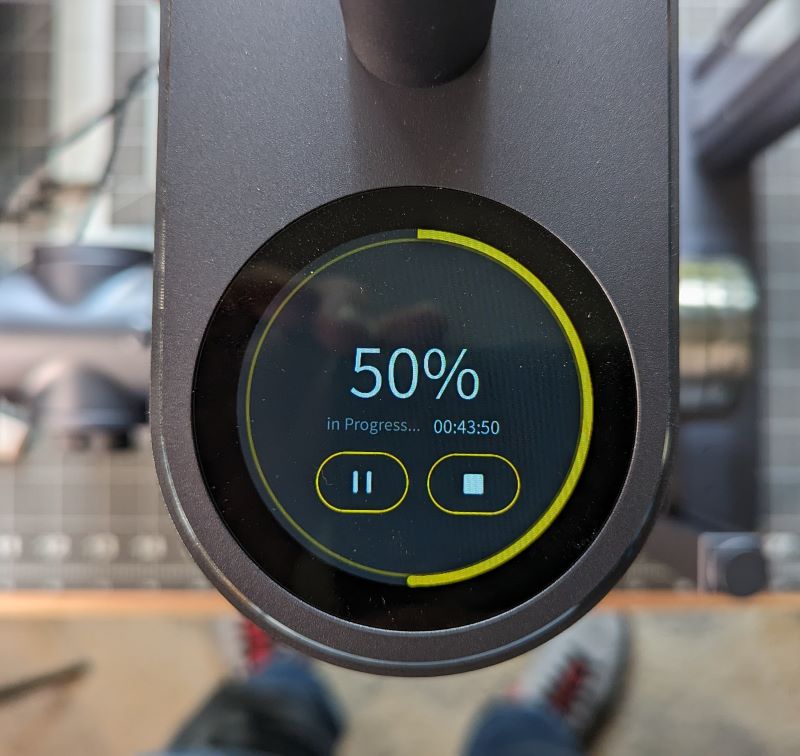
So how do you control the tiny dynamo? Well, multiple ways. One of the coolest is the built-in touchscreen.
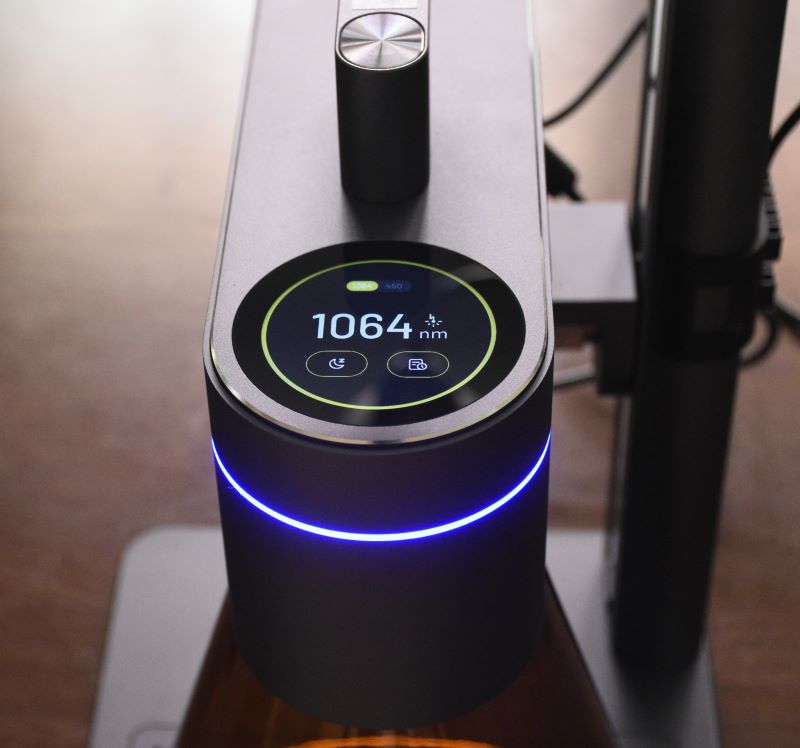
With a swipe of a finger, you can switch between the diode and fiber laser. You can put the LaserPecker 4 engraver to sleep or wake it up with the touch of a finger. It’s bright and very responsive.
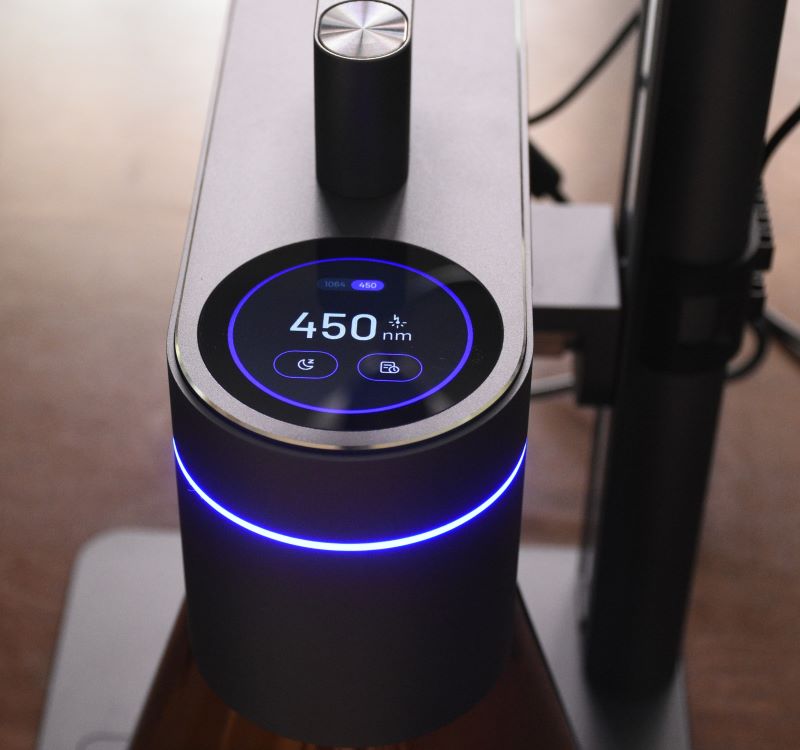
Not only does it display the laser used at the time, but it also serves as a countdown timer for the current project. It’s a great addition and well-executed.
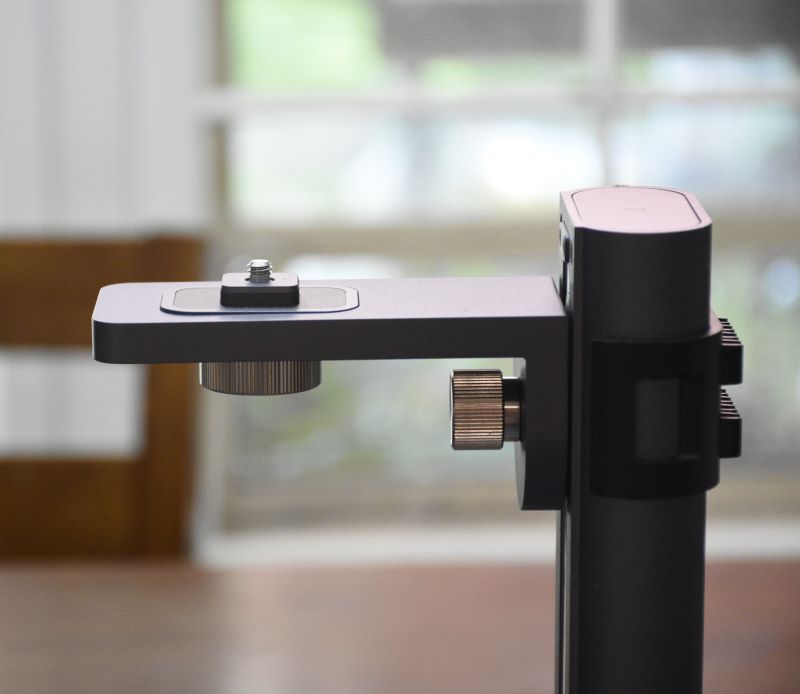
The build of the LaserPecker 4 engraver has the same great build as the LaserPecker 3. It has an all-metal chassis and base. It is very solid and stable without being overly heavy. In my opinion, it would take quite a bit to topple this thing over. But should you somehow manage to do so, it has a built-in safety feature that shuts the LaserPecker4 off. I can’t attest to whether that works or not. I’m not planning on finding out either. Another safety feature is a physical switch located at the top of the unit which will shut it down should the need arise.
I love the focusing method on the LaserPecker 4 engraver when compared to the Sculpfun S30 Pro engraver I reviewed a while back. With both the LaserPecker 3 and 4, you focus the laser by using the buttons on top of the vertical support to raise and lower the head while getting the two red dots to line up. No need to use a ruler or spacer. No need to loosen screws to slide the laser head up or down.
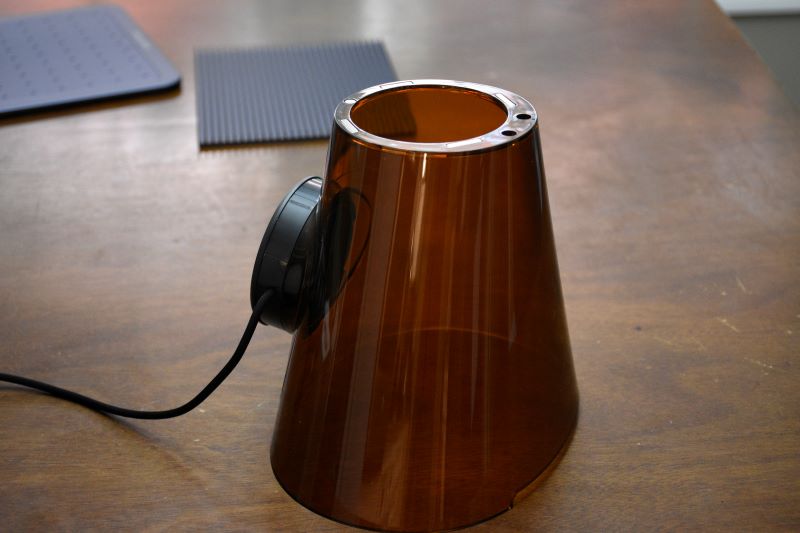
This version of the LaserPecker came with a safety shield that has a built-in fan for fume extraction. This shield serves a few other functions as well. It protects your eyes from the laser, keeps fumes contained so the fan can suck them out, and can even serve to help with focusing the laser. If you’re using a flat material, you lower the shield down to it and it should be in the perfect spot. This works well and gets you working that much faster.
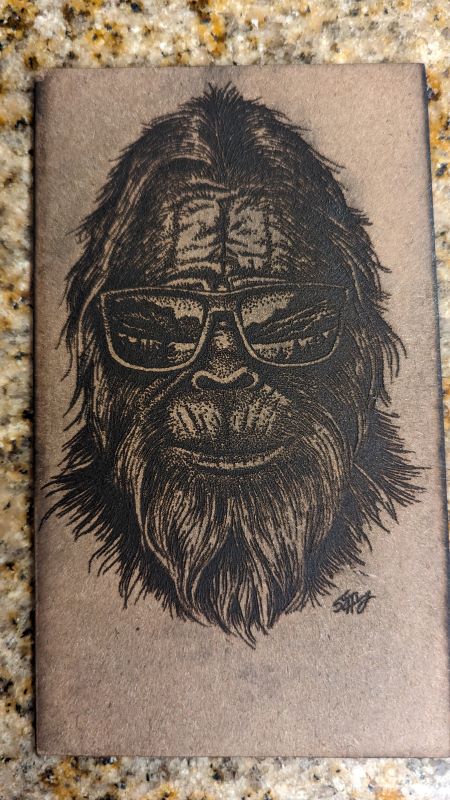
Speaking of faster, the LaserPecker 4 engraver has four speeds when using the Laserpecker software. It’s a little misleading. The speeds are listed as 1K, 2K, 4K, and 8K. Now, the LaserPecker 4 can engrave high-resolution artwork and pictures, but choosing 1K burns much faster than the other levels. With each level up you choose, the speed is slower, which is better for higher resolution or greater detail. Let me tell you, I haven’t gone with 8K yet but I did burn a self-portrait on chipboard and the project took about 3 hours to complete. So, each project you do can be quite an investment in time which is true most every consumer-level engraver.
Let’s talk about accessories. I was lucky enough to receive three accessories with my LaserPecker 4 engraver. The first isn’t that exciting but is necessary if you plan to cut anything. The cutting plate allows airflow under your material so you get better cuts and less burn.
Next up is the accessory I was most excited about. The rotary extension allows me to engrave items that aren’t perfectly cylindrical without having to come up with some janky leveling apparatus. It looks like a tiny version of a metal lathe and is similar to one.
You chuck in your object and use the height-adjustable rollers on the opposite end. Not only does the roller arm adjust up and down, but it also slides back and forth to allow support for numerous round objects. The head itself not only rotates but can also tilt up 90 degrees, so even more possibilities.
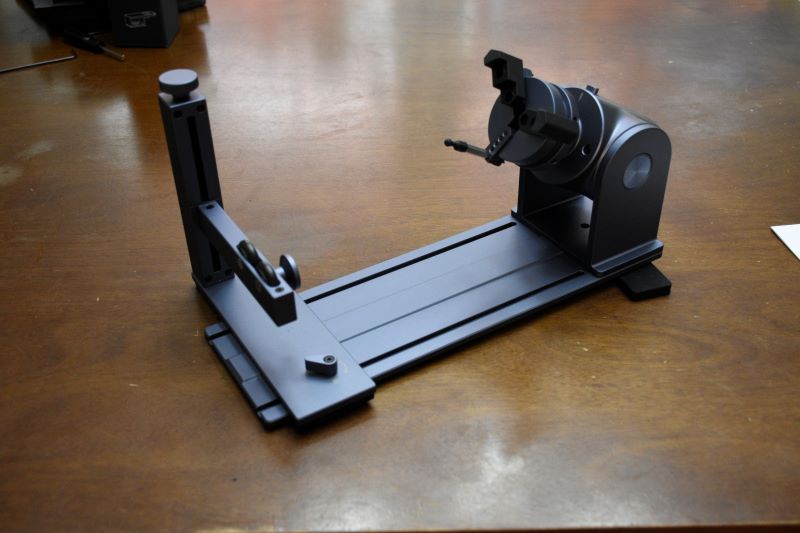
There are a couple of issues I have with it though. The interchangeable mounting options don’t hold as well as I’d like. There’s too much flex in them. Next, tightening down the chuck or the tilt doesn’t work as well as I’d like either. Once they start to get tight, there’s some grittiness, I guess you’d say. Turning each is smooth until you get resistance, then it feels crunchy.
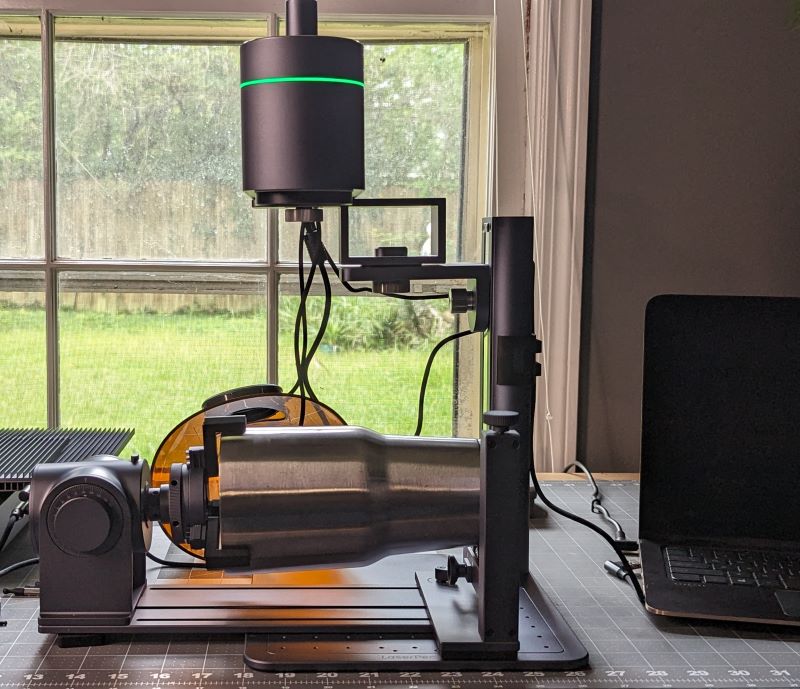
The final accessory is the slide extension. Gotta admit I wasn’t that excited about it, but after using it, my mind was changed. It essentially doubles the length of the bed. Now I can engrave or cut material twice as long. I know it might not sound like much but it’s cool to watch and the results were cool.
Setup
The physical setup of the LaserPecker 4 engraver and its accessories is quite easy. The instructions included are well-written and easy to follow. Large thumbscrews are used to assemble the engraver itself.
The accessories come mostly assembled. There are very few fiddly bits to deal with. LaserPecker, I applaud you for this. Everything connects to each other with USB cables for power and communication.
To interact with the LaserPecker 4 engraver, you have a couple of options, Bluetooth and USB. Now the Bluetooth connection only works with a mobile device and the mobile app. If you want to use Bluetooth on a PC, you’ll need to buy a separate dongle. I’m not sure why, but that’s the way it is. Currently, LaserPecker seems to believe users will mainly use a mobile device. The PC/Mac software is still in the Beta phase but is my preferred method which only works via USB. Much like when I reviewed the LaserPecker 3, the Laserpecker Design Space for PC isn’t the most intuitive, but they have made a lot of improvements and they are still developing it. I have high hopes for it.
Performance
The LaserPecker 4 engraver’s performance is great. Having the 2 separate lasers obviously make it so much more convenient to use. It increases the amount of materials you can use with one device. The amount of detail you can get with it is great. Right now, it’s the software that’s its Achilles heel. Your selections for materials in the software are a little vague. It’s difficult to know whether you’re cutting or engraving because I can’t simply select that function or if I can, I can’t figure out where it is. I don’t have a mobile tablet so to use the app, I have to use my phone which is definitely far from ideal with my large hands.

There’s hope though. The new LaserPecker4 is Lightburn compatible which is fantastic software but that compatibility isn’t perfect. I can get it to work with Lightburn but not straight out of the box. I had to dig through questions on the Kickstarter page and was able to find a link to 3 files that need to be imported to function. So compatible, yes it does work with Lightburn. Another issue I had with the Laserpecker 4 and Lightburn is it stopped working with the accessories. I got them to work once but now I can’t.
Speaking of that, I had issues getting both software packages on my PC to recognize it initially. I started with a Win 11 laptop and it was a no-go. So I switched to Win 10 and it still wouldn’t work. I uninstalled and reinstalled both software packages, downloaded tons of Windows updates, and rebooted numerous times. I can’t tell you what the actual fix was but it did start working, so there’s that. Regardless of the software issues I had, I’m happy with the results.


What I like
- Build quality
- Versatility of 2 lasers
- Portability
- Accessories
What I’d change
- Need for better software support
- Rotary extension could be better
Final thoughts
I love the LaserPecker 4 engraver. I’ve had a lot of fun with it so far. There’s so much more you can do with it because of the lasers and its portability. All this comes at a price though. Laser engravers aren’t cheap and the Laserpecker 4 is no different. The package I received was priced at $1624 on their Kickstarter page which has ended. So if you’re just wanting to dip your toes into this hobby, I would suggest something cheaper to see if it’s for you. If you know you want to engrave and cut several different materials, need to be able to move and set up with ease and expand its native capabilities to give you even more options then you should check the LaserPecker 4 engraver.
Price: $1999.00
Where to buy: LaserPecker and Amazon
Source: The sample of this product was provided by LaserPecker.

Google Review Tap Cards (3-Pack) by TapFive - Tap for Instant Reviews - All Phones Compatible - Reusable Smart Tap NFC & QR - Boost Business Reviews - Powered by TapFive (3 Card Pack)
(as of June 17, 2026 19:13 GMT -05:00 - More infoProduct prices and availability are accurate as of the date/time indicated and are subject to change. Any price and availability information displayed on [relevant Amazon Site(s), as applicable] at the time of purchase will apply to the purchase of this product.)
Gadgeteer Comment Policy - Please read before commenting
Can it cut glass or only engrave?
It will only etch glass, not cut. The jar I show in the GIF above actually cracked because the settings I used were too high.
Good day how do i get one
Click the links at the end of the review in the Where to buy section.
Hello, could you answer my question, does it have a shelf life? And after this useful life is over, is there support for changing parts?
Great questions, but unfortunately I don’t have that information.
A couple of things.
1) It’s not a fiber laser. It’s an IR laser. There was a massive difference.
2) It’s not the only. xTool was shipping their F1 which is also an IR/blue laser combo in April of 2023, and announced before the LP4 was.
The advantages of the LP4 are that it has a 10W blue vs 5W, has the tilt, and a larger work area.
You’re right! I totally missed the fact it says IR laser on their website. I’m definitely no expert so baing my experience with their Laserpecker 3 I thought it was the same technology. My apologies, but thank you for sharing this information!
Hello, I have purchased the LP4 and the instructions are poor, the written instructions and online video show different connections to the rotary arm, I have also tried to engrave onto white cardboard box and failed
And help or suggestions on settings or set up would be helpful, before the unit is return.
The only thing that comes to mind at the moment is focusing the laser. Raise or lower the laser head until the 2 dots are on top of each other to form a single dot.
I would also suggest looking into Lightburn software. It’s more feature-rich with an outstanding community where questions can be asked.
What settings would I use to cut an aluminum license plate?
Just got a LaserPecker 4 and am generally loving it. One thing I found odd was that they include the materials pack, but don’t tell you what’s in it. So I have 4 blank metalic business cards, and 3 thin pieces of wood… but I don’t know what kind of metal the business cards are made out of, and I don’t know what kind of wood the pieces are. Do you?