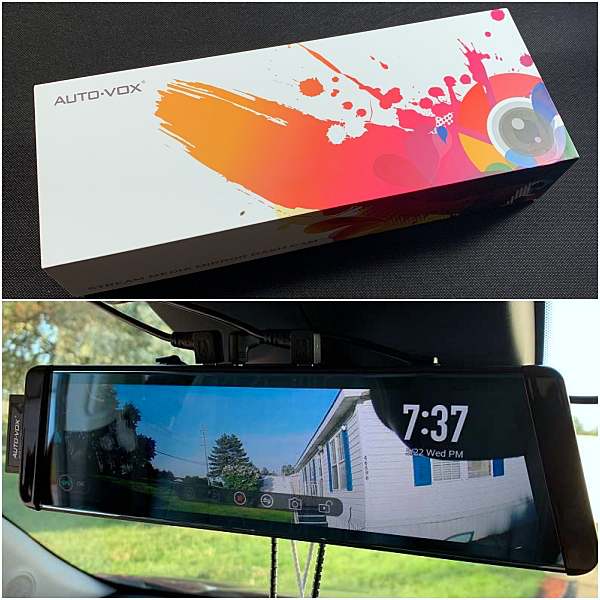
REVIEW – I’ve never reviewed a dash cam before. But with the terrible roads here in Michigan, and the increased number of distracted drivers on those roads, I thought it was time I did. Today I’ll be taking a look at the Auto-Vox X2 Streaming Media Mirror Dash Cam.
What is it?
The Auto-Vox X2 is a touch-screen streaming media mirror with a built-in dash cam and rear backup camera.
What’s in the box?
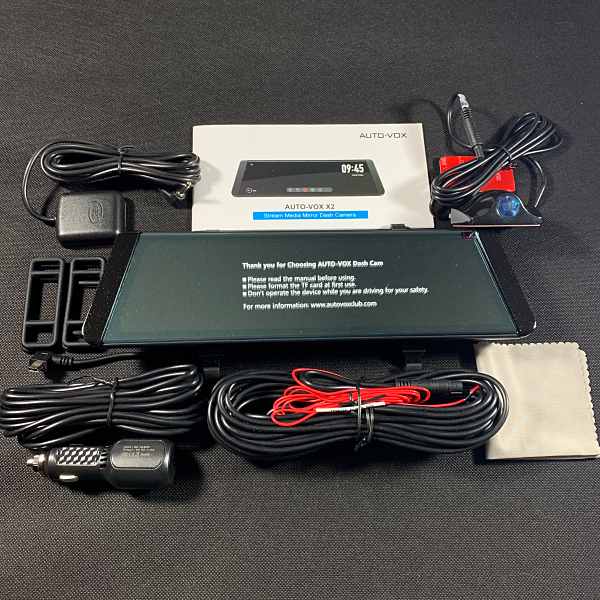
- Auto-Vox X2 streaming media mirror
- 2 sets of elastic attachment bands
- Car charger
- GPS antenna
- Backup camera
- Video cable
- Lens cloth
- Instruction manual
Hardware specs
Mirror:
- Screen Size – 9.88-inches
- Supply Voltage – DC 5-5.5V
- Resolution – 1080P,1296P
- Video – H.264 1296P@30fps+720P@25fps
- Battery – Polymer lithium ion battery
- TF Card – 64GB-128GB,Class 10(not included)
Front view camera:
- Viewing angle – 140 degrees
- Aperture Size – F2.2
- Len Focus Type – Adjustable
- Processor – High-definition HD image processor
Backup camera:
- Viewing Angle – 140 degrees
- Water-Proof – IP68 waterproof
- Resolution – 720P
Design and features
The X2 is designed to fit overtop your cars existing rearview mirror. The front of the unit contains a 9.88” LCD touch sensitive screen.
On the back, there are attachment clips along with the front view dash camera.
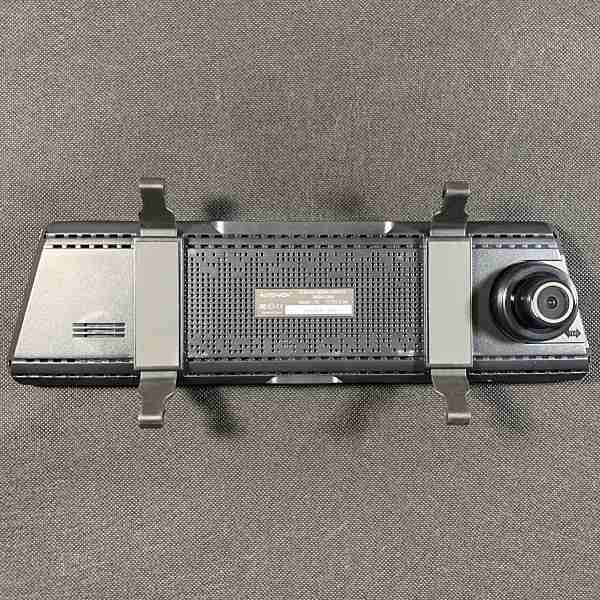
The USB power port, TF card slot, AV port for the backup cam, and the GPS port are all located along the top of the monitor.

The power button is located in the center on the bottom.

The unit requires a MicroSD card (not included). It supports 64GB to 128GB. Note: make sure that you use a class 10 card which is meant for recording and playing back Full HD video.
Installation
The X2 attaches over the top of your cars rearview mirror using to elastic bands. It only took me a couple of minutes to strap it onto the mirror.
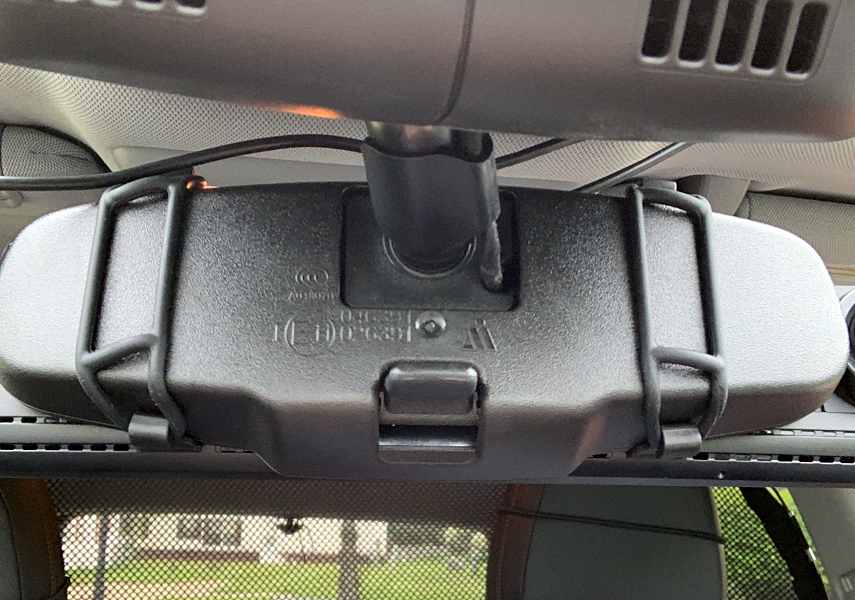
The most challenging part was running the various cables. However, after a bit of planning and some trial and error, I was able to run all 3 cables without much problem. And if I do say so myself, did a great job of hiding them too.
I have a 2019 Chevy Trax which already has a backup camera. My reason for installing the X2’s rear camera was to use it in lieu of the rearview mirror. So I just mounted it inside the car using the 3M adhesive on the base of the camera.
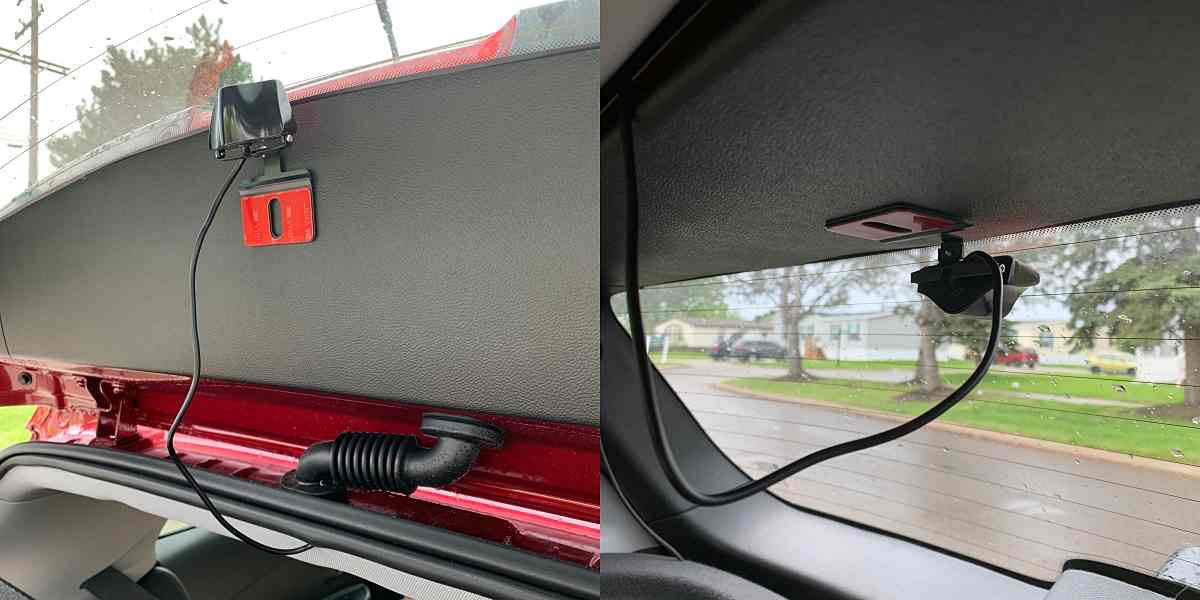
Overall installation from start to finish was under 2 hours.
Display
The X2’s display has a 9.88” LCD touch-sensitive screen. The unit automatically powers on when you start your car and powers down when your car is turned off. To manually power the unit off, press and hold the power button for 3-seconds.
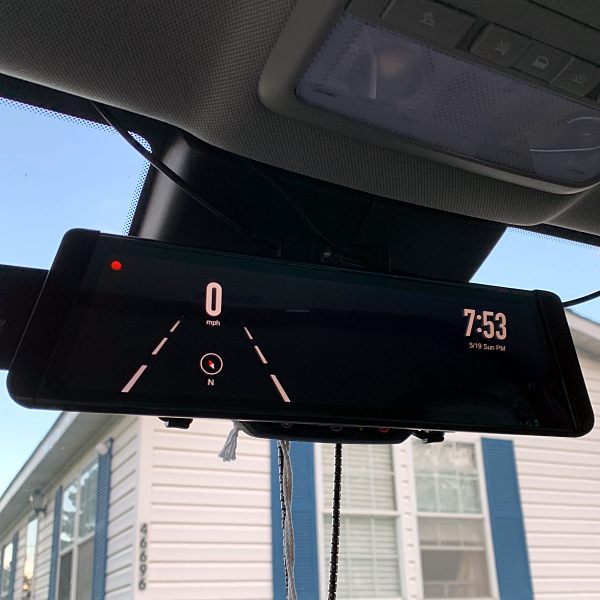
Time and date are shown in the upper right-hand corner of the display. In the lower left corner, a small compass icon indicates your driving direction.
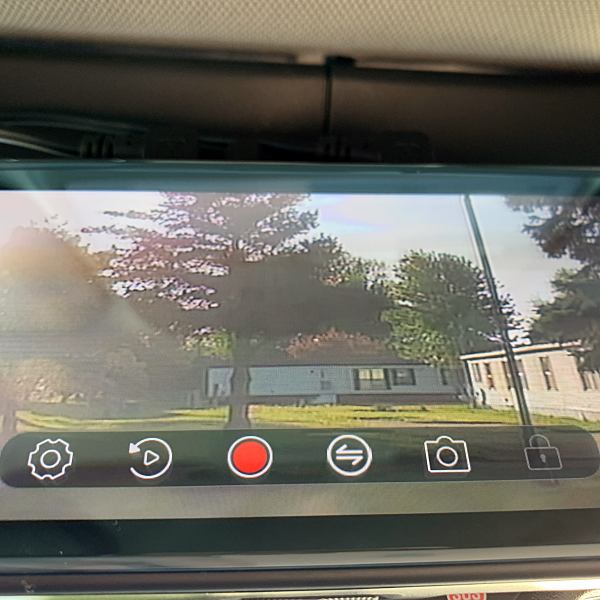
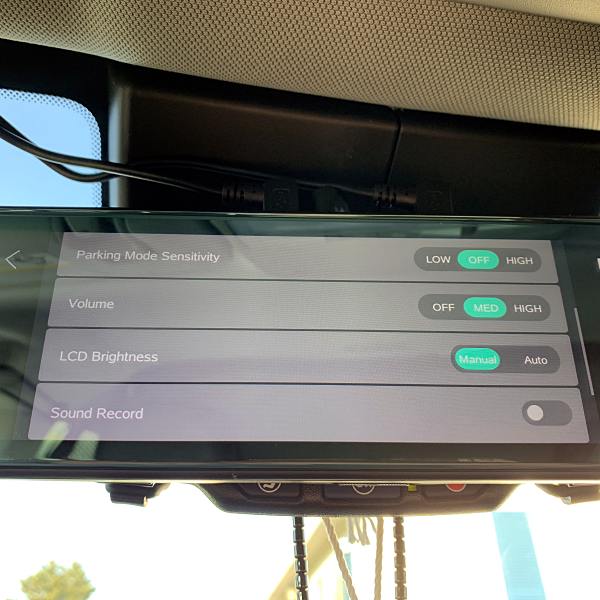
A tap anywhere the screen brings up the Touch Screen Interface. This brings up six different icons. The Settings Menu, DVR video playback, Start/Stop video, Camera switching front/back, Screenshot, and Emergency Lock – Lock the Video as SOS file (will not be covered by Loop-recording).
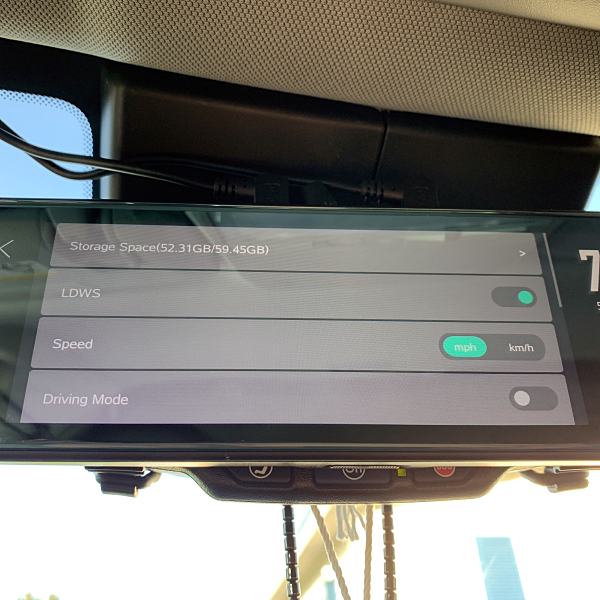
The Settings Menu allows you to select and customize all of the X2 features. (Note: You need to pause recording before entering into the menu.)
X2 can be used in two different ways while driving. In Driving Mode the camera display is turned off, and it functions as a standard analog mirror that displays speed and direction information.
If you choose you, can have the screen display the image from the rear cam. I really like this feature, and I use it almost exclusively. Using the rear camera, you get a full 140º wide angle real-time image. It almost totally eliminates the cars blind spots. And you feel like you can see everything behind you. Much better than my cars rear view mirror.
You can also toggle between the two modes. When in Drive Mode tapping the screen will bring up the rear cam view. You can go back to DM by pressing the power button.
The Lane Departure Warning System(LDWS) will sound an alarm when your car is veering into another lane. You can enable this feature in Settings.
I found the LDWS to be hit or miss. Sometimes I got a warning others times I didn’t. So I just turned the feature off.
Overall the display is very nice. The image is clear and bright, and the touch-screen is very responsive. My only complaint, it picks up a lot of glare, especially on sunny days. However, I was able to alleviate some of the glare by tilting the mirror.
Cameras
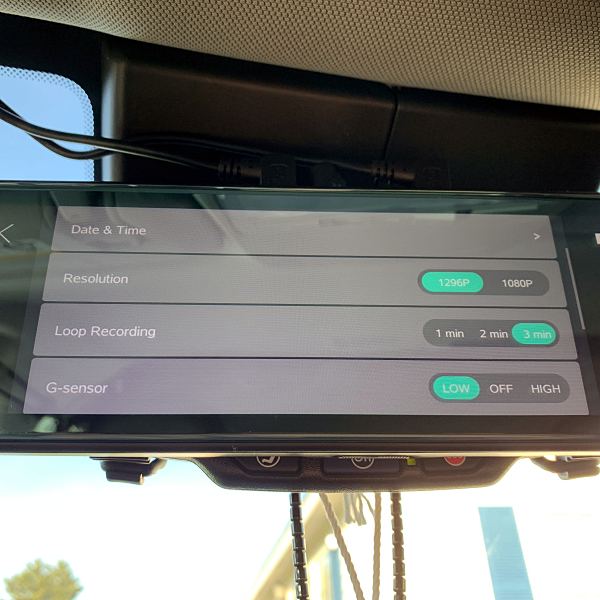
The front camera is mounted on the front of the unit. The camera has two resolutions, 1080P, which is the default resolution & 1296P. I set it at 1296P, and the image is very good. It’s bright and crystal clear so you can see details like license plate numbers. It also gives you a nice wide 140º viewing angle.
The rear camera has the same 140º wide viewing angle. Unfortunately, it has a disappointing 720P resolution. The image quality is still good, but not anywhere near as clear as the front camera. The rear camera is also IP68 waterproof. You can see both cams in action in the videos below (Front cam top/Rear cam bottom).
Both cameras do a good job of recording at night. The only issue, there’s blooming around the headlights of approaching vehicles. See the video below (Front cam top/Rear cam bottom).
You can also tilt both cameras up or down by sliding your finger up or down on the screen.
Video recording features
Video recording automatically starts the moment the unit is powered on. The unit uses Loop recording, which can be set at 1,2 or 3 minutes. With Loop recording enabled, you never have to worry about buying additional SD cards when capacity is full.
Parking Mode protects your car when it’s parked. When the DVR detects any collision, it will start recording for a short period of time. I tested it by slamming my cars door. When I turned the unit back on and went to the DVR, there were 2 short videos saved in the Emergency Video section. One for each camera.
Auto-Vox does recommend to hardwire the unit if you want to use Parking Mode. Unfortunately, they don’t provide you with the Hardwire kit. They can be purchased on Amazon for $19.
If you get into a collision, the units G-sensor will automatically lock the video, which means the video can’t be overwritten. It’s saved as an Emergency Video on the SD card and the units DVR.
The DVR function allows you to view all recorded videos directly from the display. You can view regular, emergency videos and screenshots. My complaint with the DVR is the video files are not displayed by date or time, which makes it difficult if you’re looking for a specific clip.
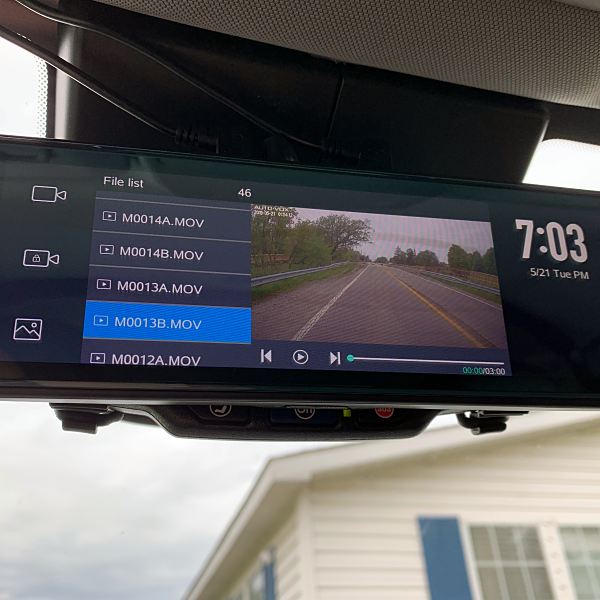
You can also playback videos from the SD card on your computer. I was able to view them on my MacBook Pro. Unlike the built-in DVR, the files are listed with date and time. Note: If you want access to the videos GPS info you must be using a PC.
What I like
- Touch Screen is easy to use / very responsive
- Both cameras have a good picture
- Being able to use the rear camera as the rearview mirror
- Great wide angle view from the rear camera
What needs to be improved
- LDWS doesn’t work properly
- Blooming from headlights at night
- Can’t access video GPS info on my MacBook Pro
- SD card slot placement makes it hard to remove the SD card
Final thoughts
On the surface, the Auto-Vox X2 may seem a bit pricey. But you not only get a dash cam, but you also get a backup/rearview camera and a nearly 10″ touch-screen monitor. I feel safer just having it installed in my car.
Price: $259.99
Where to buy: Amazon
Source: The sample for this review was provided by Auto-Vox.
ROVE R2-4K DUAL Dash Cam Front and Rear, STARVIS 2 Sensor, FREE 128GB Card Included, 5G WiFi - up to 20MB/s Fastest Download Speed with App, 4K 2160P/FHD Dash Camera for Cars, 3" IPS, 24H Parking Mode
(as of June 21, 2026 20:13 GMT -05:00 - More infoProduct prices and availability are accurate as of the date/time indicated and are subject to change. Any price and availability information displayed on [relevant Amazon Site(s), as applicable] at the time of purchase will apply to the purchase of this product.)
Gadgeteer Comment Policy - Please read before commenting
Wish they made one of these with an “AUTO DIM” feature like on my mustang that dims the rearview mirror automatically, when you encounter someone with those SUPER bright headlights.
Rusty,
I had that feature on a previous car and loved it. I agree it would be a nice if they made one with that feature.
Thanks for reading and commenting.
When using the display as a rearview mirror, does the image flip like a normal mirror would?? After years of driving with a normal rearview mirror, it would be very confusing & dangerous if it didn’t flip the image.
CHRIS,
The image looks just like it would in the rear view mirror. It does take some getting used too because it is a much wider view and vehicles seem farther away then they actually are.
Thanks for reading and the comment.
I have purchased two other rearview mirror slip on DVRs. In sports cars and smaller cars….they are just too wide and block significant vision. In a Porsche….these things can be IN YOUR FACE too big and wide. I suggest you measure the width of your existing mirror….then put a ruler up marked with the width of the car mirror DVR you are thinking about buying. If anybody spots one of these rearview mirror DVRs with a width of around 8 inches or less…I’d appreciate a head’s up.
Is there a way for the monitor to display both the rear camera view and the speed of your car at the same time?
Terry,
Unfortunately you can’t do both at the same time, it’s either or. However when using Drive Mode you can use the monitor as a regular rear view mirror. So you can still see what’s behind you and have the cars speed displayed on the left side of the mirror. Hope this helps.
Thanks for reading and commenting.