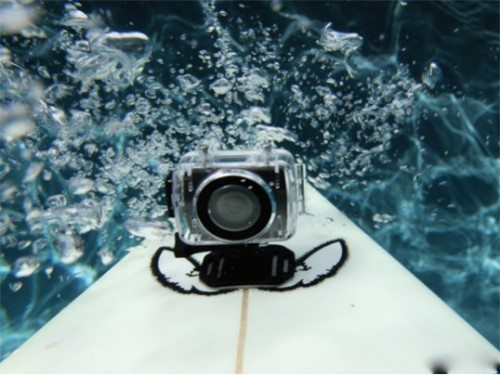
 Swann is an Australian company who for the last 25 years have specialised in wireless connectivity, professional quality CCTV cameras with infrared night vision, digital video recording with motion detection and networkability, web surveillance and remote notification products, globally. We first reported on the Freestyle HD when it was announced in November 2011. This is a new entry into what seems to be an ever growing Action Point of View (POV) camera market. Popular with outdoor and extreme sports enthusiasts, these cameras allow videos and stills from unique perspectives not available using “standard” cameras. Their small size, wide-angle views, and mounting options really allow these cameras to be used very differently. Swann Australia was good enough to supply a unit for review.
Read on if you dare, extreme sports fans. I mean, after my review of the Drift HD (and please note this isn’t going to be a comparison review between the alternatives like the Drift HD or GoPro Hero2 HD) I’m not sure how I’m going to top my Spade Cam action. 🙂
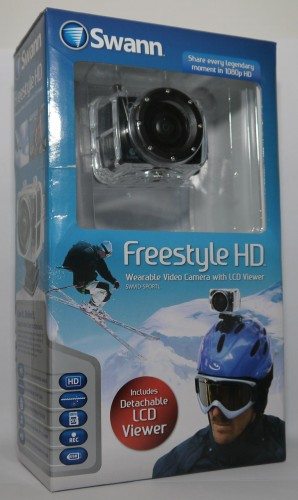 For such a small little camera, the Freestyle comes in a big box. The top is taken up with the camera and an attached mount (removed in this picture ), and the bottom half has a box with all the accessories in it.
What’s in the box ?
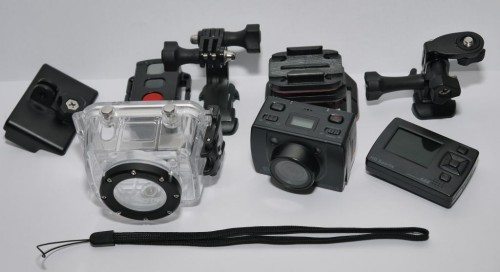 And there are quite a few accessories included as standard. From left to right: camera mount, remote control, waterproof case, L mount bracket, curved adhesive bracket, flat adhesive bracket (2), camera, low profile mounting bracket, and LCD screen. Also included in the pack, but not pictured, are another mount, a carry bag, AV cable, mini USB cable, instruction manual (in French, Spanish and English), CD with PDF versions of the manuals, some double-sided Velcro, a couple of spare tripod mount rubber grommets, and an AC power adapter. More than enough accessories to get you started.
Size
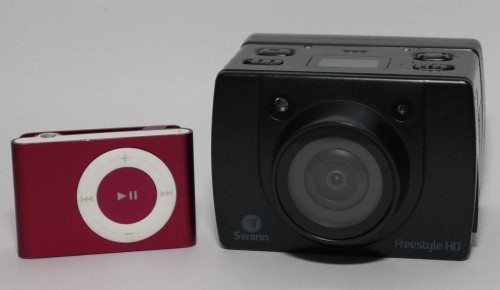 Here’s the camera with an Apple Shuffle 2G for size comparison. The camera is 2.9oz/82g without the LCD screen and measures 2.36″ x 2″ x 1.6″ / 60mm x 51mm x 42mm. On the right front of the camera is the video record/snapshot indicator, and on the left-hand side is the laser transmitter (more information later). On the bottom is a standard 1/4″ tripod mount.
Controls and ports
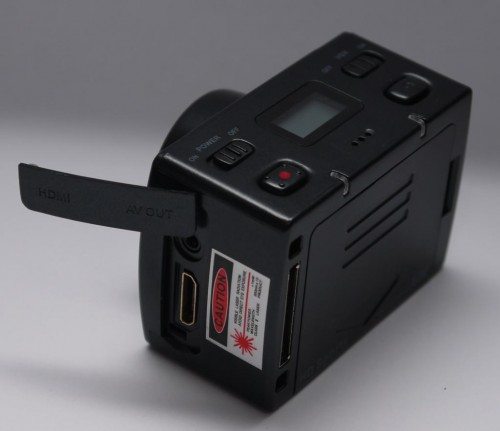 On the left-hand side of the camera, you’ll find an AV out connector and mini HDMI connector under a rubber boot and a laser warning sticker 🙂 On the top left are the on/off switch and video record button. The middle has a LCD panel that displays mode, battery level, and SD memory level with a microphone located below it.
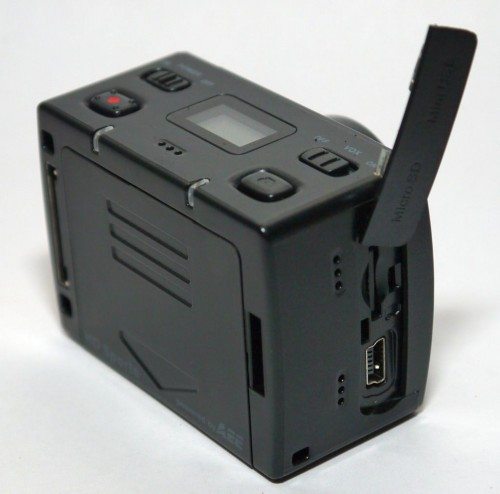 On the right-hand side are a micro SD slot (supports up to 32GB ), a miniUSB connector for charging and data transfer under a rubber boot, microphone, and a lanyard hole. It might be picky, but it would be nice if the charge port was microUSB as most of my equipment these days uses micro, but then it’s just one more cable. A VOX switch, which allows you to set the camera to start recording if a noise over 65dB is heard, and a snapshot (photo) button are on the top. The snapshot button is a nice touch, as on most POV cameras to change between video and photo you have to go into the menu system to change the mode. If you take a mix of video and photos, it’s nice to have a dedicated button for each. On the back is an LED (left) to indicate recording is on and a power LED (right).
The back cover pulls down to allow installation of the 3.7V 1000mAh battery, which Swann rates at 2.5 hours of operation.
The size of the buttons is going to make it very hard to operate in any activity where you have gloves on, but given the size of the camera itself, it’s not surprising that the buttons are quite small.
LCD Back
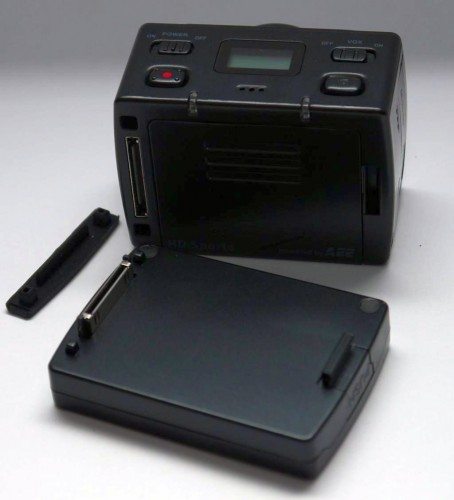 The camera comes standard with an LCD back. The connector is protected by a rubber boot when the LCD isn’t being used; however, the boot isn’t attached in any way. I assume this is so it doesn’t get in the way when the LCD is installed; I suspect that the boot is going to be the first thing I lose. The screen is only 1.5″ in size, and I can’t find any indication of the resolution. It’s fine for using the menus, framing a shot or video, or reviewing what you’ve already captured. The LCD adds minimal weight (1oz/26g) and size to the unit.
Menu Settings
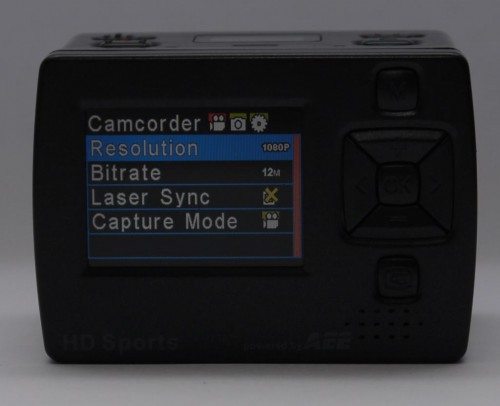 The LCD back has to be installed to get into the menu and change settings. Swann’s website seems to be a bit behind in specifications for this camera, and the camera’s settings vary from the website specifications, which differ again from the instruction booklet. So straight from the camera, here’s the options:
Video resolution:
- 1080P @ 30 fps (1920 X 1080) @ 135 degree angle view
- 720P @ 30 fps (1280X720) @ 170 degree angle view
- 720P @ 60fps ( good for slow motion )
- WXGA @ (848X280) @ 170 degree angle view
Camera Modes:
- Resolution 3, 5, and 8 MP
- Single shot
- Triple shot (3 shots per shutter press )
- Continuous mode ( for time-lapse ) (2, 3, 5, 10, 20, 30, 60 sec )
- Self Timer (5, 10 sec )
- Auto Standby can be set to 2, 5 or 10 minutes ( important when you have the camera in the waterproof housing)
- Time Display, which will stamp your videos and photos with date and time (though it’s worth noting that you can’t remove them once they’re stamped in)
- Loop Record, which restricts recording to around 15 minute sessions and then writes a new file. This makes editing easier and minimizes the risk of losing video should your battery die. Do note that that when the SD card fills up, the camera will overwrite the oldest session.
- Vox Mode will only record sound and not video when you press the video release button.
The menus are easy to understand and navigate and are divided into 3 sections: video, camera and settings.
Playback
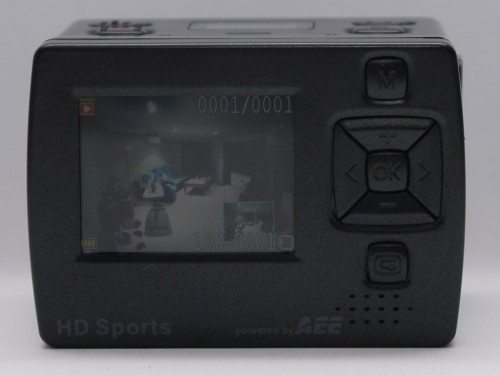 When installed, the LCD can be used to frame video and photos and also to review your videos or photos. The LCD is by no means a high-resolution display, but it’s more than sufficient to make sure you got the shot you wanted. In video playback, sound is supplied by the speaker on the bottom right. You can delete or protect recorded sessions. In photo preview mode, you can zoom and move around using the cursor keys on the right-hand side. Photos can also be deleted, protected, played in a slide show, or set up for Digital Print Order Format (DPOF).
Laser targeting
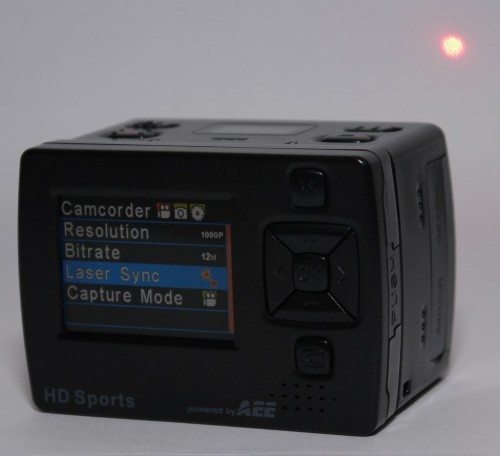 A nifty function (though I’m not really sure how much I’ll use it) is the laser targeting mode. When turned on in the menu system, if you press the video record button on the camera or the snapshot button on the remote for more than 3 seconds, then a 1MW laser beam is emitted to allow you to see where the camera is being focused and indicates the centre of the frame. This is useful when you don’t have the LCD back installed to frame your shot or when you’ve got it mounted on say a helmet and want to check if it’s aligned correctly.
Remote Control
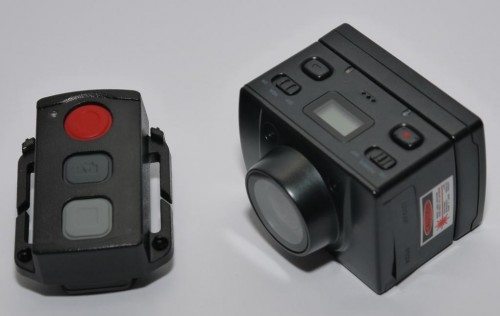 The camera is supplied with a handy large and rugged remote control. The remote has both strap holes and a spring clip on the back for flexibility to mount it in a convenient place. The buttons are nice and large and can be used with gloves on. You can again control both video and photo mode separately, and if your camera goes into sleep mode from not being used, pressing either of the release buttons will wake your camera back up. The remote can operate the camera from up to 2m/6ft away.
Waterproof Housing
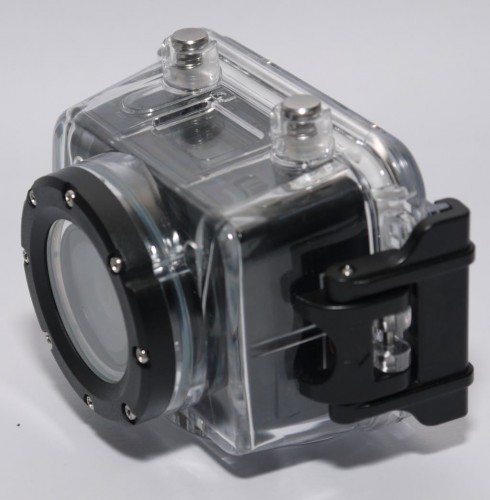 The included waterproof housing meets Ingress Protection Rating IP68, and it is rated for use 20m underwater. The housing is very well made and sturdy, and while it does add some additional bulk and weight ( approx 105g), you’ll definitely want to use it when you’re recording in more rugged or wet conditions. You don’t have any control of the menu or settings when the unit is in the housing – in fact there’s not even the option to turn the camera on or off. There are two buttons on top to control the camera, one for the video and one for photo shutter release. To use, you need to turn your camera on before you place it into the housing, and if the camera goes to sleep due to inactivity, you just have to press one of the releases to bring it back to life.
The biggest issue I have with the housing is that it’s not made to fit the camera with the LCD back installed. This means that there’s no way to frame your pictures accurately while in the housing. Loss of use of the menu system isn’t such a big deal because of the separate shutter buttons. Whether this has to do with condensation, battery life, or is just a design consideration I’m not sure, but it would be nice to have the LCD installed in the housing. Other limitations with the case on are that sound will be affected given that your camera is totally enclosed, the range of the remote control will be affected, and you can’t use the laser sight. Another issue for me is that there’s no attachment hole on the housing to attach any sort of lanyard to, not even the included wrist lanyard. If I was going to take this say snorkelling then I’d want to attach the camera to me some how. The only possible mount point is the pivot pin on the hinge on the closure.
It’s worth noting that on the Swann website and in several of the reviews on the internet, a different housing is shown. The one on the website and reviews appears to be a one piece design, but as you can see above the housing I have includes a replaceable front lens. This is definitely a plus, as the lens cover is going to be the area exposed to rocks, mud, sticks and debris, and if it does get broken or scratched, you really don’t want to have replace the entire housing.
Mounting System
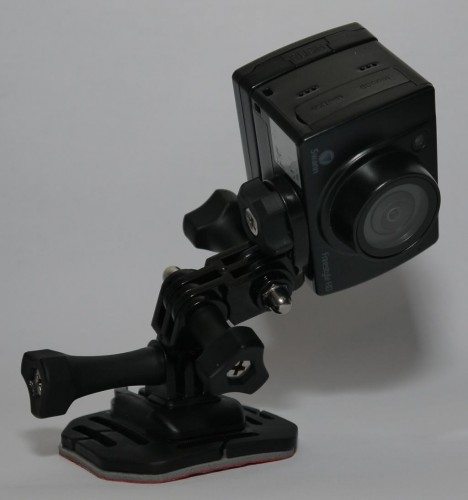 Using the included mounting system reminds me of playing with my Meccano set when I was a child. 🙂 Using a combination of the different joiners and tightening of the bolts allows you to manipulate the height and angle of your camera. You can see how, once secured, this can give you access to some unique and quirky camera angles.
Photos
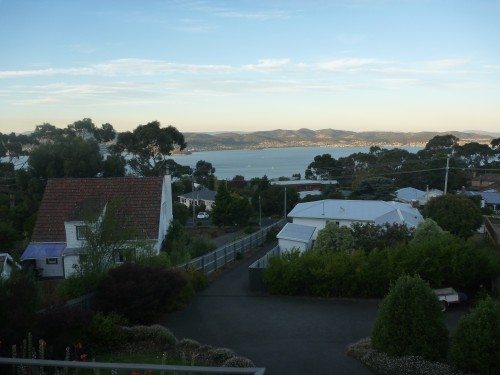
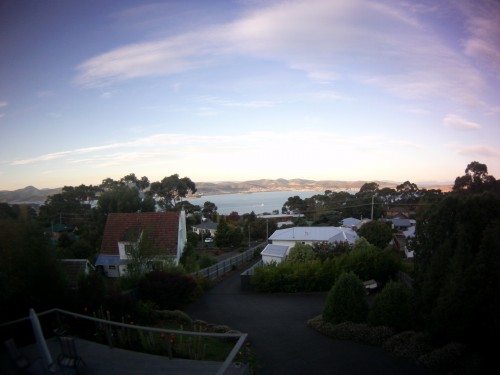
Above are two shots (you can click on to get full resolution) taken seconds apart using a “standard” point-and-shoot camera and the Freestyle. You can see the difference the 170 degree wide-angle lens makes to the picture. From EXIF information, it would appear that the Freestyle ISO ranges from 100 to 400. Like all cameras, as the ISO increases depending on light conditions, more noise is introduced into the picture. It’s not a camera you’d be using for holiday or everyday snapshots, but then that’s not the market this camera is aimed at. Note too the variation in the colour rendering.
Timelapse
Timelapse photography is pretty cool, and the Freestyle makes it easy to do. The Freestyle was set on a tripod and set to continuous mode of 30 sec snaps. In regards to processing, the 200 shots were loaded into Images to Video at 10 fps then uploaded to YouTube. Neat, quick and easy.
One thing to note here is that if you set the camera to continuous mode then turn the camera off and on again, it will NOT remember this setting and reset back to single shot. This was an issue where I wanted to do continuous mode with the camera in the waterproof housing. I had to set the mode with the LCD and then basically remove the LCD back with power still on. The same holds for triple-shot mode. There’s no indication in the manual if the LCD back is supposed to be hot pluggable, but so far, removing the LCD back with power on hasn’t appeared to have had any adverse effect on the unit.
Video Quality
Sorry folks, no extreme sports here. Instead, here’s part of my trip to work in the morning. Video was originally taken in 1080p, trimmed with Movie Maker, and converted to 1080p .WMV via Moviemaker. The trip takes in a load of different light situations, and you can see that the Freestyle handles them pretty well. There’s no major white blowout when there’s lots of sky and clouds, which is good. Sound capture is good, the radio’s not that loud, but it’s easily picked up by the multiple microphones on the unit (Note that this is taken without the waterproof housing.) Personally, I find the quality a bit “soft’ and the colours a bit ‘muted”, and while this is taken on an overcast day, the same can also be said for video’s taken on much brighter days as well. Not a big issue, but enough for me to mention.
Low light performance
How well does the Freestyle handle low light? Here’s a comparison going from a (semi) dark car park into the daylight. You can see that in the beginning, there’s quite a lot of noise but as you get towards the light the picture cleans itself up as more light is available. Footage in low light certainly isn’t crisp and clear, but it is usable, and you can’t expect too much from such a small sensor.
“Noisy” Audio ?
In the interest of full disclosure, the Freestyle at this point of time has one ongoing issue. When I received the review unit, video was perfect, but all recordings had very high pitch and annoying electronic beeping, screeching, popping, and static noises over the top of the audio channel. (It may be the aliens trying to communicate, but I was too scared to take off my aluminum foil hat off. 🙂 ) Further research on the Net found several users complaining about exactly the same issue. I rang Swann, and after some extensive testing and diagnosis, they decided I had a dodgy unit and replaced it.
The second unit also had the same problem, and after discussions with Swann and some testing on my part, I finally narrowed it down to certain microSD cards being “incompatible” with the Freestyle. I have multiple microSDs that work and others that give the annoying noise problem (including cards that have been used in other cameras to take video). With the card I’m using now, I have no issues whatsoever. It’s not transfer-speed related and I’m not sure if it’s a mechanical problem or can be fixed in firmware and the testing is still ongoing. I’ve made Swann aware of my findings so it’s pretty much in their hands at this time. If you have a Freestyle with this issue, I’d suggest trying a different card.
I’d read on several reviews that people have tried to email Swann about similar issues and had no response from them. However, I had excellent service from them, with quick responses from friendly and helpful people. I mentioned these reports of bad response to the people I talked to and was advised that they have increased their support personnel recently and that phone or their web-based live chat option was the best way to get a rapid response. A list of contact times and toll free numbers for the US, New Zealand and UK/Europe can be found here.
Final thoughts
All up, I’m really happy with the Freestyle HD (once I worked through the noisy audio issue) . For the price, you get a really good set of accessories out of the box with no optional extras required to get you started. This is good, because at this point in time, there are no optional accessories from Swann. They advise that they are about to release a range of straps, mounts, and accessories like spare batteries. It would be nice if you could use the LCD panel inside the waterproof case, but because of the wide angle lens, it’s not all that necessary. Video quality is very good, though quality does drop off in lower light, but this is to be expected. The mounting system definitely allows you to mount the camera in quirky and unusual places, which just aren’t possible with a traditional camera.
If you’re in the market for a POV camera and you’re on a budget, the Freestyle HD is definitely worthy of consideration.
SD Card Reader for iPhone iPad, Oyuiasle Digital Trail Camera SD Card Viewer with Dual Slot for MicroSD/SD, Lightening&USBC Dual-Connector Memory Card Adapter for Photography, Plug and Play
$9.99 (as of January 31, 2026 17:33 GMT -06:00 - More infoProduct prices and availability are accurate as of the date/time indicated and are subject to change. Any price and availability information displayed on [relevant Amazon Site(s), as applicable] at the time of purchase will apply to the purchase of this product.)SMALLRIG Clamp w/ 1/4" and 3/8" Thread and 9.8 Inches Adjustable Friction Power Articulating Magic Arm with 1/4" Thread Screw for LCD Monitor/LED Lights - KBUM2732B
$27.99 (as of January 30, 2026 17:59 GMT -06:00 - More infoProduct prices and availability are accurate as of the date/time indicated and are subject to change. Any price and availability information displayed on [relevant Amazon Site(s), as applicable] at the time of purchase will apply to the purchase of this product.)Product Information
| Price: | $299.95AU ($$279.99 US) ( Can be had from Amazon for under $200US) |
| Manufacturer: | Swann |
| Retailer: | Swann |
| Requirements: |
|
| Pros: |
|
| Cons: |
|


Gadgeteer Comment Policy - Please read before commenting
Can the Swann be set to overwrite the oldest video files, for continuous recording?
I just picked up a GoPro, and I really wish it had a wireless remote out of the box like the Swann! From what I hear, a wireless remote is on the way, but requires a backpack attachment. Now I’m left hacking my own wired remote…
Additional: Is that what “Loop Record” is for, by limiting sizes to 600MB?
That is, records 600MB, creates a new file, etc? But will it delete the oldest once the card is full?
Contour or GoPro are the best period!
@andy – No continuous mode that I’m aware of. Loop mode is described in the manual as saving around 15 minute segments rather than 60 minute segments minimizing how much video you lose if something happens (e.g. battery goes flat) to the camera while you’re recording. It’s currently taking video of my bookcase for the next few hours and I’ll let you know the outcome. I’ve just got a GoPro too and after using the Swann I had to purchase the LCD BacPac for framing. Remote isn’t as important to me but certainly can come in handy. The Freestyle does come with nice accessories out of the box.
@killerconceptz – Watch this space 🙂
@andy, Ok, the camera’s been put into loop mode and been running for the last 4 + hours and yes, it’s continuous mode. Overwrites the earliest file. Each file is a a 15 minute block and around 1.3GB in size. I have to admit the manual supplied certainly isn’t the best. Amending review… 🙂
Hi Ian,
I have just purchased one but no microSD as yet.
What do you recommend for ‘noise free’ audio around 16gb?
Thanks
@Barry – I tried a heap of different cards, both branded and unbranded. The noise manifested itself at different levels with different cards. The ones I found that were best and gave no noise were Kingston branded, but much is the pity even that’s no guarantee as truth is I’m not even sure if they were genuine Kingston 🙂
Sorry I can’t help with a more definitive answer. It’s going to be a bit “hit and miss”.
Find the right card though and you’ll have a great budget POV camera.
This review was a lifesaver. I have this camera and was hoping to do time lapse panoramas with the Ikea kitchen timer. Everything worked fine except nothing I tried to create the movie file worked. I tried MakeAVI, PhotoLapse, even tried the Blender 3D program. Nothing worked until I ran across this review and the mention of ImagesToVideo. THANK YOU! I can now do some cool time lapse panos while on vacation.
By the way the Sandisk 32GB card works fine…
Excellent Maypo 🙂 There are other options, Microsoft Movie Maker and Picasa will make time-lapse videos, but as a free and dedicated timelapse generator Image to Video certainly has lots of options and does the job. I haven’t made an egg-timer rotator yet, gotta find the time to do that. Enjoy 🙂
Hi, is it capable of endless continuous recording if plugged into a USB power source?
@Choc – yes it is , that’s how I tested it for 4 hours. Probably should have used it as a car camera rather than taking pictures of my bookshelf but four hours would take me to the end of the state and back again 🙂
Hi, great little camera. Does anybody know if the swann will fit on the gopro attachments. Apparently the chest attachment can be used while snorkeliing. My further question is if the camera could be mounted upside down, and does the camera have a feature to correct the horisontal line.
Reinder the connectors work together and I use a combination of both however the base mounts aren’t compatible. The Swann doesn’t have an invert mode like the GoPro.
In all of of the Hd cameras I recommend using a Class 10 card.