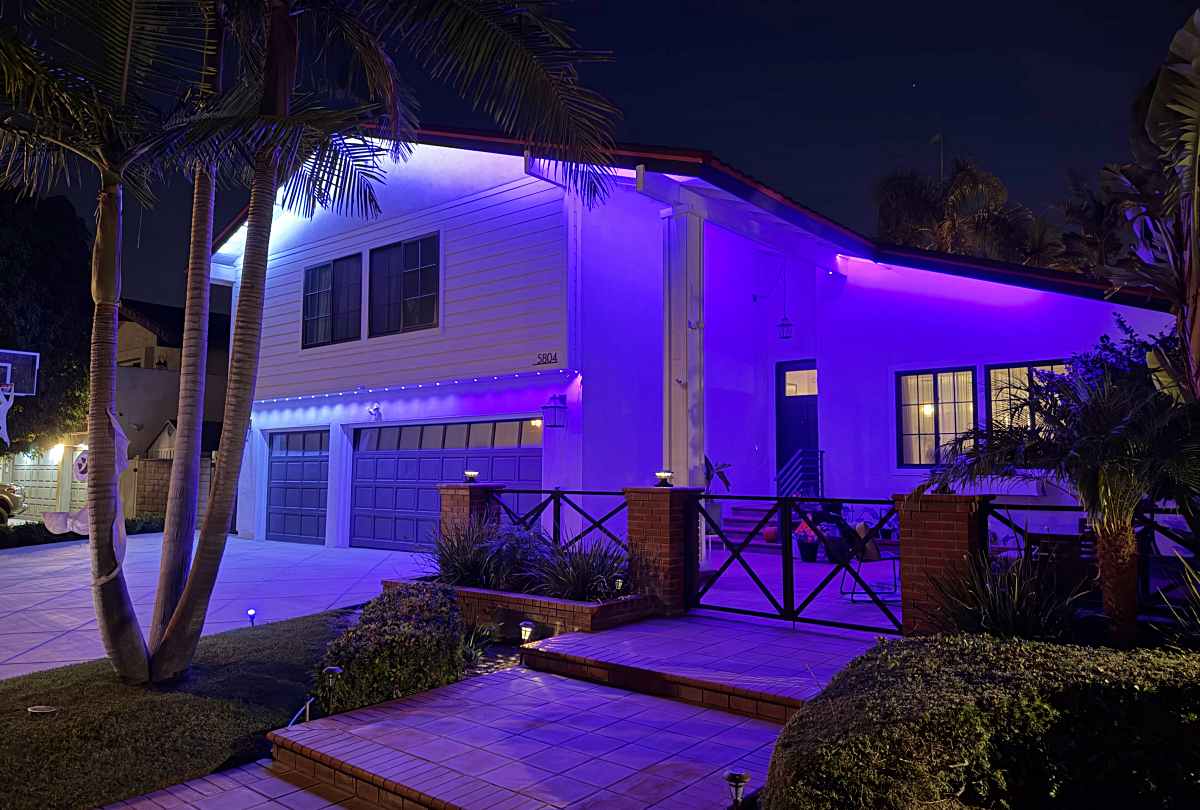
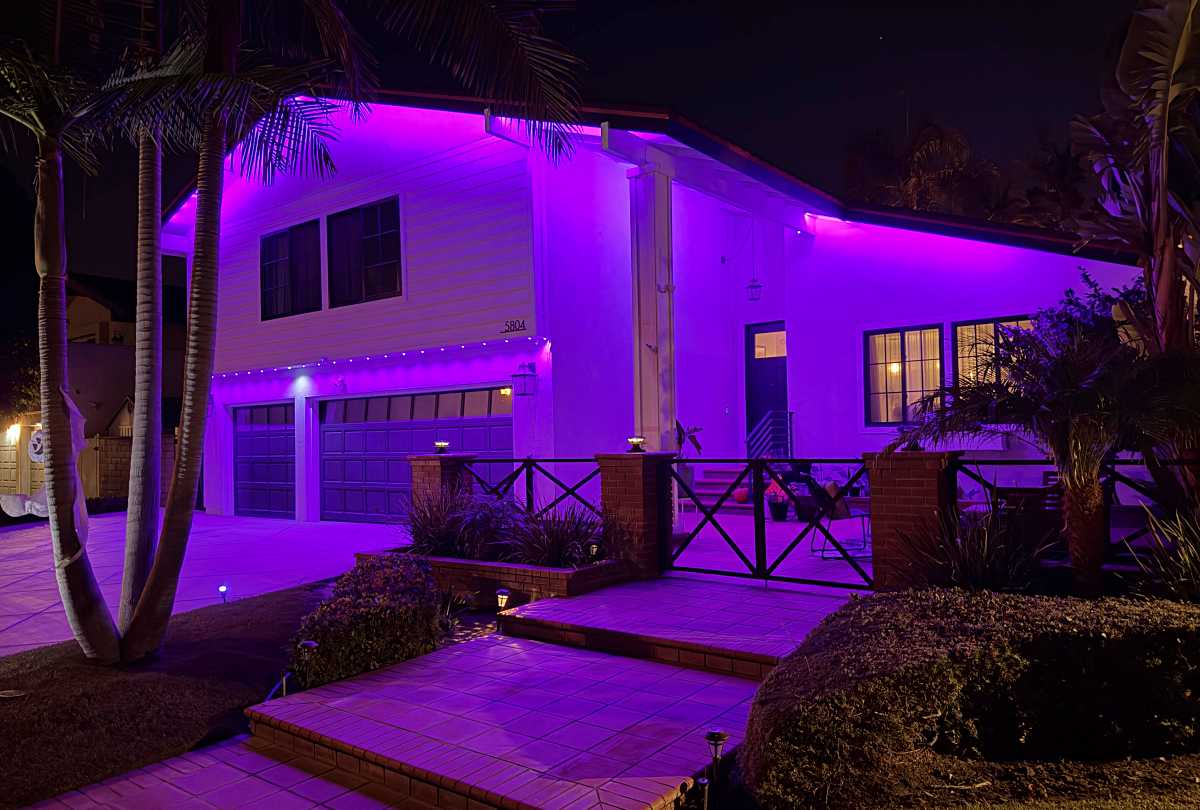
REVIEW – I’ve put up some lights each holiday, but usually a string or two, and usually within reach of a normal step ladder. Entering the fall season, I usually see plenty of handyman signs advertising light installations (near bigger HOA neighborhoods), but decidedly less this year for some reason. So a review opportunity for eufy Permanent Outdoor Lights S4 piqued my interest and helped get our house ready for this Halloween and beyond.
⬇︎ Jump to summary (pros/cons)
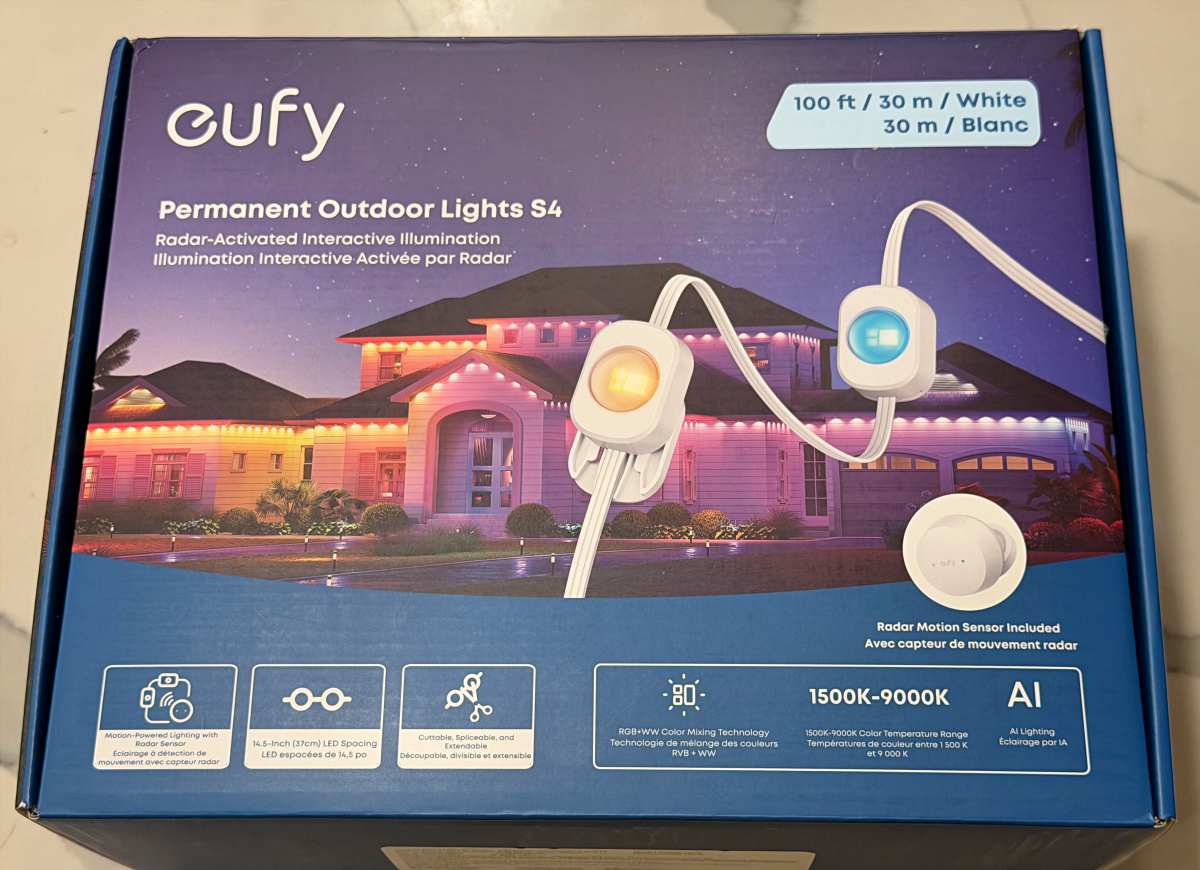
Price: $499 – $859 ($349 – $599 on sale)
Where to buy: eufy | Amazon
What is it?
The Permanent Outdoor Lights S4 from eufy are essentially weatherproof string lights for your home or outdoor space that you can install once and use year round. The eufy App lets you choose from dozens of preset holiday themes and scenes, along with individual light control when creating custom themes. The included radar module allows the lights to follow a detected human, or trigger lighting effects.
What’s included?
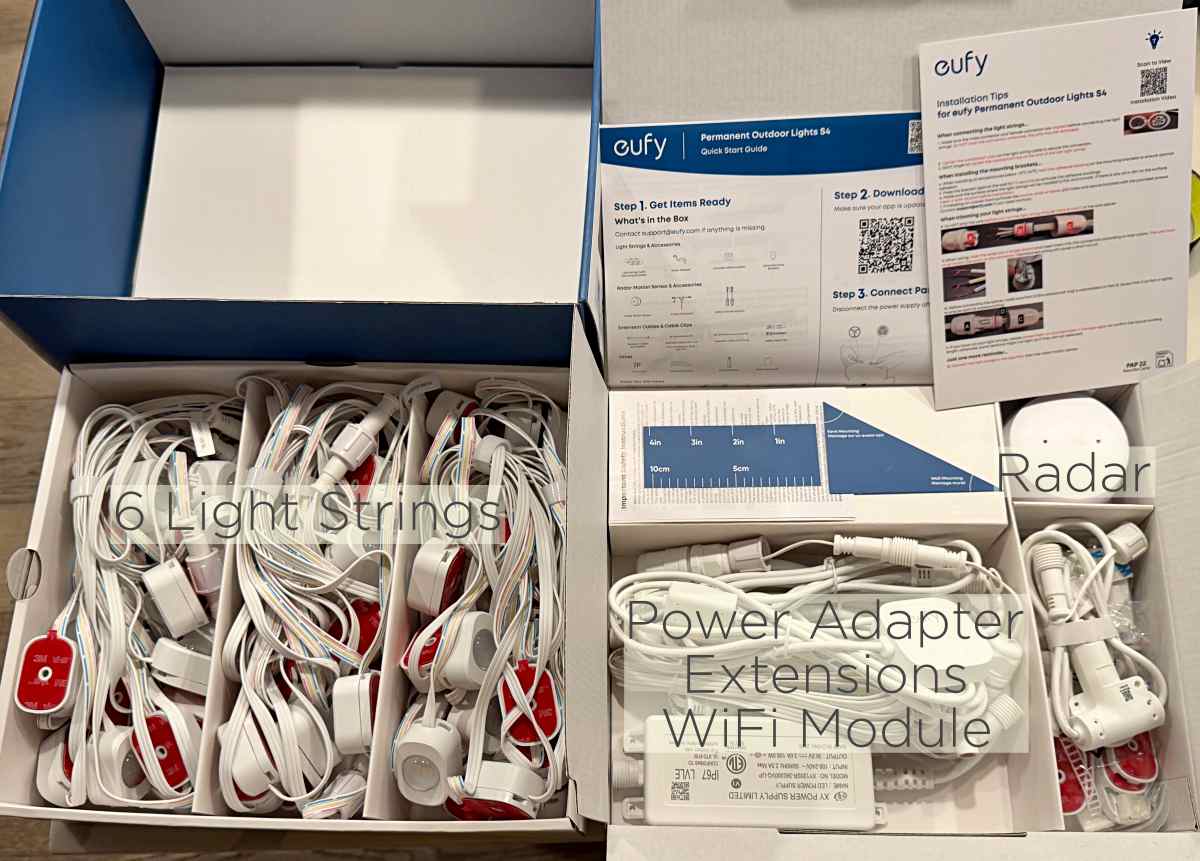
- Light strings with attached mounting brackets (6 for 100′ | 9 for 150′ | 12 for 200′)
- AC Power adapter with Controller/Amplifier extension
- 12ft no-light extension
- Splicing module
- Assorted cable clips and spares
- Installation screws
- Radar motion sensor and cable
- Quickstart guide, installation tips, measuring cards
Tech specs
Available versions: 100ft/72 lights | 150ft/108 lights | 200ft/144 lights
Light and color type: LED RGBWW color mixing tech
Brightness: 60lm per Led Light Lumen
Indoor/Outdoor: Fully waterproof outdoor rated
Connectivity: Wifi, Thread, Matter
Control: App, Radar, other eufy products
Mounting: Screw or 3M VHB peel-and-stick adhesive
Design and features
eufy’s Permanent Outdoor Lights S4 are brighter and more colorful than most lights you’ve seen.
They install with mount brackets, pre-attached to each light and can be mounted with peel-and-stick adhesive, or with screws.
An included radar motion sensor allows for some unique trigger and lighting effects.
The eufy app provides a ton of control, customization and even linking to other eufy products like smart door locks and cameras.
Assembly, Installation, Setup
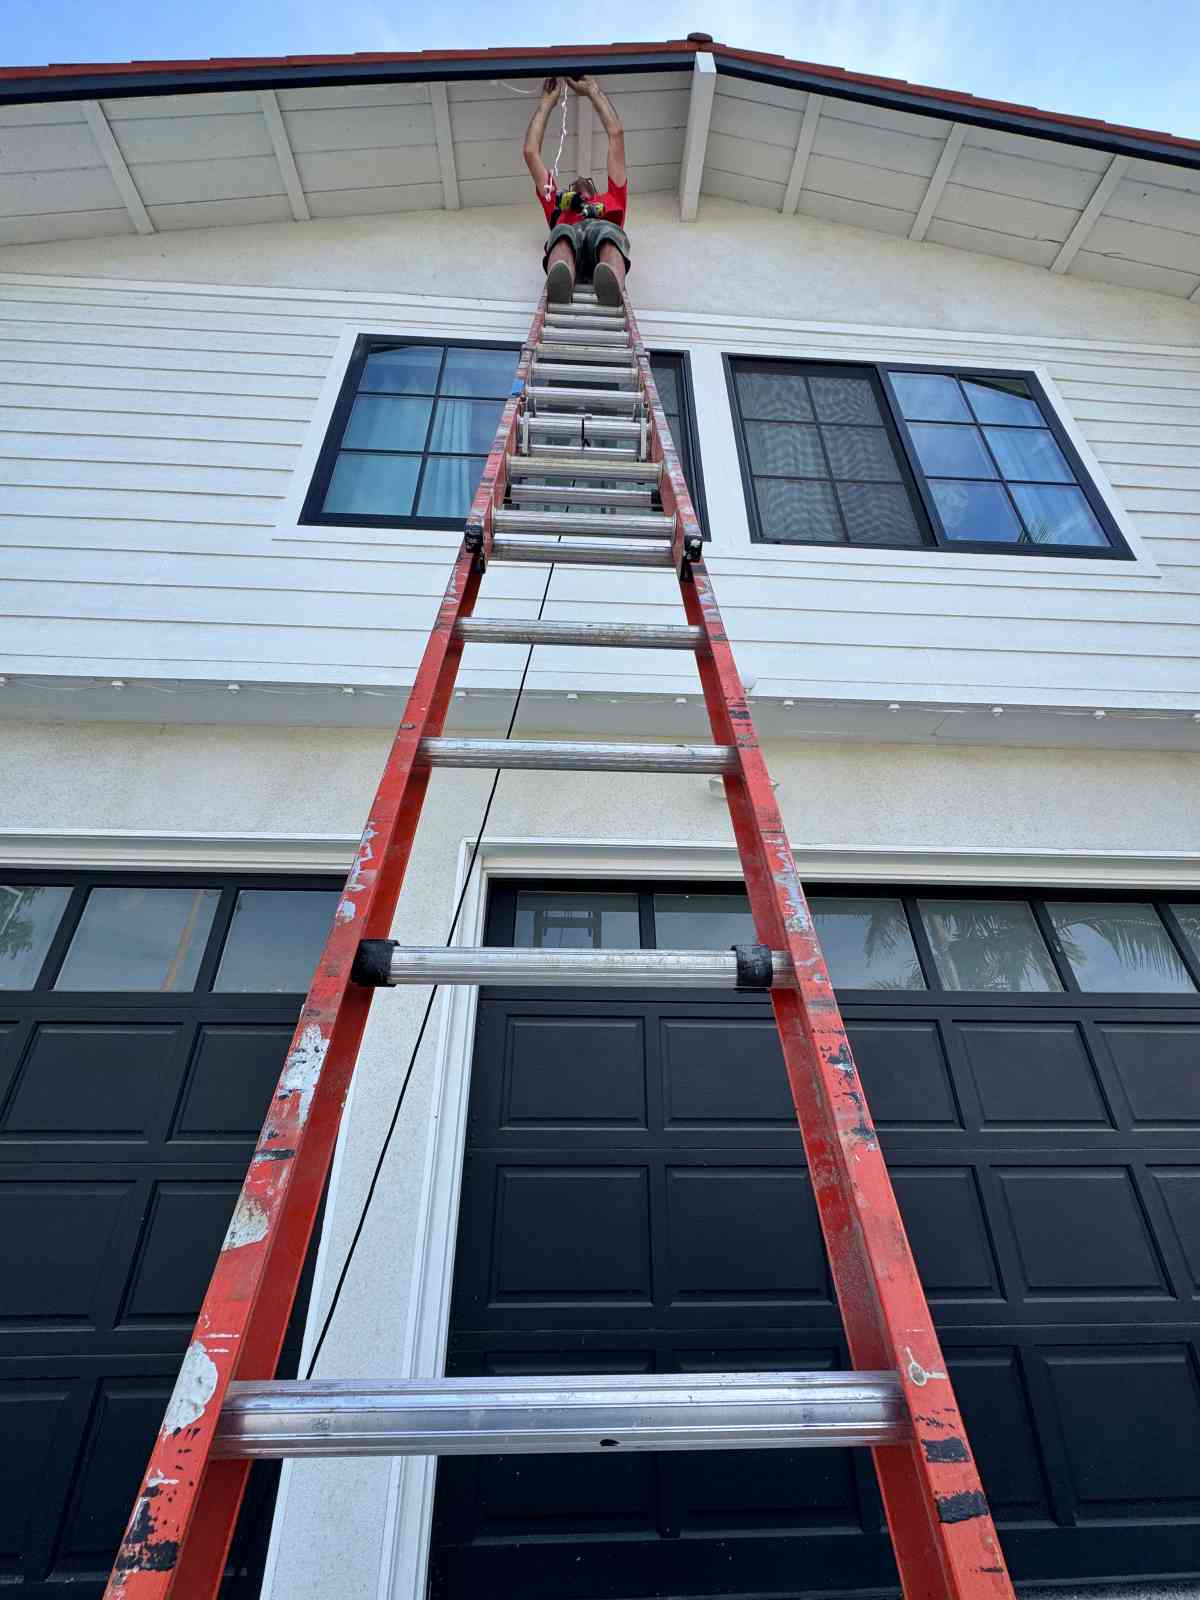
Installation of the system definitely seems the most daunting, but it’s not hard, just time consuming. Difficulty is almost confined to ladder use as a ranch style home would be significantly easier than a 2 level home with high eaves like I have. Here’s what you need to know.
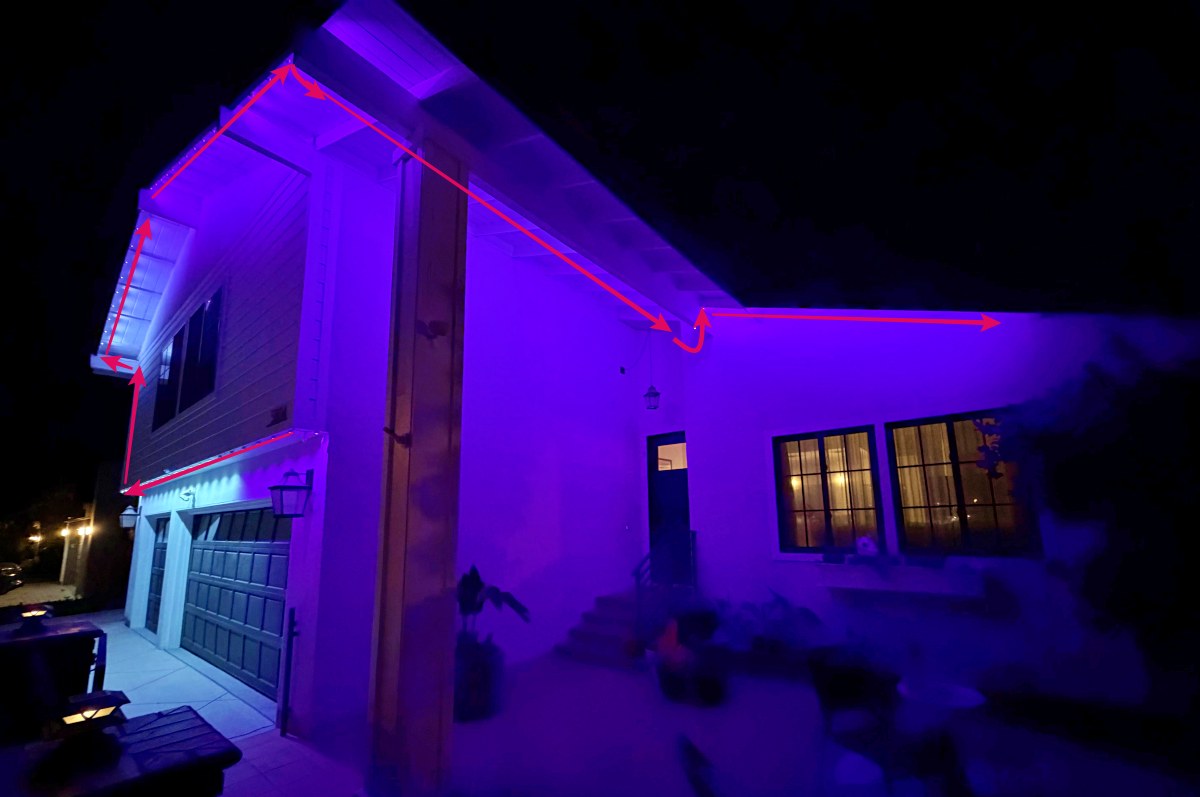
Planning how to run your lights is key to the install going well. For the core system, think of it as one big extension cord. You need to start at a power source and then work in a layout that is linear and doesn’t double back. There is one splitter in the box that lets you cut and run a T-junction should you need to. Make sure to measure and then plan accordingly. Here’s what my plan looked like overlayed on the actual install.
One: Check that everything is included in the box
Two: Download and set up the eufy app
Three: Connect the AC adapter and then each light section to verify everything works

Four: Following your plan, install the lights. I’ll go into further detail here.
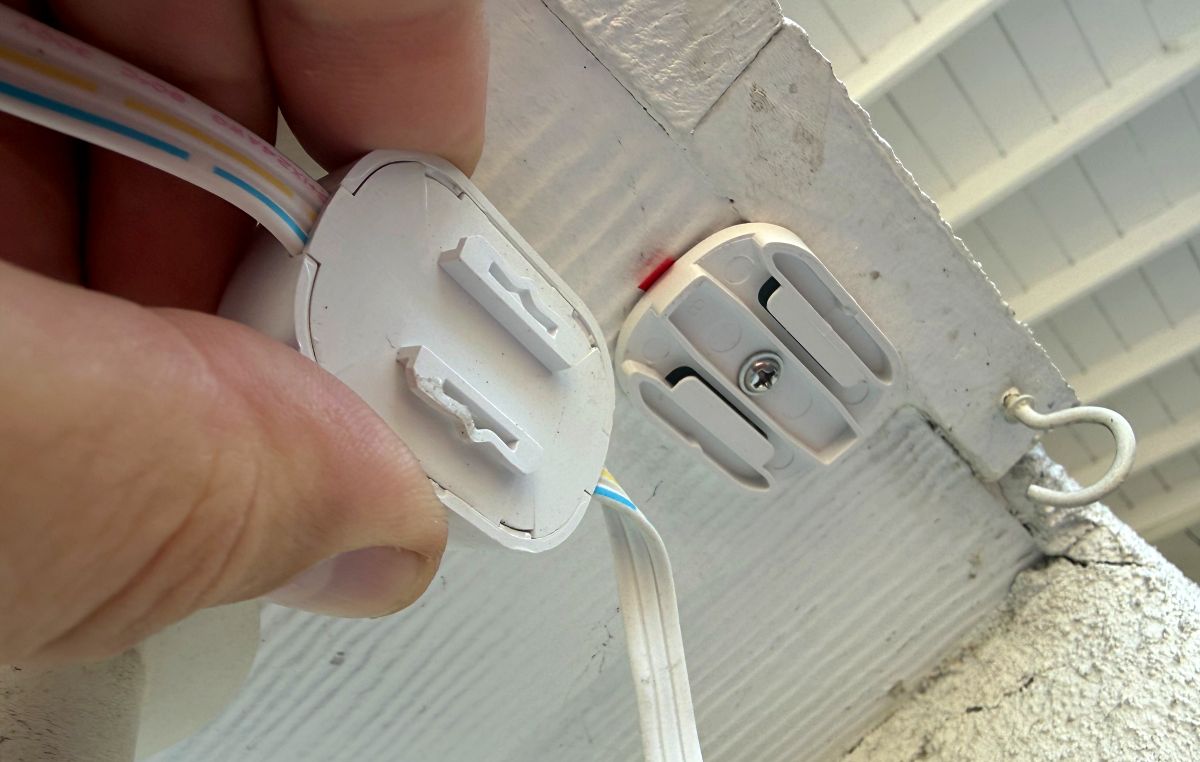
The mounts for each light work a little bit like a friction/only version of a GoPro mount. The light slides into the mount from either side. The mounts have peel-and-stick backers as well as a screw hole. I opted to use the screws as I didn’t want to add cleaning and drying to each mount location to my installation plans.
The distance between each light is 16″ on center, but not exact due to assembly tolerances, so I’d recommend against measuring and installing all the mounts first. If your spacing is slightly short, you end up with some cable droop. If your spacing is slightly long, sliding the light into place can pull the previous light(s) out of a mount.
As a result I installed one at a time, by holding each light in place, marking the location, screwing the mount in, then sliding the light onto the mount.
It’s slightly tedious, but ideally you’re installing these one time. The screws are tiny and fidgety, so be ready to drop them a lot. I ended up putting the screw into the mount, placing the drill driver tip on the screw and then pulling the mount against the bit as I lined up against each mark and drove the screw in.
I had finished mounting the first two strings across the underside of my garage overhang, and then decided to flip 180 and power from the other side. The mounts made it easy to detach and re-attach the lights, but I ended up having to move two mounts ever so slightly to not pull previous lights out of their mount.
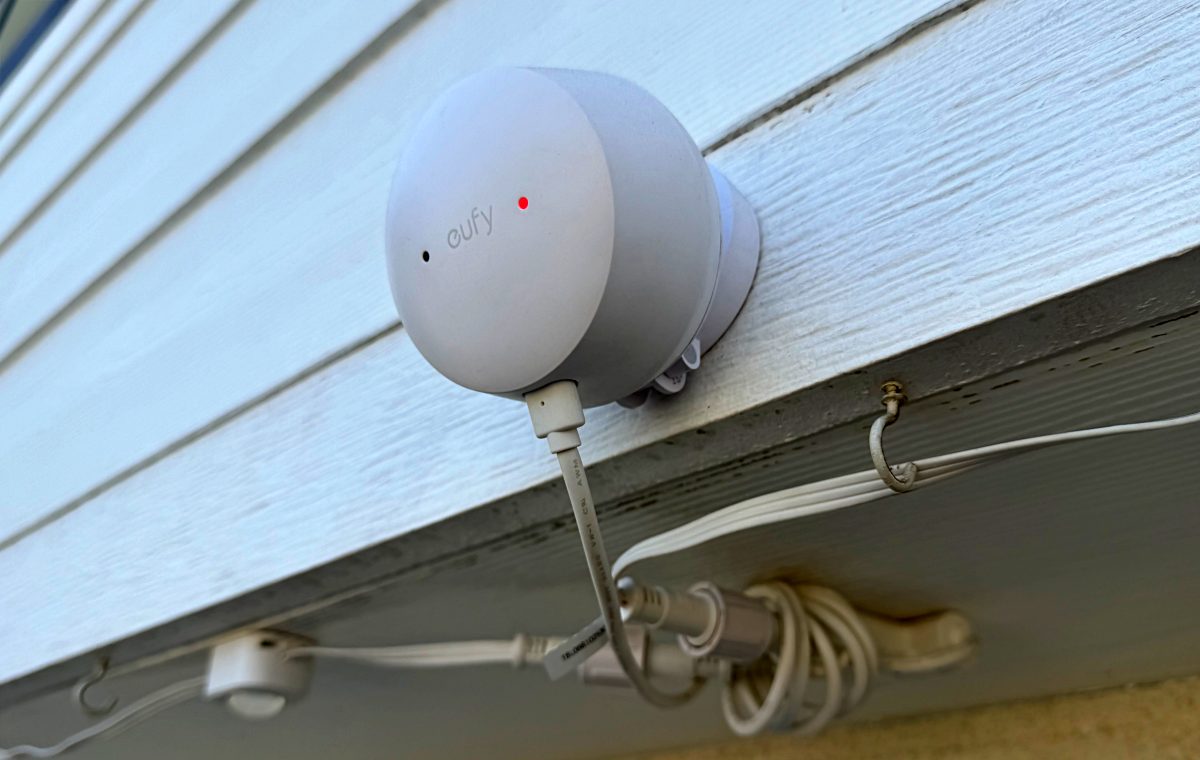
Part of your plan should include where to mount the radar module. I picked the center of my garage door which provided the least obstruction looking outward. I was able to place directly between the two strings and then coiled the excess cable around the T-mount.
Use the 12 foot extension when you want to jump a section without lights. In my install, this was between the garage line and then the start of the 2nd story eave on the left side. You can use the included cable clips to secure the cable at a couple of points.
I’m not afraid of heights but this was a long way up, especially at the peak when turning 180 on the ladder to face the backside of the eave. I made the decision to install this way to get less of a hot spot look off each LED. Please hire someone to install if your layout is beyond your abilities or comfort/safety level.
Continue through your plan until everything is installed. Take precautions when using a ladder, and go slow. Now it’s time to open the app and connect your lights. Click the + icon in the top right and select. You can skip the test section as you already did this.
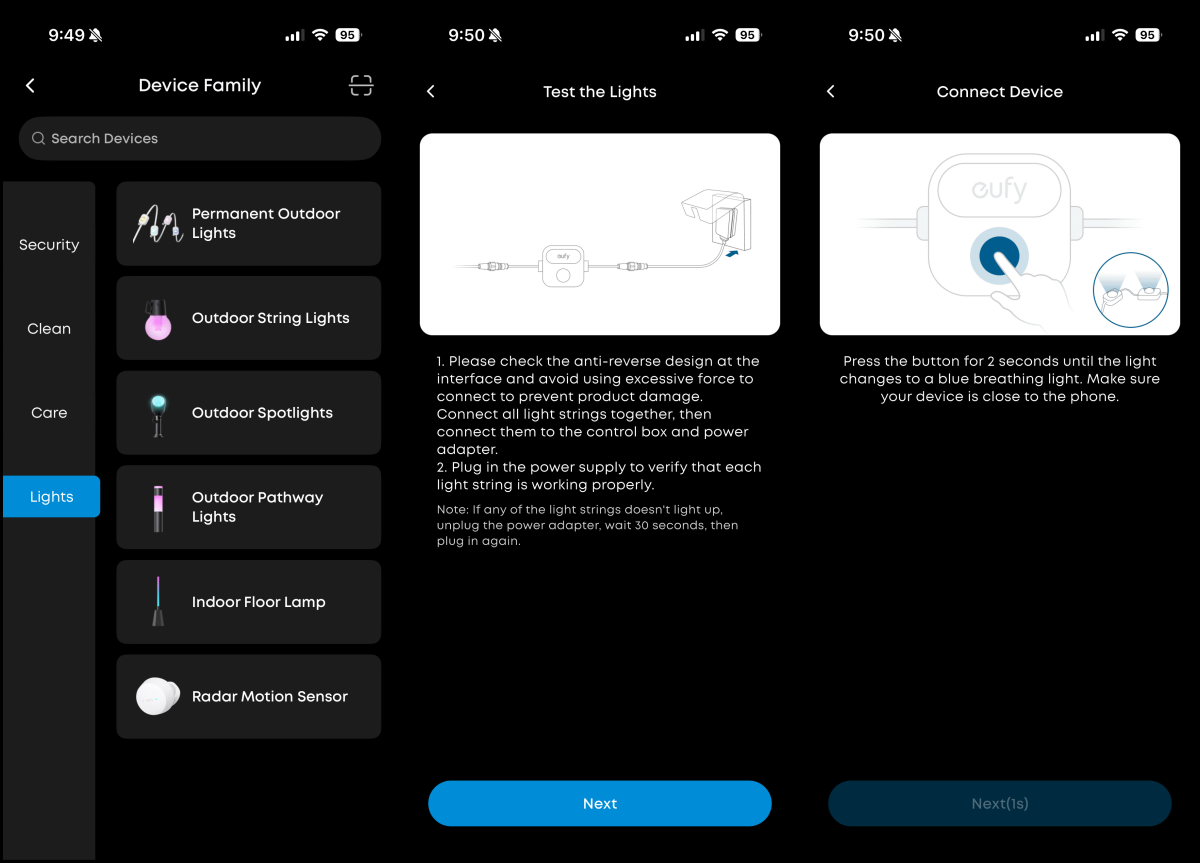
Find the Control button on the extension off the power adapter and press and hold for 2 seconds, then follow the instructions in the app. You’re now good to go for the lights. I’ll cover the radar setup down below.
Performance
I have to say that the installation process was pretty smooth. I really appreciated the light mounts. While using the peel-and-stick adhesive might have been easier, cleaning 2+ stories up on a ladder did not seem like a good use of my time.
The front of our house faces the main street coming into and out of our neighborhood. That means everyone coming in comes to a full stop pointing right at our house. As I was finishing install and starting to play with some of the built in themes, I had a car pull up behind me and start asking what kind of lights these were, liking that some of the motion was happening in pairs instead of singles. That was the first of a few questions the week before Halloween.
I then had a couple of coworkers ask about lighting saying their neighborhood installer wasn’t doing lights this year. I was surprised that the pricing didn’t scare them, but that was because it wasn’t all that different from paying an installer to install and then remove temporary lights for one season.
As for the lights, they are colorful and they are bright. We usually ended up with the lights around 35-50%. Anything more seemed too much. This video shows them at full brightness with a breathe effect.
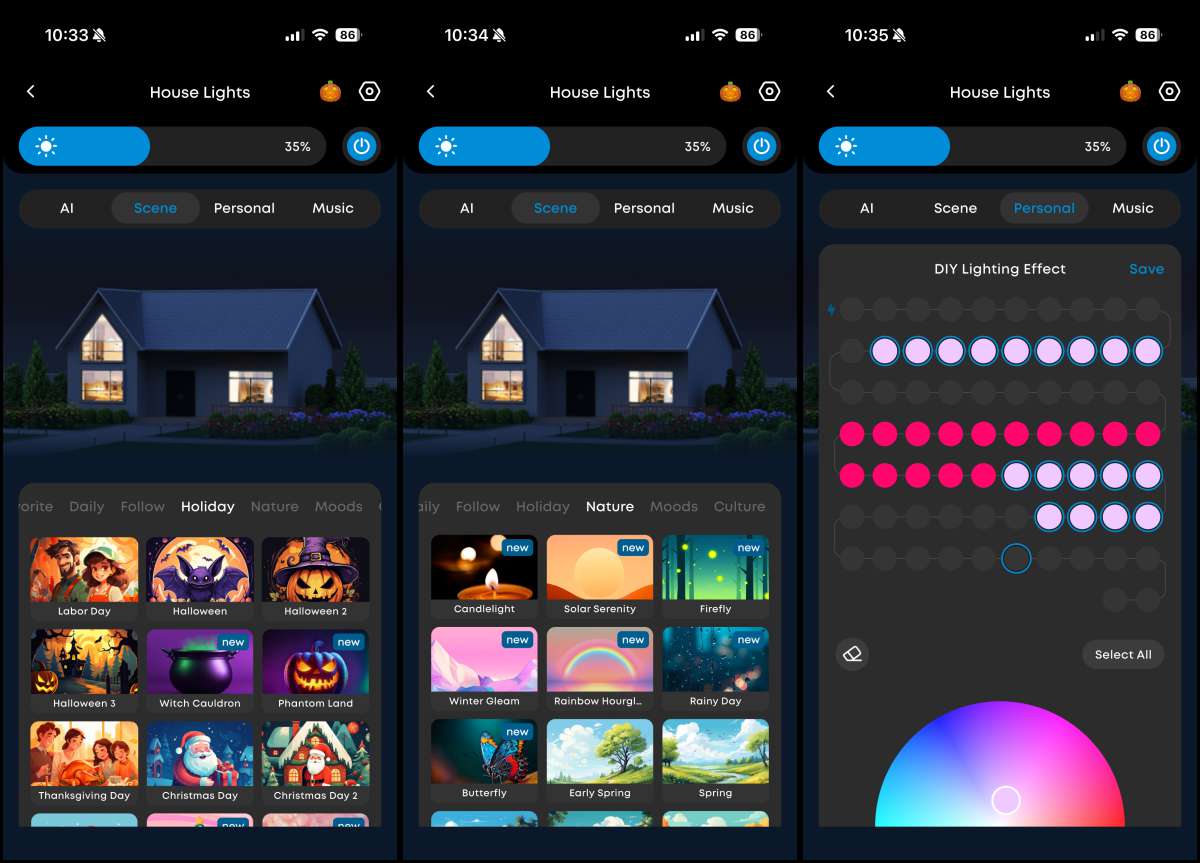
Setting a schedule was as easy as navigating to that option in the app and setting a start and stop time and even specific dates. This opens the opportunity for you to set your full calendar and never have to think about it again.
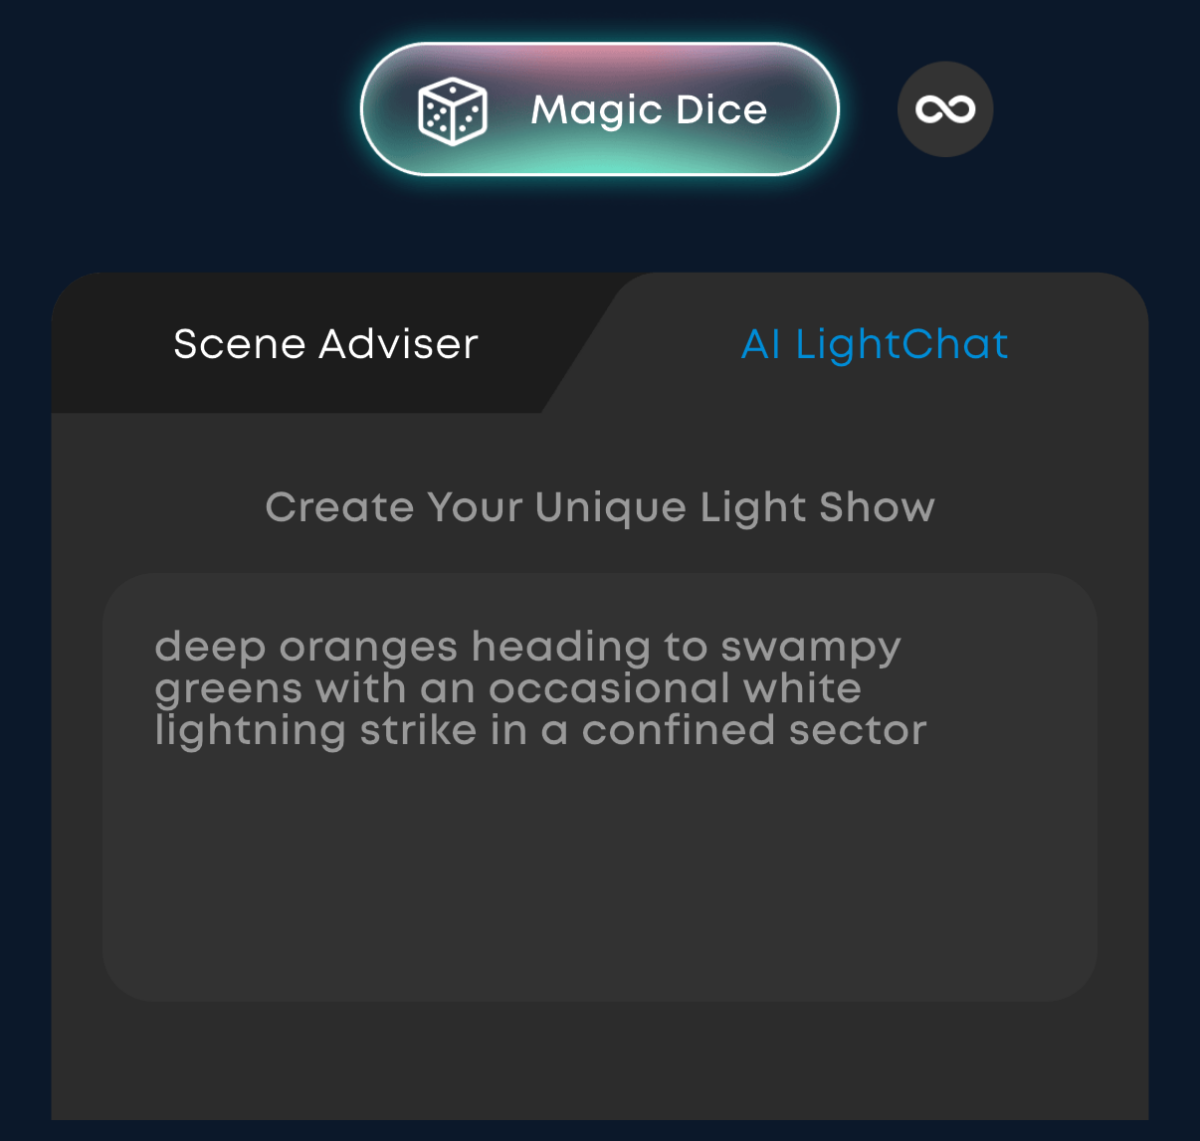
There were 5 Halloween scenes to choose from in the app. Of the 5, I liked Witches Cauldron the best as all the rest had some random pinks or other flashes that didn’t feel right. I did learn that even these preprogrammed scenes can be edited for color and more. Just click the triple dot on the right side of the selection and then adjust the lights and hit save. Some of the motion can be quite extra so play around and find ones you like. One example of that where I used the AI chat function to describe a scene. Here’s the prompt and a video of the result.
You’ll end up spending a fair amount of time just playing around with settings and colors to see what certain options do. I did notice that if you set a schedule and then decide to change the theme in the main app (outside the schedule settings) the schedule is then ignored, when I woke up one morning and the lights were still on. Akin to something along the logic of ‘well you changed the program, so I assumed you also didn’t want the schedule’.
The ‘Follow me’ radar function is pretty unique. First you’ll need to activate the feature, then train it. That process was pretty cool as it had you walk to the far left (radar’s right) and confirm then to the far right, both shown with live representation in the app.
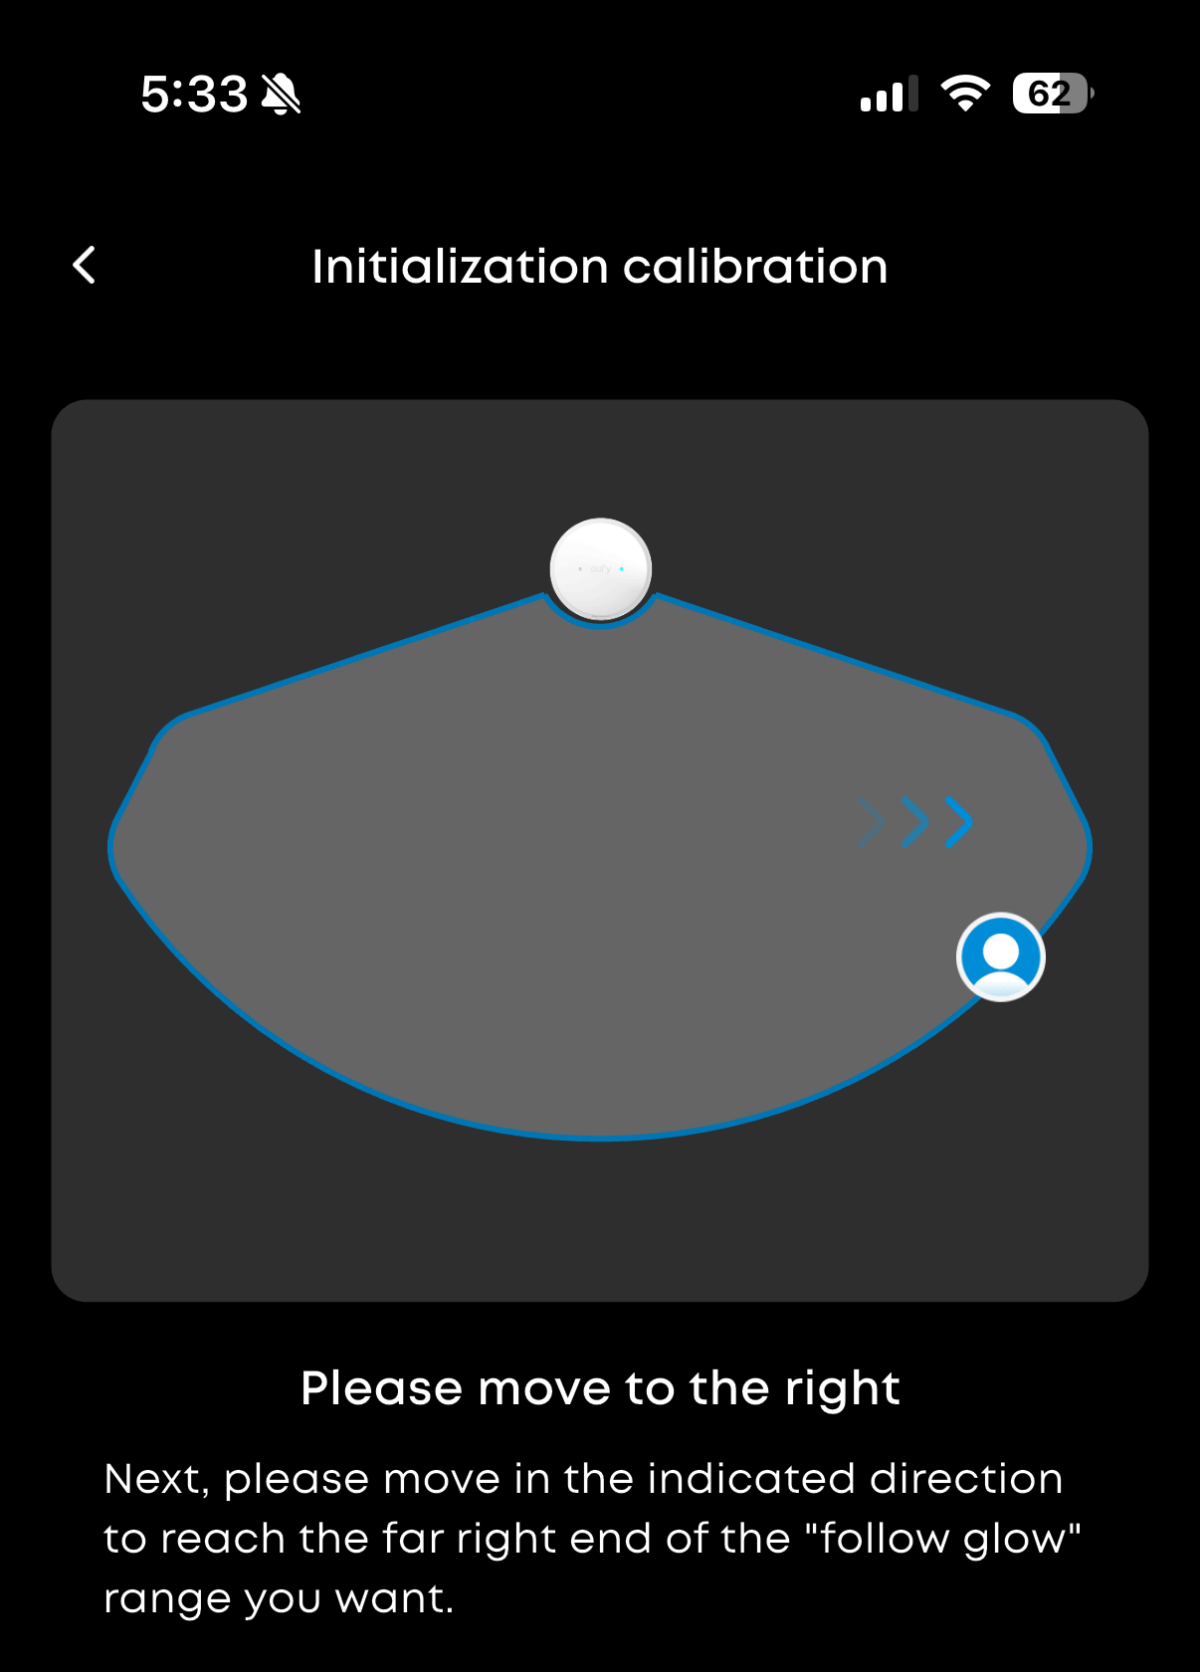
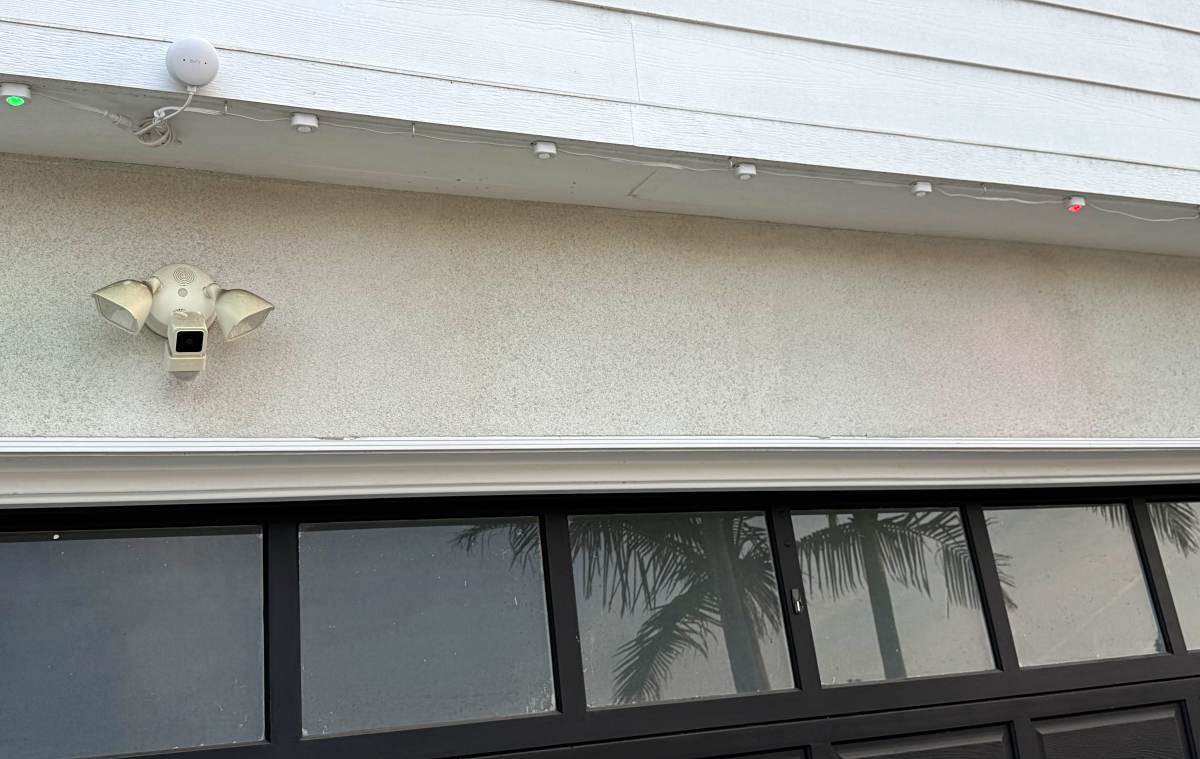
Then after confirming that the lights were generally following you, finalize calibration by turning on specific LEDs and having you stand in front of each and confirm. In the below photo you can see the green LED on the far left that I had just confirmed, and the red LED that was next to confirm on the far right.
Once up and running the effect is as you’ll see in the below video where the lights follow behind you by a light or two in a cluster.
eufy is also constantly updating the app and adding features. For instance, on the customization screen, originally you went to the color picker and then clicked on, or dragged across all individual lights you wanted that color. With the most recent update, you click on the lights first which are then highlighted with a white ring, then you click on the color picker.
Note that when using the customize screen, the string of lights snakes back and forth so across to the right and then back to the left on the next row down. It’s denoted by little return arrows, but it’s easy to forget and then be surprised when your masterpiece doesn’t look like you thought it would.
The lights do need to be ON for you to create custom arrangements, or even adjust existing themes. I’d like to see an offline mode where you can have some starting points ready for a dusk preview and tweaking. The app does have a placebo house that shows a simulation of the affect, but again the lights have to be on to have even that work. And, in case I didn’t mention it, there are daily options with just white/cool/warm variations.
Final thoughts
eufy’s Permanent Outdoor Lights S4 surprised me with a well thought through installation, app control, customization and just sheer amount of color and coverage. I actually went ahead and bought their Outdoor Spotlights for the palm tree in the front yard and their E22 Permanent Outdoor Lights for another use case based on the experience with the S4 lights and my existing use of eufy’s smart door locks.
What I like about X
- Bright, colorful, controllable lighting
- Lots of existing themes to choose from as well as custom creations
- 1 App across eufy’s products makes it easy
What needs to be improved?
- Lights have to be physically on to customize or change existing themes. Would love to see an offline mode.
- Better description of what’s in the box on both eufy and Amazon websites (# of extensions, etc.)
- Would love to see a captured screw in the mounts for frustration free install
Price: $499 – $859 ($349 – $599 on sale)
Where to buy: eufy | Amazon
Source: The sample of this product was provided for free by eufy whom did not have a final say on the review and did not preview the review before it was published.

Gerber Gear 22-47162N Fast Draw Folding Assisted Opening Pocket Knife, Fine Edge, Black
(as of February 17, 2026 17:36 GMT -06:00 - More infoProduct prices and availability are accurate as of the date/time indicated and are subject to change. Any price and availability information displayed on [relevant Amazon Site(s), as applicable] at the time of purchase will apply to the purchase of this product.)