REVIEW – I was bitten badly by the laser engraving bug when I reviewed my first laser engraver, the LaserPecker LP5. It’s a great portable machine, as I said in my review. However, the more I used it, the more I wanted something larger. The xTool P2S is such a machine. I recently got my hands on the P2S and a bunch of accessories to try from xTool. As a laser engraving newcomer, it was all a little intimidating but a heck of a lot of fun. Come with me as I go on my laser engraving adventure.
What is it?
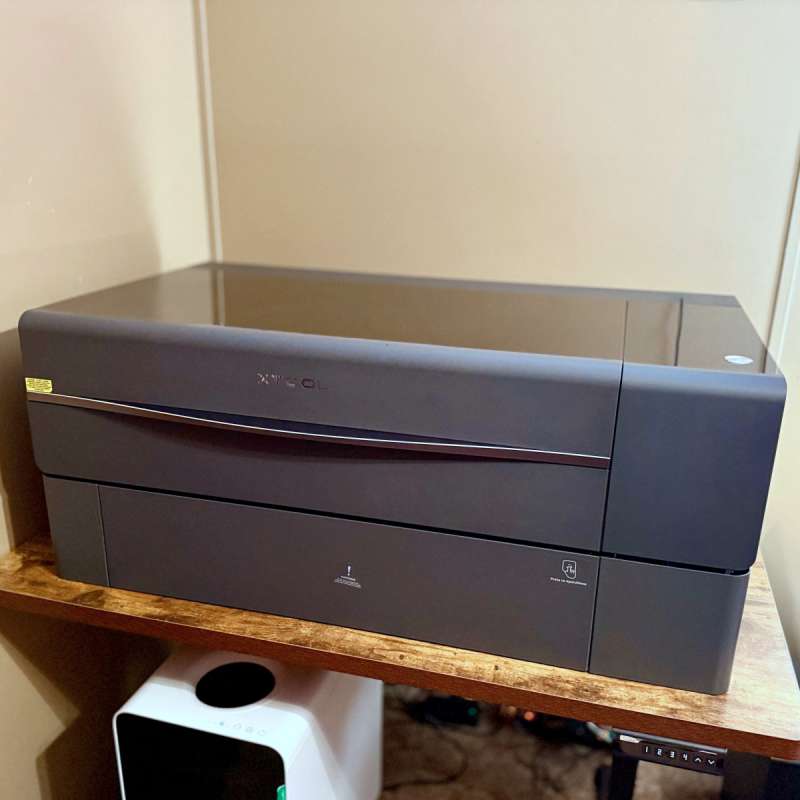
The xTool PS2 is a user-friendly, powerful 55W CO2 desktop laser cutter and engraver.
What’s included
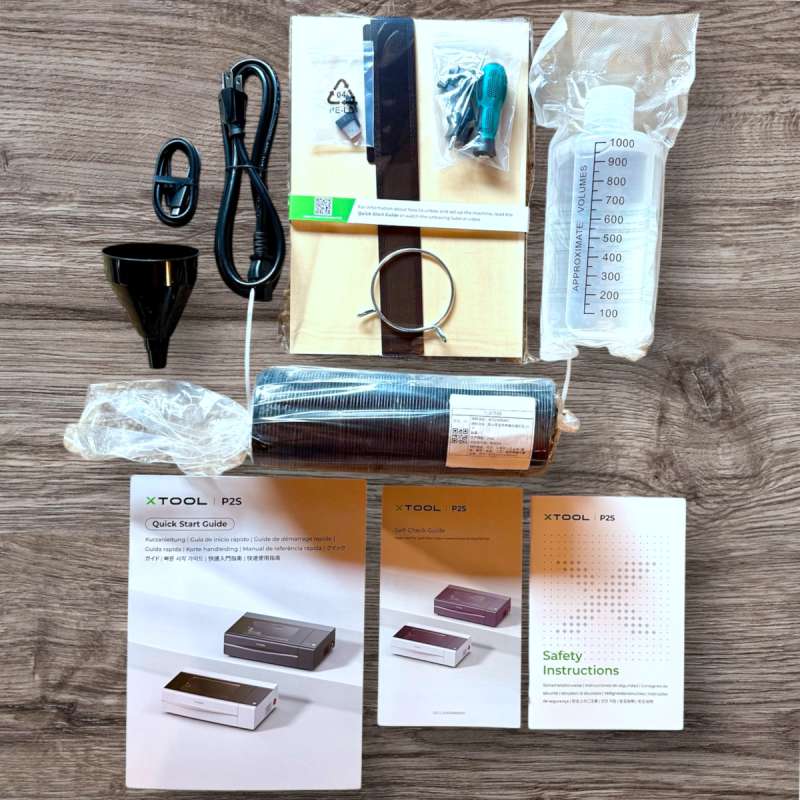
- xTool P2S
- Power cable
- USB cable ( Type-C )
- Keys x 2
- Smoke exhaust pipe
- Antifreeze
- Funnel
- Basswood 3mm x 4
- Transparent acrylic x 2
- Screwdriver
- Hex key
- Material clamps x 4
- Self-Check guide
- Quick Start guide
- Safety instructions
Also included in this review:
- Riser Base Accessory
- SafetyPro AP2 Air Purifier
- Honeycomb Panel
- RA2 Pro Rotary Accessory
- Automatic Conveyor Feeder
- SafetyPro IF2 Hyper Flow Inline Duct Fan
Hardware specs
- Bed Size: 26.7’’×14.1”(680x360mm)
- Working Space: 23.6”×12″ (600×305mm)
- Laser Power: 55W CO₂ Laser
- Product Size: 39.4”×25.1″×10.6″ (1000×639×268mm)
- Product Weight: 45kg
- Max. Working Speed: 600mm/s (X-Axis Acceleration 6400mm/s²)
- Max. Workpiece Height: With tray 2.5″(64mm), Without tray 2.7″(71mm), With riser base 8.5″(215mm)
- Rotary Engraving Diameter: With riser base 0-180mm, Without riser base 3-50mm
- Z-Axis Movement: 3”(75mm)
- Operating Ambient Temperature: 10-30°C (10-86℉) *If the temperature drops below 10°C (50℉), please add antifreeze under the guidance in the user manual.
- Storage Temperature: 10-45°C (50-113℉)
- Air Assist: 200 kPa (Dual Cylinders)
- Exhaust Fan: 233.3 CFM(14,000 RPM Dual Blades)
- Optical Path Indicator: Included
- Daily Maintenance: Quick-Release Fan Button, Magnetic Filter Screen, Mistake-Proof Laser Mirror
- Water-Cooling System: Capacity: 1.4L(0.37gal)
- Ranging System: LiDAR Ranging System (Processing Precision:0.01mm)
- Camera Type: Panoramic Camera + Close-Range Camera
- Number of Pixels (Effective): 16MP×2
- Vision Precision: 0.3mm
- Image Resolution: 1000 DPI
- Focus Mode: Autofocus
- Software: xTool Creative Space / Lightburn
- Connection: WiFi & USB
- Support File: SVG / DXF / JPG / JPEG / PNG / BMP, etc.
- Support Systems: Android / iOS / iPad / Windows / macOS
Design and features
There is little difference between the P2S and its predecessor, the P2. In fact, the two machines are identical physically (size: 39.4×25.1×10.6″) (engraving area: 23.6×12″), and the upgrades are mainly under the hood, so to speak. I’ll touch on the 5 key upgrades added to the P2S.
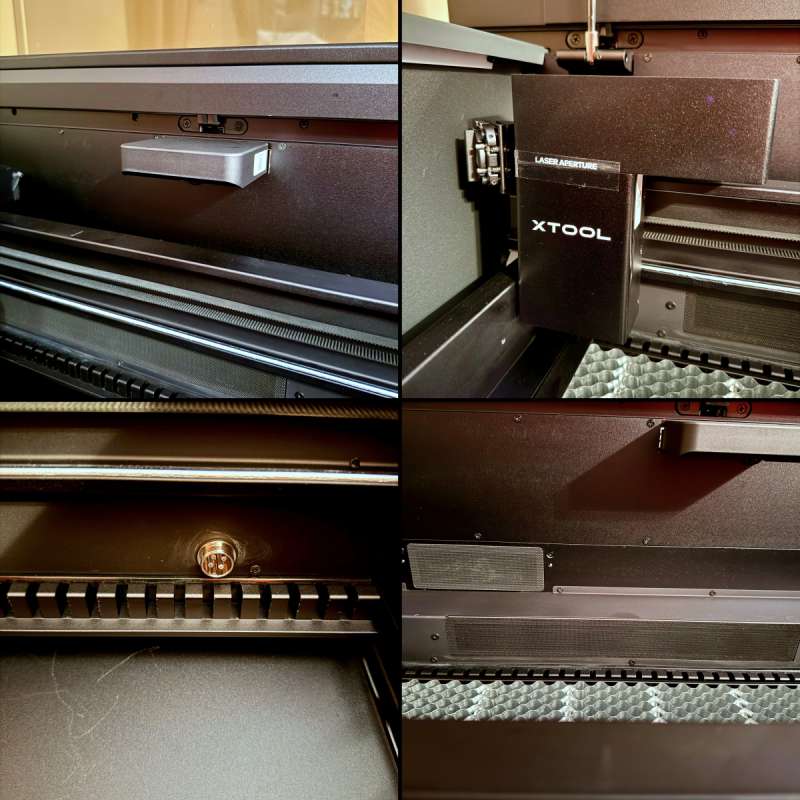
Feature #1: XTool has added two magnetic trap filters inside the machine. The filters capture larger debris and gummy soot before they reach the exhaust fan. They easily snap off and can be cleaned and reattached. xTool even includes a second set of filters so you can swap one out while the other is being cleaned.
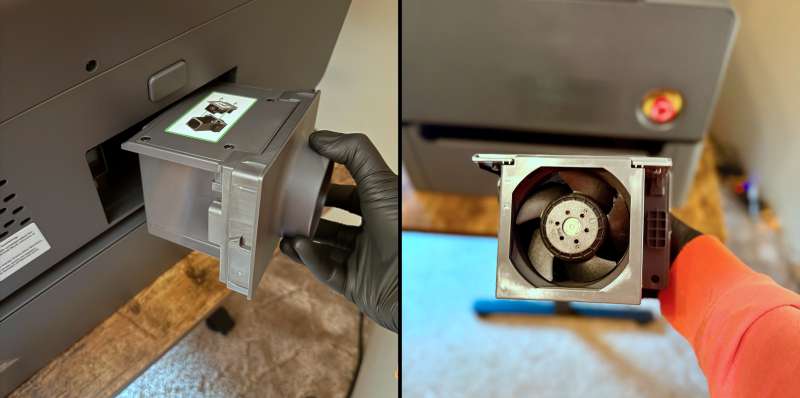
xTool has implemented some updates to the exhaust fan. First, the P2S model features a quick-release button on the exhaust fan, allowing for easy removal for cleaning or maintenance without the need for tools. Additionally, xTool has introduced a dual-stage booster fan, which increases the exhaust speed from 7,000 RPM to 14,000 RPM. This upgrade provides a 200% boost in efficiency compared to the previous P2 model.
Feature #2: Another significant upgrade compliments the new booster fan, Dual Air Pumps. This feature doubles airflow stability, delivering 200KPa of air pressure, which is 33% higher than the P2, resulting in sharper, cleaner cuts.
Feature #3: Optimal Path Improvement. This feature makes it easier to tweak the mirrors that bounce the laser beam around so it will be calibrated correctly. xTool made this super easy with a new optical path indicator light guide, which helps ensure the laser beam is spot on. They also made it easier to remove the mirrors for cleaning by adding a small handle on the back. xTool recommends cleaning the mirrors after every 2-4 hours of use, so this is a helpful upgrade.
Feature #4: 3D Cylinder Engraving & Batch Processing 2.0. 3D Cylinder Engraving enables accurate 3D modeling of curved cylindrical objects, allowing precise engraving with the rotary accessory. Unlike traditional batch engraving with a single design, Batch Processing 2.0 enables batch production with serial numbers, varied names, and custom images.
Feature #5: X-Axis speed increase. The X-Axis acceleration has been increased from 3200 to 6400mm/s, reducing processing times on elongated projects where it is primarily used.
Riser Base Accessory
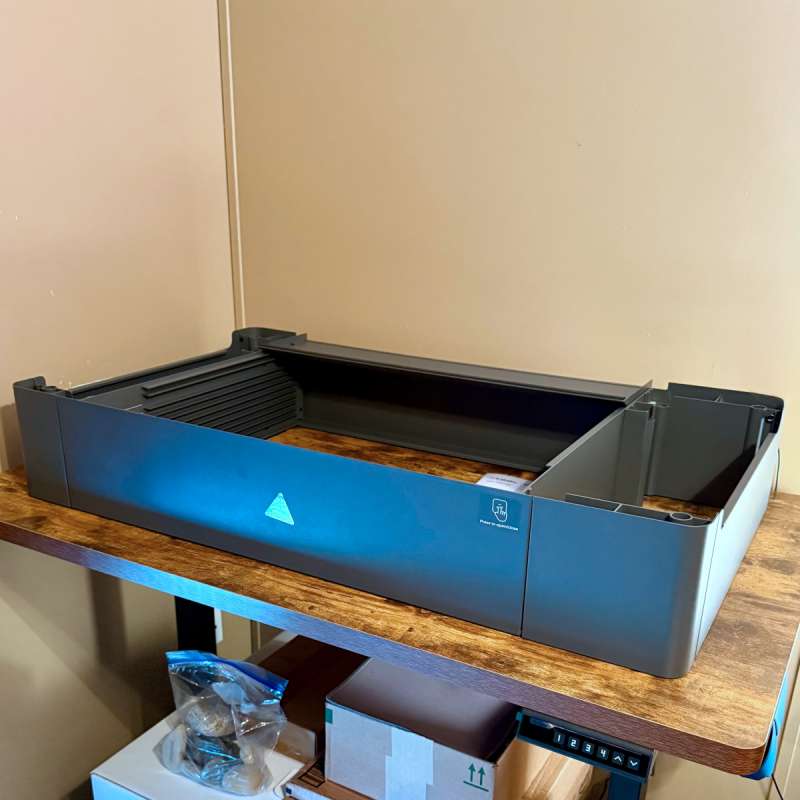
xTool was gracious enough to send me several accessories for the P2S, including the Riser Base. The Riser Base is required to engrave larger (thicker) objects or use the optional xTool RA2 Pro Rotary accessory. The Riser Base has a well-thought-out design and an all-metal construction. It features four magnetic doors and cutouts, so you don’t have to worry about injuring your hands when placing the P2S on top of it. The P2S weighs 100 lbs, requiring two people to put it on the Riser Base. On the right side of the base, there’s a cubby perfect for storing the slats and the rotary tool when they’re not being used.
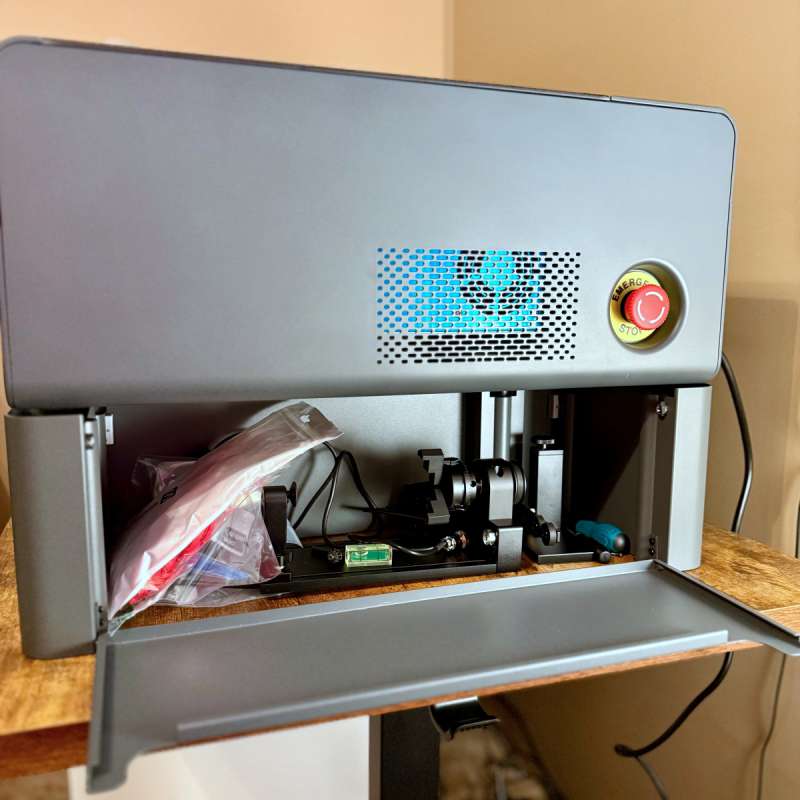
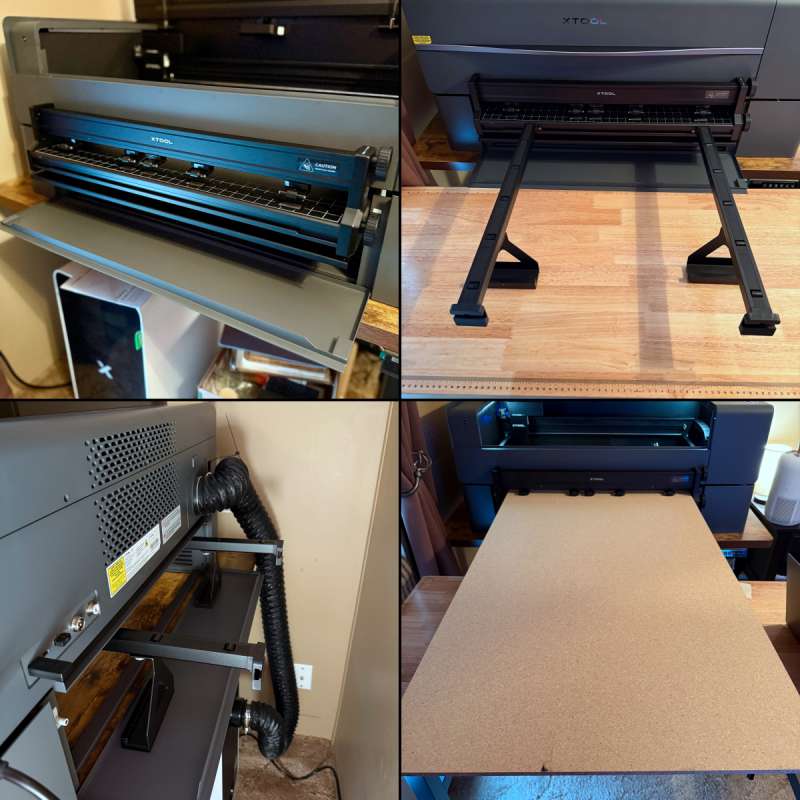
Additionally, the base is required to use the conveyor feeder accessory.
The Riser Base does require some basic assembly. If you want a P2S, I recommend purchasing the Riser Base. It’s well worth it and gives you way more options.
Unboxing and quick overview
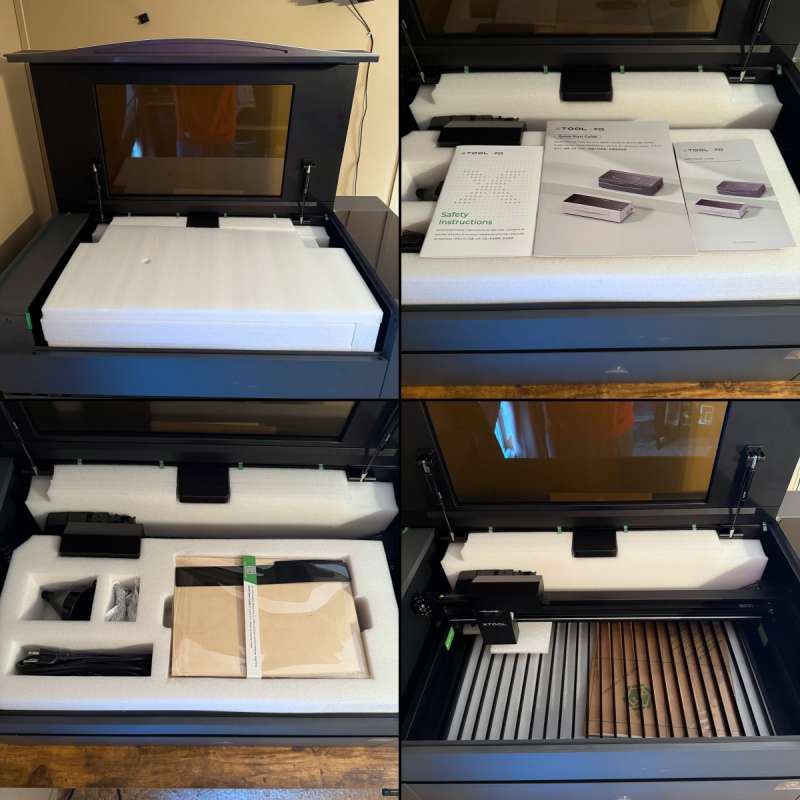
The P2S comes incredibly well-packaged and fully assembled. xTool does a fantastic job of packaging the P2S to ensure it arrives undamaged. The inside of the machine was packed with foam, and the x-axis was secured in place with thumb screws to keep it from moving around during shipping.
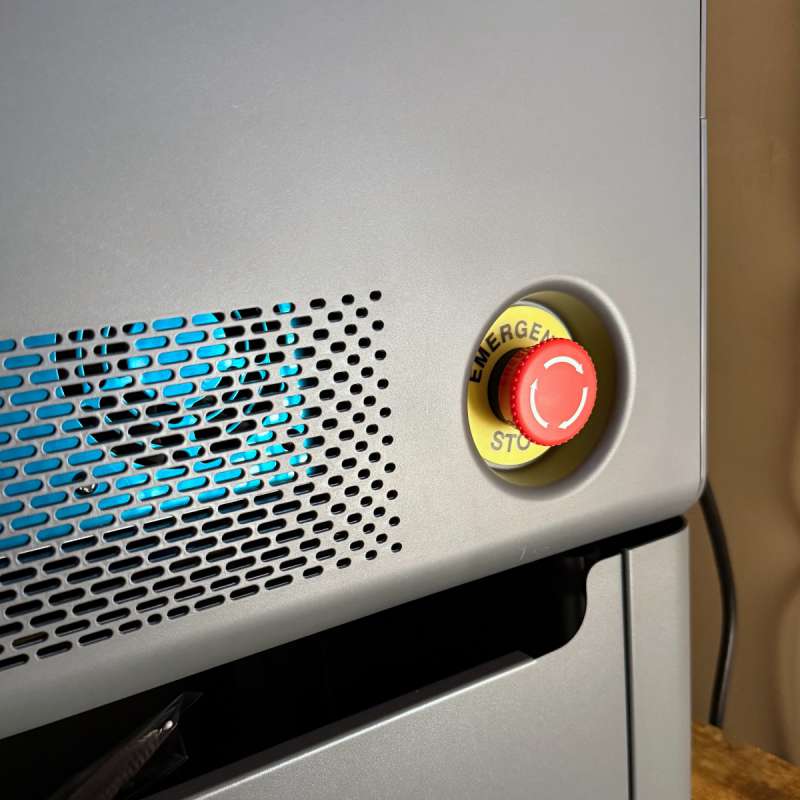
There are only three physical buttons on the P2S. There’s a power switch, a start button, and an emergency stop button. Around the back of the machine are the power switch, power port, two extension ports, the access-control key, a port for the fire safety set (sold separately), and a tube fitting.
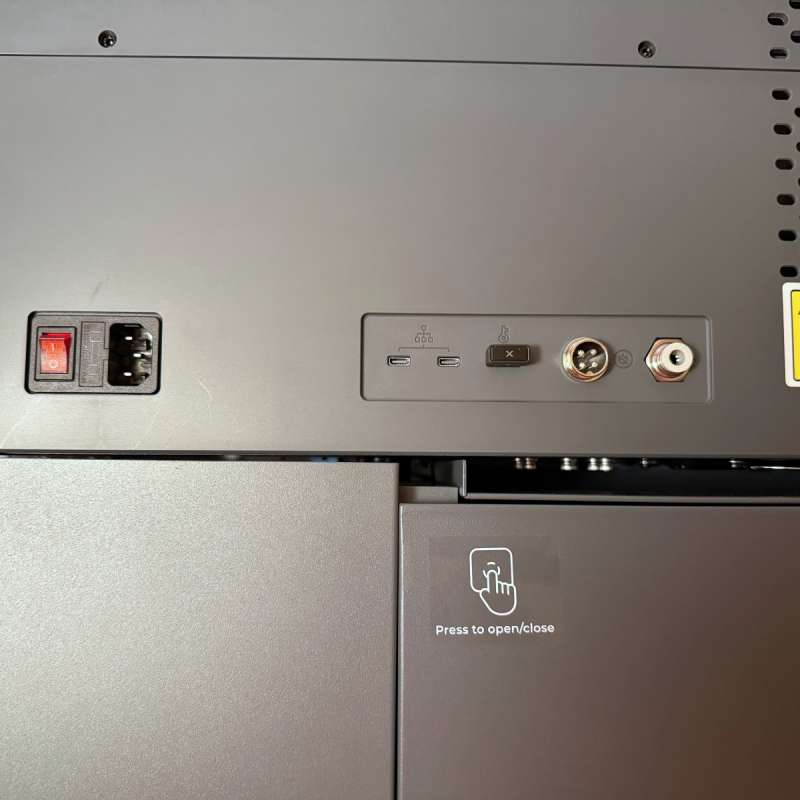
The smoke exhaust outlet and quick-release button are also located on the back of the P2S.
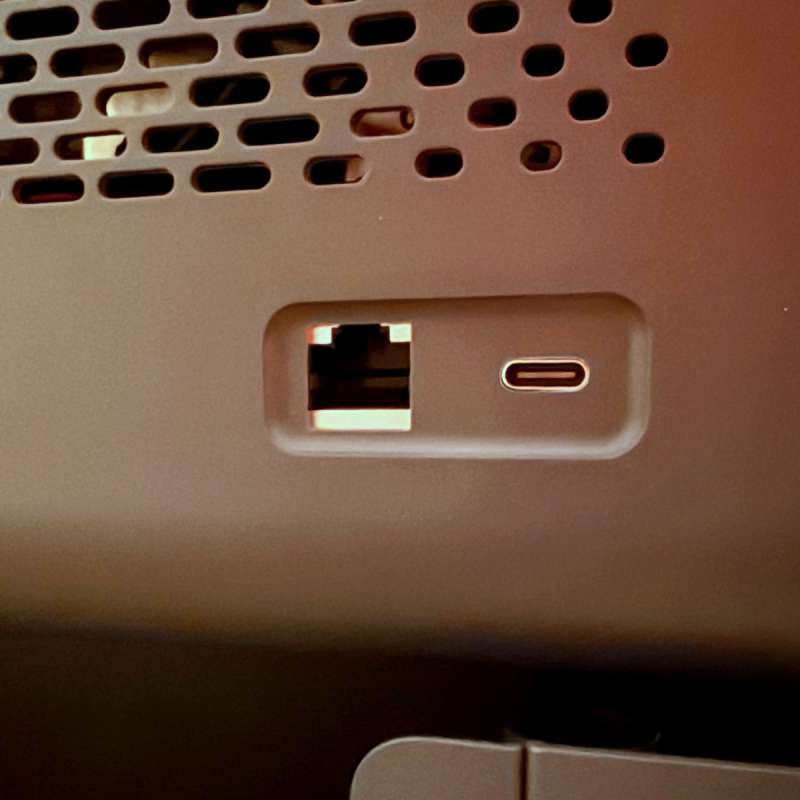
On the left side of the P2S, there is a network port and a USB-C port.
You’ll find the emergency stop button on the machine’s right side.
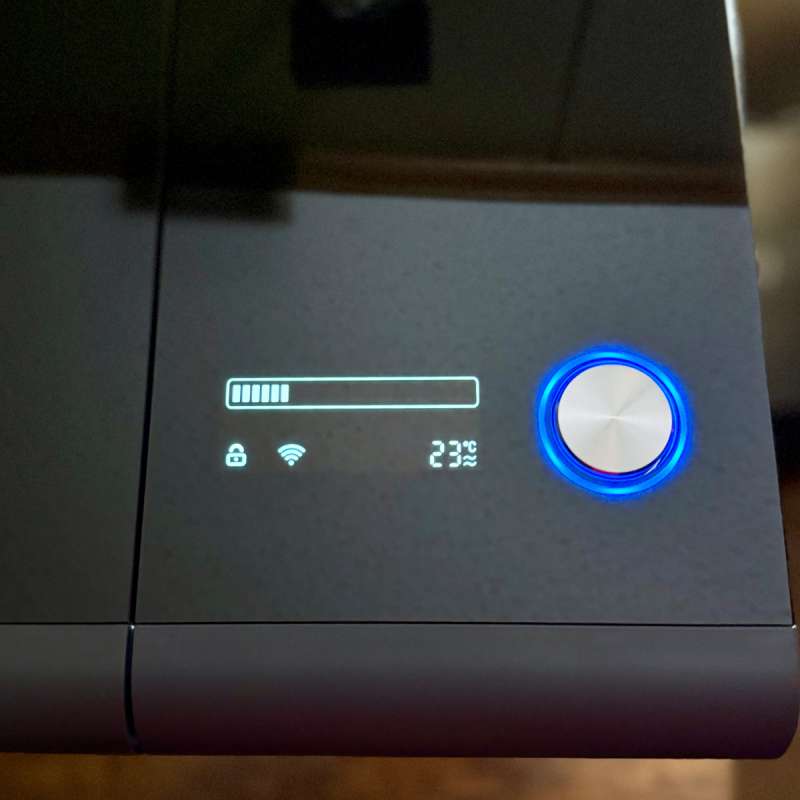
A small status display screen is next to the start button on the P2S. The screen has a progress bar, a lid lock/unlock indicator, a WiFi indicator, a USB connection indicator, an exception/error indicator, and a liquid temperature indicator. Additionally, there is an Annular indicator light surrounding the start button. The light changes colors depending on the P2S’s working status.
Inside the P2S is a wide-angle camera, a close-view camera, the laser module, magnetic filter screens, an extension port, removable slats, and the baseplate.
The P2S lid has hydraulic lifters that keep it in place when it’s opened and automatically locks when the P2S is in use.
Initial setup
The first part requires you to remove the machine’s rear cover and inspect the laser tube for damage. Then, you must fill the water tank with the proper amount of distilled water and antifreeze, which xTool provides.
I connected my laptop to the P2S using the USB-C cable and opened the xTool Creative Space software (XCS). From there, I proceeded to run the Optical Path Setup. It takes you step-by-step testing to see if your laser is aligned correctly. Mine was low and to the right, so I followed the instructions to realign one of my mirrors. It was super easy using the alignment indicator, and I was quickly able to dial it in.
Setting up the P2S sounds intimidating, especially if you’ve never used a CO2 laser. Still, it was relatively easy, and xTool does a fantastic job of walking you through the setup process.
xTool Creative Space (XCS) software
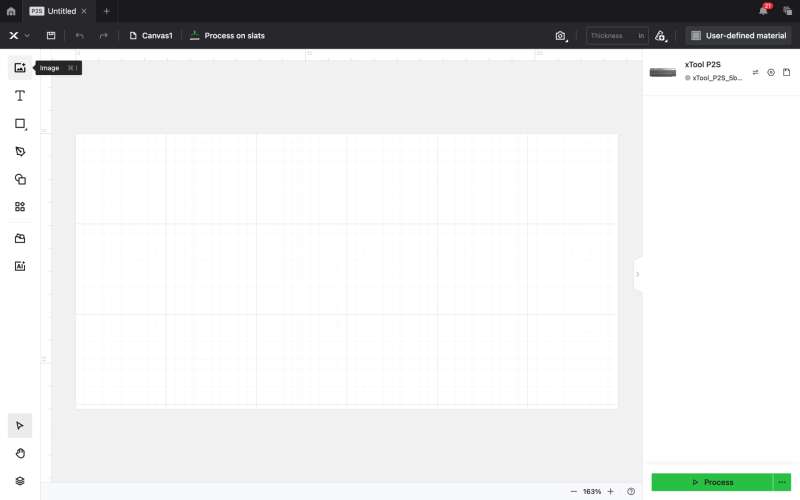
Creative Space is xTool’s design software for the P2S. XCS has so many features and settings that it’s impossible to cover them all. Here is a link to an extensive tutorial from xTool that shows you how to set up and use XCS V2.1. You can also download and use the software without the P2S, which is a great way to familiarize yourself with it beforehand.
Overall, I found XCS to be extremely user-friendly. The software is very intuitive, and the layout is easy to understand. I also spend a lot of time on YouTube watching how-to videos. This was very helpful, and I even picked up a few creative tips and tricks along the way.
The P2S is also compatible with Lightburn if you want something more advanced.
First use
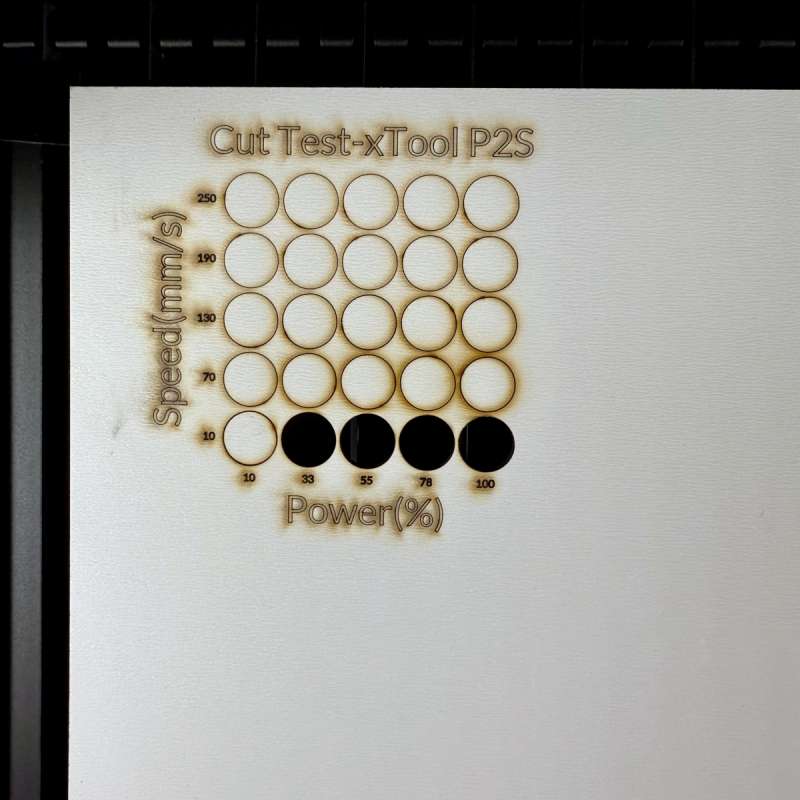
For my first project, I wanted to make Christmas stocking tags for a friend’s mom. To do this, I needed to cut names out of a piece of wood. I used a wood that I was unfamiliar with and wasn’t sure what settings to use, so I opened XCS and was able to quickly make a material test array. I then placed my material into the P2S. From there, I used XCS and the wide-view camera to resize and position the test where I wanted it on the material. To begin cutting, I hit the Start button on the P2S. The test took under 2 minutes to complete. From there, I chose the cut that looked best to me and cut out the names for my project.
I was delighted with how they turned out. The cuts were clean, and there was very little to no charring. I was even more impressed by how the P2S cut out this small, intricate snowflake.

I also used the P2S to make a couple of Christmas ornaments made from wood and clear acrylic. They, too, turned out fantastic.
One of my favorite things about the P2S is its ability to cut all types of acrylic from clear to colored and even more exotic, such as glitter and mirrored.
Honeycomb Panel 2.0
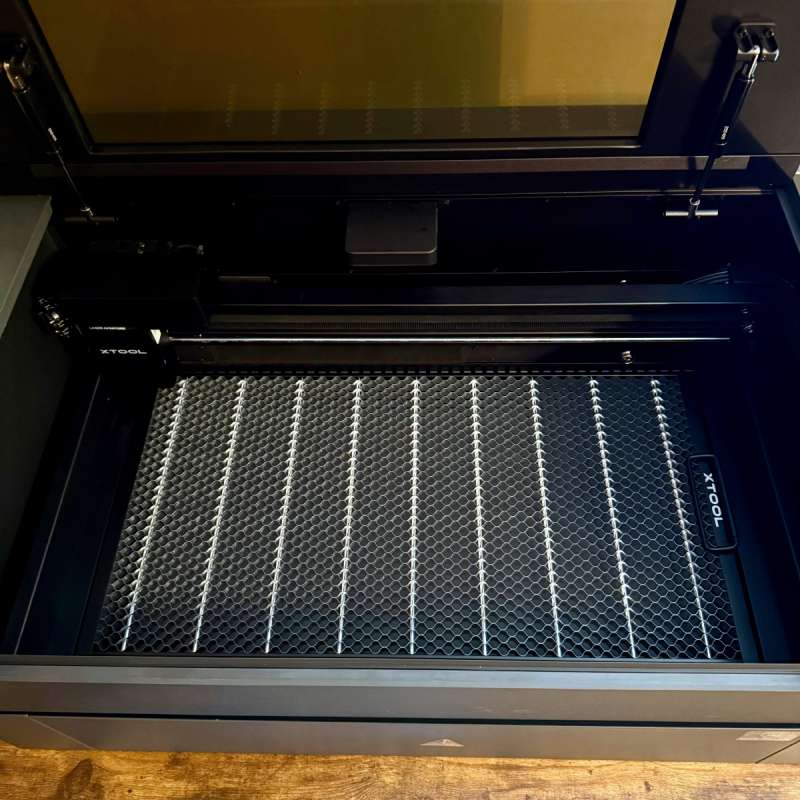
The Honeycomb Panel 2.0 accessory helps to prevent cutting pieces from falling through and getting burnt. The Honeycomb Panel comes with four magnetic clips and a cleaning brush. The panel is easy to install by removing the slats and simply sliding the panel into place. The Honeycomb Panel works well, especially if you cut or engrave smaller materials that can easily slip between the slates.
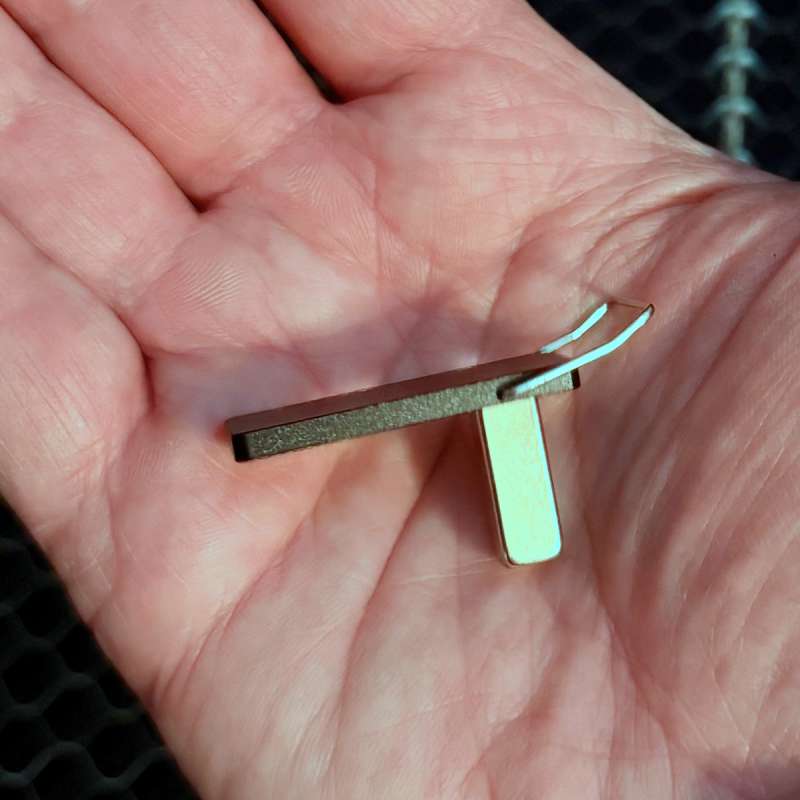
I also like the magnetic clips, which do a better job of holding materials in place and are not as awkward to use as the spring-loaded slat clips.
RA2 Pro Rotary Tool
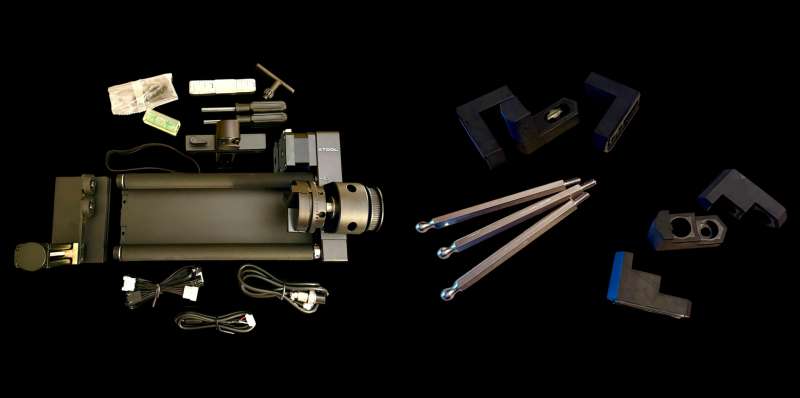
The RA2 Pro Rotary tool is a 4-in-1 tool for processing different objects. It comes with roller, chuck, sphere, and ring rotary attachments.
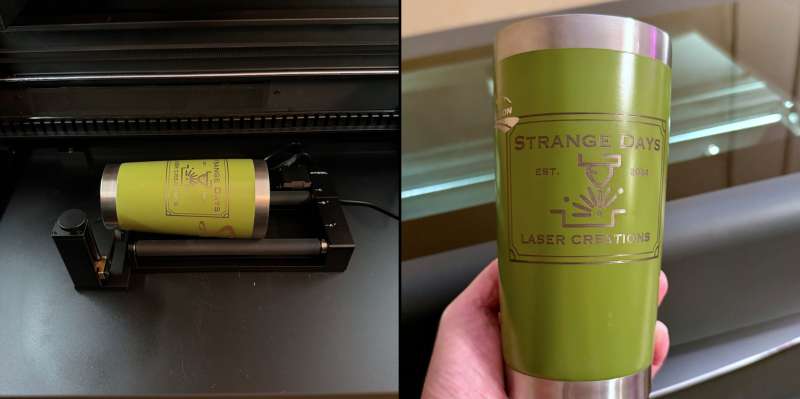
The RA2 Pro can be used in two ways: the roller and chuck tools. I used the roller tool for my test as it was easier to set up. The rotary attaches to a port inside the P2S using a porting cable. Once installed, you can open XCS and choose “Roller – use rotary attachment” from the processing mode drop-down menu. The setup and engraving process was reasonably straightforward. However, I had to watch a couple YouTube videos to help me along the way. I decided to engrave my logo onto a test tumbler. The results were good, but they turned out a little dark, and I think I need to lower my power settings next time.
SafetyPro AP2 Air Purifier and IF2 Hyper Flow Inline Fan
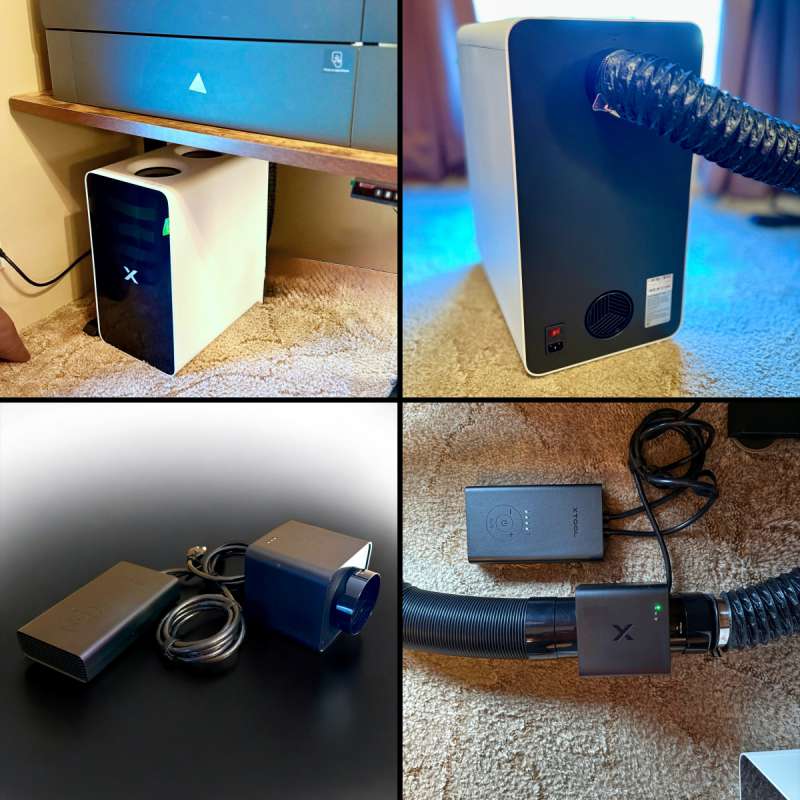
xTool also sent me their new SafetyPro AP2 Air Purifier and IF2 Hyper-Flow Inline fan. I discovered that our own Mike Dixon had recently reviewed both. I won’t go into detail about either product; instead, I will give you my thoughts on how each performed. For more information, please check out Mike’s review here.
The SafetyPro AP2 Air Purifier and IF2 Hyper Flow Inline fan are not intended to be used together. Depending on your needs, it’s more of one or the other situation. If you’re working in an area where you can’t vent the P2S out of a door or window, you’ll want to look at the AP2 because it’s an air filtration system. The IF2 will be the choice if you’re looking to push smoke and fumes out of a door or window as efficiently and quickly as possible without filtration.
I tested both the AP2 and the IF2 with the P2S. The P2S is located in a small room, approximately 10×10′, about 2 feet from a window. In my testing, I mainly cut and engraved wood and acrylic. Acrylic produces a foul odor and can be toxic, so it was a good test for the AP2. While using the AP2, I couldn’t smell anything while the P2S worked. There was no smoke, and I only perceived the slightest hint of an odor when cutting the acrylic. The AP2 set on auto mode started when the P2S did and automatically adjusted the fan’s speed based on the material I was using.
I hooked the IF2 up and vented the hose out the nearby window. It was incredibly powerful and did a great job of removing smoke and odor.
Both products performed well in eliminating smoke and odor. I recommend either, depending on your individual needs.
Batch Processing 2.0
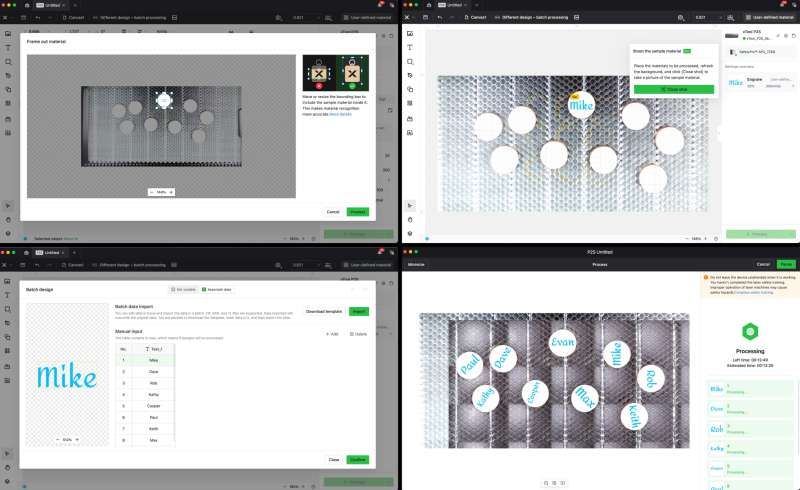
Batch processing is not new to the P2S, but Batch Processing 2.0 is a new feature. Unlike traditional batch engraving with a single design, Batch Processing 2.0 allows batch production with different numbers, names, and custom images. I tested Batch 2.0 by placing nine circles, which I cut out of basswood, into the P2S. I decided to keep it simple and use nine different names. I entered XCS and chose “Different Design – Batch Processing” from the Processing Mode drop-down menu. From the software, I input the nine names and started processing. The camera inside the P2S shoots and recognizes the shape and size of the materials. Once finished, it starts the engraving process. The job took 13 minutes, and the results were fantastic. The P2S automatically resized and correctly orientated each name to fit perfectly onto the circles.
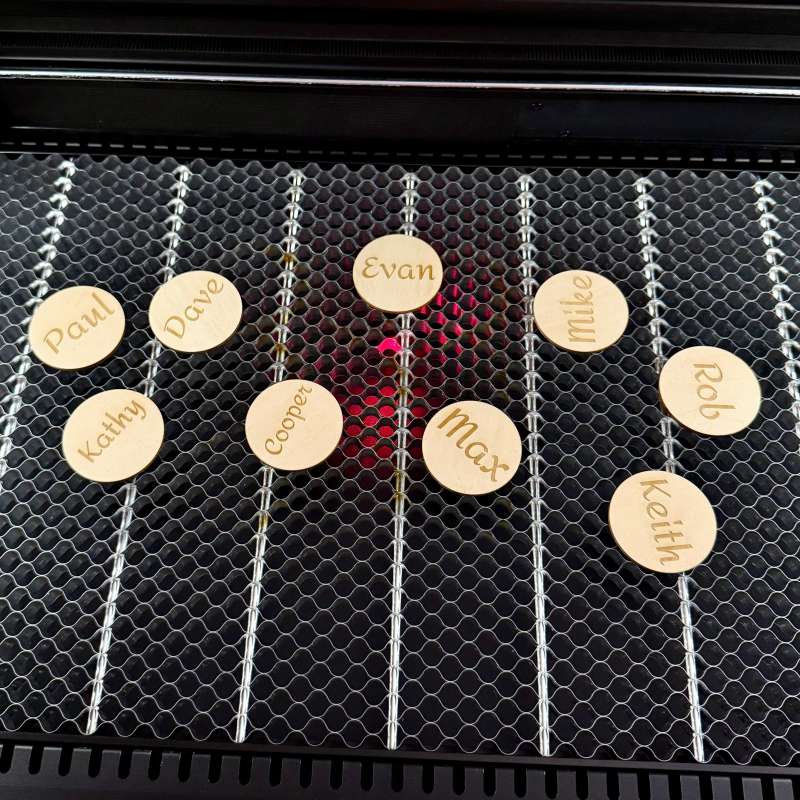
Batch Processing 2.0 works with just about any material as long as it is the same shape and size. This is a welcome new feature to the P2S, and I see myself using it a lot in the future.
Close View Camera
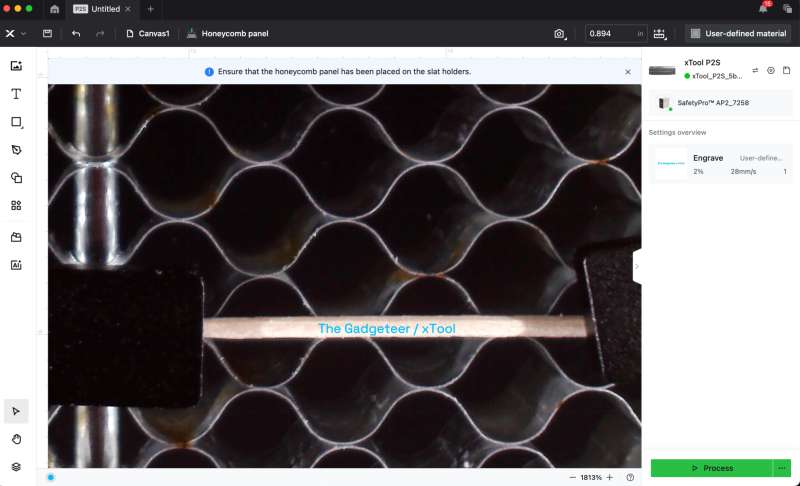
The Close View Camera is quite remarkable. It simplifies the process of engraving small items like keychains and dog tags by allowing you to zoom in and accurately position your designs. I decided to test it by trying to engrave a toothpick. As you can see in the picture below, the zooming capability is impressive, enabling me to place text precisely on the toothpick. Although the engraving could have been better, the overall result was still impressive.

3D Cylinder engraving
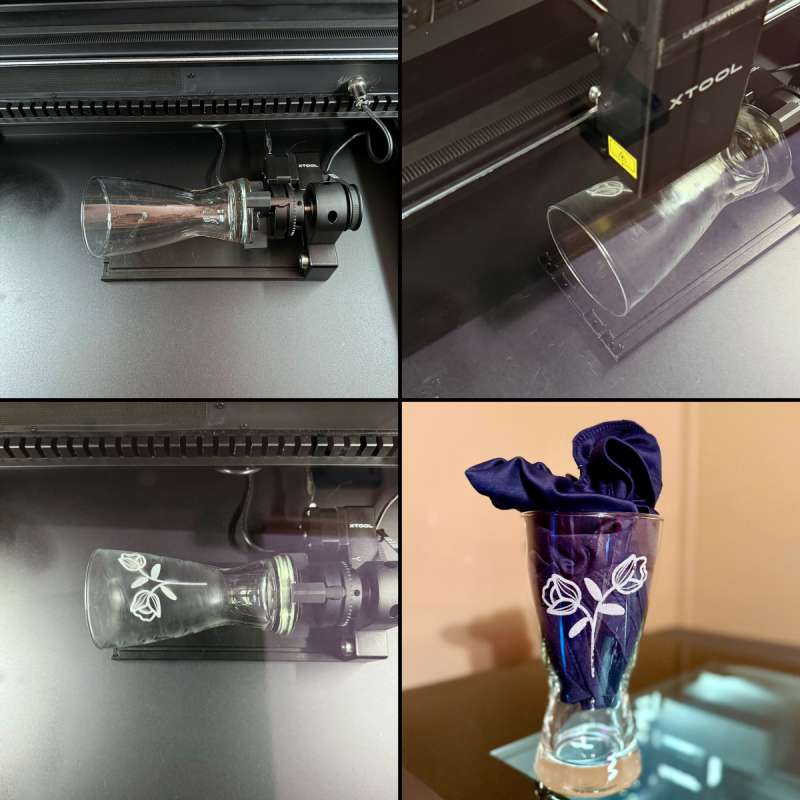
3D Cylinder Engraving enables accurate 3D modeling of curved cylindrical objects, allowing precise engraving with the rotary accessory. This process utilizes the chuck tool on the RA2 Pro rotary attachment. Like curved surface engraving, you must select two corner points on the object you wish to engrave. The laser will then scan over the object, creating a 3D cylindrical mesh onto which you can place your design.
I decided to use a curved glass that I had on hand. I first applied blue painter’s tape to prepare the glass, which helps the laser detect the surface while creating the 3D mesh. I removed the tape before engraving because treating glass with the P2S is unnecessary. However, I did apply a thin, even coat of dish soap to the glass. This helps dissipate heat from the laser and prevents chipping.
After positioning my design on the mesh, I sent the job to the P2S. The engraving took about 8 minutes to complete, and overall, I was pleased with the results. The 3D cylinder engraving feature is a nice addition.
I look forward to using it more when I have additional time to experiment.
Automatic Conveyor Feeder
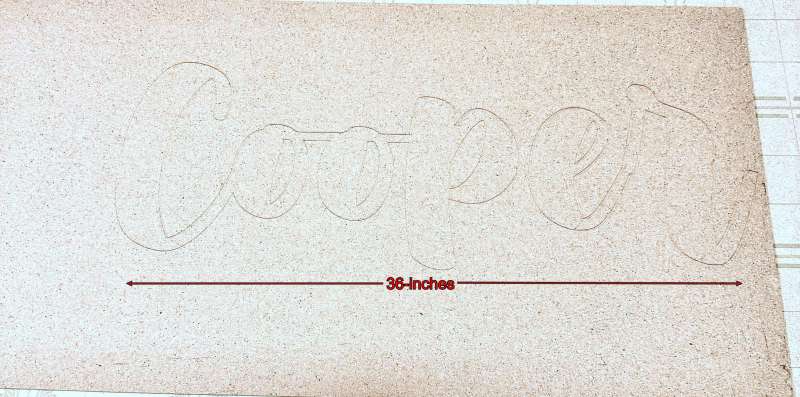
The Automatic Conveyor Feeder is an accessory for the P2S and Riser Base. The conveyor uses powered rollers that feed the material back and forth into the P2S while engraving. It allows you to engrave or cut just about any material up to 39″ x 19.6″ and 12mm thick with the basic unit and up to 118″ x 19.6″ with add-on rail extensions. I tested the basic setup and scored my dog Cooper’s name onto a 48″ fiberboard. Setup is straightforward using the manuals step by step instructions or you can watch xTool’s tutorial video here. However, even with the help of the video the software part of the process was still a little tricky. Once I figured it out I was able to score Cooper’s name 36″ wide onto the fiberboard, and the results were very good.
Since it was scored and not engraved or cut, it’s a little hard to see in my photos, but the lettering looked good, and there were no anomalies. The Automatic Conveyor Feeder is game-changing if you’re looking to do larger projects. I may not use it often, but it’s nice knowing I have it as a part of my laser engraving arsenal.


What I like about the xTool P2S laser engraver
- Great build quality
- Powerful
- Easy to setup
- Extremely user friendly
- xTool Creative Space software
- The ability to cut all types and colors of acrylic
- Riser Base
- Enclosed design
- Safety Pro AP2 air purifier does an excellent job of removing smoke and odors
- Dual cameras make it easy to place your designs
- Patch Processing 2.0
- Honey Comb bed
- The dual exhaust fans do an incredible job of venting smoke
- Dual Air Pumps provide better results for engraving and cutting
What needs to be improved?
- Wide view camera is poor quality
Final thoughts
The xTool P2S is an outstanding machine, and I am thoroughly impressed with its performance. It excels at cutting and engraving a wide variety of materials. What I appreciate most about the P2S is that it simply works. The process was incredibly user-friendly from the moment I unboxed it to the initial setup and first use. As someone looking to start a side business, I believe the xTool P2S is a dream machine.
Price: P2S: $4199, Riser Base: $499, Honeycomb Panel 2.0: $169, RA2 Pro Rotary: $299, SafetyPro AP2 Air Purifier: $699, IF2 Hyper-Flow Inline fan: $179, Automatic Conveyor Feeder: $459
Where to buy: xTool and Amazon
Source: The sample for this review was provided by xTool. xTool did not have a final say on the review and did not preview the review before it was published.

