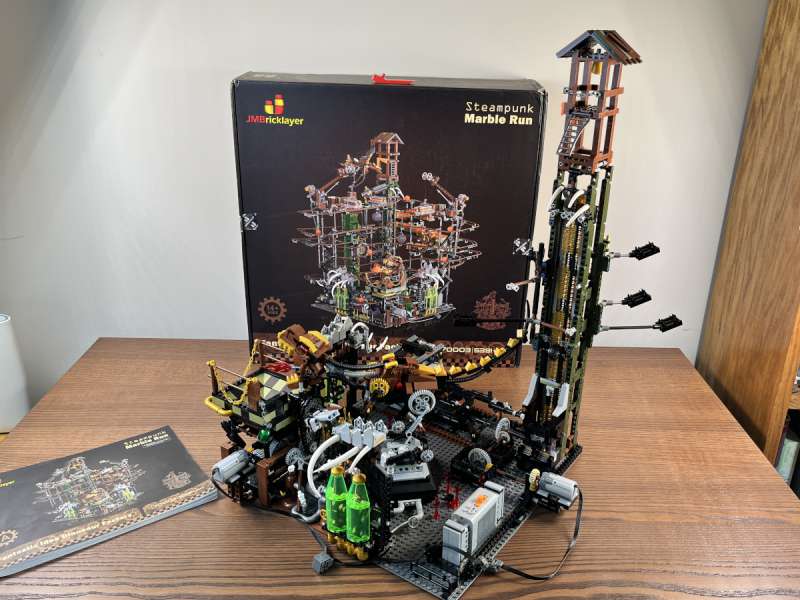
REVIEW – JMBricklayer designs, distributes, and sells building block sets that are a cheaper alternative to LEGO-brand sets. They are no stranger to The Gadgeteer, as we’ve reviewed everything from spacemen to chameleons to pirate ships to lighthouses. JMBricklayer is back with their most ambitious set ever, a massive marble run that in their own words “offers a high level of challenge and difficulty.”
What is it?
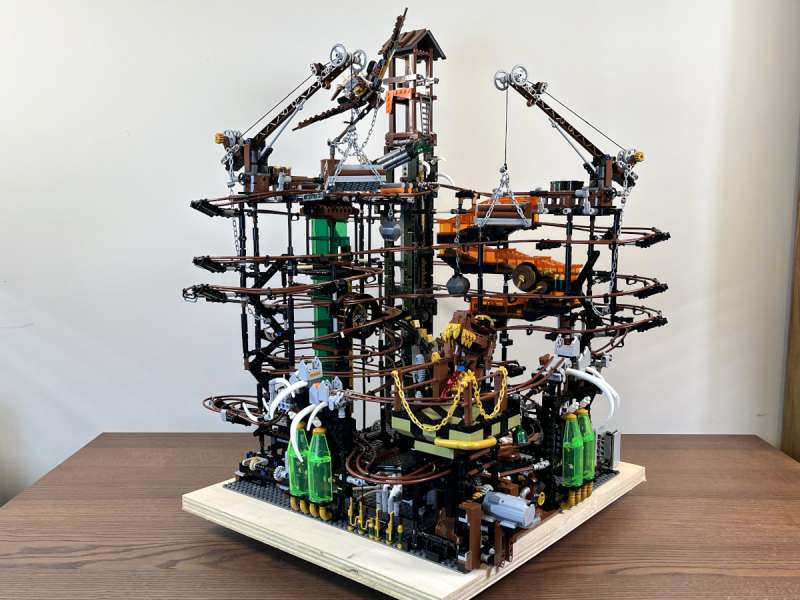
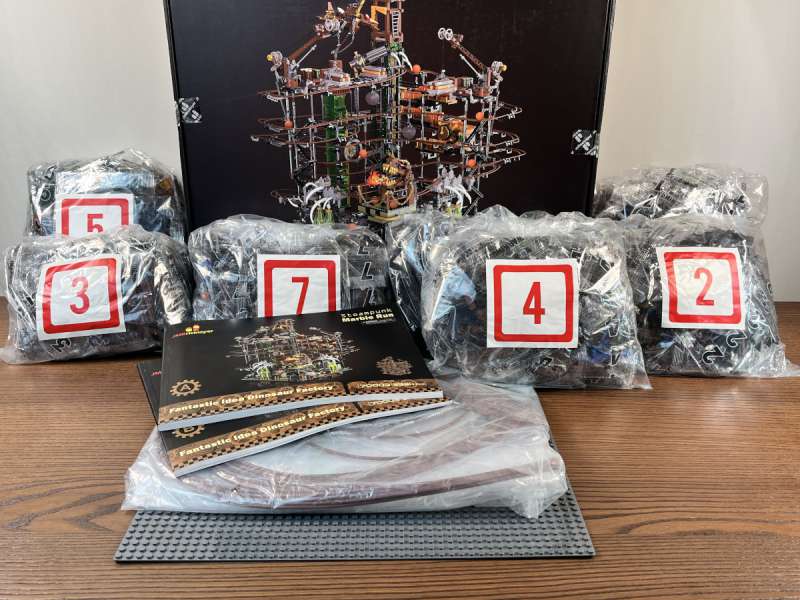
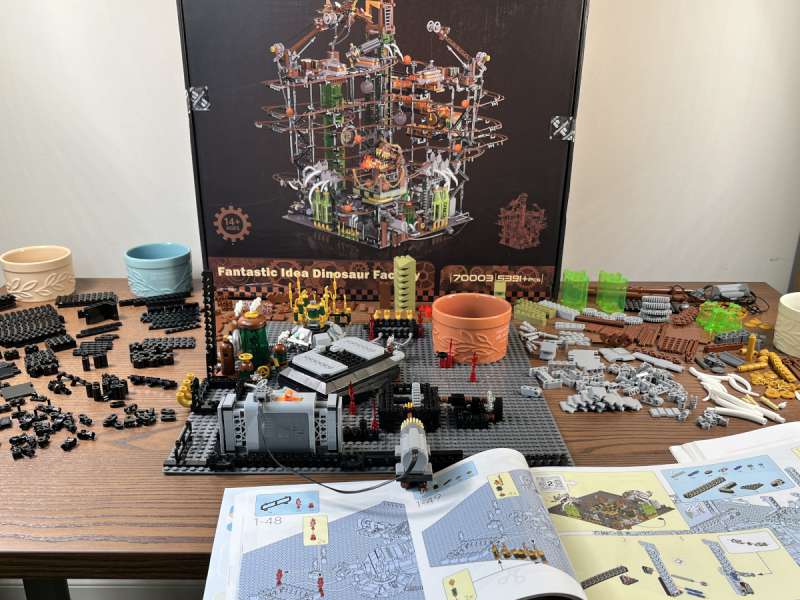
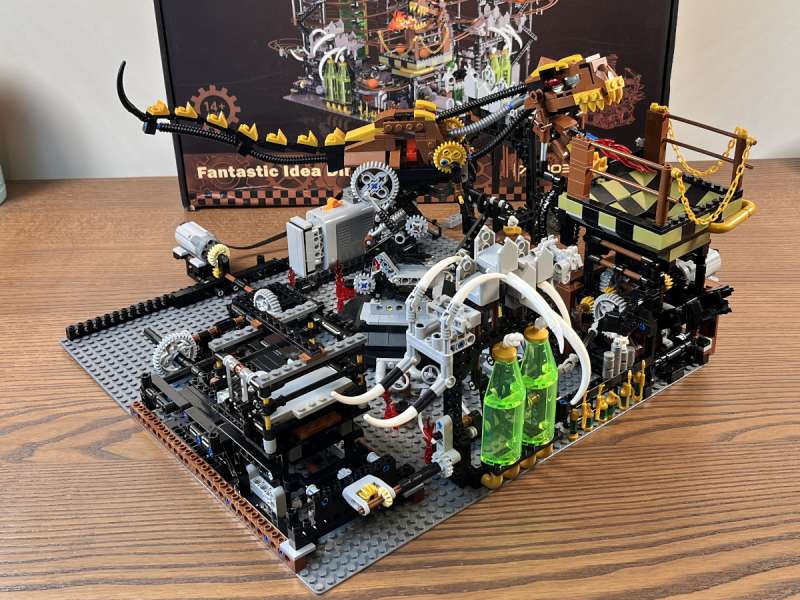
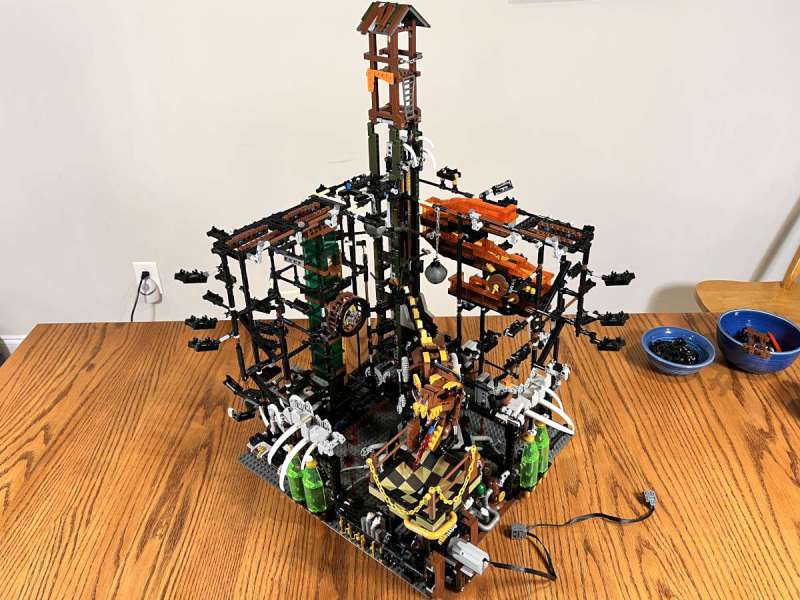
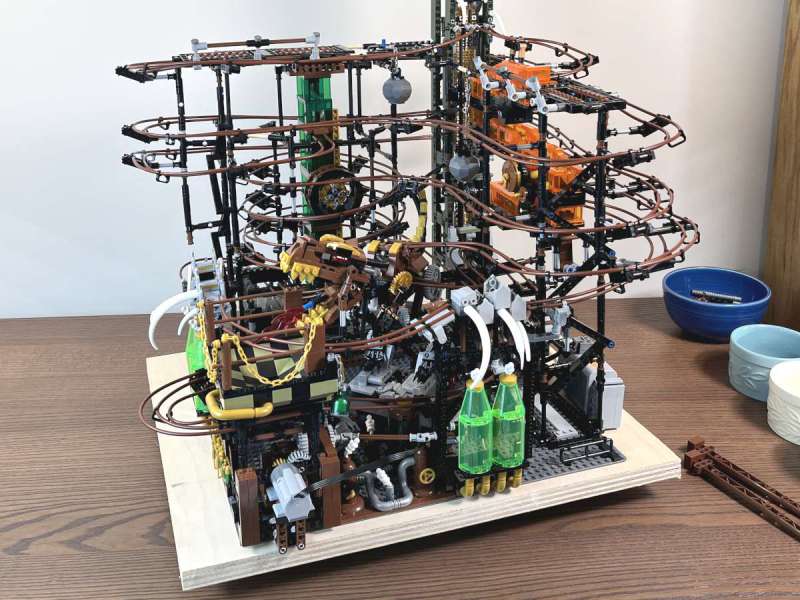
This marble run (model 70003) is themed as a dinosaur factory crossed with a mad scientist lab and mixed with some steampunk. It includes a whopping 5391 bricks along with sundry other items like a battery case, two motors, two pieces of string, and lots and lots of flexible tubing. The blocks in this set are compatible with LEGO’s blocks. The pieces are mix of regular and Technic-like, and they are mostly black in color along with grays and browns. JMBricklayer’s motto is “Joy Makes Brilliance,” and they “invite every builder to join us in building a world that is full of fantastic ideas.”
What’s included?
- 5391 bricks
- One large base plate
- Two motors
- One battery case that takes six AA batteries (not included)
- 64 flexible tubes (for the tracks)
- Two pieces of string
- Two manuals (342 pages total)
- One brick separator
Design and features
When it comes to the design of LEGO alternatives, there are a handful of questions that always need to be answered:
Are they compatible with LEGO? Yes, these pieces, both the regular ones and the Technic ones, are compatible with LEGO.
Are they of the same build quality? No, these bricks are not up to LEGO standards. I found too many pieces that were warped, deformed, and mis-sized. They are sufficient to build the marble run, but there are too many low-quality bricks for my tastes. I would like to see JMBricklayer do a better job with quality control.
Do they fit tightly, or do they come apart easily? In general, these bricks fit plenty tightly. In some cases, they fit too tightly. Many of the axle pieces, for example, are a bit too large, and it’s very difficult to slide the Technic pieces onto them.
Are they cheaper in cost than LEGO? LEGO doesn’t have a marble run set, as far as I can tell. The closest set I could find is this roller coaster set, which has 2600 pieces for $400. That’s a horrible 15.4 cents per piece. JMBricklayer’s set, in comparison, is only 3.5 cents per pieces. The LEGO set is nearly four and half times more expensive, making the marble run considerably cheaper. (And if you buy while it’s on Kickstarter, it’s even cheaper!)
How do the instructions compare? When JMBricklayer said this set would be difficult and challenging, I didn’t realize that one of the primary reasons it would be so is because of their own instructions. While many of the pages are just fine and provide building details like I would expect, these instructions repeatedly had problems that caused me to have migraine-level frustrations. More on this later.
Assembly, installation, and setup
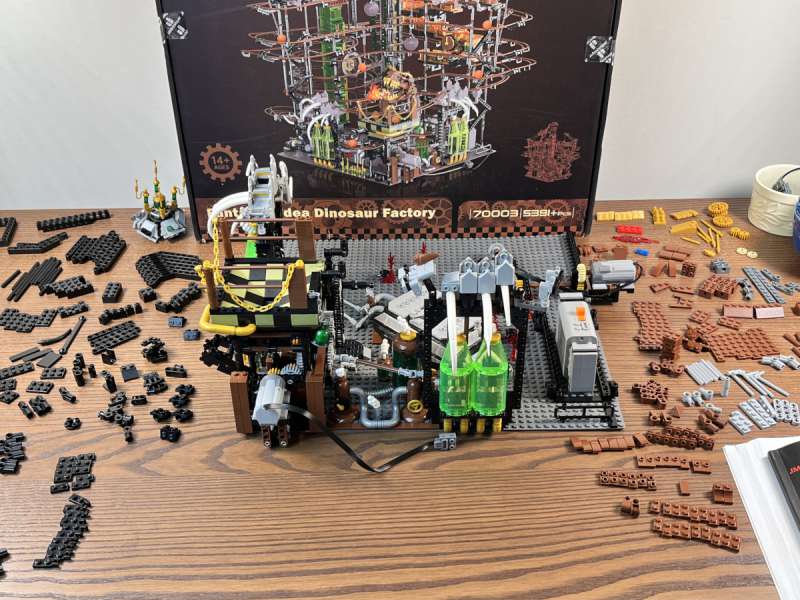
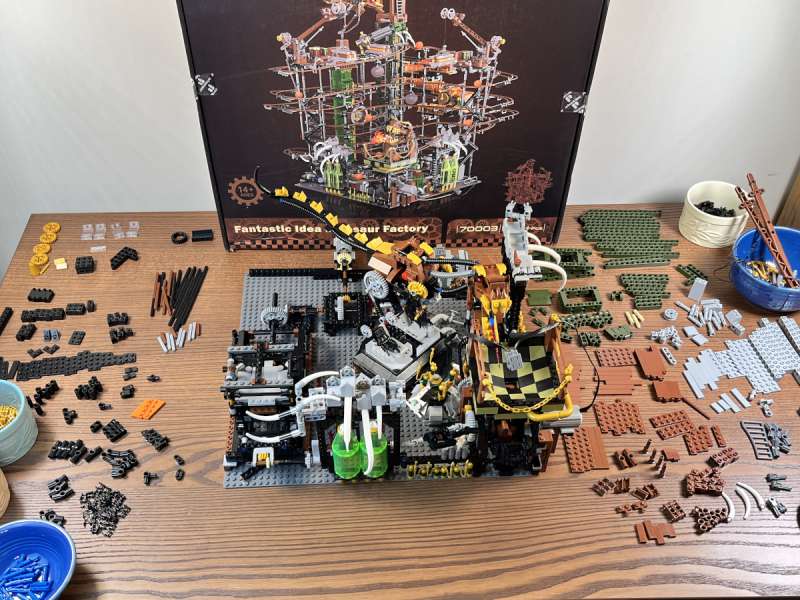
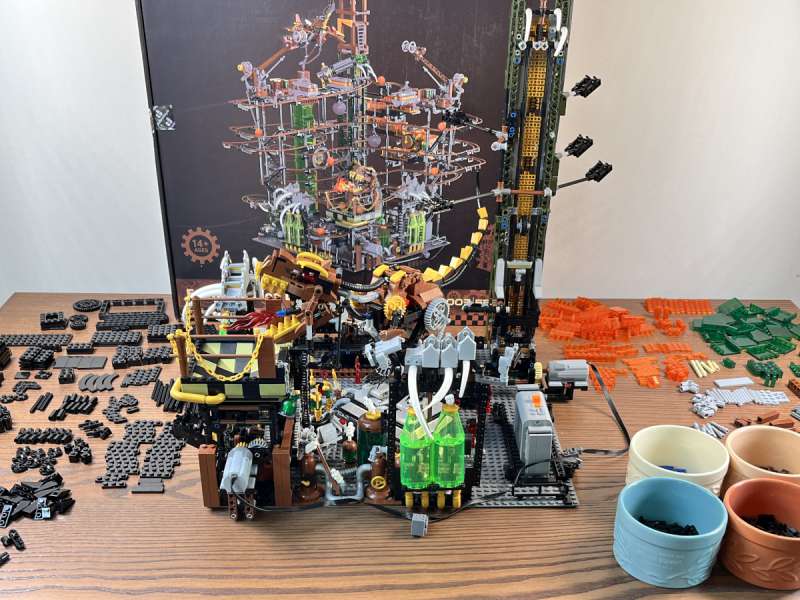
The box for this set is impressively large, and inside there were more boxes. I found seven large bags labeled from one to seven, corresponding with the major build sections in the instructions. There was also a clear bag of the track tubes and some of the power pieces.
The first thing I did was set out the large, gray baseplate. This is quite possibly the most disappointing piece in the set. It’s thin and warped, and the corners bend upward. Even after building the entire marble run, this baseplate doesn’t lay completely flat.
Section One
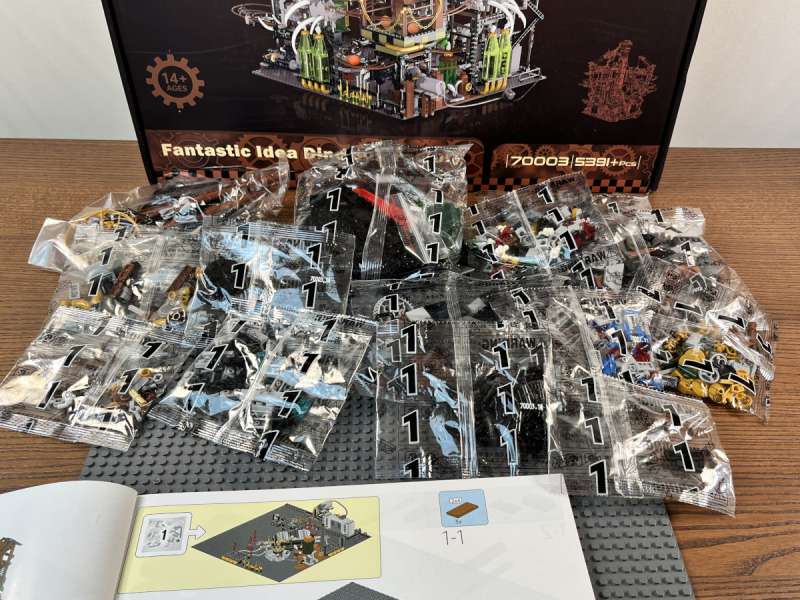
I opened the first bag and found that it was in turn full of smaller bags that had the bricks in them. I opened all of these bags and set out the pieces, organizing by color and by type. There are so many pieces in just this bag. I wish that JMBricklayer had split the marble run set into ten to twelve sections instead of just seven.
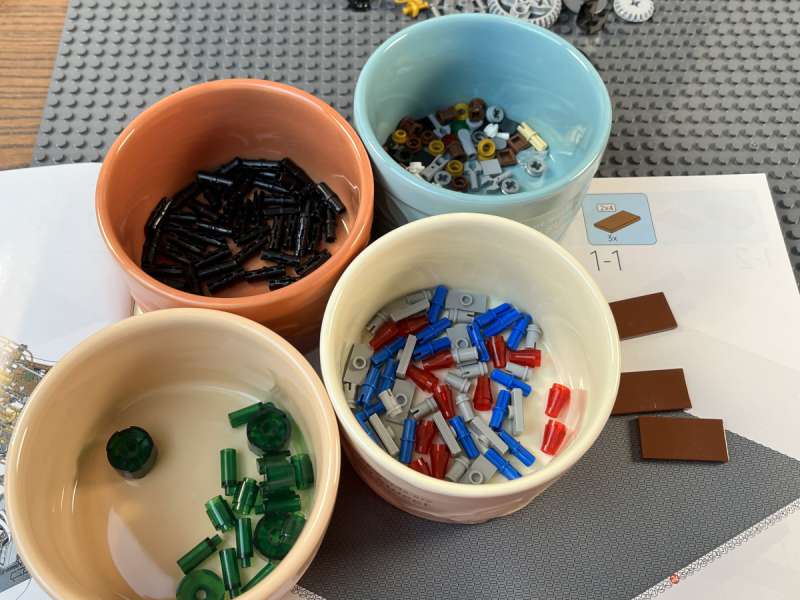
There are many, many little pieces in this set, so I grabbed a set of ramekins from the kitchen to hold them. At this point I realized how much space this build would take, between building on the baseplate, setting out 700 pieces, spreading flat a large manual, and maintaining a small build space. I built most of it on a spare desk in my office, though I did move it to the kitchen table for part of the build.
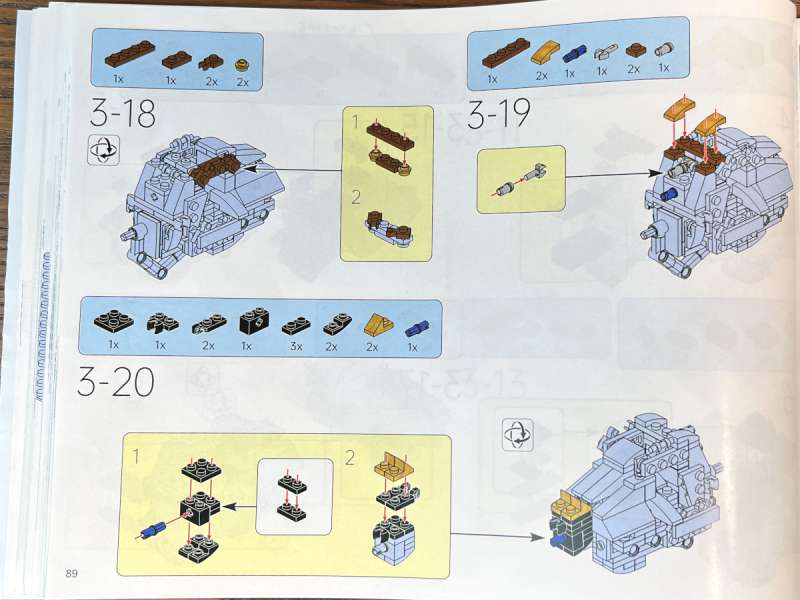
I opened the manual to the first section and found that it gave a preview of what would be built in section one, something that I appreciated. Previous steps are grayed out. Normally this approach of distinguishing the current step from past steps is just fine, but it turned out to be a pain for the marble run. There were many times where I was trying to figure out where to add something to this massive structure, and with everything gray it was hard to know what I was looking at. Many of the steps only had a few pieces, which makes building fast and easy; probably a fifth of the steps, however, had a lot of pieces (more than ten), which slowed things down.
First thing I built was this mysterious, large box-like structure that rotates freely. I had no idea what it was until much later in the build when I place a giant robot dinosaur upon it. The structure isn’t actually allowed to rotate, but I think they did this to get the dinosaur in exactly the right position, since the track actually flows through part of its body. Clever. And let me say that there are many clever parts to this set; the designer found several ingenious ways to build and lay out things.
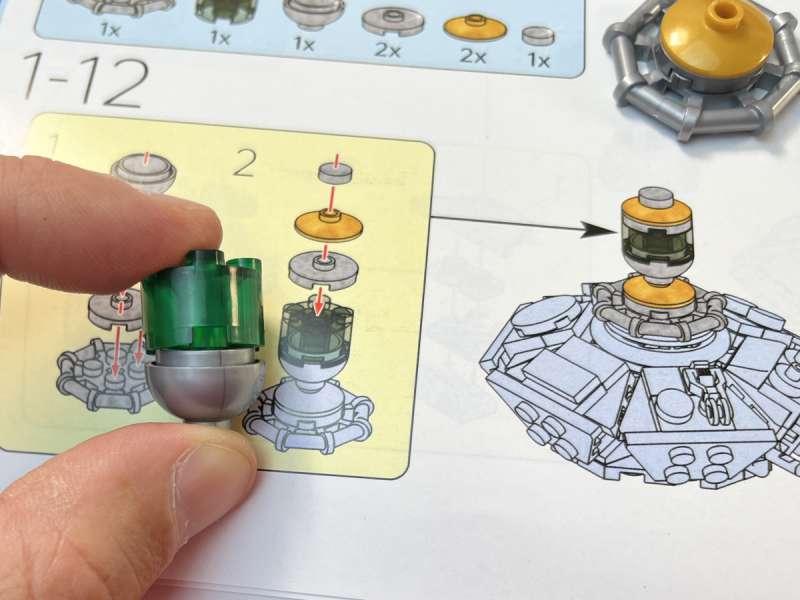
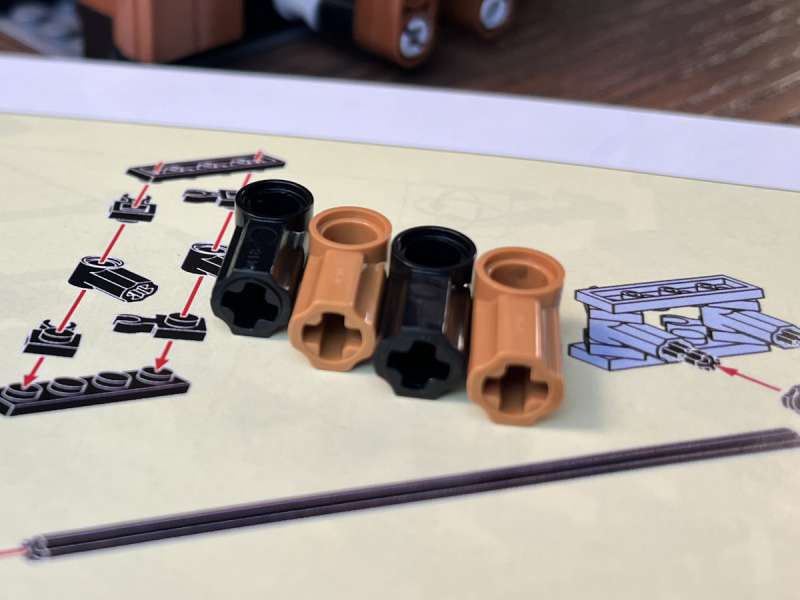
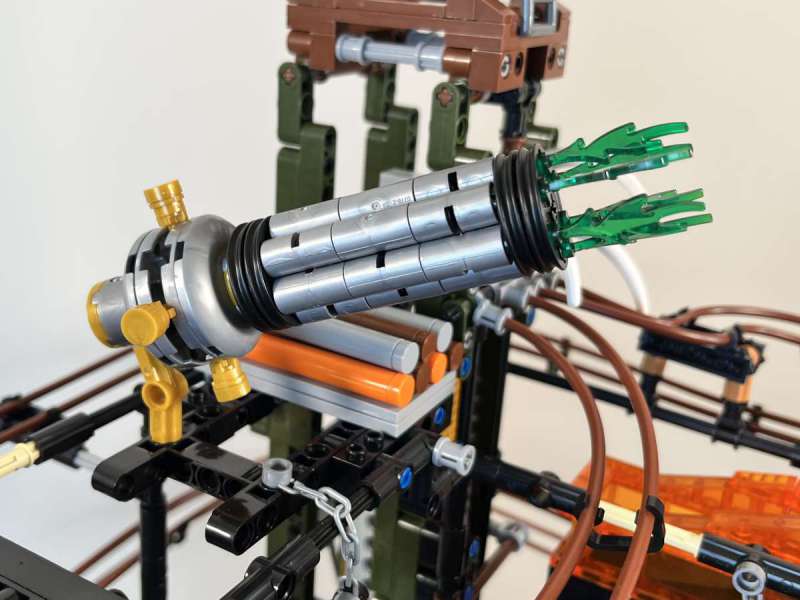
The next thing was another odd structure, a six-sided contraption with a glass container on top. This is where I ran into my first build problem. The silver half dome physically does not fit on the green glass cylinder; it should, but its rim is slightly too narrow. Knowing that JMBricklayer prides itself on good support, I sent an email with a picture and asked how to resolve this problem. Their answer was, “The piece should be pressed directly into place, though it may require a bit of extra force.” Wait, did I just get Steve-Jobs’d? Yes, I did. Just press harder. I’m holding it wrong! Sigh.
Thankfully this entire structure is purely ornamental, so I just skipped this piece and built around it. Nothing lost.
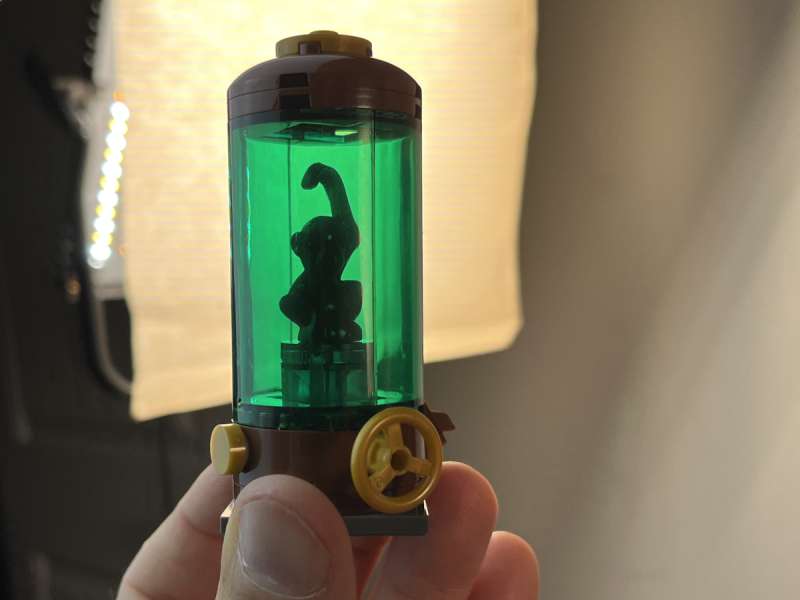
The manual for the Mechanical Octopus came with an amazing backstory. It described why we need them, what they do, and why they have certain features. This marble run set desperately needs a backstory as well. Why do I say this? There’s a monkey in this holding jar that looks like it belongs in a mad scientist’s lab. In a later step, there’s a decapitated minifig head in a smaller jar. Kinda dark stuff for a kid’s toy! Why on earth is this needed to build mechanical dinosaurs?! What’s in those gas cylinders and wooden barrels up top? I need to know! Like I said, this manual needs a backstory to explain this stuff. If they ever write it, it’ll be a hoot to read.
In step 1-19 I found the first time where I have to cut something to the right length. Most of these will be done much later (in section 6) to build the tracks, but some of these earlier steps used them for decorative effect. The instructions suggest using a pair of scissors, but I found a good pocket knife worked better. Each page has a true-to-length cutting guide, which made it really easy to know how long to cut them.
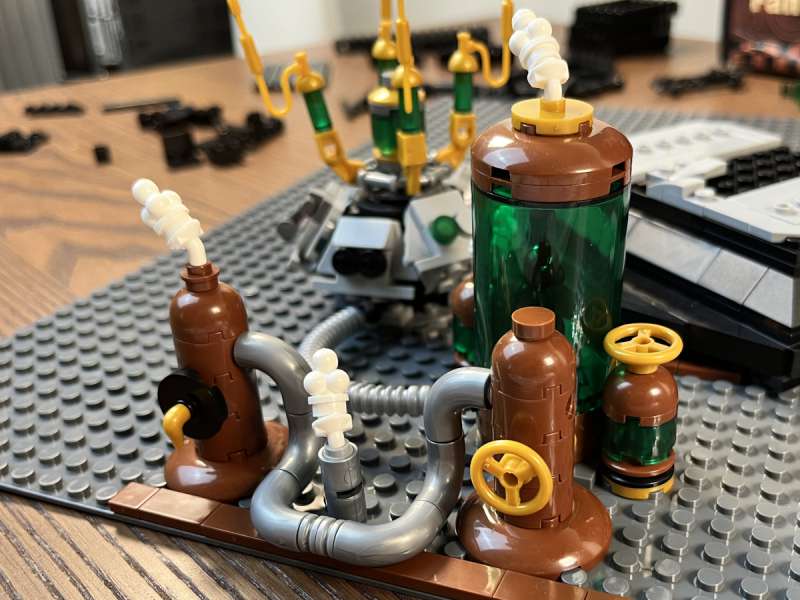
The front of the box says that this is a steampunk marble run, and there are a few places around the set where steam is escaping from cylinder, pipes, and tubes. None of this impacts the marble run itself, but it does add some nice flavor.
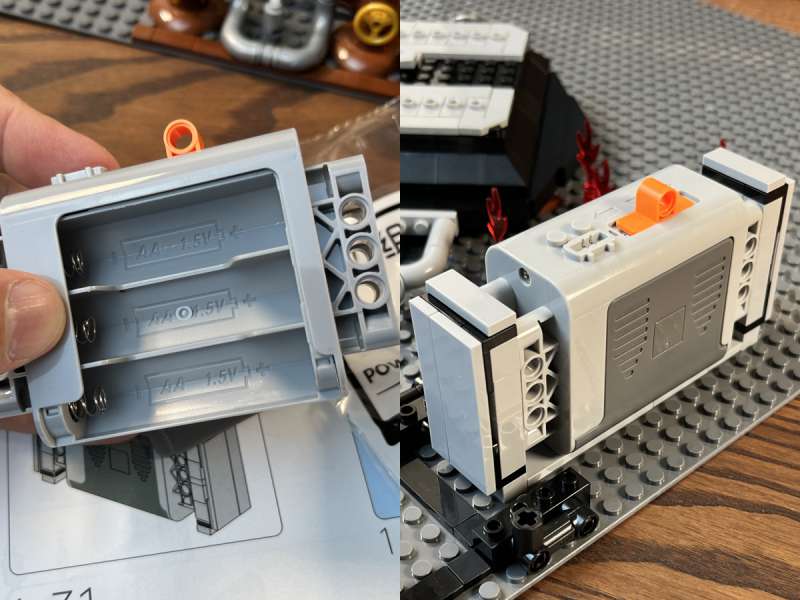
In step 1-31 I opened the power unit bag, which had the power source. It’s a housing for six AA batteries, three on each side, to which bricks and Technic pieces can be added. It will eventually be secured to one side of the baseplate. I really, really wish JMBricklayer would provide an option for a DC power supply. This set chews through AA’s like there’s no tomorrow.
Step 1-38 has some extra help. There’s a note that shows a pair of Technic pieces. One is labelled “loose” and has a green check, and other “tight” with a red X. Clearly I need to pick the loose piece, but the pictures of the pieces are identical. What is this step trying to tell me? There are several places like this in the instructions, and I never did understand what I was supposed to do.
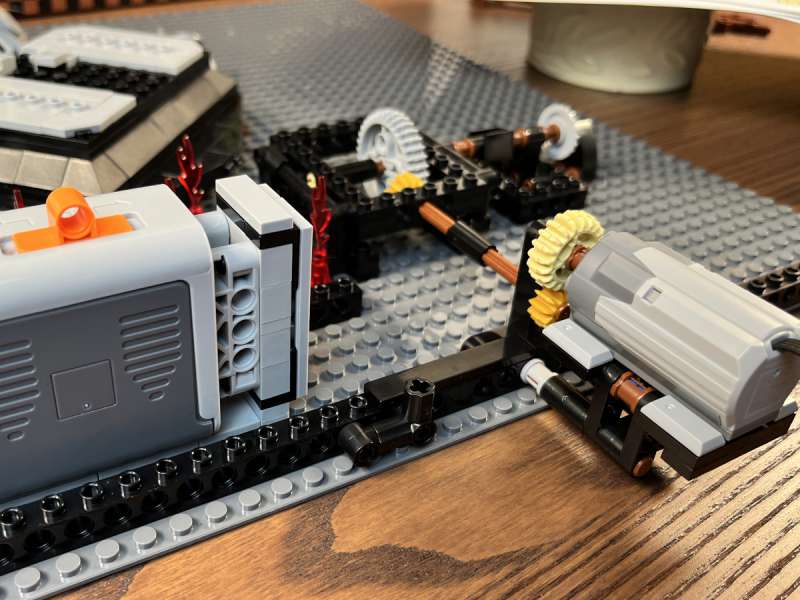
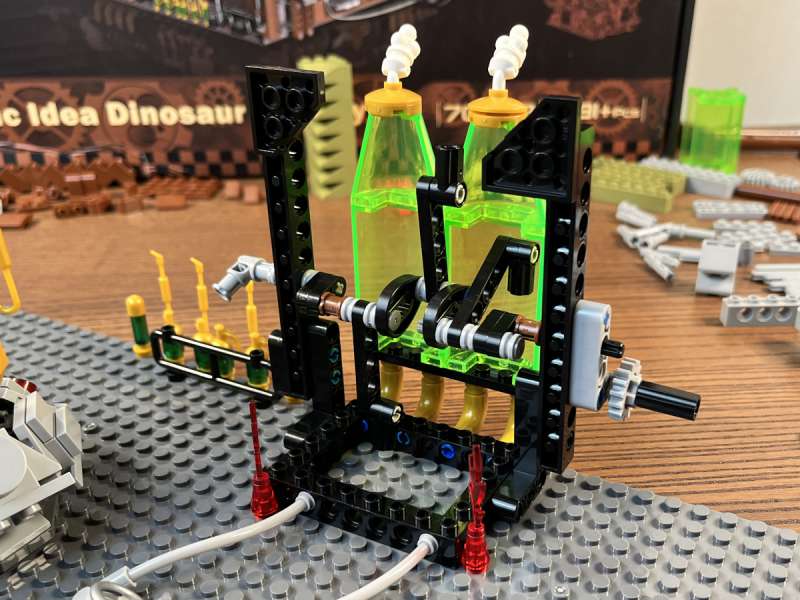
Finally, the first motor made an appearance, and it’s connected to a set of gears. These will eventually be used to power all sorts of moving parts, of which there are many. The manual has a serious flaw: There are no instructions anywhere to test the build so far; in other words, the motor should be able to turn the connected gears, even though they don’t really do anything. The manual waits until the very end to test anything. The smart thing to do is connect the motor to the batteries and give it a try now, because if there’s a problem with the build, it’s way easier to fix. I gave it a try, and it worked great. I continued to do this throughout the build, and occasionally found that I needed to make small changes.
Section Two
I set everything up for section two and began building. In step 2-1, I found a problem that I would find again and again in the manual. The steps for building the assembly are clear, but when it came time to connect it to the rest of the build, it was not clear. There are three holes in this L-bracket, but I can’t tell which two I connect. If the manual just added a cutout from a different angle, this would be clear as day. To be fair, the manual does do this occasionally (as in step 2-9); it just needs to do this consistently. I experienced so much frustration from having to guess where assemblies connect, and more than once I had to redo some building because I had guessed wrong. It’s hard work looking at every step in a manual from the eyes of someone building a set for the first time, but JMBricklayer needs to go back and do this for everything in their manual.
One of the funnest things about this set was guessing what I was building. Here is a set of gears built behind more of those mad-scientist jars, and I had no idea what it would turn into. Fun! (Spoiler: It was stair steps for the marbles.)
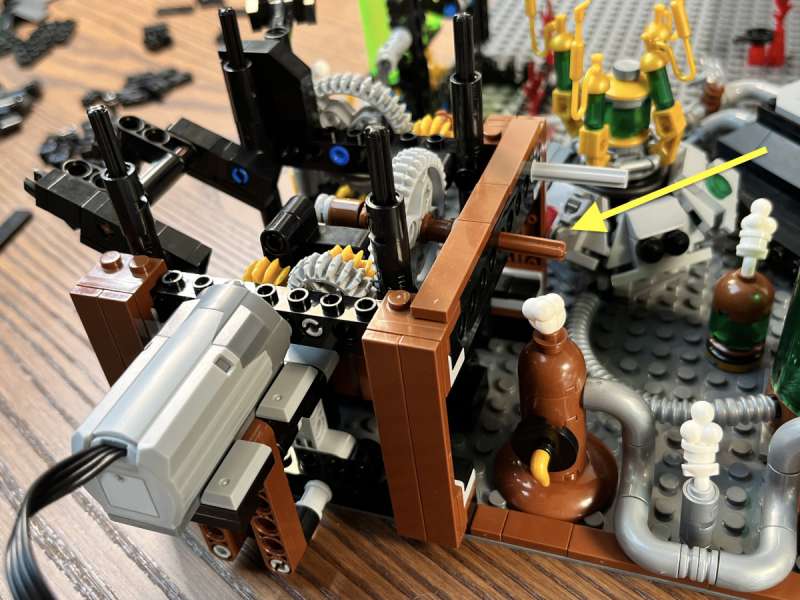
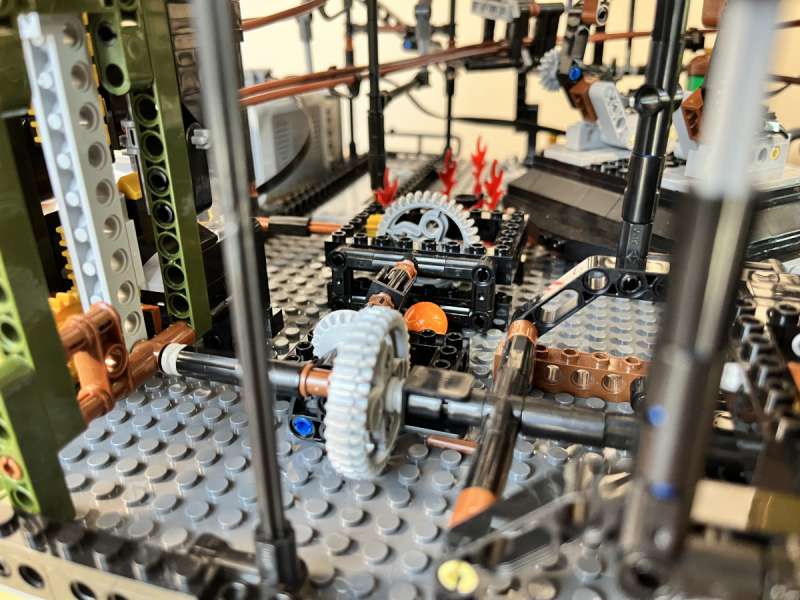
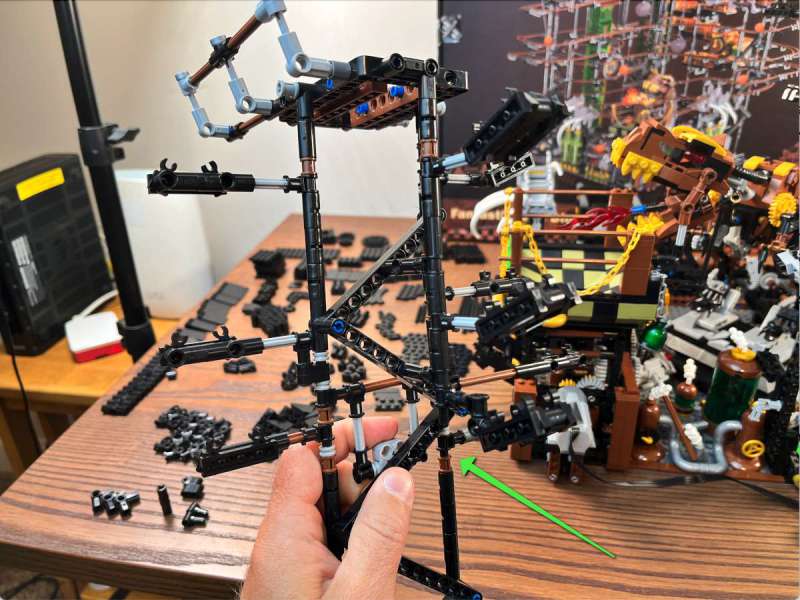
There’s a fairly large structure that houses a lot of the gears that will power the run. I appreciate how the designer added these brown, flat pieces on the front and back to reinforce the build–these gears do create a lot of stress–but I couldn’t physically get my hand around the back to add them at the bottom because that decorative, six-sided cylindrical assembly is in the way (see the yellow arrow above). That should have been moved over, or they should have been assembled in a different order. I took the assembly off and left it off for the longest time.
The second motor made its appearance here, and everything worked great when I tested it. This set has a great way of building anticipation! All these motors and gears are going to lead to great marble run!
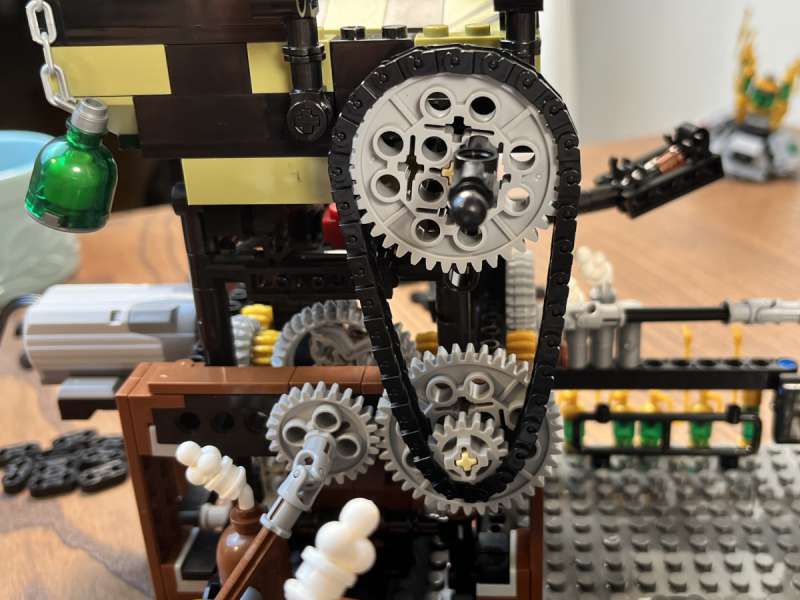
Check this fabulous piece out! It’s a chain, very similar to a bike chain, that I had to build from 33 little links. I’ve never built anything like this, and though it was a wee bit tedious to assemble, it works great! (Oh! And notice the decapitated minifig head in the green jar that I mentioned earlier. Yewww!)
At this point I tested the motors and gears again, and everything still works.
Section Three
Once again I set up all the pieces and began to build. I began building what would be the center of a mechanical dinosaur when I encountered an unexpected problem in steps 3-15 and 3-16: The two black corner pieces would not both fit on the 1×2 flat piece; the top section was too long. I solved the problem by getting my pocket knife back out and trimming off some extra plastic from the end. While I made it work, it again testified to the lower quality of some of the blocks that were sourced.
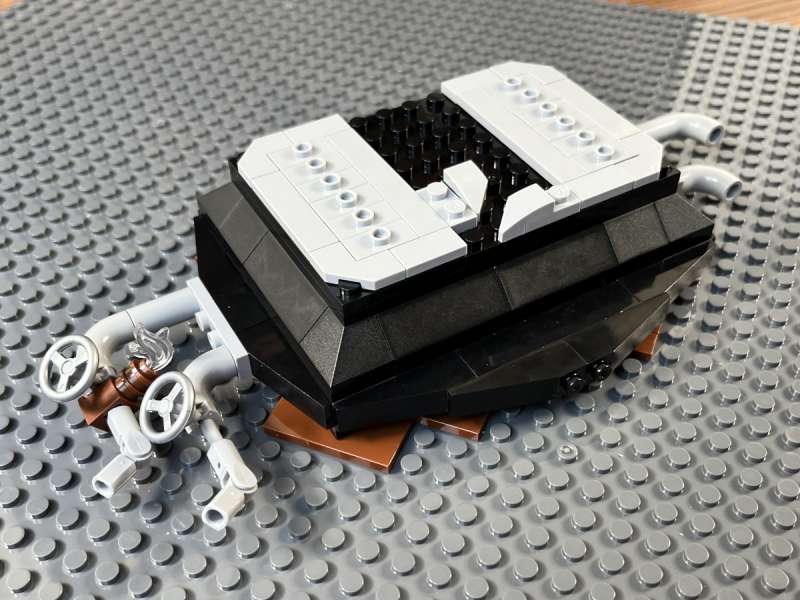
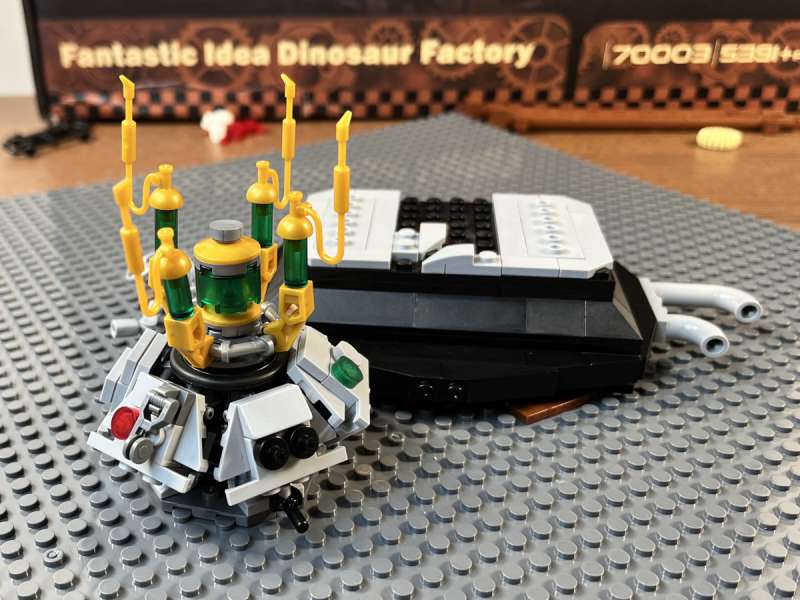
A good bit of section three is building out the mechanical dinosaur that reigns in the middle of the set. The hole through the center of its body is actually part of the run itself, which is very cool. And check out that tail! The dino rests on the structure that I built at the very beginning of the set. It’s very stable, which is good, as it will hold tracks up later.
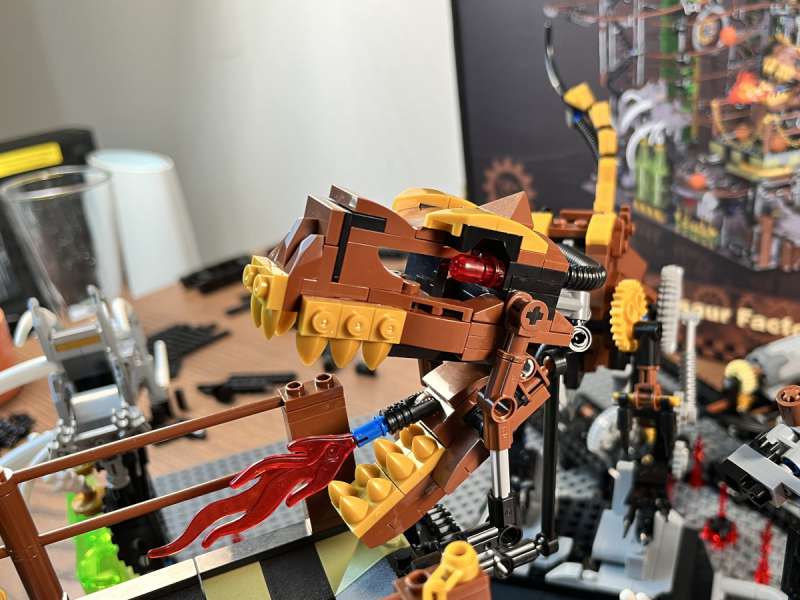
It’s a fire-breathing t-rex! The base of the jaw is connected to one of the gears that cause it to move up and down, and the fire coming out of its mouth will be able to alter the trajectory of the marbles. There really are a lot of clever design aspects of this build; someone thought a lot about what they were building.
In step 3-48, the instructions have a red arrow showing where to connect the black connector, but it’s in the wrong hole.
I spent many steps building this large contraption without knowing what it was. I later learned that it’s the base of the corkscrew elevator. Once I finished this bag, I again connected the motors and found everything was still working.
At this point, everything has been building in an outward direction; in the next section, I’ll begin to build up!
Section Four
There are lots of long, structural Technic-like pieces in this bag, which will be used to build the elevator.
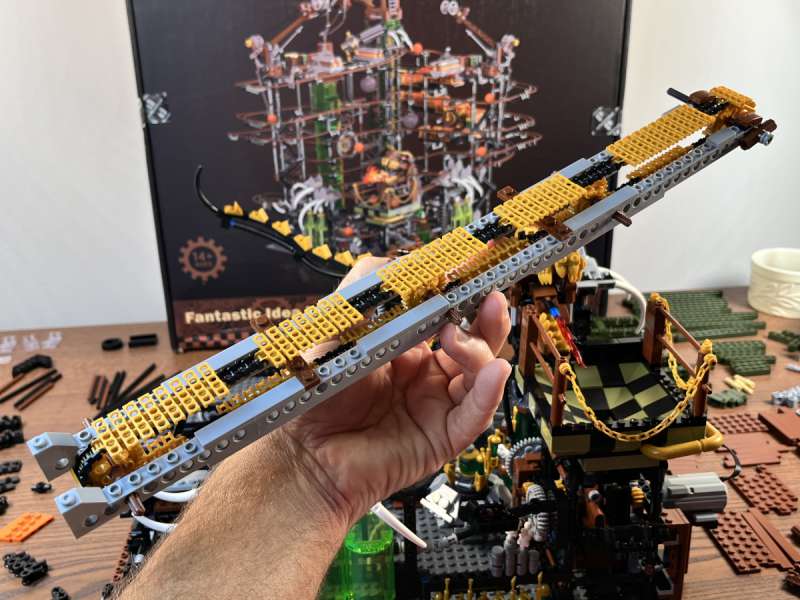
Much like the chain I showed about, the elevator was constructed from individual links that I linked together one at a time. It may seem that something like this wouldn’t come together, but everything connected perfectly. This section will be raised vertically, and the yellow sections will carry the marbles from the bottom of the run up to the top.
In step 4-20.5, I found the first of several pieces that were not included in the set. One of the flat gray Technic connectors was missing, and I had to pull one from another set. If you buy this set, don’t be surprised if you have to add pieces from your own collection, although JMBricklayer says they will supply any missing pieces.
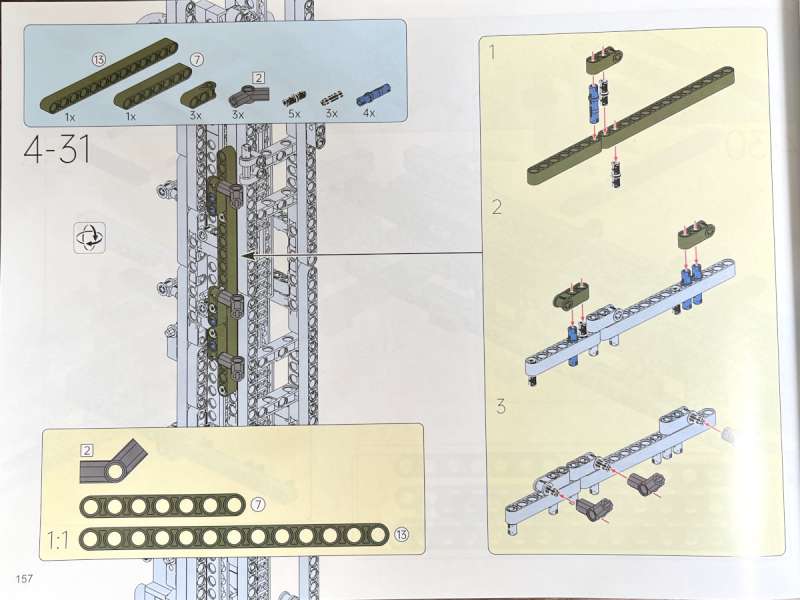
In step 4-31, I found another source of frustration with the manual. After building the assembly on the right, I needed to connect it to the main build. The list of parts above and below cover up too much of the main build, making it difficult to know where to connect it. This problem showed up again in step 4-42 and other steps.
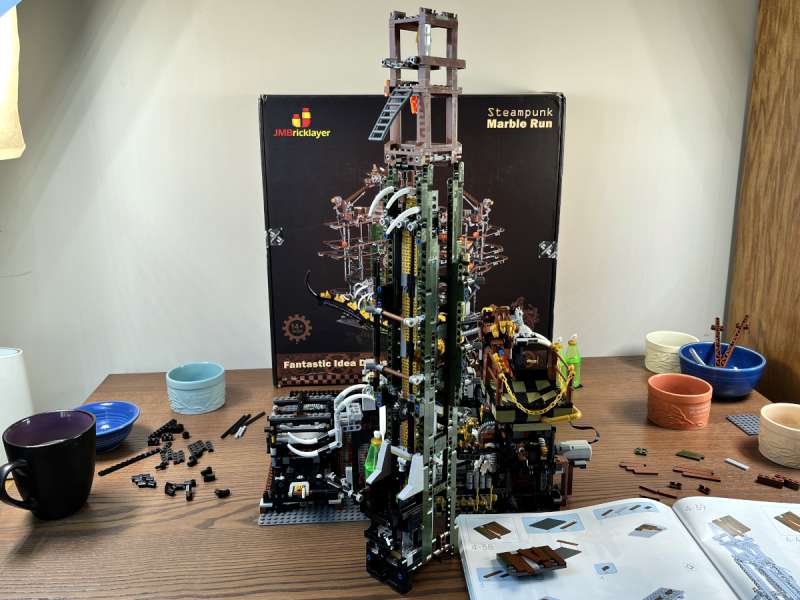
I finally finished building the tower around the elevator, and this structure is taller than the baseplate is wide. That’s outstanding! There should be plenty of height to keep the marbles rolling downhill.
I had built a few of these little guys before I had a light bulb moment: These are what’s going to hold the tubes that will be the tracks for the marbles! What I would not understand until later is that the angles of the four small pieces has to be exactly right. Too wide and the balls fall through the track; too narrow and they fall over the side. So what is exactly the right angle? I don’t know. I just guessed and built a lot of these. Later on, I would have to remove every single one of them and adjust them to the perfect angle. So much pain and frustration could have been saved if JMBricklayer would have made this clear up front. They should build a little template that I could hold up to the build to compare the angles and adjust them.
Finally! I finished book one! I was rewarded with a massive tower, a mechanical dinosaur, two motors, a lot of gears, and some places to connect tracks. It looks like a lot, but there’s still a lot more to go! I tested the motors again and found that there was a lot of slipping with one of them. At first, I thought there was too much load, but as I worked through what I had built, the problem was simply that some things were not tight enough. I had to press all the bricks together firmly, and then it began running smoothly again.
Section Five
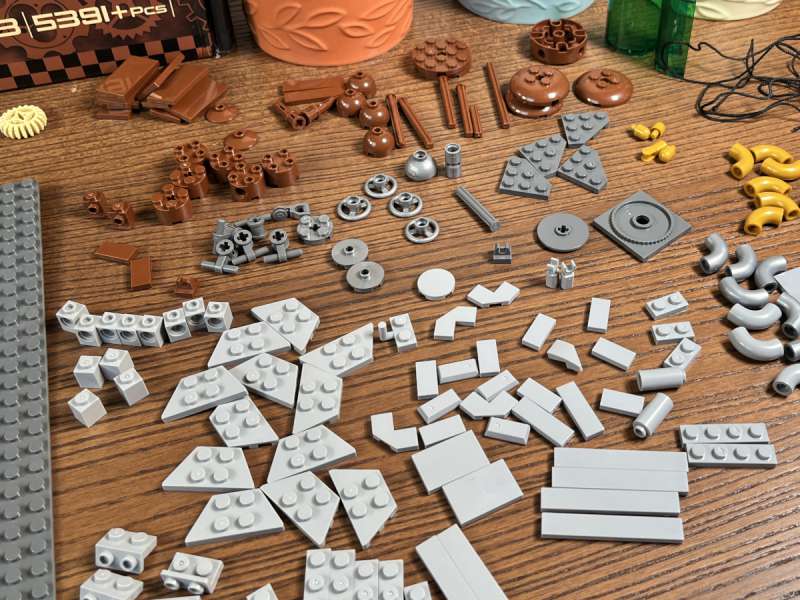
I laid out all the pieces once again, and I was excited to see where all these orange and green glass ones would go. They should add a lot of color to the set.
This section builds a lot of scaffolding using Technic-like pieces, especially long axles. Occasionally, the instructions left gaps in the build whose lengths were not explained or measured. Again, this was a source of frustration, as I didn’t know how to build it right. It wasn’t until the end that I realized this was intentional, as it allowed me to slightly raise and lower the arms that hold up the tracks. It’s a good idea, but I wish JMBricklayer had simply included a note explaining this up front.
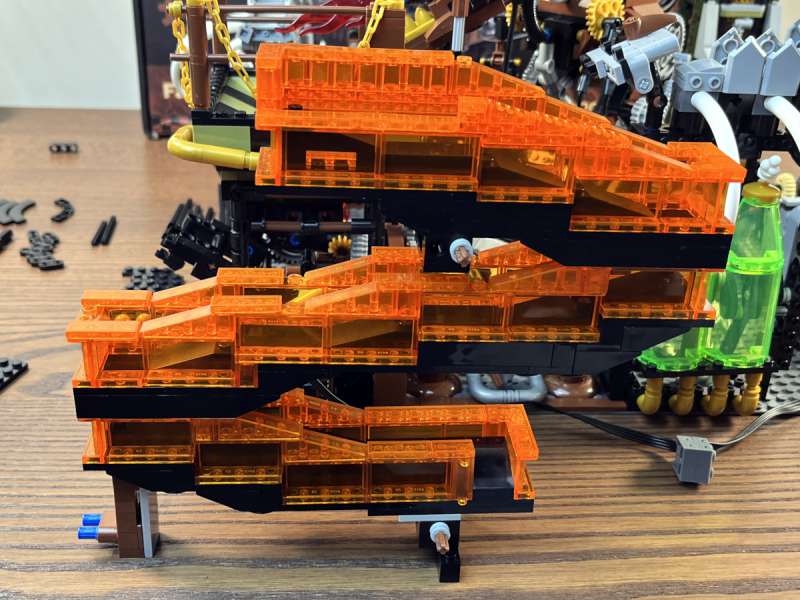
This chute is one of my favorite parts of the marble run. Just as you would expect, marbles enter at the top and then wind their way down.
Somewhere in this section I ran across these two deformed pieces. Look carefully at the picture above. (I apologize for the blurriness.) Notice the angle of the “plus” on the ends. The black ones are not square; they are off by 10 degrees or so. This means that nothing I connected to them lined up correctly. I set them aside, hoping that I would not need them, but there were no spares, and I don’t have any of these in my own collection. Eventually I had to use them to hold up some of the tracks, and they contributed to the problems that I had with the tracks. Defective pieces like this should never exist in a building block set.
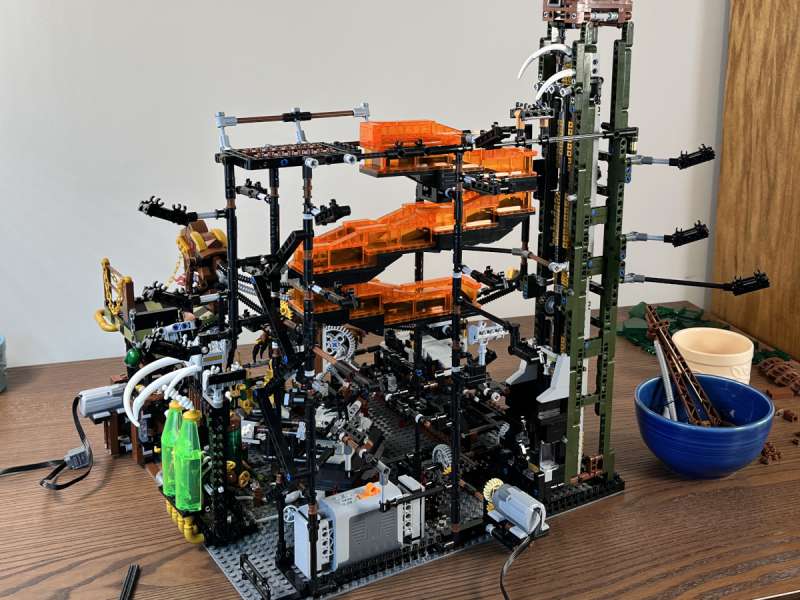
This huge scaffolding, including the chute, was added to the base and connected to the tower.
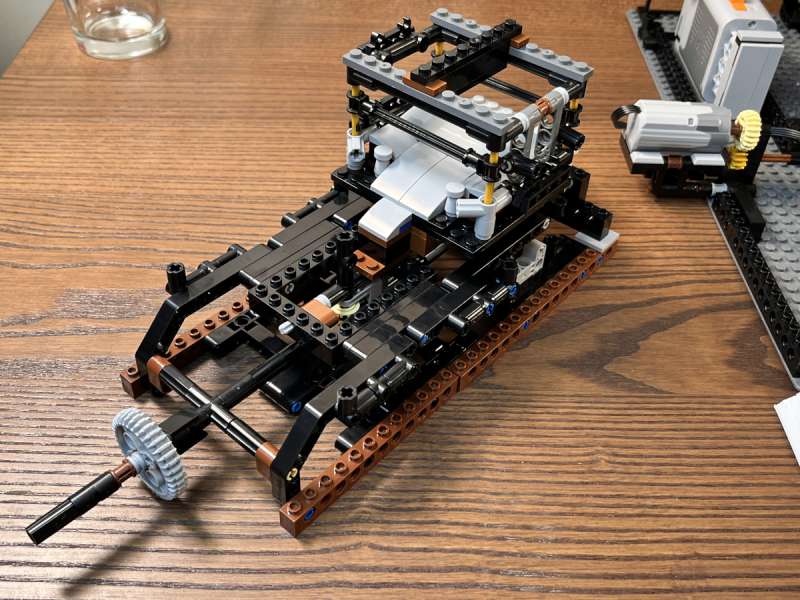
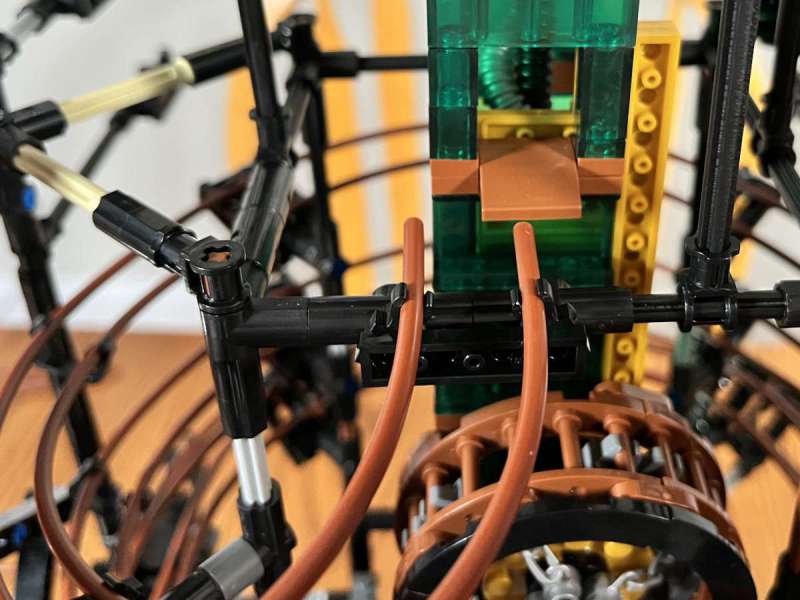
Step 5-39 was probably the strangest thing I have ever built with building blocks. It’s a corkscrew, a flexible tube wrapped around a rigid tube, and it will be the second mechanism used to raise marbles to the top of the run. It’s the same concept as an Archimedes screw, which I’ve seen in the Netherlands for raising water. The manual said this would be hard to build, but I found it easy, probably because the instructions on this step were very clear.
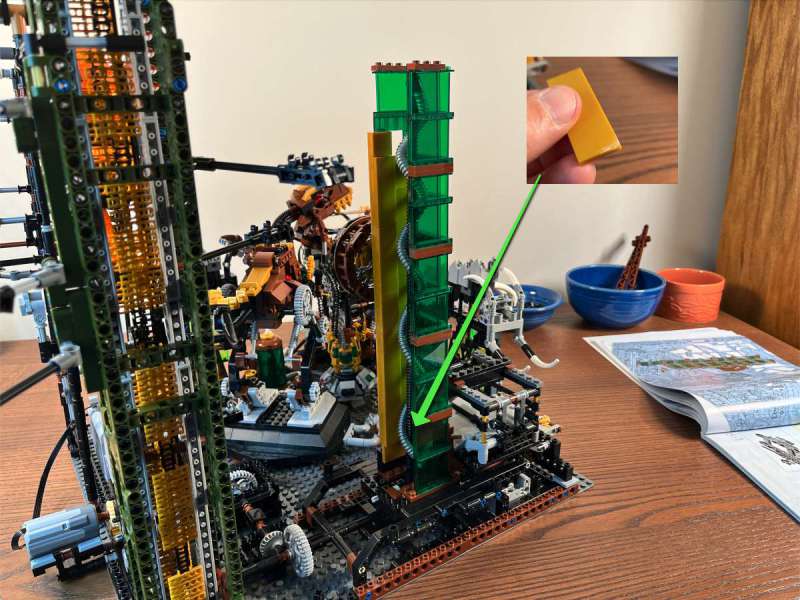
I built the chute around the corkscrew using those green glass pieces. Along one side was a set of gold pieces that formed a groove, which holds the marbles in place as they ascend. The bottommost piece, however, kept catching on the gray tube, preventing it from rotating. Once again, I had to get out my trusty pocket knife to carve off some of the plastic, and that solved the problem.
Section Six

Gabe (age 13) and Zach (age 11) came over for a couple hours to help me build out the scaffolding around the corkscrew. These guys have helped me in other builds and never had a problem, even when they were younger than the set recommended. JMBricklayer suggests an age of 14+, and that’s probably about right. The build is complex at places and requires a lot of attention to detail.
At this point, the core structure of the build was done. The gears were in place, the scaffolding was done, and the towers and chutes were ready. It was time to begin adding the tracks.
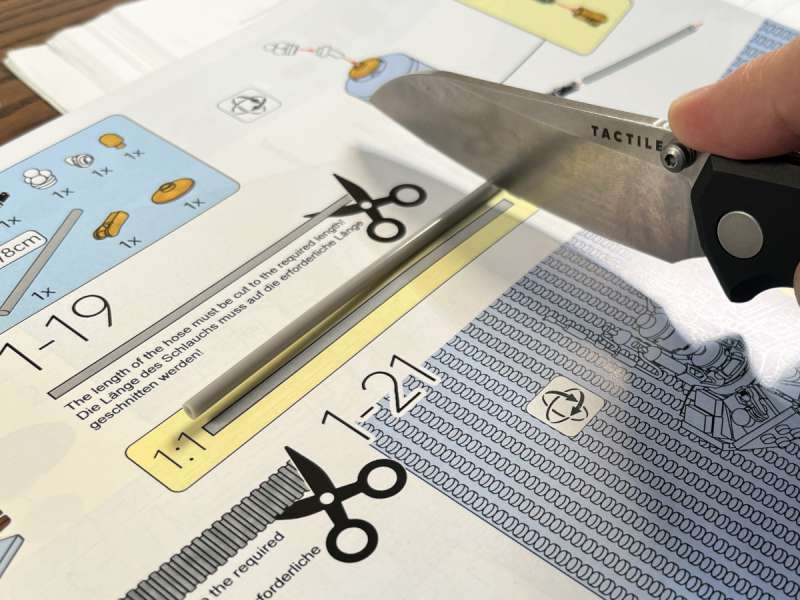
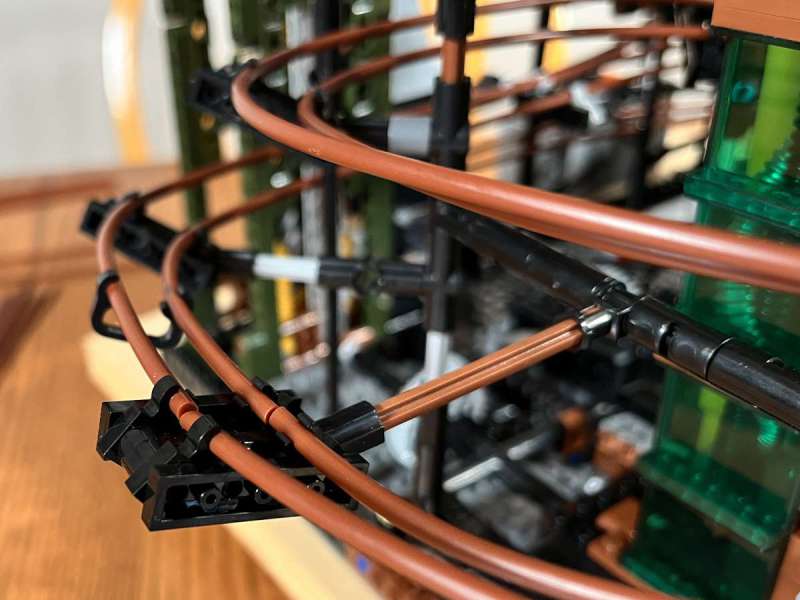
There are 31 pages of instructions for these tracks, and every one says something like this, “The hose with a length of 17.72in/45 cm and 18.27in/46.4cm must be cut with a 23.62in/60cm hose equipped with.” Terrible English aside, the point is clear: I need to find a pair of the 23.62-inch hoses and cut one to 17.72 inches and the other to 18.27. Say what?! Inches don’t work that way. The only way to cut these tubes to the exactly sizes is with a metric ruler, as cutting to 45 and 46.4 cm is pretty easy. My wife, a former teacher, just happened to have an 18-inch long wooden ruler that was perfect for the job! It was long enough for most tubes, and I could actually cut right on ruler itself with my pocket knife. If you plan to buy this marble run, do yourself a favor and go buy a long, wooden ruler with metric measurements.
Adding the tubes were by far the most painful, stressful, and frustrating part of the project, for many of the reasons I’ve already mentioned. Every support had to be taken off, adjusted, and put back. These supports were often fragile and repeatedly fell apart. I had to work with pieces in the interior of the build, and sometimes my hands simply didn’t fit where they needed to go. The instructions do not clearly show all the connections that the tubes need to make. I got it all done eventually, but it wasn’t fun.
I did have one good idea that made this work easier. I put the baseplate on a piece of plywood and set that on a lazy susan. This allowed me to rotate the build around and quickly change where I was working.
As you can see in the picture above, JMBricklayer included a ton of little C-shaped connectors called snap-fits that hold the tubes near each other and at the right angle. These pieces are insanely helpful, and thankfully there are a lot of them.

I tested everything as I worked, and many parts of the build simply didn’t work. In this example, the marble–the marbles are actually plastic and look like a cross between a basketball and a soccer ball–is supposed to roll through this box, but it doesn’t even remotely fit. I had to disassemble part of it to make this work.
I spent a lot of time adjusting things so that they lined up and allowed the marbles to roll freely.
I finished adding all the tubes and testing and fixing individual sections. I had not, however, tested the entire system as a whole.
Section Seven
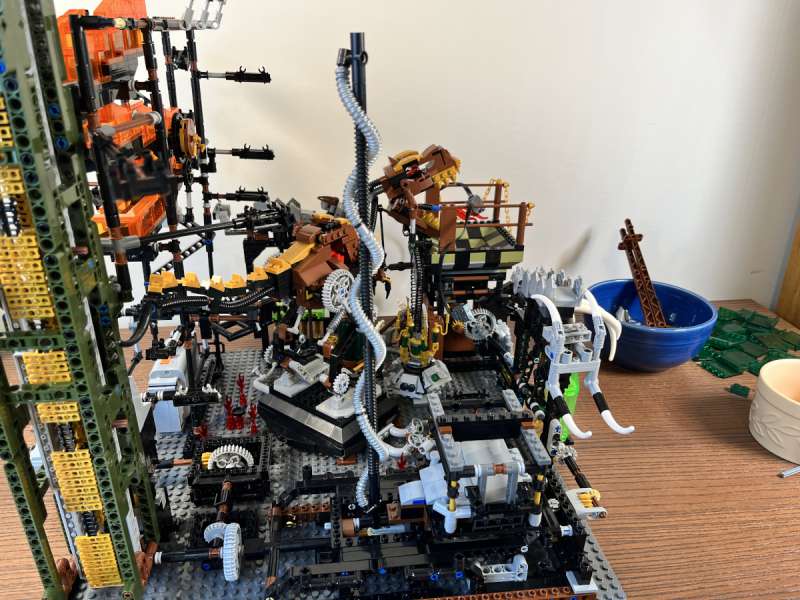
Most of section seven is cosmetic, adding cool extras to the top of the marble run structure. There’s a giant water cannon, a pair of cranes, and several sets of gas containers and barrels.
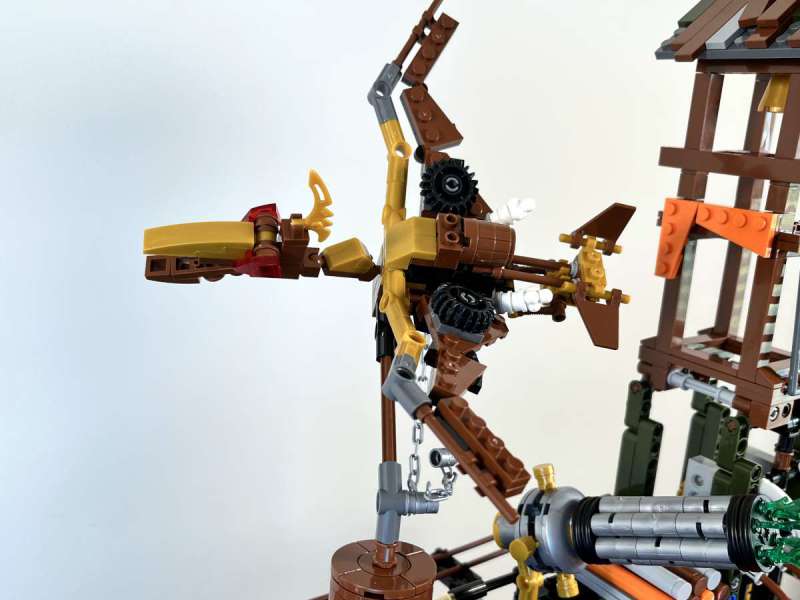
One part that is not purely cosmetic is this mechanical pterodactyl that is chained to a pole and forced to fly forever in circles. Its pole descends down through a cylinder and connects to the top of the corkscrew, keeping it vertically aligned. Once I added this, I decided to pause the rest of the build to be begin final testing. I gathered all the marbles–there’s not very many of them–and dropped them into the orange chute at the top. I needed to know if the marbles would flow all the way from top to bottom and back up again. They didn’t.
I spent about 90 minutes tweaking the build by raising and lowering the supports that held the tubes, widening and narrowing the tracks, adding and removing the snap-fits, rebuilding and realigning small assemblies, and just doing anything I could make the marbles flow. I got a lot of things working; in fact, it almost all works.
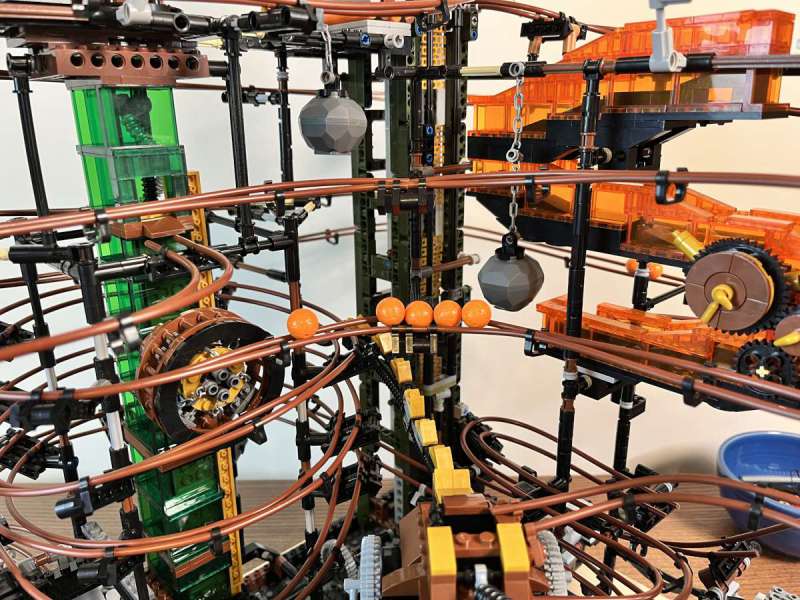
But not all of it. There’s this one stretch of track on an inside curve and two long stretches on the backside where the marbles just stop. The manual has four pages of hints on how to fit problems–that alone tells you something about this set–including what to do if marbles stop on the track. I can check the length of hoses, adjust the angle of the track, and remove some of the snap-fits. These are all good suggestions, but they were not sufficient. The marbles get stuck. At the end of the day, the biggest problem is that there is not enough decline in these parts of the track. JMBricklayer has a tutorial page with additional hints that says, “Sometimes, ball accumulation occurs. We just need to use a small stick to clear it and restore smooth movement.” What! No, this is not acceptable. They know they have problems with their design, but instead of fixing it, they want me to get a stick and push the marbles down the track. Why bother building a marble run at all if the marbles don’t run all the way? There’s some small consolation in knowing it’s not me; it’s the design.
Here’s a video showing the good and the bad of this set:
What am I going to do now? I suppose it’s possible that with a few more hours of tweaking, I could make this work, but I don’t really want to. Building a LEGO set should not involve this kind of tedious, mind-numbing work. JMB stands for Joy Makes Brilliance, but there’s not much joy in this set. JMBricklayer should re-design this set to have a sufficient decline angle so that the marbles always flow downhill, even when the track is not setup perfectly. One of the things I might do after this review is rebuild it myself to make it do that.
For now, it only mostly works.
What I like about the JMBricklayer Steampunk Marble Run
- It’s a LEGO-compatible marble run!
- A massive set of pieces at a great price
- Motors and batteries and gears
- Multiple paths for the marbles to follow
- Two ways to raise them to the top (elevator and corkscrew)
- Many clever design choices
- Two mechanical dinosaurs
What needs to be improved
- Provide a DC power supply for the motors, because batteries wear out far too quickly.
- Build all tracks with steeper inclines so there are no “hot spots” where the marbles accumulate; this may require a design that is taller and/or wider, or it may reduce the total length of the track.
- Design a more robust track system, perhaps using larger, hollow tubes that the marbles travel inside.
- Redesign the entire order of the steps to build from the inside to the outside and from the bottom to the top.
- Provide instructions for testing the gears and the tracks all along the way so that problem areas are found quickly and fixed more easily.
- Build a template for the little track holders so I know exactly what angle I should use.
- Add a hopper at the top of the marble run so I have somewhere to start the marbles.
- Redesign the interior to collect marbles that fall off the track and shunt them down and out to reservoirs that collect them; this would make it easier to retrieve marbles. Better yet, design one or more elevators so that they automatically collect the marbles from these reservoirs and elevate them to the top.
- Carefully look at every piece, replacing those that are deformed or won’t connect without trimming by knife.
- Work through the manual and make things a lot clearer. This will take a lot of extra pages, but it will be worth it. Provide extra information throughout the build to help builders understand what they are building and why.
- Include extra tubes.
- Provide more marbles or at least a place to buy more.
Final thoughts
This is an insanely ambitious project. JMBricklayer is attempting to design something that not even LEGO has done. There’s a lot to love about this marble run, and I really want it to succeed. There are, however, too many things that make it frustrating, not the least of which is that I have so far been unable to get it completely working.
The JMBricklayer Steampunk Marble Run is currently on Kickstarter. Should you support it? Most people should probably not support it. This set feels like it is still in the prototyping stage, and there are just too many things that need to be improved. The Kickstarter page says they are shipping in August, only two months away, which implies to me that they are not planning to take the time to fix the problems. The frustration won’t be worth the reward. If, however, you want a marble run, are willing to spend the extra time tweaking and rebuilding, and you don’t get frustrated easily, then by all means support it. Good luck!
Price: $125 on Kickstarter, $190 on JMBricklayer
Where to buy: Kickstarter or JMBricklayer
Source: The sample for this review was provided free of charge by JMBricklayer. JMBricklayer did not have a final say on the review and did not preview the review before it was published.

Gerber Gear Suspension 12-in-1 EDC Multi-Plier Multitool with Pocket Knife, Needle Nose Pliers, Wire Cutters and More, Gifts for Men, Camping and Survival, Grey
(as of March 27, 2026 18:27 GMT -05:00 - More infoProduct prices and availability are accurate as of the date/time indicated and are subject to change. Any price and availability information displayed on [relevant Amazon Site(s), as applicable] at the time of purchase will apply to the purchase of this product.)
Gadgeteer Comment Policy - Please read before commenting
We are the JMBricklayer team and we sincerely appreciate your detailed review of our product. Our primary goal in sending you the sample was to identify areas for improvement and optimize our sets.
We have carefully reviewed your feedback and are actively working on the necessary modifications. Our technical team is dedicated to making these improvements, and we are confident that the new and improved version of the set will be ready for our customers and supporters by September.
Thank you once again for your valuable insights.
Outstanding! I’m so glad to hear this. I’m confident that you can address each of these issues and turn a good marble run into a great one! Your customers are gonna love it!
BTW, congrats on getting funded so quickly. This means you’re making a product that a lot of people (including me) really want!
I won a car kit from Bricklayer so I should not complain but I will. This is about Bricklayer’s customer support. I had some parts missing which was not unexpected as there are a lot of parts in the kit. Bricklayer has a good customer support site where you can request missing parts but unfortunately once you order the parts you may not get them. I requested the parts and 20 days later they has not come. After repeated e-mails to the company I finally got this totally unacceptable reply –
“Thank you for contacting us. Sorry for the late reply.
Since we have stopped selling your product, we need to find these parts, which will take some time. We will send the parts to you from China in a few days.
Thank you for your understanding and patience.”
My missing parts were not unusual shapes so they should have had them in stock. I was thinking of buying another kit once I finished building my car but I guess that I will not do that.
You should rethink reviewing any more Bricklayer kits.
Hey Donald, thanks for sharing your experience. I have to say, I don’t think JMBricklayer’s response is unreasonable at all. They don’t manufacture their own bricks; they source them from other companies. If they no longer sell a product, it’s not surprising that they don’t keep spare parts around. If I were you, I would be happy that they are still willing to look for and mail you spare parts, especially when you got this set for free! In the mean time, you might be able to fill the missing bricks with other LEGOs from your collection. That’s usually what I have done. I know it’s frustrating when you can’t finish a build, but I’m hoping this all works out for you eventually.
I’m in the middle of the build, I was a supporter. I found the tube’s quite frustrating. A bit OCD, but I wanted to make sure I had enough when cutting the corrugated ones. It seems like I maybe didn’t have to worry. But I cut one and belatedly discovered there was a pin embedded in the end. Pulled that out and it fell into two sections, so now it was too short. I think there’s enough I can make do. Other places, like the bottom tubes on the trex head, they’re too short, I wish I’d cut them 5mm longer than instructed.
The tiny tubes on the bottom near the trex feet don’t really bend well into the instructions shapes. I used a hairdryer and that helped with the tight curve.
I expected FLEGO quality and it’s not horrible. A few bits are so loose I put a tad of Elmer’s glue in the fit so they wouldn’t fall off (the cool green cylinders and their tops for one).
Looking forward to completing it.
The instructions are tough. Things like implying you stick a bit on the end of an axle…. and then look at the next pix and it’s actually supposed to go almost all the way across the axle. 4-1 substep 3…. that’s not a bad one, it’s just the step I did last.
Little nerve wracking to have exactly the tiny parts in the first set of bags. We’ve found a couple totally failed molds, one of the barrels is only 1/4 there. (Not sure if we have all of them or not).
Many bricks are so tight you have to work to connect them. And a couple seem to want to spring apart later.
Some weird choices, like 4 technic pins in bag 3 that only go 1/2way through the brick. So not totally secure. Secure enough.
In the section section of ribs that lift the balls, one cam is designed to be so close to a link they can bind, and the torque tears it apart. I wiggled stuff and have my fingers crossed. I might file a slope or redesign that bit if it acts up.
The colors are really cool. Gears and things in colors lego doesn’t do, like the pearl gold. So that was really cool.
Overall it’s fun for advanced builders. I think it’ll work when we get done, but I’m not sure how robust it’ll be.
I also wished that they had used a different type of part to build the tracks, but I suspect they used the tubes because they are light and flexible.
Having built several sets from third parties, I can say with confidence that you should not expect LEGO-quality parts from a non-LEGO vendor. Funwhole’s bricks are the best, and JMBricklayer’s are good; neither are perfect.
Sounds like you are managing to deal creatively with the issues, and I think that’s what you have to be willing to do! Let us know how your set turned out.
1. This is my first LEGO kit so I don’t have a collection of parts.
2. The fact that it was free is irrelevant. I have a kit that is partly finished because I am lacking parts. Useless and free is still useless.
3. Some but not all of the missing parts look like very standard parts and not specialized ones that should be kept in stock.
4. Perhaps and I realize that this would be difficult but Bricklayer should include a full parts list with their kits so you can check for missing parts as soon as you get your kit.
5. We are now up to 1 month from when I asked for the parts. Still no parts.
6. I wonder if you have these problems if you spend the additional money and buy kits directly from LEGO.
DON
I’m sorry to hear that you haven’t received the extra parts, Donald. If you were to purchase a set from LEGO, I would completely expect them to include all the parts, and every brick would be perfect (w/o any deformity). LEGO is definitely still the industry leader in terms of quality, though companies like Funwhole’s are very good and JMBrickerlayer, in general, is good.