REVIEW – For a while now, I’ve been thinking about getting a network-attached storage (NAS) device to keep all our shared files in a central location to access them easily no matter what device we are using. So when the TerraMaster F4-424 Pro NAS was offered to the Gadgeteer for review, I decided to give it a try.
What is it?
Network-attached storage (NAS) is a device that serves as a central digital storage unit for your files so that all your devices (computers, tablets, phones, etc.) can access them on your network. A NAS attaches to your router or a network switch usually via Ethernet or USB and has its own operating system to manage and perform tasks to maintain your centralized network files. You can use a NAS as a local area network (LAN) file server, media server, security camera server (for security camera footage), or personal cloud server to access your files inside or outside your home network.
The F4-424 Pro is a TerraMaster NAS (TNAS) that holds up to four 3.5″ (or 2.5″) SATA hard drives (HDDs) or 2.5″ SATA solid-state drives (SSDs) and uses a proprietary operating system called TerraMaster Operating System or TOS.
What’s included?
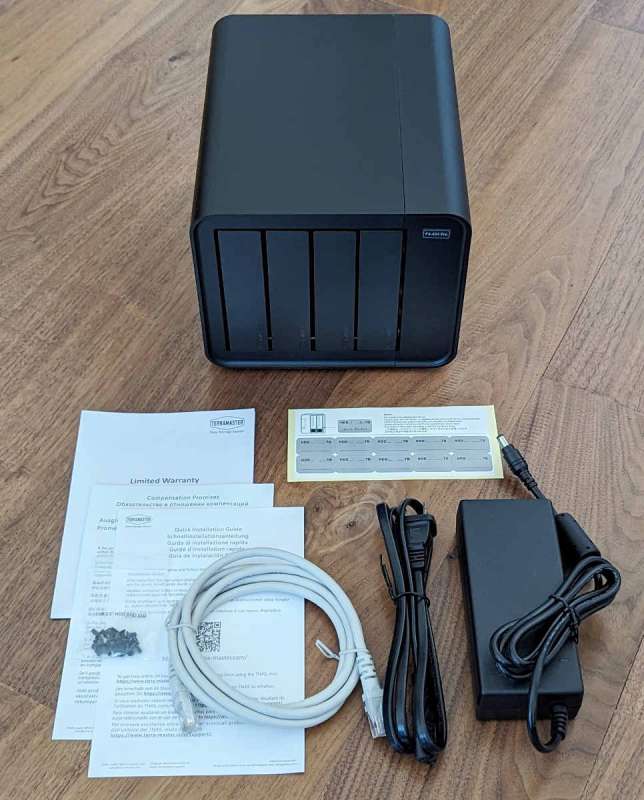
- TerraMaster F4-424 Pro NAS (without drives)
- Power adapter
- LAN cable
- Quick guide
- Limited warranty notice
- Screws
Tech specs
Click to expand
- Processor Model: Intel® Core™ i3
- Processor Architecture: X.86 64-bit
- Processor Frequency: Max burst up to 3.8 GHz
- Hardware Encryption Engine
- Hardware Transcoding Engine: H.264, H.265, MPEG-4, VC-1;maximum resolution: 4K (4096 x 2160); maximum frame rate per second (FPS): 60
Memory
- System Memory: 32 GB DDR5 non-ECC SODIMM
- Pre-installed Memory module: 32 GB DDR5 non-ECC SODIMM (1x 32 GB)
- Total Memory Slot Number: 1 (DDR5 SODIMM)
- Maximum Supported Memory: 32 GB DDR5 non-ECC SODIMM
- Note that TerraMaster reserves the right to replace memory modules with the same or higher frequency based on the supplier’s product life cycle status. Rest assured that the compatibility and stability have been strictly verified with the same benchmark to ensure identical performance.
Storage
- Disk Slot Number: 4
- Compatible Drive types:
- 3.5″ SATA HDD
- 2.5″ SATA HDD
- 2.5″ SATA SSD
- Maximum Internal Raw Storage Capacity: 88 TB (22 TB x4) (Capacity may vary by RAID types)
- Drive Hot Swap
- Note: Hard drive vendors will release their latest models of hard drives and Maximum internal raw storage capacity may be adjusted accordingly. The maximum single volume size is not directly related to the maximum raw capacity.
File Systems
- Internal Drive: Btrfs, EXT4
- External Drive: EXT3, EXT4, NTFS, FAT32, HFS+, BTRFS
External Ports
- RJ-45 2.5GbE Network Jack: 2
- USB3.2 Host Port: 2 (10Gbps)
- HDMI: 1 (HDMI 2.1)
- M.2 2280 NVMe Slot: 2
Appearance
- Size: (H*W*D) 222 x 179 x 154 mm
- Packaging Size: (H*W*D) 300 x 275 x 186 mm
- Weight: 3.4 kg
Others
- System Fan: 120 x 120 x 25mm 1PCS
- Fan Modes: Smart, High speed, Middle speed, Low speed
- Noise Level: 21.0 dB(A) (Using 2 SATA HDDs/SSDs in standby mode; Test environment noise: 17.3dB(A); Test distance: 1m)
- Power Supply: 90W
- AC Input Voltage: 100V – 240V AC
- Current Frequency: 50/60 Hz, Single frequency
- Power Consumption: 33.0 W (Fully loaded Seagate 4TB ST4000VN008 hard drive(s) in read/write state), 13.0 W (Fully loaded Seagate 4TB ST4000VN008 hard drive(s) in hibernation)
- Limited warranty: 2 years
- Certificate: FCC, CE, CCC, KC
- Environment: RoHS, WEEE
Temperature
- Working Temperature: 0°C ~ 40°C (32°F ~ 104°F)
- Storage Temperature: -20°C ~ 60°C (-5°F ~ 140°F)
- Relative Humidity: 5% ~ 95% RH
TOS Features
- OS Supported
- Supported Client OS: Windows OS, Mac OS, Linux OS
- Supported Web Browsers: Google Chrome 97.0.xxxx, Mozilla Firefox 9.3, Apple Safari 12.1; Microsoft Edge 99.0.xx, or later version.
- Supported mobile OS: iOS14.0, Android 10.0 or later version
Storage Management
- Supported RAID Types: TRAID, Single, JBOD, RAID 0, RAID 1, RAID5, RAID 6, RAID 10
- Maximum Internal Volume Number: 256
- Maximum iSCSI Target: 128
- Maximum iSCSI LUN: 256
- Volume Expansion with Larger HDDs: TRAID, RAID 1, RAID 5, RAID 6, RAID 10
- Volume Expansion by Adding a HDD: TRAID, RAID5, RAID6
- RAID Migration
- SSD Cache
- Hot Spare
- SSD TRIM
- Hard Drive S.M.A.R.T.
- Seagate IHM
- Shared Folder Snapshot
File Services
- File Protocol: SMB/AFP/NFS/FTP/SFTP/WebDAV
- Maximum Concurrent SMB/AFP/FTP/SFTP Connections: 512
- Windows Access Control List (ACL) Integration
- NFS Kerberos Authentication
- Account & Shared Folder
- Maximum local user’s account number: 2048
- Maximum local group number: 512
- Maximum shared folders number: 512
- Maximum shared folders syncing tasks: 8
Backup
- Rsync Backup
- Duple Backup
- Centralized Backup
- Snapshot
- USB Backup
- Cloud Sync
- Time Machine Backup
- File System Snapshot
- TFM Backup
Networking
- TCP/IP IPv4/IPv6
- Protocols: CIFS/SMB, NFS, FTP, SFTP, HTTPS, SSH, iSCSI, SNMP
- Link Aggregation
- DLNA Compliance
- VPN Client
- VPN Server
- Proxy Client
- UPnP/Bonjour Discovery
- TNAS.online Remote Access
- DDNS
Access Right Management
- Import/Export users
- User Quota Managerment
- Local user access control for CIFS/SAMBA and FTP
Domain Authentication
- AD Domain
- LDAP Client
Security
- Firewall Protection
- Account Auto-block Protection
- AES Volume and Shared Folder Encryption
- Importable SSL certificate
- Instant Alert via email, Desktop Notification, Beep
- RSA 2048 Encryption (TOS 5.0)
- PAM (Pluggable Authentication Modules)
- OTP Authentication (TOS 5.0)
- HyperLock File System (TOS 5.0)
Power Management
- Power Resume
- Scheduled Power On/Off
- Wake up On LAN (WOL)
- UPS Supported
Administration
- Multi-window, Multi-task System Management
- Custom Desktop
- Control Panel
- Resource Monitor
- Syslog
- OS UI Language English, German, French, Spanish, Italian, Magyar, Chinese, Japanese, Korean, Turkish, Portuguese, Russian
Applications
- Application Center
- iSCSI Target
- Terra Photos
- TerraSync
- Duple Backup
- CloudSync
- Centralized Backup
- USB Copy
- VPN Server
- Transmission
- qBittorent
- Aria 2
- Terra Search
- Deduplication
- Web Server
- Clam Antivirus
- EMBY
- Multi-Media Server
- Plex Media Server
- Docker Manager
- Snapshot
Design and features
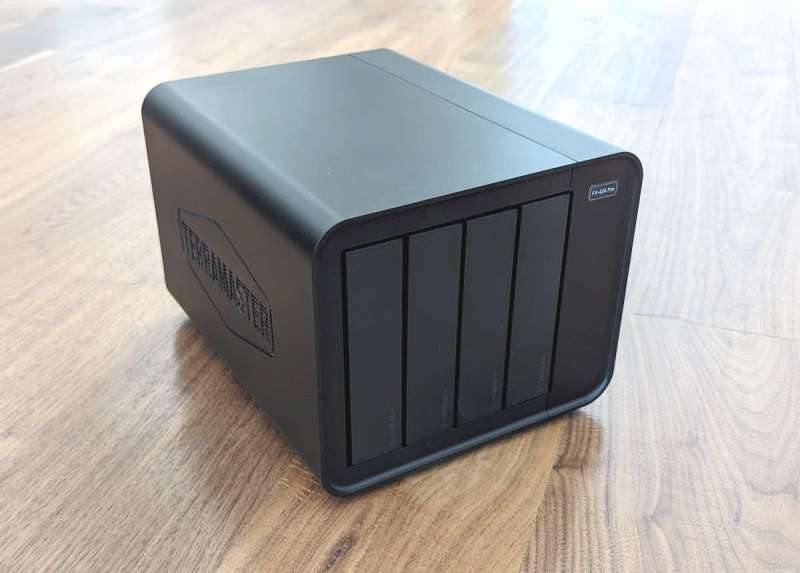
The TerraMaster F4-424 Pro NAS has a matte black plastic enclosure that houses four drives (3.5″/2.5″ SATA HDDs or 2.5″ SATA SSDs). Although it doesn’t look like a premium device, its internals (discussed later) belie its encasement.

The front of the TNAS has pinhole LED status lights for bays 1-4 and power.

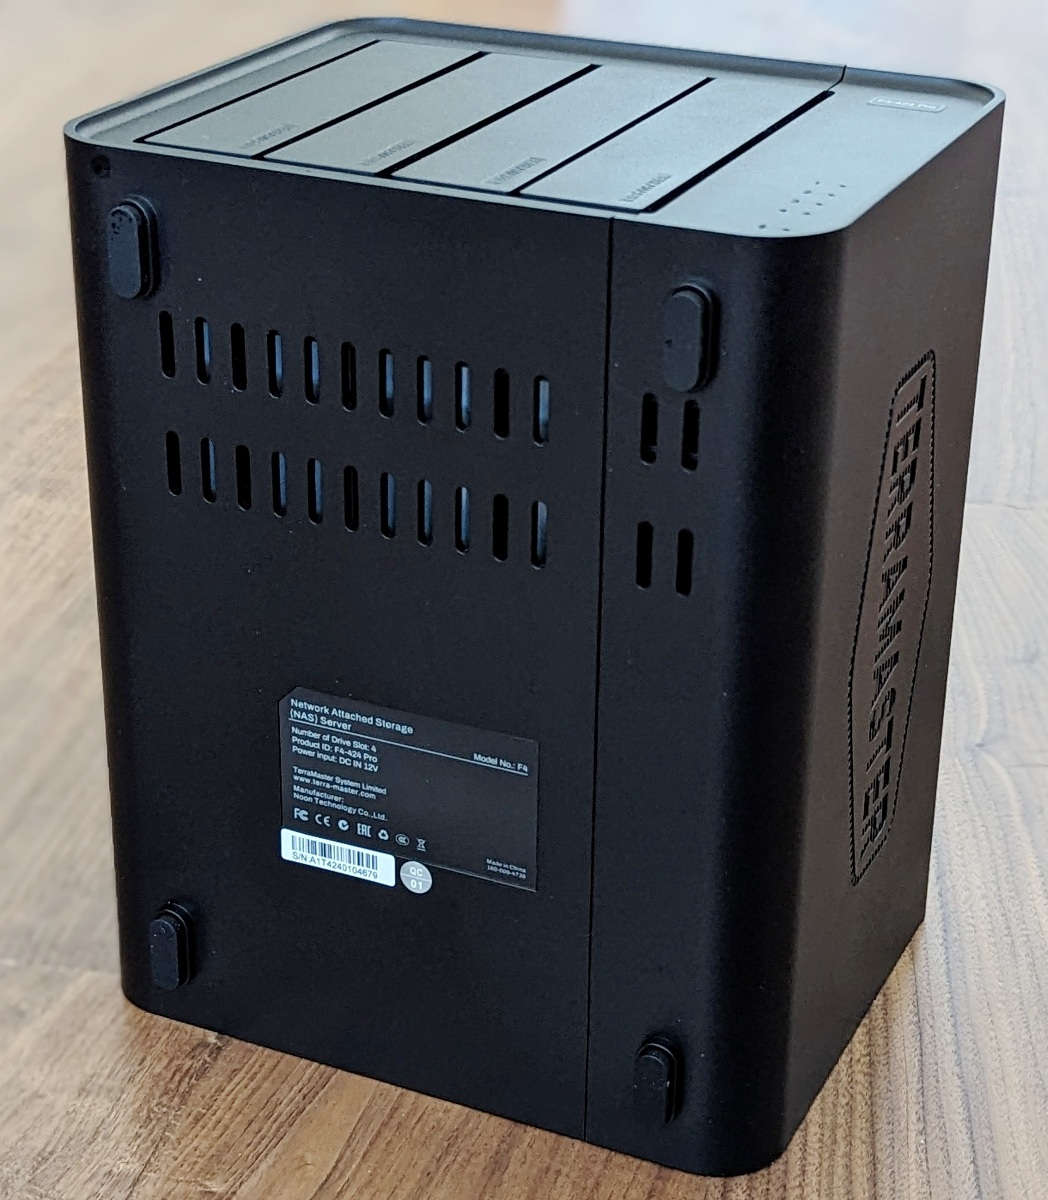
The sides and bottom of the TerraMaster NAS (TNAS) have vents. The TerraMaster logo is made up of slots and there are small holes around the logo. The bottom also has slots that promote air circulation to help dissipate heat. The bottom of the TNAS also has rubber pads to help absorb vibration, keep the NAS from moving around, and keep it from scratching the surface on which it sits.
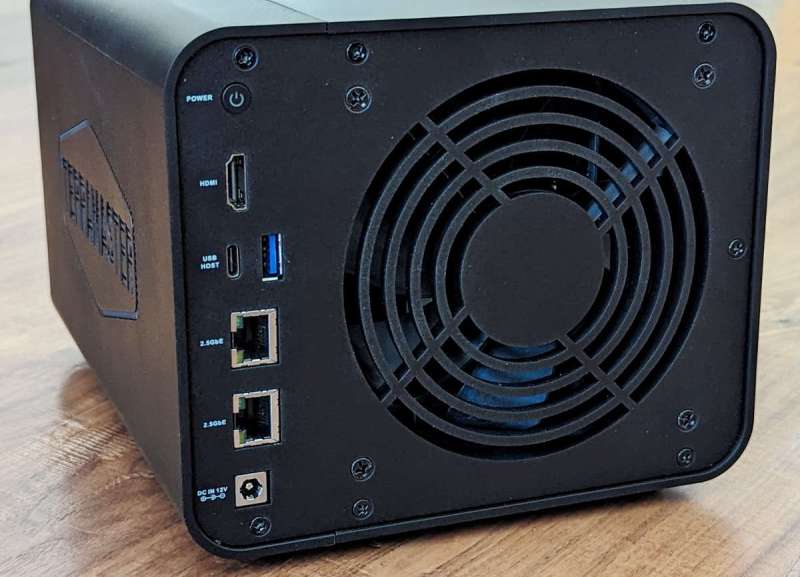
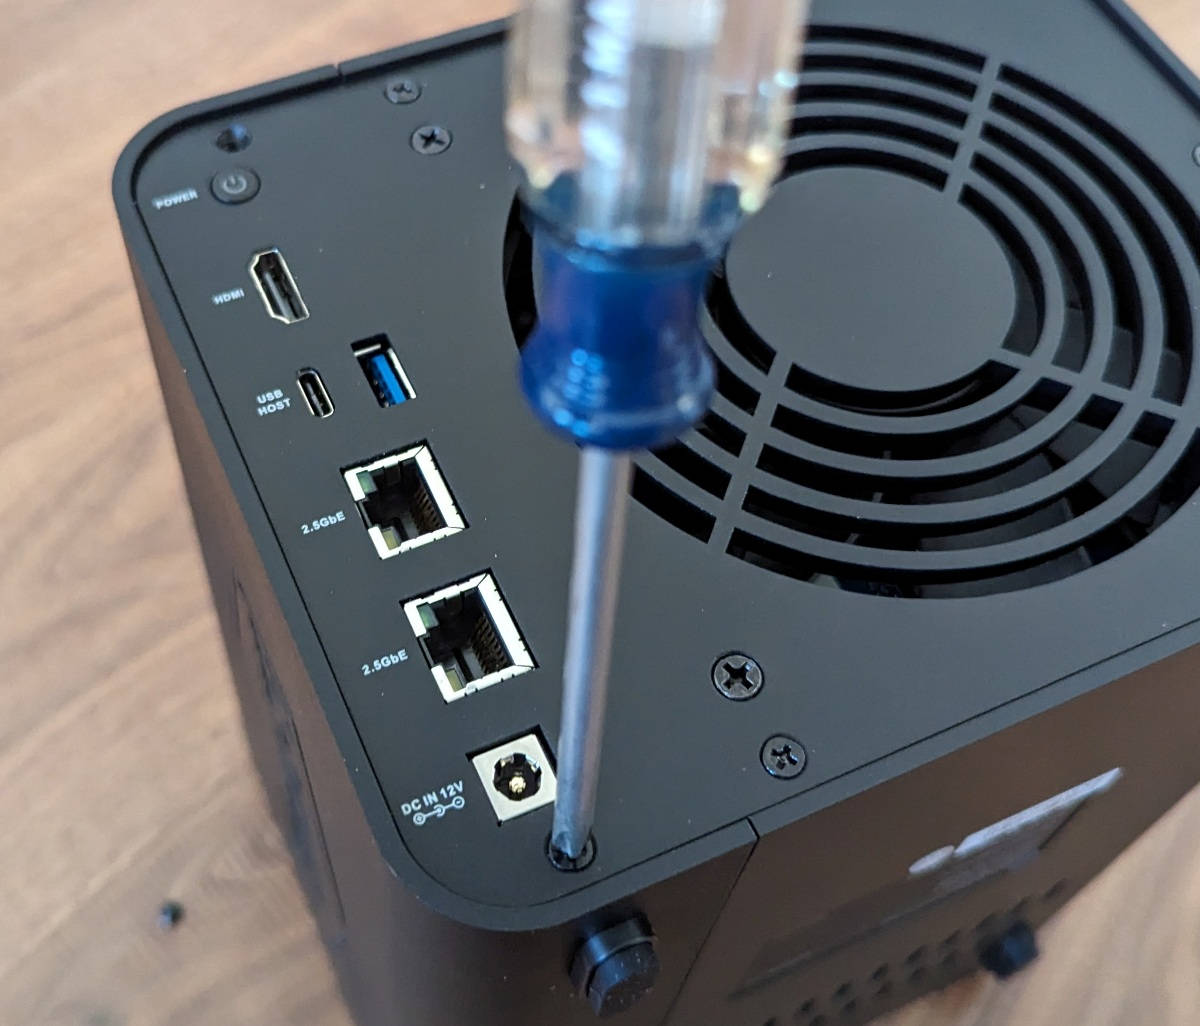
The back of the TNAS has a fan, vents, and a power button. It also has an HDMI port, a USB-C and USB-A port capable of transferring up to 10 Gbps, two 2.5GbE ports (with link aggregation you can get up to 5 Gb), and a DC power port.
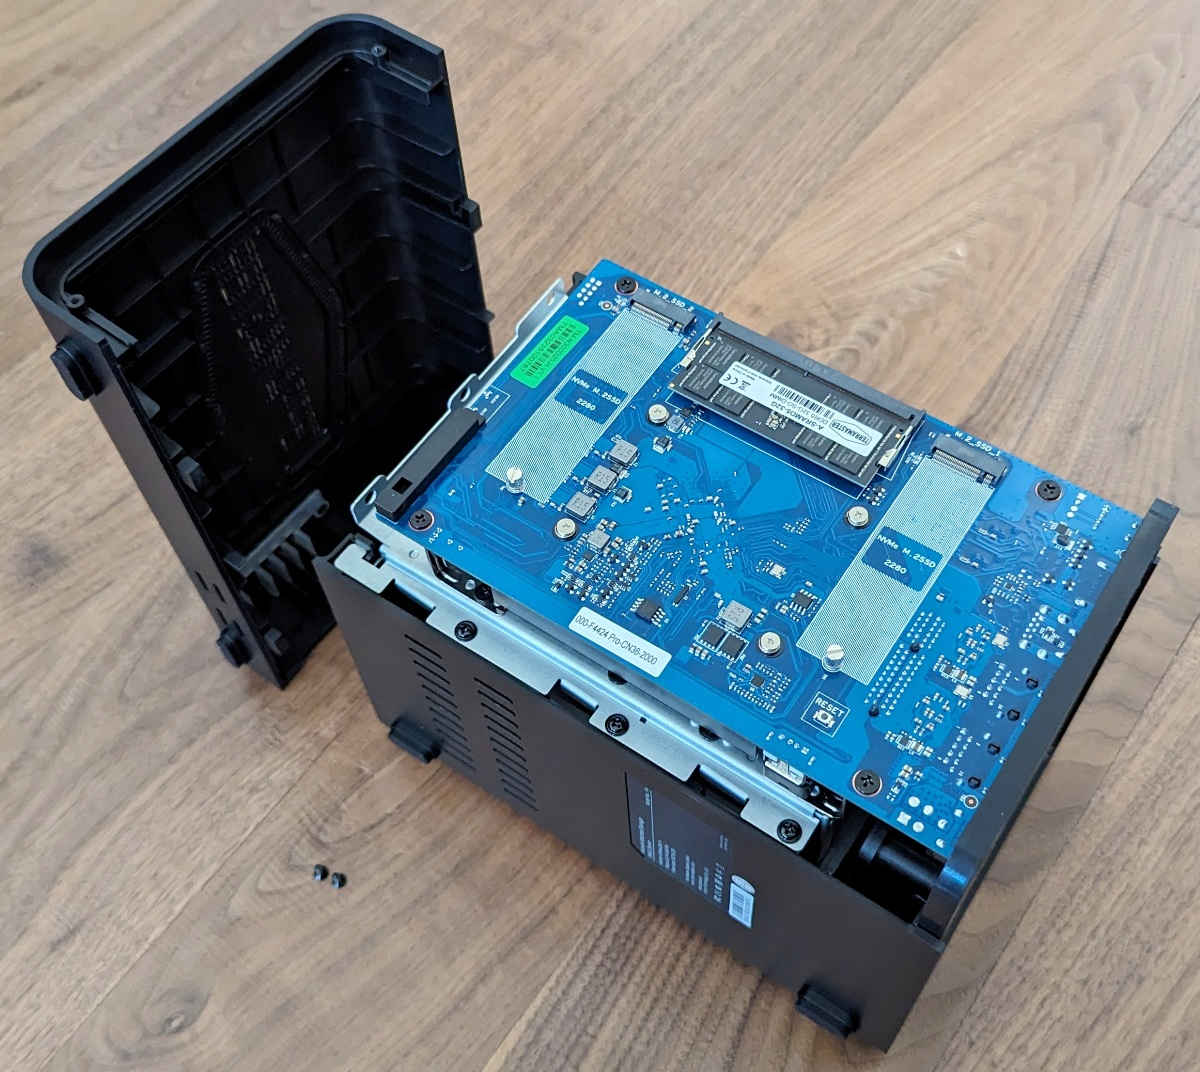
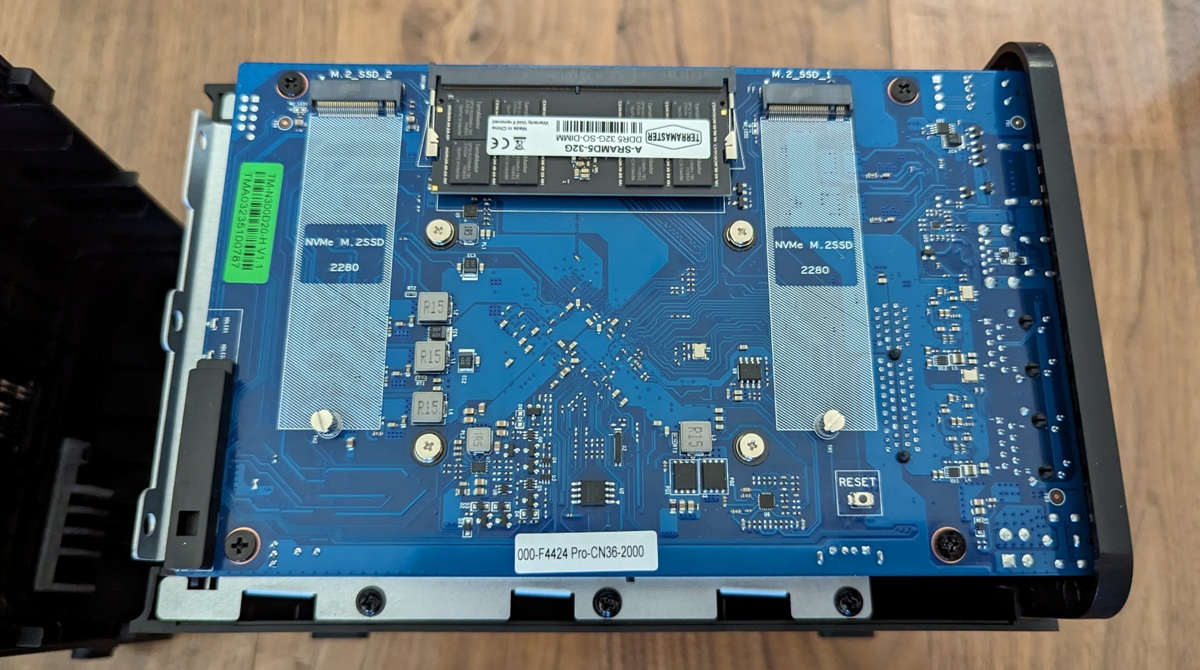
The internal components of the F4-424 Pro are impressive; it’s one of the more powerful home or small office NASs available. It has an Intel i3 8-core processor and 32 GB RAM in addition to the aforementioned 10 Gbps USB ports and 2.5 GbE ports.
To view the components, remove two screws, one above the power button and the other below the DC port. Then slide off the side of the TNAS to access the motherboard. This TNAS even allows you to install two internal M.2 NVMe SSDs.
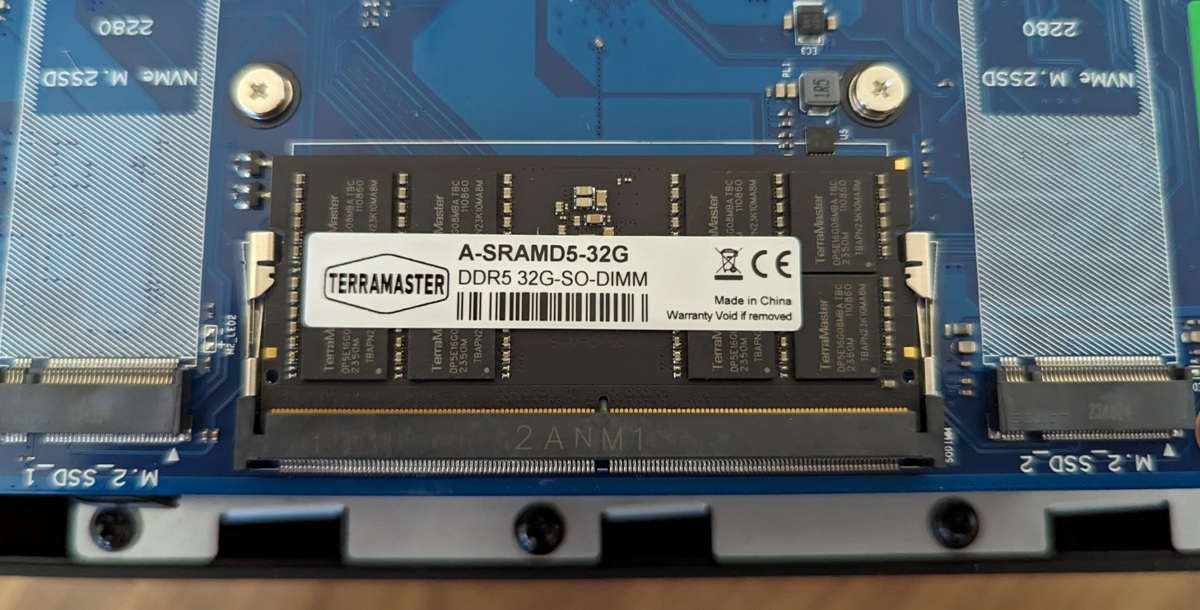
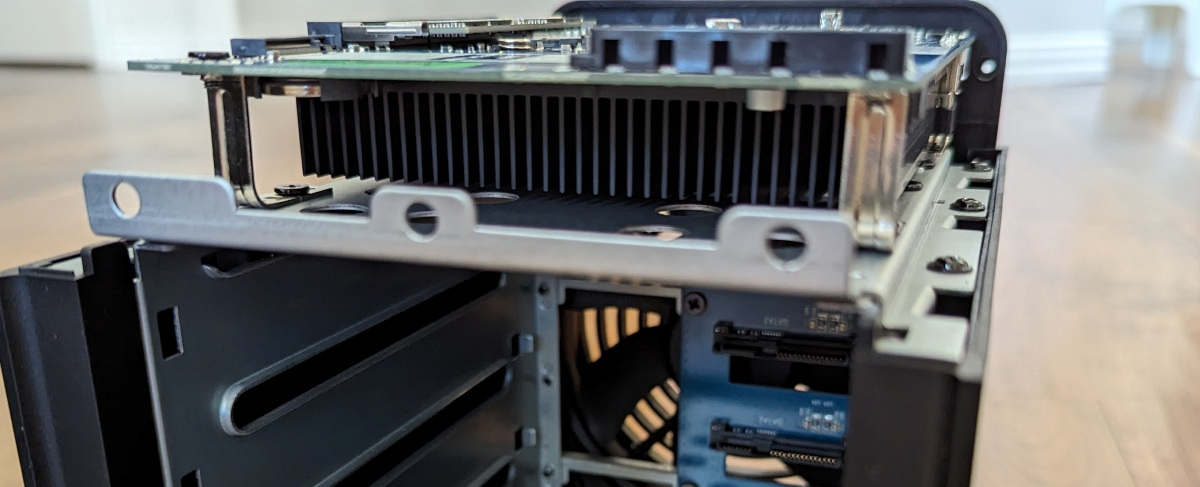
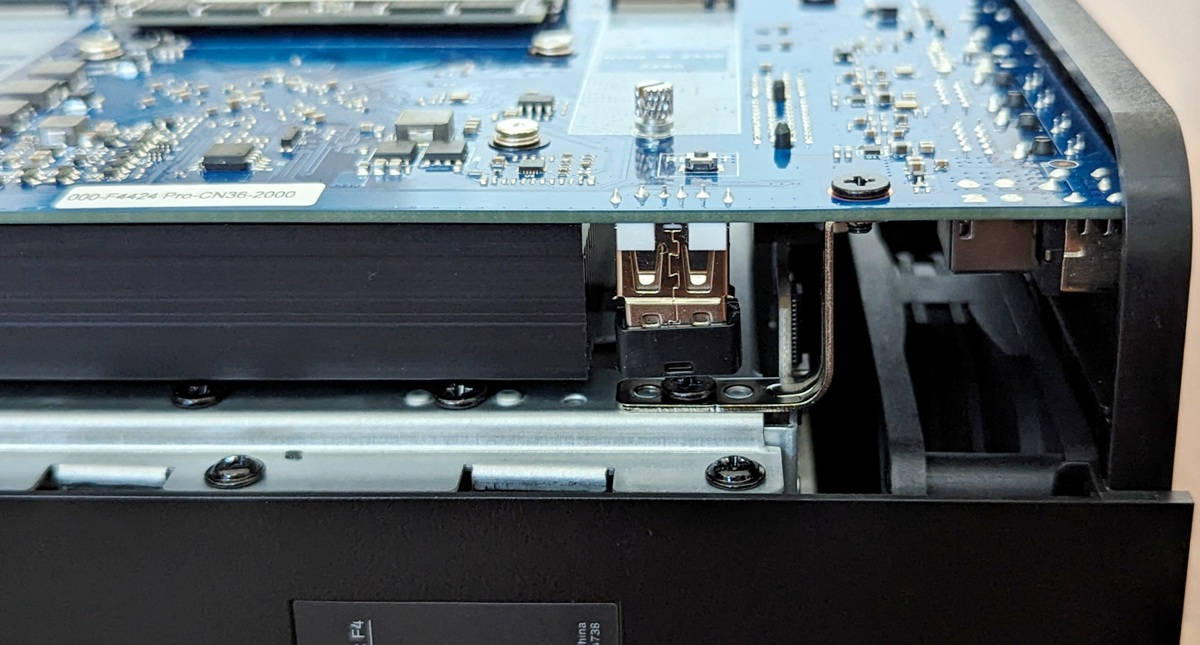
The first photo above shows the 32 GB RAM (interestingly, the processor only supports up to 16 GB, but since this is what TerraMaster installed, I’m trusting that they support this setup). The center photo above shows the large heatsink to keep the components cool. The last photo above shows the small USB flash drive that the TerraMaster NAS uses to boot up to install the TOS.
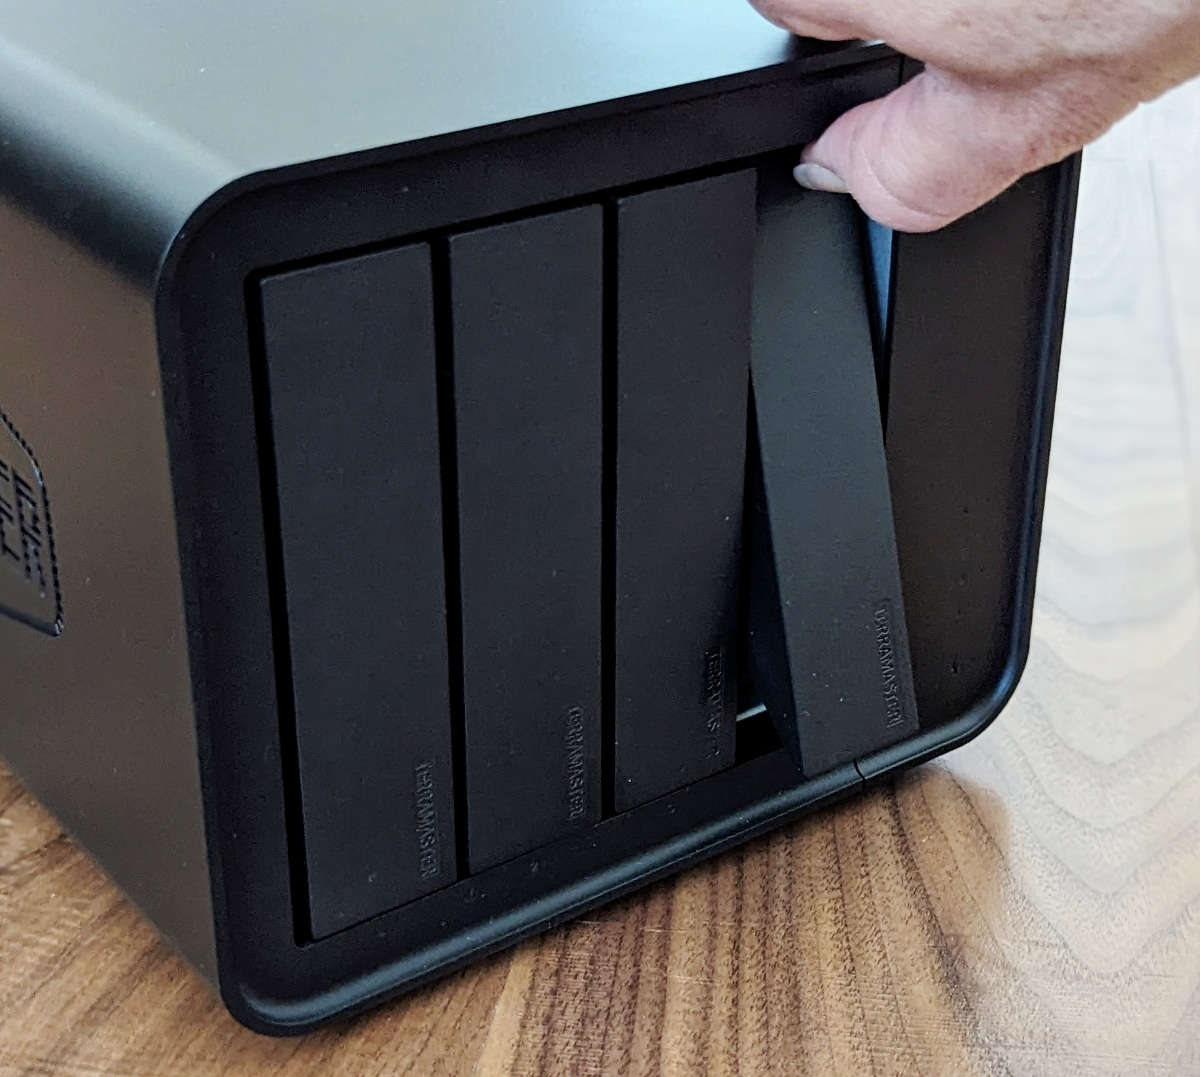
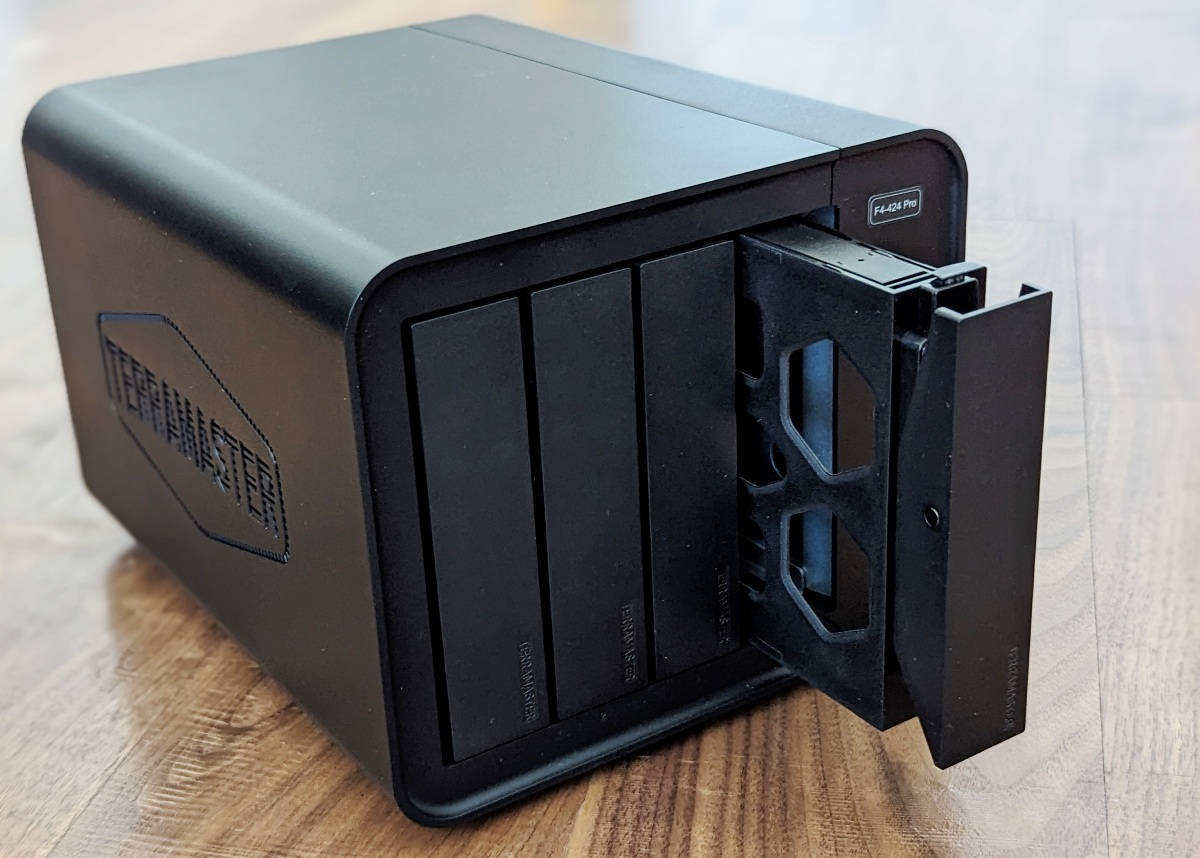
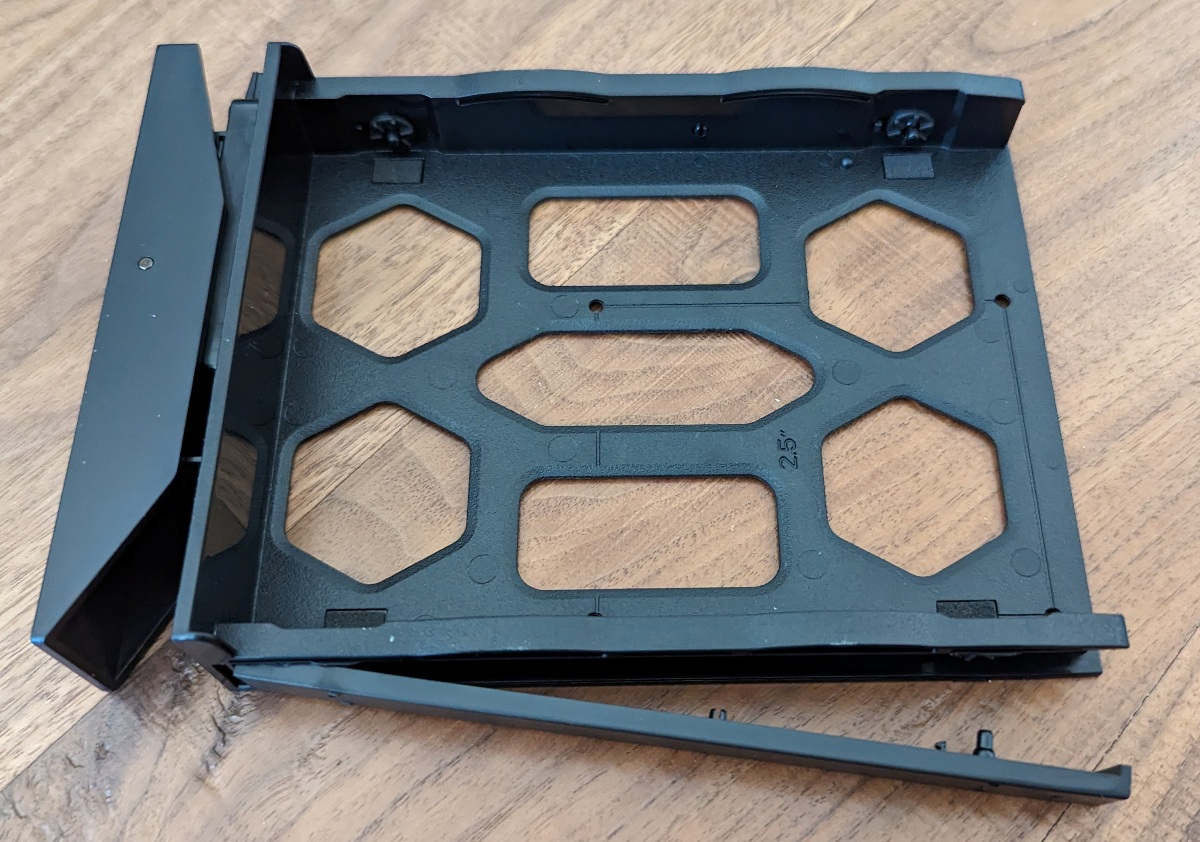
Removing the drive bay trays is easy. Push on the top of a tray as shown in the first photo above, then grab the lower end of the tray and pull.
Assembly, Installation, Setup
I scanned a QR code on the TNAS documentation and clicked on the link to an online quick setup guide. The online documentation includes a video guide on the initialization process. Unfortunately, it was unavailable. Since the video guide was unavailable, I stopped using the online guide and went to do some internet searches about the setup process. I got help from wundertech.net and YouTubers NASCompares and Britec09. I discovered later that I would have understood the setup process better if I had continued with the other parts of the online setup guide.
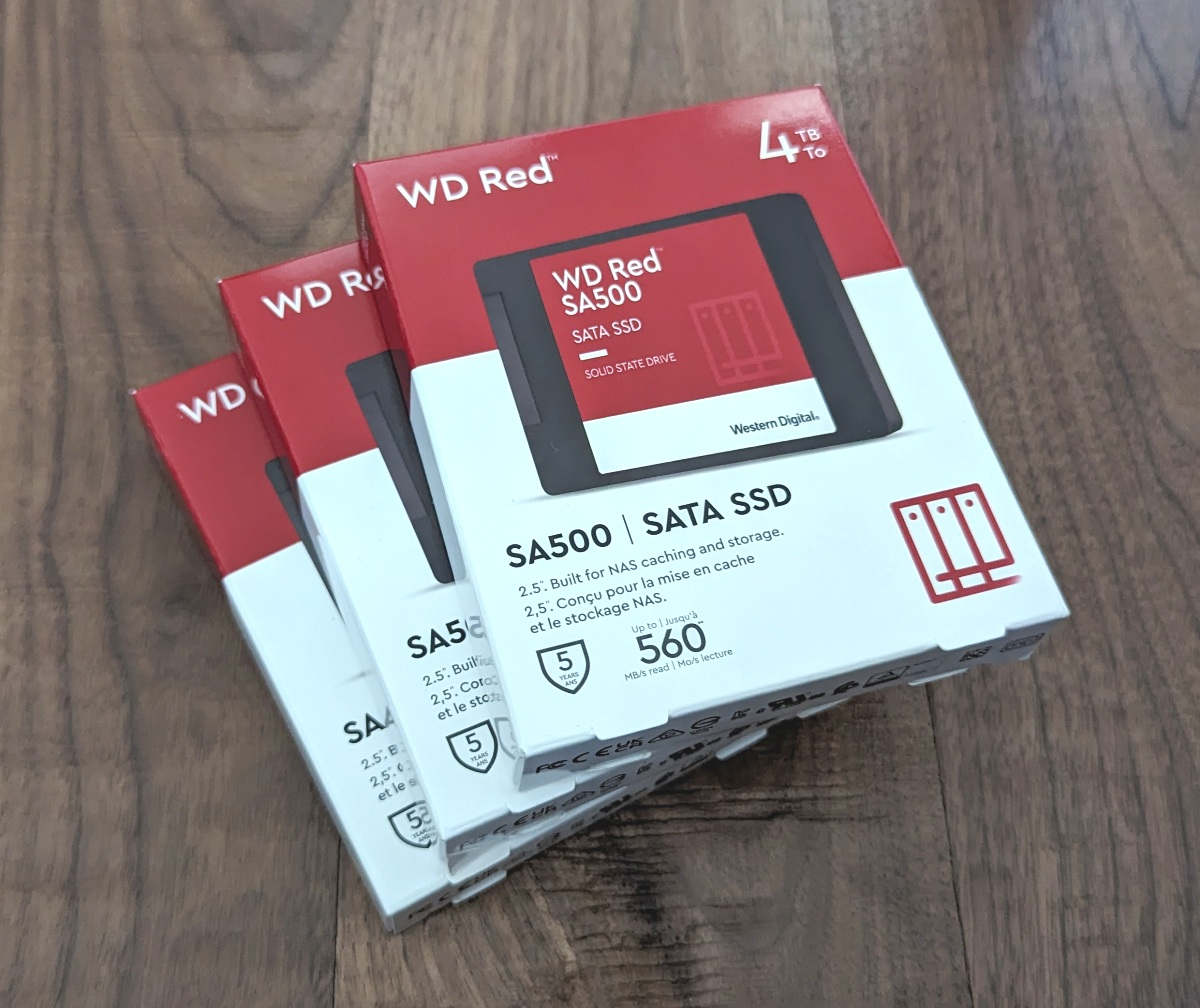
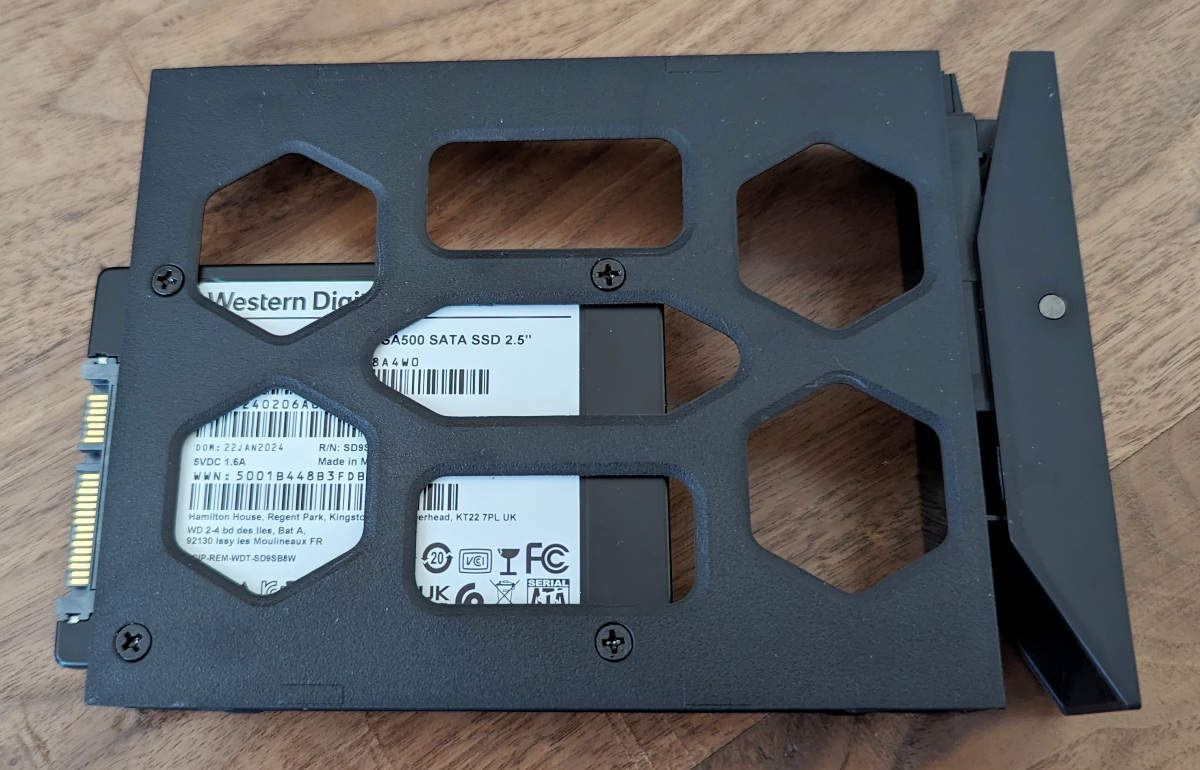
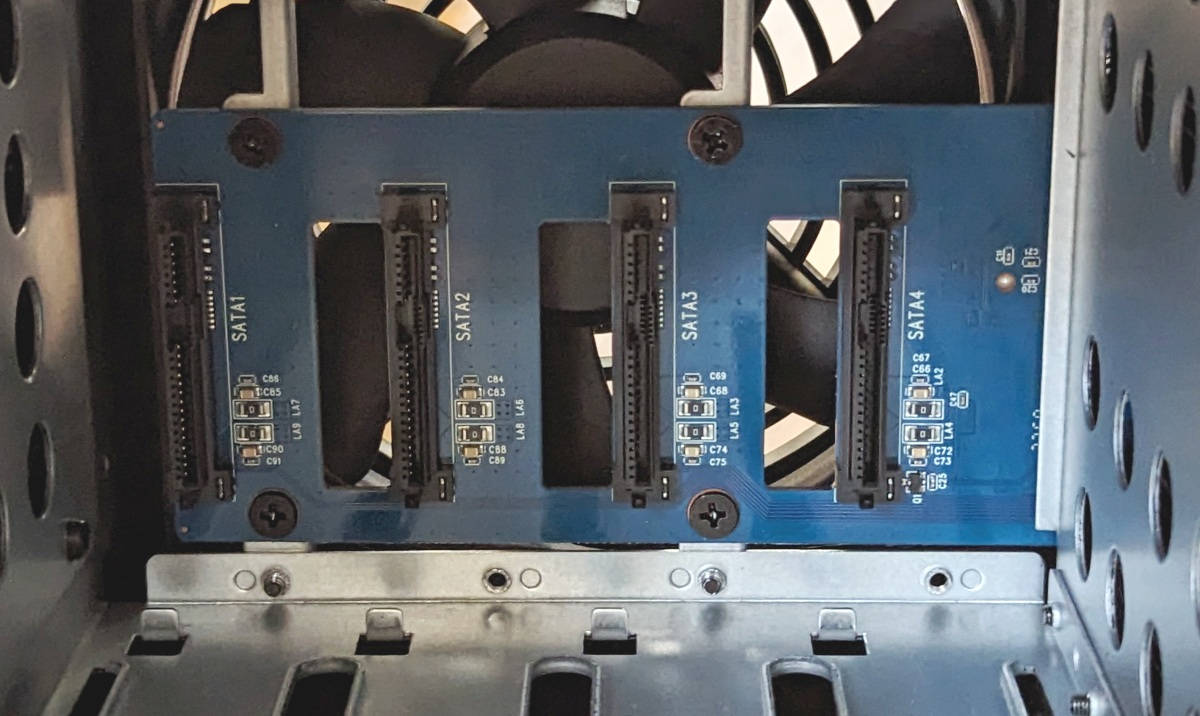
Installing drives on TerraMaster F4-424 Pro
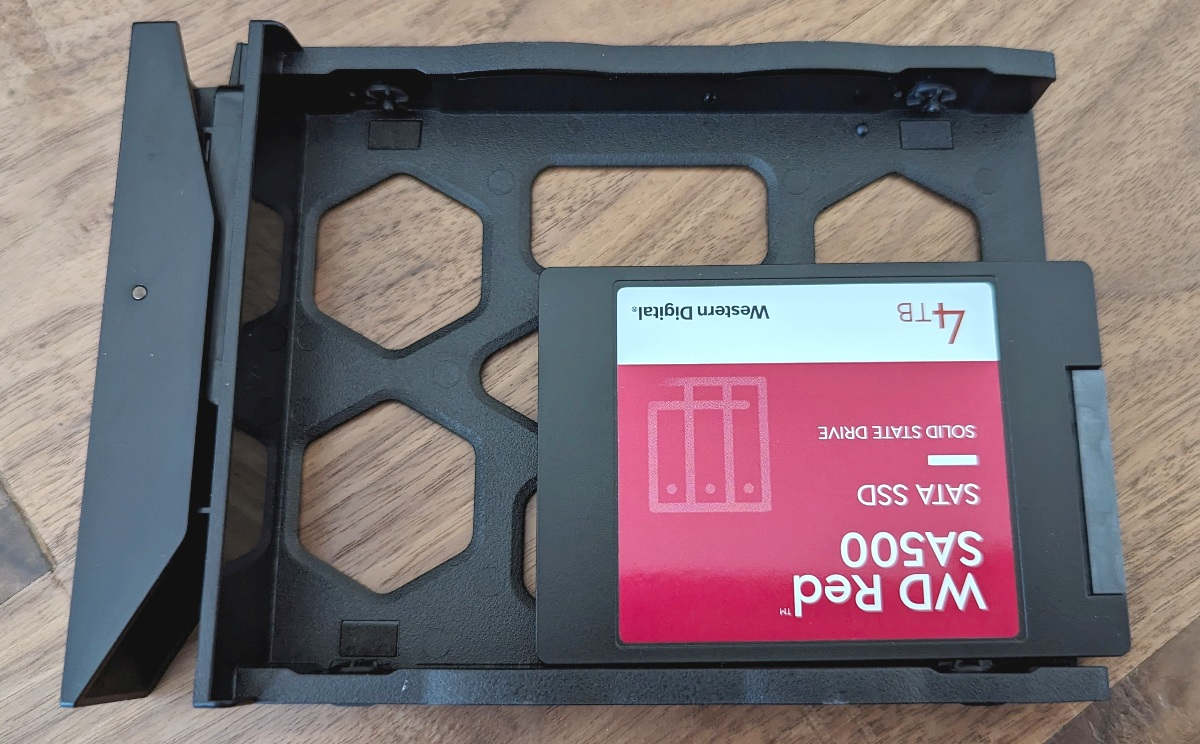
I decided to splurge on three SSDs made specifically for NASs and used the online setup guide to install the drives as shown above. I installed three Western Digital 4TB WD Red SA500 NAS 3D NAND Internal 2.5″ SSDs (shown above) using the online setup guide.
There are holes drilled into the drive-bay trays that line up with the holes on the 2.5″ SATA SSDs. I secured them to the trays using the screws that TerraMaster provided.
Downloading the computer client tool, “TNAS PC”
I plugged the TNAS into power and connected it to my home router via the Ethernet cable provided by TerraMaster. I then pressed the power button and let it boot up.
According to some YouTubers, the next step of the setup process was to go to terra-master.com and click on “Support” > “Download” to download the TNAS PC application for my Windows 11 computer (I later learned that this application provides only rudimentary functions. Since you can connect and completely configure the TNAS through the web interface, I didn’t need to use TNAS PC application):
- Select “Network-attached storage TNAS” for the product category, “4” for the number of drives, and “F4-424 Pro” for the ID/model number > Start button
- Click on the “Desktop and System” tab and download the latest TNAS PC app
- Double-clicked on the TNAS PC Setup file to install the app
- Launch the TNAS PC app and allow it to access your network (NOTE: make sure that the NAS and your computer are on the same network)
- The app then performed a search to find the TNAS
Initializing/formatting the drives/installing TOS
The next step was to initialize the drives, format the drives, and install the TerraMaster Operating System. Since the Installation Video Guide wasn’t available, I wasn’t sure how to proceed. YouTubers “Britec09” and “NASCompares” were very helpful. I needed to use a web browser and go to “tnas.local” to start the process.
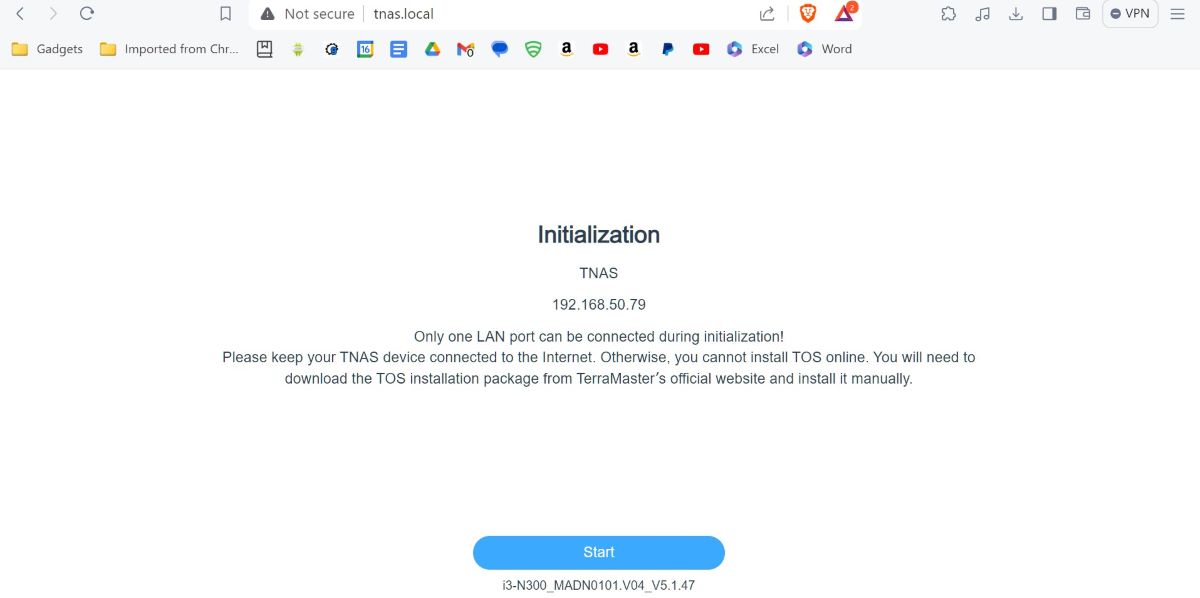
- I went to “tnas.local” in a web browser where it loaded the bootloader on the TNAS
- The “Initialization” page pops up which informs you that only one LAN port can be connected during initialization and to keep your TNAS connected to the internet to download the TOS online otherwise you would have to install TOS manually
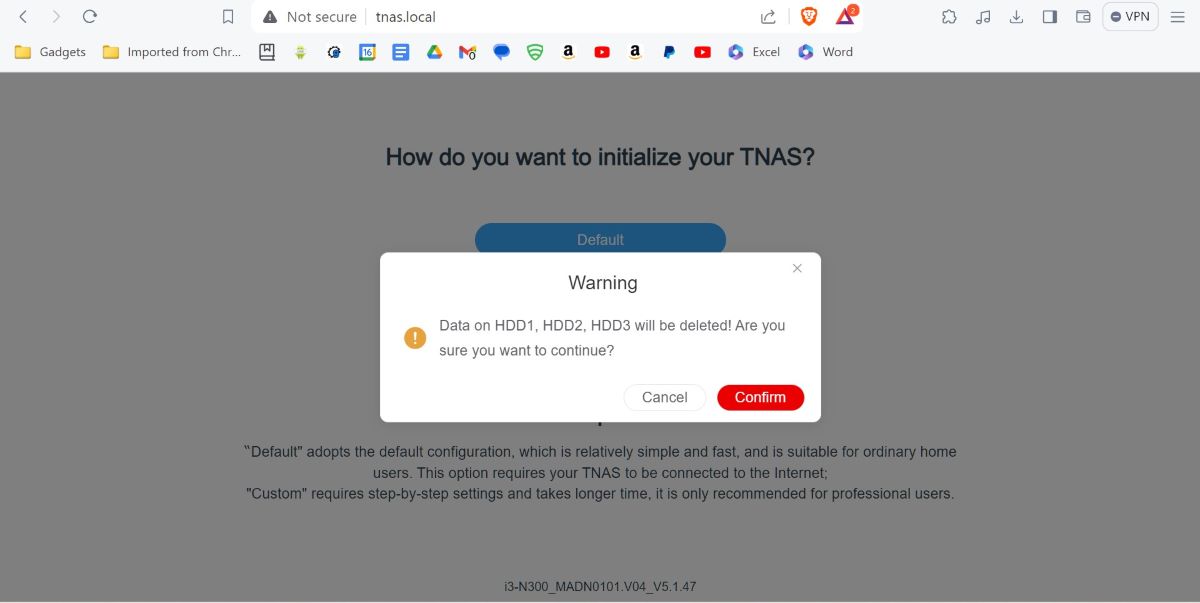
- The next page warns you to use compatible drives and that using old drives may cause slow responses, system crashes, etc.
- The subsequent web page allows you to select the “Default” (easy) or a “Custom” (step-by-step) initialization process
-
- “Default” sets up a TRAID and a single volume and formats the drives using the BTRFS file system
-
“TRAID is the abbreviation of TerraMaster RAID. TRAID is a flexible disk array management tool developed by TerraMaster. It has features such as the automatic combination of disk space, hard disk failure redundancy protection, and automatic capacity expansion. All these features do not require manual configuration by the user, and the system will automatically complete the configuration according to the properties of the hard disk.
TRAID provides users with an optimized, flexible and elastic disk array management solution, especially suitable for new users who are not proficient in how to configure a disk array…With TRAID flexible management strategy, you can continuously add hard disks to your array to expand the storage capacity, even if the hard disk capacity is quite different.
-
-
- “Custom” allows you to select the drives you want to initialize, the file system (either BTRFS or EXT4), and the RAID configuration (TRAID, RAID 0, 1, or 5)
-
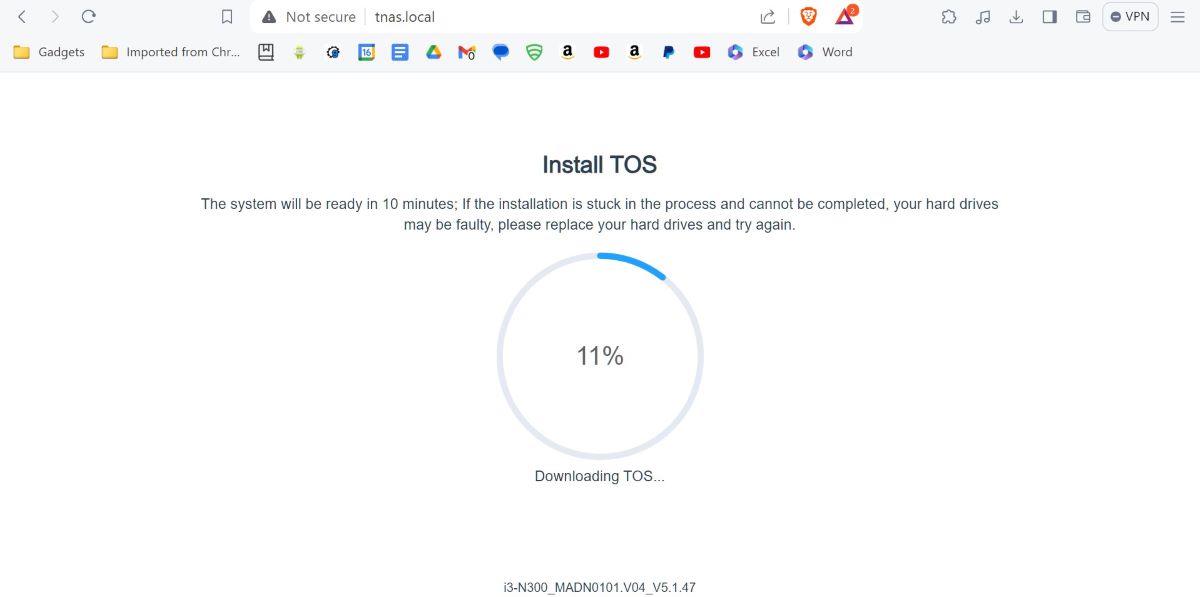
- After choosing one of the above (I chose “Default”), you will be warned that the drives will be erased, then the drives will be checked for compatibility, formatted, and TOS will be installed
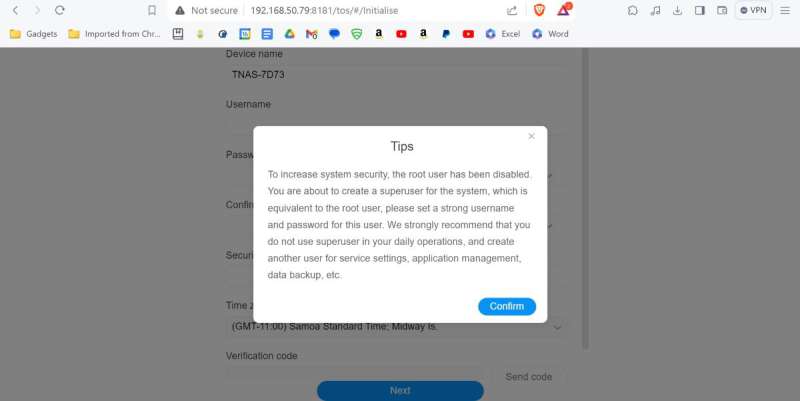
Once initialization was complete, the TNAS rebooted and I was prompted to set up a “superuser”.
I installed three 4 TB SATA SSDs. After the initialization, my usable space was 7.26 TB.
Performance
TNAS PC app
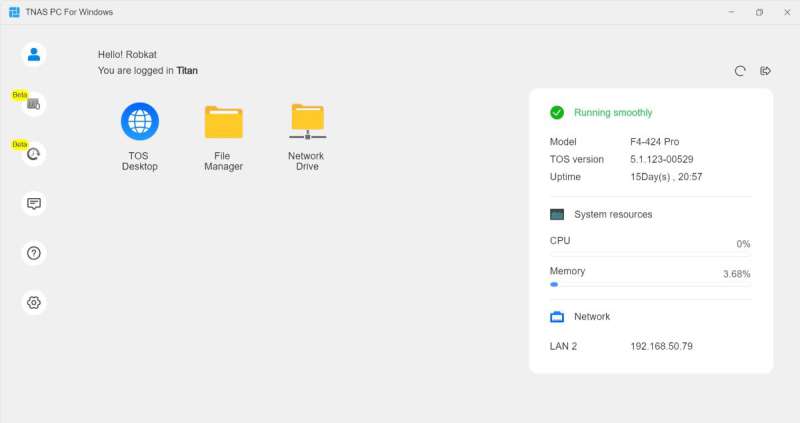
Using the latest version of the TNAS PC app (5.1.352) and the latest version of TOS (5.1.123), I discovered that the PC app works, but offers very little functionality. Each of the icons in the PC app (the “TOS Desktop” icon, “File Manager” icon, “Feedback” icon, and “Support” icon) directs the user either to the TerraMaster NAS web interface or to Windows (the “Network Drive” icon for mapping the shared folder to a drive letter). So why use the PC app? The web interface has all the PC app functionality and so much more. Thus, I used the web interface for everything (for the TNAS configuration and management).
Even though the current TNAS PC app doesn’t offer much, TerraMaster is good about updating the software fairly quickly to improve functionality according to NASCompares.
TNAS Web Interface
In the browser URL, I entered the IP address of my TNAS and logged in using the admin username and password I set up.
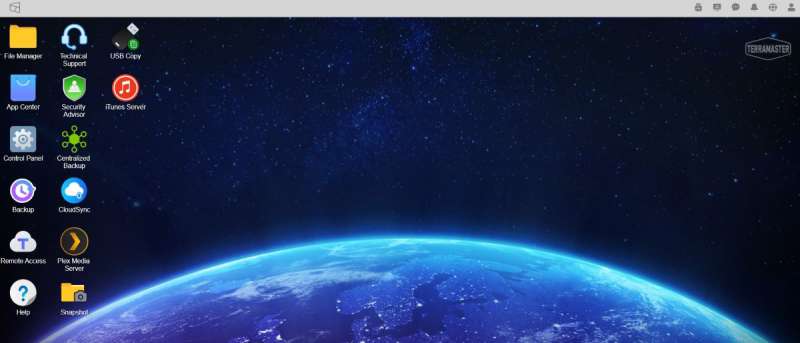
The following were the default items on the home page (the above screenshot shows apps I installed in addition to the default apps):
-
-
- File Manager
- App Center
- Control Panel
- Backup
- Remote Access
- Help
- Technical Support
- Security Advisor
-
In the upper right corner of the home page are five icons: System info, Notifications, Mute the buzzer, Language, and User settings (profile icon) which allow you to change the background, set up a security email, etc.
The web interface offers so much more functionality than the TNAS PC app and it’s easy to use.
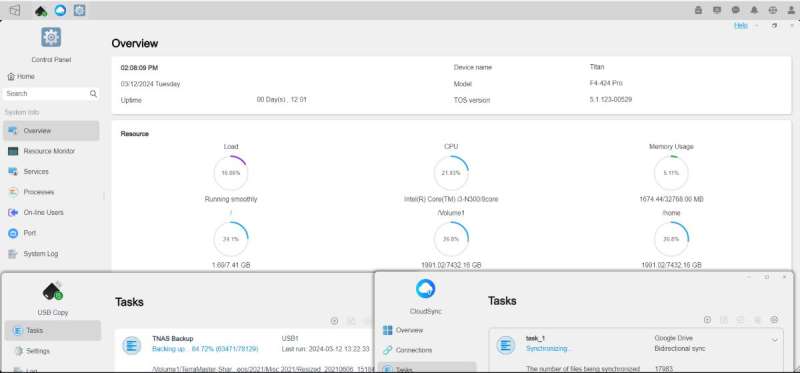
Control Panel app
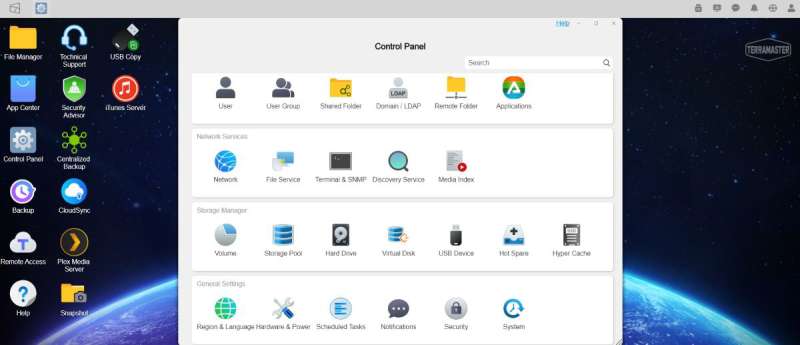
The Control Panel app allows you to set up privileges (users, shared folders, etc.), network services (e.g. add a WiFi adapter and set it up, manage file services like FTP, etc.), manage storage, adjust general settings, and view system information.
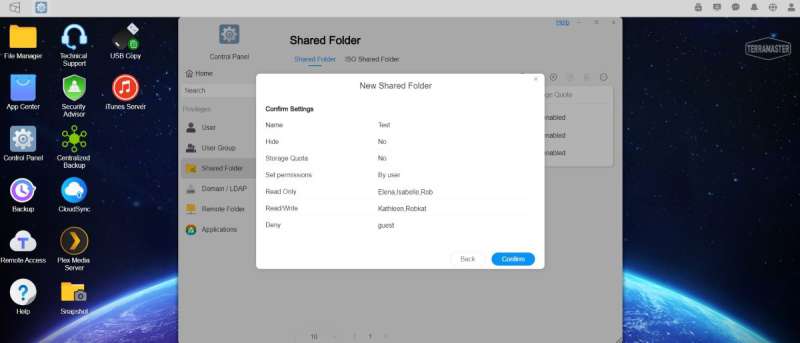
One of the first things I did was set up users and a shared folder we could all access on our network. I selected “Shared Folder” in the Control Panel app and clicked on the “+” to add a new folder. I chose not to encrypt the shared folder but you can encrypt it (which requires a password for folder access). I set the permissions (by the user, user group, etc.), and user storage quotas.
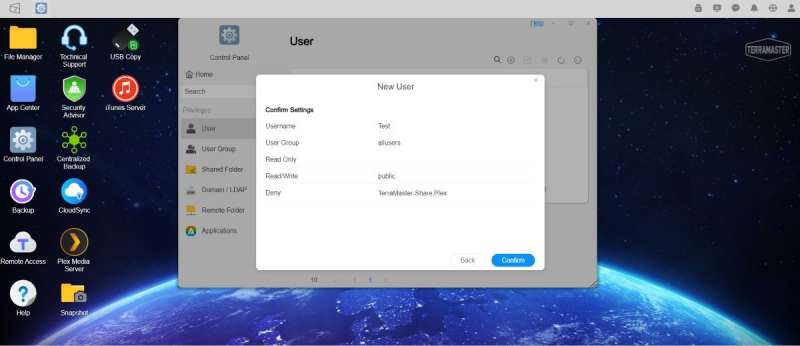
I then set up users, their storage quotas, user groups, and permissions for the shared folders.
Mapping the TNAS shared folder and copying files
Next, I mapped the shared folder on my Windows 11 laptop. To do this, I used Windows File Explorer and found the TNAS under “Network”. I searched the TNAS for my shared folder, right-clicked on it, and selected “Map network drive”. I then selected a drive letter to map it to, entered the location of the folder e.g. \\[name of the NAS]\[folder], then clicked “Finish”.
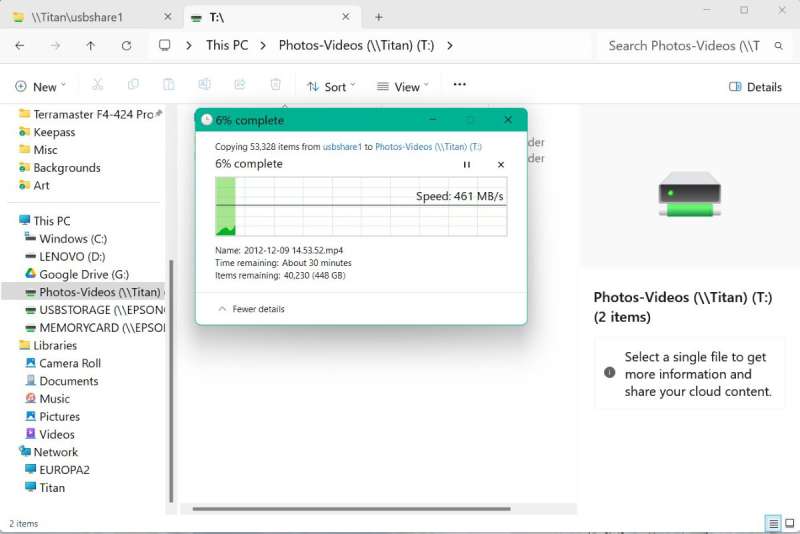
After mapping the shared TNAS folder, I moved all my files, photos, and videos to the TNAS. All my photos and videos were on a portable SSD which I connected to the TNAS via the USB-C port. I used Windows File Explorer to transfer the files from the portable drive to the shared TNAS folder. The transfer rate started rather slowly (24 MB/s) but really picked up speed (up to around 461 MB/s). The TNAS handled this well. Nice!
TerraMaster File System Snapshot
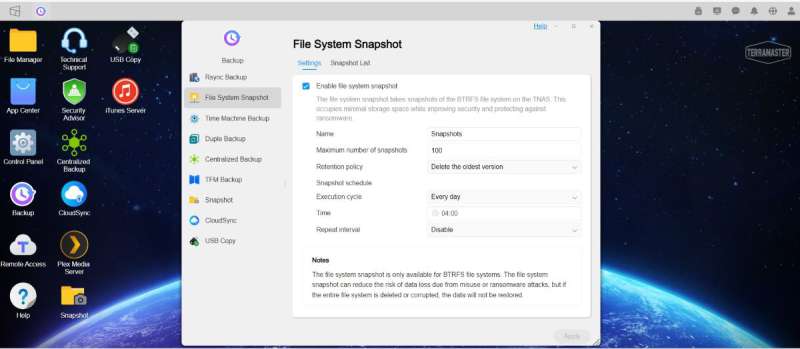
I then set up a TerraMaster File System Snapshot of my TNAS. This creates a snapshot of the entire TNAS BTRFS file system allowing you to revert to a previous state if necessary.
Note: TerraMaster supports TerraMaster File System Snapshot (TFSS) and TerraMaster Snapshot app (separate things). TFSS takes a snapshot of the entire file system and the TerraMaster Snapshot app takes a snapshot of the individual shared folders. A snapshot is a disaster recovery tool based on the copy-on-write (COW) technique that allows for an instant “snapshot” of the system and takes up very little space (techpowerup.com). According to computerhope.com:
Copy-on-write or CoW is a technique to efficiently copy data resources in a computer system. If a unit of data is copied but not modified, the “copy” can exist as a reference to the original data. Only when the copied data is modified is a copy created, and new bytes are actually written.
According to techpowerup.com, “The snapshot file resides in the same storage space as the sub-volume, and you can browse it like a normal directory and restore a copy of the file as it was when the snapshot was taken.”
App Center app

There are 59 TNAS apps available in the App Center app. There are third-party apps, or “Community Apps” available too. I installed the following apps:
- CloudSync
- USB Copy
- Plex Media Server
- Snapshot
- Centralized Backup (not covered below)
- iTunes Server (not covered below)
CloudSync app

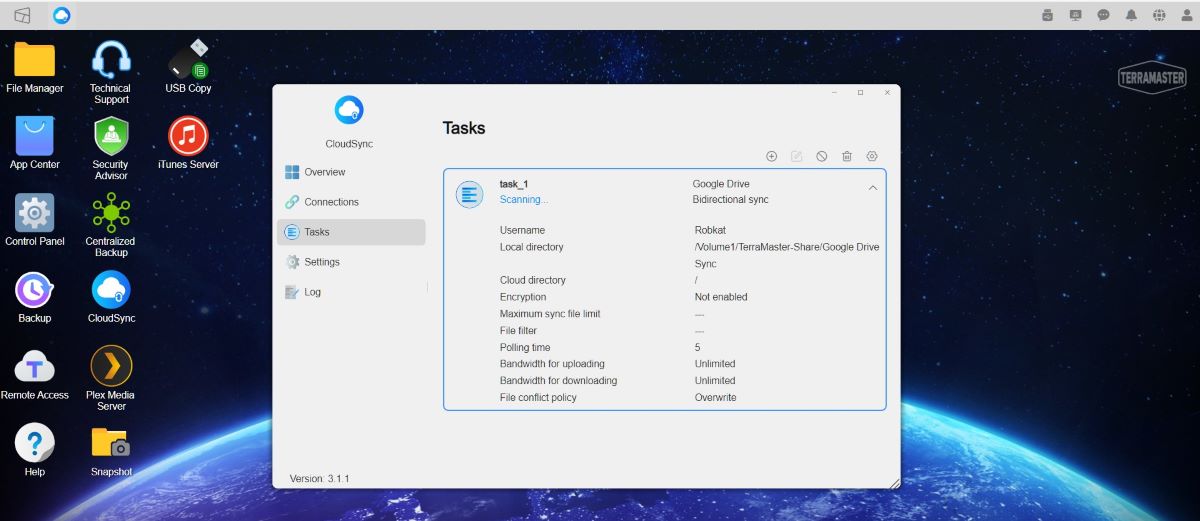
I had some trouble with the CloudSync app. Opening up the CloudSync app, I first connected it to my Google Drive and then tried to configure a task to sync Google Drive to my TNAS shared folder. After confirming the sync settings of my task, however, a message popped up, saying that I needed to connect to Google Drive first. So, I went to check to see if it was connected and sure enough, it wasn’t so I had to reconnect it. I tried again to set up the syncing task, which disconnected Google Drive. Ugh! I had to do this several times before I was finally successful.
Syncing my entire Google Drive was painfully slow the first time, but I set up the task to sync incrementally (which means that after the first full syncing, only those files and folders that have changed will sync). So, all future syncing should be much faster.
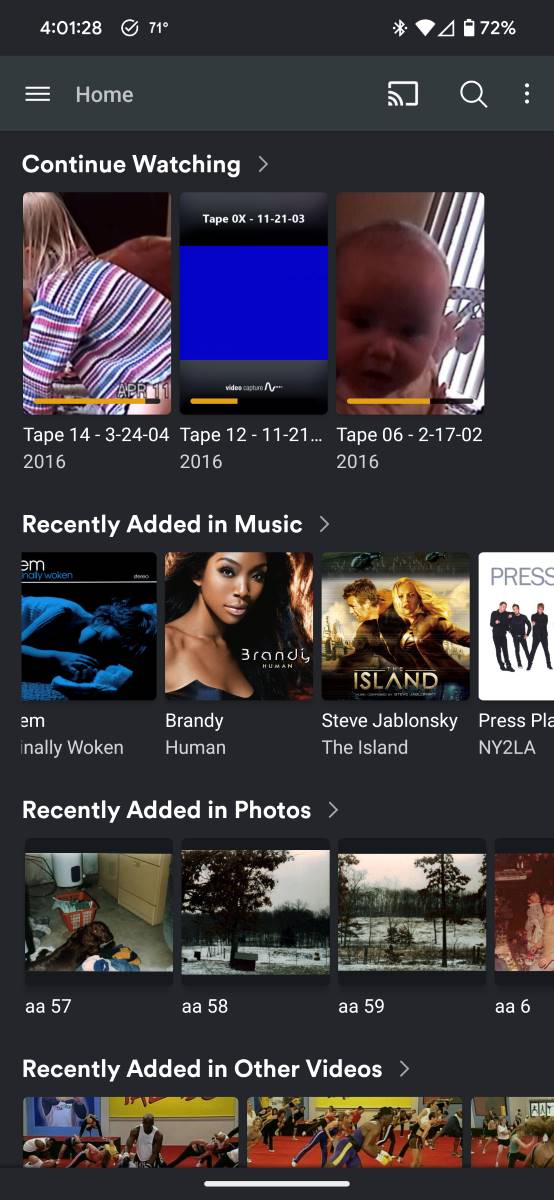
Plex Media Server app
I had some difficulty setting up the Plex Media Server app too. When I installed the Plex app on the TNAS, it created a shared folder called “Plex”. However, that “Plex” folder is not visible using Windows File Explorer. So I thought I could use the Windows File Explorer to move my media folders (e.g. music folder, photos folder, etc.) from my laptop or portable drive to the TNAS shared folder that I created and point the Plex app to use those folders. Having watched and read about setting up Plex on a TNAS, I thought it was possible. However, this didn’t work. I even verified all the permissions for the Music, Photos, and Videos folders and the TNAS shared folder but I still couldn’t get Plex to work.
Because the Plex folder is not visible in Windows File Explorer, I used Windows File Explorer to move the media files from my laptop and portable USB drive to the shared TNAS folder I created (my “TerraMaster-Share” folder). I then used the TNAS web interface to transfer those files from the “TerraMaster-Share” folder to the “Plex” folder on the TNAS (I placed my media files in: /plex/library/[“music” or “photos” or “videos”]).
Why didn’t I upload my folders to the “Plex” folder, to begin with? Because I wanted to be able to access those media folders from the Windows File Explorer to move any additional media files from my laptop to the TNAS. I guess, I’ll have to live without Explorer access to the “Plex” folder *sigh*.
Updating TNAS apps
After installing the Plex app on the TNAS, a notification popped up saying that there was an update for the Plex app. It directed me to a link where I could download the latest version. I downloaded the file on my Windows laptop. But this is a TOS app, not a Windows app. Soooooo, now what? Having never updated a TOS app, I wasn’t sure what to do.
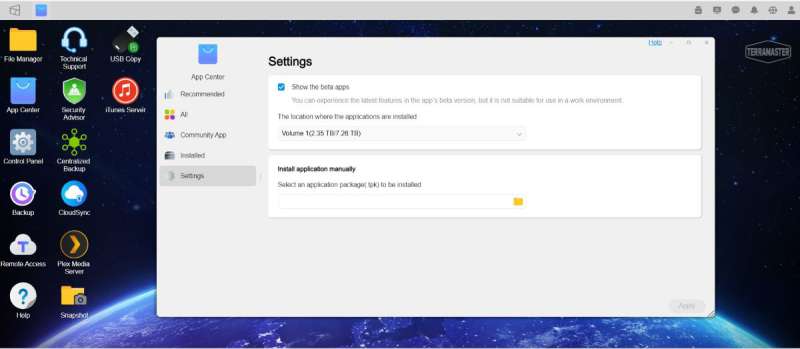
I finally stumbled on it. Using the TNAS web interface, I opened the App Center app and clicked on “Settings” in the left bar (shown above). I then saw the “Install application manually” section where I could browse my laptop for the .tpk file I downloaded. It installed it. Success! Yay!!
USB Copy app
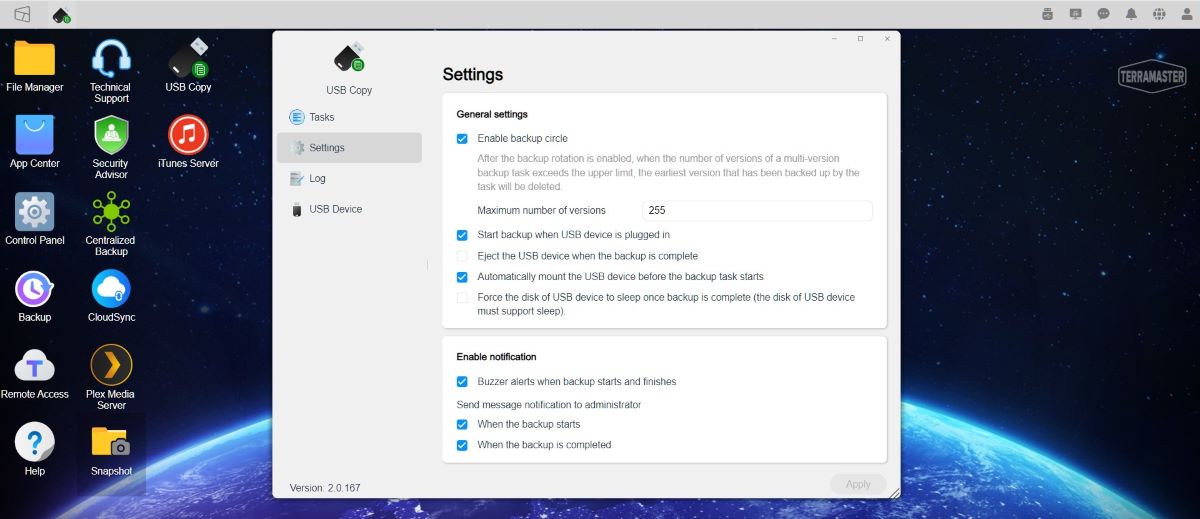
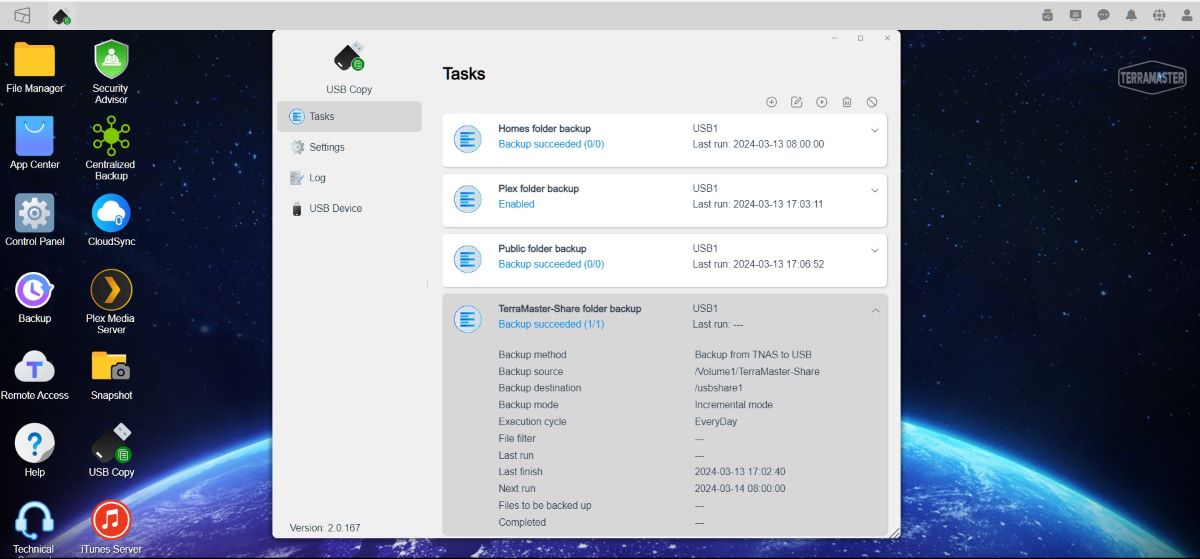
The USB Copy app worked well for me. I went into the app settings to configure the backup to start whenever I attached a USB drive. I then set up several tasks to back up all my shared folders. It worked like a charm!
Snapshot app
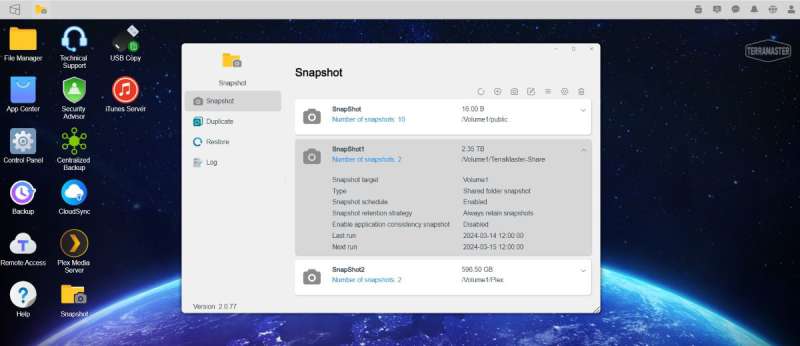
The SnapShop app enables you to back up your shared folders (not the same as the entire TNAS file system snapshot). I set up tasks to take a snapshot of my shared folders once per day. However, when using the Snapshot app, I discovered that when I opened it, it took a few seconds for my tasks to show up. So, if you experience a blank page, be patient – your tasks are still there and will pop up after a few seconds.
So far, I’ve had no problems with the Snapshot app. I now have several snapshots available in case I need them.
TNAS system response
The TNAS was able to perform several tasks simultaneously quickly and smoothly. I performed two USB Copy backups and synced my Google Drive and the F4-242 Pro handled it like a pro (ha!). Additionally, it’s so quiet. I can’t even tell it’s there! I’m impressed!
TNAS Mobile 3 app
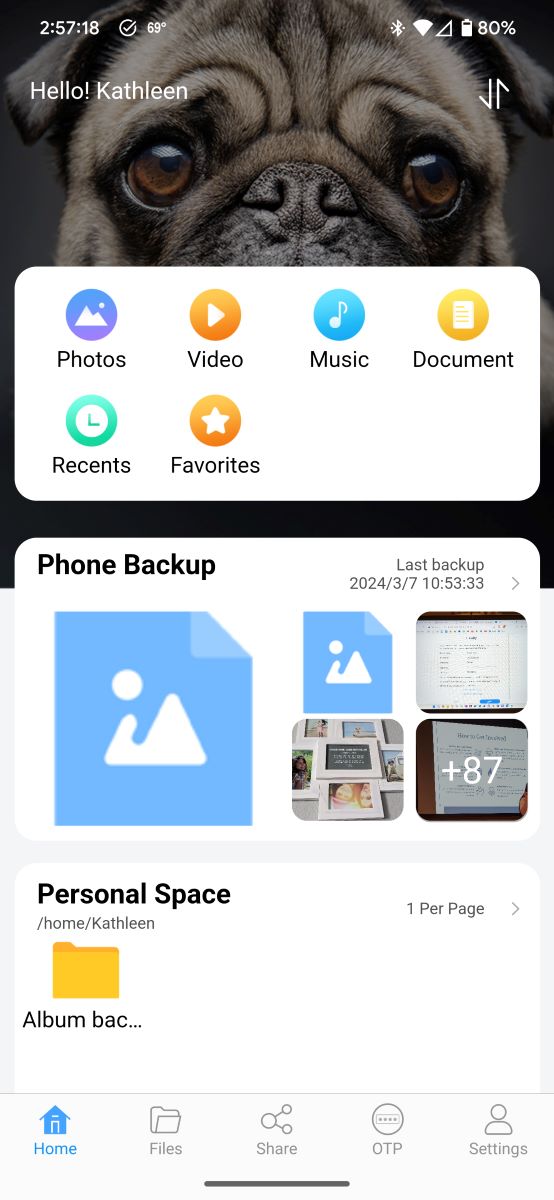
I installed the TNAS Mobile 3 app on my Pixel 6 Pro phone using the Google Play Store. At the time I installed it, it was available on Google Play. But when my husband went to find it, it wasn’t there. I’m not sure why.
Anyway, I set it up to back up my phone to a specific folder (I was happy to see that I could choose the location). Using the app, I can also tap on Music, Video, Document, etc. to see the files stored on my TNAS. Note: you can see them only after indexing your media using the Media Index in the Control Panel app. However, the TNAS Mobile 3 app appears to lump all the files together. The Plex app better organizes my photos, videos, and music. And, using a file manager app or Windows File Explorer is best for documents.
So, after mucking around for several days learning the ins and outs of the F4-424Pro, I finally configured the TNAS to my liking. It now contains all of my documents, photos, and videos in a central location so that my family and I can access them whenever we want, it syncs my Google Drive to my TNAS, and I can back up my TNAS onto a USB-C SSD portable drive that can be stored in our fire/water-proof box for safekeeping.
What I like about the TerraMaster F4-424 Pro NAS
- The TNAS is powerful, fast, and quiet (using SSDs)
- I can keep all my important documents, photos, and videos in a central location for everyone in our home network to access
- USB Copy worked well allowing me to backup the TNAS on a portable SSD (as an “offsite” backup)
- Plex Media Server worked well (once I figured out how to configure it)
What needs to be improved?
- The TNAS setup documentation is scant (please provide the Installation Video Guide for the F4-424 Pro!)
- CloudSync app often disconnected from Google Drive when I was setting up a new task
- The TNAS PC app provides rudimentary functions
- The TNAS Mobile 3 app is missing from the Google Play store
Final thoughts
The TerraMaster F4-424 Pro NAS is a powerful and less expensive home/home office/small office NAS compared to other home NASs. Its plastic enclosure belies the power inside. This TNAS has an Intel i3 8-core processor, 32 GB DDR5 RAM, two 2.5 Gb Ethernet ports (using link aggregation you can get up to 5 Gb), and two USB ports (USB-C and USB-A) able to transfer up to 10Gbps.
Initially, I was frustrated trying to get everything configured like I wanted (e.g. the CloudSync and Plex apps), but eventually, I was successful. I couldn’t be happier! My NAS needs are simple: keep the files I want to share in a central location so everyone in my family can access them, sync my Google Drive, backup the TNAS to a USB drive (an “off-site” backup), and use Plex to access my media. So, if you have the same basic needs as I do, I can recommend the TerraMaster F4-424 Pro. It’s a powerful, fast, and affordable NAS for home use.
Price: $699.99
Where to buy: TerraMaster and Amazon
Source: The sample of this product was provided for free by TerraMaster. TerraMaster did not have a final say on the review and did not preview the review before it was published.

TERRAMASTER F4-424 Pro NAS Storage - 4Bay Core i3-N305 8-Core 8-Thread CPU, 32GB DDR5 RAM, 2.5GbE Port x 2, Network Attached Storage Peak Performance for Business (Diskless) Black
(as of June 28, 2026 20:28 GMT -05:00 - More infoProduct prices and availability are accurate as of the date/time indicated and are subject to change. Any price and availability information displayed on [relevant Amazon Site(s), as applicable] at the time of purchase will apply to the purchase of this product.)
Gadgeteer Comment Policy - Please read before commenting
Thank you, I benefited a lot from your article.
I did not know that I could view my files via the phone.
I was confused between it and Synology.
Now I have decided to buy Teramaster.