
REVIEW – Over the past couple of years I have been trying to get back into cycling a little bit. Do you know what I have discovered? Pedaling a bicycle is hard! After assembling the Velotric Discovery 1 eBike and taking it for a spin, I found this marvel can take away some or all of the burden!
With the high temperatures that have become common in Indiana over the past several years, this bike might be the difference between riding a bike or just jumping in the car. The Velotric Discovery 1 has the heavy-duty construction and upright riding style of a cruiser bike, but with its 3 motorized assist levels, 7-speed Shimano gear train, dual disk brakes, and integrated rear rack, it also easily serves the purpose of a commuter bicycle.
What is it?
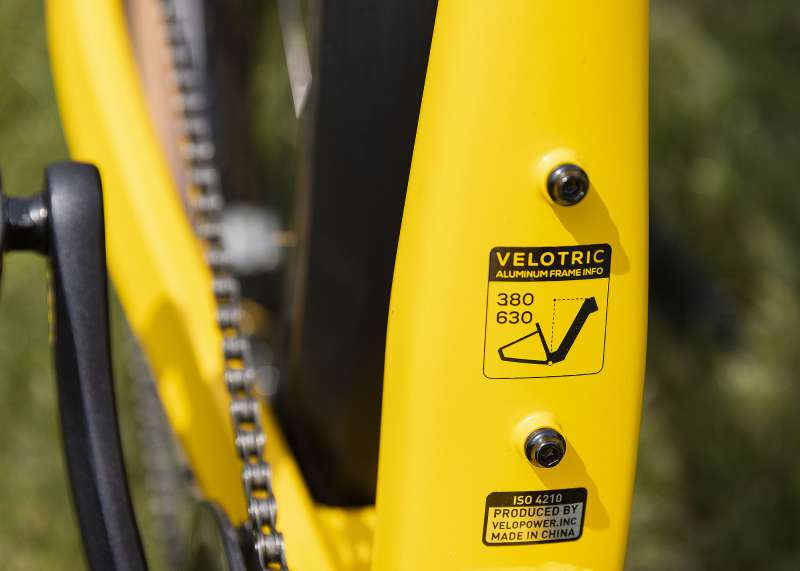
The Velotric Discovery 1 is an eBike developed by one of the cofounders of Lime — an electric scooter and eBike ride-sharing company. Adam Zhang, the Lime co-founder responsible for hardware design, has launched this new company (Velotric) in an effort to improve the eBikes available for purchase by consumers. A noble idea and, based on a bit of research into some similarly priced and even more expensive eBikes, I think Velotric has succeeded in raising the bar for reasonably affordable consumer eBikes.
What’s in the box (and it is a pretty big box)?
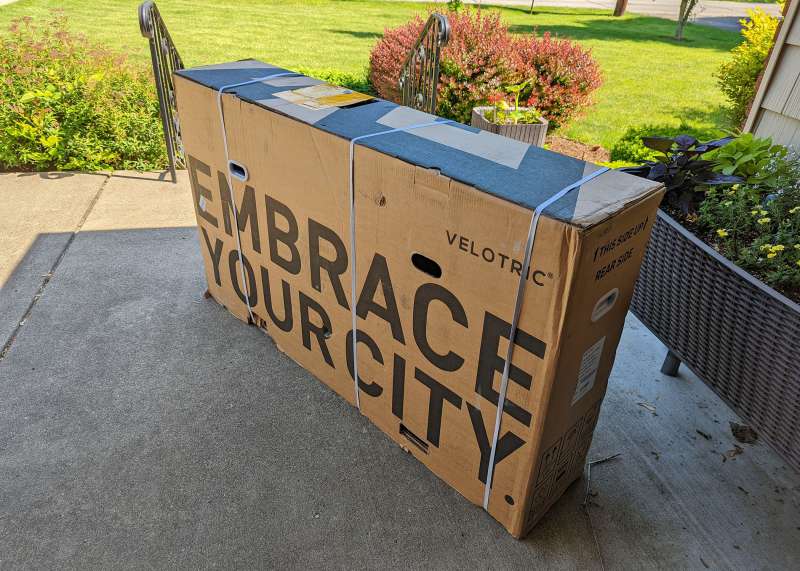
- Partially assembled Velotric Discovery 1 eBike
- Front wheel
- Battery
- Battery Charger

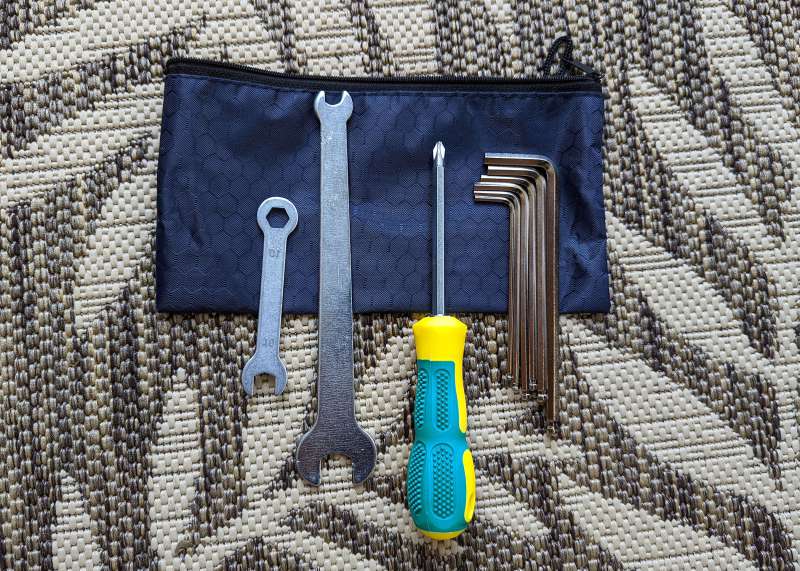
- Toolkit for assembling the bicycle
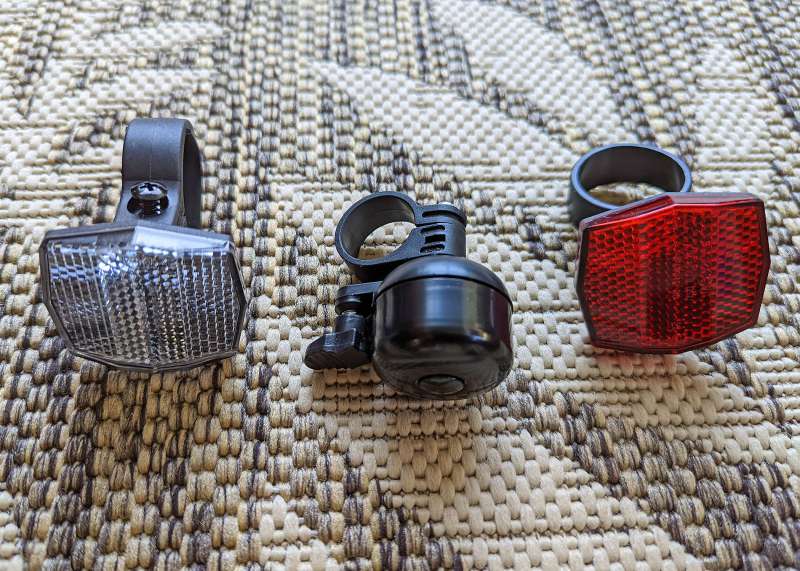
- Two reflectors
- Handlebar bell
- Quick start guide
- Owners manual

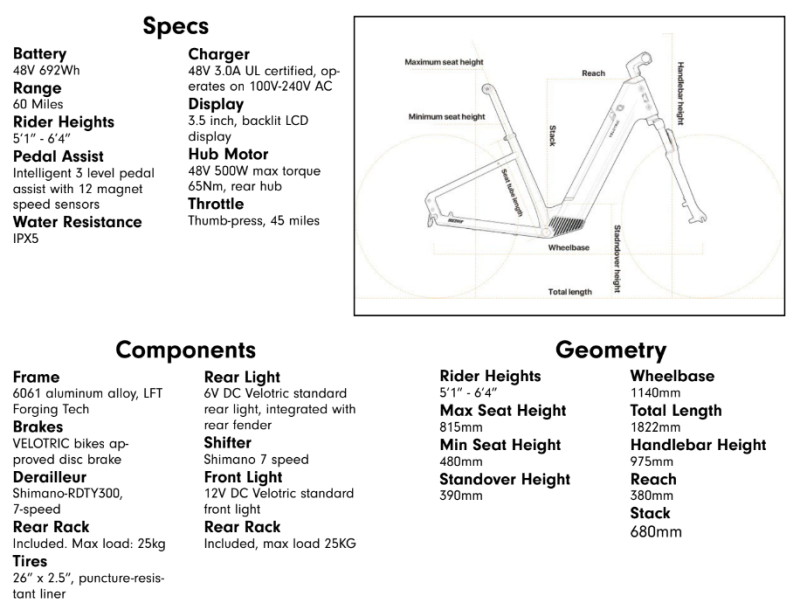
Hardware specs
- 48V 14.4Ah Battery
- 60 Mile Range
- 500/900W rated/peak with 65Nm torque motor
- 440lbs Payload
- 5’1” – 6’4” Rider Height
- Available in five colours: Mango, Indigo Grey, Cyan, Jet Black, and Pearl
A bit more specification detail (I nicked this from the Velotric media kit for the Discovery 1).
Setup
- Remove the top cover of the box and remove all items.
- Inspect all items and compare them to the inventory in the quick start guide.
- Straighten the handlebar and install the front wheel axle into the front fork — lock using the quick release.
- Assemble the front fender onto the front wheel.
- Calibrate front and rear disk brakes if necessary.
- Assemble the handlebars.
- Adjust the seat height.
- Assemble the pedals.
- Assemble the front headlight.
- Install and charge the battery.
- Start the bike.
- Ride.
Design and features
My initial thoughts on the Velotric Discovery 1 eBike… I like the Cruiser style design in that this bike is set up to be ridden sitting upright and comfortably — not crouched over the handlebars like someone training for the Tour de France. I like the overall look of the bike, from its integrated battery to the cables that are wrapped where visible and routed inside the frame where possible. The excellent glossy mango paint job and contrasting matte black parts make for a pretty classy look. Mostly I like the reduction in the work required from me to get from point A to point B.
This eBike from Velotric is an all-weather piece of equipment. It is rated IPX5 which basically means it will not allow water jets from any angle to penetrate the electric components of the machine. This is indicated by the 5 in IPX5. It is one rating higher than needed to feel good about riding the Discovery 1 in the rain. So, presumably safe to run it through a car wash, but don’t take it under water.
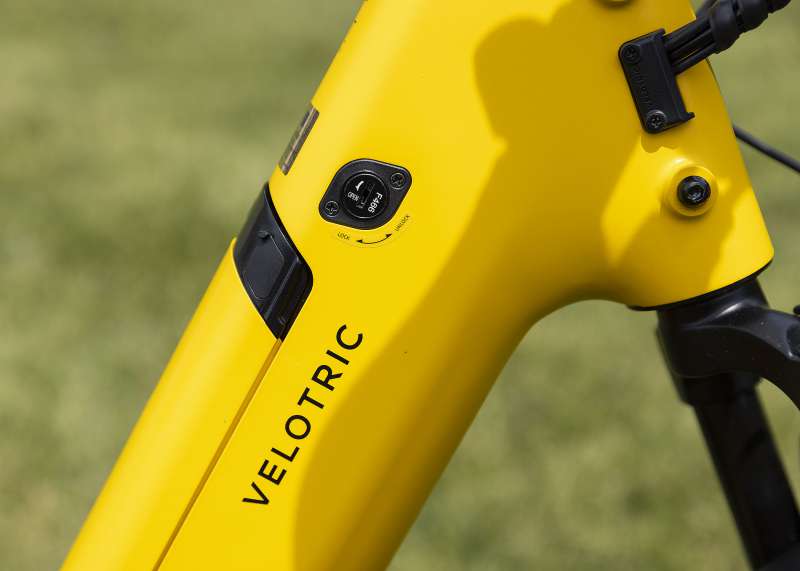
The Velotric Discovery 1 eBike comes with a key and lock integrated into the top of the frame just above the battery. This lock secures the battery in the frame. It is not necessary to remove the battery to charge it as the soft rubber cover over the charging port is accessible when the battery is installed in the bike. The manual suggests that you turn the bike off before plugging in the battery charger. The lock on this bike functions as a latch for the battery. It securely locks the battery into the frame which should help deter thieves.
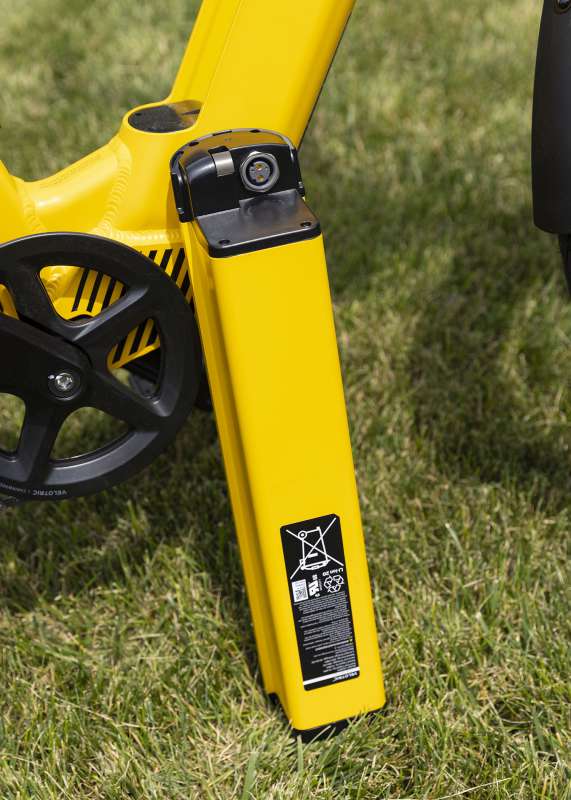
The Discovery 1 eBike comes complete with a ‘Tesla grade’ (according to Velotric) 48V 14.4Ah with a 60 Mile Range using battery cells manufactured by LG/Samsung. This is a better range than that advertised in the listings I reviewed for comparison on Amazon — even for eBikes with a higher price tag. I have not personally run the battery all the way down to verify this range. I have been using the bike on a regular basis to make short runs around the neighborhood and after more than 15 miles on the current charge, the battery meter is still showing nearly a full complement of bars.
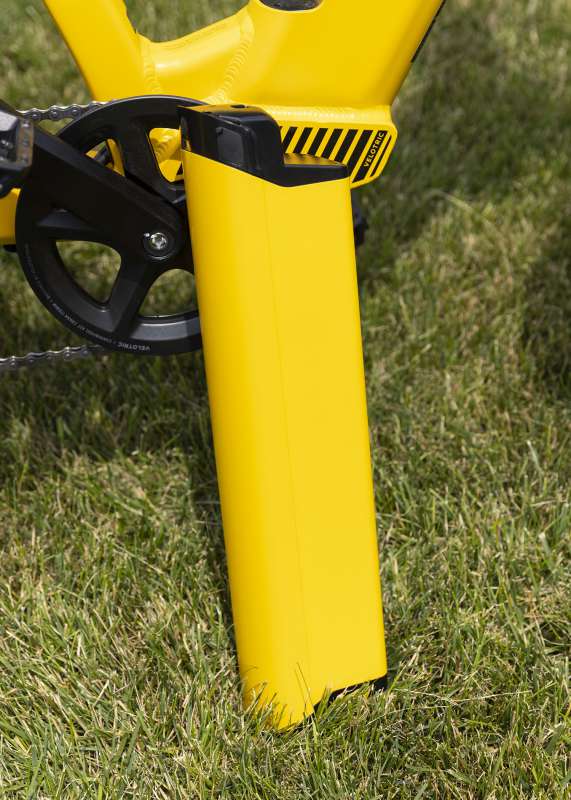
The battery is solidly constructed with a casing made of a metal material that seems similar to the aluminum material used in the frame. It feels solid. The battery has the same glossy paint coating and looks like part of the frame when installed on the bicycle.
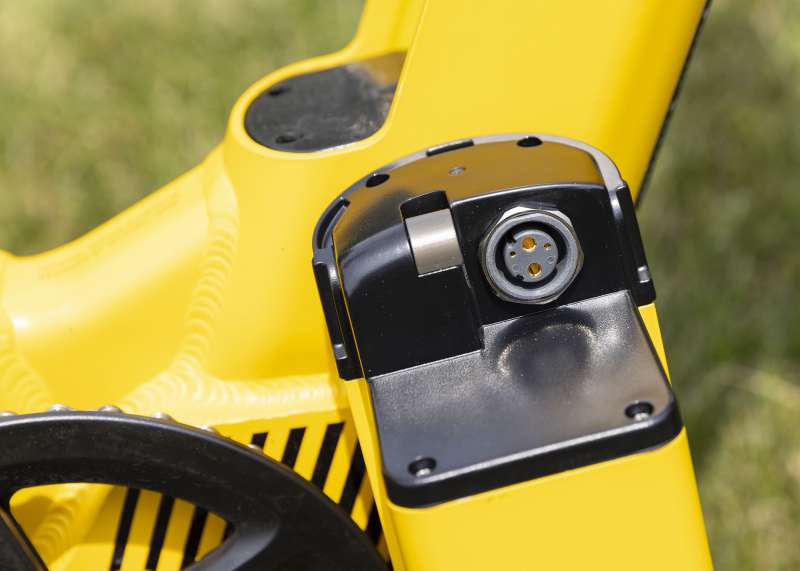
The electrical connectors on both the battery and bicycle side are heavy-duty and durable.
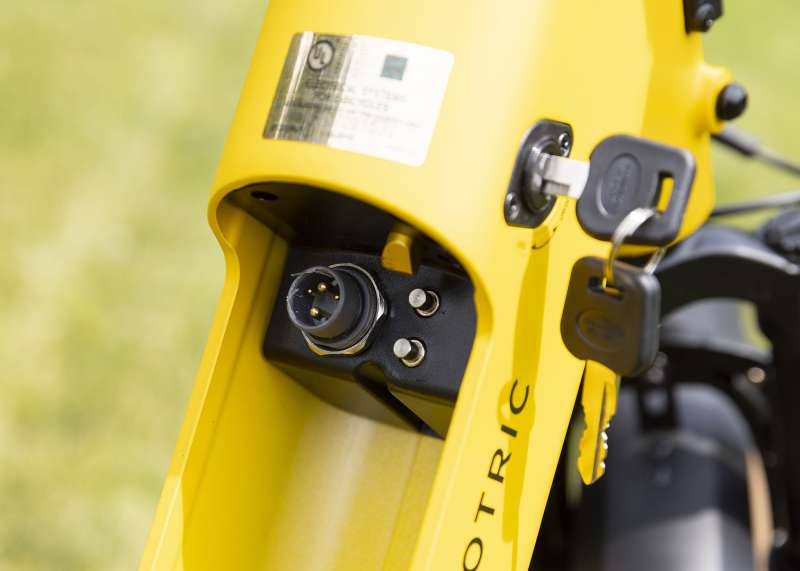
The latch behind the Velotric Discovery 1 eBike’s lock mechanism solidly attaches the battery into the frame. There are two spring-loaded posts next to the electrical connector inside the eBike frame that gets depressed when the battery is fully installed. They probably perform some electrical safety function. The Discovery 1 battery system seems to be well designed. The parts fit together cleanly with a streamlined look that appeals to the eye. In fact, at a glance, it is not obvious that the Discovery 1 is an eBike because of the way the fairly large battery is integrated into the frame. This bike is perfect for someone who wants to be stealthy with their motorized assistance!
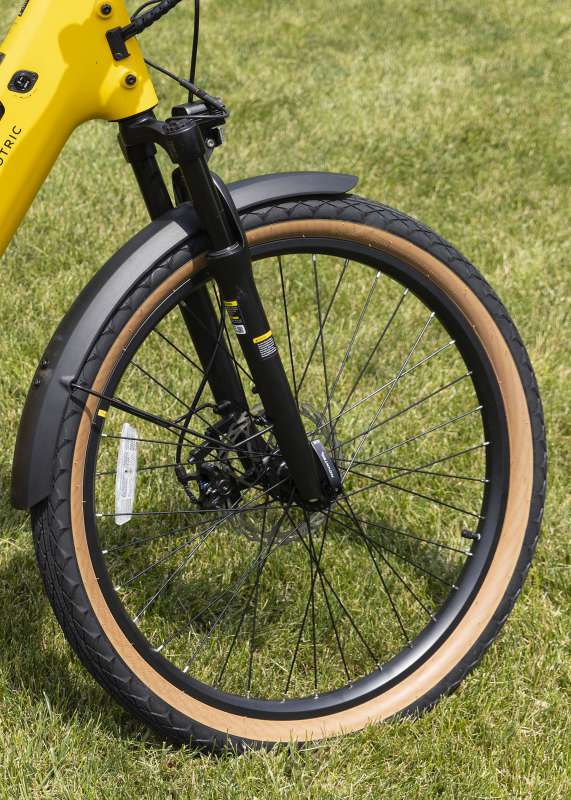
The Velotric Discovery 1 eBike comes equipped with two 26X2.5 inch wide puncture-resistant tires. These tires are a bit wider than those on any bicycle I have ever owned, but I found the ride comfortable and the bicycle reasonably agile. They are a bit oversized and wide enough to provide stability, but not what I would call fat tires — like the ones on some beach cruisers I have rented while on vacation.
You remember vacations, right? Those trips we used to take prior to Spring 2020.
Tan sidewalls are a pretty nice visual touch. The front tire is mounted to suspension forks with adjustable compression to either soften or stiffen the ride. I found the default settings to be a little bit too soft, so I dialed up the compression a bit. Both front and rear tires have full-size fenders to help keep the water and mud off the rider in inclement weather.
The cables for the brakes and wiring are nicely wrapped. The designers at Velotric have obviously put a lot of thought into the visual aspects of this machine. This is just one of many nice aesthetic touches.
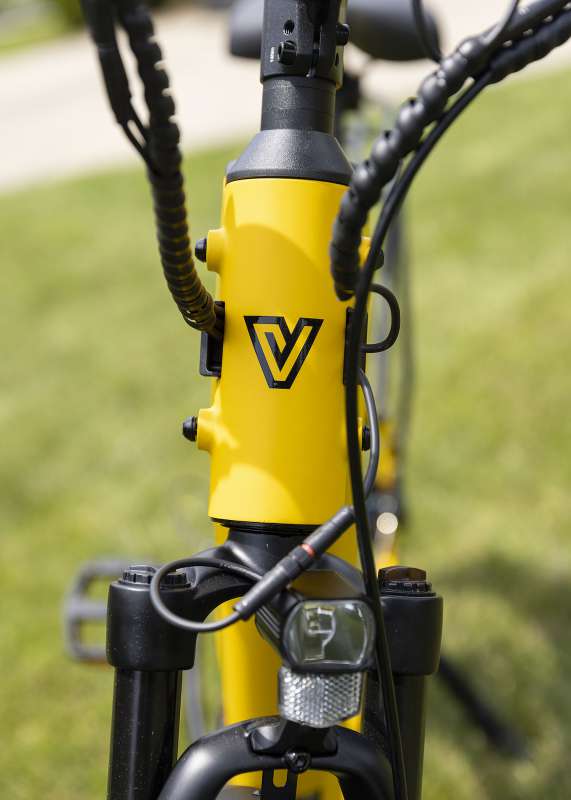
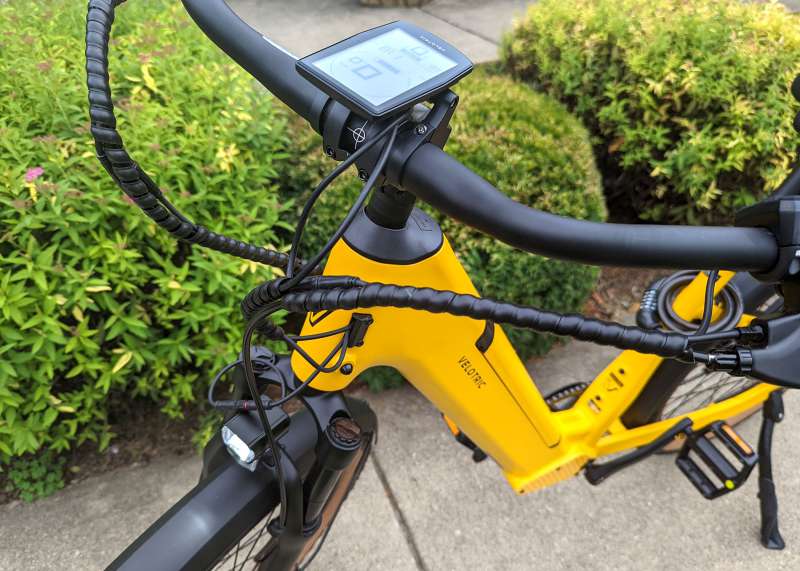
The cables and wires enter the head tube on both sides of the Velotric Discovery 1 eBike just below the handlebars. All of the cables and wires have been routed through the inside of the frame — which gives the bike a cleaner look than a lot of other eBikes on the market. Probably an advantage of designing the machine to be an eBike from the ground up.
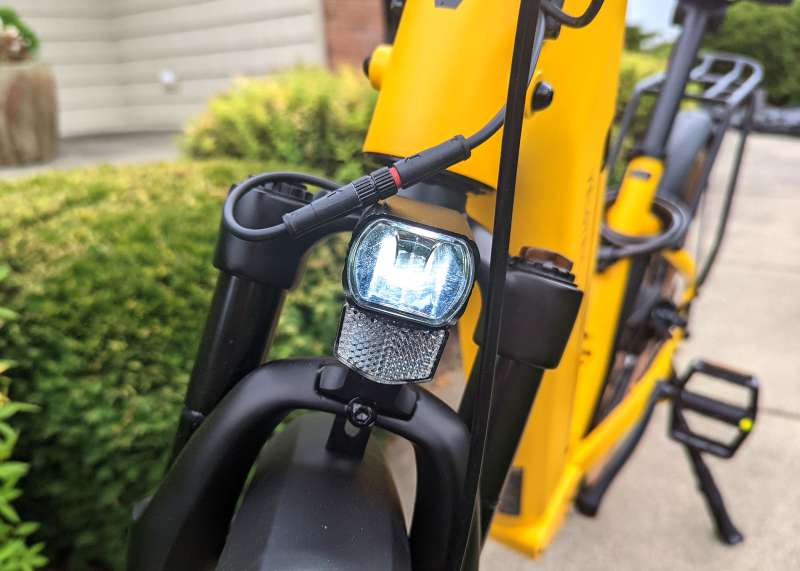
There is a white LED headlight mounted to the front that can be turned on or off by holding the “+” button on the assist level controller (left side handlebar) down for about two seconds. You can turn the headlight back off by holding the “+” button down again for about two seconds. Note — the two connectors sitting on top of the headlight. Because the headlight has to be assembled onto the front fender after the fender is installed on the bicycle, these power connectors were needed.
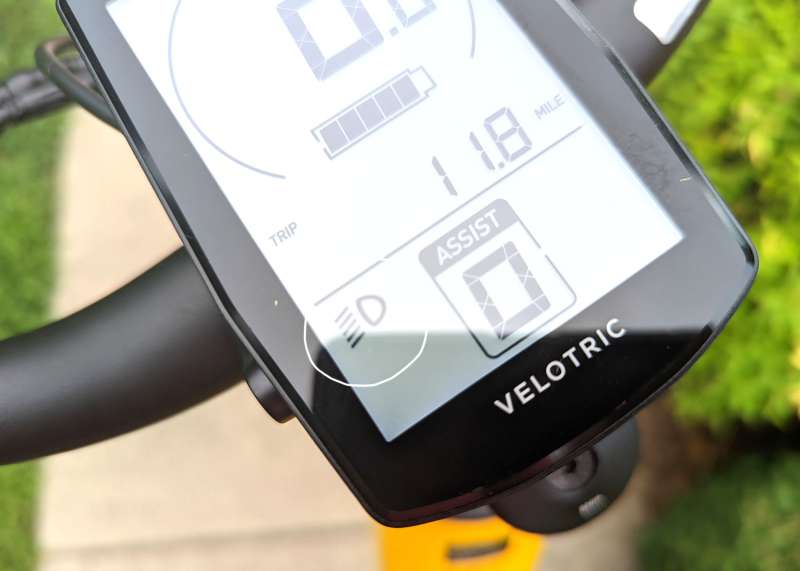
There is a headlight indicator in the lower left corner of the main control panel that lets you know if you have the headlamp on or off. I noticed the overall backlighting of the built-in LCD control panel dims a bit when I turn on the headlight — kind of like the way my car’s instrument panel dims when I turn on the headlights at night. The panel is still bright enough to read in daylight even with the headlight on which is good because I typically run with the front light on day or night. Anything I can do to help the passing cars see me seems like a good idea to me. A flashing mode for the headlight would be a really nice safety addition.
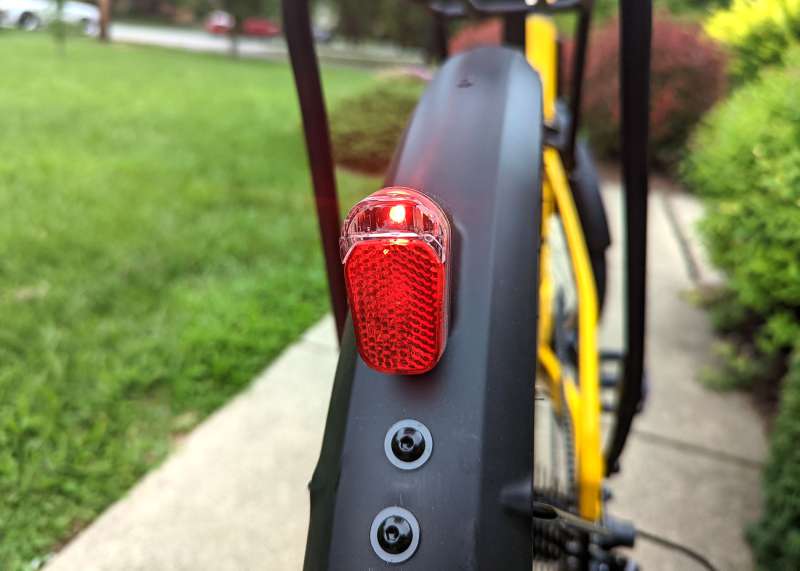
The Velotric designers also included a red rear LED tail light that is built into the rear fender. This one is always on and gets significantly brighter when I apply the brakes — just like the brake lights on my car. This is a pretty nice safety feature and something I had not noticed on a bicycle before.
The built-in LCD control panel is relatively simple. I’m sure Velotric could have included a lot more bells and whistles here. I looked at pictures of several online that had 3 or 4 times as many indicator lights, bar graphs, etc. For me, it makes a lot of sense to keep this display simple with just the information you really need. When I am riding my bike I want to keep my eyes on what is going on around me — not a screen mounted to the handlebars.
As an example of what I mean, earlier this week I put my car in gear and was starting to pull forward in the gym parking lot when a kid on a regular bicycle drove by inches in front of my car — his face almost touching his cell phone. Fortunately, I was able to stop and avoid a collision. When he was about two bike lengths past the danger he suddenly seemed to register that he was nearly hit by a car. He turned and looked back over his shoulder at me with wide eyes. Anyway, not exactly the same thing, but you get my point.
And kids, don’t text and drive … your bikes … or cars. Let’s all try and pay attention to what we are doing, OK?
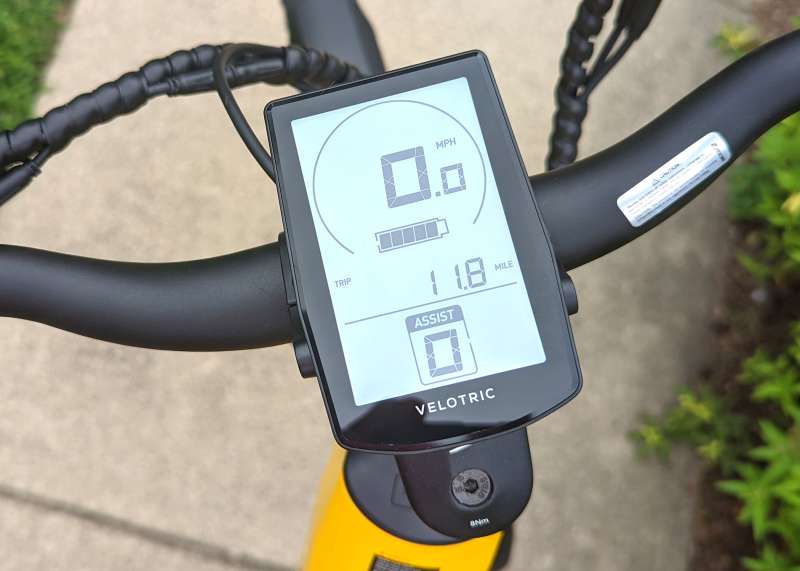
Back to the panel. It provides a speedometer reading, battery charge level, trip meter, assist level from 1 to 3 (more on that later), and the aforementioned headlight indicator. That’s it and I really only find myself glancing at the first two indicators when I am riding. The trip meter can be reset by holding the power and assist level “+” buttons down at the same time for two or three seconds. The panel is well-lit and easy to read even in bright sunlight.
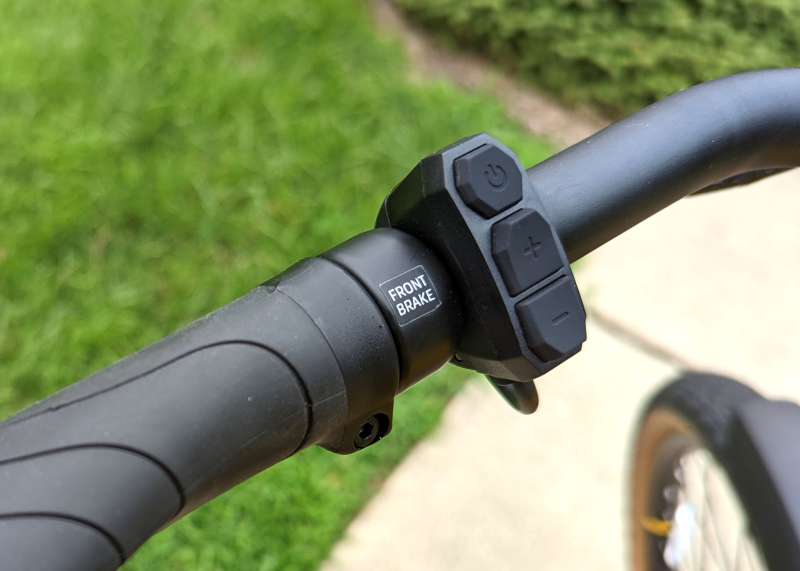
Let’s discuss the electronic controls for a bit. The power on and assist level “+” and “-” controls can be found on the left side handlebar. Holding the power button down for two or three seconds turns the Discovery 1 on. Holding it down for two or three seconds again powers it down. As mentioned previously, holding the “+” button down turns the headlight on and off. Although not visible in this photo, there is also a standard front-hand brake just on the opposite side of the handlebar grip.
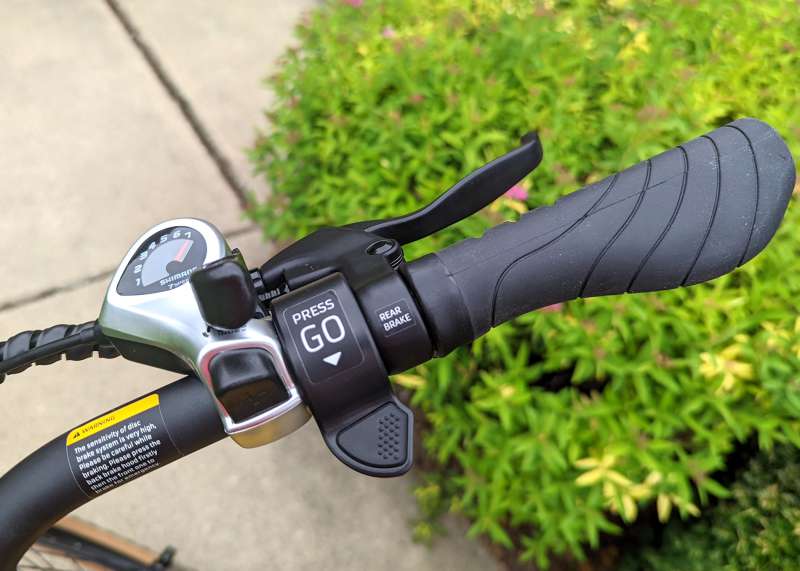
Here we see the Velotric Discovery 1 eBike’s controls mounted to the right side of the handlebar. This photo also affords us a better view of the handlebar grip which is soft and ergonomically shaped to fit the hand. I find it to be a very comfortable grip and wouldn’t change anything about it. The throttle is also mounted on this side of the handlebar. It is located to fit comfortably under the right thumb. if you press this throttle down the Discovery 1 will begin to accelerate with a top speed that is controlled by the assist level. At assist level 1 the eBike I was given to test runs around 13 MPH on flat streets. Assist level 2 brings the speed up to approximately 17 MPH and level 3 tops out at about 21 MPH. These speeds are a bit better than advertised by Velotric so hurray. I was talking about the bike with a friend in Germany and he told me that in his country eBikes are allowed, but they can only assist a rider who is pedaling. In other words, this thumb throttle mode would not fly in Deutschland. I found this in the media kit from Velotric:
Throttle on-demand: Accelerate with pure electric power using the throttle-on-demand (US models only).
This would seem to back up my friend’s position regarding the use of eBikes in Germany (and everywhere outside the U.S.). It may also make a statement about Americans and our relationship with exercise. I say. “Don’t be so judgmental people of the world!”
We have much bigger problems right now than throttle-on-demand.
This is as good a place as any to discuss the Velotric Discovery 1 eBike’s pedal assist function. Pedal assist works much like the throttle — the only difference as far as activating pedal assist is that the bike just automatically starts helping when you start pedaling. When you use the throttle control you are not required to pedal. During my testing of the Discovery 1, I did not see a huge difference in speeds between the pedal assist mode and the throttle mode. Generally, I could get an additional 2 MPH without too much effort on my part.
That is exactly what I have been giving the Discovery 1 up to this point — not too much effort.
If I want to work at it I will jump on my old bike thank you very much.
The rear brake lever is also located on the right side and, unlike my photo of the left side handle, you can see the lever in this photo. Both the front and rear brakes are mechanical disk brakes using old tech cables to actuate the brake calipers. We will have a look at the rest of the brake system a little farther down the page.
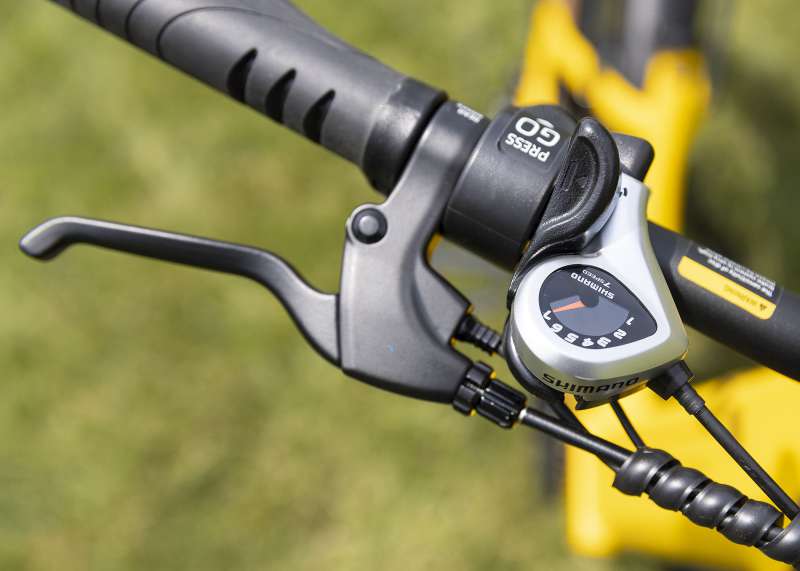
Sticking to the left side of the handlebar and continuing with our old tech mechanical bicycle control theme, let’s have a look at the Shimano 7-speed gear shift controller. This control directs the Shimano derailer to move the chain between the gears on the rear wheel. This shifter has a lever to change to a lower gear and a push button to change to a higher gear. the button is more visible in the previous photo. My older trek bike had a single lever to raise and lower the derailer — although it did have two separate controls to afford me 21 speeds. My newer Progressive Pro GT bicycle has dual Shimano shifters that are pretty similar to the single shifter on the Discovery 1. Because the throttle control has been positioned between the handle grip and the shifter, it is a small stretch to reach the gear shift lever. I did not struggle with this at all. Full disclosure, I only shifted gears to test them out for this review. I find that with the electric motor assist and the mostly flat ground around here I rarely feel the need to downshift on this bicycle.
I only wish I could say the same for my old-fashioned manual bicycle.
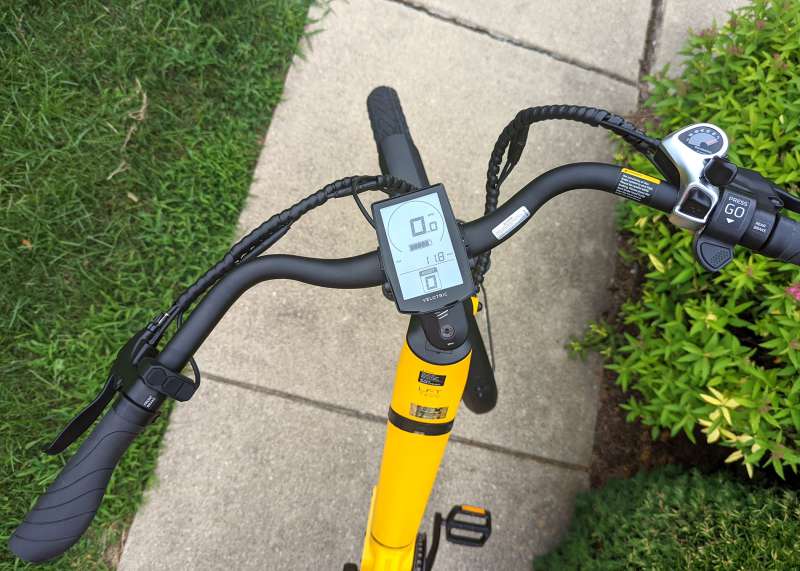
Here is a more complete view of the front handlebar with its LCD control panel, left and right handgrips, electronic controls for the motorized assist, and manual controls for the brakes and chain gears. The entire package is laid out in a way that is effective to use and really pretty easy on the eyes.
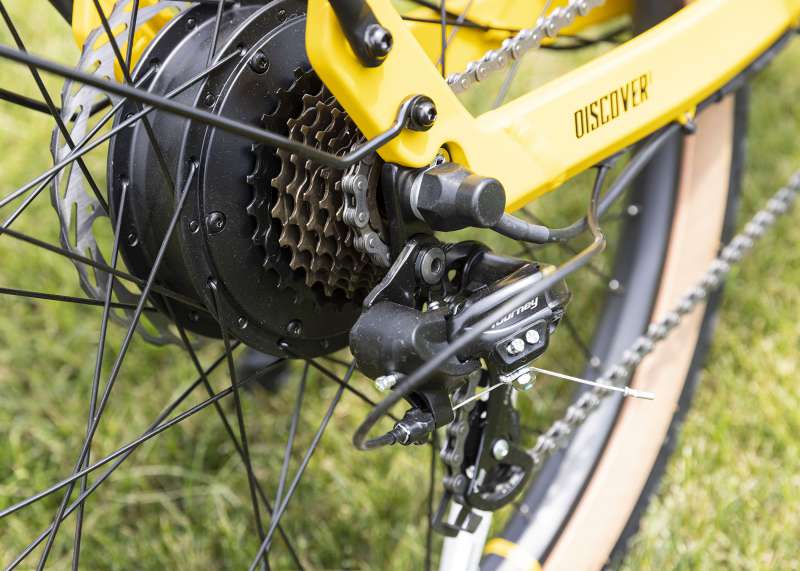
Taking a look at the rear wheel we find the Shimano derailer and seven gears. We can also see the hub that contains the 500/900W rated/peak motor that generates 65Nm of torque to help you get around town without putting so much effort into it. It really isn’t obvious that there is a motor in the hub. Velotric put a durable clear coating over the paint on the chainstay portion of the frame to protect the paint from chain slap. This is not really visible in the photo, but worth noting if only as one more example of the attention to detail given to this bicycle design.

This shot of the other side of the Velotric Discovery 1 eBike’s rear hub gives a better view of the braking system including the disk and caliper.
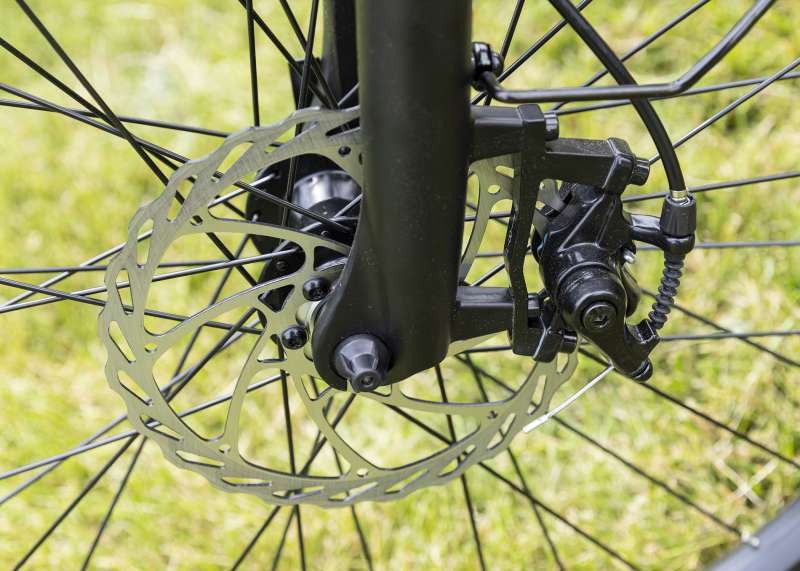
Here we can see the front disk brake and caliper. This is not the heaviest braking system I have seen on a bicycle, but I found the brakes to be more than adequate for a commuter/cruiser eBike to be used around town. I probably would want a more substantial braking system if I were about to plunge down the side of a mountain. I have been riding the Discovery 1 for more than a month now and at no time have the brakes made me feel unsafe.
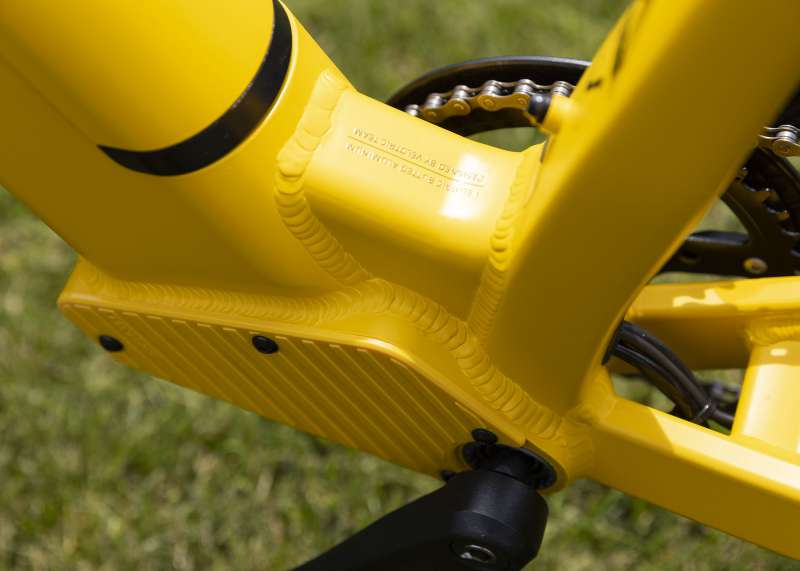
In another nod to the designers at Velotric, let us have a look at the bottom bracket. As you can see, this is really very heavy-duty construction. Because the Discovery 1 has a step-through frame for easier mounting and dismounting, there is no top bar to reduce the strain on this critical intersection of frame members. This bike is designed to travel at speeds in excess of 20 MPH and allows for a maximum payload of 440 lbs. It is good to see that this portion of the bike frame is maybe even a bit overdesigned. The access cover is sturdy and also looks pretty good. Here you can also see where the wiring and cables exit the bottom bracket to provide power and control to the motor, rear brakes, and chain derailer. The wires and cables were routed to the inside of the frame through the head tube below the handles bars. From there they traveled inside the frame through the down tube — exiting here to make the necessary electrical and mechanical connections at the rear wheel.
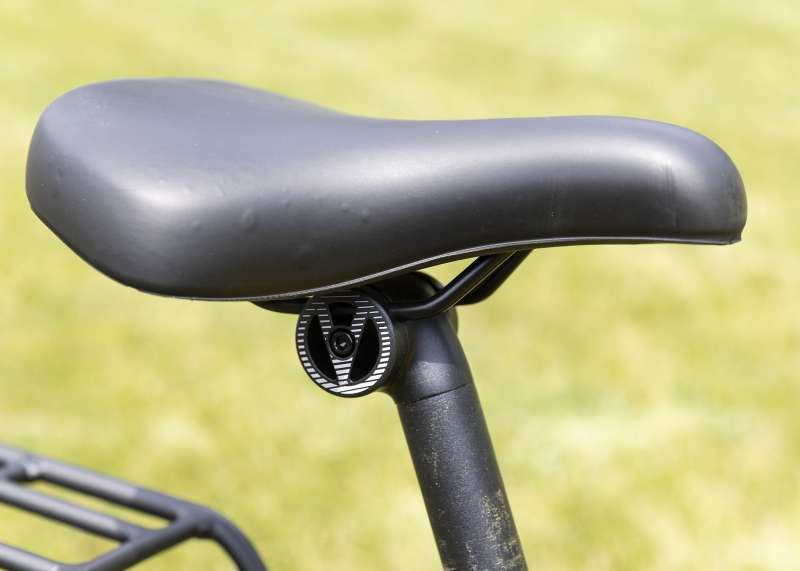
Nothing too terribly exciting here, but the seat is comfortable and rides nicely. Easy to adjust the height, and angle, and even shift it forward or rearward over the mounting post. This would be easy to replace or upgrade if you like, but I am not feeling the need.
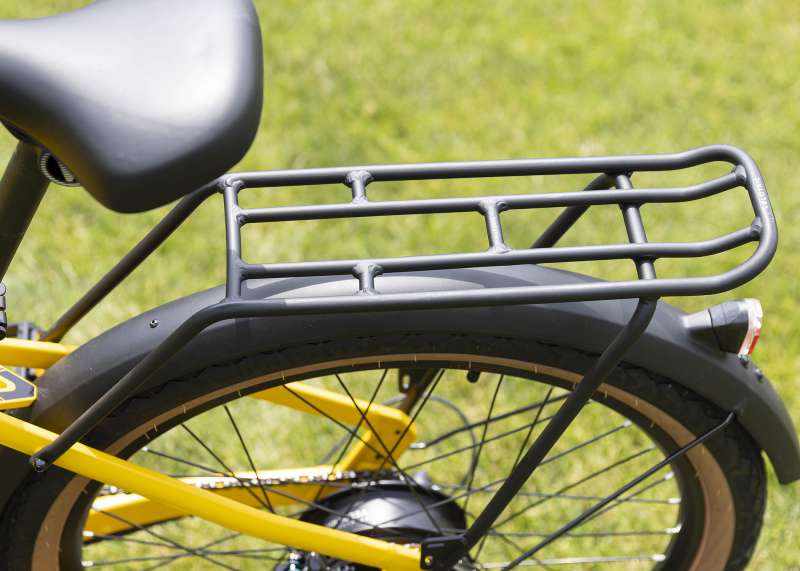
The included rear rack is rated to carry up to 25 kg ~ 55 lbs. Like all of the other black components on the Velotric Discovery 1 eBike, the rack has a really nice matte black finish that contrasts nicely with the glossy mango color of the frame.
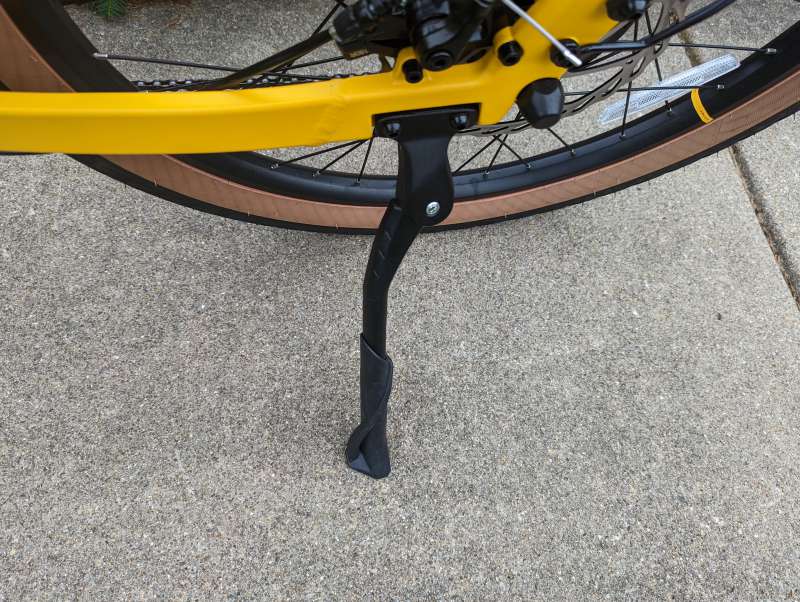
The integrated (notice the cutout in the frame for the mount) rear kickstand looks nice and props the bike up nicely. It has been located to avoid any possibility of pedal interference.
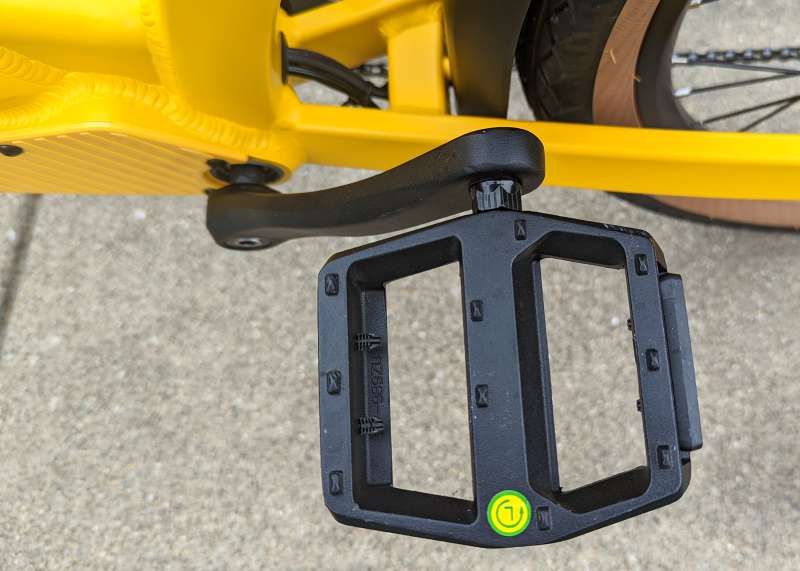
The plastic pedals are OK and I haven’t yet replaced them, but this is probably the one thing on the bike that I will update in the near future. I left them as delivered at least until finishing this review.
Here we see the two threaded bosses for a standard water bottle mount. I haven’t gotten around to adding one yet. Oddly enough, I do not find myself getting nearly as thirsty riding the Discovery 1 as I did riding my old bicycle!
See the Velotric Discovery 1 eBike in action
What I like
- Riding a bike was never so easy.
- Stylish and heavy-duty design.
- Long battery life.
- Designed to ride in an upright comfortable position.
- Brake light.
What I’d change
- Sturdier pedals
- Flashing mode for front light
Final thoughts
I love the Velotric Discovery 1 eBike and would recommend to it anyone who needs a little help getting around town.
Price: $1899.00 (currently on sale for $1349.00)
Where to buy: Velotric – Discovery 1
Source: The sample of this product was provided by Velotric.

Now retrieving an image set.
Google Review Tap Cards (3-Pack) by TapFive - Tap for Instant Reviews - All Phones Compatible - Reusable Smart Tap NFC & QR - Boost Business Reviews - Powered by TapFive (3 Card Pack)
(as of July 13, 2026 18:55 GMT -05:00 - More infoProduct prices and availability are accurate as of the date/time indicated and are subject to change. Any price and availability information displayed on [relevant Amazon Site(s), as applicable] at the time of purchase will apply to the purchase of this product.)
Now retrieving an image set.
Gadgeteer Comment Policy - Please read before commenting
Looks very well constructed and nice, clean welding job for the frame sections. It’s apparent lots of thought went into this bike and a great price, especially the sale price. Heck, it’s hard to get a good non-electric bike for less than a grand anymore.
You got that Right!
Look likes that Boston Dynamics dog morphed into this bike.