
REVIEW – If you’re of a certain age, like me, you remember the first TV remote control – it was you. Your parent would tell you to get up and go change the channel to one of the other two that your TV received. Then, TVs started coming with Infrared (IR) remote controls, giving you the supreme freedom to change channels from across the room. Of course, then, cable TV arrived with their wired remotes on 20-foot wires. When cable boxes finally got actual remotes, it came at about the time sound systems for TVs arrived. Ultimately, we wound up with a pile of remote controls and 132 simple steps to get the TV or projector, cable box, amplifier, tuner, and a zillion other components turned on and operational. Finally, the universal remote concept took off and we got our hands on a single remote with 10,000 very small buttons that could control every single thing after connecting it to a PC and programming it with all the different remote control specifications. But…you still had to pick it up, aim it in the general direction of whatever you wanted to control and actually press the right buttons. Wow – that is so…yesterday!
Today, we’re in the age of smart home assistants and home automation. Orvibo has a solution called Magic Cube that adds voice control and access to control everything right from the always-in-your-hands smartphone we Gadgeteers dutifully carry. Does it hit all the right buttons? Read on!
What is it?
The Magic Cube is an infrared (IR) blaster that sends out IR remote control signals in a 360-degree pattern. It can emulate many different remotes from multiple manufacturers, allowing you to automate IR tasks and add voice control.
What’s in the box?
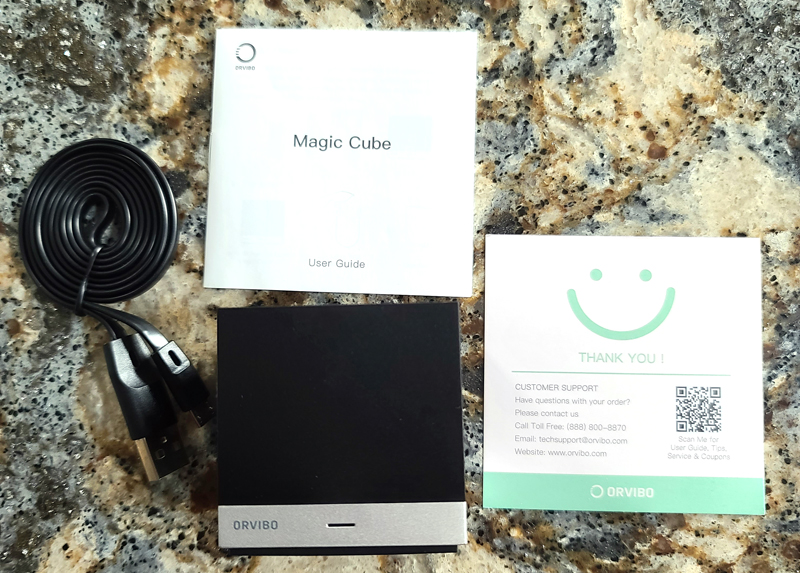
- Magic Cube
- USB-A to micro-USB cable
- User guide
- Thank you card
- NOTE – a USB power supply is NOT included
Hardware specs
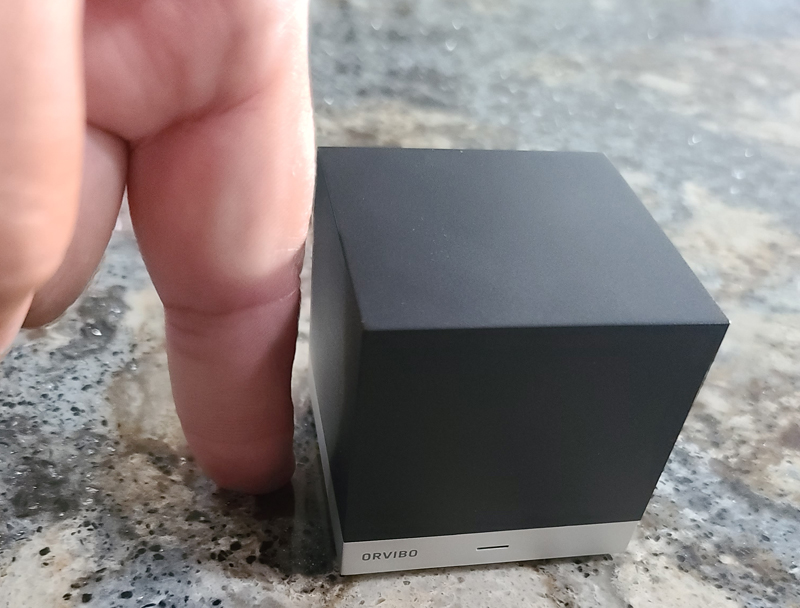
- Product size: 53x53x54mm (about 2″ square)
- Weight: 102g
- Case material: PC + ABS + TPU
- Wireless type: Wi-Fi 2.4GHz
- Wireless standard: IEEE 802.11 b/g/n
- Infrared frequency: 20~60KHz
- Infrared transmittance: 93%
- Infrared remote distance: 8m+
- Infrared remote angle: 360°
- Supported IR appliances brands: 8000+
- Voice control: Alexa and Google Assistant
Design and features
The Magic Cube is just that – a cube. It is black plastic with a silver band at the bottom. The very bottom is non-slip rubber, and the entire base is a button. You initiate the Wi-Fi pairing by pressing the entire cube down. In the lead image, you can see the status LED right in the center of the silver band. This LED lights as follows:
- solid red – default state – not connected
- rapid flashing red – configuration mode
- slow flashing red – connecting to the network
- solid blue – connected and working normally
- single blue flash – transmitting an IR signal
- solid purple – learning IR signal from unknown remote
On the back of the cube, we find the micro-USB port.
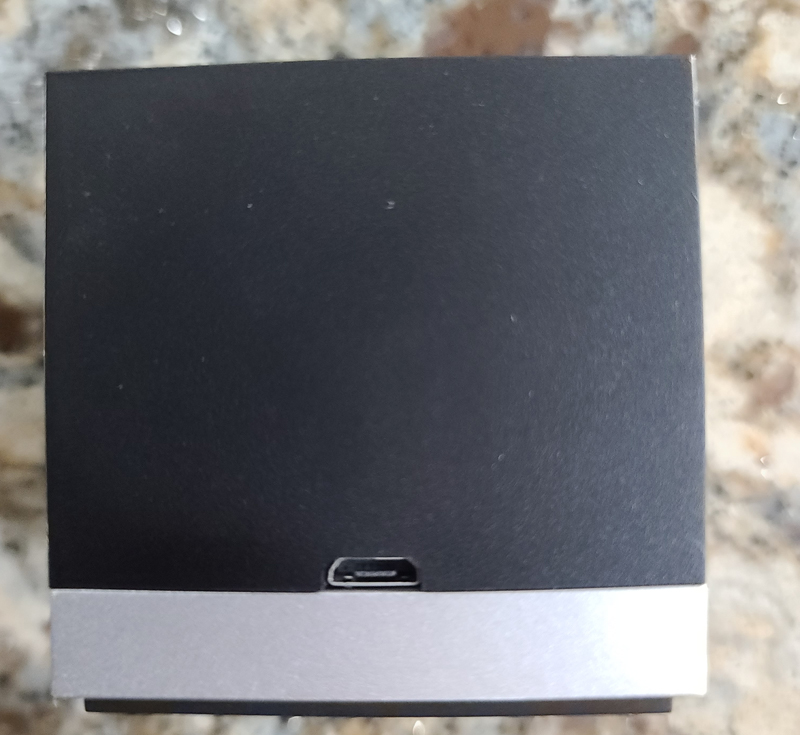
Again, I want to note that the Magic Cube does not come with a power supply. I guess the expectation is that we all have USB power plugs sitting around in drawers. In my case, that was true, but if you don’t, figure on adding a few bucks for a USB power supply.
I want to emphasize – this thing is tiny. At roughly 53mm square or just a shade over 2″, it disappears on a countertop.
Setup
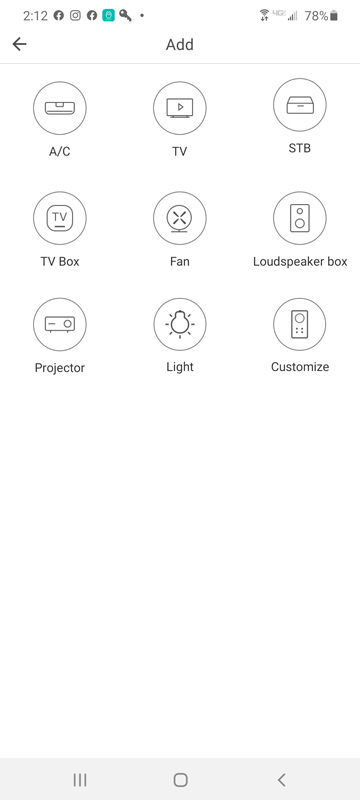
Setup starts with downloading and installing the Android or IOS Orvibo Home app. After plugging in the cube, you fire up the app and click “+” to add a new device, then choose Remote and then Magic Cube. When the app starts searching, you press on the top of the cube to start Wi-Fi pairing. Once paired, you can start adding remotes and scenes. You can also customize your cube with a photo to show in the app. I did this and it appears in the second photo in the next section.
Performance
Adding your remotes to the Magic Cube is what makes the magic happen. Magic Cube supports a huge number of manufactures and remotes. If it has an IR remote, Magic Cube either supports it directly, or it can be learned.
I added my Xfinity set-top box (STB) remote and Samsung TV remote with no issues. If you have an oddball remote, the “customize” feature lets Magic Cube learn your remote’s codes one button at a time.

I could have given them friendlier names but left them at the default. I will probably change this in the future.
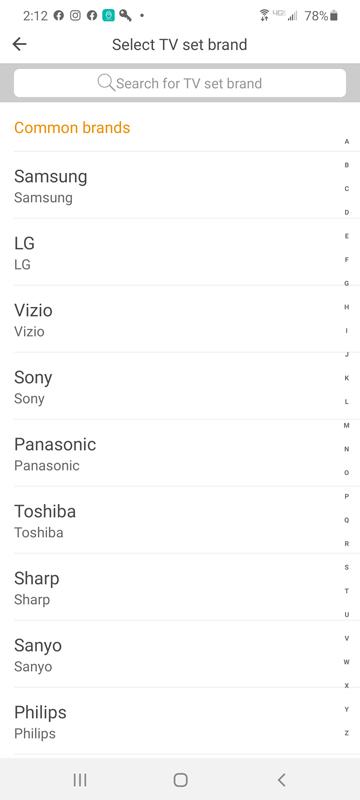
When you add a device, a huge list of choices comes up with popular ones listed first. Within each brand, there are a ton of remote control choices based on the brand’s offerings.
From the app, I could control both the TV and cable box.
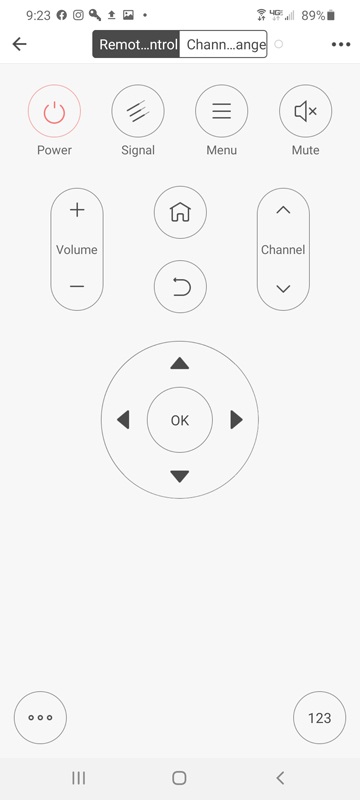
That is an image of the TV controller. The cable controller is similar. Clicking the “123” button brings up the keypad.
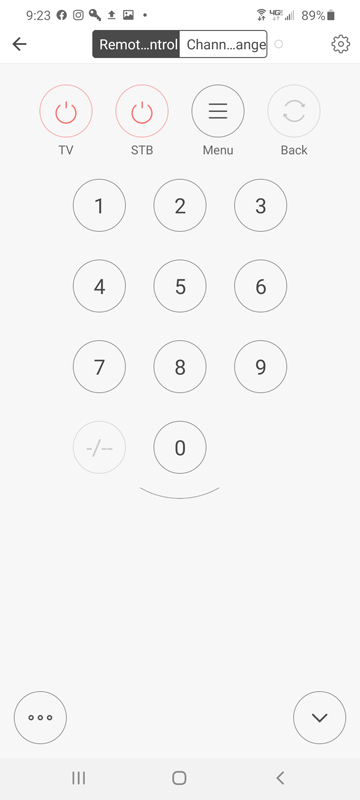
The “…” button brings up the rest of the specialty buttons on that remote, like the color buttons, menu, A/B/C/D, and other less-used buttons.
Having the ability to control your TV and cable box from your phone is nice, but creating scenes is where the power of the cube really sits. A scene is a series of commends from one or more remotes. You can customize scenes with individual photos, but I got lazy as I didn’t feel like downloading network logos. 🙂
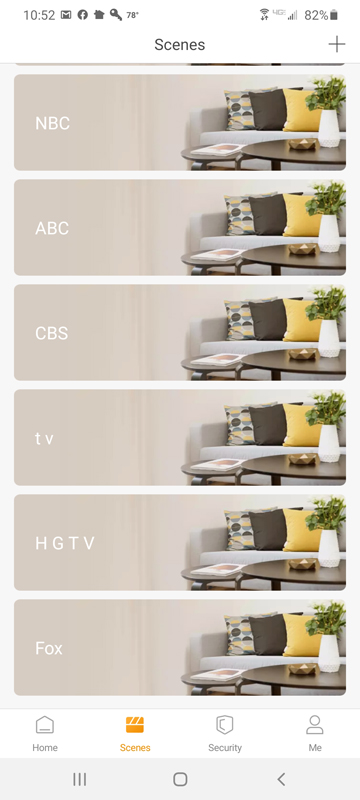
I set up a bunch of scenes to change the channel on the Xfinity box. Here’s the scene for “CBS”.
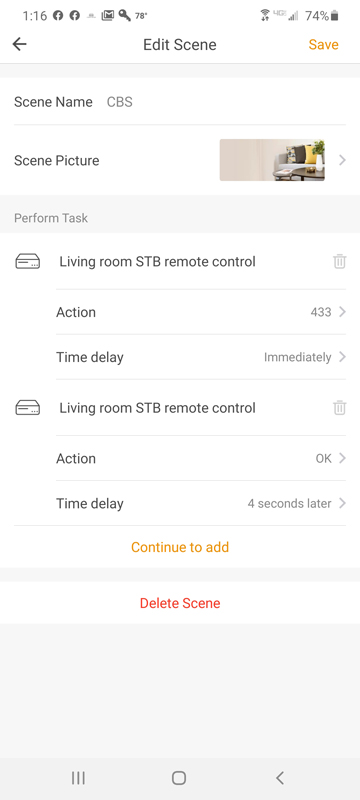
Scenes are incredibly powerful, allowing you to set up complex interactions with multiple remotes and commands, but doing so is super frustrating. To set up this above scene, I had to do the following:
- Click the Scenes icon
- Click “+”
- Enter a scene name
- Click Add Execution Task
- Click Device
- Choose STB remote control
- Click the back arrow
- Click the Set Action button
- Click the 123 button
- Click 4 3 3
- Click the back arrow
- Click “Continue to add”
- Click Device
- Choose STB remote control
- Click the back arrow
- Click the Set Action button
- Click the OK button
- Click the back arrow
- Click the “Time delay – immediate” button
- Click “4 sec” (more on this below)
- Click Save
That’s 21 steps to perform a simple task to hit “433” and “OK” on the remote. To program scenes for 10 channels, you’d perform over 200 steps! Crazy! Each press of a button on a remote control is a new step in a scene. The exception is the number buttons, where multiple numbers can be combined in a single step. Now, more about the time delay. When I first programmed this, I left the time delay as “immediate” for everything. The app said I can’t do that because the cube can’t send more than one command at the same time. OK, I thought – I’ll send the “OK command 1 second after the numbers. Wrong! It sent the OK 1 second after starting the “433” sequence, so it tuned to channel 43. Doh! I moved the delay for the “OK” to 4 seconds, and now it works fine. The issue to me is that the app isn’t smart enough to know how long a command takes – that’s up to you to figure out.
Once scenes are set up, clicking on the scene runs it, changing the channel. But, I already mentioned that touching the remote is old school. I added the Orvibo skill to Alexa and tried voice control. To invoke a scene, I said, “Alexa, turn on <scene name>.”
This is where another complaint came up. Alexa should be able to discover new scenes by running the Discover Scenes action in the Alexa app. It does that successfully with other skills, but not with Orvibo. The only way I could get Alexa to discover new scenes was to disable the Orvibo skill, enable the skill again, and run the Discover Devices action again. That’s frustrating.
I was able to add a scene that turns on the cable box, turns on the TV and tunes to NBC. The complexity of a scene is only limited by your creativity and ability to calculate how long to delay each step to allow for the completion of the previous step. I also tested a simple scene that turns on my cable box and then the TV. Since my cable box shuts down at night for power savings, it has to be turned back on in the morning. So now, I can walk into the living room in the morning and say, “Alexa, turn on TV”, and the cable box and TV will both power-up.
One other limitation isn’t really the fault of the Magic Cube. The power button for my Samsung TV is just a toggle. It sends the same signal to the TV, regardless of whether the TV is on or off. If the TV is off, it turns on, and vice versa. That means I can’t tell Alexa to turn the TV on or off since that action uses the same button. Plus, invoking a scene means you tell Alexa to turn on the scene. I created a scene called “TV” and can not tell Alexa to “turn on TV” and it will turn on or off. Again, a little clunky, but Magic Cube has no way to know if the TV is on or not. The way around that is to use the name of the remote control itself – mine is currently “TV set remote control”. If I say “Alexa, turn on/off TV set remote control”, Magic Cube sends the power IR code and the TV responds correctly. Of course, that means that if the TV is off and I tell Alexa to turn it off, it will turn on, but, hey – that makes it a little more entertaining. I will be renaming the remote control to something less tongue-twisting!
The other really nice thing is that scenes can be scheduled. We plan to set up scenes so that if we’re on vacation, our TV can turn on in the evening and turn off after a couple of hours. Between that and our automated lights and window shades, you really won’t be able to tell whether we’re home or not.
What I like
- Controls just about any IR-controlled device
- Small size
- You can schedule scenes
What I’d change
- Include a power plug
- Programming scenes is clunky
- Improve Alexa integration so new scenes can be discovered without deleting the skill
Final thoughts
The real power of the Magic Cube is its ability to combine commands from different remotes into a single, seamless scene. This could include turning on a room air conditioner, dimming IR-controlled lights, turning on the TV and DVD player, and so on. The ability to schedule events, either in the app or via Alexa routines is a nice plus as well. At under 24 bucks, it’s cheaper than many universal remotes and offers a lot of power and flexibility. I just wish that the programming interface was more straightforward and the integration between the Orvibo skill and Alexa was stronger. Still, this has found a permanent home in our living room and has become part of my overall home automation plan.
Price: $23.99
Where to buy: Amazon
Source: The sample of this product was provided by Orvibo.

Amazon Smart Plug | Works with Alexa | Simple setup, endless possibilities
$24.99 (as of July 10, 2025 16:01 GMT -04:00 - More infoProduct prices and availability are accurate as of the date/time indicated and are subject to change. Any price and availability information displayed on [relevant Amazon Site(s), as applicable] at the time of purchase will apply to the purchase of this product.)
Gadgeteer Comment Policy - Please read before commenting
Can you compare this to a Harmony Hub?
David:
Good question. I have never used the Harmony Hub, but the two devices appear pretty similar. Both connect to WiFi, work via voice or app control, and serve as an IR blaster, controlling multiple devices that can be combined into single actions. One difference is that the Harmony Hub is $99.99 and the Magic Cube is $24.99.
Because I have no experience with the Harmony, I can’t comment beyond that.
I go back to the days of “the clickers”. Old zenith remotes that had the aluminum rods of different lengths that would create a different pitch that the microphone on the tv would know if you wanted volume up/down, channel up down, on/off. I had some fun with a friend of mine…I took it apart and swapped a couple of the rods around. It was funny watching his mom try to change the channel and it would do something different. Even jingling car keys would sometimes screw them up.
Ah, Rusty, the Zenith Space Command remote. My grandfather had one. The interesting thing was that it was a mechanical tuner. So the sound went like:
Click (the button)
Boong (the tone from the specific tuning fork rod)
Ka-Chunk as the tuner dial twisted up or down
There were just two buttons – channel up & channel down.
https://www.wired.com/2010/10/the-real-original-remote-control-zenith-space-command/
I can still hear it like it was yesterday. It was probably my first gadget experience.
Thanks for the memory!
I don’t remember who had it, but there was also an early 1 button remote that used a flash of light. It cycled through your channels. My grandfather had it, you had to keep the window blind closed otherwise flashes from shiny cars driving outside would cause the TV to change channels.
Also a Zenith remote – the Zenith Flash-matic, if it’s the one I’m thinking of.
https://historictech.com/product/1955-zenith-flash-matic-television-controller/
That’s it. Tho if I remember my grandparents was mostly duct tape by the time I saw it.