CROWDFUNDED REVIEW – Electric bikes are on the rise. I see all types around the bay area too; kid carriers, commuters, big bike brands, custom assembled and more. It makes perfect sense in dense cities where having a car may not be practical. But what if you already have a decent bicycle? Surely there’s a way to convert yours to an awesome electric-assisted commuter. Kits have been around for a while but they require a good bit of bicycle knowledge, specialized tools, and customer support is likely to be tricky at best. Following on the heels of their first Indiegogo campaign, Swytch has introduced a new universal kit that promises to dramatically simplify all of that. Want to know more? Please read on.
What is it?
The Swytch Universal eBike Kit is a conversion-in-a-box that will transform your existing bicycle into an electric one. The front wheel is available in 5 different sizes: 16″, 20″, 26″, 27.5″ or 28″/700c. You’ll need to know your existing wheel size when you order.
What’s in the box?
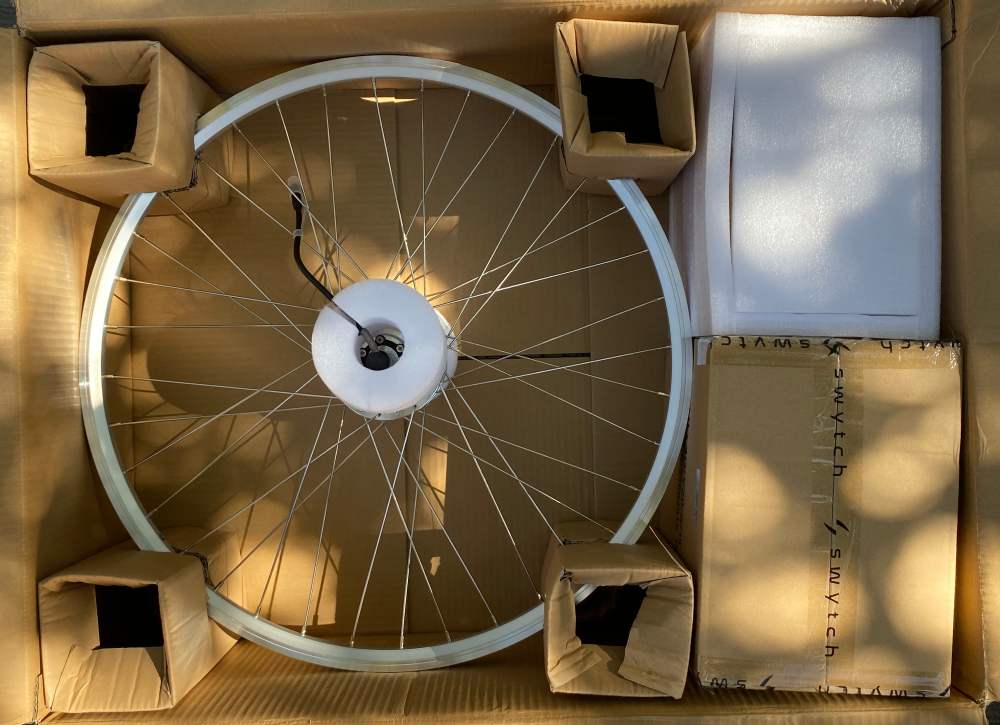
Everything comes securely packaged in one big box. The Power Pack is in the white foam box, and all the other accessories are in the box in the lower right.
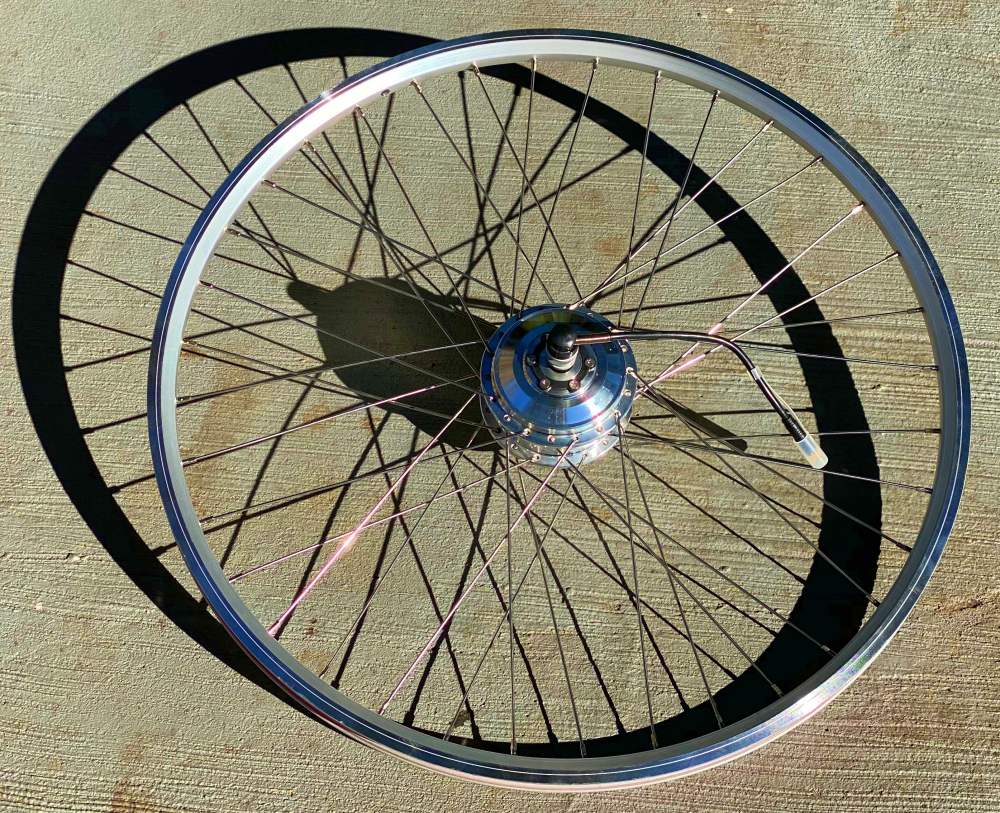
- Front Wheel with motor hub
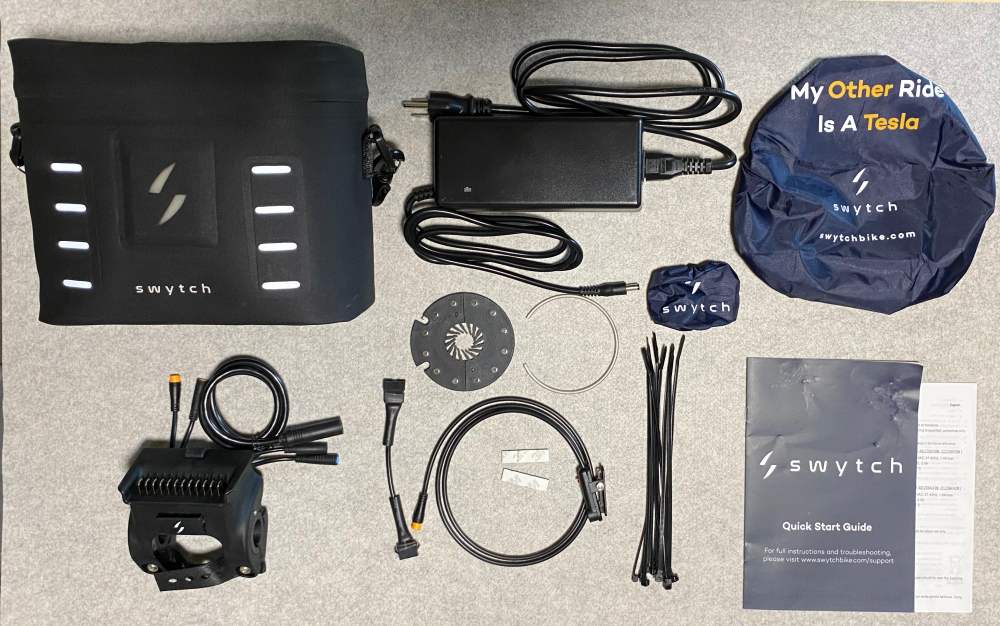
- Handlebar Mount
- Pedal Sensor (crank ring and sensor)
- Charger
- Mounting accessories: zipties and adhesive strips
- Rain covers for battery and handlebar mount
- Instruction manual
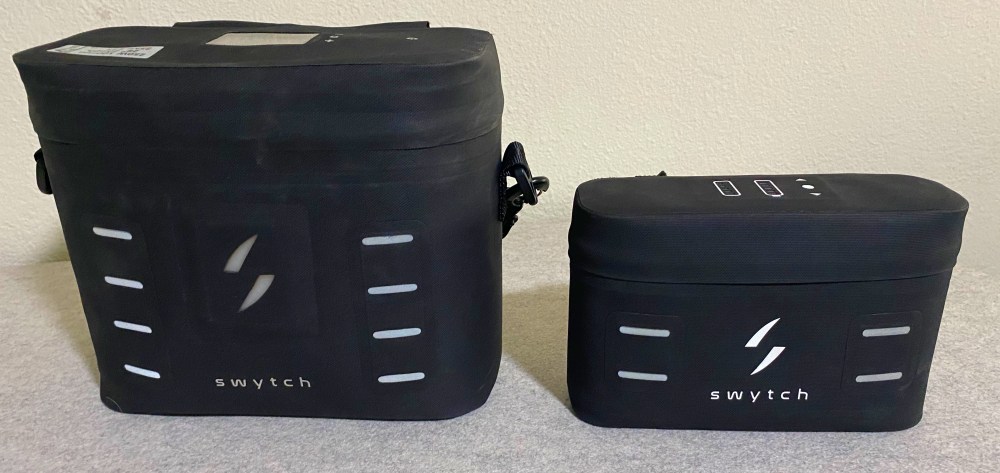
- Swytch Power Pack – This is the larger capacity pack for long range. The current kit has a much smaller and lighter Power Pack that looks like this…
Hardware specs
Wheel Size: 16″, 20″, 26″, 27.5″ and 28/700c are available
Motor: 250w
Brake Type: Disc and rim brake compatible
Battery: 7.5″ x 5′” x 3″ • Lithium-ion (charges in about 3 hours)
Range: Up to 50km/31m
Speed: Provides assistance up to 32kph/20mph
Design and features
Swytch has simplified the process of electrifying your current bicycle. Everything you need is in one box, and the only specialized bicycle tools you will need are a bicycle air pump and maybe some tire levers.
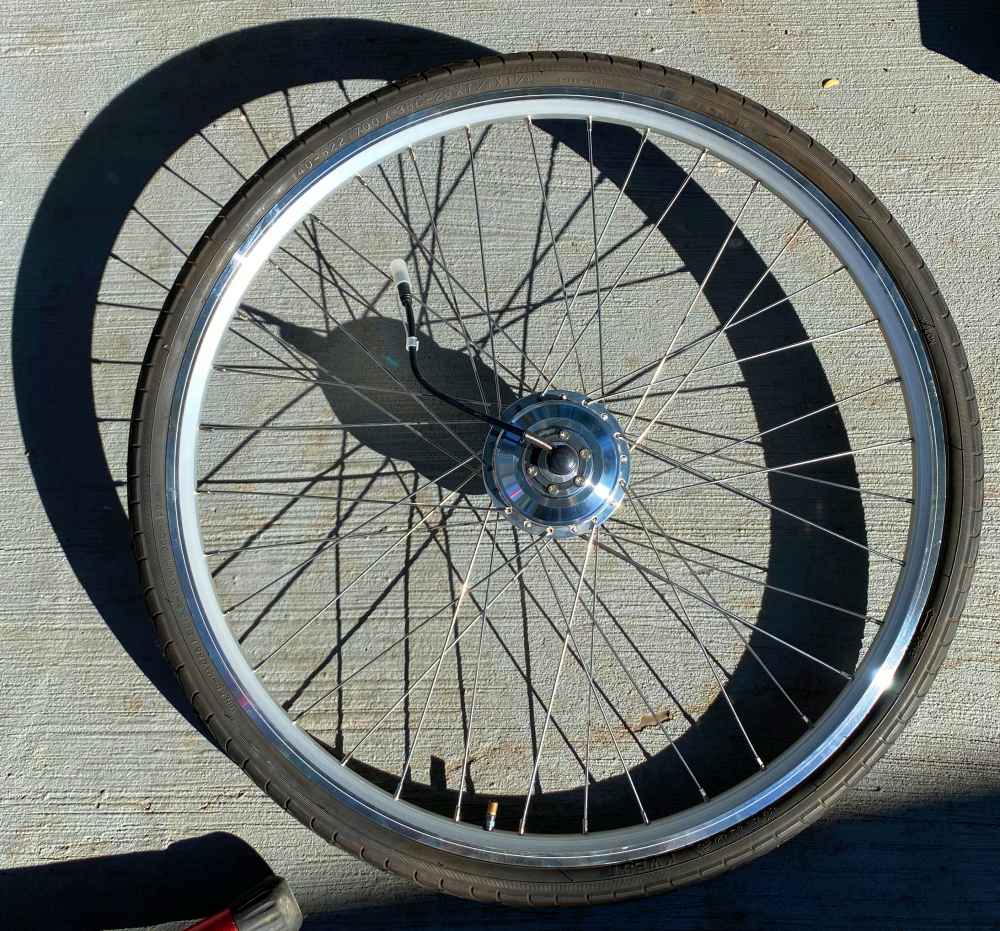
The motor is designed to support both disc brakes and rim brakes with the same wheel. Here’s the 6 bolt mounting for discs…

And the flat braking surface for rim brakes, which means it should work with almost every bike.

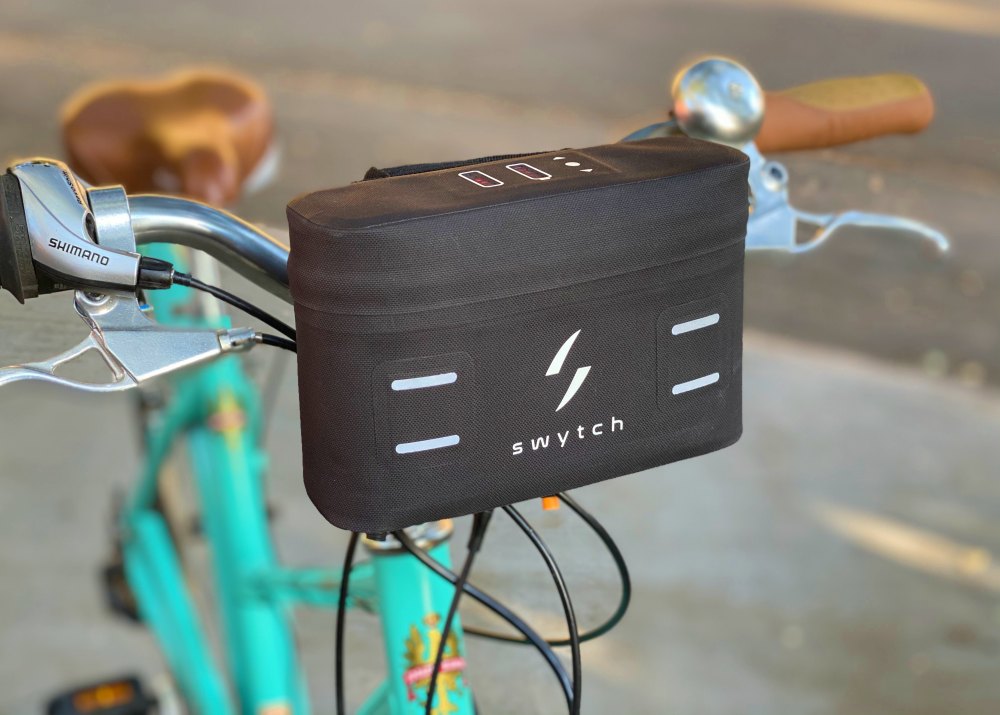
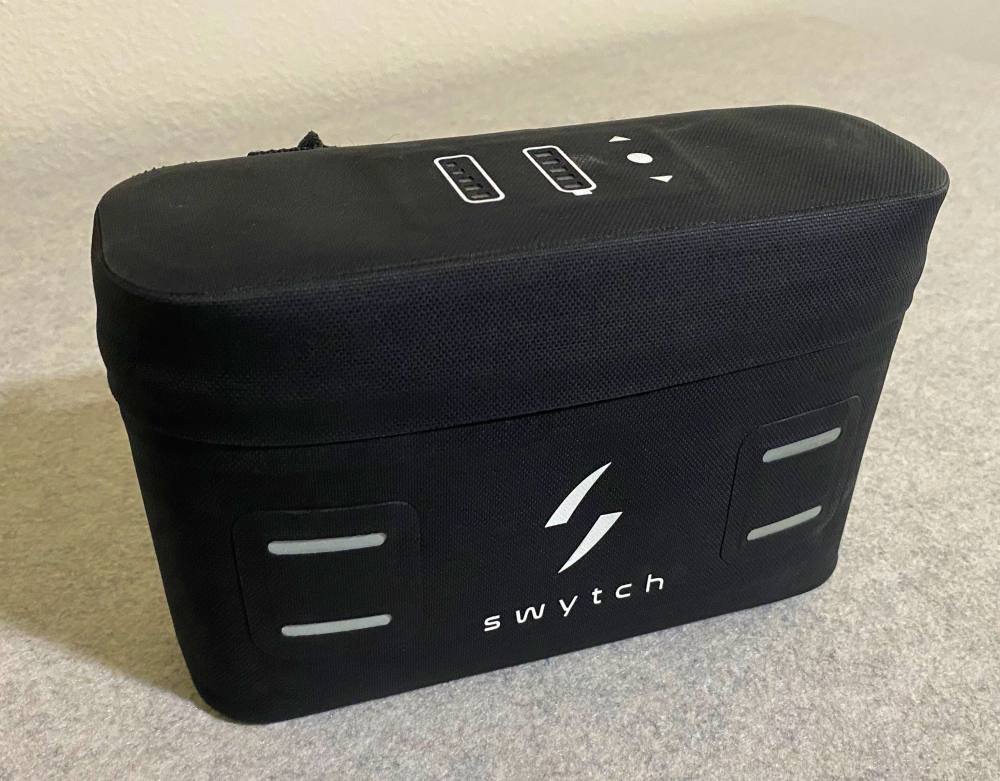
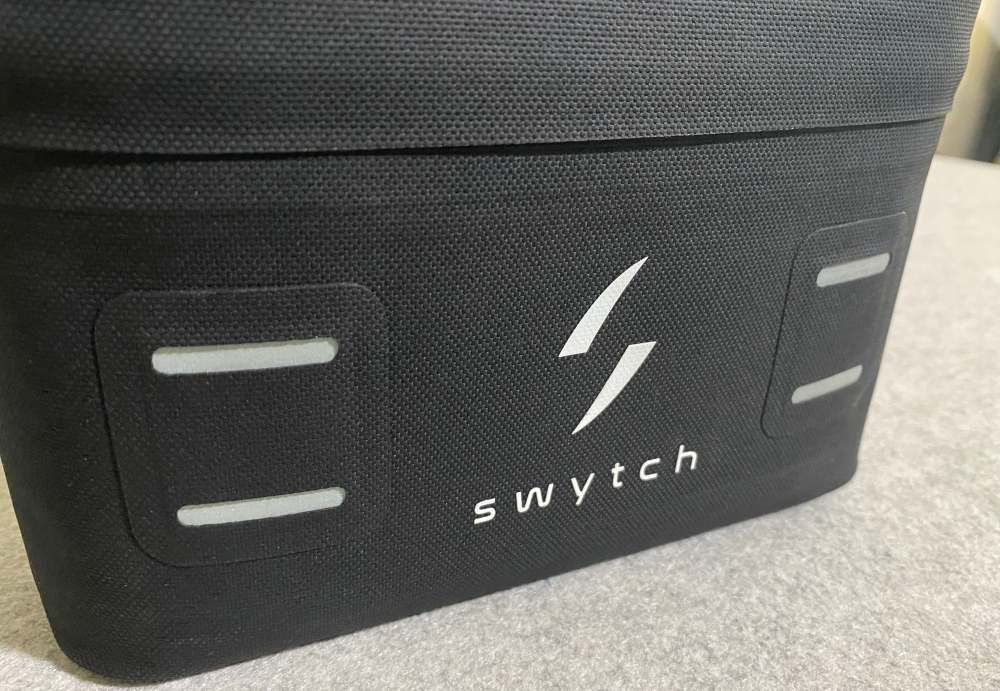
The power pack is an integrated unit that combines your battery, display and system control into a single unit. The entire unit is basically a well constructed, reinforced bag made from a waterproof nylon with laser-cut details and reflective accents.
From the top, you can power the system on and off, check the battery level and adjust the amount of assist you would like.
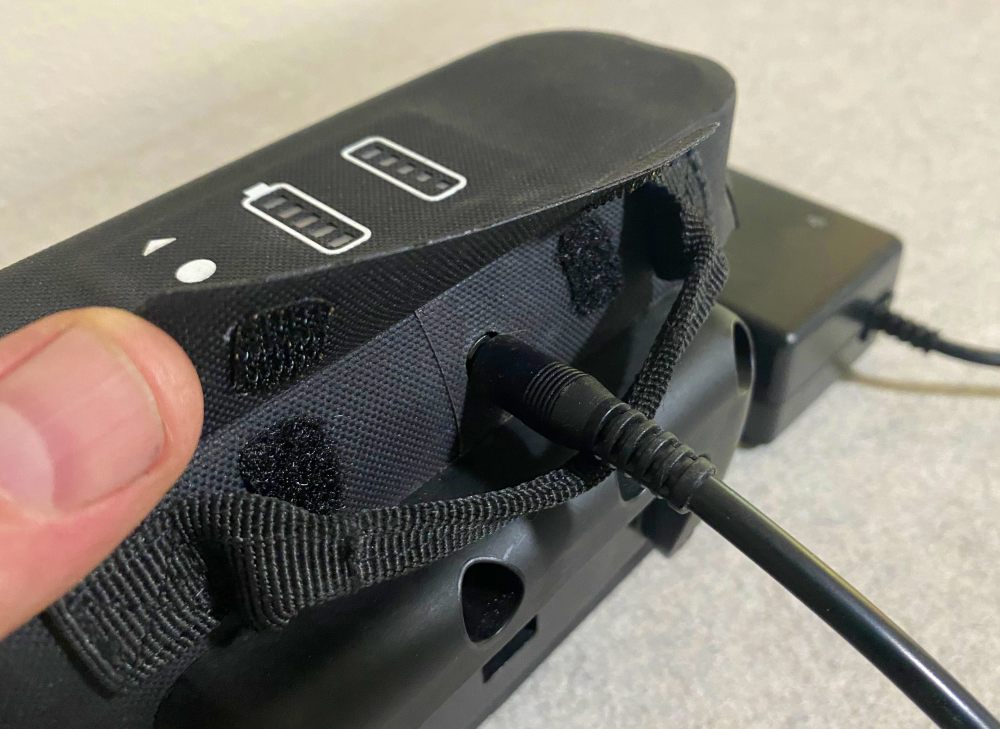
The power pack has a proprietary dock on your handlebars that securely mounts while allowing you to remove it at the press of a button to take it with you for security or to charge which can be done at a flap at the rear which is easy to access on or off the bike.
Setup
Before starting the installation, go ahead and connect the Swytch Power Pack to the charger and plug it in to make sure you top off the battery before your first ride.
Aside from making sure your bicycle already is functional and tuned prior to install, here’s what it takes to get Swytch up and running on your bike. You’ll need an air pump, tire levers, a 5mm hex wrench, and scissors. You may need a few additional tools depending on your own bicycle.
I’ve been working on bicycles since I was 15 and between being I mechanic in bike shops, working on my own constantly and more recently developing ebikes, I have to say this was a really low complication install. It took me a little over an hour in total and that included some tuning that was overdue and not related to the conversion kit. I do think anyone with some patience can do this without too much trouble.
Swytch customer service also does a very cool thing and offers a free video call to every customer so if you’re running into any issues, they’ve got your back. This is a big deal as you won’t get that kind of service on kits ordered from AliExpress.
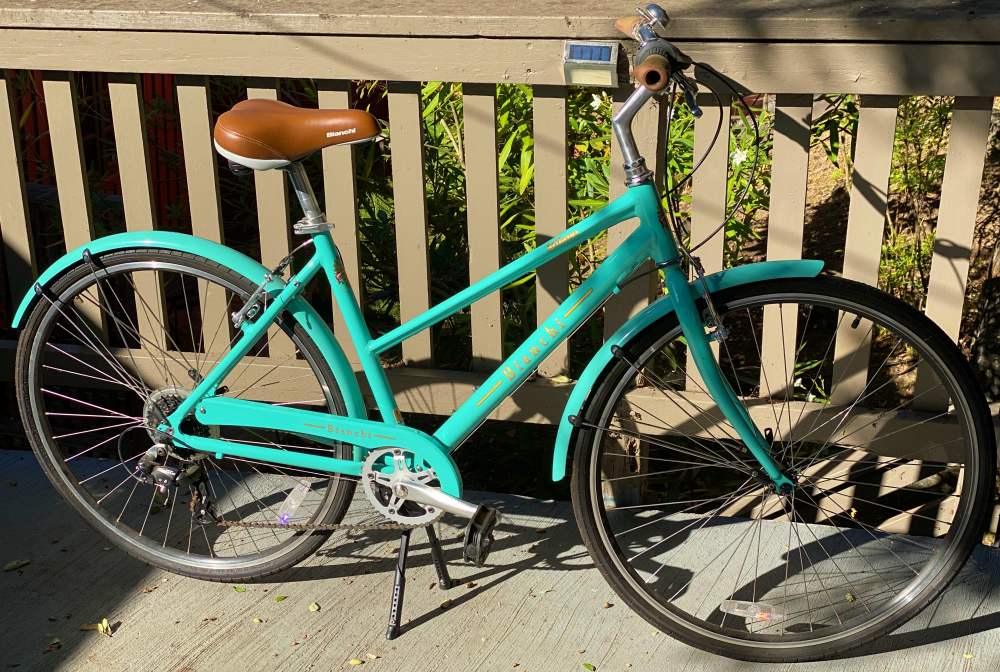
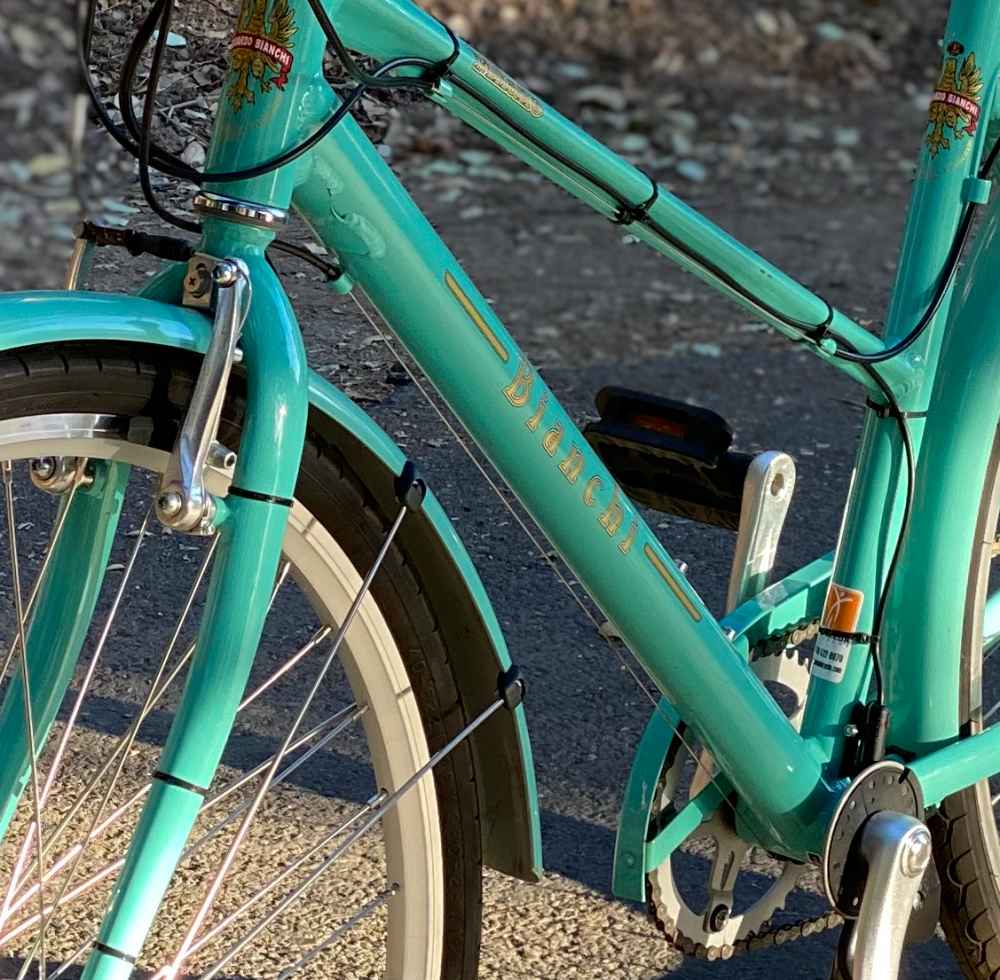
Here’s the bike I’m converting. It’s my wife’s Bianchi Milano Step-Thru. It was an anniversary present many years ago and it has never seen a whole lot of use because we live in a pretty hilly area. I had been looking for a conversion kit, but wasn’t happy with available kits and their battery placement/size or the amount of weight. Swytch by comparison looked perfect. I ordered the 700c wheel knowing that it would work with the v-brakes on the Bianchi.
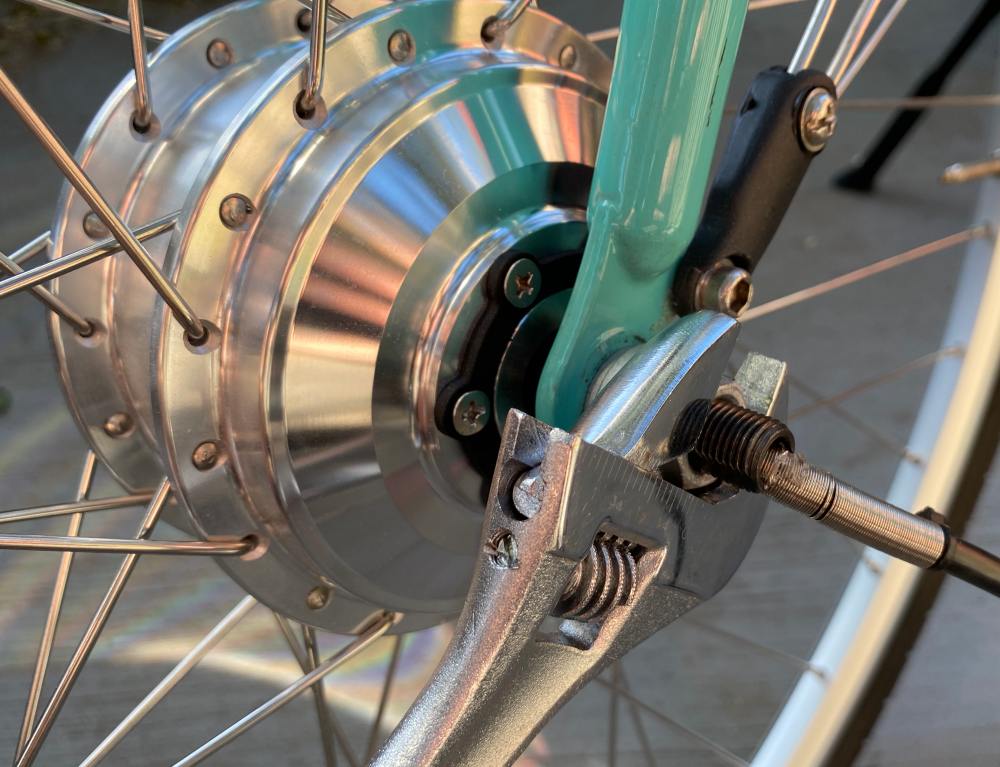
The first step is to remove the front wheel from your bicycle. Depending on your bike this may be a quick release lever (like this one) or hex nuts. I used my bike stand, but you can just flip your bike upside down onto the seat and handlebars so you have access to the wheels.
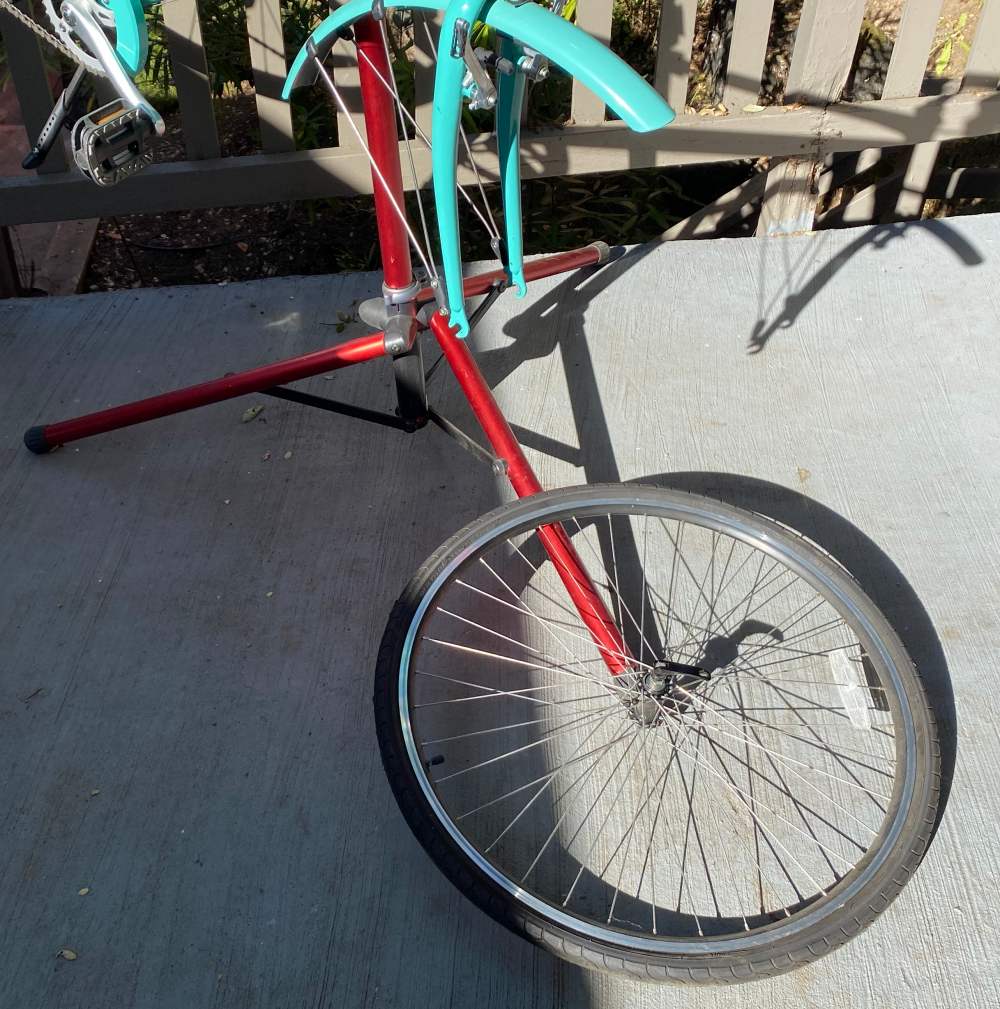
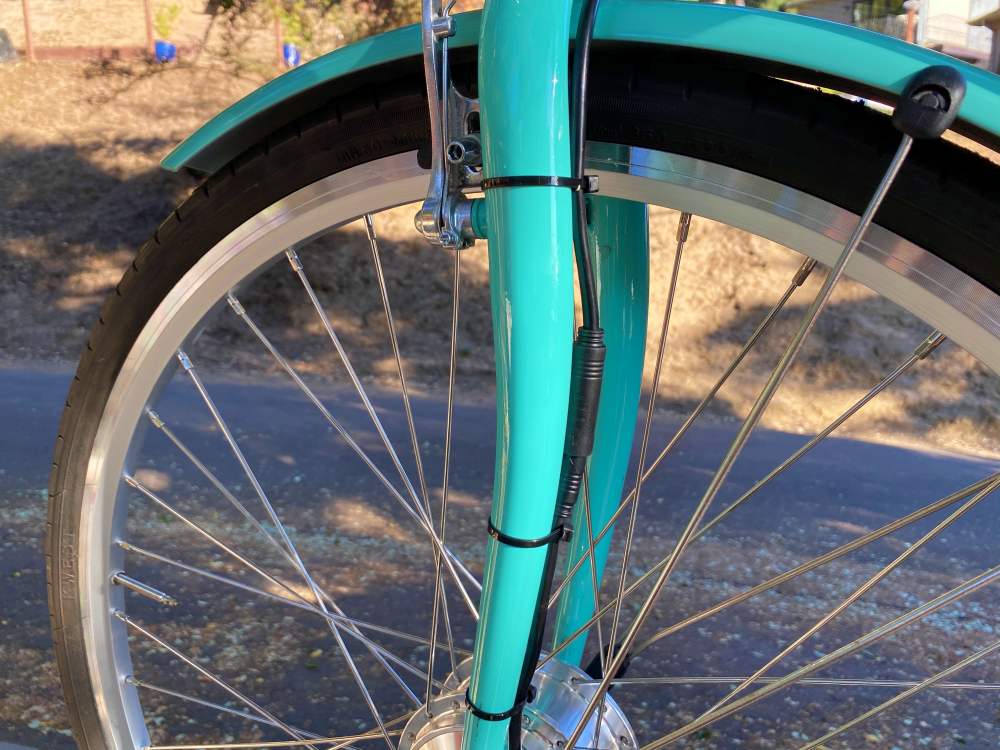
With the wheel removed, let the air out and then remove the tire and inner tube as you’ll want to move these to your new wheel. Your tire may have directional tread, so check the sidewall for an arrow or other indication. Go ahead and get the tire on your new wheel making sure the motor’s power cable is on the rider’s left of your bicycle. Here’s the new wheel all tired up.
Install the wheel on your bike, again keeping that motor cable on the rider’s left. Take note of the specialized washers.
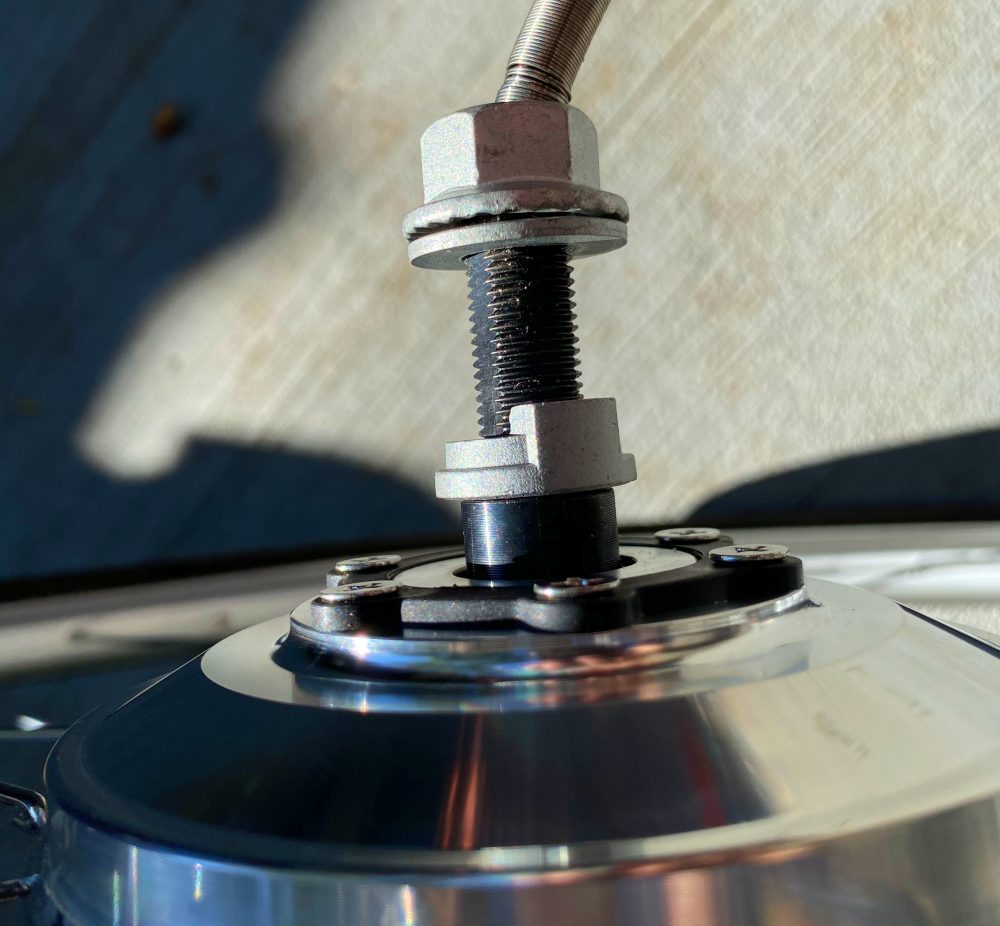
On normal bikes, these are sometimes referred to as lawyer washers as they keep a wheel from falling off if the axle nuts loosen. On an electric bicycle they’re a bit different and serve a different purpose. The chunky block section needs to lock into the flat opening at the bottom of your fork (conveniently shown here in shadow).
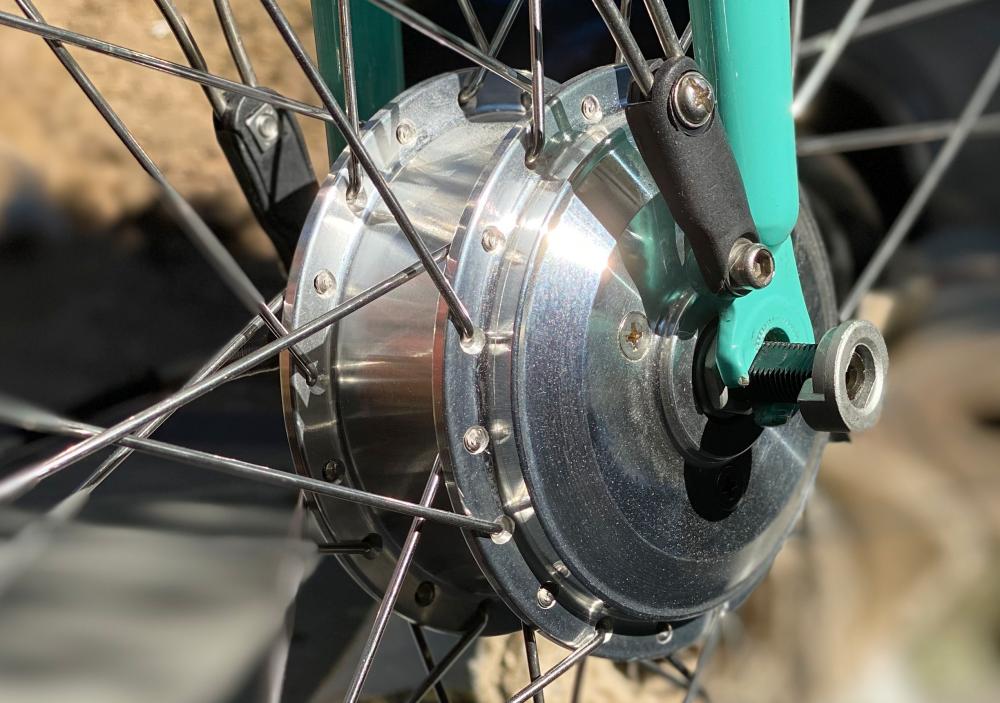
This locks the flats of the axle to your fork in that orientation and it’s what allows the motor to propel the bike. You may need to change the position and orientation for your bicycle, but just make sure that the flats are engaged in your fork properly before tightening the axle nuts.
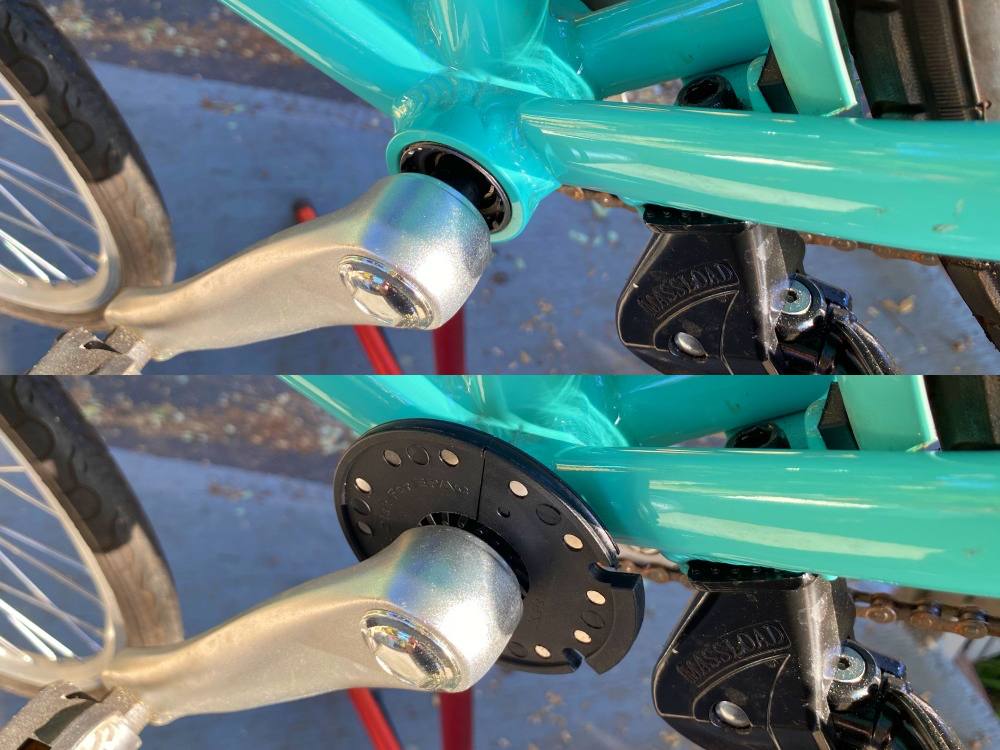
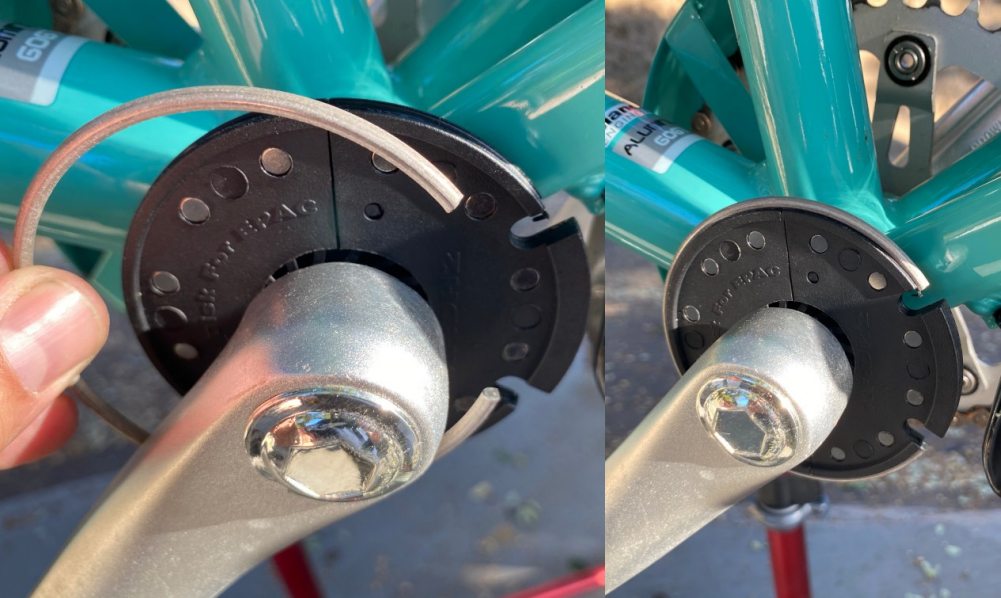
Next, you’ll want to install the pedal sensor assembly. This is the 12 magnet ring that mounts around your left crank spindle (non-drive side). Normally this is a single piece that requires you to take your cranks apart to push on. Swytch found a unique two-piece solution that you can snap around the spindle without tools. Super awesome and saves a ton of time.
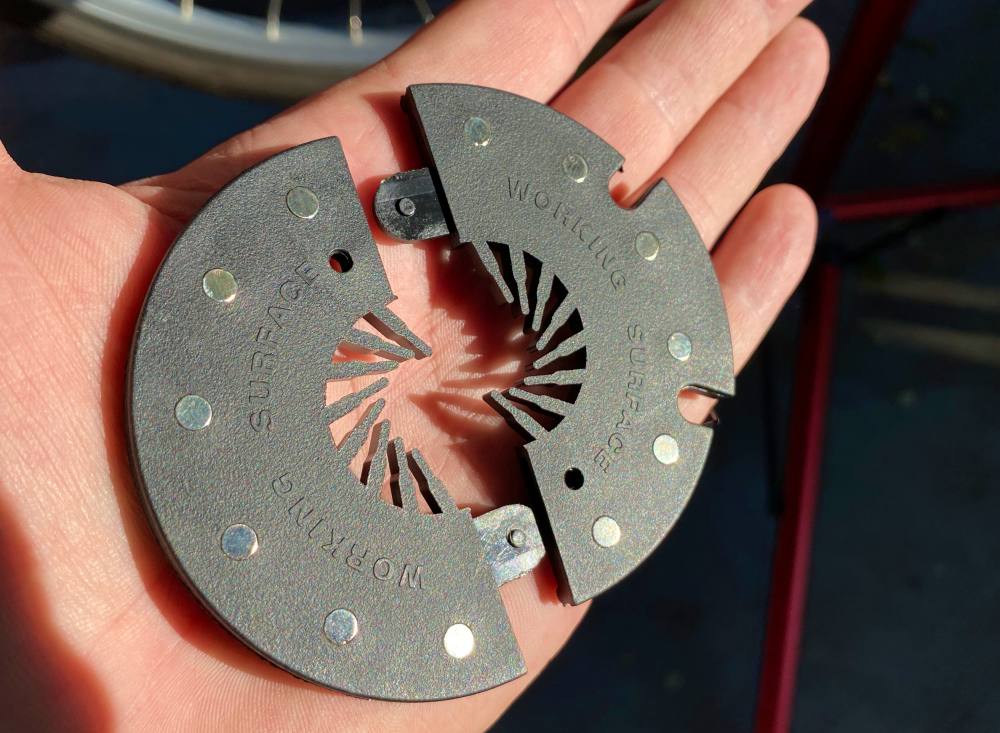
Here’s a shot of where it goes and what it looks like snapped together into place.
Lock it into place with the included snap ring.
Now we need to mount the sensor. It looks like this.
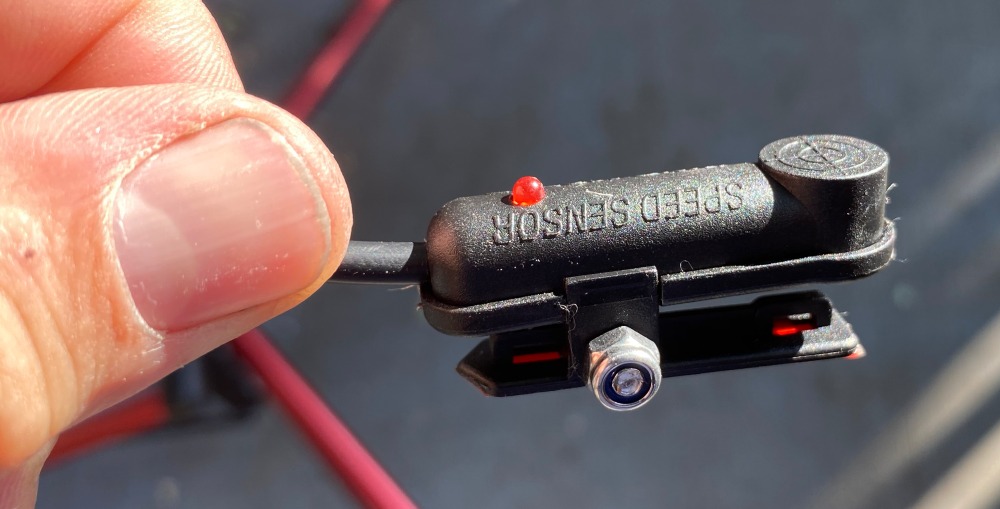
This gets mounted with 2-sided adhesive to your seat tube near the pedal ring you just installed. Again depending on the design of your frame it may need to be mounted in a different location, but the key is that you get it nice and close (~1mm) with the bullseye on the circle above centered on the magnets within the pedal ring. The pivot allows you to adjust for your scenario and then lock it in place. Here’s how it looks on this bike.

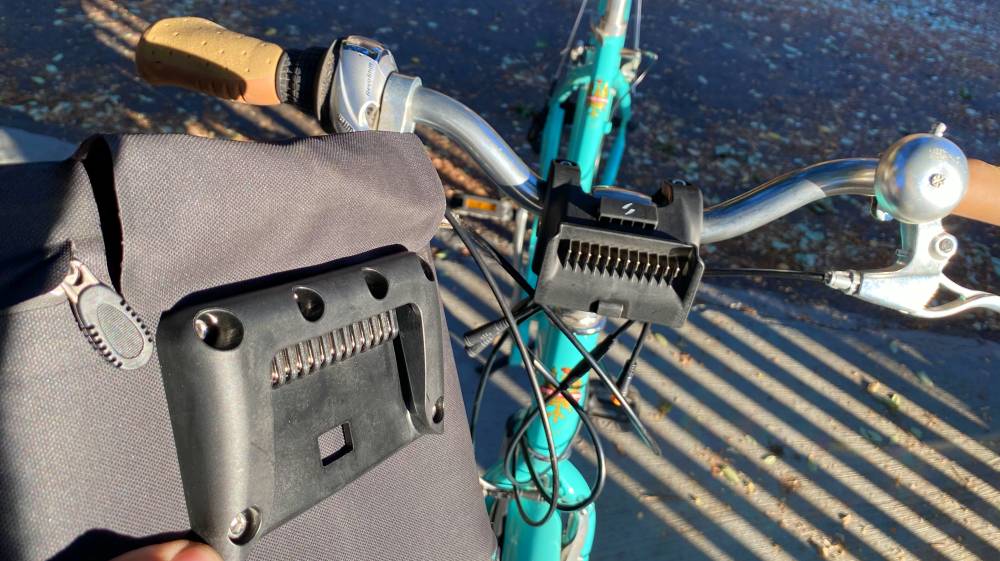
The mount for the Power Pack on your handlebars is next. Remove the screws from the bar clamps and place the mount onto your handlebars with each arm on either side of your stem. This is actually the trickiest part, or at least the most fiddly. Use the nylon strap with the row of holes to run under your stem and into the clamp on each side. Double it back on itself to get it to the right length. That’s easy to undo if you get the length wrong.
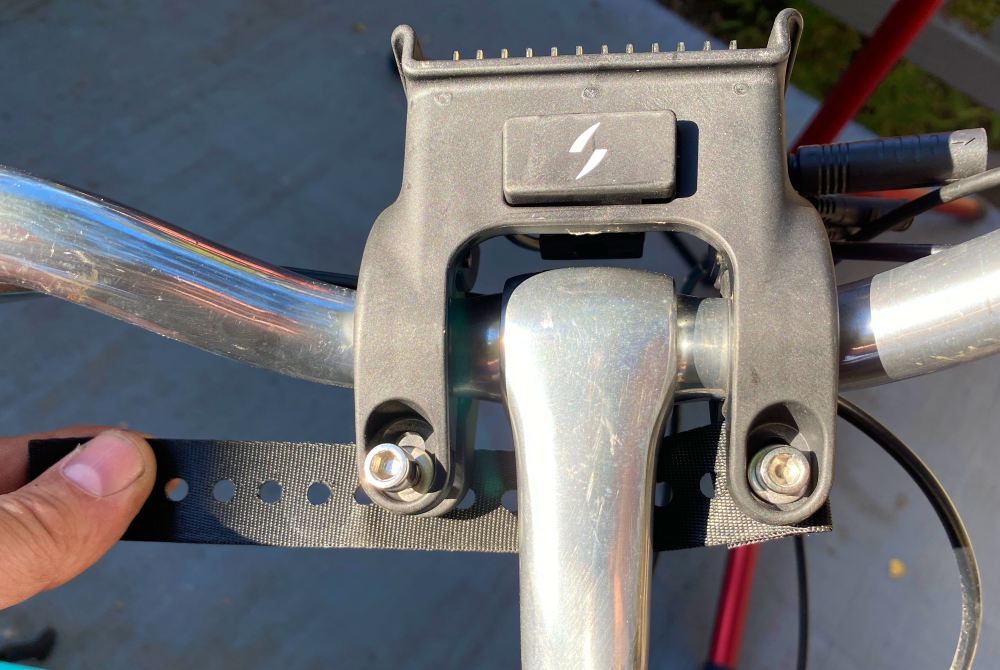
This strap keeps your mount from rotating forward under the weight of the pack by leveraging against the stem. You’ll need to adjust this distance for your particular setup, but once installed it works perfectly and should look something like this.
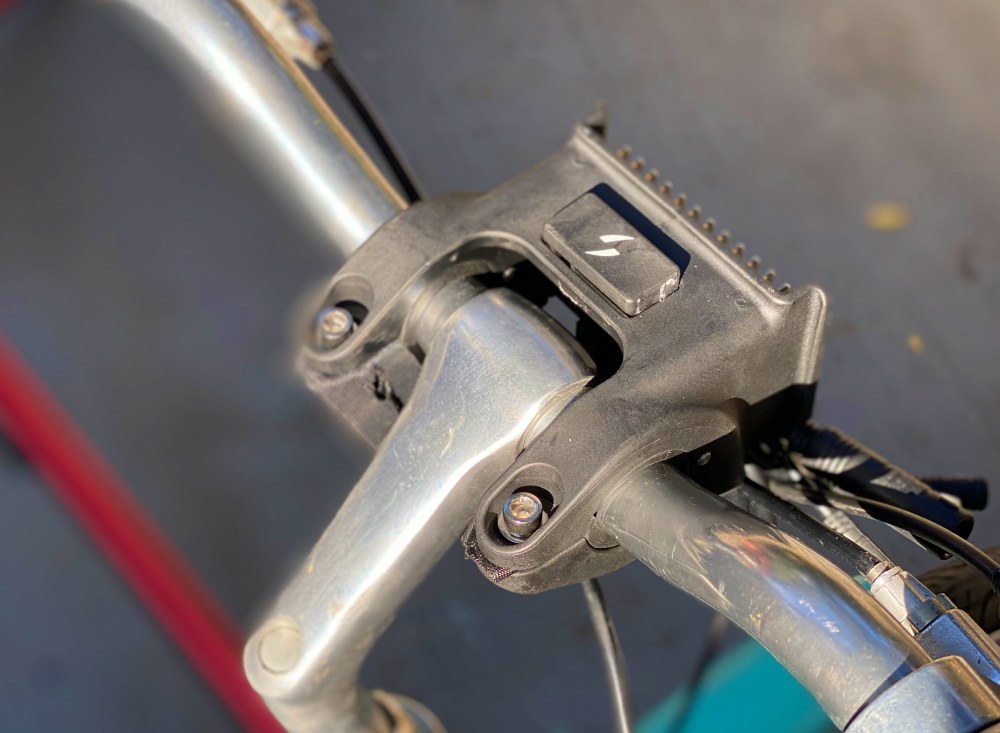
There’s a lot of cables and connectors coming out from the bottom of the mount, but there’s really only two we’re concerned with at the moment. The long cable with the big connector and one of the short yellow ended cables.
The long cable needs to find its way down to meet the motor cable on your fork.
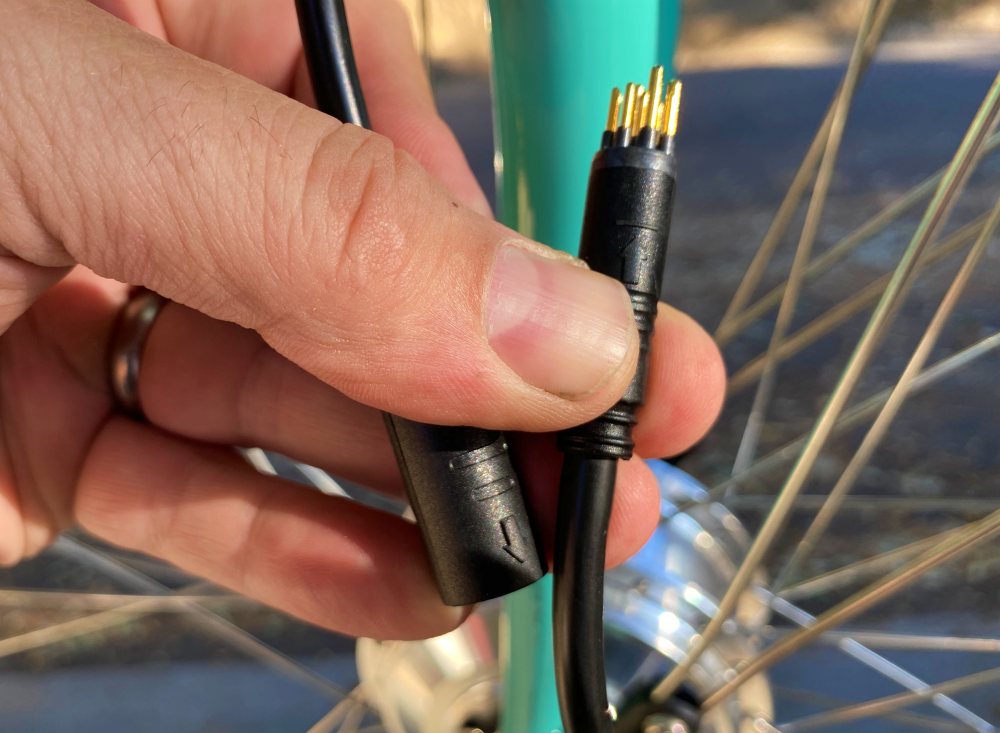
Make sure to fasten it in a few spots and check that you haven’t created a loop that can find it’s way around reflectors or lights when you turn the handlebars and then restrict your steering. You may want to leave the zipties until the end as it’s not uncommon to change your mind on routing a couple times, but in the end it will look something like this.
The pedal sensor cable ends with a protruding yellow cylindar which only mates to the connector shown on the right. This cables also needs to be fastened to your frame in a way that keeps it secure and out of trouble.
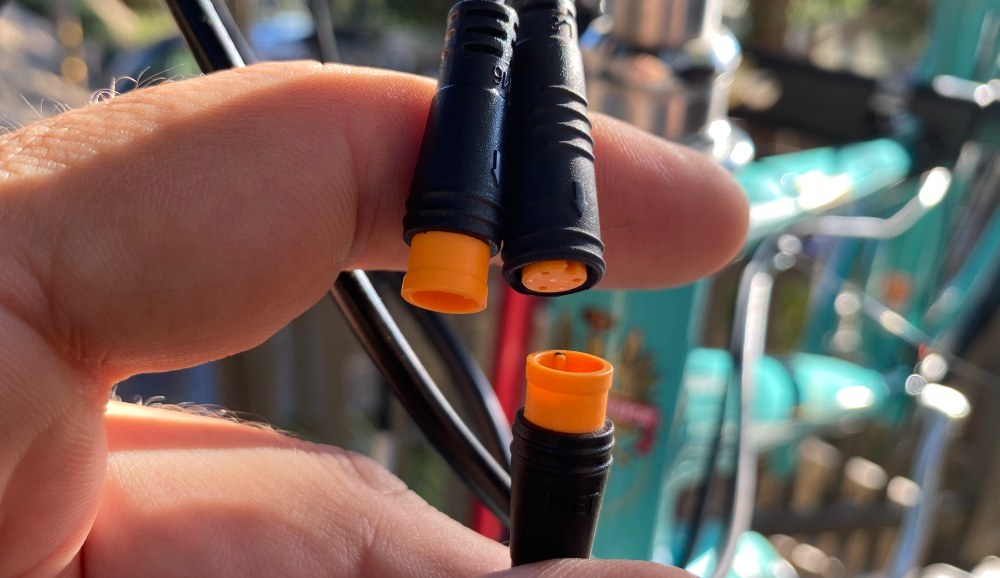
So what are these other connectors?
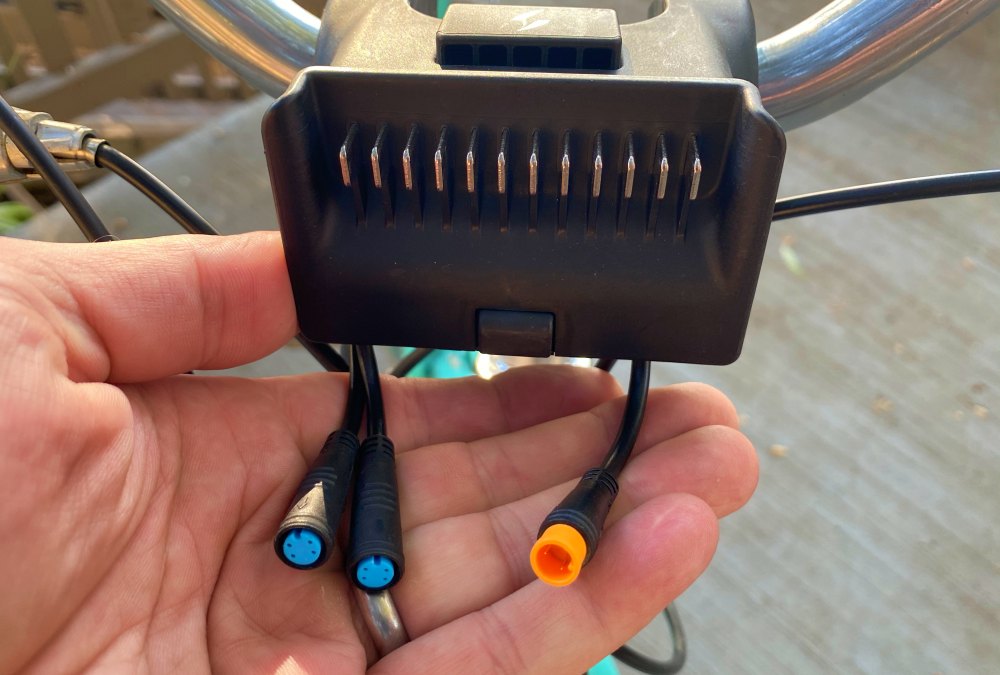
These are thoughtfully provided for additional expansion. The yellow connector is for adding an optional throttle. Throttles are useful for big hills, getting up to speed and for anyone that might have trouble pedaling for whatever reason.
The two blue ones are for connecting brake levers with e-sensors which are definitely recommended if you add a throttle. When connected, they will override pedal or throttle input and kill all boost.
Each bicycle frame is different so your routing will likely be unique to you. Here’s a shot of the final routing on this installation. Make sure you snug down and clip ends on the zipties. Now I need to go on the hunt for some Celeste Green zipties.
All that’s left is to install the Power Pack. Confirm it’s fully charged and bring it on over to your bike. Line up the connectors so that it slides into place, pushing down until you hear a click and that Swytch logo’ed button shifts forward. That’s it!
Performance
So it’s installed. Let’s go for a ride.
Press and hold the circle button between the two arrows. The LEDs for battery level and assist level will visually fill and then settle to their accurate readings. The system is now on and ready to go. Use the up and down arrows to adjust the amount of boost the system gives you. The LEDs are pretty easy to see in sunlight and the controls are well placed for adjusting while riding. The indicator on the right side will show you which of the 6 levels (including off) you’re set to.
The system is pretty quiet but does have a small propulsion whine that you can hear when the motor is engaged. Here’s a video where it sounds louder than reality, but it’s helpful for you to be informed. I think it’s a small concession for a system that’s overwhelmingly well thought through and you’ll get used to it pretty quickly.
Start at 1 to get a feel for it and begin pedaling. There’s a delay before the boost kicks in. It’s about a quarter pedal turn. This is a good thing as it keeps the bicycle from lurching at small movements or before your handlebars are straight.
Each increased level provides more power assist, but also a bigger drain on the battery. You’ll want to take a few rides to understand the range and how hills affect your power budget so you don’t run out of juice before getting home. My wife found the middle setting worked great but did have to bump it up on our monster hills.
The system does not have regenerative braking (that is to say it won’t charge while braking on downhills or pedaling in reverse). This is a design choice by Swytch to make sure that the motor has zero drag. This means that you can pedal your bike without having to fight the motor if the system is off or if you’ve depleted the battery.
Being able to easily remove the Power Pack is great. If you’re running around town, you can lock up your bike and bring the pack with you. At home, a quick disconnect lets you charge wherever is most convenient. If you do leave your bike outside, the small rain cover fits over the empty mount to protect the battery contacts.
The main weight you’ve added to the system is the delta in the front wheel, the Power Pack and its mount hardware. The cables and pedal assist parts are negligible. It’s roughly about a 3kg/6.6lb hit. For us, that’s a bargain. It’s a bike she’s always loved, but not had the opportunity to ride because of our hills. One that can now cruise up those hills with a lot less effort.
Should you need more range, Swytch does have a longer range pack that’s going through some retooling and will be available in the future. I received an older sample of the original large Power Pack in addition to the new smaller Power Pack shipping with the kit that’s finishing its Indiegogo campaign right now. The dimensional difference in both size and weight is impressive with the new Power Pack weighing in at just 3.8lbs (and remember that’s battery, motor controller and mode control/display all in one pack). Here’s the two side by side.
Last thing is I’d like to recommend one small addition if you’re looking at picking up a Swytch system for yourself. While the Power Pack is pretty lightweight, all of that weight is sitting on your handlebars. It doesn’t affect steering much while riding, but it does tend to throw it’s weight around when you park your bike. Velo Orange sells a wheel stabilizer which you can grab from Amazon for less than $12.
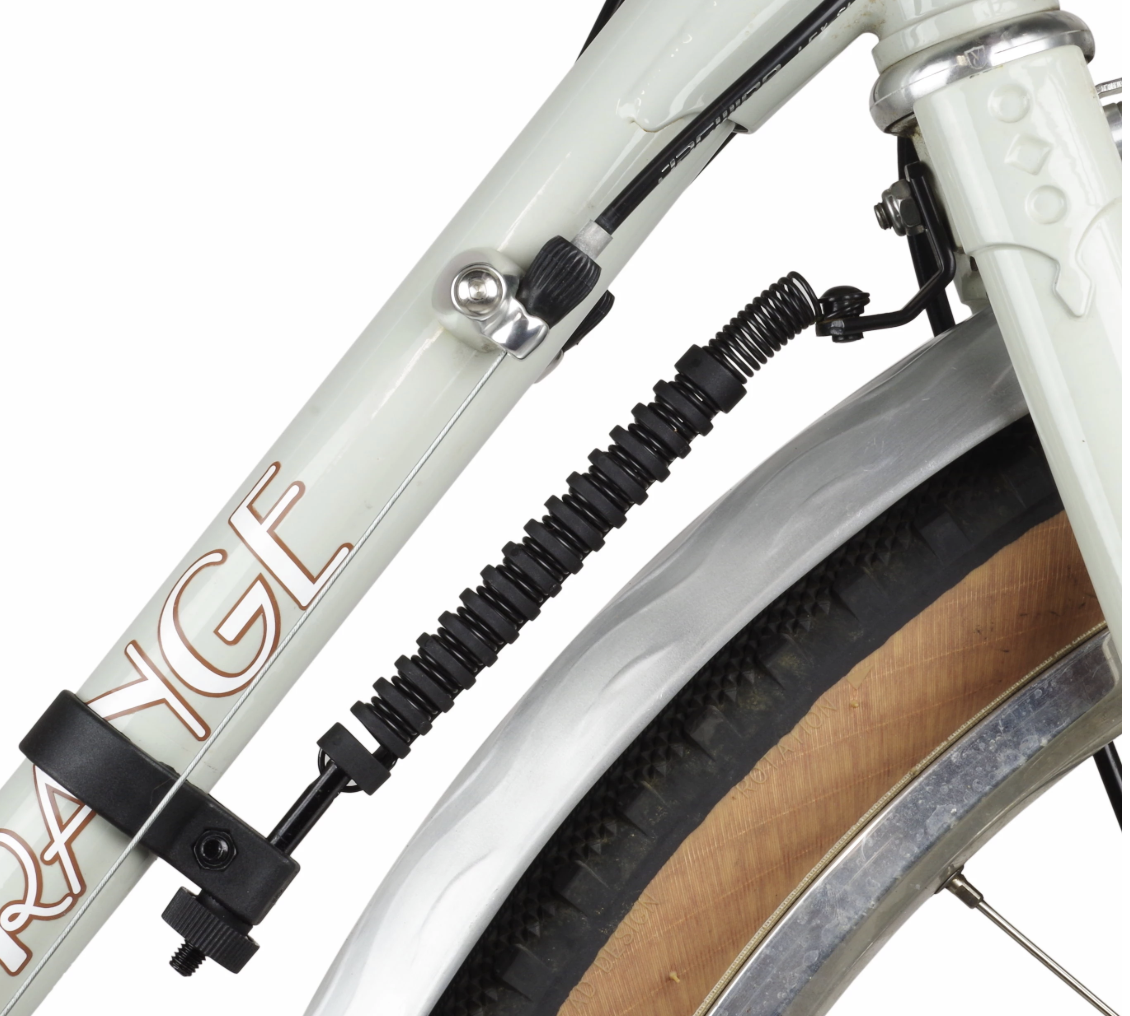
It installs onto your down tube and fork and provides some steering resistance through a covered spring. It’s a small thing but helps to mitigate the newly added weight on your handlebars and keeps them from swinging violently when walking or parking your bike.
What I like
- One convenient kit with everything you need
- Simplified install that anyone can tackle
- Electrify the bike you already have
- Demystifies e-bike conversion
- Your bike still looks like your bike
What I’d change
- I’d add a steering stabilizer spring
- Make more information available on e-brake levers and throttles
Final thoughts
I’m seriously impressed. Researching e-bike kits online leads you down some serious rabbit holes and building your own customized kit is not for the faint of heart. Swytch has succeeded in simplifying all of that into a kit that fits pretty much any bike with a handlebar. All the components are well made and the install is very manageable. A lot of the expense of an e-bike is in the battery and motor. A brand new e-bike at a bargain price has probably been de-spec’ed in all the standard bike parts. If you’ve been wanting an e-bike and already have a bike you like to ride, this is a great solution. Their Indiegogo campaign is almost 4000% funded and closes in a couple days.
Price: $449
Where to buy: Swytch and Indiegogo (shipping due in March 2020)
Source: The sample of this product was provided by Swytch

2-Pack LED Video Light Kit, NiceVeedi Studio Light, 2800-6500K Dimmable Photography Lighting Kit with Tripod Stand&Phone Holder, 73" Stream Light for Video Recording, Game Streaming, YouTube
(as of June 26, 2026 19:14 GMT -05:00 - More infoProduct prices and availability are accurate as of the date/time indicated and are subject to change. Any price and availability information displayed on [relevant Amazon Site(s), as applicable] at the time of purchase will apply to the purchase of this product.)
Gadgeteer Comment Policy - Please read before commenting
That was a great review. I really wish we had bicycle-friendly roads here in San Antonio. I would order this kit in a heartbeat. My bike has disc brakes. Would I just install the disc using those six screws? Would it be in the correct position for the brake calipers? We are getting some bike lanes and have quite a few trails available, but there is no good way for me to ride my bicycle in to work yet. We just got showers last year, so that is one hurdle out of the way. There are just way too many distracted drivers going to and from work for me to trust them on roads with no shoulders at this time.
Hi Lynn, Glad you liked the review. It’s a great solution. For your disc brakes it should be as simple as removing the disc from your front wheel (usually a T25 torx wrench which looks like a hex key but with a 6-point star shape). Remove the 6 bolts from the Swytch wheel and remove the black spacer (shouldn’t need it) and install your disc. When you install the wheel on your bike, you may need to loosen and adjust the placement of your disc caliper to center it on the disc. It’s usually two 5mm hex bolts. Loosen them both a turn or two, then gently squeeze your brake lever until the pads make contact with the disc. Hold the lever there and tighten the bolts enough to hold. Release the lever and spin the wheel to see if it’s spinning freely without drag. If so, tighten the bolts securely and you’re good to go. There may be some additional tweaking needed, but this is the general process.
Check out this cool article on Lifehacker about using a pool noodle on your bike to demand a bit more space from drivers.
I think you need to update your review in view of the major issues with delivery. Customers have had masive delays and now people living in the EU cannot get their kits delivered because of Brexit. And Swtych were warned but continued to deliver kits to customers who ordered more recently in the UK. Take a look at comments on the Facebook Swtcuh Chat group. It might be a great product but many customers will never know. At least two people have posted that their partners died of cancer while waiting six months or more for their kits after being promised delivery in 10 to 12 weeks!
Dear Lynn
I read your artcle with interset.
I have a tike wkith 20″ front wheel hub
Would like ti cinvert to e. Trike forrecreation use and
Exsecice. Pleas let me know if it possible and can you deliver to Spain.
Thank you
Izzat Mackaoui
Izzat, we do not sell these products. This was a review. Please contact Swytch directly.
I backed the latest Indiegogo campaign and have had the kit installed for a little over a month. The kit overall is quality, and the installation while not “easy” wasn’t too hard to accomplish, but I do my own bike repair and maintenance so YMMV. The instructions could use some work, and I had to dig around on their web site to find the full instruction PDF which confirmed some modifications that I had used to get the PAS sensor installed on my frame. All bikes are going to vary some so no points off for that. The kit seems to work well, and the extra weight is completely offset by the ability to power up hills and maintain top speed against wind resistance. I plan to use my converted bike for shopping trips etc. so this kit has completely fulfilled my expectations regarding usability, and the installation was relatively smooth. One of the best aspects of this kit is that the front hub motor is practically unnoticeable if you have disc brakes, which pretty much obscures the hub motor. However it does affect your ride as there is quite a bit of weight on the handlebars and if you start riding into a turn when the motor kicks in that along with the extra weight can put you into a dangerous situation as you can suddenly find the front end pitching over sideways.
Now for the downside. This company is HORRIBLE at communications, and when you do finally receive answers they sound like the staff has day jobs with the Boris Johnson administration – basically the answers are misdirections bordering on outright lies. My kit took almost an entire year to deliver, and while it is impossible to assign what exactly caused this delay due to the whole COVID pandemic, the company blew through all of my goodwill and patience by basically not answering simple questions like HOW LONG WILL I BE WAITING FOR DELIVERY. Their Comments section on Indiegogo provided the only point of information, and that was crowdsourced by other customers reporting on bits of info they received either through the answers from support staff or by using maritime tracking sites to find out where the containers might be. And speaking of support, the initial contact emails NEVER addressed the questions asked, they were literally cut and paste replies that offered nothing but vague handwaving and smiles – direct questions regarding customs duties, the status of the shipment in customs etc. weren’t even addressed and it was necessary to do a frustrating back and forth in order to get any information at all, which was usually unclear and inaccurate anyway. Currently the Indiegogo forum is full of people literally begging to get the rest of their incomplete kits shipped or wondering why after over $2000 spent and more than a year of waiting they still don’t have their kits. Shameful.
Honestly the company should sell itself to someone that has an understanding of the necessity of building the trust that makes a good relationship between a company and its customers, especially when said customers have laid out hundreds of dollars and had been given a promise that they would receive their product within a six month window. I could not recommend funding anything through Swytch, as it will be an exercise in frustration bordering on madness. Rarely have I had such an unresponsive interaction with a company, and the fix was so simple, they could have provided transparent and accurate information regarding the status of deliveries. As I write this the last “update” on their Indiegogo page is from August 27, and it is now December 15. There is NO centralized location for information for the backers of their Indiegogo campaigns and the information that was provided through the very infrequent emails was less than helpful. I actually received shipping information from the contract warehouse before I got an email from Swytch stating that my kit was on its way, which if I was running Swytch I would have sent out a day earlier.
Basically the company seems to be run by incompetent millennials who fancy themselves “disruptors” when actually they are just run-of-the-mill bad businessmen.
DO NOT BUY. They will not deliver when they say and their support is rubbish. Now for those who live in the EU there is no delivery at all because of Brexit. And even though they knew this they still deliver to customers who ordered much later than those who live in the EU because of their incompetence.
I agree that the amount of time it took to arrive (4 months) was a bit ridiculous (I bought online, not through indiegogo so I dont know what the experience has been like there). I am in Paris and the product was first shipped to China to the UK and then from the UK to France, and because of Brexit, was delayed at the border. I thought as a UK company they would be making it in the UK but they just produced it in China like everyone else and then made us the customers pay for that privilege by expecting us to pay the duties for import into UK from China.
Power cable: instructions seem to say it should be pointing downwards from the wheel, requiring it to loop up to the battery. Have I got this right?
Has anyone found a problem fitting Switch to a women’s Trek bike, please?