 REVIEW – Each of my two printers at home has a scanner, but neither is a duplex scanner. When the Xerox Duplex Combo Scanner was offered to the Gadgeteer for review, I was excited to try it out. What’s the verdict? Well, it’s relatively small and lightweight. It scanned my large two-sided documents quickly and allowed me to save them as searchable-PDF files (there are lots of file types you may save your scan as). I also found that I was able to scan multiple photos at once and save them as individual files using the multi-crop TWAIN application setting.
However, when scanning a large document, it sometimes would crop off important information close to the edge of the page thus requiring me to rescan that page. In addition, while scanning photos using the multi-crop setting, the scanner would get crop-happy and chop a photo into tiny pieces creating for me my very own unique and challenging puzzle. Anyway, I had to rescan the image by itself without the multi-crop setting. Additionally, the quality of the photo scans was not quite as good as I expected.
Overall, this scanner makes quick work of large two-sided documents and scanning lots of photos but you need to review the scans carefully to make sure all the information is there and the photos are intact.
What is it?
The Xerox Duplex Combo Scanner is a device that will scan your documents and photos using either the duplex Automatic Document Feeder (ADF) tray or the flatbed scanner and will allow you to save the scans digitally in different file types depending on the scan destination. Duplex scanning means that this scanner can scan both sides of one sheet of paper simultaneously. This scanner is meant to supplement your existing printer(s) to give you or your small business additional functionality.
NOTE: This scanner is NOT WiFi or Ethernet compatible. It connects to your computer via USB and uses your computer’s processor and WiFi or Ethernet connection to your network to do its work.
What’s in the box?

- Xerox® Duplex Combo Scanner
- Power Supply with Power Plug Adapters
- USB Cable (USB-A to USB-B cable, USB 2.0 data transfer speed)
- Spare ADF pad
- Quick Installation Guide
- Technical Support Card
- Warranty Card
- DVD-ROM including:
- User’s Manual
- Visioneer OneTouch
- Visioneer Acuity
- ABBYY Business Card Reader
- ABBYY Fine Reader Sprint
- Scanner Drivers: TWAIN, EMC® Captiva® ISIS® and Microsoft Windows Image Acquisition (WIA) Driver
Hardware specs
Document Requirements (ADF)
- Minimum Item Size 3 x 5.9 inches (76 x 150 mm)
- Maximum Item Size 8.5 x 14inches (216 x 356mm)
- Capacity 35 pages of 20lb printer paper (75–80 gsm)
- Paper Thickness 16–28 lbs. (60–125 gsm)
Document Requirements (Flatbed)
- Minimum Item Size 0.5 x 0.5 inches ( 13 x 13 mm)
- Maximum Item Size 8.5 x 11.70 inches (216 x 297 mm)
- Item Thickness 0.39 inch (10 mm)
General Specifications
- Model Number: XD-Combo
- ADF Scan Speed: 25 ppm/50 ipm @ 300 or 200 dpi (Color, B&W, or Grayscale)
- Duty Cycle: 1500 pages/day
- Optical Resolution: 600 dpi
- Interpolated Resolution with Visioneer Acuity: 75, 100, 150, 200, 300, 400, 500, 1200
- Output Bit Depth: 24-bit color, 8-bit grayscale, 1-bit bitonal (black & white)
- Scan Method: Duplex Automatic Document Feeder (ADF) or Simplex U.S. Letter / A4 Flatbed
- Scanning Media Supported: Paper, plastic ID cards, photos
- Image Sensor: CIS (Contact Image Sensor)
- Light Source: RGB LED lamp
- Interface: Hi-Speed USB 2.0, compatible with USB 1.1
- Certifications: UL/C-UL, FCC CLASS B, CE, CB, WEEE, ROHS, ENERGY STAR, MEXICO ENERGY (CFE), RCM, USB-IF, CCC
- Operating Temperature: 40° ~ 95° F (5° ~ 35° C without condensation)
- Relative Humidity: 10% ~ 90%
Scanner Dimensions (Trays Extended)
- Width 15.8 inches (402 mm)
- Depth 13 inches (330 mm)
- Height 5.5 inches (139 mm)
- Weight 5.94 pounds (2.7 kg)
Power Information
- Power Supply APD (WA-36A24R)
- DC Jack, 2P, 100~240 VAC, 24 VDC, 1.5 A, 36 W, Class 1, ENERGY STAR, RoHS
- Scanner Rating: 24 VDC, 1.5 A
- Power consumption
- ≤ 15 Watts (during operation)
- ≤ 6.0 Watts (on standby)
- < 2.0 Watts (power save after 15 minutes without scanning)
- ≤ 0.5 Watt (power off)
Cable Information
- USB cable 1850 mm, 28AWG, with core, RoHS compliant
Software Information – Supported Operating Systems
- Microsoft Windows
- 32-bit or 64-bit 7 (Service Pack 1)
- 32-bit or 64-bit 8 / 8.1
- 32-bit or 64-bit 10
Scanner Drivers
- TWAIN, WIA, ISIS
Bundled Software
- Visioneer® OneTouch®
- Visioneer® Acuity Module
Design and features
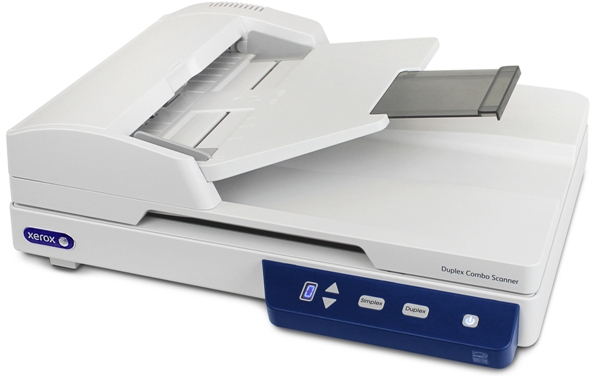
 The Xerox Duplex Combo Scanner is a really lightweight and small flatbed/duplex ADF scanner. I was surprised by how lightweight it was. It is almond colored and made of hard matte plastic.
 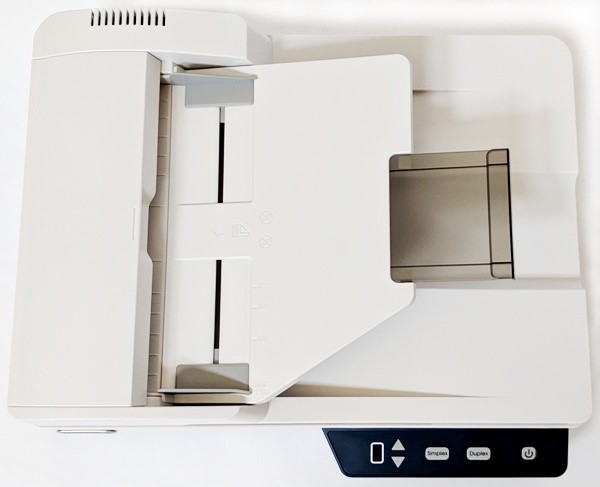 The top of the scanner has paper guides and an Input Tray for the ADF. And just below that is the Output Tray.
The plastic control panel is very simple and contains from left to right an LED display, the Up/Down Function keys, a Simplex button, a Duplex button, and a Power button/Status Light. The control panel looks black in my photos but is actually a very dark blue.
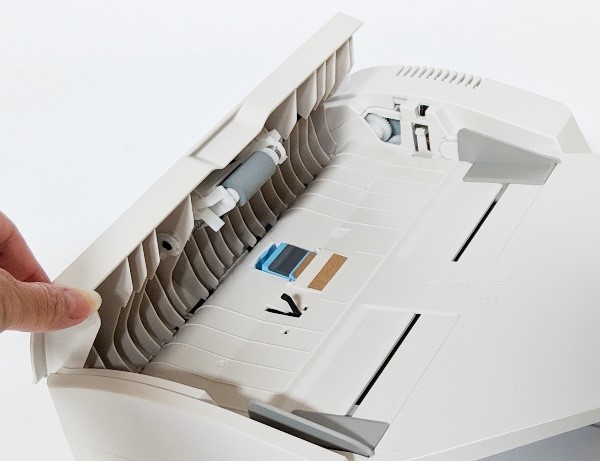 If the ADF gets a paper jam or you need to replace the small blue ADF pad, you can do so by lifting the ADF cover.
  Lifting the Scanner Lid reveals the flatbed scanner.
  The bottom of the scanner has rubber pads at the corners to prevent scratching furniture or moving around. You’ll also notice that on the left side of the bottom of the scanner is a grey sliding button. This is a locking button that will prevent the scanner from scanning when in the locked position. You must slide this button to the unlocked position in order to use the scanner.
 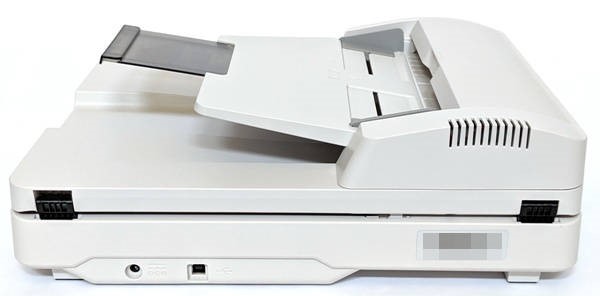 The back of the scanner has the power port and the USB-B port that you use to connect to an outlet and your computer, respectively.
Setup
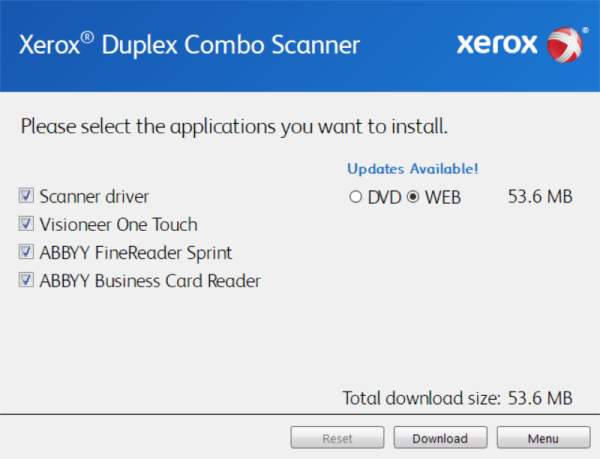 I chose to install the driver and all of the scanning software. I did not install it from the web because I received errors, so instead, I installed the software from the DVD and checked for updates later. The installation took quite a bit longer than I anticipated. Each piece of software required me to accept the terms of use before proceeding.
Performance
 Once all the software was installed, I could launch the One Touch 4.6 software which would bring up the above tiny screen of scanning functions. Left-clicking on any of the icons (Scanning Function Presets 1-9) starts the scanning process when the scanner is powered on and connected to a computer. Right-clicking on any of the icons launches the One Touch configuration screen.
The OneTouch application provides nine preset scanning functions for this scanner:
- Function 1 – “Scan” – the default uses the ABBYY FineReader Sprint application destination and saves the file as a searchable PDF
- Function 2 – “Search” – the default uses the ABBYY FineReader Sprint application destination and saves the file as an sPDF
- Function 3 – “Print” – the default uses the Microsoft XPS Document Writer setting destination and saves the files as a BMP
- Function 4 – “Email” – the default uses the PackagedMail setting destination and saves the file as a PDF
- Function 5 – “Archive” – the default uses the Transfer to Storage setting destination and saves the file as a PDF
- Function 6 – “Photo” – the default uses the Transfer to Storage setting destination and saves the file as JPG
- Function 7 – “Edit” – the default uses the Microsoft Word application destination and saves the file as a DOCX
- Function 8 – “Contact” – the default uses the ABBYY Business Card Reader application destination and saves the file as a JPG
- Function 9 – “Magazine” – the default uses the Transfer to Storage setting destination and saves the file as a JPG
Configuration settings for preset scanning functions
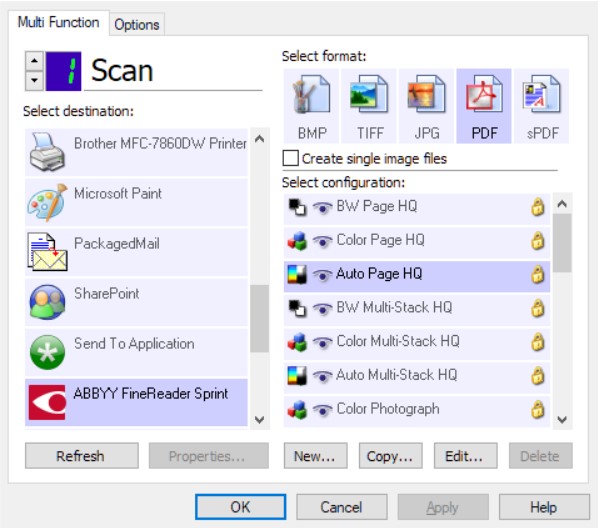
The first screenshot above is the OneTouch configuration screen for Scanning Function 1 entitled “Scan”. The default view is the Multi-Function tab which allows you to select the destination of the scan, the saved file type, and the configuration.
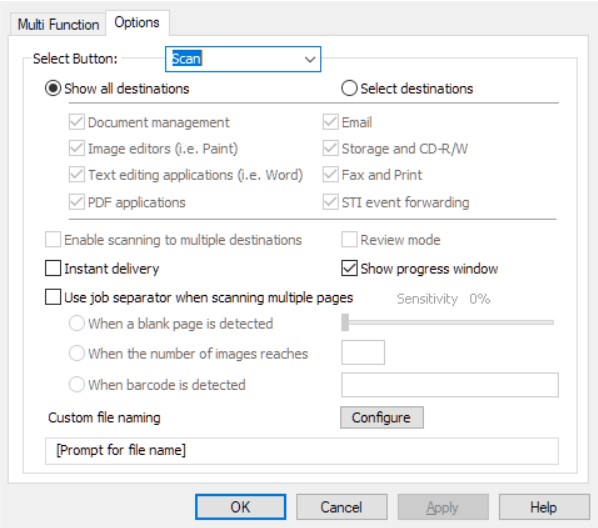
The Options tab located at the top of the screen (shown in the second screenshot above) allows you to select things like which destinations to show, “Use job separator when scanning multiple pages”, and “Custom file naming”.
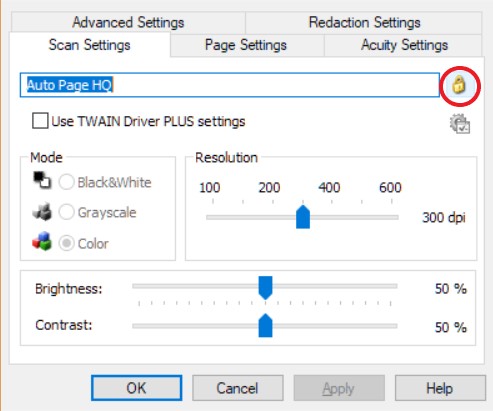
The last screenshot comes up when you click on the Edit button from the default configuration screen. On this screen, you must first unlock the preset configuration by clicking on the lock icon to allow you to adjust the settings.
You can alter the Scan Settings as shown in the last screenshot above…
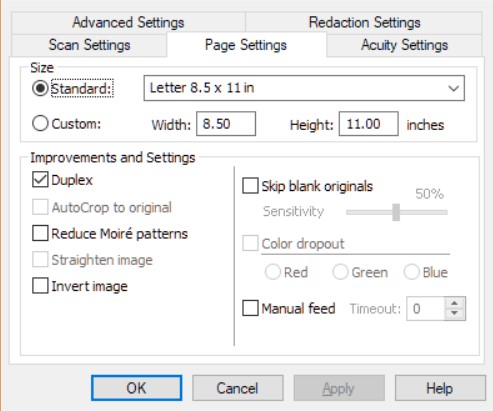
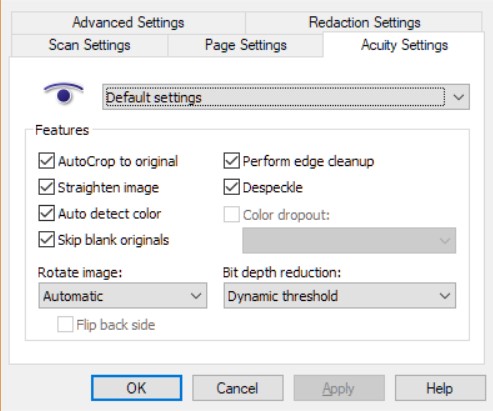

…Page Settings, Acuity Settings, Redaction Settings (not shown), Advanced Settings, and sometimes Storage Settings depending on which scanning function you are editing.
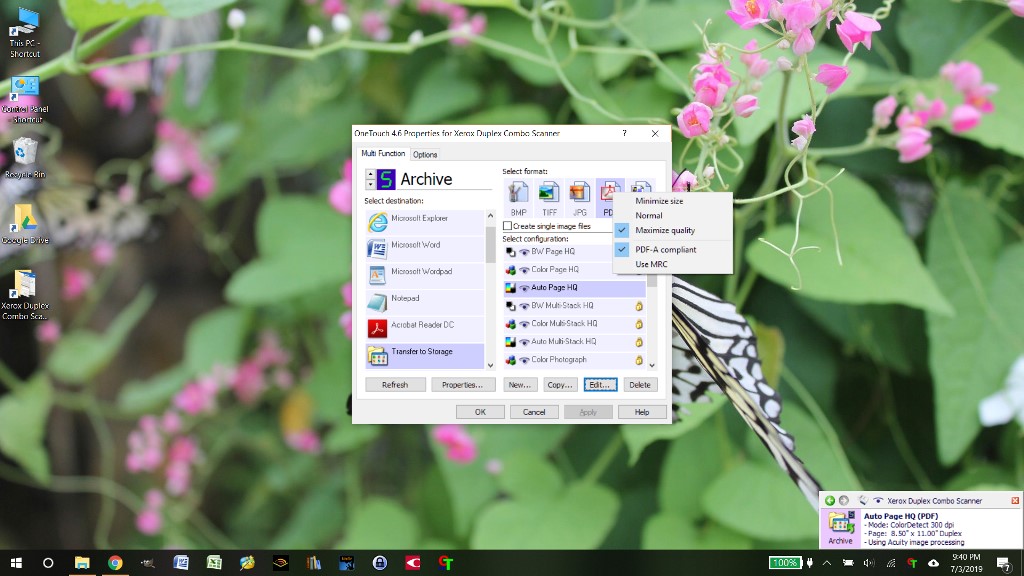 When selecting the file type from the default configuration screen, you can right-click on the file type to select the quality of the scan e.g. minimize size, normal, or maximize quality.
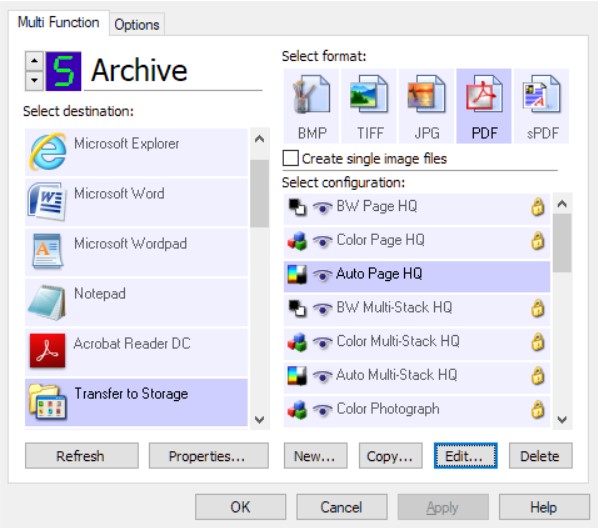
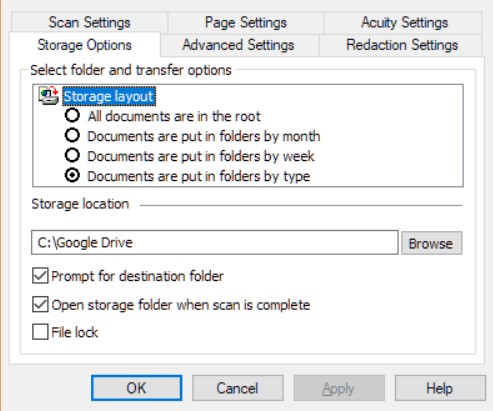
I tended to use Scanning Preset Functions 1 and 5. Scanning Function 5 is entitled “Archive”. When editing this function, I was additionally able to edit Storage Options settings like where to store the file.
Scanning large two-sided documents
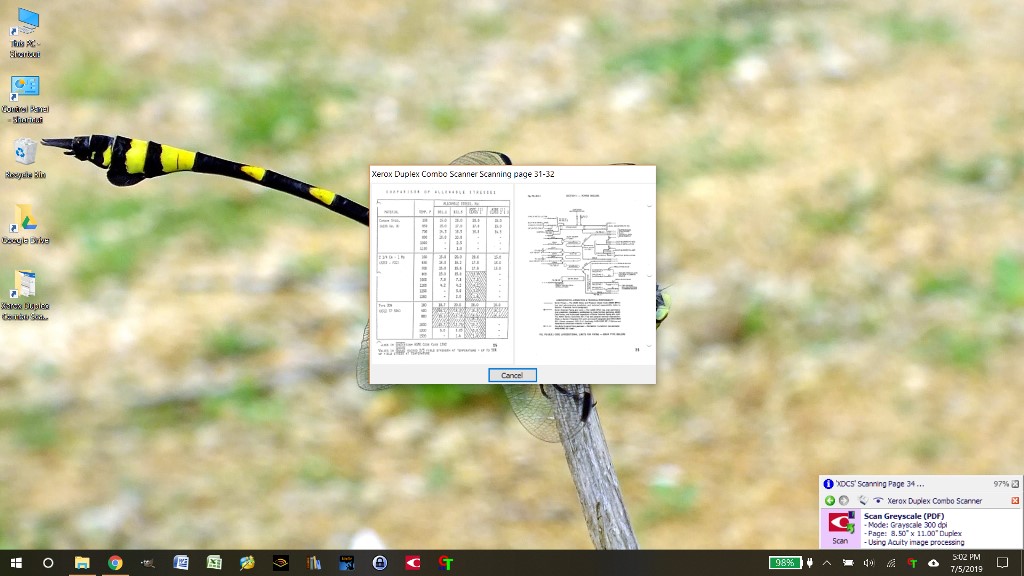
After altering the Scanning Function 1 to my preferences, I was able to start scanning some large two-sided documents by left-clicking on the icon. You can also use the control panel on the scanner to select Function 1 using the Up Function key or Down Function key and then press the Simplex or Duplex button on the scanner.
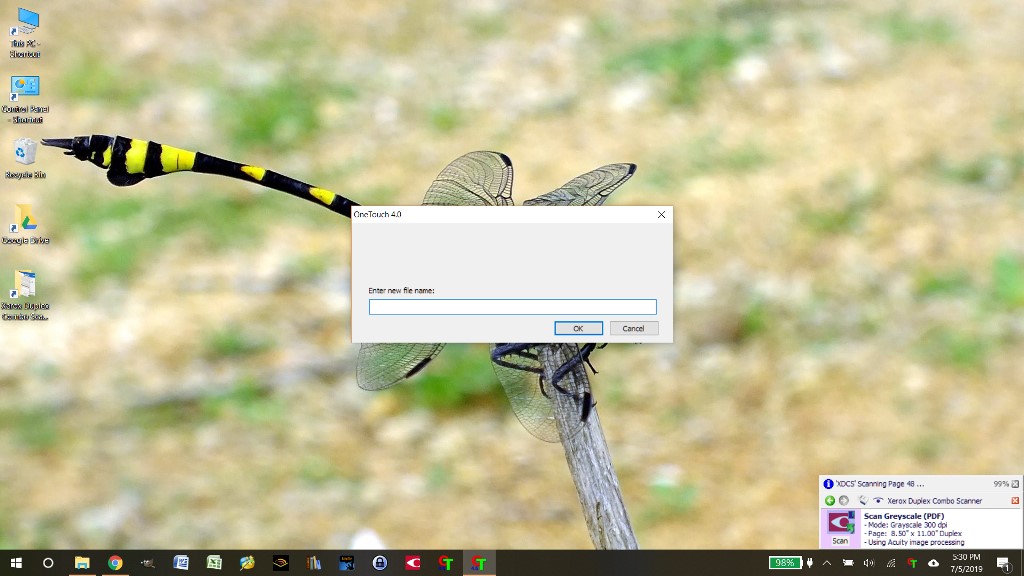
After the initial scan was completed, I was then prompted to enter a file name because that’s how I configured the scanning function.
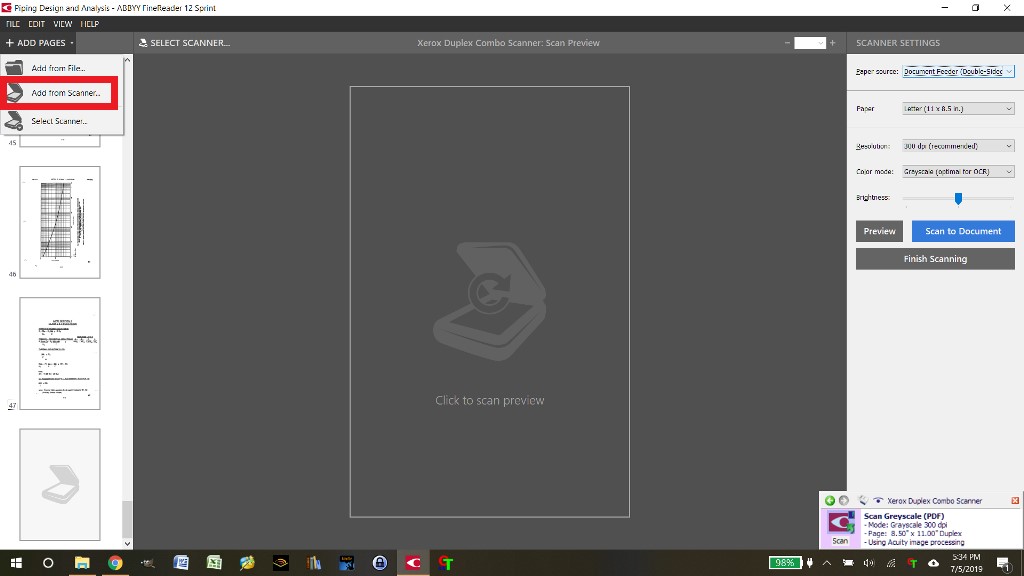
Because the ADF tray limits the number of pages it will hold to about 35, I had to divide large documents into sections. After scanning the first section and naming it, Scanning Function 1 opens up the ABBYY FineReader 12 Sprint application which was the destination for Function 1. However, this is only one section of the document that I was scanning and I wanted to save all the sections in one file. To do this, I needed to click on “Add pages” and select “Add from scanner”.
After selecting “Add from scanner”, the right pane of the application displayed settings for the additional scan (so, I guess I’m no longer using the OneTouch scanner settings but the ABBYY FineReader Sprint scanner settings?). I selected the ADF double-sided paper source, Letter (11″x8.5″) paper, 300 dpi resolution, and the Grayscale (Optimal for OCR) setting. I then clicked on the “Scan to Document” button.
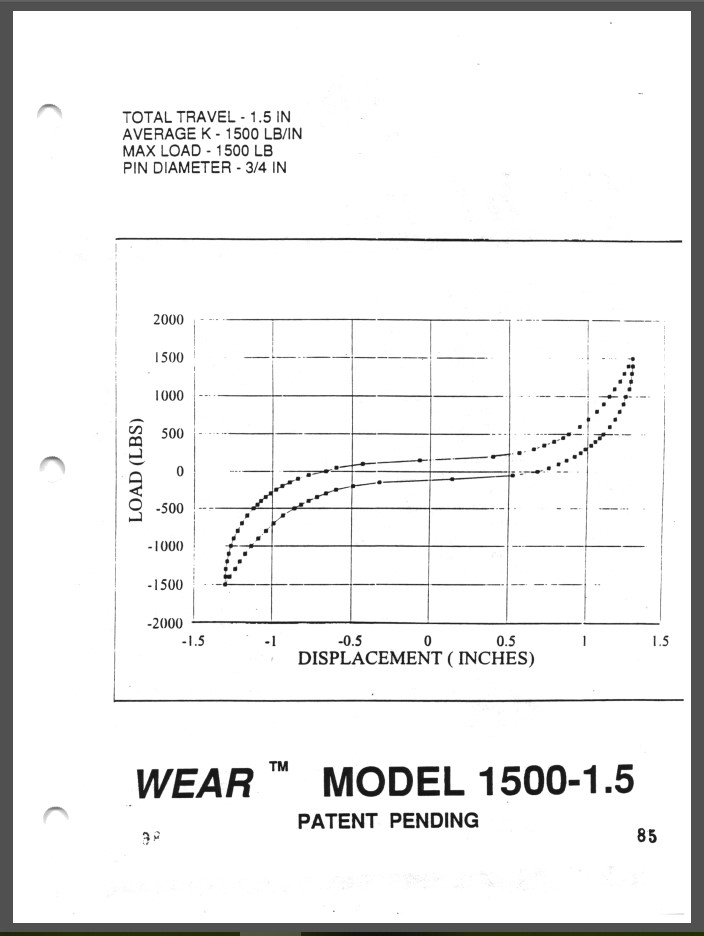
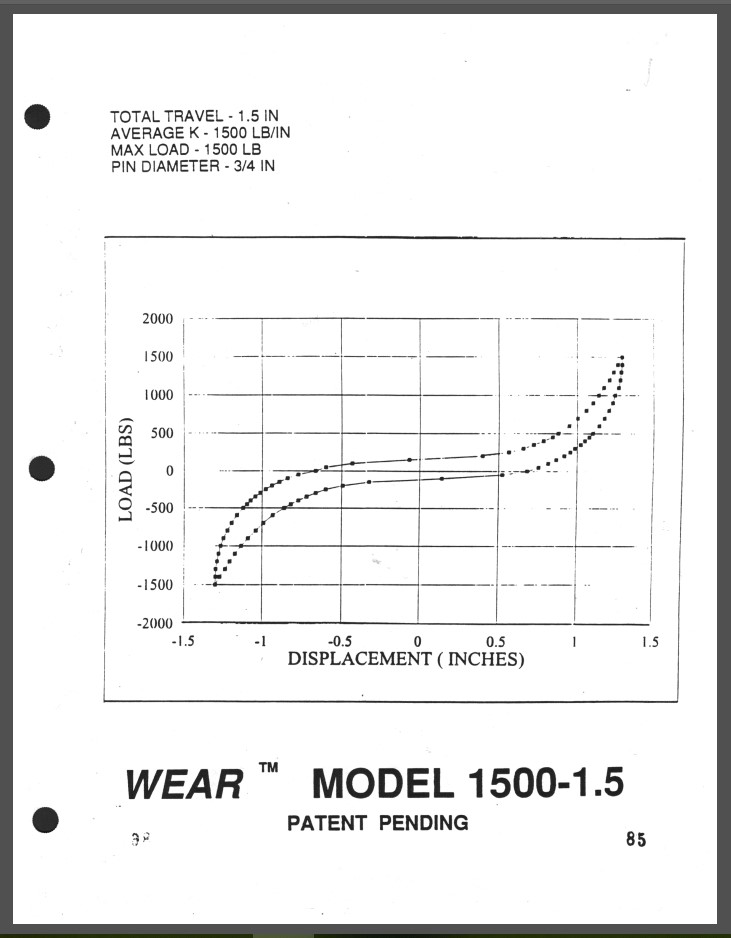

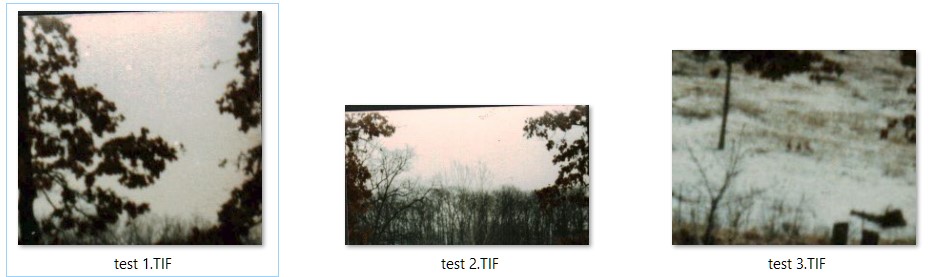
While scanning a large document which was about 400 pages long, there where some cropping issues. Periodically, when there was important information near the edge of the page being scanned, it was cropped such that some of the information was lost as shown in the screenshots above. This happened to about 20 pages out of 400.
To illustrate the problem, the first and third images above were scanned using the ADF and lost some details, while the second and fourth images above were scanned using the flatbed scanner and did not lose any detail. I had to rescan the problem pages and place the new images in the correct position in the document then delete the messed-up image. This was a bit tedious. I tried to figure out if settings like “AutoCrop to original” were the problem, but nothing seemed to work.
You can also see in the above scans that even though the scanner was set to scan to 8.5″ x 11″, the widths of each page is slightly different. This drives me crazy! However, even though the pages are slightly different widths, most of those pages did not lose any information.
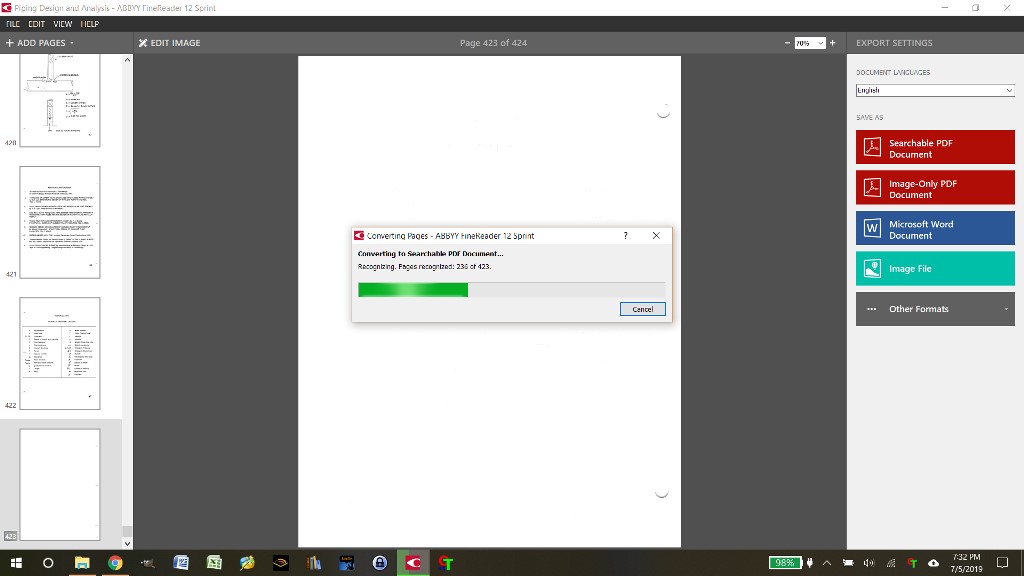 When I was finished scanning all sections of my large document, I saved it as a searchable PDF by clicking on the red “Searchable PDF” button located in the right pane of the screen. It successfully converted the document into the PDF.
The scan quality of the documents was really quite good – better than the scanners on our printers. The OCR capabilities of the ABBYY FineReader Sprint application was also pretty good. It made most of the text searchable (some text was not very clear on the original to start with).
Overall, even though the scanner made quick work of scanning my large documents, I had to be careful that it wasn’t cutting off important information. In the end, I think it was worth it. I saved a great deal of time using this duplex scanner over my other simplex scanners on my two printers.
Scanning old photos
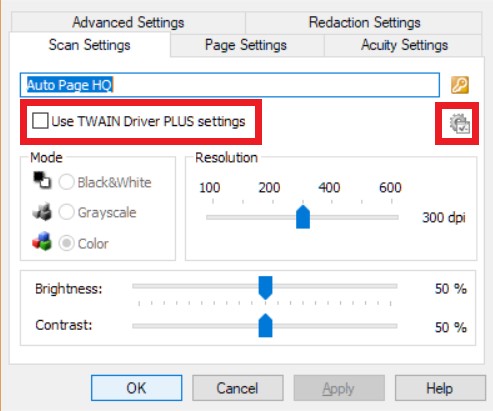
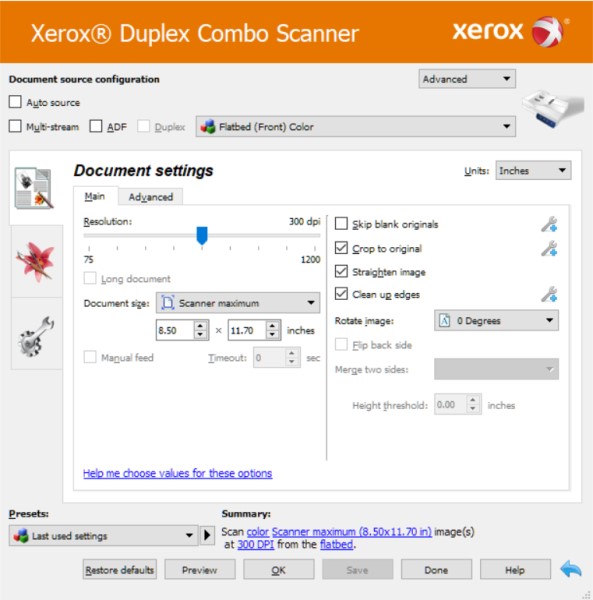
Using Scanning Preset Function 6, I also scanned lots of old photos. Since I wanted to scan about three photos at a time and save them as individual files, I had to alter the configuration settings for Function 6 to use the TWAIN Driver PLUS settings as shown in the first screenshot above.
After clicking on the “Use TWAIN Driver PLUS settings” checkbox then clicking on the gear icon next to it, it launched the TWAIN driver settings screen (shown in the first screenshot above). I had to select “Advanced” from the dropdown menu located at the top right corner of the screen shown in the second screenshot above to reach the multi-crop settings that I needed which was located under the Advanced tab. It took me quite a bit of time to find the multi-crop setting. But once I found it, I was able to scan three photos at a time and save them as individual files as long as I was saving them as TIFF files (you can’t do this with JPG files).
 However, while scanning several photos at a time using the multi-crop setting, the scanner sometimes cropped a photo into small bits as shown above. I’m not sure why – perhaps because of all the vertical lines in this photo?
 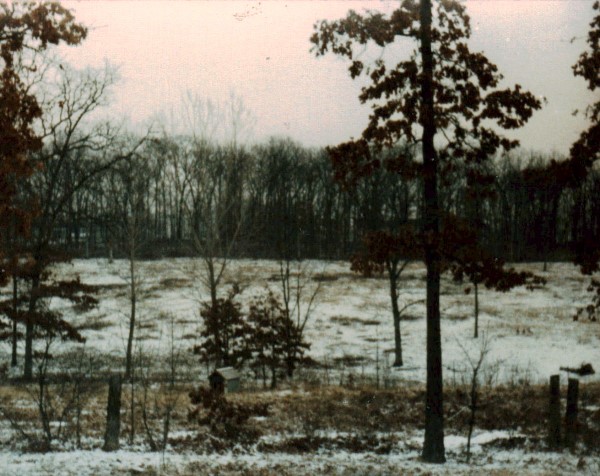 It was necessary to unselect the multi-crop setting and scan the photo by itself in order to get the image to appear correctly as shown above. This slowed the scanning process down some. This happened several times and not just with landscape pictures but also with people. The tops of some people’s heads were cut off and saved as separate files. Perhaps the scanner needs some therapy. Luckily, I was able to scan about two-thirds of my photos without this problem.
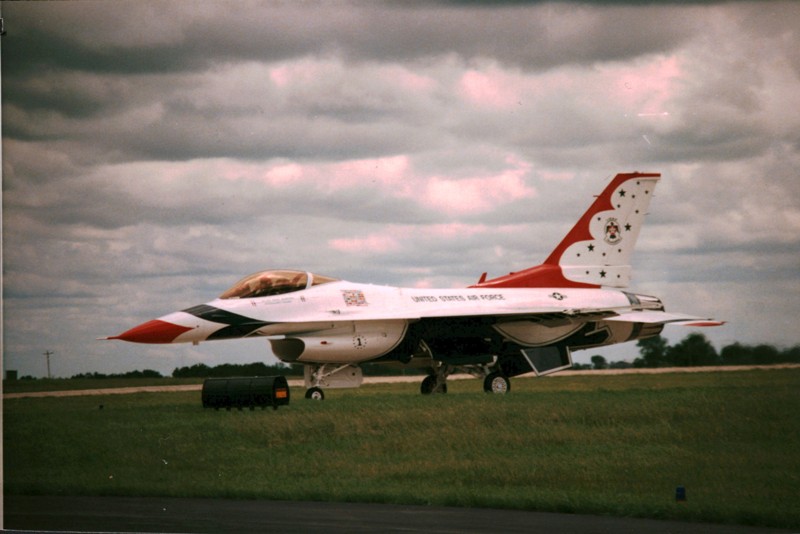
The above images are various captures of the same photo to give you an idea of how well the Xerox scanner captures the colors and details of the photo. The first image above is from the Xerox scanner (a 600 dpi JPG). The second image shown above is from the Google Photoscan app on my phone which uses my phone’s camera to capture the photo and the last image is one taken directly with my Pixel 2 XL camera. Each of the photos was resized to 800 x 800, but no other adjustments were made; brightness, contrast, color saturation, color hue, and gamma settings on the scanner were left at the default settings.
The image that best replicates the actual photo is that taken directly from my Pixel 2 XL camera. I suppose with some work, I could get the Xerox scanned image to better replicate that of the original by adjusting the scanner settings or by using photo software. However, if you need a scanner to scan all your old photos, perhaps it’s best to look for a photo scanner.
Overall, the scanner did an adequate job of scanning my old photos. Though you should know that I’m not a really sentimental or nostalgic person. Thus, I felt that I was able to save time by scanning several photos at a time and have the scanner automatically crop them as separate images and save them as separate TIFF files rather than scanning the photos one at a time.
What I like
- The Xerox Duplex Combo Scanner makes quick work of scanning large two-sided documents
- For my purposes, it also adequately scans about three photos at once and crops and saves them as individual TIFF files
- The scanner is lightweight and is relatively small for a flatbed/ADF duplex combo scanner
- It adds duplex scanning capabilities to your home office or small business at an inexpensive price tag
What I’d change
- The scan widths of 8.5″ x 11″ scans were cropped at slightly different widths throughout the document, but only about 20 pages of a 400-page document were cropped such that important information was lost, thus requiring me to rescan those pages
- It cropped some photos into several pieces also requiring me to rescan those photos individually with the multi-crop TWAIN driver setting turned off
- I would love for it to be WiFi or Ethernet compatible
Final thoughts
When I first received the Xerox Duplex Combo Scanner, I was disappointed that it didn’t connect to my network either via WiFi or Ethernet (it must be connected to a computer via USB to work). However, I think that if those things were included in this scanner as well as the processing power necessary to quickly scan large documents, it would be more expensive. Because the scanner was connected to my computer, it used my computer’s processor and my computer’s WiFi connection to allow me to scan quickly then save the document anywhere that my computer had access to. I guess that means I’ll be hauling my computer into the room where the scanner resides because I don’t have room for the scanner where my computer normally sits.
In addition to the fact that the scanner must be connected to your computer via USB to work, I noticed that when scanning documents, all of the widths of 8.5″ x 11″ scans were slightly different. And on about 20 pages out of 400, the scanner would crop them such that some valuable information was cut off along the edge of the paper. Because of this, I had to rescan those pages and move them to the correct position in the document and delete the old ones before saving the whole document. Incorrect cropping also occurred when scanning in several photos at a time and saving them as individual TIFF files using the multi-crop TWAIN driver setting. Approximately one-third of the time, the scanner would crop one photo into several pieces and save those pieces as separate TIFF files, thus requiring me to rescan them in without the multi-crop setting.
Overall, the Xerox Duplex Combo scanner did a decent job of scanning my large documents quickly and clearly and an okay job of scanning my photos. Using the scanner saved me a lot of time even after correcting for all the issues that I had with it. My husband (who works at home) and I intend on using the scanner mainly for digitizing our personal and work papers so this scanner will suffice for now. If your main purpose is to scan photos, it may be best to search specifically for a photo scanner.
Price: $219.99 (down from $269) from Xerox, $229.99 from Amazon
Where to buy: Xerox or Amazon
Source: The sample of this product was provided by Visioneer.

ESR for MagSafe Wallet, 5-Card Holder With RFID Blocking, MagSafe Sticker Included, Slim Magnetic Wallet for iPhone 17e/17/16/15/14/13/12 Series and Selected Samsung Devices, Not for 13/12 Mini, Black
(as of March 16, 2026 13:59 GMT -05:00 - More infoProduct prices and availability are accurate as of the date/time indicated and are subject to change. Any price and availability information displayed on [relevant Amazon Site(s), as applicable] at the time of purchase will apply to the purchase of this product.)
Gadgeteer Comment Policy - Please read before commenting
Part of the problem you run into with dual scan, is typically the 1st side is an optical scan (ie: the light reflects off of mirrors, then is focused to a CCD lens assembly), but the 2nd side is an “electronic” image, (ie: a contact image sensor). When you are scanning photos, or very detailed documents, unless the image processing software compensates for the difference between the two scans, you can end up with two different images. I’ve had to on some large production machines, had to use a photo spectrometer to get them balanced (and if you are doing high end photo work, you should anyway). Pain in the rear and time consuming, but a LOT less headaches in the long run. 😉
Rusty – Thanks for the info! This helped me and will hopefully help others understand how to obtain more accurate scans.
FTP is out of question to transfer large files. Forget about email to transfer large files. Do it with Binfer. See https://www.binfer.com/solutions/tasks/secure-file-sharing/
Question: I would like to buy the Xerox Combo Scanner reviewed above. Does it have this one simple feature?
Example: I have a 2 page document I want to scan as one PDF file. I want to use the flatbed function. On my office scanner, I can put in one sheet, scan it, and when scanned, the program asks me if I want to “finish” (in which case, the operation is complete and a file is created, but only that first sheet is in the file) or it gives me the option of clicking “next”. When I click on “next”, I can remove the first sheet and place in the second sheet and scan again. Then when given the same choice of “finish” or “next”, I click on “finish” and then the program creates one file with both sheets or pages on it. Does the Xerox Duplex Combo Scanner do this?
William – Yes, the Xerox scanner does this using the ABBYY FineReader 12 Sprint application that comes with the scanner.
After scanning one sheet in the flatbed scanner, the ABBYY FineReader application opens to show you the scanned page. You can then click on the “Add Pages” tab in the top left of the screen to add another scanned image. (After selecting “Add Pages”, you then select “Add from scanner”). The ABBYY application then allows you to select the paper source (here’s where you would select “Flatbed”), Paper (size of the paper being scanned), Resolution, Color Mode, and Brightness settings. You then click on “Scan to Document”.
When you are finished adding all the scanned pages you want, you would then click on “Finish Scanning”, and then you can then save all the scans as one file.
If you need more clarification, you can check the online manual for the Xerox Duplex Combo Scanner for more info:
https://www.xeroxscanners.com/downloads/Manuals/XDCS/XDCS_Guide.OT4.EN.pdf
I hope this helps! 🙂
I cannot figure out how to get my scanner to scan two sided. Do I have to change a setting for this? I have the duplex scanner combo
Judy – Please see my section on “Scanning large two-sided documents” in this review. If you find that this does not help you, please contact Xerox support:
http://www.xeroxscanners.com/en/us/contact.asp
Thank you for this detailed description of functions 1-9. Alternate pages were scanning upside down, so this helped us figure out to switch to function 5 instead of 1, which solved the problem. This info wasn’t even available on xerox’s website.
Tracy – I’m so glad the review helped you! Thanks for your comment!
How do I extract the charger prongs?
Chinny – The scanner has a simple power cord that is easily pulled out, but if that’s not what you are talking about, it may be best to contact customer support using the following link:
https://www.xeroxscanners.com/en/uk/contact.asp
Good luck! 🙂