The LEDVANCE Gateway is a smart hub that interprets commands from a Wi-Fi network and transmits them to devices on its ZigBee network, and also monitors the status of those devices and reports it to authorized users. It is metaphorically the jam that holds all of the intelligent LEDVANCE products together. But, like the jam that holds your sandwich together, there are competing brands to choose from and different qualities of each. What you choose depends on your preferences and, to some extent, budget. Ok, enough of this metaphor, I’m getting hungry and want to check out this hub. Let’s see how it works and what it has to offer.
You may have noticed that the manufacturer listed in the title of this post is LEDVANCE but the device is branded with the Osram trademark. This is because in January 2016, Osram GmbH spun-out some of its business units into a new company named LEDVANCE. The portfolio of the new company includes, amongst other units, connected and intelligent lighting solutions for smart homes and smart buildings. The app on the iTunes store and the Google Play site are still branded as Osram, even though the iTunes app has been revised 6 times and the Android app 7 times since the rebranding.
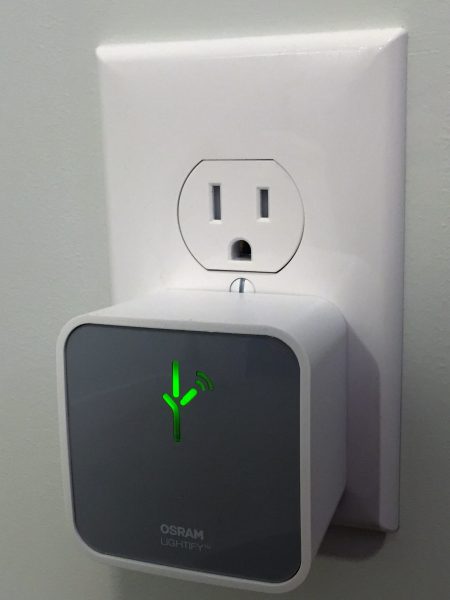
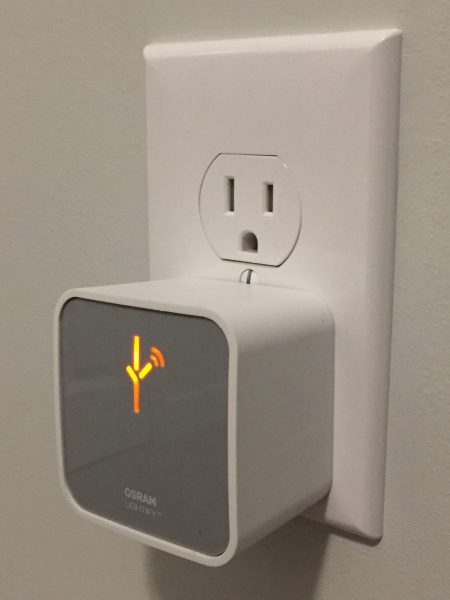
The actual product is a 60 mm wide, 60 mm high, and 41 mm deep (not including the outlet prong) box. The plug is a 15 amp non-polarized design so it permits the most flexibility when installing it into your chosen receptacle. When installed and configured correctly the symbol on the front (which I think looks like the alphabet used by the Predator) glows green with just enough brightness that it is easy to tell it is functioning during the day but isn’t obtrusive at night. When the hub is offline the symbol glows orange/amber and when it is logging into the WI-FI it blinks orange/amber. The gateway requires 5 watts, so that’s 3.65kWh/month, or less than a dollar.
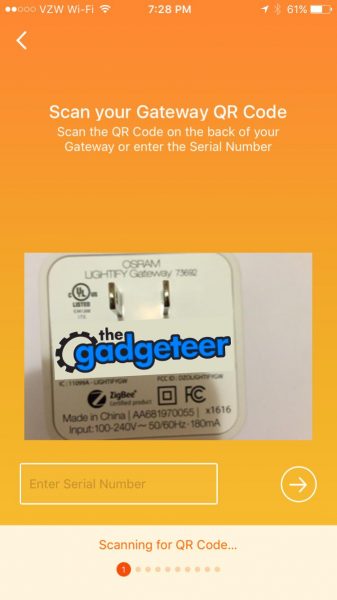
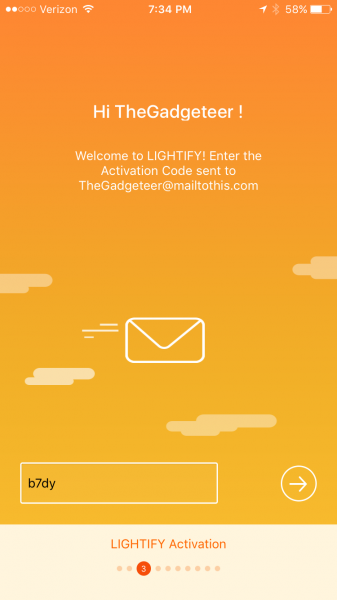
The set up process is easy but sort of lengthy, the video that they send to you in the sign-up email is not found on YouTube, and the only other YouTube videos are in German. So, I’ll describe the setup here and provide some pictures to go along with it for those of you who don’t sprechen Deutsch. These are iPhone screenshots but the process on the iPhone and Android is very similar. I’ve covered the MAC addresses, SSID’s and passwords used with The Gadgeteer logo for security. Download and install the companion app before plugging in the hub. Current versions are 32 MB for iOS and 27 MB for Android. The first step is to scan a QR code on the back of the hub. This allows the app to look up the SSID and password of the hub’s built in ad hoc Wi-Fi network. Alternatively, you can type in the 13 character alphanumeric serial number. (If you plan to integrate this into Amazon Alexa, write down the serial number; you’ll need it later, but you’ll also need to keep the hub plugged into the wall.)
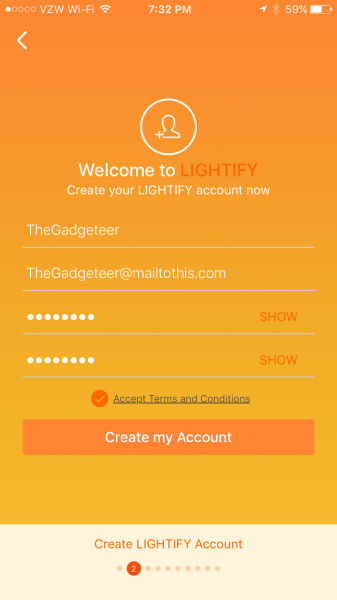
 Assuming you don’t have an existing account you must create an account here and verify that it is a real account. I just used a throw-away Mailinator account for this demo. The account will be verified so you need to use an account that you can actually access. You may share this account login information with up to four other devices to permit shared operation of the hub. App settings will be synchronized across each device through the internet.
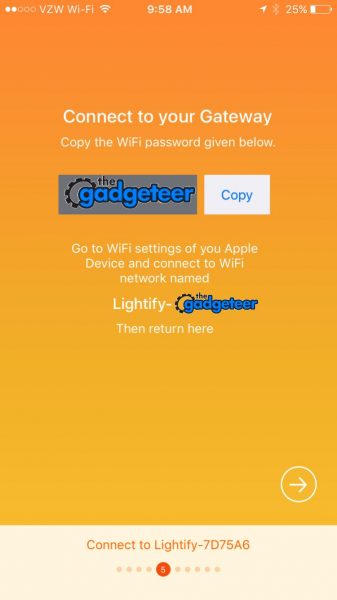
 After creating the account you can finally install your hub. The unit will power up and start an ad-hoc Wi-Fi network. The app will conveniently display the password to the network and display the name of the SSID you need to join. Task switch to the settings screen and join the provisional Wi-Fi network.

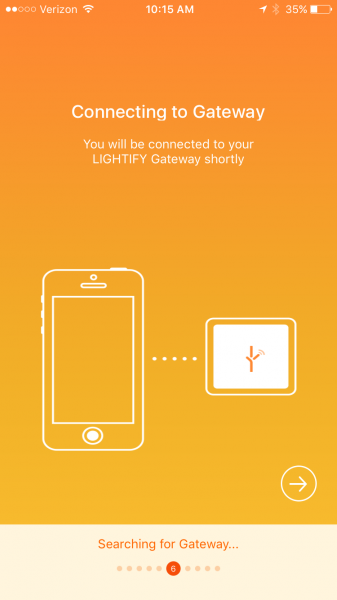 After task switching back to the app, and after the phone is connected to the hub, it will search for 2.4 GHz Wi-Fi hotspots (or 2,4 GHz in Europe) and display the detected SSID’s on the next screen. If you don’t broadcast your SSID you can still type it in by selecting “Hidden Networks”.
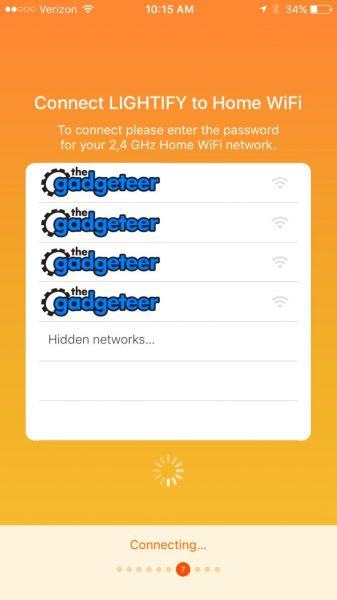
Here you will provide the password to your SSID and the hub will associate itself with your home Wi-Fi network. Mid last year, this article was published on how there were security flaws in the Osram app and how the home Wi-Fi password was not encrypted in the app. The app has since been patched and this security flaw has been fixed. Also, unlike SmartThings, there is no option to run the hub off of a wired connection and there doesn’t appear to be a battery backup to the AC power. 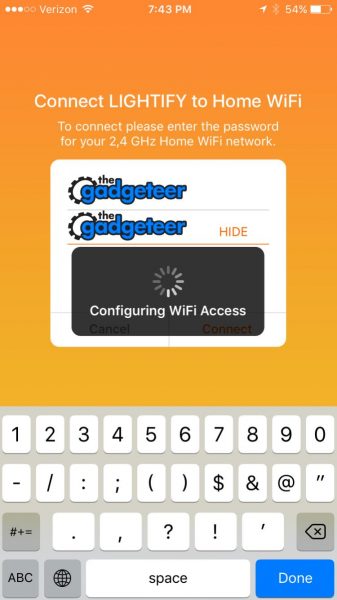
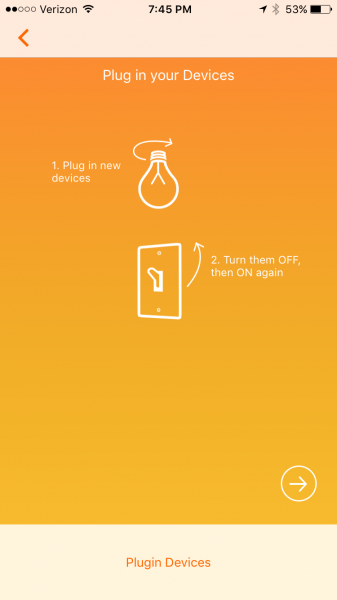
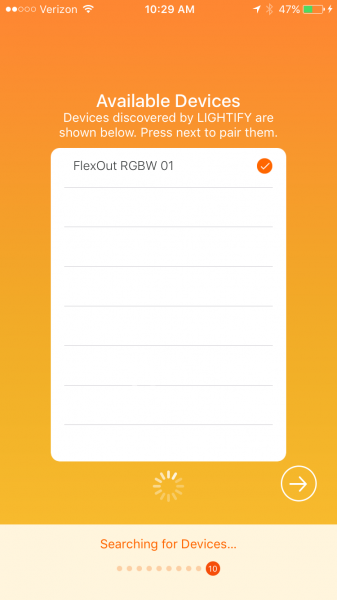
Once the hub has associated itself with your network it will ask you to plug in your devices. Turning them on, off, and on again should signal the controller within each to join the newly established network. ZigBee devices can only be part of one network at a time. If the lamp is not responding then you may need to turn it on for 5 seconds and off for 1 second 6 times in order to reset the controller. Other devices may have a hard reset button.
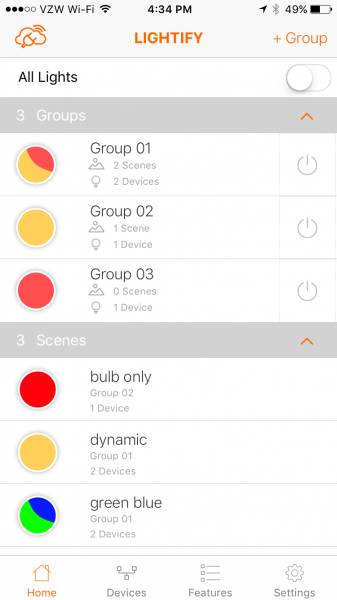
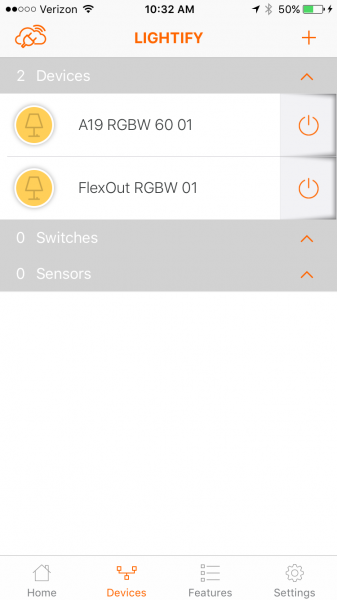
After the devices are found you are brought to the home screen. This will show two empty categories: group and scene. Groups are collections of devices that you can turn on or off at the same time and apply dynamic lighting presets to all at once (more about this later). Scenes are groups of devices that have preset settings, but not each device in a scene has to have the same settings. Each device in a scene may have independent or shared correlated color temperature, brightness, or hue. Think of a scene in a theatrical production: there may be some bright lamps with red filters and some dim lamps with blue filters. This arrangement could be set by selecting one scene button on the Lightify app.
The cloud with a plug on top of it means that the hub is communicating with the smartphone/tablet using a local Wi-Fi router and also an internet connection. If the smartphone/tablet is not using the same router (if Wi-Fi is turned off on the phone) then the plug disappears. In this case there is about a 0.2 sec delay between pressing the on button on the phone and the light turning on/off. If communication through the router is used then the response time to the button press is almost instantaneous.
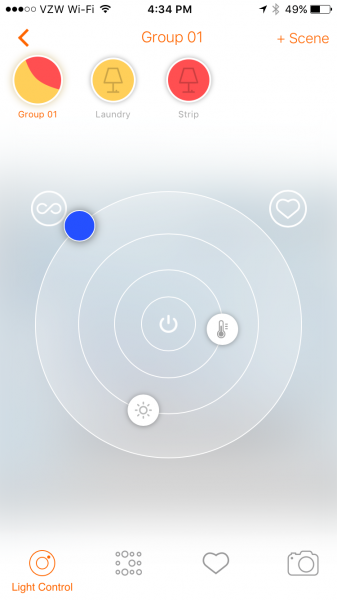
To create a group press the + group in the upper right. it will take you to a screen where you can enter an group name and select which device, from amongst all the devices on the network, belong to the group. Once the group is created return to the Home screen. On the home screen the switch to the right of each group looks like a Decora switch that is pressed in when active and flat when switched off. Pressing the circle to the left of the group name will take you to a device settings screen where the settings for each or every device in the group may be set. (More about this in the next paragraph). On the device setting screen there will be a + Scene button on the top left which you may use to save the current condition of the devices within the group. Pressing the name on the home screen will allow you change the name and set the members of the group. Once a scene is created the color of the button on the home screen will roughly match the colors of the devices in the scene.
On the devices screen, each device is listed in a separate category. The color of the icon roughly matches the selected hue of the bulb. Pushing either the icon or the name brings you to the device settings screen.
The device settings screen has a main light control wheel that features rotary sliders around a central on/off pushbutton. Adjusting the correlated color temperature sets the hue to the correct color, from cool blue to warm orange. The intensity may be adjusted independently of the hue. Using the outermost slider turns the display into a color wheel which allows the user to specify the hue and saturation. If the Lightify lamp is lit while you are adjusting these settings it changes color according to your selection. The lamp is very responsive to your color and brightness selections which makes finding a lamp color an easy experience. Unfortunately, there is no record of actual RGBW values. Pressing the device name at the top of the screen allows the user to edit the name of the device. Pushing the rocker switch icon at the top left allows the user to change the default appearance of the device. There are three more buttons at the bottom of the screen: Presets, Favorites, and Camera.
The presets screen shows 14 different color presets. There are three presets that are static color settings: plant light, active, and relax. There are two long-period dynamic lighting presets called day light and good night light. The good night light will fade to off in a user-set amount of time and the day light will simulate the color of sunlight throughout the day. The other light patterns are short-period dynamic lighting presets and include Fireplace, Ocean, Evening, LIGHTIFY Loop, Candy, Polar light, White and White, Activate, and Chill Down. The speed of the color change may be set for each dynamic preset and the brightness may be changed for all of these except for Activate and Chill Down.
The color loops and the dynamic lighting are unique features of the Lightify gateway. I was unable to create this with the SmartThings hub CoRE programming, but it may be duplicated if the actual header information is programmed into a SmartThings program. Still, this would take some above average programming knowledge. The main differentiator is the speed at which colors may change. Note that the presets may not be saved as favorites, may not be saved as scenes, and will not resume if the bulb is turned off. They may only be set from the device screen or the group screen.
The favorites button lists the 16 favorite user settings for each device. The favorites may be saved by pressing the circle inscribed heart to the top right of the setting wheel. Note that when I added my Android phone account to the iPhone account that the existing favorites disappeared. The favorites show the approximate hue and brightness, but there is no way to name the favorite.
The camera icon allows the user to match the hue of the light to a grouping of pixels in a stored image or a captured photo. This is a neat trick but I believe it is mostly a tool to demonstrate the range of the RGBW lighting capabilities.
There are six more capabilities of the gateway. Four of them are under the Features menu: Scheduler, Wake-up light, Vacation Modes, TV Simulation. The scheduler will simply turn on the light for a predetermined period every weekday the scheduler is selected. Any number of schedules may be set, so more than one on-off cycle may be scheduled per day. The wake up alarm will dim the selected light from a low brightness to bright daylight and then switch off at a desired time. The smartphone/tablet that created the wake-up event will signal an alarm (alarm and tickling [sic], digital alarm clock, fog horn, old alarm clock and ringing, seagulls on beach, whistle, or wild birds). The acoustic alarm won’t sound if the smartphone/tablet is in silent mode. The vacation mode will turn on and off the lights between every 5 minutes and every 2 hours (user-selectable) in the time period selected. Finally, there is a TV simulator that uses the color loops to simulate a TV being watched within a user-selected time period.
The settings menu allows the lights to work with Nest home and away profiles so that different lighting can be set to each mode. The settings screen on the iPhone allows customization of the today screen widget, and a widget is also available on Android, that allows the user to set group and scene lighting from outside of the app.
Lastly, the gateway can be integrated with Amazon Alexa smart home automation to permit devices to be turned on and off and set to a percent intensity. Sadly, Alexa doesn’t allow the setting of color or correlated color temperature. Alexa only controls devices through the gateway; if you want to control groups you need to define them within the Amazon smart home settings. Also, since you will have to speak the name of your device, make sure it is one that you will be able to roll off your tongue. In the images above I have FlexOut RGBW 01 listed as a device but I renamed this to Strip for use with Alexa.
In conclusion, the LEDVANCE Lightify Gateway provides flexibility and creativity in the operation of lights and plugs. The gateway provides limited automation in the form of turning on and off lights and plugs using ZigBee switches and sensors, programming lights and plugs using timers and alarms, and coordinating modes with a Nest thermostat. The gateway also allows limited control with Amazon Alexa. More advanced automation, such as integration with IFTTT, Stringify, or other home automation devices is not supported. However, this gateway is available for $32.59 alone, and is often packaged with LEDVANCE lamps for even larger savings. If you want to explore home automation without breaking the bank, and if you want flexible, responsive, and creative lighting capabilities from the palm of your hand, then the LEDVANCE Lightify Gateway may be just what you’re looking for.
Source: The sample for this review was provided by LEDVANCE Sylvania. Please visit their site for more info and Amazon to order.
Amazon Echo Show 5 (newest model), Smart display, Designed for Alexa+, 2x the bass and clearer sound, Glacier White
(as of July 9, 2026 00:31 GMT -05:00 - More infoProduct prices and availability are accurate as of the date/time indicated and are subject to change. Any price and availability information displayed on [relevant Amazon Site(s), as applicable] at the time of purchase will apply to the purchase of this product.)
Amazon Echo Dot (newest model) - Vibrant sounding speaker, Designed for Alexa+, Great for bedrooms, dining rooms and offices, Deep Sea Blue
(as of July 9, 2026 09:24 GMT -05:00 - More infoProduct prices and availability are accurate as of the date/time indicated and are subject to change. Any price and availability information displayed on [relevant Amazon Site(s), as applicable] at the time of purchase will apply to the purchase of this product.)Product Information
| Price: | $32.59 |
| Manufacturer: | LEDVANCE Sylvania |
| Retailer: | Amazon |
| Requirements: |
|
| Pros: |
|
| Cons: |
|
Gadgeteer Comment Policy - Please read before commenting
Not Apple Homekit compatible. That’s a con IMHO. Funny because they have announced a bulb that is Homekit compatible. Maybe they’ll update their product. It would be nice to have a Zigbee gateway that works with HomeKit.
Alan, You’re right. I’ve edited the cons to include Apple HomeKit.