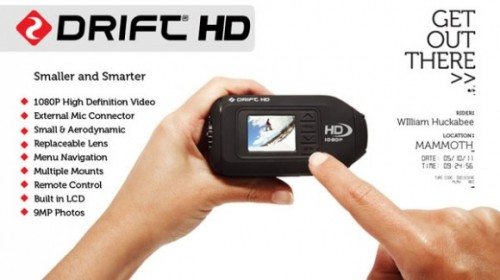
 So……..what does a 46 year young man do when he’s given a Drift Innovations HD Action Extreme Sports camera to review? You know the ones, you’ve seen the videos of the guys in the California X Games doing motorcycle or skateboard jumps and flips, or the guys skydiving or…….
Well the mind might be willing but these days the body ain’t….
How am I going to test this one ?????? 🙂
The Drift HD is a splash-proof, dust-proof, weatherproof, and dunk-proof camera primarily aimed at the “Extreme Sports” market. Clipped to a vehicle, a helmet, or a board, the concept is to record quirky angle type videos that give a sense of action that normal recording equipment can’t give. It’s small size and weight means that it can be used in situations again where traditional recording equipment isn’t appropriate to use.
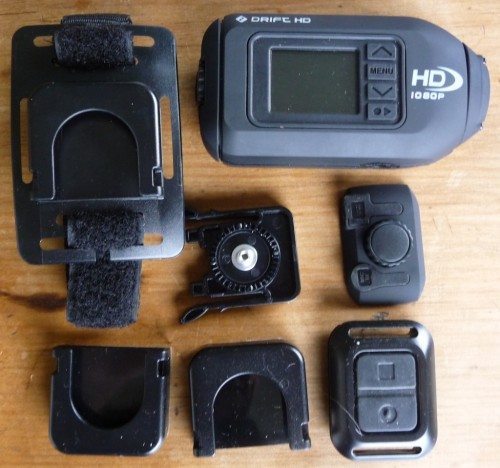 The unit itself comes standard with a good collection of accessories. Clockwise from top left: Goggle/Strap mount, the HD camera itself, alternative back with rubber doors for USB and microphone, RF remote, curve mount, flat mount, middle: universal clip (+ USB cable not shown) . The review unit also came with an 8GB microSD card, which isn’t standard, and the unit will take up to a 32GB card . Class 4 or higher is recommended for video, and there’s no internal memory.
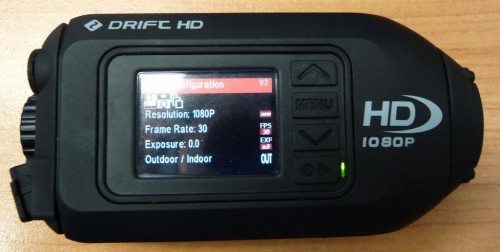 The camera’s small and aerodynamic (important when you’re going fast and aerodynamics are important), weighs in at 119.91g (4.23 oz) and measures 104.14 X 50.00 X 33.00 mm (4.10 X 1.97 X1.30 in). One of the things that differentiates this camera from other action POV cameras is the integrated 1.5″ Colour LCD screen which can be used to change settings, frame videos and pictures, and playback your captures. With the other offerings, the colour LCD is generally an optional extra, so there’s no way to see your video instantly onsite without additional AV equipment like a notebook/tablet being available. The green/red/blue LED next to the play/select button indicates various states (e.g recording, charging).
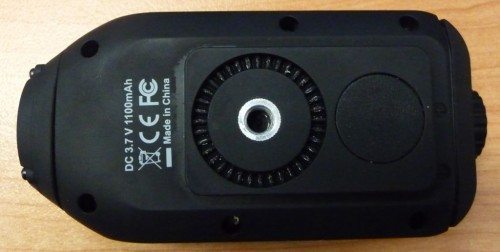 On the bottom side, there’s not a lot except for the ratcheted standard tripod thumb screw receptacle (1/4″, 1/4-20) . So the camera can be placed onto a standard tripod for photos or filming, if required.
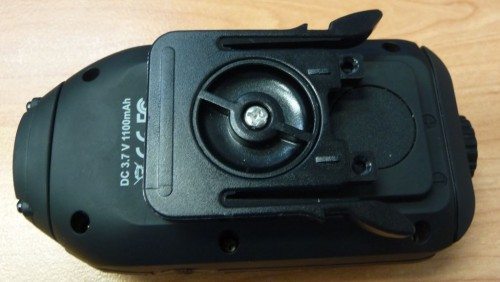 Supplied with the unit is a universal clip that screws into the tripod hole and has a ratchet mechanism so that the camera can be manipulated and held into any position. This then allows the camera to be fitted into a number of different mounting options.
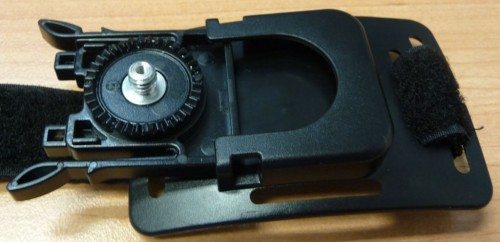 The mounting assembly works the same with all the supplied holders and for various optional ones you can purchase, like a suction cup mount or a gun mount. The flat and curved mounts (supplied) use 3M double-sided tape to be permanently fixed. The goggle/strap mount shown above is the one I used the most with the supplied velcro strap during the review period. Using the strap you can attach the camera to bike helmets, poles and all manner of things.
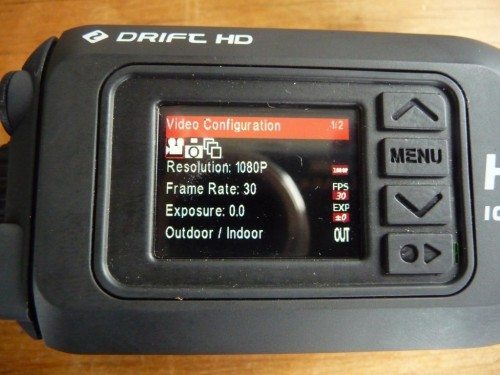 Above you can see the three modes supported with the camera
Video supported options:
- 1080P, 720p, SD options
- 30, 25 frames per second ( + 50 and 60 in 720, +90 in SD )
- Exposure compensation ( +/- 2.0 )
- Indoor/Outdoor mode
Camera supported options:
- Exposure compensation ( +/- 2.0 )
- Indoor/Outdoor mode
- Action/Still mode
- Inside ( optional ) waterproof case mode
Continuous supported mode:
- Exposure compensation
- 2/3/5/10/30 sec exposure delay
- Indoor/Outdoor mode
- Action/Still mode
- Inside waterproof case mode
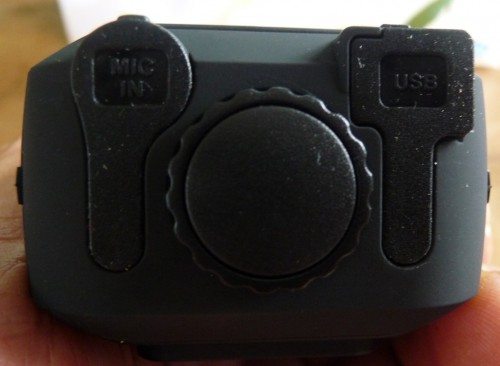 Here’s the back of the unit, with the “open” port backing on it. The backing screws on using the small thumbscrew in the middle. This back obviously reduces the water resistance integrity, but makes it easier than having to unscrew the back every time you want access to the USB port. The camera itself is only rated as “water-resistant”, not waterproof, but it’s splash-proof, dust-proof, weatherproof, and dunk-proof. The standard back has no port opening plugs and would be more water-resistant than the one above. A 3-metre waterproof pouch and a fully-waterproof-to-30-metres hard case are available as optional accessories.
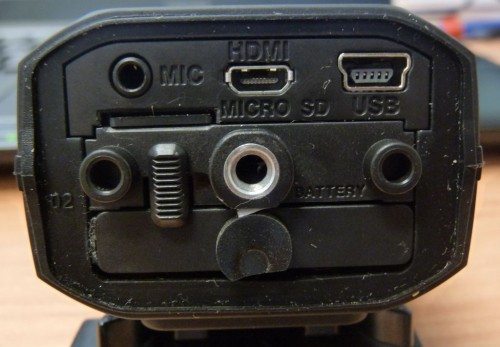 Once you’ve removed the back cover you have full access to the ports (note the rubber boot around the edges that increase the water resistance when the backing is screwed in) :
- External Microphone
- Micro HDMI
- Mini USB
- Micro SD slot
- Battery
One thing to note is that there’s no key guide mechanism on the battery pack system. Not reading the quick start manual, I initially put in the battery upside down. The quickstart manual (come on, hands up! Who here actually reads the quickstart manual? 🙂 ) does indicate which way the brand sticker should go. The unit is powered by a 3.7V, 1100 mAh rechargeable lithium-ion battery. Charging is easy as it’s done via the mini-USB port. Battery life is quoted at around 4 hours. Drift also offers an external battery pack to extend your battery life (though the right generic external pack would most likely do the job as well since it just connects via mini-USB ).
Once your camera is connected and turned on , your desktop/notebook will appear as a new drive which makes it easy to get your videos off the camera and start editing.
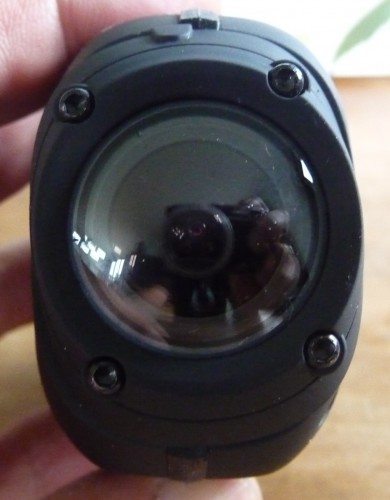
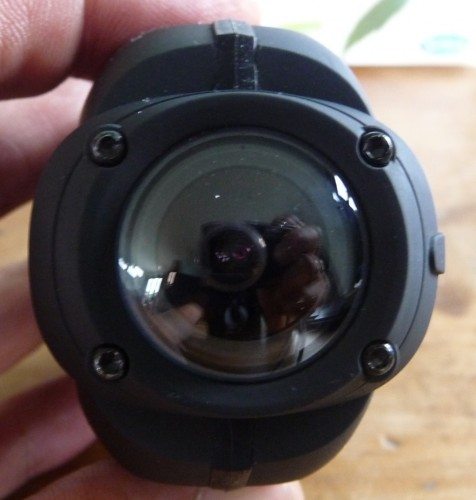 One of the other unique features on the Drift in it’s market is the rotatable lens. This means that the camera can be mounted at all sorts of positions, and you can then rotate the lens to get a straight and level image. With a 170° view you get a pretty wide field of view (so you don’t miss that off to the side action). You do get some distortion, but with a lens that wide you’d expect that. The lens will actually rotate a full 300°. Combining the rotating lens and the ratcheted clip mount, the camera can be made to perform at all sorts of weird angles.
The unit also has a 4X digital zoom, something that normally I turn off as soon as I receive a camera 🙂
The lens itself doesn’t have any real protection, and I’ve taken to carrying it around in a Timbuk2 On the Go Shed Pouch. The front lens is available as a spare part and can be replaced by removing the 4 hex screws (seen in the picture above) should you have the misfortune of breaking or damaging your lens during your extreme action.
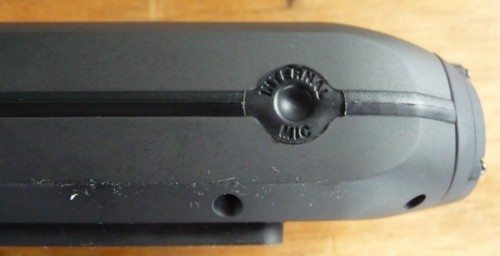 For sound, the Drift has an internal microphone mounted on the side of the unit. To keep it’s water resistance, the microphone has a thin layer of rubber over the top of it. This does limit the quality and pickup range of the microphone, and if audio’s important to you, then for better audio quality it would be worth investing in an external microphone.
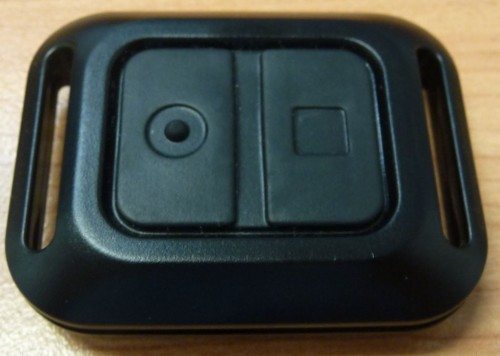 For starting or stopping recording (in any mode), the remote control is supplied as standard. At 52X40X13 mm (2.05X1.58x.51 in), it’s nice and big, which is handy for quickly being able to find and hit the buttons , especially if you had gloves on. The unit comes with mounts for connecting to a strap to put on your wrist or other appropriate, easy-to-find place. Being RF based, you don’t need line of sight to the camera, and the range is rated at 5 metres. You can also pair a single remote to pair with a number of cameras for simultaneous and synchronised on/off . The camera will beep when you start or stop recording, and the only issue that I found was that there appeared to be some delay between hitting the button and the start/stop operation happening. Nothing too major, but something to keep in the back of your mind.
Once I got the item all fired up the next thing I decided I should do is to check if there was any updated firmware available for the unit. It turned out that this camera was 2 …yes 2 firmware updates behind, however looking at the dates on the firmware page, this unit had those updates only over the last 3 months. Nice to see a company that’s producing consistent firmware that improves the performance of their products. To upgrade you just copy the firmware to the micro-SD, get into the menu system and hit the firmware option which will upgrade it for you.
I then had a quick look at the support section of their website. There’s a heap of online video tutorials, again very useful to go through to learn the basics of using the camera. That being said, the operation of the unit is pretty straight forward and intuitive. The site also has sample videos from all those extreme sports to give you an idea what you can do with it. 🙂
 The unit is capable of taking 9 MP still shots. This is the view from my top balcony with the camera set to outdoor mode. There is distortion of straight lines but you’d expect that from such a wide lens. Colours are fairly accurate, if not a bit dull. If you look at the picture full-size however (click on the above image), you’ll see that the photo quality isn’t overly good. There’s a lot of pixelation and blurring. This camera certainly isn’t going to give you the sort of quality picture that you can blow up past about a standard 6X4″ print.
One thing to note is that because the camera has a side mounted LCD, it’s a bit weird taking photos as you have to stand at 90 degrees to your subject. Using it like a range finder (looking down on the LCD) helps in camera mode a bit, but only if you’re taking pictures in portrait.
Continuous mode had interesting possibilities, but there was no construction work or festivals being set up around my area, so here’s…..extreme table tennis 🙂
The camera was set to indoor with 10 sec bursts (and I just realized was set at still mode rather than action) . The camera is actually set up on the umpire’s chair which is probably less than about 1 metre (3 feet) away from the table. You can see the crazy wide-angle on the camera that takes in the whole table (and more). Again the pictures don’t look too bad in this size, but the originals are fairly pixelated.
But the prime market for this sort of camera isn’t photos, it’s extreme video shots. So I thought I’d do the obligatory car driving video. Strapped it to the door handle of my car and off I went for a bit of a spin. Note I can’t get the following embedded clips to default to HD, so if you want to view the full HD experience please view on youtube in 1080p.
The picture is really clear in fact if you look really closely you can even see the cobwebs on my side mirror 🙂 Colours are good, though there is a bit of white blow out as I go into the tunnel and it goes from a bright to dark to bright environment. Road and wind noise is pretty bad as the microphone was pointing down towards the road surface. The remote control was really useful to turn it on and off and minimise final editing.
Trouble is, I’m no Stig and that all looked pretty boring on review. So what’s my next extreme sport for the weekend…….gardening 🙂 Yep, sorry folks, you ain’t going to get too many videos of me screaming my way out of a helicopter while skydiving, or doing flips on my motocross bike………….
Because the camera’s so small, light and ruggedised, the options for where you can mount it really is open to your imagination. You can place it where you’d never consider using your “standard” digital camera. Using the supplied goggle mount and Velcro strap, I present to you extreme spade-cam. Using the rotatable lens and the ratchet, I was able to straighten and square up the view.
The movie above is raw, straight out of the camera. Videos are recorded in .MOV format at up to 30fps in 1080p (up to 90fps in SD) . 60 fps can be used to do slow motion footage in 720p and SD as well. For file size the 34 seconds of car video above is about 65MB in size, while my 37 secs of extreme spading is around 52MB. Video quality is good and the wide-angle really does add a different perspective to things.
As mentioned above, the internal microphone isn’t that good. The microphone was on the left of the camera/spade and at one time the wife was yelling something to me from the right, but in the video you can’t hear it. In addition, if you listen carefully, you can only just hear my reply to her.
Seeing the POV camera , the 13 year old decided to take it out to “the jumps” and do a bit of recording. The camera was attached to the top of his helmet using the ratchet and rotatable lens to frame the video. The above was just trimmed in Arcsoft Showbiz and resaved in .MOV format. Sound is much better on this video clip compared to the previous ones, perhaps just because of the distance between the sound and the microphone. The remote was wrapped around his wrist , so it was easy for him to stop and start the camera without having to take his hands off the bar for too long.
One criticism is that it would appear that bright areas like the sky tend to look overexposed and “blown out” in the video at times. Like the car video above however, it’s where you go from bright to dark so to be expected. It may be possible to compensate for the “blow out” a bit with the exposure compensation setting.
I’m not entirely sure what effect changing the settings do on the camera, and a quick search didn’t find any answers. Does the still/action, indoor/outdoor settings change the “shutter” speed or change the “ISO” speed or change the Kelvin setting? I suppose it doesn’t really matter for the market it’s aimed at, but I for one would be interested to know.
All in all, I’m not sure that I was the correct person to fully review this item. Maybe the job should have gone to a (much) younger Gadgeteer in their prime for extreme sports. That being said, I have done a tandem skydive jump in the last 3 years and only really just got rid of my motorbike (though not a motocross and I know the wheels have ever left the ground 🙂 ). Pity I didn’t have this camera a few years ago.
I really love the camera because of the unique views of the world that you can get. I want to connect it to the end of the paddle of my wave ski, connect it to the forks of my mate’s motorbike (and I’ll take the bike for a spin 🙂 ), to the headstock of a guitar, to the end of my fork while eating dinner. I will get round to this when time permits.
It’s certainly not an everyday camera. The still quality just isn’t good enough and the quirky wide-angle isn’t something that you’d want to record family snaps or videos in. And as mentioned above, the viewfinder on the side makes it hard to frame photos or video. I suspect that this will be doing the rounds of some of my friends and my kid’s friends for them to use when they’re out an about doing “silly” things.
If however you’re into extreme sports and want those POV shots you often see on the TV or internet, or if you’re a bit of a budding movie maker and like to find those weird and different angles, the Drift HD is a great performer. Its small size and light weight, coupled with the rotating lens, ruggedised construction and various mounting options, lets you get those shots you couldn’t get with your normal video camera.
If my extreme gardening videos got you going, hop on over to the Drift Innovation website for some much more sedate flying, BMX, motor sports, mountain biking, skateboarding, snow and other assorted videos. 🙂
SD Card Reader for iPhone iPad, Oyuiasle Digital Trail Camera SD Card Viewer with Dual Slot for MicroSD/SD, Lightening&USBC Dual-Connector Memory Card Adapter for Photography, Plug and Play
(as of February 7, 2026 17:48 GMT -06:00 - More infoProduct prices and availability are accurate as of the date/time indicated and are subject to change. Any price and availability information displayed on [relevant Amazon Site(s), as applicable] at the time of purchase will apply to the purchase of this product.)DJI Mic Mini (2 TX + 1 RX + Charging Case), Wireless Lavalier Microphone for iPhone/Camera/Android, Ultralight, Detail-Rich Audio, 48h Use, Noise Cancelling, Automatic Limiting, Vlog, Streaming
(as of February 7, 2026 17:48 GMT -06:00 - More infoProduct prices and availability are accurate as of the date/time indicated and are subject to change. Any price and availability information displayed on [relevant Amazon Site(s), as applicable] at the time of purchase will apply to the purchase of this product.)Product Information
| Price: | List: $369.00 |
| Manufacturer: | Drift Innovation |
| Pros: |
|
| Cons: |
|


![Small but Mighty - The DJI Mic Mini lavalier microphone transmitter is small and ultralight, weighing only 10 g, [1] making it comfortable to wear, discreet, and aesthetically pleasing on-camera. Detail-Rich Sound - Mic Mini wireless microphones deli...](https://m.media-amazon.com/images/I/31KzYDU8pvL._SL160_.jpg)
Gadgeteer Comment Policy - Please read before commenting
Hi Ian,
You wrote:
All in all, I’m not sure that I was the correct person to fully review this item.
I think you did a very good job here.
With videos showing different use of the camera. There is one thing though. Action cameras are mechanically mounted to whatever devices like a car, helmet and so on… This way of mounting will record a lot of unwanted mechanical noises like during the second video with this cameras mounted on a moving car, it is very “noisy” It is better to take out some “bass” sound spectrum from the recording in order to compensate.
My 2 cents
Thanks Mario,
In regards to post processing on the sound thanks for the tip. I’d rather leave things “raw” in the review so that people know what they’re getting right out of the box. I could have put some “trendy doof doof” music over the videos but figured that wouldn’t have helped the review 🙂
In the video, can you make out the license plate on the passing vehicle?
Can’t on the Youtube video even in 1080p, I’ll have to see if I’ve still got the raw footage and see if it’s any clearer but I might have deleted it 🙁
I found your review very informative and educational.
If I do decide to get this camera, you have inspired me to make a video of EXTREME SPAGHETTI TWIRLING!
I think the HD (1080p) is going to be aw better investment over the HD720 as this microphone issue seems to be a problem, I like that the HD and HD Ghost give you the option to use an external microphone.
Photos where disappointing though.