
I have been using screen protectors since the days of the Palm V. Back when they were just a simple piece of plastic that slid under the edge of the casing. Over the course of the many years since, not only have our tech-toys improved by leaps and bounds but the protection for them has evolved many times over as well. Being the AR guy I am, I like to protect my gadgets in as many ways as possible. Every device I have ever owned with a display has had a screen protector to guard it from the perils of the world.
Being one of the early adopters of Apple’s iPad, there were few options available to protect its fancy, eye-popping display. Many of my usual sources had them available for pre-order but almost most of them weren’t available on iPad Launch Day. So, I was surprised that ZAGG had their Full Body invisibleSHIELD for the iPad to me by Wednesday after it’s release.
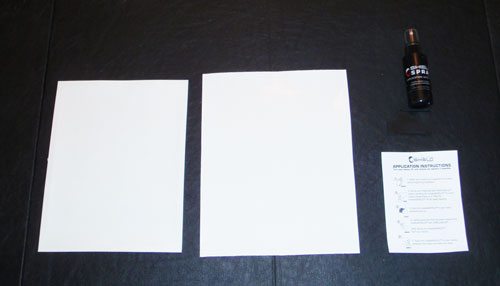
The Full Body iPad invisibleSHIELD includes films for both the front and back of the device, (approx.) 2-3 oz of installation fluid, squeegee, and installation instructions.
Over the years, I have installed countless screen protectors for myself and many others. 99% of them have been the Brando type that are a semi-rigid plastic sheet with adhesive on one side. This type of screen protector takes a little practice and patience to get it perfect but once you get the hang of it, is quick and easy to install. Overall, I have been very pleased with this type of screen protection. Once installed they typically never have to be removed.
That said, the invisibleSHIELD is a whole different animal. The invisibleSHIELD is a non-rigid, plastic that needs liquid (or a hair dryer) to be installed and took me the better part of an hour to complete the process.
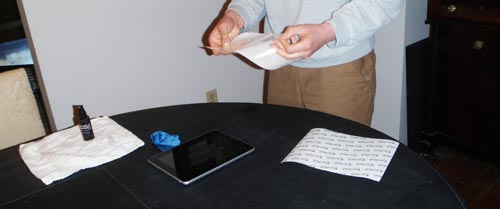
The first step with installing any screen protector is to clean the device’s display. Once that is done, ZAGG suggests putting some of the application liquid on your fingers to prevent fingerprints from getting on the invisibleSHIELD during installation.
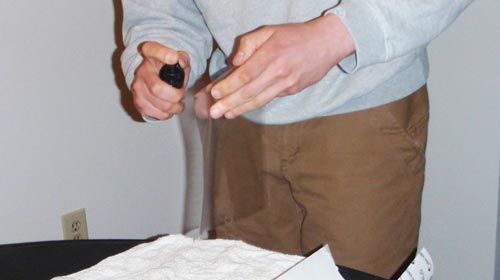
You then remove the plastic film from the sheet it comes on. Next you add several spritzes of the installation liquid. I used three pumps trying not to over apply it….we all know liquids and electronics do not mix. It would have STUNK to fry my new tech-toy while trying to protect it ;).
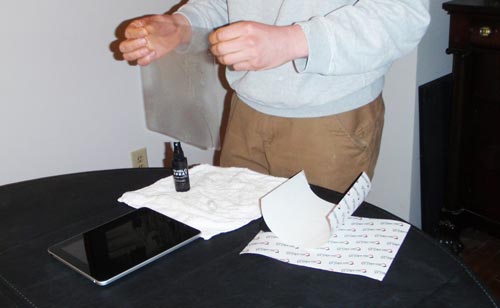
At this point, I let the excess liquid drip off the film before laying it on the iPad’s screen.
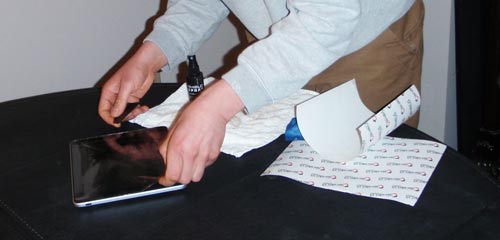
It took a few adjustments getting the invisibleSHIELD to sit perfectly in place.
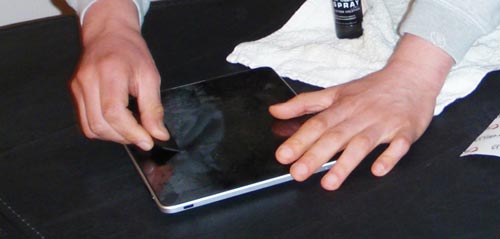
After you get the film just where you want it, comes the long and tedious process of removing the excess liquids and trapped air bubbles. Being a film-type thinner, non-rigid screen protector, those two joys come with the territory. It took me 20 minutes to get it even tolerable looking. The instructions say that you should let the device sit 12-24 hrs so that the remaining liquid has the chance to dry and the invisibleSHIELD has the opportunity to ‘set’ in place.
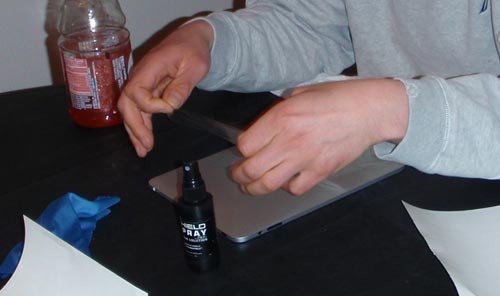
The invisibleSHIELD for the back of the iPad goes on the same way as the one for the front did.
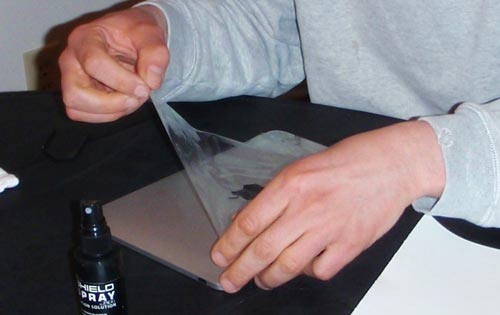
Although once it was in place, removing the excess liquid and bubbles from the back of the iPad was much easier than the front. Fortunately, it took me a fraction of the time to install.
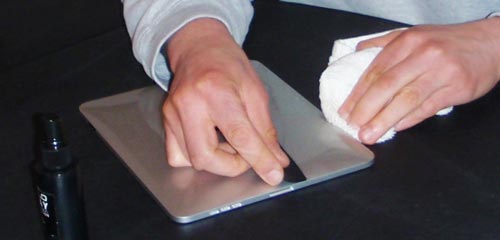
Throughout the entire process, I was using a cloth to absorb the excess liquid I squeegeed out; to prevent any moisture from getting into the innards of the iPad.
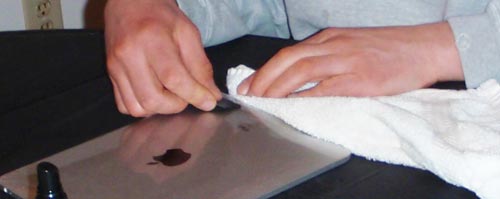
Initially I was extremely disappointed with how the protector looked on the iPad’s screen. But I continued to follow ZAGG’s guidance and let my iPad sit overnight.
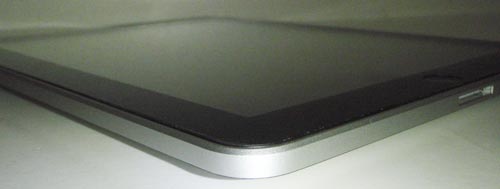
When I got up the next morning, I was pleasantly surprised the screen looked great, nearly perfect.
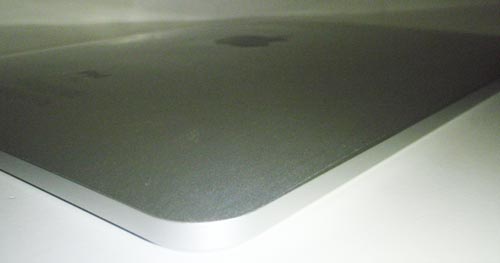
All of small bubbles and minor amounts of liquid were gone. My iPad once again looks great but now has an effective layer of protection against scratching. Although, obviously the invisibleSHIELD provides little to no protection from dings or falls. Another great feature of the invisibleSHIELD is the feel and added grip it gives the somewhat slick iPad. It gives the iPad a nice semi-rubbery texture.
The front or back invisibleSHIELD costs $30 each or if you buy them together (aka Full Body coverage) they are $40. It is definitely one of the pricier film/screen protectors out there. However, after using the Full Body coverage ZAGG sent me, it is well worth the money. ZAGG believes in their invisibleSHIELD technology so much, they come with a lifetime warranty for wear or scratches. On their website, ZAGG shows someone using a dremel on an iPhone protected by an invisibleSHIELD. I would never do this myself, but it is good to know that my new iPad is well protected and more secure in my hand.
Product Information
| Price: | Full Body Coverage: $39.99 Front Coverage: $29.99 Back Coverage: $29.99 |
| Manufacturer: | ZAGG |
| Pros: |
|
| Cons: |
|

Gadgeteer Comment Policy - Please read before commenting
Excellent review. I put a Zagg Invisible-shield on my iPad screen shortly after I bought it. I was disappointed in the beginning. It seems like the shield is big and clumsy and there were many air bubbles. However, in a couple of days, all the bubbles where gone and the shield is perfect. Easily cleans with regular eyeglass cleaner. I like the screen feel with the shield better than without. Definitely worth the effort. Thanks for the review.
I have been using the Zagg InvisibleShield for over 3 years – iPod 5G, several cameras, Nintendo DS, and of course my iPhone.
It is a pain to put on, but I love the lack of finger prints, and the grippy texture. It does however make your fingers grip a little more when you’re “pinching to zoom” gesturing.
I’d consider putting one on the front of the iPad for finger prints, but since I leave it in its Apple case, I don’t need the protection for the back.
I’d avoid. I had the front screen installed. Although it looked great, the texture causes a stickiness that stops your fingers as you slide around the iPad. The screen feel is so important on the iPad and the zagg kind of ruins it. I took mine off and went with a static screen protector
Have you tried using your iPad with the Zagg shield on outside? Were you able to see the screen or just your reflection?
For a truly great glare protector you should review the NuShield DayVue film that is made to eliminate glare outdoors and give you a perfect view indoors. And it only takes 5 minutes to install!!!
I would give the Zagg InvisibleShield for iPad only a 5/10. It is very over-hyped, and does not self-heal nearly as well as they claim. Installation was far more difficult than their instructional video would lead you to believe and not all of the small bubbles or marks from the squeegee have disappeared a week after installation. Also the surface is very soft and marks easily. Swiping your fingernail will leave a mark that will not rub off or self heal. It also has none of the oleophobic (oil-resistant) properties of the iPad’s own screen so it gets quickly covered in fingerprints and has to be cleaned constantly. Definitely not worth the $30.
The added grippiness would be a boon for the back surface, but I don’t see how it’s a good thing on the screen. If anything, I want a screen protector that will make my iPad’s screen *more* slippery.
Does anyone know what is in that bottle? Also, does it leave a residue if you need to peel it off? (does it peel off?)
It looks great! I guess the install is easier than the iPhone install because you don’t have to worry about folding over corners or anything.
I had no luck with the install after i had the backing off it suddenly rolled backwards and it stuck together. it was unusable after that i
regards Frank Irger
I bought three Zagg protectors. Two for my iPad and one for my HTC Incredible. What a disappointment. The two protectors I bought for my iPad (front and back) change the iPad from a smooth to sticky tablet. The back protector is ok, sticky yes, but protects against minor scrtches and I can live with it for now. The front protector changed the smooth screen of the iPad from smooth to sticky -like a cheap shrink wrap feel. I pulled it off the front and chucked it in the basket.
Total disappointment. I would suggest getting a case or pouch to protect the iPad and pull it out and use it without protection. I have had my iPad for a month now and have no scratches. I can deal with wiping fingerprints off of it with a smooth rag.
I still have the screen protector on my Incredible but strongly considering throwinf that in the trash too and just going with a pouch.
Total waste od $63.00 – chock it up to lesson learned.
I find it very interesting how folks either love or hate invisibleSHIELDs. I continue to use the one I reviewed. It does make the iPad more ‘sticky’ both front & back. I really like/appreciate the added grip-ability to the slick iPad. I like invisibleSHIELDs so much, last month when ZAGG had a 50% off sale I bought a dozen of them for friends & family’s various devices. I do install the invisibleSHIELD for them….because putting them on truly is an art.
I just tried to install one yesterday and I HATE it. I only did the backside (for “practice” as I figured doing the front side well was most important). It does not fit well (too much material on corners, not enough on side edges), was very hard to position, and I don’t care for the look of it or the feel. I will not be installing the front side, and I hope it peels off without any ill effect.
Stay away from Zag’s invisibleShield for the iPad.
It comes in a tube and needs flattening overnight. It does not cover properly the entire surface of the iPad. It is immediately susceptible to scratches, by the very squeegee that comes with the film to remove the bubbles. Once installed, it creates too much friction with fingers and kills the entire touch-screen user experience.
Major piece of junk.
Be careful when applying, this is not an easy application and I have done many types of shield and window applications. In the new flat packaging the new spray pump is difficult to get much out (not the same as in video)with each pump. I advise watching the Zagg online instruction video first and have an extra set of hands ready to assist. Unfortunately when I was carefully removing the shield from it’s backing it released and stuck to an edge – I used most of my spray trying to separate it without damaging it (kind of like when you accidently get a fold in duct tape.) I have a smuck in it from where the adhesive touched. Zagg said I could add more water to the bottle several times after to get more fluid mix – but you can’t take apart their new spray bottle (new flat packaging). Course this was after-the-fact. My shield has some bubbles in it and the smirp – best recovery I could do with the fluid provided. I also noticed that in some applications I have to use more pressure for the iPad to sense the touch through the shield. With my problem the best customer service they would offer was for me to follow their replacement program – I pay shipping for the new shield and I have to ship the old shield back and pay for delivery confirmation to guarantee their reciept or they will charge your credit for full replacement costs if they don’t recieve it – makes you wonder (might as well buy another for the time and cost). All this hassle doesn’t seem worth it. I’m leaning toward a good anti-glare product and with my Apple cover I think it will be fine – I don’t manhandle it, so the Zagg may be over-kill. Goodluck!
I’m so happy to see people who HATE this product on a tech site. It was a monster to apply and the company agreed to replace it (after it kept coiling and pretty much messed itself up) if I pay to return it. They never suggested to let it lie flat overnight. Given that they sell shields for macs I’d presume they would say that in the instructions. Before you say “Duh” I’ve only used shields on smaller products and it never occurred to me to do that.
I hate the way it feels. It’s too sticky and it attracts fingerprints like flies to garbage. It doesn’t fit well and there are lines on it. I don’t know where those came from.
I’ve changed my mind from requesting a replacement to give me my money back. I’ll use a cheaper one or nothing.
My girfriend messed hers up and here is the fix: adhesive was covered in dust, and we ran out of spray upon second installation, BUT HERE IS THE FIX. Clean adhesive face with generous application of EYE GLASSES Cleaner spray. Rub adhesive with finger tip as pools of liquid run off. This gets rid of the dust for the most part. Now reapply film as per usual method (be sure to dab any drops that build up near buttons), and use the glasses cleaning fluid as you would the original Zagg fluid. Works great!!!!!
Is it me or does this screen protector Add a grain or static texture to my view?
Dave, it isn’t just you. I also find that my screen now has a static texture.
This product is worthless. First off, it is extremely hard to install. Within one day of installing my Zagg shield I accidentally scratched it with my fingernail while wiping the screen with a lens cloth. Since I work only 15 minutes from the Zagg headquarters, I returned it and had them install a new shield. That one made it about 2 weeks before it was scratched again with my fingernail. I went back again and had it replaced. Once again it made it only 2 weeks before it was scratched. I took extreme care to not scratch that last shield and it still happened. What a worthless “shield”. I am now giving up with the Zagg shield. It is not a good product and I would recommend everyone to avoid buying it.
This shield (anti-glare) makes my screen look fuzzy or grainy and ruins the tight resolution on virtually anything! Will this go away? What’s the point?
I agree, this “invisa shield” is very overrated. After several days I still have micro bubbles and when I tried to smooth them out I scratched this seemingly impenetrable object with my fingernail… Also, it leaves the screen tacky and grainy, in short it looks like crap. I will be removing and returning this product….
I bought this product and completely gave up even trying to install it. Sorry, too difficult. The iPad actually has a great screen anyway.
I wish they advertised the stickyness of the Zagg can reduce the ability to easily slide across the screen of the ipad. Had they advertised this, I would not have purchased it. I guess I can scratch it down as a lesson learned that I should research something before I buy it. I highly doubt they give refunds even though they do not state that it has a slightly sticky feel to it, which can result in reduced functionality of the ipad. I have used touch screen devices with screen protectors for years and this is the first one that is like this.
A little tip if you should run out of liquid (if you do the installation right, you will with the new bottle), you can refill the spray with cleaning alcohol as it in this context will have the same properties as the isopropyl alcohol that the spray contains…
If you are looking for the tackiest piece of translucent rubberaized “shield” to prevent you of slidding your fingers throughtout your Ipad’s screen…. Then that’s the way to go.
Don’t waste you money!
WOW what a mixed bunch of comments. I believe that the installation takes one trail application to get it right. The first time I purchased a shield for my first gen Iphone they provided you with two covers so you could tear the first one off after realizing your own errors on the first install. It took me two times to get it right on my first install for my Ipad2 also.
I have been a big fan of Zagg for a while now and always highly recommended their products. I am now experiencing my first major issue and that is with the “stickiness” of their latest film. The humidity is starting to climb this spring in my area and now my ipad sticks to everything. I had to peel a magazine away from it which destroyed the cover of the magazine. My Boss IM’s me this morning that he tore his off after it stuck to two different pieces of paper.
I have sent an email to Zagg and hopefully this will get resolved. I am wondering if they have made it a little too sticky?
I can see why there are a “mixed bag” of comments re: Zaggshield. I personally love the tactile feel to the product and feel like I have a non slip grip on a device you don’t want to see hit the ground. I think the installation is pretty finicky, but patience and perhaps a YouTube preview might help. Could just be my oily fingertips, but my screen w/o Zagg looked frightful in no time. With Zagg, some slight bubbling, and a bit of surface drag (more of a tactile sensation) but over all a more pleasing experience. I suspect if I were watching lots of vids, I might not be as pleased, but for me personally, I like the “protection” feel of it. No one product will suit all users, but I feel that as far as the back covering goes (much easier to install on ipad) most would find some merit in the product. The screen cover (a bit of an installation bear) is probably a personal preference thing.
Just purchased IPad and an Otterbox (I have one for my IPhone and love it). I thought the Otterbox would have a screen protector like my IPhone’s Otterbox does. I did not want to travel back to the Apple Store that is a long way from where I live. I went to Best Buy and the only screen protector they had was the Zagg protector for $30. It ticked me off that they only carried one and it was so expensive.
When we read the instructions on this I got even more ticked, putting this liquid on an electronic face seemed completely counter intuitive. I let my husband the “techie” put the screen on the IPad for me. Neither one of us is impressed with the results as there are plenty of bubbles no matter how much we tried to remove them. Maybe the bubbles will evaporate and the screen will be fine but if you can purchase any other screen protector, do it.
The number one mistake people make with the Zagg is spending the extra 15$, and having it professionally installed, by the best buy geek squad. The sickness that these people complain about. Doesn’t happen, if applied right. There is a protective coating over the new product, and this coating makes it extremely tacky. Best buy removes this coating, and applies a spray. If you attempt this install on your own, be sure to buy some Endust for electronics. And some extra micro fiber cloth, and be prepared to spend a few hours buffing. But there ain’t a damn thing wrong with the zagg.
@Tom G I applied mine on my iPad 2 myself, and I got a nice smooth application. I didn’t even need to spend hours buffing it to get it smooth. There were still problems with it. It left a lot of the metal uncovered because of the way it was designed, but worst of all, it started peeling up (within just a few days) where I held it.
Also you’ll notice in the instructions that Zagg says to turn off your device and take out the battery before you do the application because of the liquid they have you apply to the skin. There is no way to take the battery out of an iPhone, iPod, or iPad. I went ahead with the application anyway, but I’ll admit I was worried about water getting inside the iPad. Maybe people are willing to pay the $15 for professional application because they are hoping Best Buy will replace the device if it gets ruined by the liquid.
@Janet The buffing not only ensures a smooth finish, but as you buff you apply pressure pressing out all bubbles and ensuring a good seal between the device and protector. Here’s how I did mine, regardless of what the directions said.
I let my device set a few minutes, after my sister applied it. I then took my micro fiber cloth, and gently started buffing until I could no longer feel resistance.When the micro fiber cloth slid across the screen with no drag, I wrapped the cloth around my index finger and increased pressure. Going all over the screen, around the edges many times. I never shut my device off, I didn’t use it any. But, I’m having no issues.
The endust was an after thought, but thanks for chiming in with that I’ll be sure to buy some.
I am sure this product would be great if you could get it installed. Unfortunately, I am not experienced at installing screen protectors and I flubbed the install on my ipod touch. Yes, that is my fault, but now I am out $40 ($25 plus $15 shipping). If you are not experienced at installing screen protectors I highly recommend you steer clear of the invisible shield. It is way too easy to mess it up and it is a costly mistake.
Way too difficult to install! Forget it!
Well, I watched the video, washed my hands, spritzed my fingers with the solution that came with the invisible shield, and I still ended up with prints on the adhesive side of the film when I applied it to my tablet screen. I don’t like the look, and will likely take it off. There must be something better…
I absolutely hate my front cover for my iPad. It feels sticky and is very easily scratched!!! I will be sending it back for a refund and not purchasing their products again.
Put me on the list of those who dislike it. Immediately after I installed it I noticed how dull the screen now looked compared to the beautiful vibrant natural iPad look. Second, I couldn’t stand the stickiness of not being able to glide my finger as easily across the surface. But most of all, the problem I had was with how it affected my iPad stylus. I like to use the iPad to take notes and suddenly my stylus wasn’t effective. It kept missing parts of what I write, and I have to press harder than usual to get it to write at all, and the stylus head makes an annoying squeaking noise now since it doesn’t smoothly glide on the surface anymore. It’s killed the iPad experience. Anyone know if it’s easy to get your money back from Zagg when dissatisfied?
Hated it. I put an Invisible Shield on my iPhone carefully following the instructions and after watching the video a couple times. Wound up with an iPhone screen covered in little air bubbles that I could not squeegee out and which were still very visible 3 days later. Not to mention that it’s a bit tacky and interferes with sliding fingers on the screen. I just pulled it off and cleaned the screen with the microfiber cloth and all is well. Invisible Shield was a total waste of money.
Had the zagg shield installed on my brand new 3rd gen iPad. Best Buy techie did great job (aligned perfectly). After almost 24 hours, I can see all air bubbles diss appearing, but screen is EXTREMELY grainy, which seriously detracts from beautiful screen res of device. Scan anyone advise if graininess resolves with a bit more time?
I just got the invisbleshield HD installed on my 3rd gen iPad by a professional at my local shopping mall. I payed a little more to have a skilled expert do it, but totally worth the cost! I don’t know how the regular stuff looks, but the HD film look great on my new iPad. No grainy or static look at all. You really can’t even tell its there at all. I’m going back tomorrow to get the back done with regular invisbleshield.
@Andy Thanks for letting us know what you think of Zagg’s new HD invisibleSHIELD and having it installed. I have been enjoying the new iPad’s glass & aluminum feel but have been pondering putting some kind of film protection on it. But do not want to take away from the iPad’s stellar retina display.
Just had it installed on my new iPad. Paid $15 to have BB put it on. Took them 3 tries – glad I did not try but after all that hate it.
Wish I had tried a device with it already installed. Might give great protection but it is ‘grippy’ and ruins the great smooth feel of the original screen or other protectors that are semi rigid. Multi gestures are annoying with this shield. Expensive mistake.
I’m not sure I’m a fan. Just installed yesterday and agree that the “tacky” feel is boersome. More irritating is that somehow, when I put my iPad away (up high where my toddlers couldn’t reach it) the corner of the shield came up and stuck to an envelope, so now I have paper such to part of it. Not sure if there’s a fix for that or if I’m out $30 from the get-go.
My sister gave me the Zagg as a Christmas present last year, when I purchased my ipad2. The installation part was a bit tricky. Took me about close to an hour, trying to align the screen protector to the screen, then squeezing out those bubbles with the plastic squeegee that came with the kit. What a wonderful way to spend a weekend. Anyways, two days ago, while doing routine cleaning (since fingerprints do build up and become noticeable over time), I accidentally made two scratch marks. I start googling for a solution to my problem. On the manufacturer’s website, Zagg claims the material is so tough, it is scratch-resistant and that with its nano memory technology, it can even self heal. I called their customer service, which by the way is poor, all the guy did was emailed me three links and told me to order a new one, but I would have to pay the shippinng and provide a credit card number, in case they do not receive my old screen protector. I asked him about the nano memory self healing technology, he just told me to wait for 48 hours, if the scratches are still there, get a replacement. That sounds like a lot of hassle to be getting a replacement and going through that brutal ritual of reinstalling the thing. I did some research and many users point out that Zagg is not scratch resistant. If your fingernail accidentally scratches over it, they will leave a permanent mark. I am thinking maybe getting a new one from Clarivue. The product just does not live up to its hyped up claims. Total waste of money and efforts. Terrible customer service and return policy.
For those of you with the HD shield on their tablet screens, that love the clarity and protection, but don’t like that ‘sticky’ feeling…
Get some HIGH QUALITY paste wax (i used Meguiar’s Ultimate pure synthetic polymer) and put a thin coat on the shield. let it dry and buff it off. the Zagg HD protector is now as slick as can be. with absolutely NO finger dragging. yes, after a few weeks it wears off if i clean the screen a lot… but it only takes five minutes to put another coat on and i’m good for another couple of weeks.
for those who are using that awful ‘anti-smudge’ version of the Zagg that literally destroys clarity, i’d go back to the merchant and tell them it’s useless. insist that they replace it with the HD version. then apply the wax…
give a new install a few days to dry out before waxing it. i suspect that waxing too early may interfere with (or at least slow) the drying/setting process. i waited about two weeks before applying the wax…
for obvious reasons, do not apply the wax to the back(s) of devices where you want to retain good grip… otherwise you may watch your treasured tablet/device as it crashes to the ground…
cheers!
This is an incredibly awesome, tough, resilient film shield for any of your devices especially if you have very dry hands like mine.
BUT, I probably wouldn’t put it on the actual touch screen itself. Its just a bit too grippy in my opinion. It’s kinda tolerable for my dry hands and fingers, but probably would annoy most people.
Instead I’d probably get like a normal glossy or anti-glare screen protector that either reduces or maintains the co-efficiency of friction for the screen and only apply the shield to the back or casing of the device.
My setup is I have a iPhone 4S with a very thin bumper case (sinjimoru), invisible shield on the back and normal screen protector on the front. The back has lots of grip. The front is protected by scratches, and if I ever drop it 95% of the time the shock will get absorbed by the bumper. It’s absolutely perfect.
I have also installed the shield on the back and rear, non-working parts of my MacBook Pro Retina and it is totally awesome. Provides valuable grip and protection. Before I was nervous about carrying it with two hands. Now, I can use it with one hand easily. Awesome shield! Just don’t install it on the working areas of your device.
I received an iPad Wi-Fi and invisibleSHIELD as a gift last year. Installation of the shield went well. In June 2011 I received an offer from the New York Times; a free ZAGG Bluetooth keyboard if I subscribe for 6 months. In a relatively short time the screen started to discolor, caused by the keyboard. The pattern of color exactly matches parts of the keyboard, which doubles as a protective cover. Upon contacting ZAGG, they would not acknowledge the N Y Times promotion and, as I had no receipt for the screen, offered me no help in resolving a situation which they had caused.
This “invisible shield” product sucks! It is impossible to apply …. OK – I’m not the most patient guy in the world but, for $30, this should work MUCH better. Had to throw it away.