
REVIEW – In a perfect world, every content creator would have their own personal videographer, someone who is always ready to keep the camera focused on them. That’s not always possible, so I am testing a new AI-powered gimbal from Hohem to see how well it can do this job.
⬇︎ Jump to summary (pros/cons)
Price: $239
Where to buy: Hohem or Amazon
What is it?
The Hohem iSteady M7 is a gimbal for your smartphone. It features three axes of stabilization, an automated tracking system, and a mini remote control.
What’s included?

- Gimbal
- Two USB-C cables
- AI tracker
- Remote control
- Mini tripod
- Carry case
- Quick start guide
- Warranty card
- Safety guidelines
Tech specs
- Dimensions: 12.9 × 4.8 × 4.7 inches
- Smartphone width: 2.3 to 3.54 inches
- Weight: 1.6 pounds with tripod
- Material: Composite
- Remote: 1.4-inch, color touchscreen, 32-foot range
- Battery: Li-ion, 3 hours charging time, 12 hours operating time (8 with AI tracker)
- Max load: 1.1 pounds
Design and features

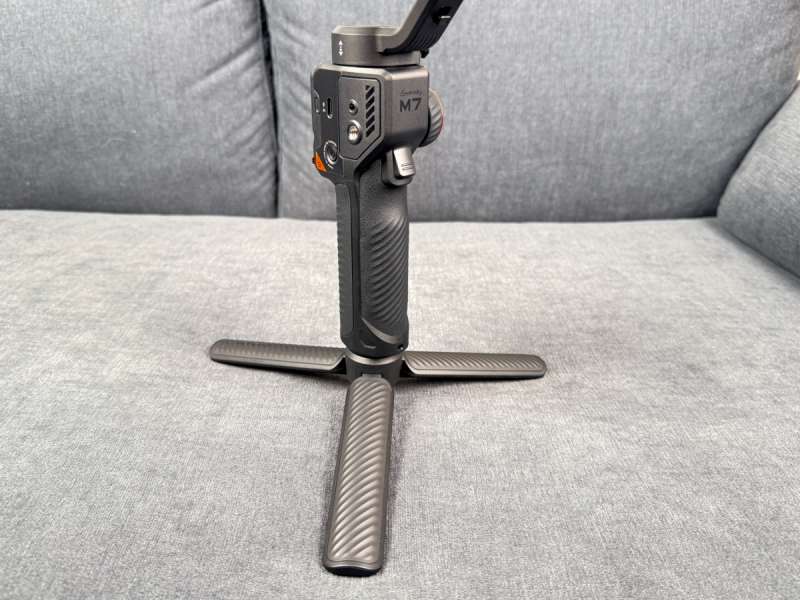
There are a host of gimbals for smartphones on the market these days, and M7’s overall design is very similar to the others. It has a handle to hold while shooting, a built-in extender for capturing extra high or low shots, three axes of stabilization, horizontal and vertical shooting, and a mini tripod. The M7 has two features that I think are especially helpful:
- A remote whose 1.4-inch color screen is a touch interface that uses a Bluetooth connection to display what the camera is viewing. This allows the subject to make framing adjustments while remaining in place on a set.
- An AI tracker that can automatically track the subject, both horizontally and vertically. This gives the subject the freedom to move around while filming content, knowing that they are consistently in frame.
Preparation
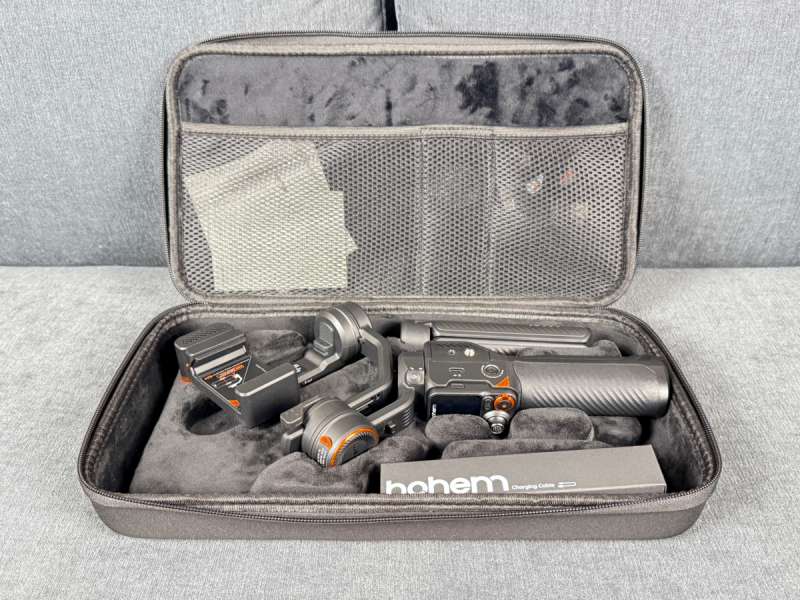
The M7 arrived in a nice, custom carrying case that gave me a favorable first impression. Wherever I might need to take it, I know the M7 will be well-protected and no parts will fall out and go missing. After removing the gimbal from the case, the first thing I did was read through the Quick Start Guide, which I found to be spectacularly unhelpful. The problem is that the M7 has so many features; this little guide didn’t have enough information to get me going. The good news is that it does have a QR code to this web page of helpful videos. I recommend skipping the Quick Start Guide and watching the video titled First Use instead.
The name of this video is a misnomer. It’s not a video about the first thing to do; instead, it’s one long video that Hohem uses to explain the majority of the features of the M7. The other videos on the page are snippets from the First Use video, so you can go back and watch them if you just want to remember how to use a specific feature.
This page also has a link to the M7’s manual. I recommend reading the manual after watching the First Use video. You can save it to your computer or phone and use it as a reference later. I also found a third-party YouTube video about the M7 that is even better than Hohem’s as it explains every feature in detail; I recommend watching it after you’ve tried out the M7 for a while and are ready to learn more features.
To say that the iSteady M7 is a complex gadget doesn’t do it justice. I counted 18 unique input mechanisms, including buttons, knobs, and switches, and most of them have multiple functions. As one example, the trigger can be single-clicked, double-clicked, triple-clicked, quad-clicked, clicked-and-held, and single-clicked then clicked-and-held. That means that there are six distinct functions connected to this one input mechanism alone. This highlights why the M7 has a design that is simultaneously amazing and terrible.
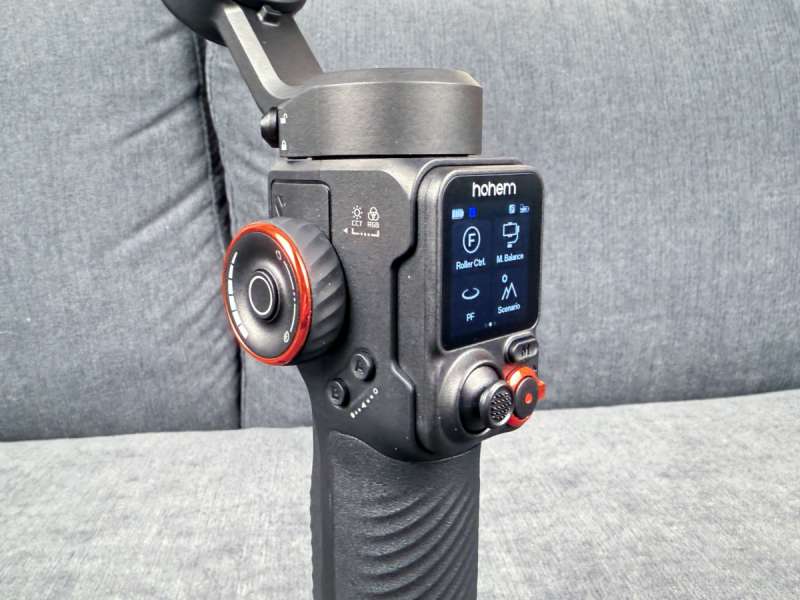
It’s amazing because Hohem’s engineers have managed shove a ton of features into one small gadget; it’s terrible because it’s impossible to remember all the ways that each input mechanism can be used. I would love to see Hohem ditch their Quick Start Guide and replace it with a set of laminated cheat sheets that make it easy to recall what each input mechanism can do. Speaking of features, don’t forget there’s also a remote with a touchscreen interface, a phone app for iPhone and Android, and an AI tracker that can register hand gestures; each of these have even more ways to interact with the M7. (Yikes.)
Hohem has an iPhone app called Hohem Joy that can be used to control the M7. Unfortunately, it has an abysmal 2.3-star rating on Apple’s App Store and is full of complaints; it looks like Hohem needs to find a new development team and start over. I didn’t bother to test this app, but be aware that there are some features, like double-clicking the shutter button to switch between photo mode and video mode in the camera, that are not available without it. If and when Hohem creates a good app, they could move a lot of the extra complexity from their input mechanisms into the app.
Despite the problems with the M7’s interfaces, I think you should keep reading and give this gimbal a try. It’s a very capable device, and it’s easy enough to use it for its two primary capabilities. In the reminder of this review, I am going to walk through the steps required to setup the M7, describe how to use it in handheld mode to film someone else, and then describe how to use it in remote mode with AI tracking to film yourself.
Setup

The first step for setup is to charge the gimbal using the included USB-C cable and the charging port located on the handle. The second step is to screw in the tripod, though this is only needed if you will be shooting in remote mode. The third step is the unlock the three axis locks that are located near the motors; this allows the gimbal to move freely in all three dimensions.
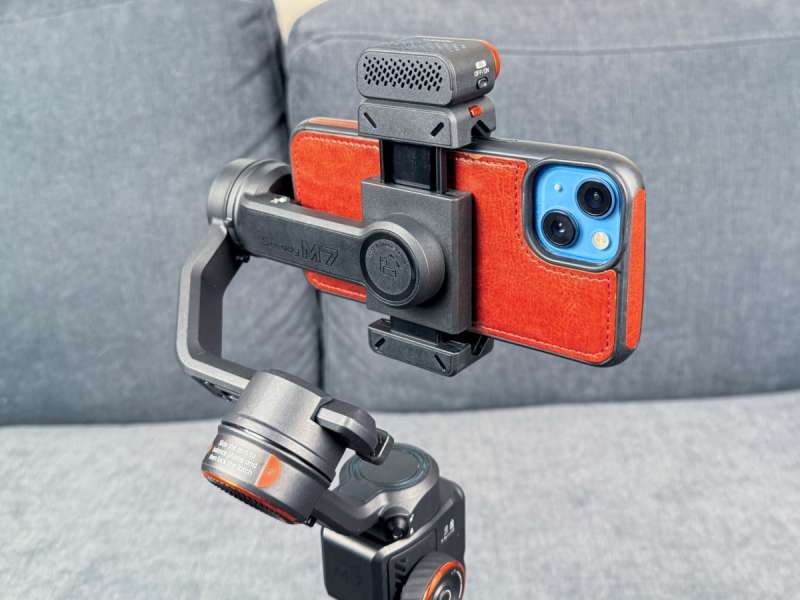
The fourth step is to mount the phone, making sure that the screen faces away from the clamp. This gives an unobstructed view of the screen so that adjustments can be made to the camera app. The camera should be on the opposite side of the tilt arm and should not be obstructed. The fifth step is to rotate the clamp to either the horizontal or vertical position. The sixth step is to balance the phone. Open the roll arm latch and then slide the roll arm left or right. To verify that the phone is level, turn on the camera app in the phone and enable the level. If you’re close, you can just twist the phone slightly in the clamp to make it level.
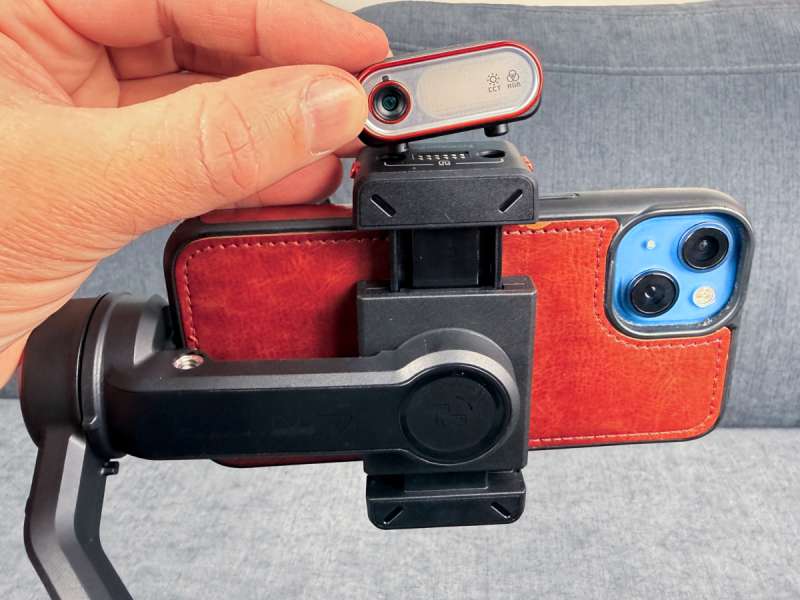
The seventh step is to mount the AI tracker so that it’s facing the same direction as your camera. (Note: it can be used with self-facing camera, as some of the pictures show, but as the video quality is lower, you normally won’t want to do this.) The eighth step is to turn on the gimbal by holding the power button for three seconds. Once it turns on, hold the gimbal handle so that the remote screen is facing towards you. The camera on the back of the phone should be facing away from you, but don’t worry if it’s not. The ninth step is to double-click the trigger (or the side button) to center the gimbal. The phone should be perfectly horizontal or vertical, depending upon how you rotated the clamp in step 5 previously. If the camera is facing towards you, triple-click the side button; this rotates it 180 degrees. The tenth and final step for setup is to connect the remote to the phone using Bluetooth. Go to the Bluetooth settings in your phone and pair with the device whose name starts with “iM7”. You are ready to start filming!
Handheld Mode
Handheld mode refers to holding the gimbal in my hand while filming a subject. This is the classic use for a gimbal, and it ensures a smooth video even when I am moving around. Within this mode there are several sub-modes, the most common of which is pan-tilt-follow (PTF) mode. PTF allows the camera to rotate left/right and up/down, but it won’t roll (like an airplane); this allows the camera to remain perfectly horizontal or vertical all the time.
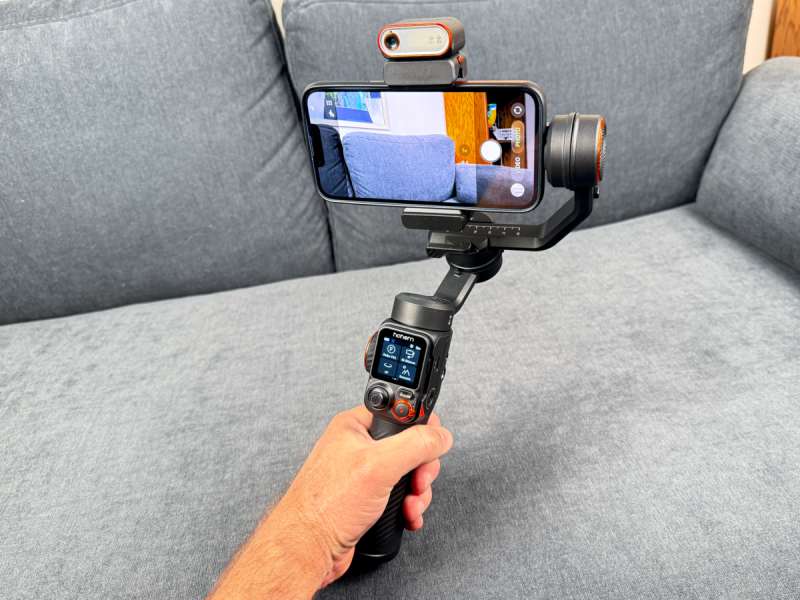
After doing all the steps for setup, the first step for using handheld mode is to click Mode Switch on the remote and set it to PTF. The second step is to turn on the phone, start the camera app, and set it to video. The third step is to press the record button on the video or the shutter button on the remote. From here I can film my subject simply by rotating the handle left/right and up/down; the camera will move smoothly to follow wherever I am pointing. This is super easy to use, and I was amazed at how much smoother the video was. Don’t forget to stop the video when you’re done recording.
Here is the test video that I made shooting in handheld mode:
Remote Mode
Remove mode refers to placing the gimbal in a fixed location using the tripod and configuring it to automatically follow me as I move around. This is a comparatively new feature that allows a content creator to move around and stay in focus, even without a dedicated videographer. There are also multiple sub-modes, but the one that interests me is AI tracking mode.
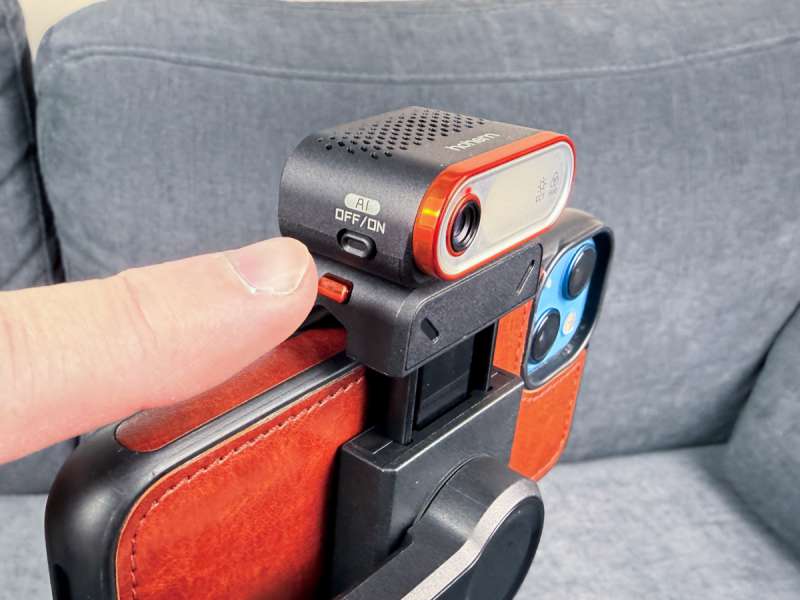
After doing all the steps for setup, the first step for using remote mode is to power on the AI tracker by pressing the AI button on the side of the tracker. Although this powers on the tracker, the M7 doesn’t start tracking yet.
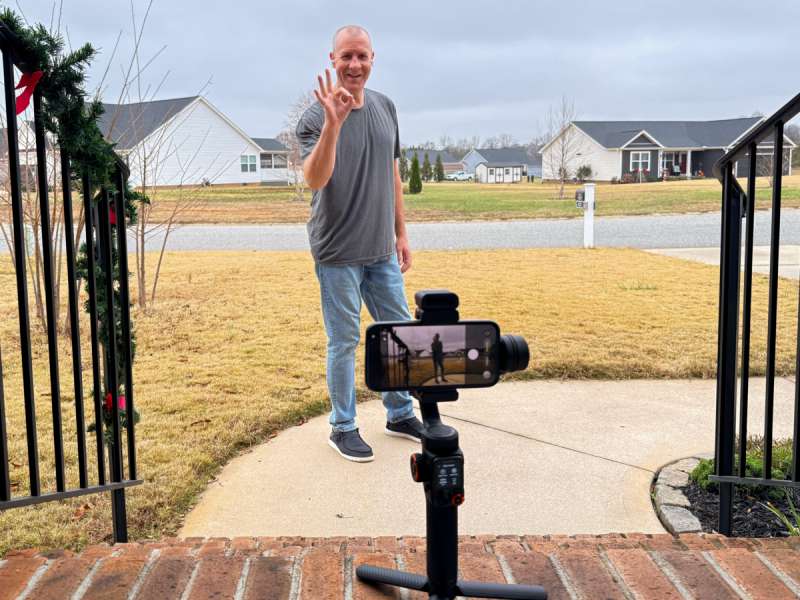
The second step is to walk around to the front of the camera, somewhere between 2 and 16 feet away, and give it the gesture to begin tracking, which is making the ok sign with your hand. If the tracker catches the gesture, the indicator light on the tracker turns solid green. To verify that it’s working, simply walk left and right, and the M7 will starting tracking you. (This is super cool!) When you’re ready for it to stop tracking you, make the stop gesture, which is holding out your hand like a traffic cop stopping a car. The indicator light will turn red.

If you record a video like this, you’ll notice that you may be framed awkwardly; I often found my head right in the middle of the screen. Thankfully, Hohem has already designed a way to let you reframe the video. The third step is the give the customized composition gesture, which is sorta like making the symbol for a picture frame. If successful, the indicator light turns green and beings blinking. The fourth step is to look at the image on the remote screen and use the joystick to reframe. I push my head more to the top of the screen, which I think makes for a more natural composition. If you want to follow the rule of thirds, you could also push yourself to one side. This is a really neat feature; big creds to Hohem for thinking about this problem. Don’t forget to stop the video when you’re done recording.
Here is the video that I made shooting in remote mode:
At this point, I have figured out 90% of what I want this gadget to do, but I have probably shared only 30% of all its features. If you’re a creative content creator, there’s a lot more it can do to work with you.
Performance
From the first video I learned that the M7 is an excellent gimbal. Despite the fact that I was filming with my left hand while throwing the ball and running towards my dogs, the video was always buttery smooth. I really like the results.
From the second video I learned two things about the M7. The first is that the AI tracker works really well. As I moved around on the porch making burgers, it followed me perfectly and kept the video smooth. The second is that I can’t trust the screen on the remote while reframing. Every time I created a new section of the video and started the AI tracker, I reframed so that my head was in video on the video on the remote, but as you can see from the video, my head was almost never in the frame. This was a disappointing albeit solvable problem. Until I can figure out the discrepancy between the it and the remote screen, I’m going to have to have someone check the video on the camera to make sure I’m frame. The gimbal does have an AI calibration feature, so maybe that will help.
Final thoughts
The iSteady M7 from Hohem is a very capable gimbal. It has all the features a content creator could want for filming with a smart phone, including an AI tracker that can automatically follow the subject. Despite its overly complex interface, I like this gimbal and am excited about using it to create videos for The Gadgeteer in the future.
What I like about the Hohem iSteady M7 Gimbal
- Steady gimbal for smooth video
- AI tracker for great tracking
- Lots of features for content creators
What needs to be improved?
- Improve the documentation
- Simplify the interface
- Write a better app for iOS
- Align the remote screen with my camera when framing
Price: $239
Where to buy: Hohem or Amazon
Source: The sample of this product was provided for free by Hohem. They did not have a final say on the review and did not preview the review before it was published.
Check out these other reviews!
- Hohem iSteady V3 Gimbal
- Zhiyun Smooth 5S Gimbal
- Feiyu Scorp 2 Gimbal
Gerber Gear 22-47162N Fast Draw Folding Assisted Opening Pocket Knife, Fine Edge, Black
(as of June 22, 2026 18:55 GMT -05:00 - More infoProduct prices and availability are accurate as of the date/time indicated and are subject to change. Any price and availability information displayed on [relevant Amazon Site(s), as applicable] at the time of purchase will apply to the purchase of this product.)