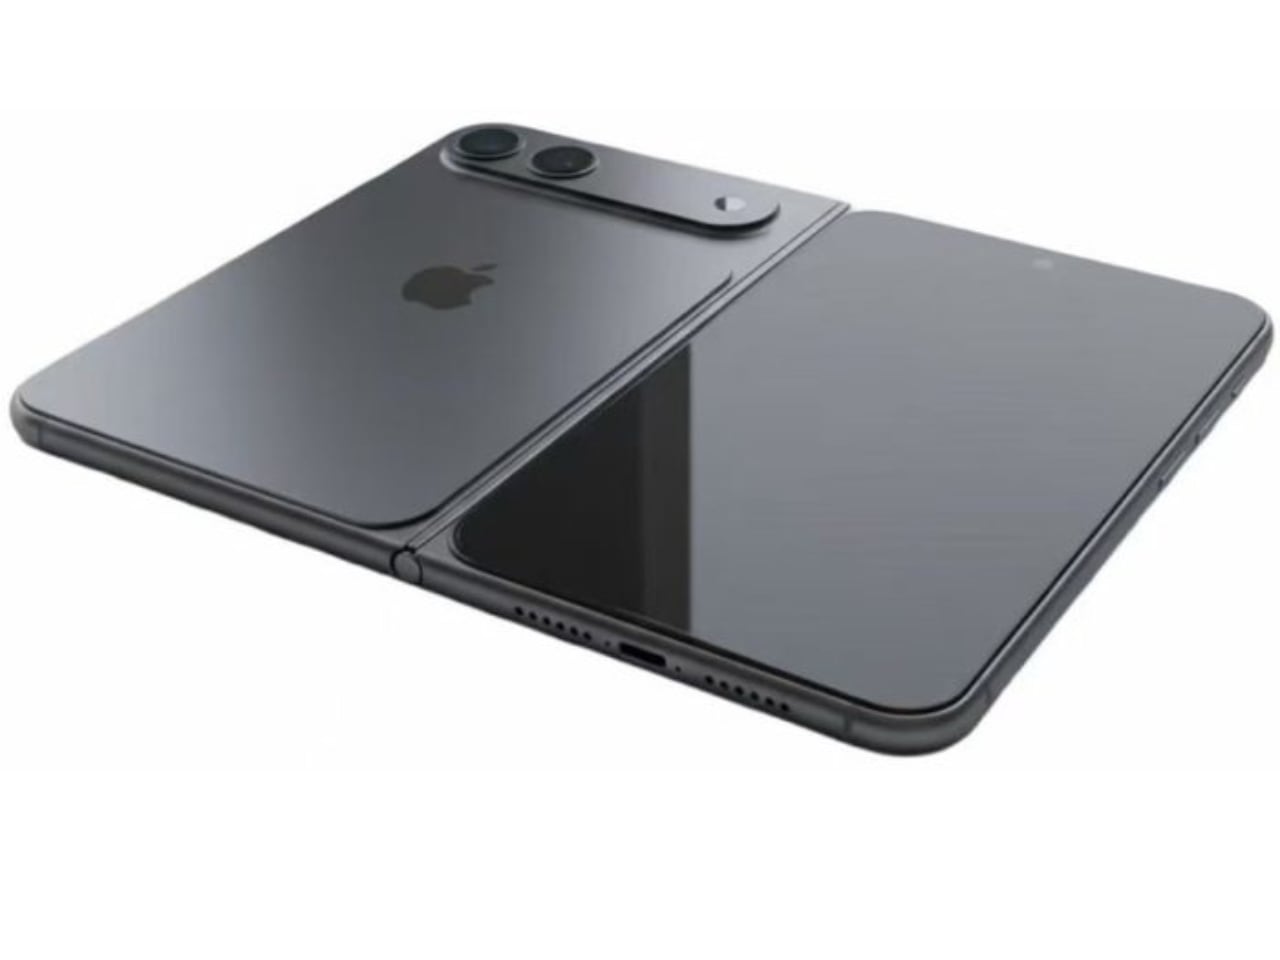
ARTICLE – You can 3D print the foldable iPhone today. Not a working phone, but a physical mockup built from leaked CAD dimensions that lets you hold, fold, and judge the form factor for yourself. Apple’s rumored foldable, often referred to as the iPhone Fold, reportedly won’t ship until late 2026. The shape? You can print that now.
What you need: A consumer 3D printer, PLA filament, basic CAD software, and about $10 in materials. Time: One evening to model, 6-10 hours to print both halves.
This isn’t about chasing rumors. It’s about answering a question no render or spec sheet can: does this form factor actually make sense in your hands, your pocket, your daily routine?
Jeff Hawkins proved this matters. Before the PalmPilot existed, he carried a block of wood for about a week to test whether a pocket computer would feel natural or annoying. If the shape was wrong, no software could fix it. That insight defined an entire product category. Today, leaked CAD files and consumer 3D printers let anyone run the same experiment on Apple’s next bet, years before launch.
What You’re Building
Two plastic halves joined by tape or magnets, replicating the iPhone Fold’s reported dimensions:
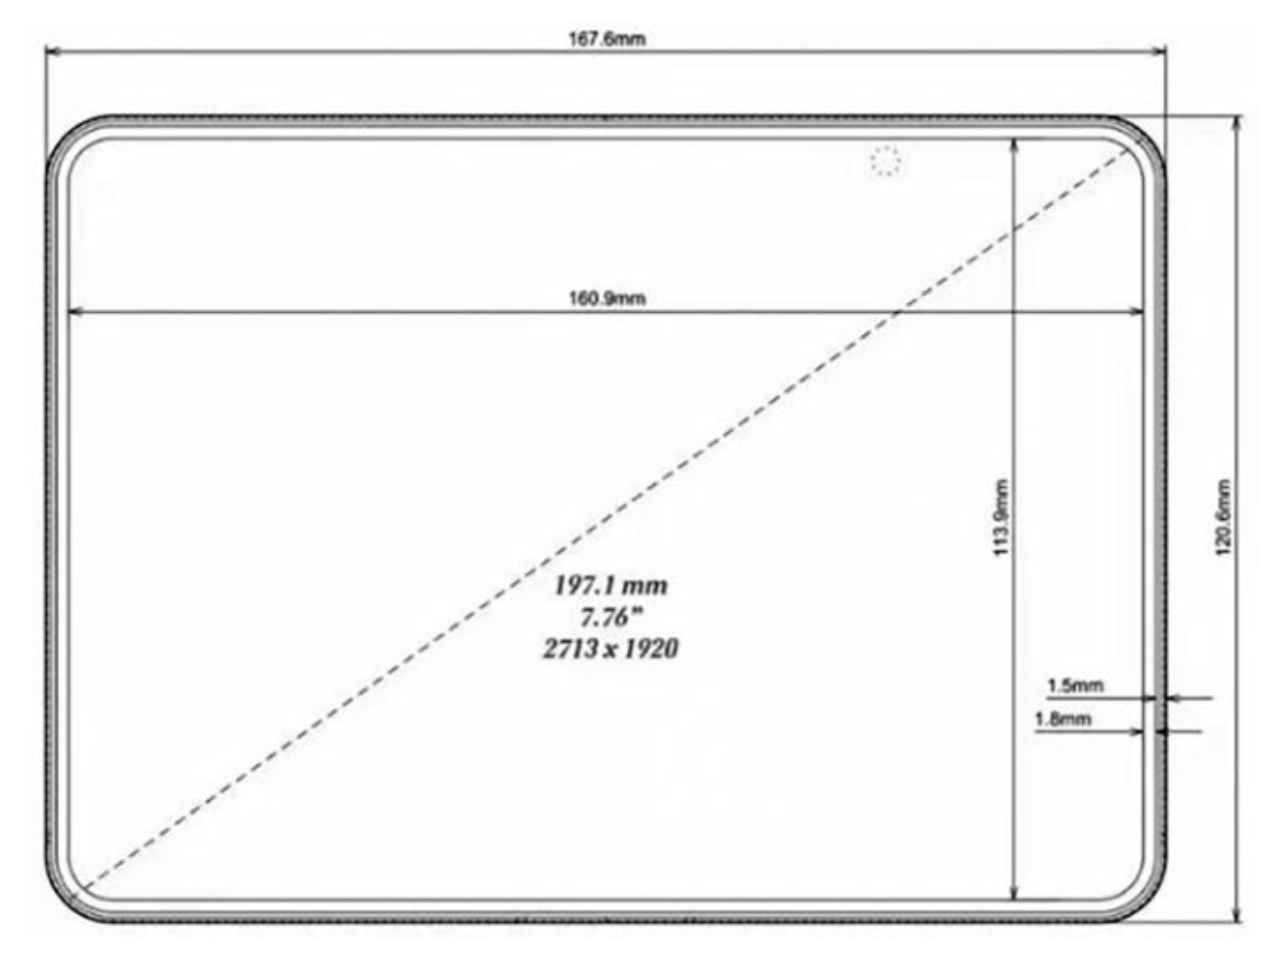
- Closed: 84mm wide, 121mm tall, 9.6mm thick
- Open: 168mm wide, 4.8mm thick per side
The goal isn’t visual accuracy. You won’t have a screen, a camera bump, or Apple’s logo. What you will have is the exact footprint and the exact shape that will either feel right or wrong the moment you pick it up. That answer is worth more than a thousand leaked renders.

Tools and Materials
File sources: You do not need leaked CAD files. The dimensions below are enough to model this from scratch in any CAD program. Two rectangular slabs with rounded corners.
Printer fit check: Confirm your bed can handle 168mm in at least one dimension before you start. The open mockup exceeds many smaller printers even though each half prints fine.
Required:
- FDM 3D printer (build plate must fit 168mm when open). Most printers in the $200-400 range qualify.
- PLA filament. Prints easily, doesn’t warp, sands well if you want cleaner edges.
- CAD software. Fusion 360 offers a free hobbyist license. FreeCAD works if you prefer open source. Neither requires advanced skills for what amounts to two flat slabs with rounded corners.
- Ruler or digital caliper. Small errors compound fast on something this size. Being off by 2mm per side means your closed mockup is nearly a centimeter wider than intended.
For the hinge:
- Strong cloth tape on the inner edge creates a functional fold.
- Small neodymium magnets near the corners let the halves snap together when closed, which feels more satisfying than tape alone.
Do not attempt a mechanical hinge on your first build. That’s where most DIY foldable projects die, and you don’t need it to answer the questions that actually matter.
Optional: TPU filament for flexible hinge zone (adds complexity). Sandpaper in 220 and 400 grit smooths edges and improves hand feel. Double-sided tape grips both surfaces without peeling under repeated folds.

Step by Step: 3D Print a Foldable iPhone Mockup
Step 1: Pick your version of the dimensions. Start with the reported CAD measurements, then decide whether you are modeling the “exact numbers” version or a “close enough for feel” version. If your goal is pocket comfort and hand feel, the footprint matters more than tiny tolerances. Keep a note of your target closed width (84mm) and height (121mm), since those are the fastest sanity checks later. If you plan to add magnets, note where you want the snap points, because that affects where you leave extra plastic.
Step 2: Confirm your printer can handle the footprint. Measure your printer bed and confirm it can print each half as a flat piece without awkward rotation. Each half is the safer approach for smaller beds, even if the open width (168mm) is larger than what your printer can do in one piece. If your bed is tight, rotate the part diagonally in the slicer so it fits, then re-check that you still have enough brim or skirt space. This one check prevents wasted hours.
Step 3: Make the simplest possible CAD model. Create two rectangles that match the closed width and height, then split into left half and right half. Round the corners to a phone-like radius, but avoid obsessing over Apple-exact radii since you are testing ergonomics, not visual fidelity. Extrude each half to the thickness you want per side (4.8mm), then add a flat inner edge where the hinge will sit. Leave a small gap between halves to account for tape thickness or a flexible hinge strip.
Step 4: Add optional features only if they help the test. Skip camera bumps for the first version unless your goal is to test wobble on a desk or pocket snag risk. If you want magnets, cut shallow pockets near the corners so the magnets sit flush. If you want a more realistic feel when closed, add a tiny chamfer on the outside edges so it does not feel like a sharp slab. Keep everything else plain.
Step 5: Export the files for printing. Export each half as STL or 3MF and name them clearly, like “left half” and “right half.” If your CAD tool offers a units warning, confirm millimeters. Do a quick measurement inside the slicer after import to make sure nothing scaled incorrectly. A wrong unit import is the most common silent failure.
Step 6: Slice with beginner-safe settings. Use a standard profile for PLA and aim for a balance of speed and durability. A typical starting point is 0.2mm layer height, 15% infill, and a few solid outer walls so the edges feel rigid in hand. Print each half flat on the bed so the broad face is smooth and strong, and so tape adheres cleanly later. Avoid supports unless you added geometry that truly needs it.
Step 7: Print and do quick cleanup. Print both halves, remove any brim or raft, then lightly sand the edges where your fingers will rest. Focus on the inner fold edge so tape can stick without lifting. If you are embedding magnets, test fit and polarity before gluing. A polarity mistake turns your “snap shut” idea into a comedy sketch.
Step 8: Assemble with a simple hinge. For the first build, use strong cloth tape along the inner edge on the inside face, leaving just enough slack for the fold. If you added magnets, they handle the closure feel while tape handles the motion. If you want an open-only tablet test, skip the hinge and simply butt the halves together on a table. The point is to answer the feel question fast, not to engineer a perfect hinge.
Step 9: Run the real-life handling test. Put the iPhone Fold mockup in the pocket you actually use, then walk around for a few minutes and notice whether it shifts, pokes, or feels too wide. Hold it closed and pretend to type with both thumbs, since width is what makes or breaks messaging comfort. Open it and use it like a mini tablet, then decide whether the shape fits reading, email, and split-screen habits. Pay attention to what annoys you after five minutes, since that is closer to what daily life reveals than the first impression.
Step 10: Write down your verdict. Note three things: what felt surprisingly good, what felt immediately wrong, and what felt “fine but annoying.” If you plan a second print, change only one variable at a time, like corner radius, thickness, or hinge gap. This keeps the experiment honest and prevents endless tinkering.
Limitations and Disclosure
Your mockup won’t simulate weight distribution, the crease, hinge durability, or software transitions. PLA is lighter than glass and aluminum. The real device will feel different.
What it does simulate is the fundamental question: is this foldable iPhone shape worth carrying?
Disclosure: The dimensions used in this guide come from accessory manufacturer CAD leaks, not official Apple sources. Apple has not confirmed a foldable iPhone product. The device codename (V68), expected timing (late 2026), and all specifications referenced here are unverified. Dimensions may change significantly before any official announcement or launch. This mockup represents a snapshot of current supply chain intelligence, not a guaranteed final design. The Gadgeteer has no affiliation with Apple Inc. and receives no compensation related to this coverage.
Full Circle
For Gadgeteer readers who remember syncing a PalmPilot with a desktop and marveling at a digital organizer that fit in a pocket, the foldable iPhone moment feels familiar. The tools have changed dramatically. The question has not: does this shape make sense in real life?
The difference now is you don’t have to imagine the answer. You can hold it.
Great products are born from living with an idea long enough to know whether it belongs in your routine. Decades ago, that insight came from a block of wood. Today, it comes from a 3D printer at home. That’s not just progress in technology. It’s progress in who gets to participate.
Print your iPhone Fold mockup. Test it. Form an opinion before Apple tells you what to think.

Gerber Gear Suspension 12-in-1 EDC Multi-Plier Multitool with Pocket Knife, Needle Nose Pliers, Wire Cutters and More, Gifts for Men, Camping and Survival, Grey
(as of March 28, 2026 18:29 GMT -05:00 - More infoProduct prices and availability are accurate as of the date/time indicated and are subject to change. Any price and availability information displayed on [relevant Amazon Site(s), as applicable] at the time of purchase will apply to the purchase of this product.)
Gadgeteer Comment Policy - Please read before commenting
Or you can save a lot of time and effort and just download the model here:
https://makerworld.com/models/2141264?appSharePlatform=copy
I’m gonna have a buddy of mine print this, then stick it on one of my coworkers desk. He’s a huge apple guy and I’d love to see the look on his face!