REVIEW – When it comes to creating video, we concentrate on visual aspects such as exposure, focus, white balance, frame rate, and more. But what many people tend to overlook is the audio. Sound can make or break a video especially when it comes to the dialogue. If you cannot make out what people are saying, if they sound muffled, or if you can barely hear them, it makes the video unappealing.
And who wants to watch an unappealing video? But with audio recording equipment like the BlinkMe 2.4Ghz Wireless Smart Microphone System from Saramonic, these wireless mics allow you to capture the best audio for your video.
What is it?
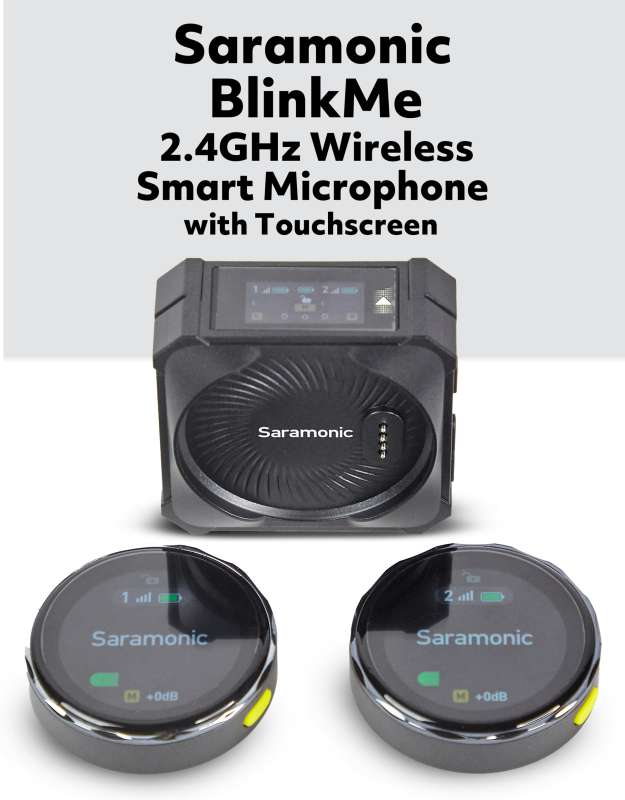
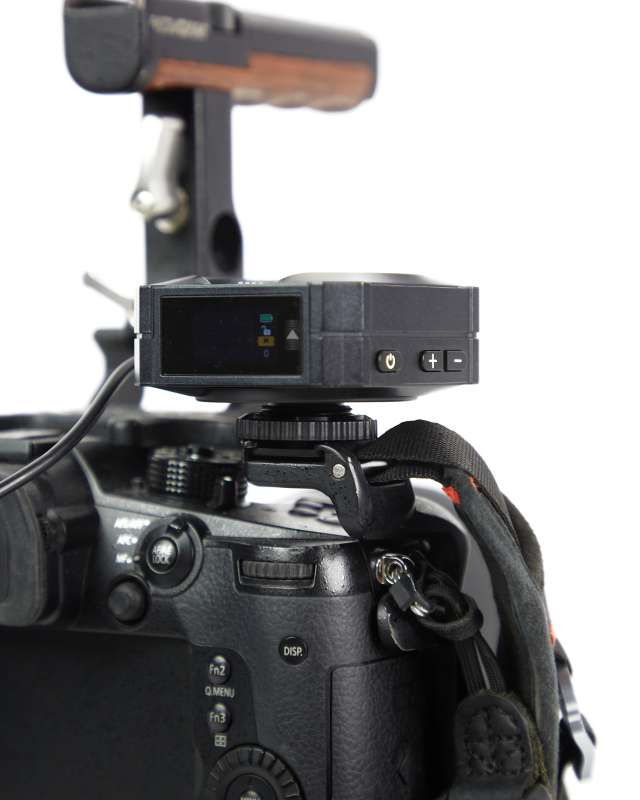
The Saramonic BlinkMe Microphone System is a clip-on wireless Lavalier microphone system giving a person a hands-free way of recording their voice. The BlinkMe lav mics can also be used with mixers, recorders, various types of video cameras like DSLR cameras, action cameras, mirrorless cameras, and your smartphone as well.
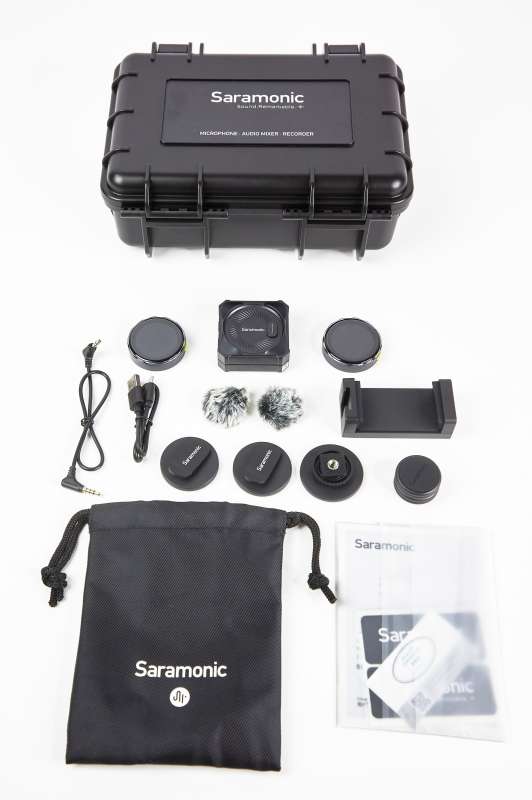
What’s in the box?
- Transmitter (2)
- Receiver
- Magnetic Clip for Transmitters (2)
- 1/4″ Magnetic Cold Shoe Adapter
- Magnetic Tabs for Transmitters (4)
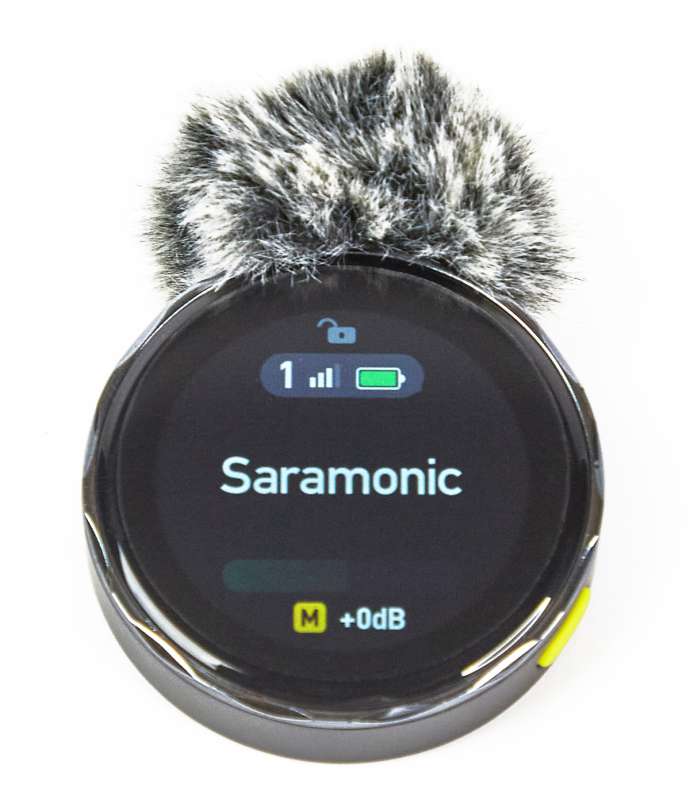
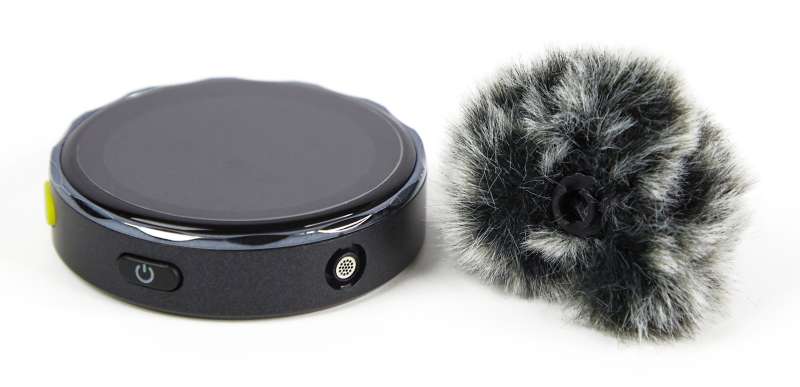
- Fur Windshield (2)
- Phone Holder
- USB-A to USB-C Cable
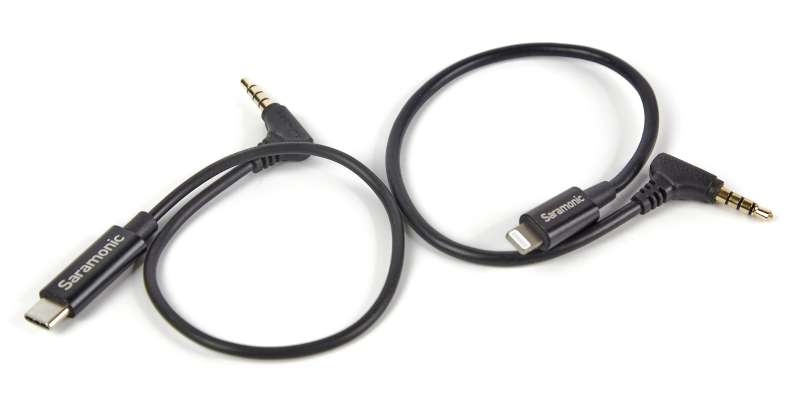
- 3.5mm TRRS to 3.5mm TRRS Cable
- 3.5mm TRRS to Lightning Cable
- Protective Case
- Drawstring Bag
Design and features
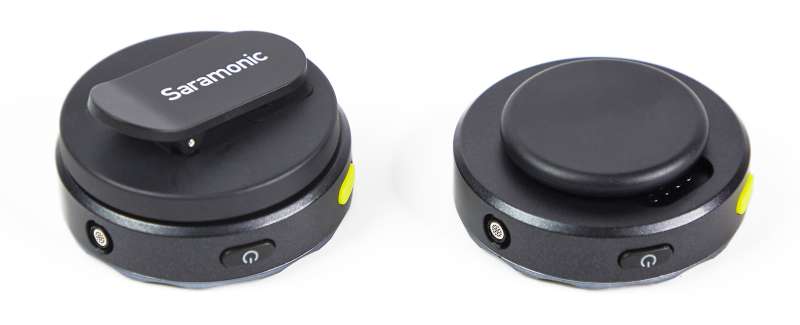
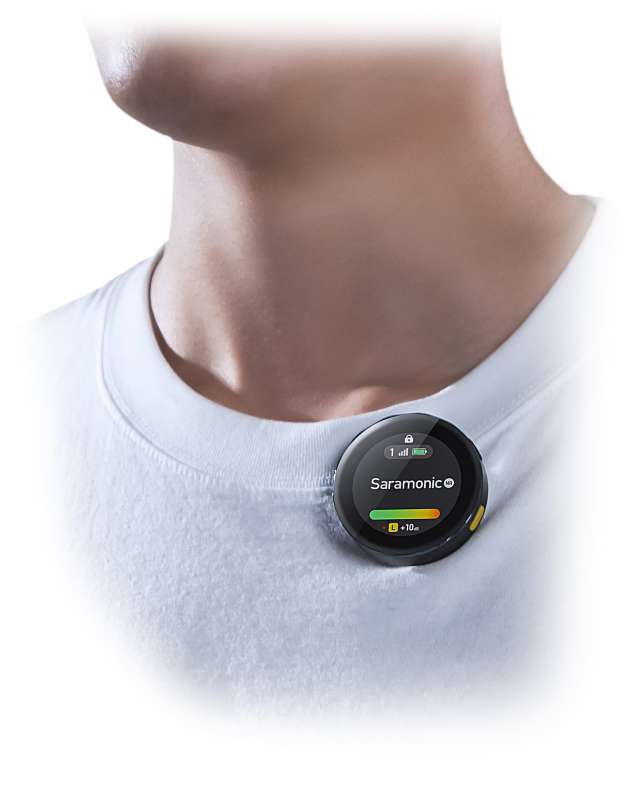
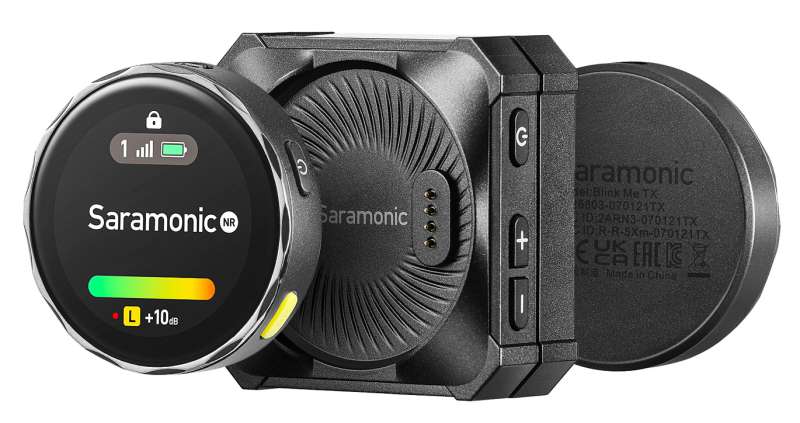
What makes the Saramonic BlinkMe wireless mic system unique is its shape and all-in-one design. I really like the round shape of these lav mics. They don’t look like the typical square or rectangle mics that you see many content creators wear, like the Rode Go or DJI MIC. Plus, the BlinkMe transmitter lav mics aren’t bulky or protruding and they have a nice slim design to them. When the screen is off, the transmitter blends very well with the person wearing it.
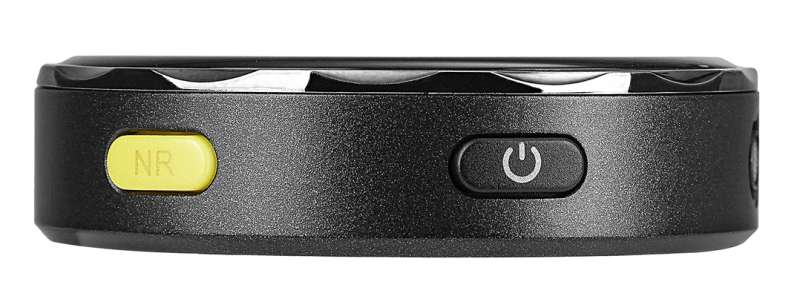
And speaking of screens, the BlinkMe receiver and transmitters both have color touchscreens. The transmitters have a 1.3″ touchscreen and the receiver has a 0.96″ touchscreen. The only buttons on the receiver are the Power button and the Plus/Minus buttons. On the transmitter, the only buttons are the Power button and the Noise Reduction button.
The BlinkMe mic system, and its magnetic docking design is something to admire. Not only does attaching the transmitters to the receiver keep them stored when not in use, but the receiver acts as a charging station that can charge the transmitters. The receiver can share 4.5 hours of battery with each transmitter. Having the receiver actually charge the transmitters is a great feature. I found it to be convenient as well as practical.
The battery life on each transmitter is up to 6 hours when the onboard recording is enabled and up to 8 hours when the onboard recording is disabled.
The receiver has a battery life of up to 24 hours. If you are only using one of the transmitters, you can keep the other transmitter attached to the receiver so as not to lose it; and keep it within reach when you do need it.
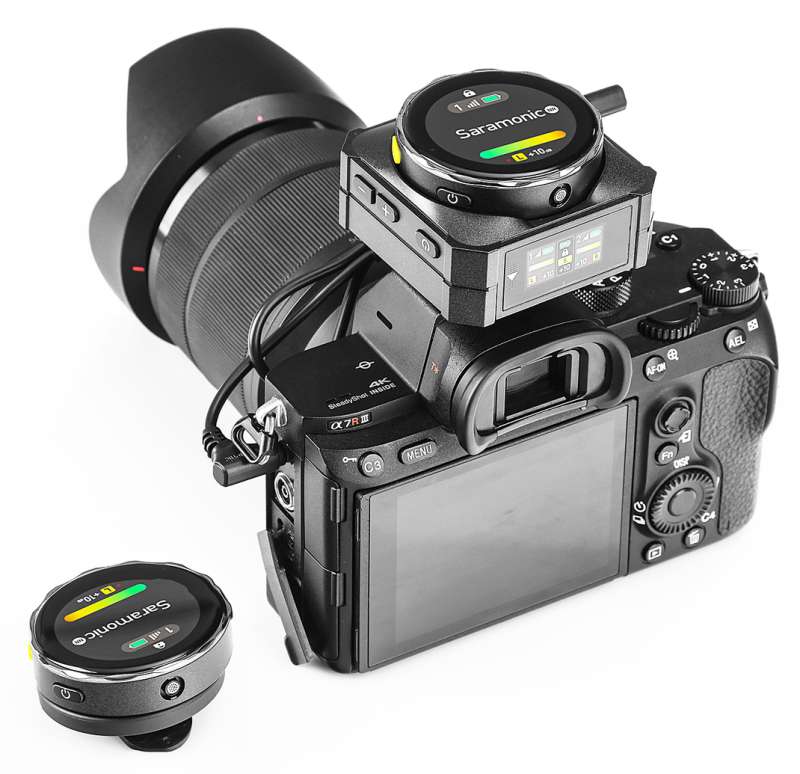
To wear a transmitter, there are two magnetic attachments that you can choose from. One of them is just a round magnet tab that you attach to the back of the transmitter. For example, if you want to wear the transmitter somewhere on your shirt, you can just place the transmitter on the front of your shirt and then attach the magnetic tab underneath your shirt behind the transmitter. Included are 4 magnetic tabs.
One magnetic tab should hold the transmitter just fine, but in case you need more holding power then you can use two magnetic tabs. The other magnetic attachment has a clip so that if you want to have the transmitter mic in the more traditional areas on your collar or neckline of your shirt, you can. Using the clip allows you to place the transmitter mic anywhere you can clip it and remove it just as easily.
The touchscreens on the Saramonic BlinkMe’s transmitters are made with Panda glass, so it should be durable and scratch resistant. From what I have read about Panda glass is that it is supposed to be stronger and harder than Gorilla glass. Pressing and swiping on the transmitter’s screen wasn’t the most responsive since there are times when I had to tap or swipe 2 or 3 times for a response. However, when I pressed and swiped slower on the screens, the touchscreens were more responsive.
I like the Menu layout on both the transmitters and receiver since it was simple and straightforward. It was easy to navigate around with the help of the icons on the screens. A neat feature of BlinkMe’s screens is that they are customizable. The wallpaper screen, the user interface, and the button layouts can be customized on the transmitter and receiver using the Saramonic app.
I really liked this feature because I am a fan of customizing settings on my devices where I can. But more on my experience with the app later.
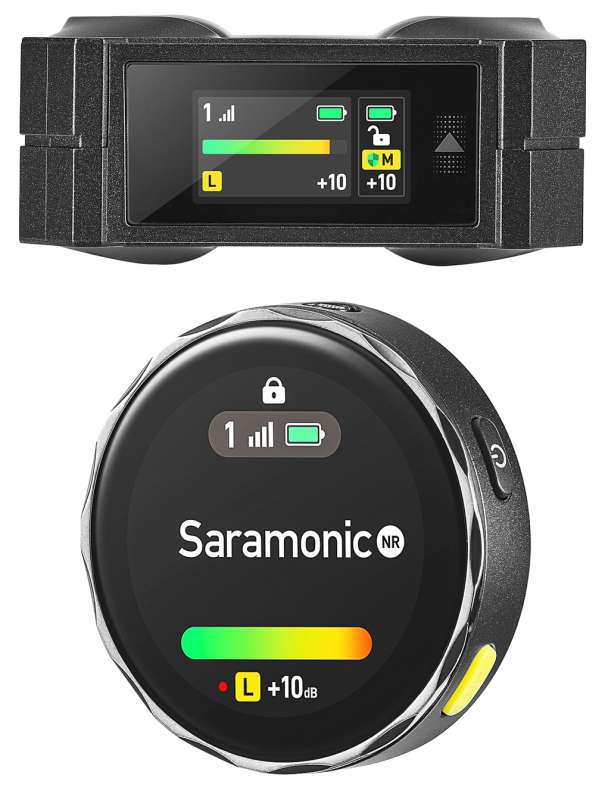
Along the sides of the Saramonic BlinkMe’s receiver and transmitters are actual physical buttons. On the transmitters, you have a Power button and a Noise Reduction button. Pressing the Power button turns On and Off the screen. And Pressing the Power button twice, locks and unlocks the screen preventing accidental taps or swipes. Pressing the Noise Reduction button enables and disables that feature but pressing it twice enables and disables the On-Board Recording.
Holding the Noise Reduction button for 1.5 seconds Mutes and Unmutes the Microphone. Both transmitters have 8 GB of memory which should give you about 22 hours of recording at 48kHz/16bit or 15 hours at 48kHz/24bit. The microphone sits right at the top of the transmitter just past the Power button.
Unfortunately, the transmitter lacks a port for a wired Lavalier microphone which I wished it had. It would have been nice to have that option in case you needed it.
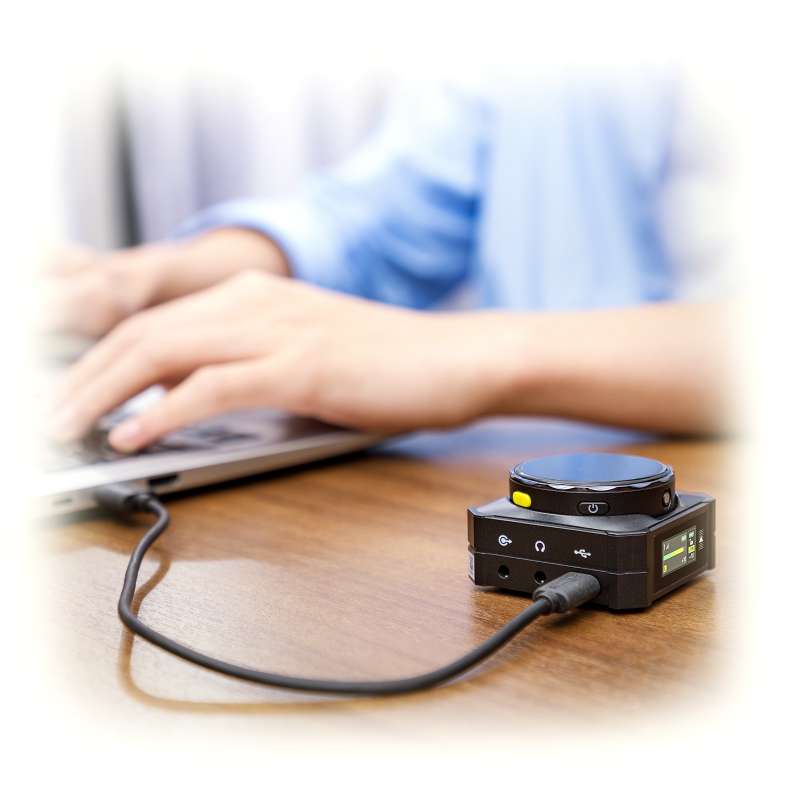
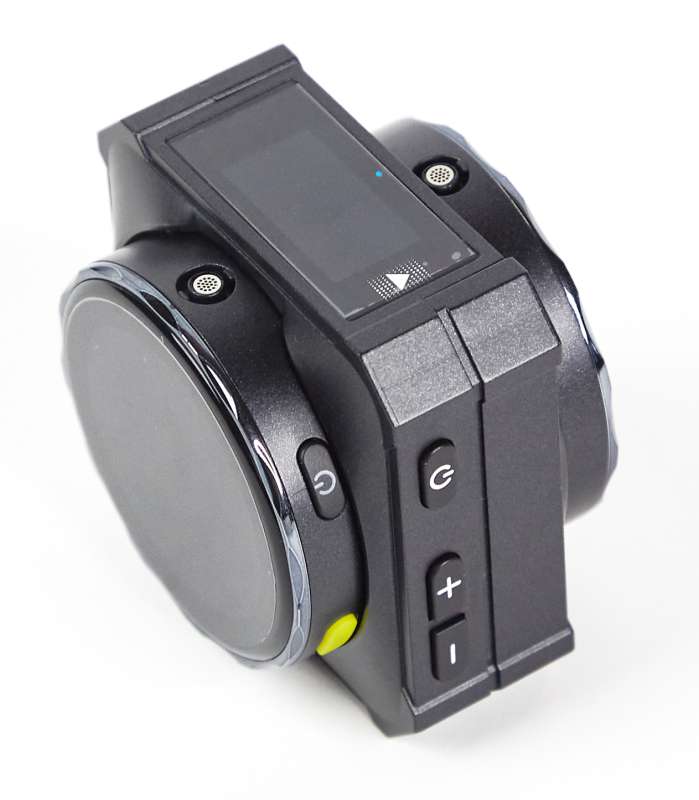 On one side of the Saramonic BlinkMe’s receiver are buttons for the Power and +/- buttons to increase and decrease the receiver’s output gain. Pressing the Power button twice also locks and unlocks the screen. On the other side of the receiver is a USB-C port, a 3.5mm headphone jack, and a second 3.5mm jack. The USB-C port is used to charge the receiver, transfer audio files, and digitally output to your computer or laptop.
The headphone jack is used to monitor the audio level and is a refreshing feature to see on the receiver, especially since many cameras may have a microphone jack but no headphone jack.
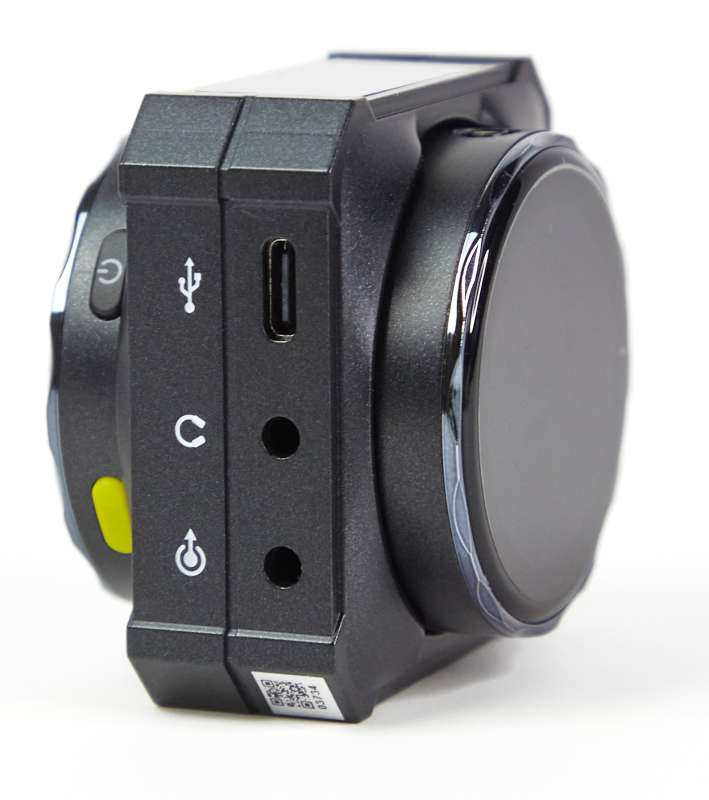 I didn’t experience any latency lag using headphones and the audio sounded loud and clear. The second 3.5mm jack is for the TRS/TRRS Auto-Sensing Output for analog audio output. With this jack and a TRS/TRRS cable, you are able to record to your DSLR camera, a mixer, or smartphone. There is also a cable with a lightning tip for use with iPhones.
You have the ability to output and record to two separate devices when you use the USB-C port and the TRS/TRRS ports simultaneously. I can see where having this dual recording feature would be beneficial during recording sessions to record two sets of audio for backup.
Setup
Remove a transmitter, or both if you need it, from the receiver and choose either the clip or a magnetic tab, 2 magnetic tabs for a stronger hold. If you are going to be in a windy area, attaching the included small fur windsock is a good idea because it will help filter out the wind noise.
Next, you attach the magnetic cold shoe mount to the Receiver. Finally. plug in the TRRS cable, USB-C cable, or both into the desired device(s). Power on the Transmitters and Receiver. Plug in a pair of headphones to help monitor the sound.
Performance
I’m not going to get too technical with the specs since I want to write about my experience with this mic system rather than throw out a bunch of technical jargon. If you really want to see the detailed specs, you can jump over to Saramonic’s website for that. With that being said, I was really surprised at how well the Saramonic BlinkMe mic system worked.
Setting up and using the mics seemed easy enough. And the settings on both the transmitters and receiver worked just fine right out of the box, so there was really no need for me to adjust or change any of the settings.
However, after playing around and checking out the other settings and features that BlinkMe offers, I can see how they could be very useful in different environments and scenarios. The microphone on the transmitters are 6mm omnidirectional mics with a 48kHz sampling rate and 24-bit depth CD sound quality.
The Saramonic BlinkMe mic did a great job of recording when I placed it on the neckline of my shirt using the magnetic clip and also in a lower spot on my shirt using the magnetic tab. You have several modes to choose from when recording: Stereo, Mono, and Safety Channel. The Safety Channel is similar to Mono but an additional -6db audio track will be recorded on the right channel in case there is clipping recorded in the Mono track.
Having a safety channel was always a lifesaver for me. When I would record with my Sennheiser G2 wireless lav mics, I always had my camera’s right channel as a safety channel. It helped saved clipped audio, as well as editing time, having that safety channel.
 To help get a clearer sound recording, the Noise Reduction on the transmitter can be easily activated with just a push of a button. This is a great feature to have because capturing the cleanest and clearest sound recording is ideal. And, as mentioned before, if you press the Noise Reduction button twice, you activate the transmitter’s onboard recording. This is also a nice feature to have should you want a backup of your recording or record the ambient sound during recording.
And with 8 GB of memory, you should have plenty of storage space to record between 15 and 22 hours depending on the selected audio bit recording. Perhaps, you probably could use it as a personal voice recorder, if you wanted. One thing about the transmitters that I thought was lacking was a mic port for a wired Lavalier mic. Having the option to use a traditional Lavalier mic in your production would have been a great addition.
 Saramonic has an app to use with the BlinkMe mic system which will allow you to customize the wallpaper on the transmitters, the user interface, and also lets you customize the button functions on the transmitters and receiver.
This is a neat concept because you will be able to change the wallpaper on the transmitter to display a photo such as your logo, website, picture, or design. Unfortunately, at the time of writing this review, there was an issue with the app where I just could not input my email to get a verification code to continue the setup.
Each time I tried to type in my email, only one letter would input and as I continued to type I kept getting an error stating that I “Cannot enter illegal characters.” I wasn’t sure what that meant, but either way, I was getting nowhere.
I installed the app on my Samsung S22 Ultra and I also installed it on my LG Wing (both phones are Android) but the app was having the same issues on both phones. I think that the app for Android is still going through final upgrades but for iOS, it has been updated to the full version. Needless to say, I was not able to use the app and see how it worked with the BlinkMe mic system. I really want to try the app out, so I’ll have to reach out to Saramonic and inquire if they have an update, or a fix yet.
What I like
- Round shape of transmitters
- Touchscreen
- Onboard recording
- Long battery life
- Receiver and charging dock combo
What I’d change
- Add a mic port for a lavalier mic
- Add a 1/4 inch screw hole on receiver bottom
Final thoughts
Sound is often taken for granted when it comes to making videos. Most times we count on the onboard microphones of our cameras or smartphones to capture the audio and decide that it is good enough. Unless you’re going to keep the camera or smartphone right up to your mouth as you record your video, chances are you’re not going to get the clearest and cleanest sound possible without a wireless mic near your mouth. Having a wireless mic system will greatly help to improve your audio production. And with the Saramonic BlinkMe 2.4Ghz Wireless Smart Microphone System, these wireless mics will help make your video sound and look its best.
Price: $249.00
Where to buy: Saramonic BlinkMe and other Saramonic devices are available on Amazon
Source: The sample of this product was provided by Saramonic.

Gerber Gear Suspension 12-in-1 EDC Multi-Plier Multitool with Pocket Knife, Needle Nose Pliers, Wire Cutters and More, Gifts for Men, Camping and Survival, Grey
(as of July 30, 2026 09:33 GMT -05:00 - More infoProduct prices and availability are accurate as of the date/time indicated and are subject to change. Any price and availability information displayed on [relevant Amazon Site(s), as applicable] at the time of purchase will apply to the purchase of this product.)