
REVIEW – As a semi-competitive gamer, I’m always on the lookout for a good gaming mouse. Normally I’m not that excited about wireless gaming mice, because there’s always the risk that my battery dies in the middle of a game, leaving me stranded for 30 seconds or so while I fumble for a new pair of double A’s. HyperX has an idea on how to solve that problem, which is why I’m excited to be testing their new Pulsefire Dart and its associated ChargePlay Base.
What is it?
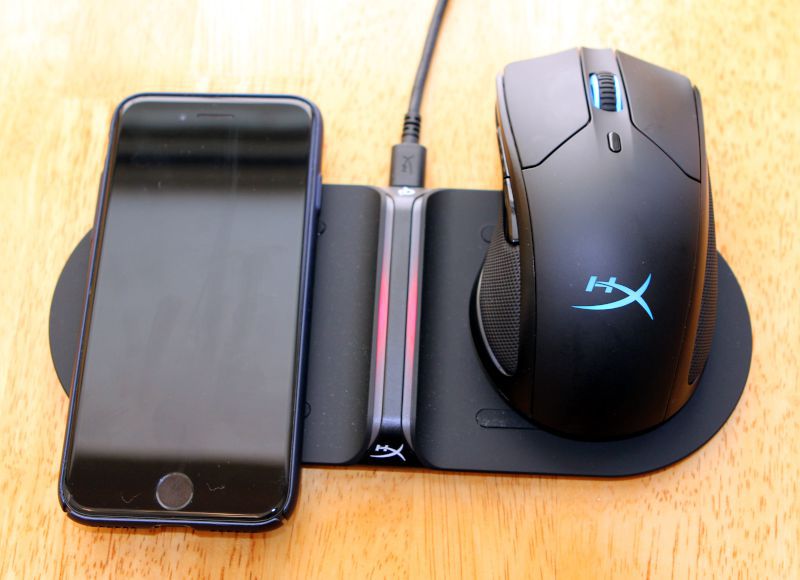
The Pulsefire Dart is a new wireless gaming mouse from HyperX that includes a rechargeable battery and supports the Qi wireless charging standard. The HyperX ChargePlay Base is a charging station that can wirelessly charge two devices at once.
What’s in the box?
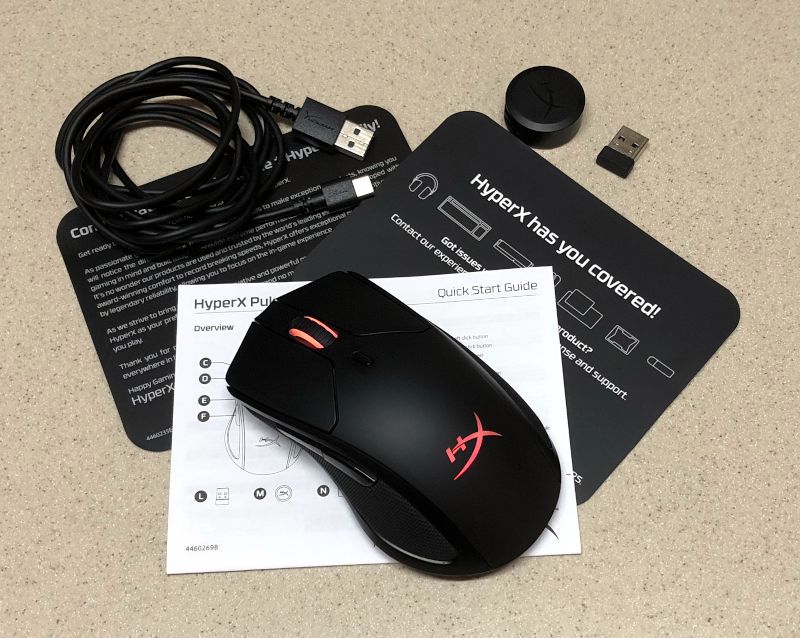
In the Pulsefire Dart box:
- The mouse
- A USB wireless receiver dongle
- A USB cable adapter
- A USB-A to USB-C cable
- A quick-start guide with 5 pages of English instructions
- A tech support card and a congratulations card
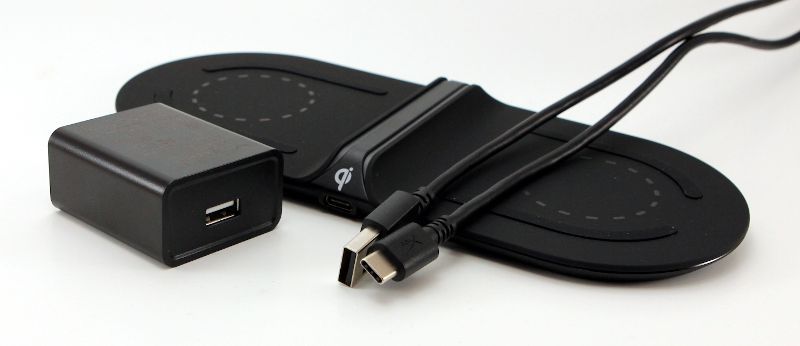
In the ChargePlay Base box:
- The charging station
- An AC wall adapter
- A USB-A to USB-C cable
- A quick-start guide with 2.5 pages of English instructions
- A tech support card
Hardware specs
For the mouse:
- Polling Rate: 1000 Hz
- DPI Presets: 800/1600/3200
- Lighting: RGB
- Wireless: 2.4 GHz
- Battery Life: 50 hours with lighting, 90 without
- Charging: Qi Compatible
For the base:
- Output: Up to 15 watts
- Size: 8.5 x 3.5 inches
Design and features
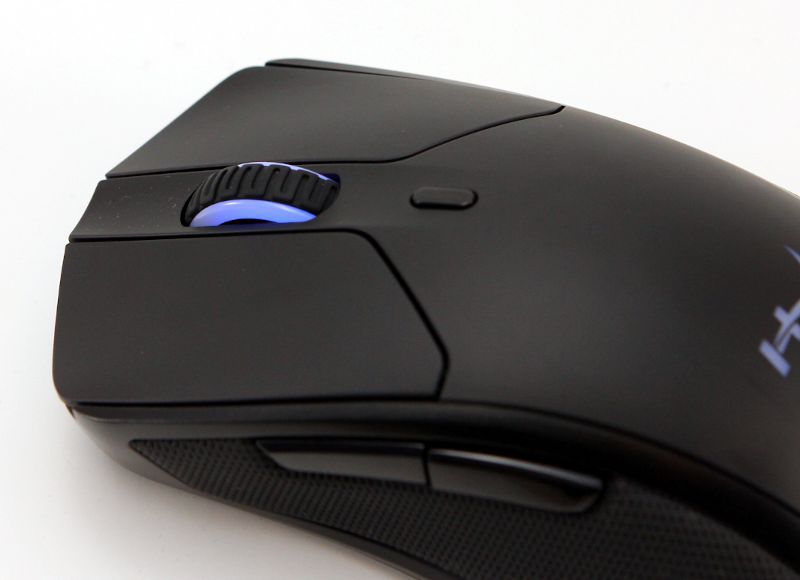
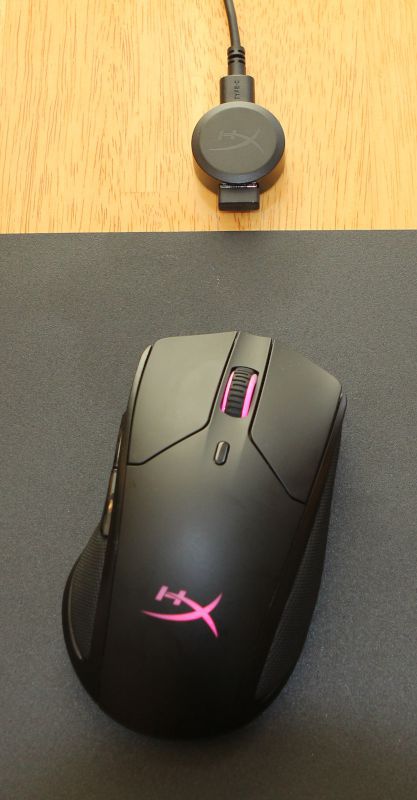
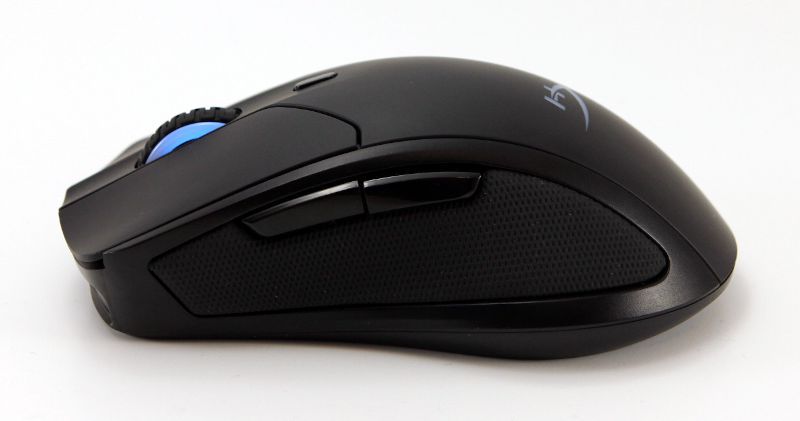
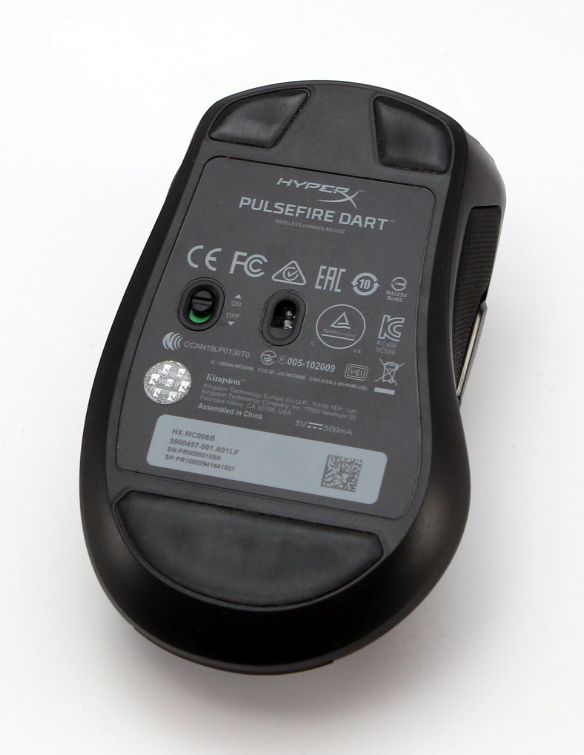
The Pulsefire Dart has a fairly standard design. It’s a medium-sized, ergonomic, right-handed mouse. It has the typical left and right mouse buttons, a scroll wheel that doubles as the middle mouse, a DPI button, and two programmable side buttons on the left. There’s an LED in the scroll wheel and another in the logo in the palm rest. The left and right of the mouse have rubbery grips. The base has three sliders, the sensor, and an on/off button. It’s a tried-and-true design that works well.
The ChargePlay is actually a pair of charging bases that are back-to-back with a pair of LED indicators between them. It can simultaneously charge two wireless devices, such as my iPhone and the Dart.
Installation and setup
As this mouse has a rechargeable battery, the first step was to charge it. I plugged the wall adapter for the base into an outlet, then connected it to the base with the provided USB cable. Both red LEDs flashed twice to let me know they are ready to charge. I put the Dart on the charger, keeping in mind that it has to be positioned just so, with the palm rest over the center of one of the chargers. The red LED on the base lit, and the LEDs in the mouse turned white and began to fade in and out; together these indicated that it was charging. When the LEDs in the mouse changed from white to color, the mouse was fully charged and ready to go.

I plugged USB cable into the back of my gaming rig, attached the dongle, and plugged the wireless receiver into it.
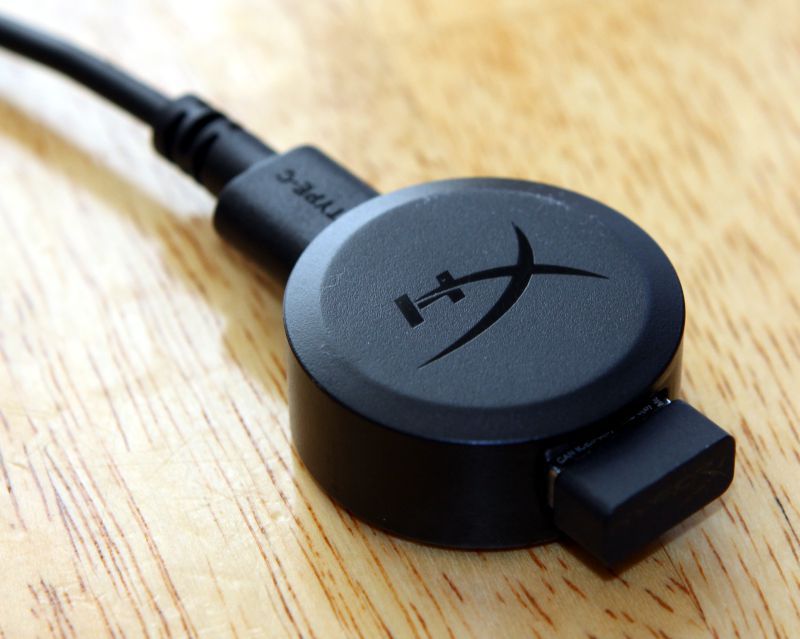
The manual recommends keeping this receiver within 8 inches of the mousepad. To me, this seems like a rather odd requirement. If it’s a wireless mouse, why does it require a wire that has to stay so close to the mouse? This is a genuine technical need, however, because when I removed the cable and plugged the receiver into the back of my computer, I often found that my mouse pointer jumped and skipped around, making it unusable for both gaming and everyday tasks. When the receiver was in the dongle and kept close to the mousepad, it worked perfectly.
The Dart does work as a wired mouse as well. All I had to do was remove the dongle and plug the USB-C port directly into the top of the mouse. That worked without any problems. The DPI button has 3 preset values, and the middle one (1600 DPI) worked fairly well for me. At this point, I had a fully functional gaming mouse!
(Note: This remainder of this section has been edited after working with HyperX support.)
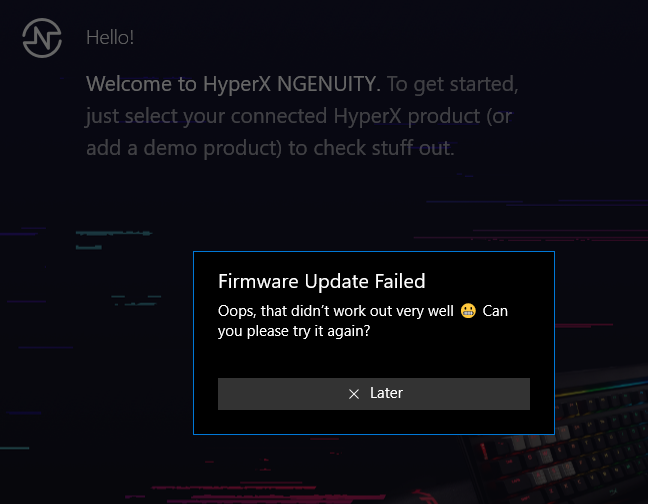
The manual says I can customize the lighting, DPI, and macro settings with the HyperX NGenuity 2 software, so I went to their download page and grabbed a copy to install. I installed the software for my PC—it only runs on Windows, not macOS—and it easily recognized my Dart. The first thing that I noticed was that my mouse needed a firmware update, so I let NGenuity do the update. The first time that tried this update it failed, causing my computer to stop recognizing the mouse. I uninstalled NGenuity and rebooted my computer, the only thing that I could do to get it to get it to recognize the mouse again. This left me without any access to the features of NGenuity.
Two weeks later, I had an opportunity to speak with the friendly and helpful HyperX support team, and they were able to resolve the problem. Here’s what worked for me: First, I connected the Dart to my computer using the cable, not the wireless receiver. Second, I downloaded and installed the current version of the NGenuity software. Third, I rebooted my computer. Fourth, I started NGenuity, which required a firmware update. As an aside, it seems that their developers have a sense of humor.
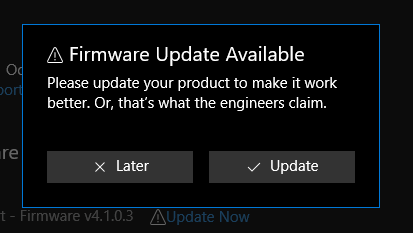
This time the update worked perfectly. Fifth, I unplugged the Dart from the cable, plugged the cable into the dongle, and attached the wireless receiver to it. This caused NGenuity to request another firmware update. It turns out that there is one firmware for the mouse itself and another for the wireless receiver. This isn’t documented anywhere, and the HyperX support team acknowledged that they need to improve this; I suspect that future updates will provide additional information to make these updates easier.
Once this finished with these firmware updates, I was able to access the features in NGenuity.
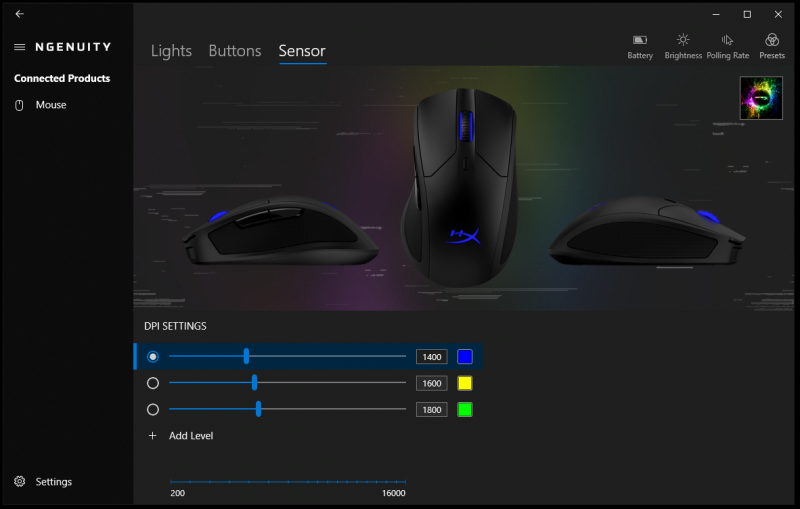
Some of these settings are important for gamers. The Sensor tab allows me to change the DPI settings. This was great, as with some experimentation I settled on 1400, a value that felt really comfortable while playing Dota 2. The Battery indicator lets me know at a glance how much charge remains in the internal battery; during a long gaming session, this could be key to knowing when it’s time to switch to wired mode. The Brightness indicator allows me to turn down the brightness of the lights, which might increase the battery life a bit. Finally, the Polling Rate dropdown has the option for 1000Hz, the fastest sample rate, so I selected that. I saved all of these settings as my own Preset, which gives me the ability to have different sets of options for different games.
Performance
The PulseFire Dart plays perfectly. I find it very easy to grip and control. The left and right mouse buttons click accurately without any fuss. The scroll wheel rotates smoothly as I would expect. The programmable buttons on the left worked perfectly; in Dota 2, one buttons works as my quick-buy and the other to the courier. Even after many hours of gaming, there’s nothing to complain about. I really like how it plays.
The base of the Dart has 3 mouse skates, the slippery areas where the mouse comes into contact with my mouse pad. These provided just the right amount of traction for me; I never felt like it was too slippery or too grabby.
The all-black surface tends to collect dust and fingerprints, as many mice do, so keeping a microfiber cloth handy and wiping it down before playing is a good idea.
I have nothing but praise for HyperX’s support of the Qi charging spec. The Dart not only charges on the ChargePlay, but it also works on my Soundcore Wakey and my trusty Anker PowerWave charger. Additionally, the ChargePlay supported my iPhone, and because of its dual chargers, it’s become my wireless charging station of choice. Because it’s so easy to keep the rechargeable battery fully charged, I don’t worry about running out of batteries during a critical moment in a game. Even so, it’s nice to know that can simply plug in the cable to the mouse, should something go wrong. This is a great solution.
What I like
- Standard design
- Smooth game play
- Effortless charging
What I’d change
- Improved documentation for firmware updates
Final thoughts
(Note: This section has been edited after working with HyperX support.)
I like the PulseFire Dart. I like the way it’s designed, and I like the way it games. I really like being able to pick it up after a gaming session and set it on the ChargePlay, knowing that it will be fully charged when I’m ready to game again. I’m very happy that the NGenuity software is working now, and that I’m able to customize the DPI settings and other features. If you’re looking for a quality wireless gaming mouse with a great solution for keeping its battery charged, then I wholeheartedly recommend the PulseFire Dart and the ChargePlay charger to you.
Price: $99.99 for the mouse and $59.99 for the charger
Where to buy: HyperX’s store (mouse, charger) and Amazon
Source: The sample for this review was provided by HyperX.

HyperX Pulsefire Haste 2 Core Wireless – Gaming Mouse for PC, Long Battery Life, Lightweight, Custom Core Sensor, Dual Wireless Connectivity, Black
(as of June 21, 2026 22:34 GMT -05:00 - More infoProduct prices and availability are accurate as of the date/time indicated and are subject to change. Any price and availability information displayed on [relevant Amazon Site(s), as applicable] at the time of purchase will apply to the purchase of this product.)
Gadgeteer Comment Policy - Please read before commenting
This seems a good one compare to the cheapo ones that might not perform better. I like the style and the button placements.