REVIEW – Whenever I am out on a photo or video shoot, it is very important that I have a portable power source or power sources for my laptop, USB devices, and for charging and recharging numerous accessories. While there are many USB portable power packs available, many lack the versatility or the charge capacity to handle serving the power and charge needs for multiple devices and for extended periods of time. The iMuto S5 Portable Solar Power Station which just launched on Indiegogo looks like a possible solution and a game changer for me. Let’s see!!
What is it?
The iMuto S5 Portable Solar Power Station is a portable power solution that can power and recharge devices using common methods, such as an AC wall outlet, auto accessory power, or USB-C. It can also be charged and recharged via a solar panel using the power of the sun. It is lightweight and portable enough to be used for outdoor and indoor activities, and as standby emergency power in the case of a power outage or inaccessibility to a power source. Its features include 7 various power outlets for a total of 260W of power, all powered from its 50,000mAh built-in battery. It also has a built-in air cooling system that allows for safe charging, an intelligent Battery Management System to self-monitor, and built-in protection from overheating, overvoltage, and short circuits
What’s in the box
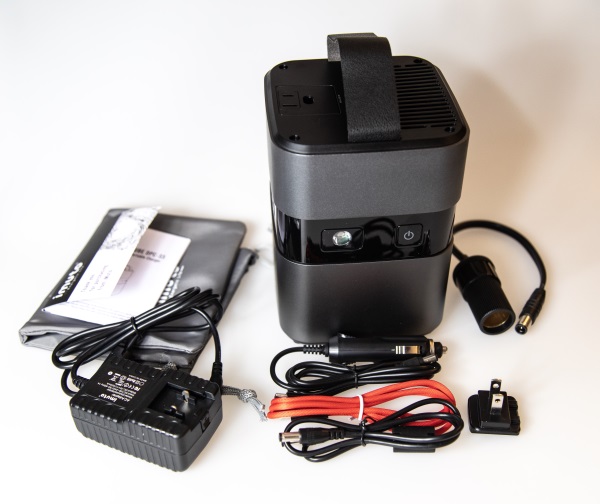
1 x iMuto S5 Portable Solar Power Station
1 x AC Power Supply
1 x USB-C Cable
1 x 12V DC Outlet
1 x 12 Volt Auto Cable
1 x Accessory Cable
1 x User Guide
Design and features
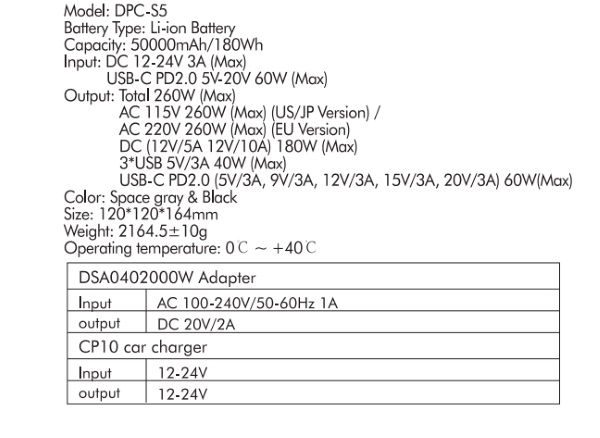
Specifications
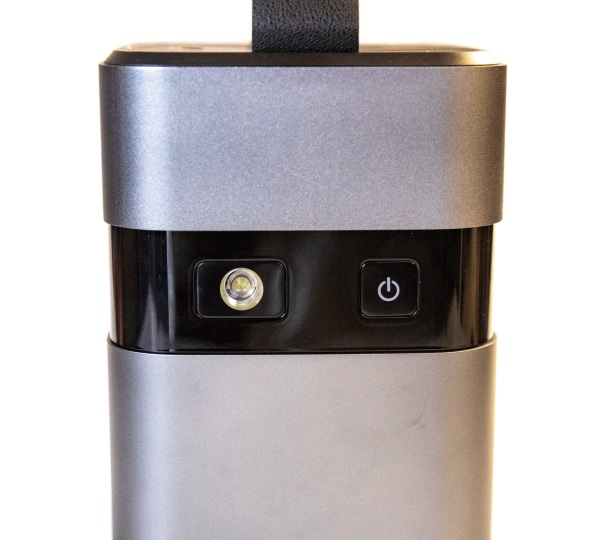
On the front of the iMuto, there is the power button that turns on the LED display and all of the ports except for the AC port that has a dedicated switch.
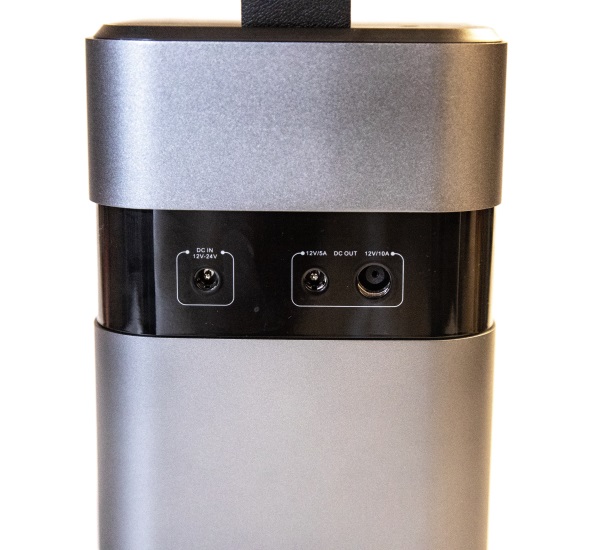
On one side there are 3 ports. From left to right as shown below there is the DC in charging port, and 2 DC out ports.
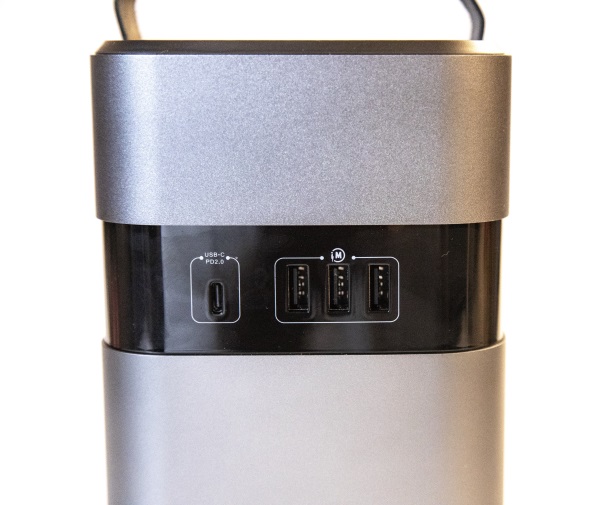
On the 3rd side of the device, there is a USB-C input/output port and 3 USB output ports.
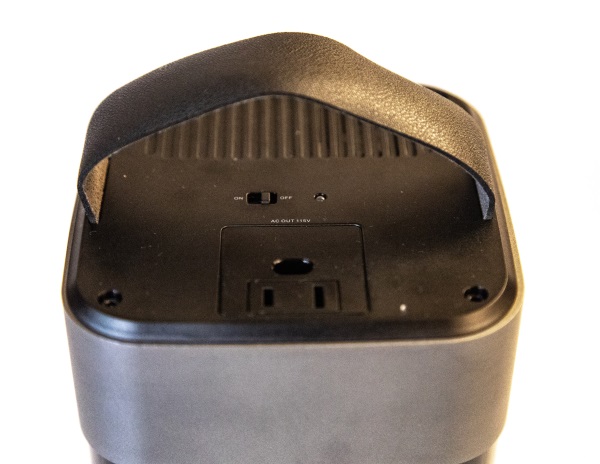
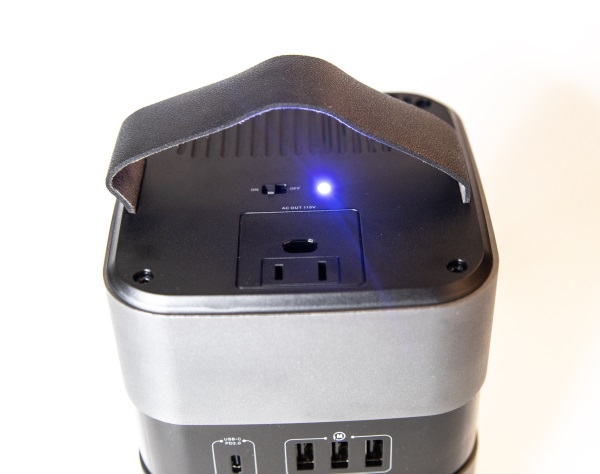
On the top of the iMuto, there is the AC port, with a switch and blue LED power indicator above it. There is also the carrying handle.
Below is a detailed picture of the device and its functional parts.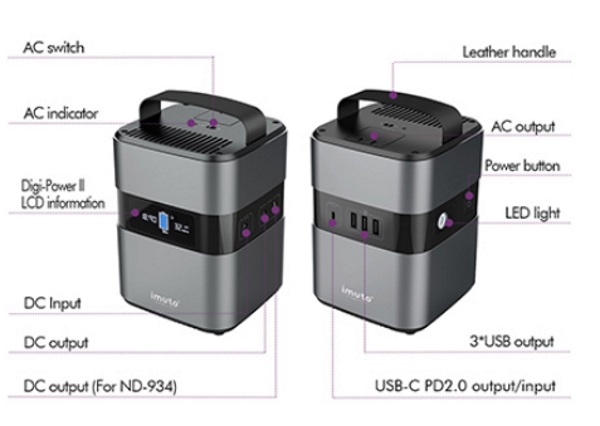
Performance
The first thing that I did when I took the iMuto out of the box was to plug it in to fully charge. While it did arrive with some amount of charge, I wanted it fully charged before I started my testing. Once it was fully charged, for my first test I decided to use it to power my Nebra AnyBeam portable projector which is another device that I am testing, along with a 4K Roku Stick with its power adapter plugged into the AC port. I also plugged in my smartphone to charge while binge-watching NCIS: Los Angeles via the projector. After about 6 hours of the three devices being connected to the iMuto, it seemed to have barely moved off of 100% charge. While it is easily noted that these devices do not require much power, it is exactly these types of devices that I would use this power supply for. I do not own a portable fridge nor would I likely use it for such a device. Rather, my use involves keeping 3 to 4 tablets charged, along with a couple of smartphones, a couple of camera batteries via their respective battery chargers, while powering things like my projector and Roku/Amazon sticks, etc. Occasionally, I would also need to plug in a laptop for extended use for editing or as a slideshow video source either directly connected to a TV or a projector. It may take me some time to really add a formidable stress load to “push” the capabilities of this power supply, but from initial impressions, this device is great.
The iMuto S5 is also very solidly built and is likely to withstand life inside of one of my gear bags. For my use, it is not the device that I would carry in my backpack unless I really had to. It does have some weight to it and would add too much more weight to my already heavy backpack. For this reason, a home in my gear bag will work better for me.
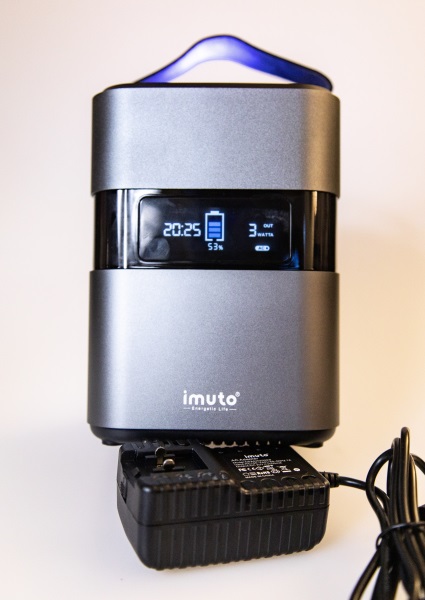
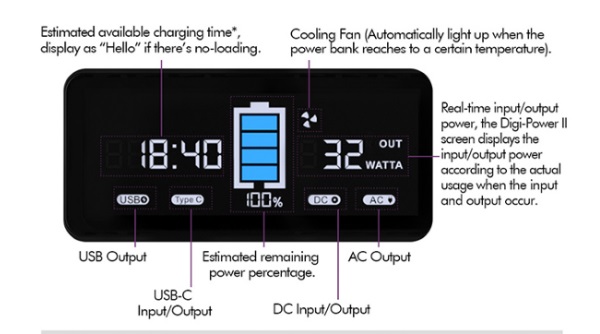
The picture below shows the LED display when the iMuto is fully charged and without any load plugged in. The second picture below shows all of the information that would be displayed depending on what is plugged into the iMuto.
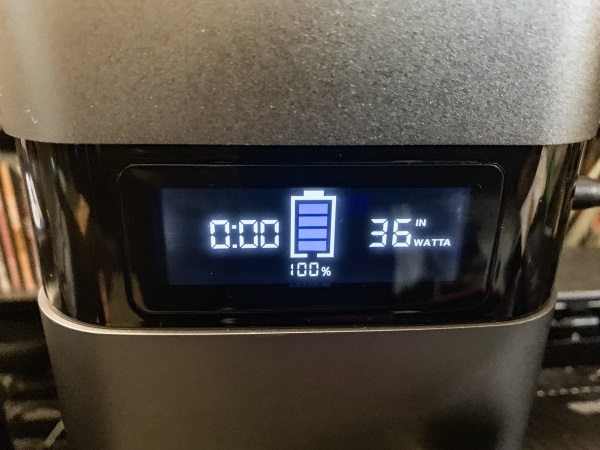
On top of the power station, there is the AC plug and the switch that allows you to control power to it independently. There is also a Blue LED that lights when the switch is turned on.
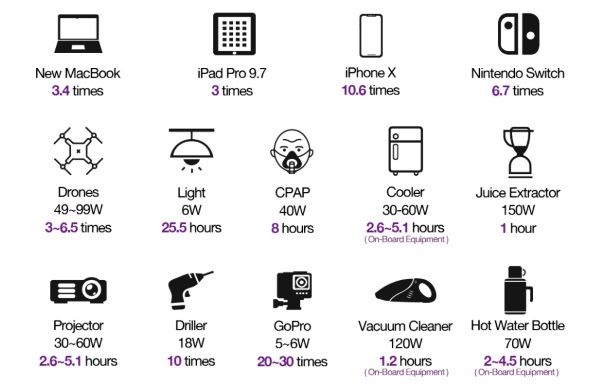
The chart below provides some information on the approximated/expected charging/powering capabilities of this iMuto Power Station.
At the time when I received this device for testing, iMuto was not yet able to provide the complimentary solar panel for review and testing.
What I like
- The build quality
- The built-in battery capacity
- The Solar Panel charging option
- The types and number of outlets
- The size
What can be improved
- The solar panel should be included
Final thoughts
I have been lucky enough to test a few portable battery packs/devices like this one, and so far, this one is my favorite. The capacity of the built-in battery along with the types of power ports make it a really useful addition to my gear bag. I also love that I am able to plug in my small portable projector and my Roku or Amazon Stick and head outdoors or anywhere else without worrying about power or more importantly the longevity of my power source. The overall build quality is very solid and unlike others that I own that feel like plastic toys. I am giving this one two thumbs up!!
Price: Pledges start at $229 with rewards estimated to ship in August.
Where to buy: Indiegogo
Source: The sample for this review was provided by iMuto

SOARAISE Solar Charger Power Bank - 48000mAh Wireless Portable Charger Built-in 4 Cables and 4 Solar Panels, PD QC 3.0 Fast Charging USB C Battery Pack with Flashlight for Camping Travel
(as of June 21, 2026 09:13 GMT -05:00 - More infoProduct prices and availability are accurate as of the date/time indicated and are subject to change. Any price and availability information displayed on [relevant Amazon Site(s), as applicable] at the time of purchase will apply to the purchase of this product.)![[22.5W Fast Charging Portable Charger]: This portable phone charger combines the most advanced PD 3.0 and QC 3.0 fast charging technologies, supporting charging speeds up to 22.5W. Charge your iPhone 14 up to 60% in just 30 minutes, no need to wait f...](https://m.media-amazon.com/images/I/51cAlcHsa5L._SL160_.jpg)
Now retrieving an image set.
Gadgeteer Comment Policy - Please read before commenting
this is NOT a review. This is an overview. It is like many amazon Vine reviewers recycling PR material. Where is your testing? How did you evaluate OCP or the PD control chip implementation or critique of circuit?