REVIEW – Blinkers Laser set adds turn signals and a laser to a bicycle lighting system providing a lot of bang for your Euros. Read on to find out more.
What is it?
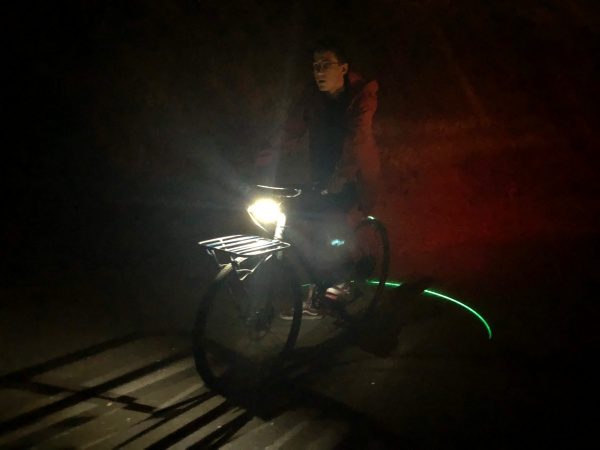
Blinkers Laser Set is a bicycle lighting system that includes front and rear lights, turn signals and a rear high-visibility laser that casts a bright green arc on the pavement behind you to increase your visibility to cars and pedestrians. Sound interesting? I thought so too. Let’s take a look.
Hardware specs
- White LEDs in the front light with amber turn signals
- Red LEDs in the rear light with amber turn signals
- Green laser projection from rear light
- Rechargeable lithium-ion batteries
- Micro-USB charging ports (behind rubber port covers)
What’s in the box?
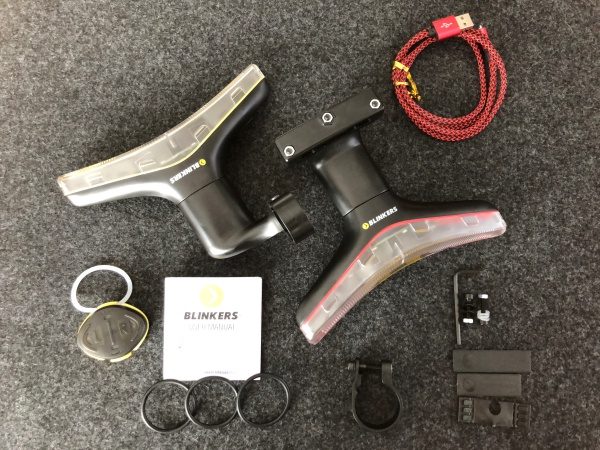
- Front Blinkers Light and mount with two handlebar clamps and hardware
- Rear Blinkers Laser Light with seat rail mount with hardware
- Handlebar-mounted remote control with retention O-rings
- Spare hardware and Allen wrench
- USB cable for charging
- Instructions
Design and features
Bicycle lights have seen a lot of invention over the years and while LED technology has brightened things up for quite a while now, there’s a lot more opportunity to create a safer biking experience. That’s what Blinkers is going for. Let’s see what we have here.
First off, there’s a distinctive arrow-head or mustache look to the lights. While the visual may be hit or miss, it’s really the technology we want to dive into. Both the front and rear light use LEDs for lighting which results in some significantly bright lights.
The lights are also fully sealed from any kind of water ingress with the micro-USB charging port needing a simple tethered rubber plug cover to keep moisture at bay. The lights do not have an on/off switch per se or any kind of controls on the light, as they automatically come on when slid into the magnetic mounts. A sort of soft trapezoidal shape in the mount only allows the lights to be attached in one orientation keeping things simple.
Setup
The installation will vary a little bit depending on your specific bike and your components. Blinkers have included what you’ll need to save a couple of specific scenarios that I’ll mention as we get to each one.
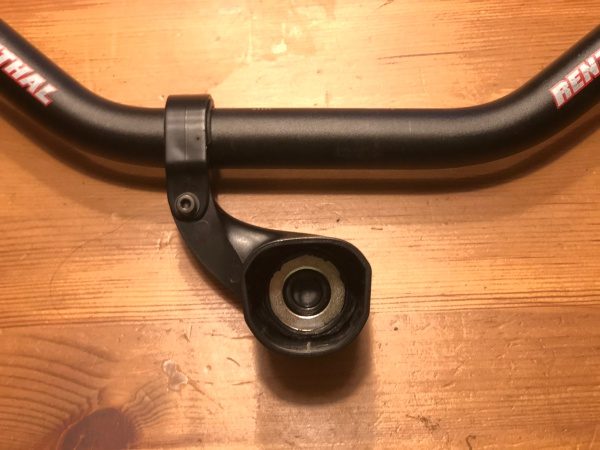
For the front light, it’s mounted off-center to the left of your stem looking at the front of your bike. Choose the large clamp if you’ve got bars that swell to a 31.8mm diameter, or the smaller clamp if you’re running a smaller bar. Choose one of the two small rubber strips to add some cushion and friction, placing the raised edges upward so the clamp traps the strip. The Blinker only fits into the clamp one way, so take a look at that closely before proceeding. Take care not to over-tighten as the clamp will snap (as I found out). I was running a 22mm Renthal bar with no diameter change where I couldn’t quite get the clamp tight enough. I solved this with a 22-25.4 shim and a strip of gaffer’s tape around the bar to slightly increase the diameter. In the review below, I’m using the large clamp on a Jones H-Bar that is 31.8mm and I’m using the thinner rubber strip.
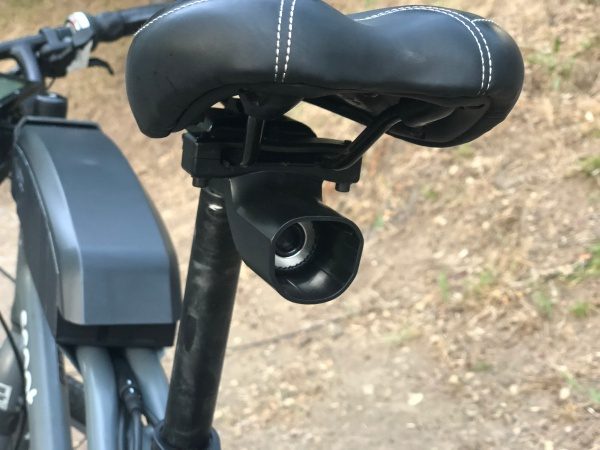
The rear light mounts onto your saddle rails. Unless you have your seat adjusted all the way forward, you should have plenty of room to mount the rear Blinker. There’s a small rubber strip that needs to be placed on the underside of the rails for traction that can be a bit finicky, so just make sure to keep an eye on it. Mount the screws finger tight, center first, then installing the two outside screws and adjusting the position. When you’ve got it where you want it, tighten the outside screws firmly, then tighten the center screw so that the mount slightly bows. Over-tightening this screw will crack the top bracket (as I found out). Blinkers do make a rear mount specifically for rear racks if you’re running one. You can pick one up on their site.
The remote has a curved underside to fit on your handlebars provided you have the real-estate. I have probably the worst case scenario as I’ve got an ebike with a power button, separate brake and shifter mounts, a throttle and a bell. Ultimately I was able to slide my brake lever off, slide an O-ring onto my brake lever and then reinstall letting the remote rest directly on the brake clamp which worked well. On receipt of this Blinkers set, there was a separate clear O-ring with a little fortune cookie note saying to please use this instead. Out of curiosity, I tried the black O-ring and over a weekend in the garage, it split. No such problem with the clear one so looks like they’ve got that fix working.
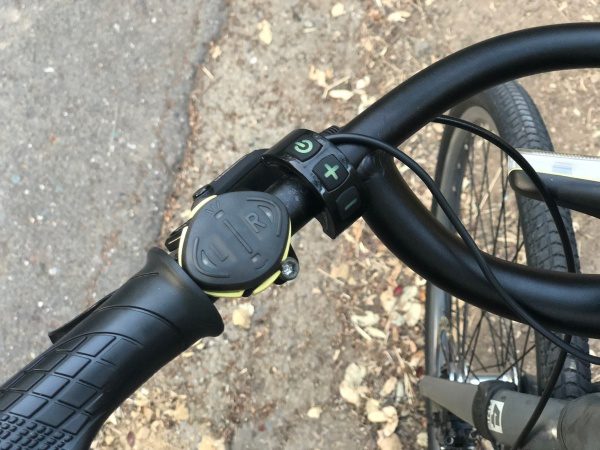
The final step is pairing the remote to your lights. Here are the steps as Blinkers describes them…
- Make sure your Blinkers are charged.
- Connect Blinkers to USB cables or plug them into the mounts.
- Press the upper and lower buttons of the control pad for 3s until the “L” and “R” lights turn on.
- Start with the rear light and bring the remote close to the Blinker (~10cm) and wait until the lower green light on the remote control turns on.
- Bring the remote close to the front Blinker (~10cm) and wait until the upper red light of the remote turns on.
- Finally, all the lights of the remote control will start blinking meaning that everything is paired.
Performance
Okay, so I immediately need to mention how cool it is that these lights function with a magnet and a hall-effect sensor. All you have to do is start to place each of the lights into its mount and it will be sucked in by the magnet with a satisfying thunk, the light immediately comes to life. Its startup amber lighting also gives you a clue of how much charge you have left with the left side being zero and the far right side being full. Having used a number of lights over the years, it can be very easy to forget to turn lights off or forget to remove them when locking your bike up. Blinkers are not small, and they’re bright so it’s hard to not notice that you’re about to leave them behind. Secondly, the magnet makes them so easy to remove that there’s no excuse not to do so.
Pressing the upper button toggles the front light from solid to flashing to an interrupted flash to off. A long press will put the front light into an “emergency” mode which is basically like a hazard light. A long press again disables that light. Here’s a video that runs through all of that with the front light.
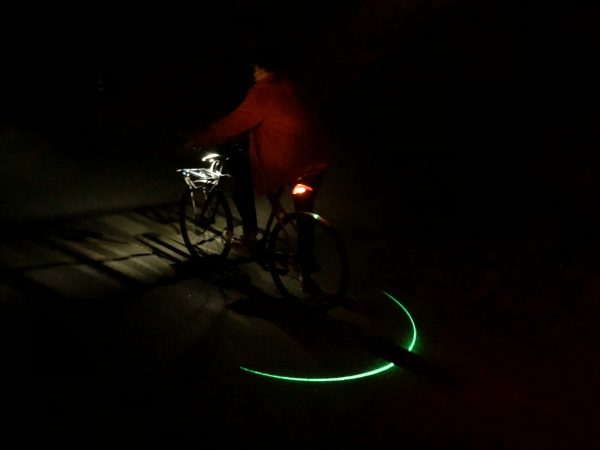
Pressing the lower button toggles the rear light from solid to flashing to an interrupted flash to off. A long press turns on the rear laser which casts a bright green arc on the pavement behind your rear tire. It projects a little closer to the bike than I would have imagined and the only way to change that would be to change the angle of your saddle as there’s no adjustment in the mount itself. The gap in the arc below is where the light is being interrupted by my rear tire.
The left and right buttons activate your turn signals which fire simultaneously on the front and rear lights. Another press turns them off, or they will automatically cease after 12 seconds. If you anticipate a longer wait before turning… a longer press will deactivate the 12-second timer.
In daylight, you’ll want to use the flashing modes to increase visibility. There’s a couple things to know about the rear laser. First, it isn’t visible during the day so you might as well save some battery and leave it off. Second, it will time out after 12 minutes. Blinkers say this is a safety feature as lasers do generate a lot of heat. As a safety feature of being seen, however, this seems like a fault to have it time out. The only way to tell that it’s stopped is to notice that the blinking light on the remote has also stopped. I also wonder why the laser function is not also available on the front light. At night, the lights are super visible from a good distance. I’d estimate 40-50 meters in really dark conditions. Here’s a video shot at night where you can get an idea of visibility.
What I like
- Magnet mounting feature with the auto-on function
- Turn signals for letting cars know you’re turning
- Bright visible lighting
- Cool laser function for increased visibility
What needs to be improved
- The mounts need to be stronger
- Would like a 2nd USB cable for charging
- Would like to see no timeout on the laser
- Would like to see a laser on the front light
Final thoughts
Lights are a very important part of using a bicycle. Blinkers have created a great light system that provides great lighting with the added functionality of both turn signals and a rear laser that helps create even more awareness directly around you. Their unique mounting system makes is easier to take them with you after parking your bike, and almost instantaneous as you start to ride. If their size and look isn’t an issue for you, it’s a great solution. It may be summer and full of long days, but this set will stay on my bike and I’m looking forward to seeing further ahead and being more visible as the days start to get shorter.
Price: €120
Where to buy: Blinkers.bike
Source: The sample of this product was provided by Blinkers.
L39 Ultra Slim UV Protective Filter for Leica Q3 43 Q2 Camera with Moisture-Proof Case & Removal Tool 19 Layers Mulit-Coated UV Ultraviolet Filter 99.3% Light Transmission Water Oil Scratch Resistant
(as of April 7, 2026 14:27 GMT -05:00 - More infoProduct prices and availability are accurate as of the date/time indicated and are subject to change. Any price and availability information displayed on [relevant Amazon Site(s), as applicable] at the time of purchase will apply to the purchase of this product.)
Gadgeteer Comment Policy - Please read before commenting
In my opinion, the blinkers are too close to the front and rear light, so that other drivers cannot see clearly, where I want to drive. It would be better to mount them at the end of the handlebar.
The company does not stand behind their product. An early batch of laser rear Blinkers had a design flaw that kept the laser diode energized at all times, slowly sucking the battery down even when turned off. They admit they messed up, but American buyers are stuck paying the $25 postage to ship it back to Zurich for exchange. They refuse to reimburse the shipping even though they admit they shipped a defective product. That’s unacceptable for a $150 light. Caveat emptor.
I find the timeout feature on the turn indicators to be about half as short as it needs to be.
The turn indicators will automatically turn off about 7 seconds after they are engaged. 7 seconds is extremely quick for even a car. For a bike, 7 seconds goes by in the blink of an eye. It often takes me more than 7 seconds simply to brake for the stop sign, let alone wait for my turn to go and then also to move through the intersection.
Unfortunately I am unable to find an option that allows me to disable or lengthen the timeout feature. As it stands now, I usually have to press the turn indicator button 2-3 times each time I encounter an intersection, which is anything but convenient.
I would love to see a future version of Blinkers with a 20-30 second timeout feature for the turn indicators.