 As a child long, long, long ago, I remember longing for a microscope in order to study things that were too small for me to see and tragically, I never received one. I now have a marvelous stereo microscope but it is too large and heavy to carry around with me to investigate things while I’m outside. When the My First Lab STEM Starter Kit: Smartphone Microscope and 3D Slides came up for review, it piqued my interest. I eagerly volunteered to review this tiny microscope. After receiving it, I discovered that it is a clever little microscope that works well magnifying small objects, is easily portable, and it allows you to take pictures of your microscopic adventures using your phone’s camera. Perfect for a big kid like me.
What is it?
The My First Lab STEM Starter Kit: Smartphone Microscope and 3D Slides is a science, technology, engineering, and mathematics (STEM) kit that includes a clip-on smartphone (or other mobile devices) microscope and 3D slides. The slides are paperboard slides with small items glued to them to observe using the microscope.
What’s in the box?
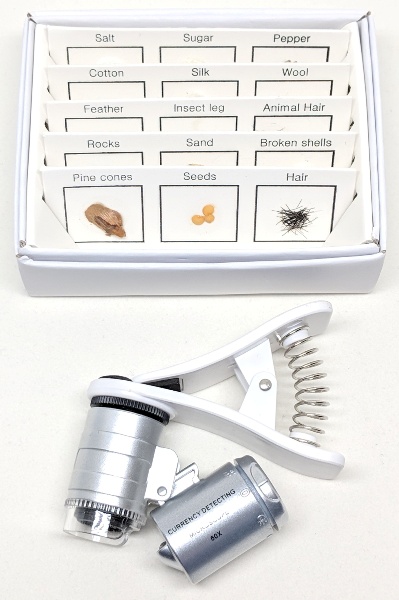
- My First Lab Smartphone Microscope (60x magnification – with the aid of your phone’s camera zoom)
- LED light and UV light are attached to the microscope (LR1130 button cell battery is replaceable)
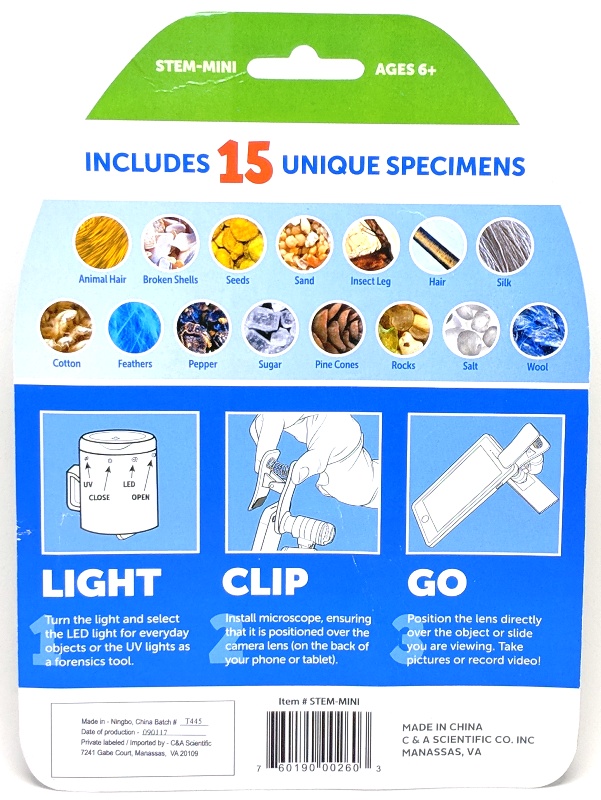
- 3D paperboard slides which contain 15 specimens to observe
Design and features
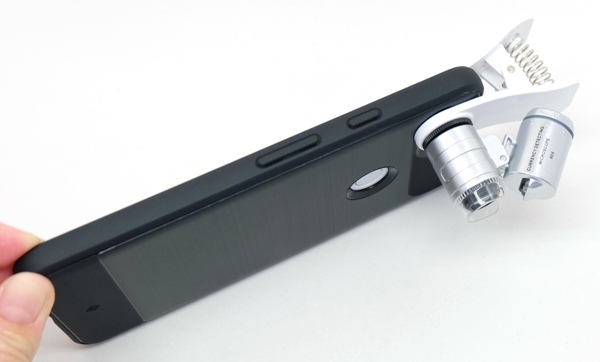
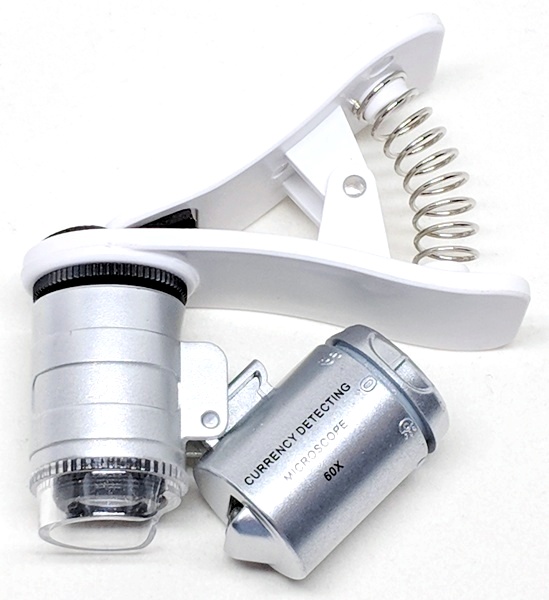 The smartphone microscope appears to be made out of silver colored hard plastic. It has a clear plastic ring over the end of the microscope to protect the lens. The smartphone microscope is mounted to a white plastic clip and rotates at this juncture. The clip that holds the microscope to the mobile device has black foam padding on both sides. This keeps the microscope from sliding around on your device and it helps to avoid damaging your phone.
Attached to the microscope on a rocker mechanism is the LED/UV light. There is a cap/dial on the end of the light that you’ll need to twist (you might have to push in and twist) to turn on or off the lights or change the battery. To access the dial, you’ll first need to rotate the whole assembly out from under the clip.
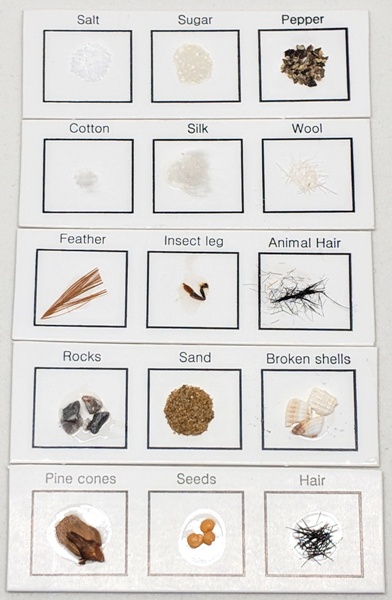 In addition to the microscope, you receive 15 specimens to study mounted on paperboard slides. They include samples of salt, sugar, pepper, cotton, silk, wool, a feather, insect leg, animal hair, rocks, sand, broken shells, pine cones (seed?), seeds, and hair.
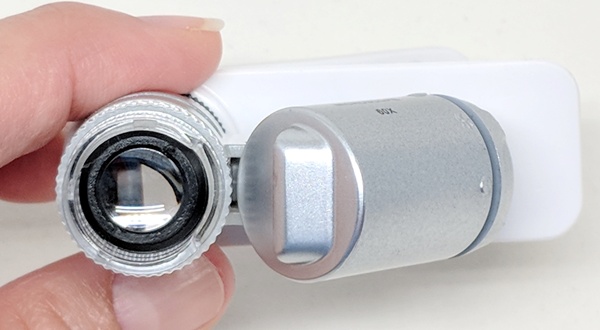 In the photo above, you can see the microscope lens used for magnification.
 The above photo shows that the light contains three LED bulbs.
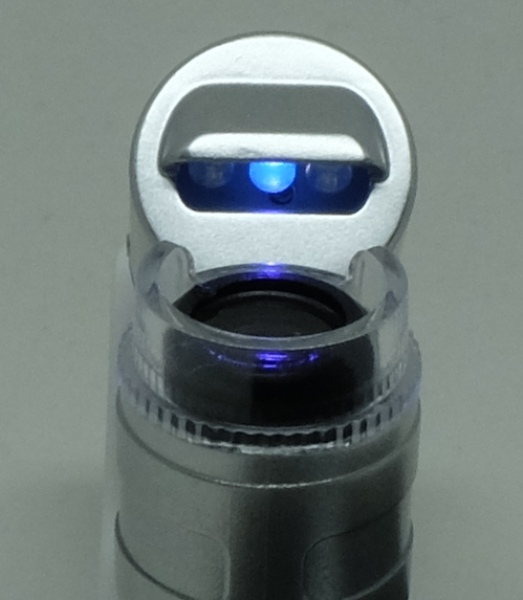 The center LED is the UV light.
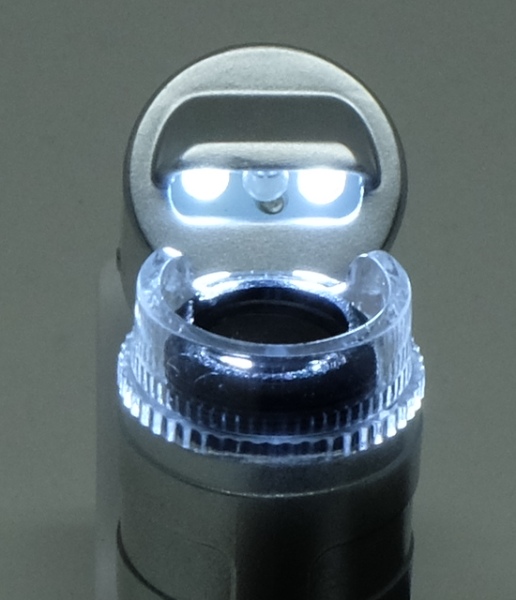 And the everyday use lights are the two outer LEDs.
 When the cap/dial is removed from the light, you can access and replace the LR1130 button cell battery when necessary.
How to use the microscope
 The back of the packaging contains the instructions for using the microscope and LED lights. When you clip the microscope on your mobile device, you need to make sure that the microscope covers the camera lens. NOTE: Your camera lens must be within about 2.5 cm from the edge of your phone to use this microscope. The clip will not reach farther. Moreover, my phone only has one camera, so for those of you who have more than one, you may have to experiment which lens to place the microscope over.
The packaging also tells you the correct positions of the dial to turn on the UV light, turn off all lights, turn on the LED lights, and open the battery compartment.
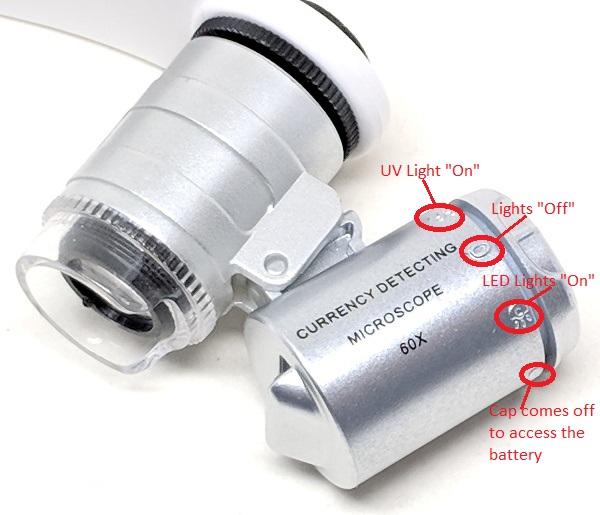 First of all, you’ll need to turn on the LED lights to observe an object. Starting at the very top of the light is the UV light “On” position, the zero represents the “Off” position, the shining icon represents the LED lights “On” position, and the last position allows the cap to come off to replace the battery. To turn on the lights you’ll need to twist the cap to the desired lights “On” position. Again, you may have to push in and twist to do this.
 Next, you need to clip the microscope lens over your mobile device’s camera lens.
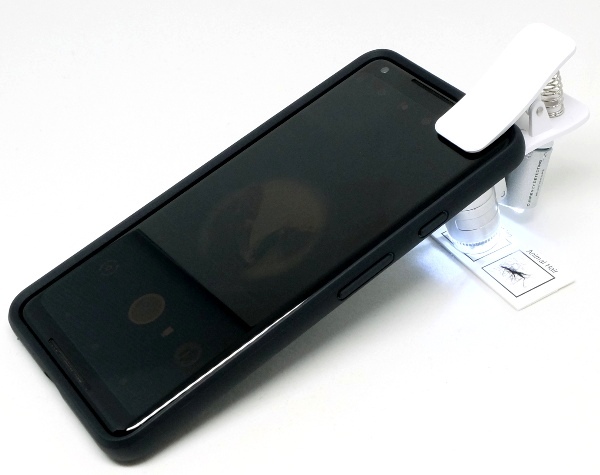 Finally, to view any specimen, you must place the end of the microscope’s clear plastic ring directly onto the surface containing the specimen to obtain a clearly focused subject. You may increase this distance a maximum of 1 cm by gently pulling the microscope away from the clip, though I never needed to do this. This ring not only protects the microscope lens but also helps place the specimen at the correct distance from the microscope for the clearest view.
Use
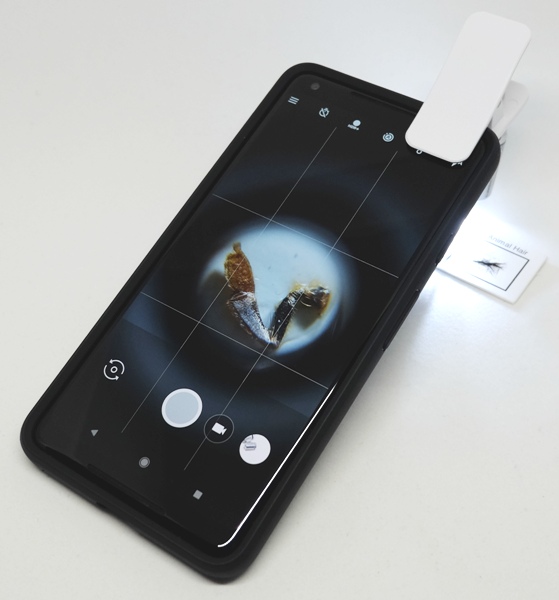 When I first used the microscope with my Pixel 2 XL, I used it to study all of the specimens on the prepared slides. The above photo illustrates the magnified view of the insect leg specimen included in the kit. The above photo does NOT include any additional magnification from my camera’s zoom.
 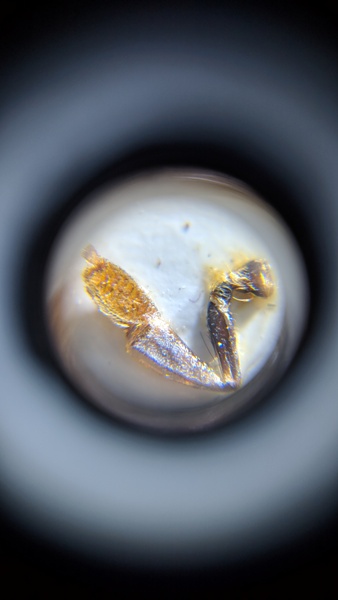 I used my phone’s camera to take a photo of the microscope’s magnified view. I think this magnification is about 10x.
Even though the microscope says it magnifies objects by 60x, I think the My First Lab company assumes that you have a camera zoom and takes that into account when calculating the total magnification of the microscope. That means if the microscope has a magnification of 10x and your phone magnifies 6x, then the total magnification is 10 x 6 = 60x. This is why I think the microscope, by itself, magnifies 10x.
 My Pixel 2 XL magnifies objects by 7x, so my total magnification may be about 70x as shown above.
The above photo is actually the pollen comb of a honey bee’s hind leg. It is also the first tarsal segment of a honey bee foot. The bee brushes all the pollen off her body and places it in the pollen basket just above this segment. Those are the clumps of yellow you see clinging to honey bees’ hind legs. Unfortunately, the rest of the foot (tarsal segments) of the bee’s leg was broken off on my specimen. But WOW, it’s fascinating being able to see the detail of the pollen comb using this tiny microscope’s full magnification!
The next few photos are of insects from an insect collection I made while in graduate school studying entomology.
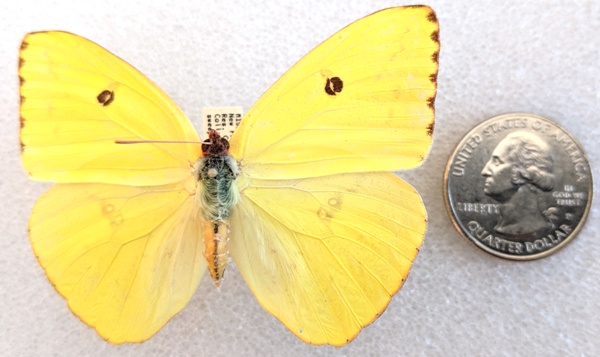 This is a normal photo taken of a sulfur butterfly (family Pieridae). My camera was about 5″ away from the subject. You can tell the butterfly’s relative size when compared to a quarter.
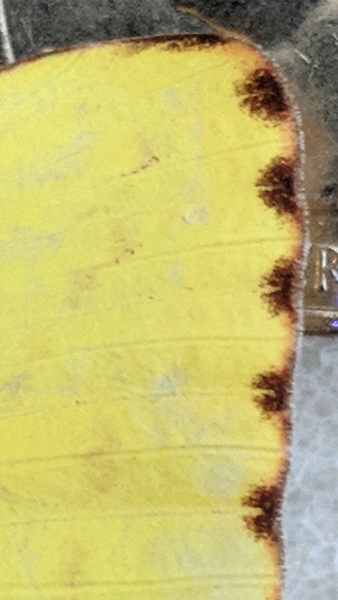 Using just my camera’s maximum magnification (7x) without the microscope, this is what the butterfly’s wing looks like with the quarter in the background.
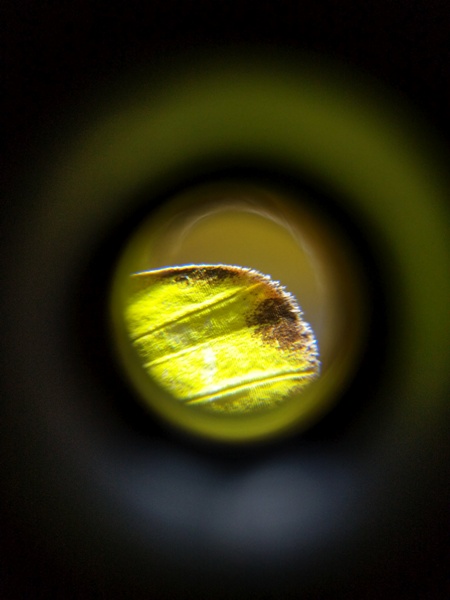 This is the view of the wing after attaching the microscope to my phone (without camera magnification).
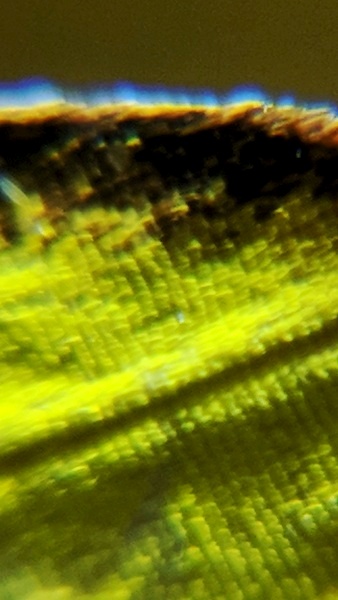 This is the view through the microscope with the addition of my camera’s maximum magnification. It is difficult to get a crystal clear, focused picture of any specimen using the maximum magnification of this microscope. However, it makes a great companion while you explore the outdoors because it is small and portable.
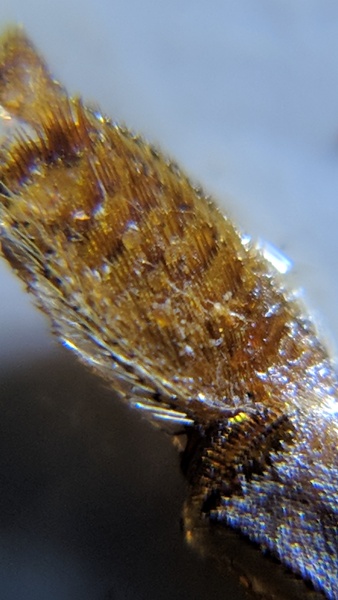
My larger, heavier microscope has infinitely better optics and provides 90x magnification to obtain a crystal clear magnified image. However, I do not have the equipment to take photos of what I see while using my larger microscope.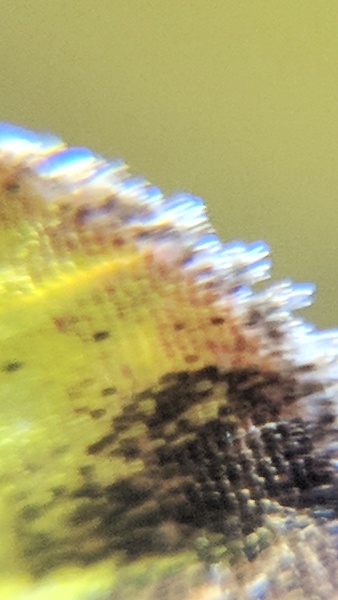 I took a picture of another area of the wing using maximum magnification (microscope + my camera’s zoom). Look at the details of the scales and the fringes of the wings! Isn’t that magnificent?
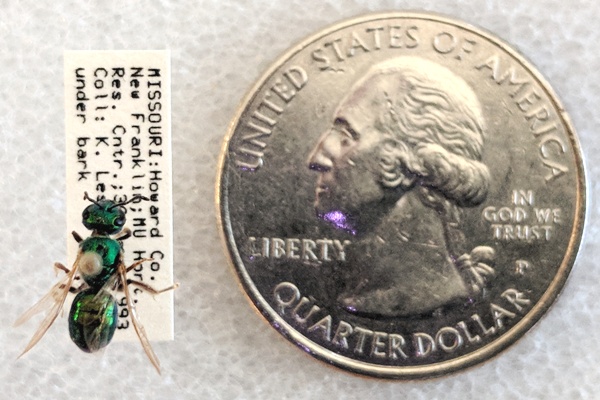 Next is a photo of an iridescent bee from the insect family Halictidae (the family of sweat bees). This photo illustrates how large this bee is in relation to a quarter. My camera was about 5″ away from the bee.
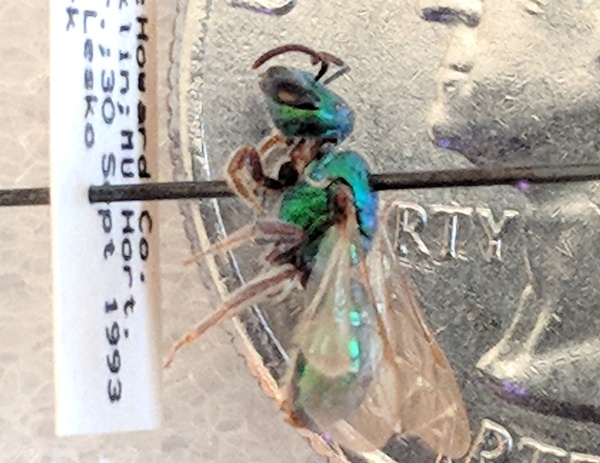 This is another photo of the bee using my camera’s maximum magnification (without the microscope).
 I then attached the microscope to my phone and took a photo (no additional magnification from my phone’s camera).
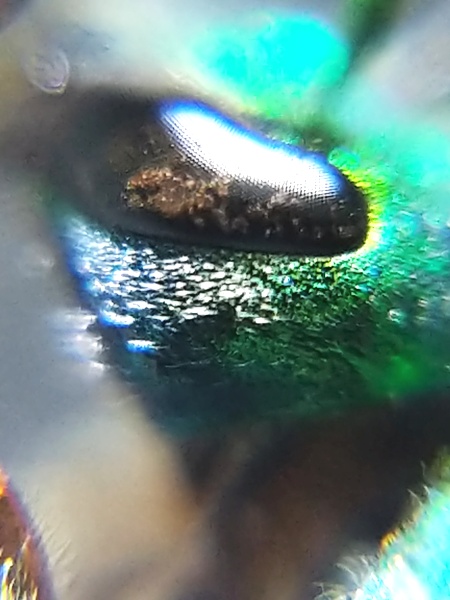 Here is the same bee magnified to about 70x (microscope + camera magnification). I really like this little microscope! You can tell that the compound eye is made up of hundreds of ommatidia – so cool.
Overall, I found that the microscope worked really well for me as long as I placed the clear plastic ring directly on the surface containing the object I wished to see. Every now and then, the LED lights flickered but this was easily addressed by adjusting the dial on the light. I did not use the UV light, but you could use it to look at the patterns on flower petals that only show up under UV light.
What I like
- The microscope and LED lights work well
- Microscope magnification + phone magnification ≅ 60x total magnification
- You may use your phone’s camera to take pictures or videos of your specimen
- There’s foam padding on both sides of the clip to keep the microscope from sliding around and to prevents scratches
- It seems durable
- It’s small and portable
- Inexpensive
What needs to be improved
- Don’t expect crystal clear images when using the highest magnification
- Your camera lens must be within about 2.5 cm from the edge of your phone to use this microscope
Final thoughts
I really enjoyed using the My First Lab STEM Starter Kit: Smartphone Microscope and 3D Slides. The kit includes a small microscope that is perfect for kids ages 6 and up (or big kids like me). In addition, the kit also comes with five prepared paperboard slides which have a total of 15 specimens to study. However, it is important to know that the purpose of the microscope is to magnify macroscopic objects or organisms (things that can be seen with the naked eye). It will not magnify microscopic organisms enough to for you to see (like those in pond water – you’ll need a compound microscope for that).
This microscope is easy to use; works well; is small, portable, and durable; allows you to take pictures of your microscopic adventures (YES!!); and has a replaceable battery for the LED lights. I would have LOVED receiving this as a kid!
NOTE: you may purchase just the microscope without the slides for only $11.
Price: $17.99 (kit) or $11.00 (microscope + LED light only)
Where to buy: Amazon (kit) or Amazon (microscope + LED light only)
Source: The product used in this review was provided by My First Lab.
![[MINI SIZE. ULTRA PORTABLE CHARGER]: Roughly the size of an AirPods Pro case, this smallest power bank packs 10,000mAh of long lasting power into a tiny, nano footprint. Easily slide this ultra slim, credit card size charger into your skinny jeans, a...](https://m.media-amazon.com/images/I/41rATpm6dyL._SL160_.jpg)
Now retrieving an image set.
INIU Portable Charger, Ultra Mini 10000mAh 45W Fast Charging with Detachable Cable, Flight-Safe Travel USB C Power Bank External Phone Battery Pack for Xiaomi iPhone 17 16 Samsung S26 Google iPad etc
(as of July 13, 2026 18:57 GMT -05:00 - More infoProduct prices and availability are accurate as of the date/time indicated and are subject to change. Any price and availability information displayed on [relevant Amazon Site(s), as applicable] at the time of purchase will apply to the purchase of this product.)
Now retrieving an image set.