Product Requirements:
Device:
Windows 98 or higher
I do a lot of scanning of documents as I hate keeping paper. I don’t mind the
mundane and mindless activity of scanning but I (more so my wife!) do not like
to be stuck to my PC and trusty flatbed scanner for long periods while scanning.
Along came Ambir Technology’s
TravelScan XP 600dpi portable scanner …. it was hard to resist and I quickly
ordered one!
First Impressions
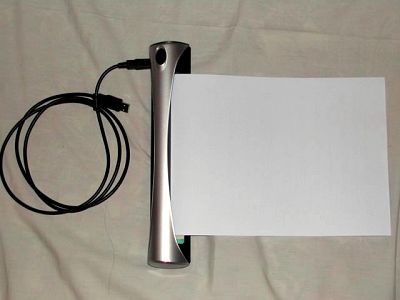
You really have to hold the scanner in your hands to appreciate its compactness
and how well it is built. Weighing only 390gm (12oz) and measuring 44 x 51 x
292mm, it really is not much larger or heavier than a pocket umbrella (see
picture). If you can fit an umbrella in your bag or briefcase, you can fit the
TravelScan XP! I really liked the solid, compact feeling and smooth finish of
the scanner.
The little piece of wood and green blob of Blu Tak on the left of the scanner
was an add-on but more of this later.

There is only 1 socket on the scanner – this is for the USB interface cable
which also supplies the power to the scanner. The good thing is that there is no
additional power adapter to lug around – this would have made carrying the
scanner a lot more cumbersome.
There is only 1 button on the scanner this is to "quick launch" the imaging
software. Have not used much of this at all as it is not difficult to fire up
Page Manager directly from the Laptop/PC prior to scanning.

The scanner comes with a classy black carrying case, a 1.5m USB cable,
Presto! Page Manager 6.0 software to manages the scanning, calibration paper and
a cleaning cloth.
Key Specifications
The scanner scans a maximum area of 8.5” x 14” (legal page) and paper thickness
of between 0.1 and 0.6mm which should be adequate for most on-the-run scanning.
Resolution is 600 x 1200dpi. Scanning speed for a Letter sized sheet is quoted
at 10 seconds. Speed has not been an issue for me.
Setup
Setup of the hardware and software is similar to that of other USB devices. One
additional step to calibrate the scanner was required – this involved feeding
the calibration paper through the scanner. No drama with this. The manual
recommends that this calibration be done after scanning 500 sheets or monthly to
maintain image quality but have not reached this to be able to verify the need
for this.
Bundled Software
I liked the bundled Page Manager software. Much better than the HP PrecisionScan
software that drives my trusty HP flatbed scanner at least! I seem to have
easier and better control over all the critical scan settings. Several default
scan settings are provided but it was easy to customize a setting to suit my
specific needs. The software also has other document management capabilities to
manage scanned documents but I have not had any immediate need for this. There
was also no problem scanning an image directly into Adobe Acrobat which was
important to me.
Scanning Documents
Scanning using a sheeted scanner is really quite a different experience from
flatbed scanners and was not quite as easy as I thought it would be. To be
honest, I was not quite prepared for the change and it took a bit of getting
used to.
To scan a sheet, you slide the sheet into the scanner with the printed side
faced down until you hear a “paper-in-place” beep and the sound of the rollers
gripping the sheet. Hit the Scan button on the PC/Laptop and the sheet
automatically feeds through the scanner.
I was pleasantly surprised by the low noise level as the sheet is fed through
the scanner. Your colleague in the next office cubicle would probably not hear
the scanner running or at worst, not be irritated by it.
Some Practical Considerations
This sounds awfully simple but there are practical realities that you need to
contend with if you are used to working with flatbed scanners. This is to be
expected as flatbed and sheet fed scanners fundamentally work differently. In
flatbed scanners, the sheet stays static and the scanning sensor moves up and
down the length of the sheet. In sheeted scanners, it’s the other way around –
the scanning sensor stays static and the sheet moves as it is “fed through” the
scanner. It took me some days to reconcile with this ….
Apart from one gripe (which I will outline below), IMHO, I think these
realities are simply inherent in sheeted scanners and are not a reflection of
poor design/quality on the part of Ambir. I really think the TravelScan XP is a
superbly designed and built device.
You need to ensure that there is enough space for the sheet to pass through
the scanner on both sides completely unobstructed – this can be a challenge on a
crowded table. Make sure there are no obstructions, especially the USB cable
which tends to get in the way of the sheet if not carefully tucked away. If the
sheet is obstructed in even the slightest way, the result will be a distorted
scanned image. This can be very annoying if the document is text-based as the
distortion shows up very clearly.
The top of the paper must also be lined up correctly across the width of the
scanner. Other than experience and a good sense of visual alignment between
sheet and scanner (using the sides of the sheet and the scanner, that is – see
picture above), there is no way of knowing that you’ve lined it up straight
until after the sheet is scanned. If it is not lined up properly, you end up
with 1 or 2 problems – the document turns out distorted and/or there is a black
strip at the top of the scanned image. The thickness of the black strip depends
on how badly aligned the sheet was in the first place and could vary between
1-5mm. Getting a document which looks straight from top to bottom may require a
few scans depending on how much of a perfectionist you are!
Scanning documents with sizes smaller than Letter or A4 size requires an
additional step as the empty area (Letter or A4 minus the actual size of the
document) will turn out pitch black on the scanned image. This is unlike flatbed
scanners where any excess area is white due to the presence of the lid on top of
the document. You will need to crop off the unwanted black areas, thus adding
one extra step. If you mostly scan documents on standard sized paper, this is
not a major issue. One workaround for this is to setup the page size in
PageManager to fit the smaller document but this is really not practical.
My biggest gripe with the TravelScan XP is the fact that it has no side paper
guide on the left of the scanner to ensure that the sheet travels through the
scanner in a straight line. This is no major issue if the sheet is Letter sized
where the width is 8.5” but this is a real problem when scanning sheets which
are not Letter size. I scan mostly A4 sized documents where the width is shorter
than 8.5”. Despite lining the A4 size sheet tightly to the right edge of the
scanner, the sheet can run as much as 5mm to the left as the sheet feeds through
the scanner. This results in a horribly distorted document and that thick black
strip at the top of the page which results in an unacceptable image.
To overcome this, I used a small piece of balsa wood and Blu-Tak to create a
crude paper guide (see picture).
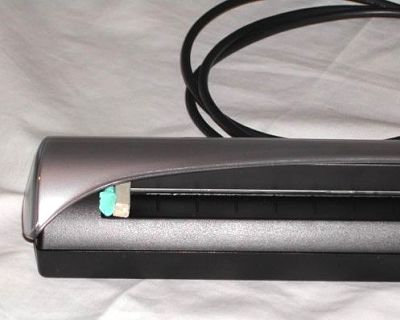
Although this is not the most elegant of solutions, it does the job of
keeping the sheet straight as it travels through the scanner. It also allows me
to continue using the carry case as the mod does not protrude out in any way. I
wrote to Ambir Tech Support on this issue but it has been a month and have not
heard from them. I cannot understand why Ambir did not build this paper guide
into the scanner. After all, not every document that could be scanned is in
Letter size and I can’t see the mod costing too much money.
Practice Makes Perfect …
I found that as I got more experience using the scanner, the better and more
consistent the results I got. A case of practice makes perfect! Scanning is now
a breeze and the number of distorted images have significantly decreased. But I
still restrict the scanning to full-sized A4 documents and save the odd sized
ones for the flatbed scanner – it is less problematic.
I have scanned mostly text-based documents and am really pleased with the
scanned images. They appear extremely crisp, clear and sharp, especially on a
laptop LCD screen. I wonder if this is an attribute of sheeted scanners since
the scanning sensor is positioned very close to the sheet being scanned as
compared to flatbed scanners.
Overall
Despite the practical considerations outlined above, I absolutely, absolutely
love the mobility that the scanner provides. I can now scan documents while in
the office, on the road, while watching TV etc. I also like the feeling of being
able to immediately scan an image of handwritten notes, diagrams etc and send it
out via email or fax wherever I am in an instant. This is the true value of the
scanner.
You could use the TravelScan XP to replace your large-footprint flatbed
scanner and reclaim valuable desktop space but I feel that there is still a need
for a flatbed scanner for reasons outlined above. I thus see the TravelScan XP
complementing a desktop flatbed scanner rather than replacing it entirely, but
your mileage may vary depending on the nature of your scanning needs.
In short, if you (a) do a lot of document scanning (b) do not like to be tied
to a flatbed scanner hooked up to a desktop while scanning, for long periods (c)
are constantly on the move and (d) have had occasions where you just wished you
had a portable scanner, the TravelScan XP is really a desktop-liberating
scanning device that you really should have.
Price: About $149.95
Pros:
Mobile scanning capability
Crisp scanned images
Small & light
Cons:
No side paper guide
Occurrence of distorted images

Gerber Gear Suspension 12-in-1 EDC Multi-Plier Multitool with Pocket Knife, Needle Nose Pliers, Wire Cutters and More, Gifts for Men, Camping and Survival, Grey
(as of May 20, 2026 18:54 GMT -05:00 - More infoProduct prices and availability are accurate as of the date/time indicated and are subject to change. Any price and availability information displayed on [relevant Amazon Site(s), as applicable] at the time of purchase will apply to the purchase of this product.)
L39 Ultra Slim UV Protective Filter for Leica Q3 43 Q2 Camera with Moisture-Proof Case & Removal Tool 19 Layers Mulit-Coated UV Ultraviolet Filter 99.3% Light Transmission Water Oil Scratch Resistant
(as of May 20, 2026 18:04 GMT -05:00 - More infoProduct prices and availability are accurate as of the date/time indicated and are subject to change. Any price and availability information displayed on [relevant Amazon Site(s), as applicable] at the time of purchase will apply to the purchase of this product.)Product Information
| Price: | |
| Manufacturer: | Ambir Technology |
Gadgeteer Comment Policy - Please read before commenting
I wish the review would have contained more about the software that’s included and its functionality. Does it do OCR? Or is it strictly read-only pdf? For example, Neat Receipts can scan a receipt and then import the data to Excel or any other spreadsheet software. Even if you did not test all of the capabilities of TravelScan, at least say briefly what it claims it can do. Can’t seem to find much real info on the web about the TravelScan. Neat Receipts has more info and a better description. The downside to Neat Receipts is that it’s not meant for pics…data & doc mgmt only. Looking for one that does it all (pics, data, doc mgmt). So, please give more infomation in your reviews. Thanks. ~Don
My duaghter gave me a Travel Scan 860 Bus. card scanner some years ago, which i had used a few times. i have found the devise and want to use it again but i do not have the software to load on to my laptop. How can I get this product to work?
I have a travelscan 860 and software CD… I am missing the calibration card. I can you get a copy of the software, can you help me with a copy of the calibration card ?
I use one of the new cordless scanner made by Visioneer.
It scans all my photos and Docs without a Computer Cables or Software.
It’s really portable and comes in a neat bag, but best of all it scans directly to my usb key or memory card my mate scans directly to his android .
I got it off scannersrus.com.au I paid around $290 a few months ago but I think they are now only $217.00 plus $22.00 shipping.
Here is the link
http://www.scannersrus.com.au/shop/item/78-visioneer-mobility-colour-cordless-scanner.html
have fun scanning