REVIEW – Can you smell that picture? It’s grilling season! I’m testing the Kamado Joe Konnected Joe Digital Charcoal Grill & Smoker, which claims to combine the benefits of a ceramic grill with digital control (and a companion app) that makes charcoal cooking effortless. Heads up: we have a lot to cover in this one, so it’s a big review. Grab a beverage and we’ll get started!
What is it?
The Kamado Joe Konnected Joe Digital Charcoal Grill & Smoker is a Kamado-style ceramic grill that leverages a digital control panel, a digitally-controlled internal fan, an integrated electric charcoal lighter, and digital temperature probes to precisely control your grilling sessions. You can monitor all the activities and manipulate your settings from the companion app.
What’s included?
The kit comes with the grill, a multi-level grilling rack, grill grates, ceramic heat deflectors for indirect cooking, an ash removal tool, one digital meat probe, and a gripping tool to move (or remove) the grates. My test bundle also included two bags of Kamado Joe’s Big Block lump charcoal, some fire starters, and an all-weather cover.
Tech specs
Click to expand
18 inch diameter
250 square inches of cooking surface
Temperature range from 225 to 700 degrees
Requires 110-120VAC, 4AMP, 50/60HZ, 500W 3-prong grounded plug to support the heating element.
48″ tall by 47″ wide (with shelves extended)
216 pounds assembled
Design and features
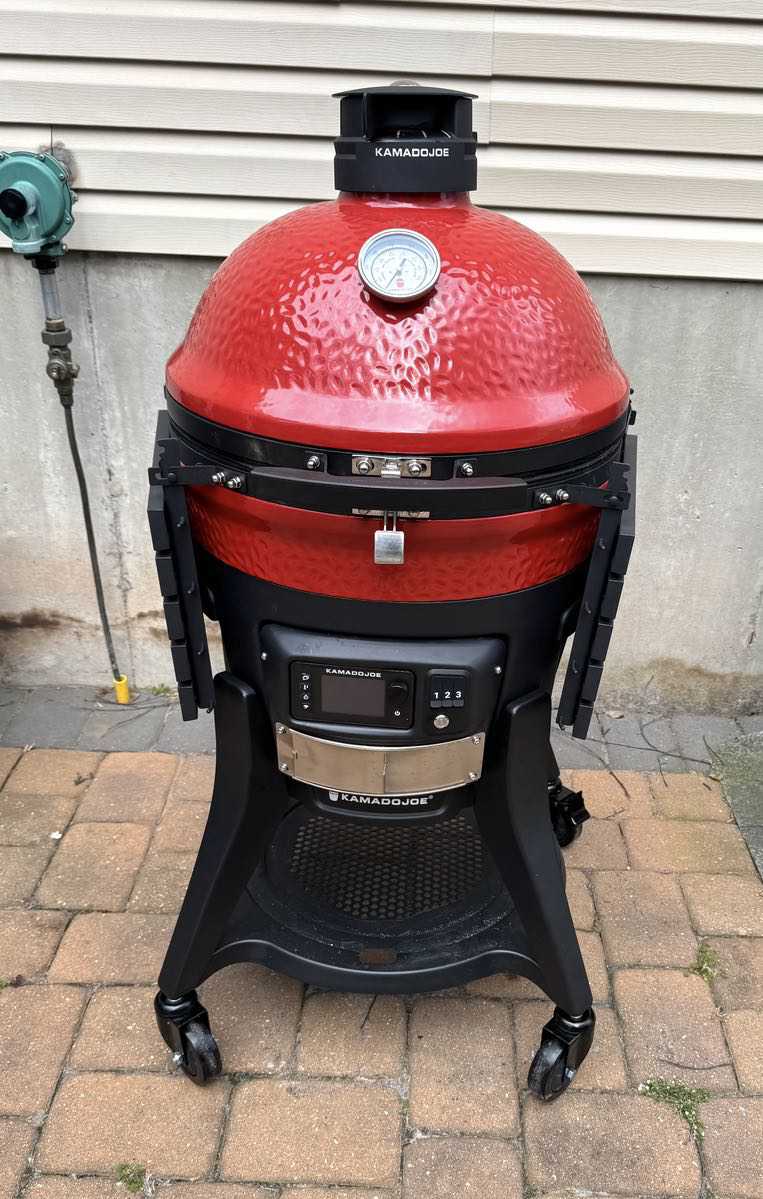
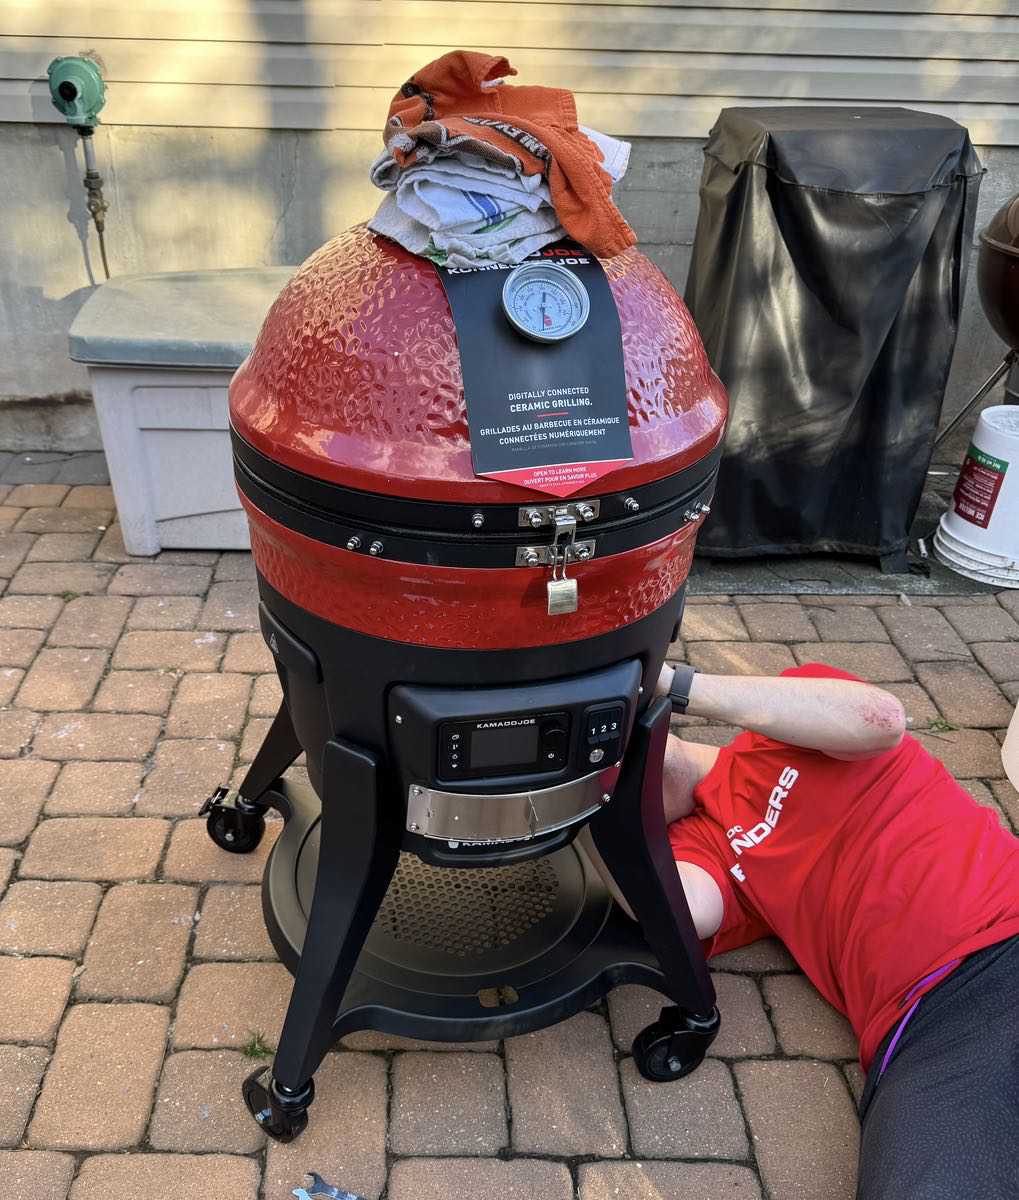
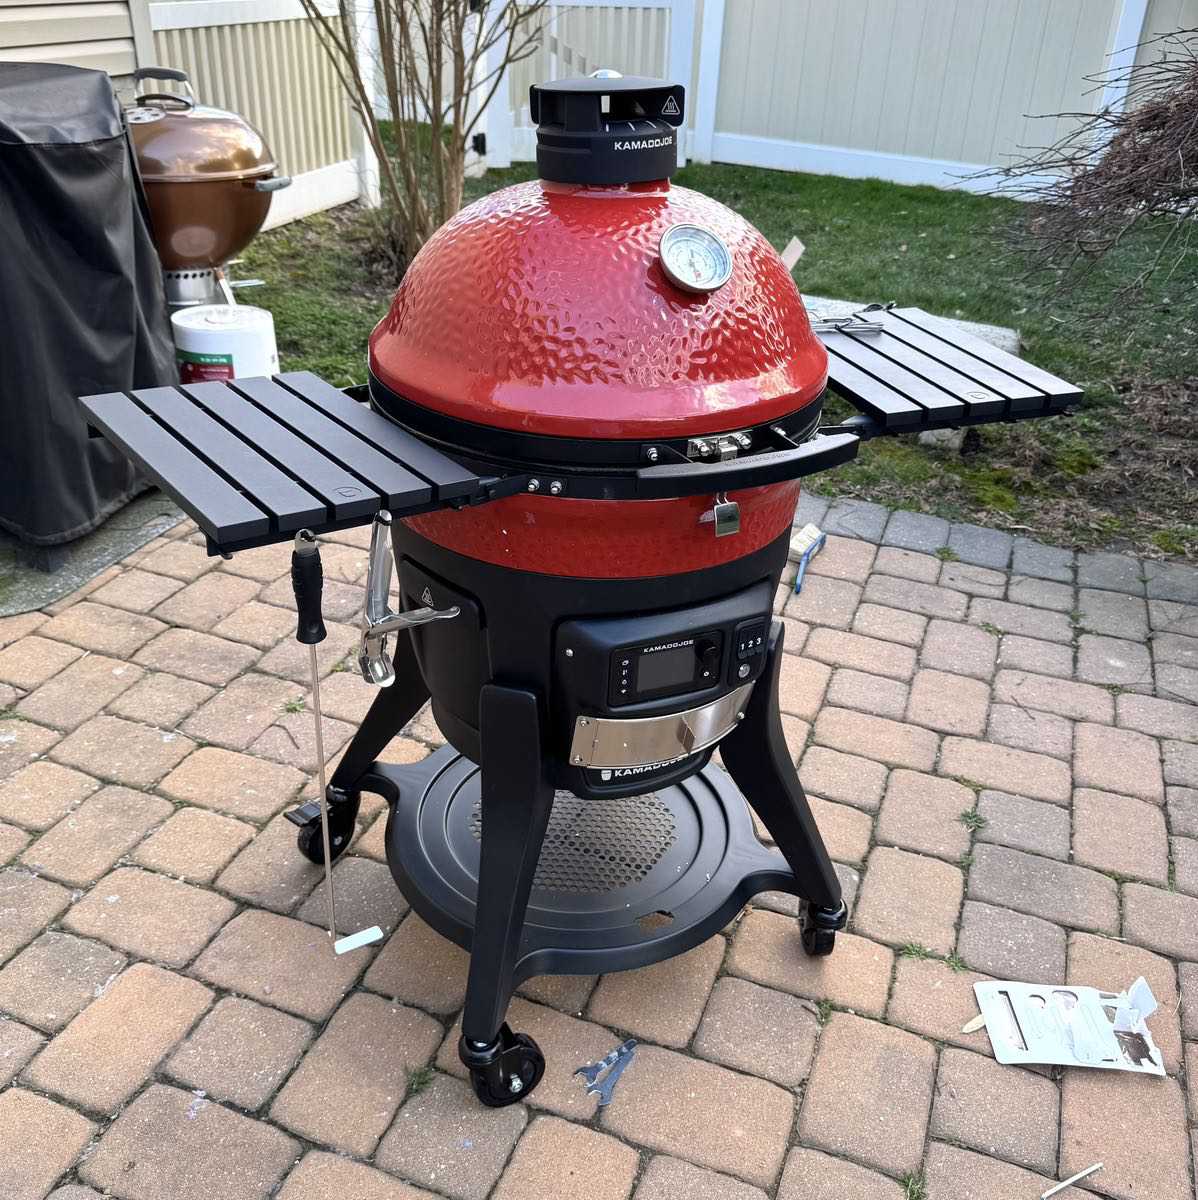
The Konnected Joe Digital Charcoal Grill & Smoker is a big boy. This model weighs in at a total of 216 pounds including all the accessories in the kit, and stands 48″ tall including the top vent. It shares the bright red ceramic body style with other models in the Kamodo Joe lineup, the difference being that the bottom third is constructed from powder coated steel to accommodate the additional electronic components.
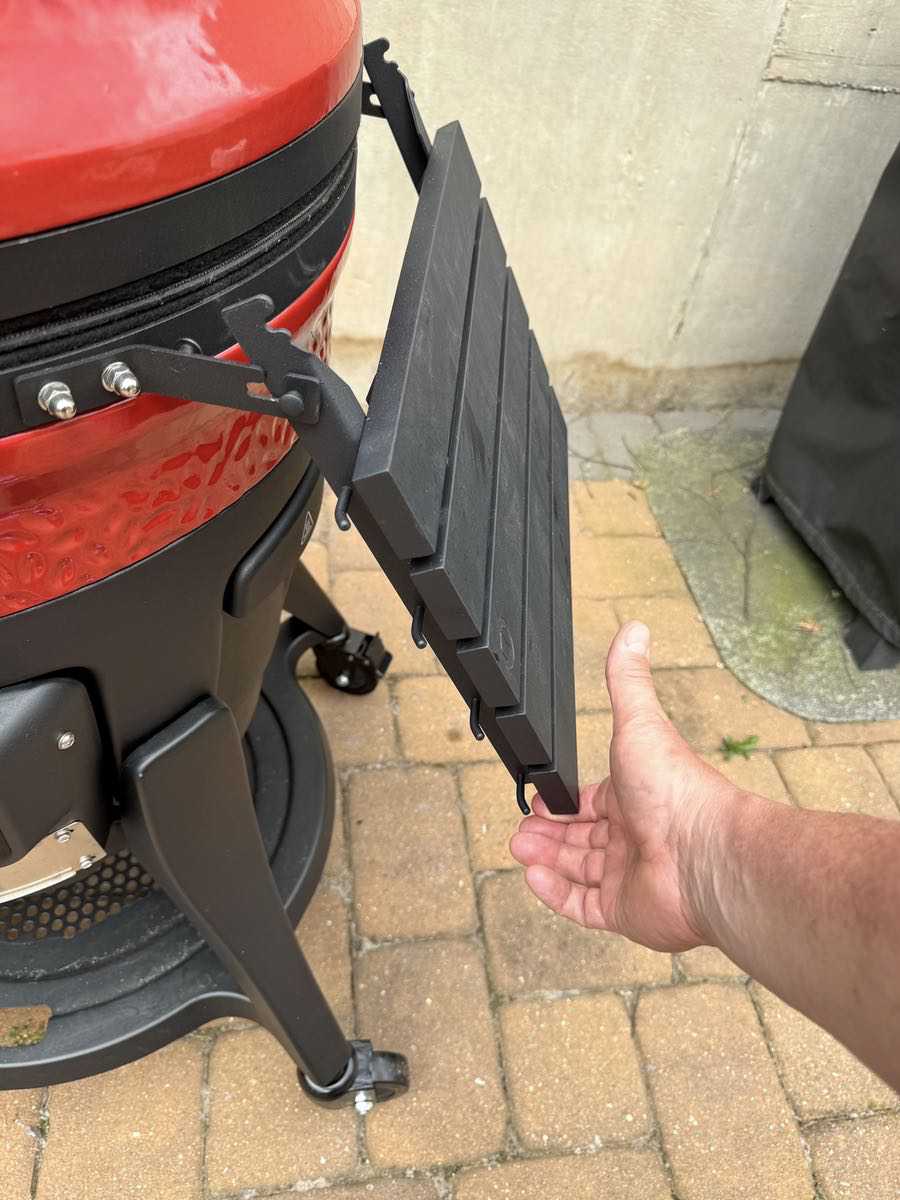
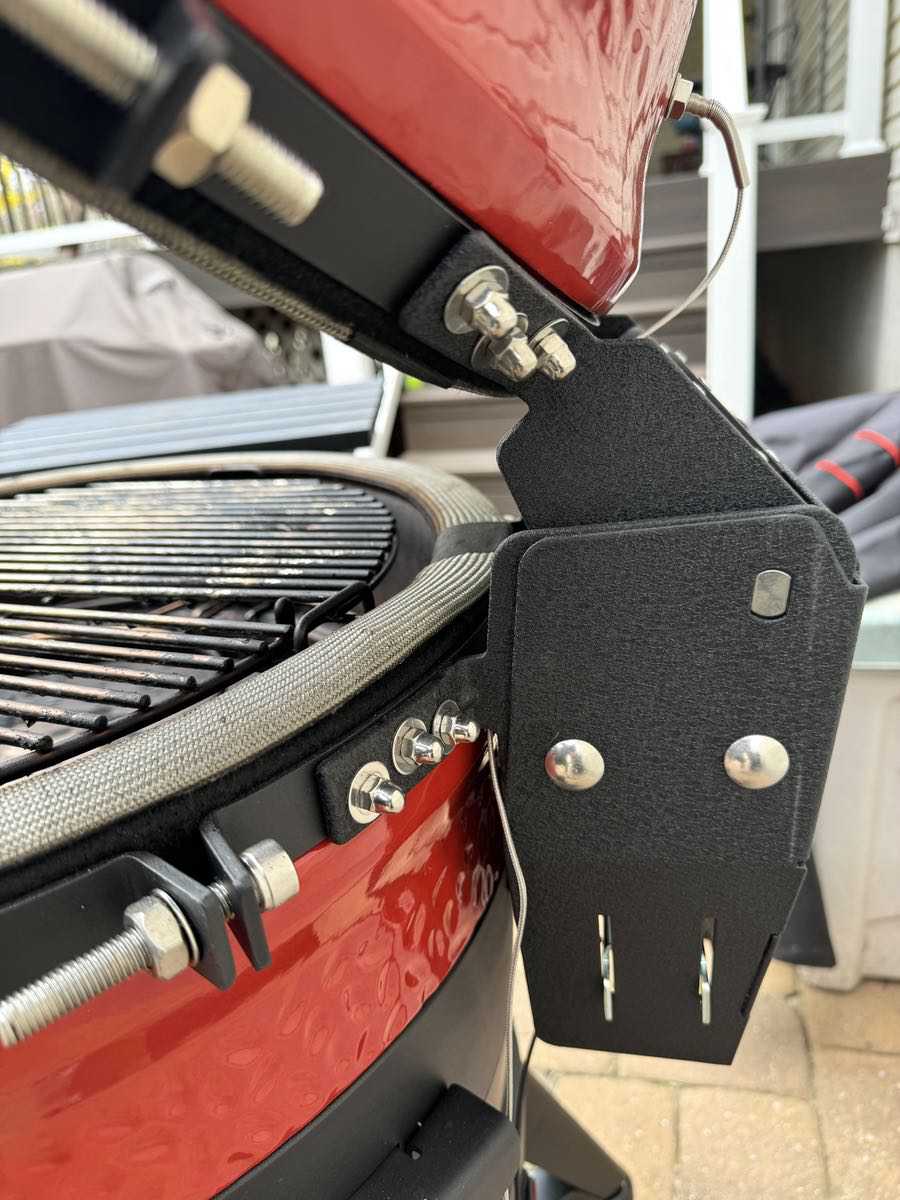
Heavy gauge aluminum shelves on each side use a clever peg/slot system to lock them in the “up” position for use, but also allow you to remove them entirely if you want. Or you just fold them out of the way for storage.

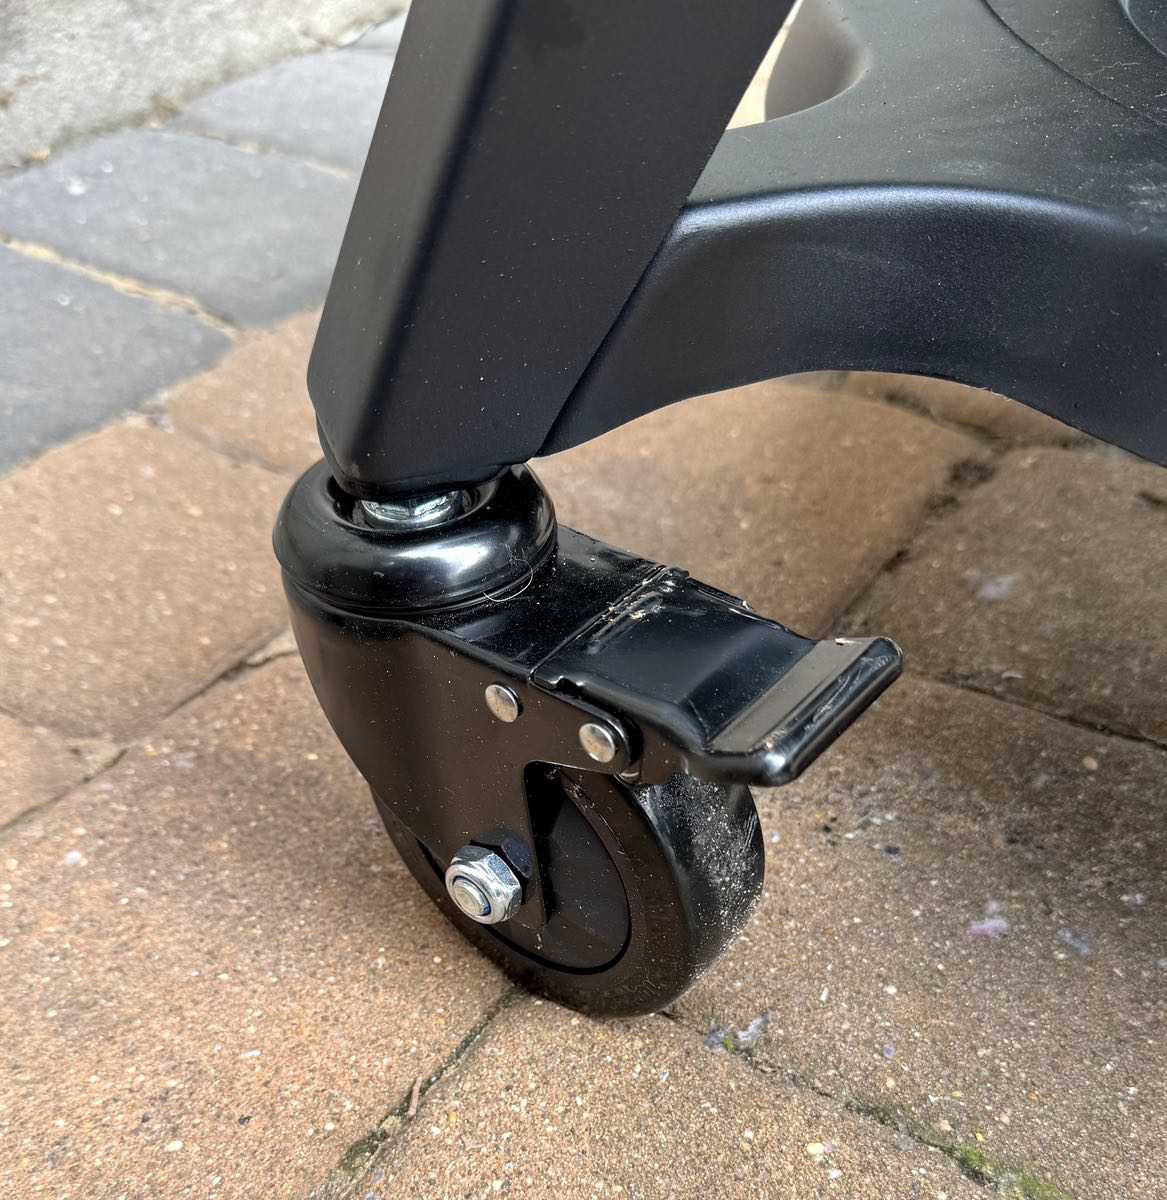
The tank-like frame sits on a powder-coated steel base. The hardware, down to the lockable wheels on the base, is heavy and built to last.
This backside of the grill is where you’ll find the hinge mechanism and your power block.
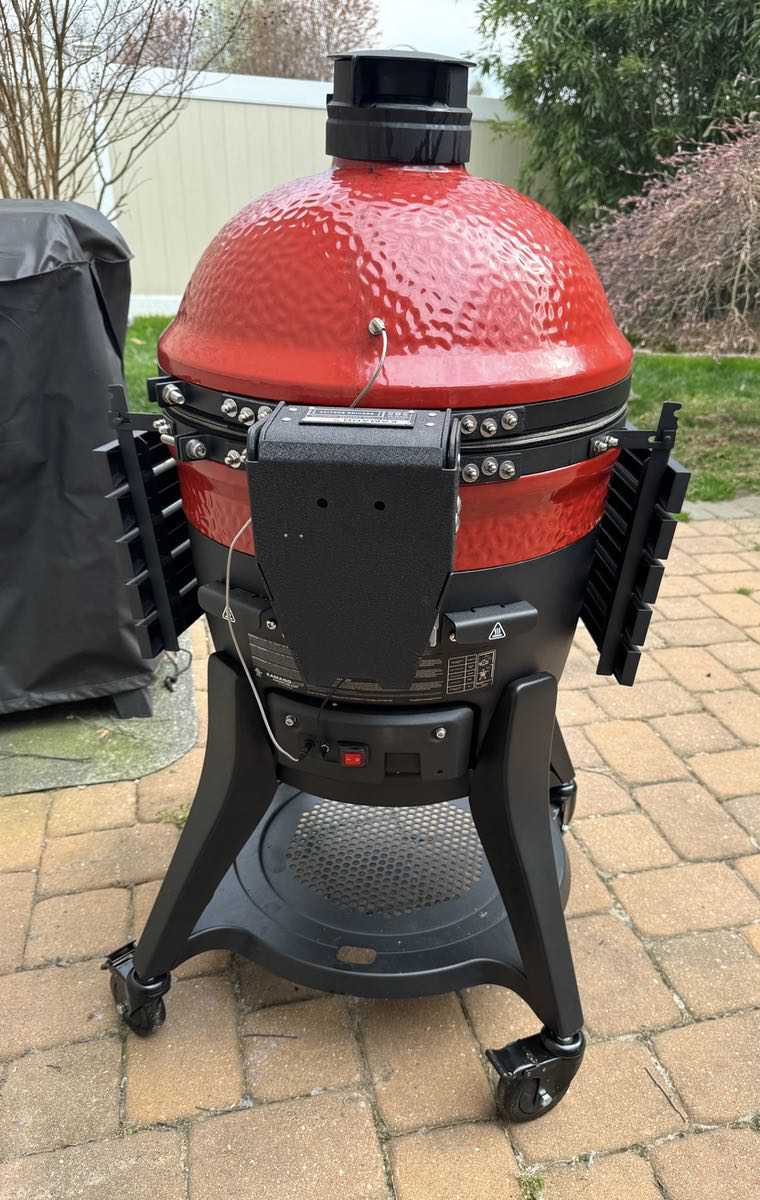
The hinge mechanism (called an “Air Lift” hinge by Kamado Joe) is designed to counterbalance the heavy ceramic lid so that it opens and closes easily with one hand. It stays in place when fully opened so that you don’t crush your fingers while loading the grill. The opening angle can be adjusted with a special tool (included with your kit) if you want a default higher opening point.
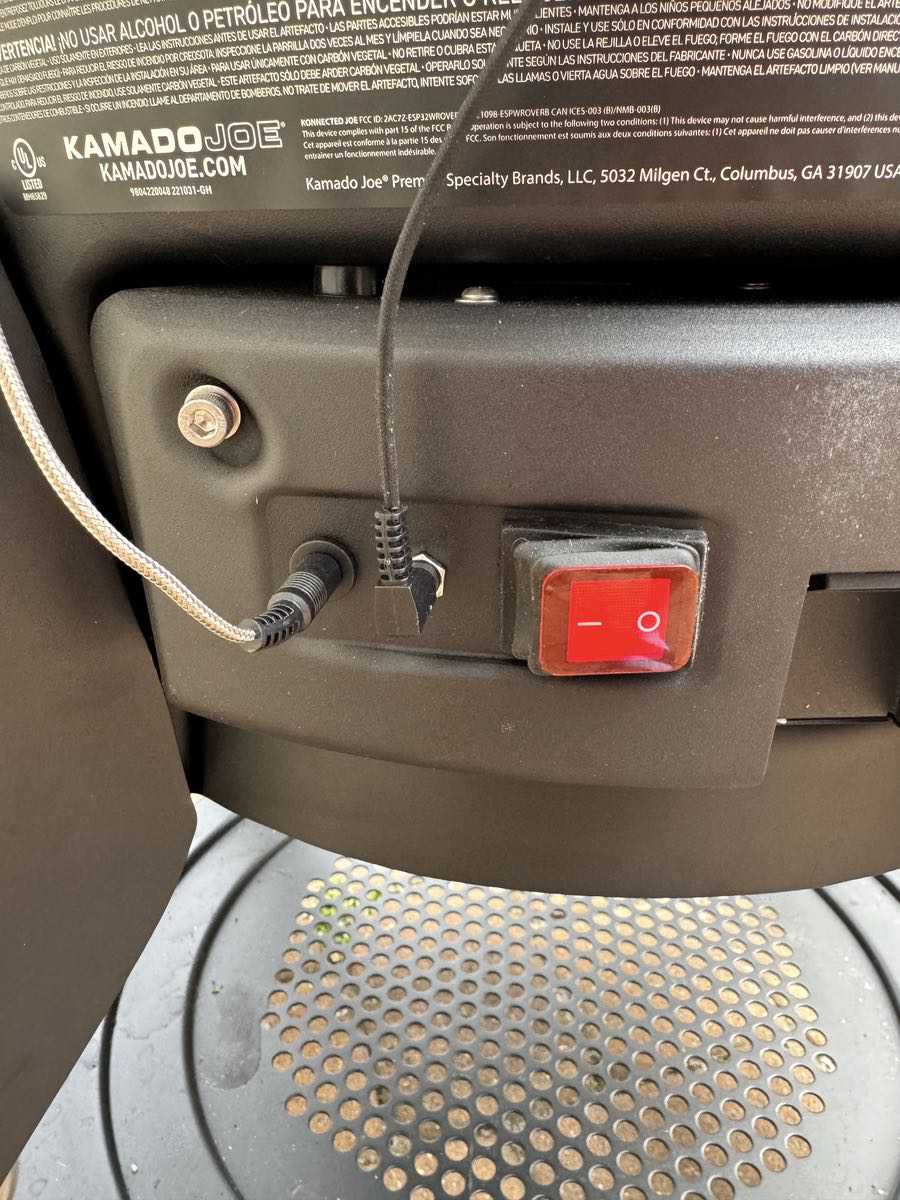
Below that hinge is your power block. Your power cable plugs into that port on the lower right of the pic below. There’s a shielded power switch back here that you’ll hit to turn the electronics.
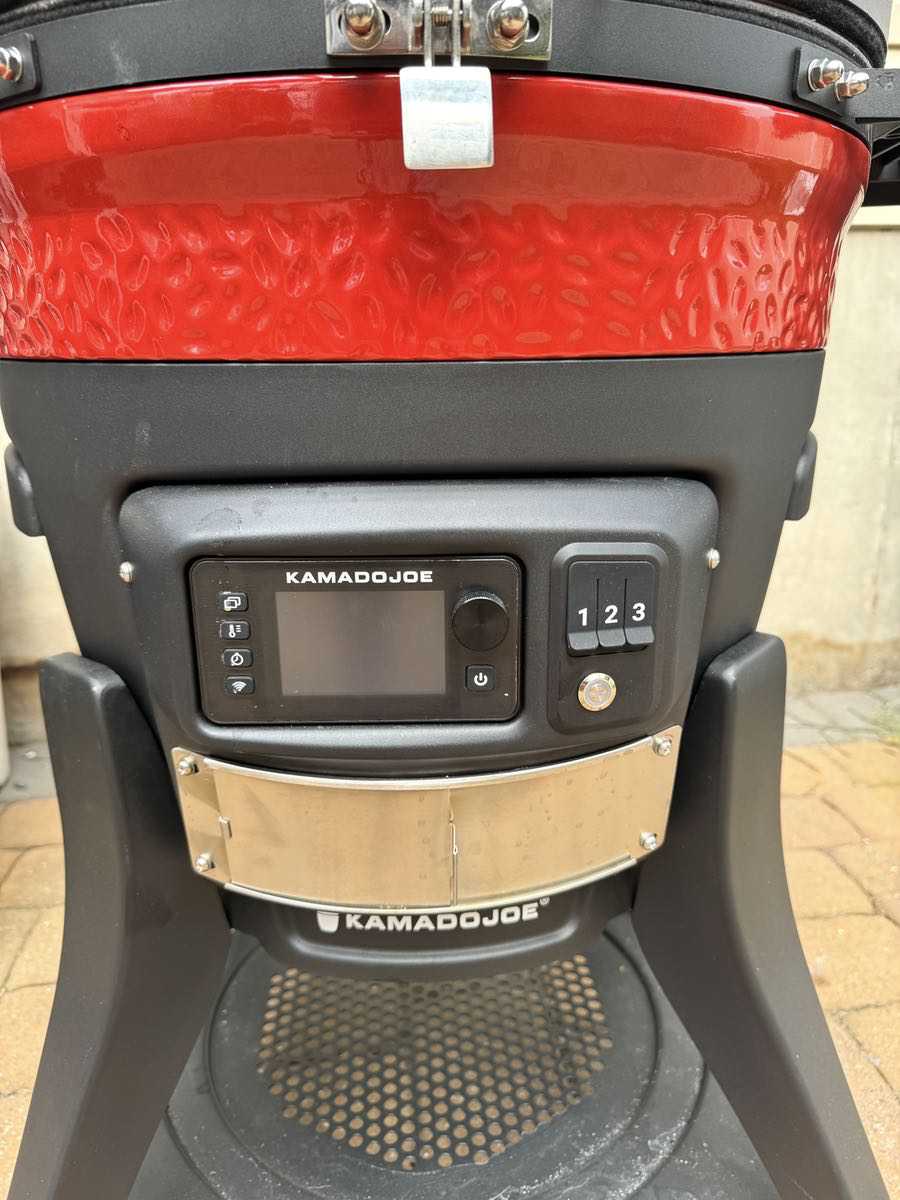
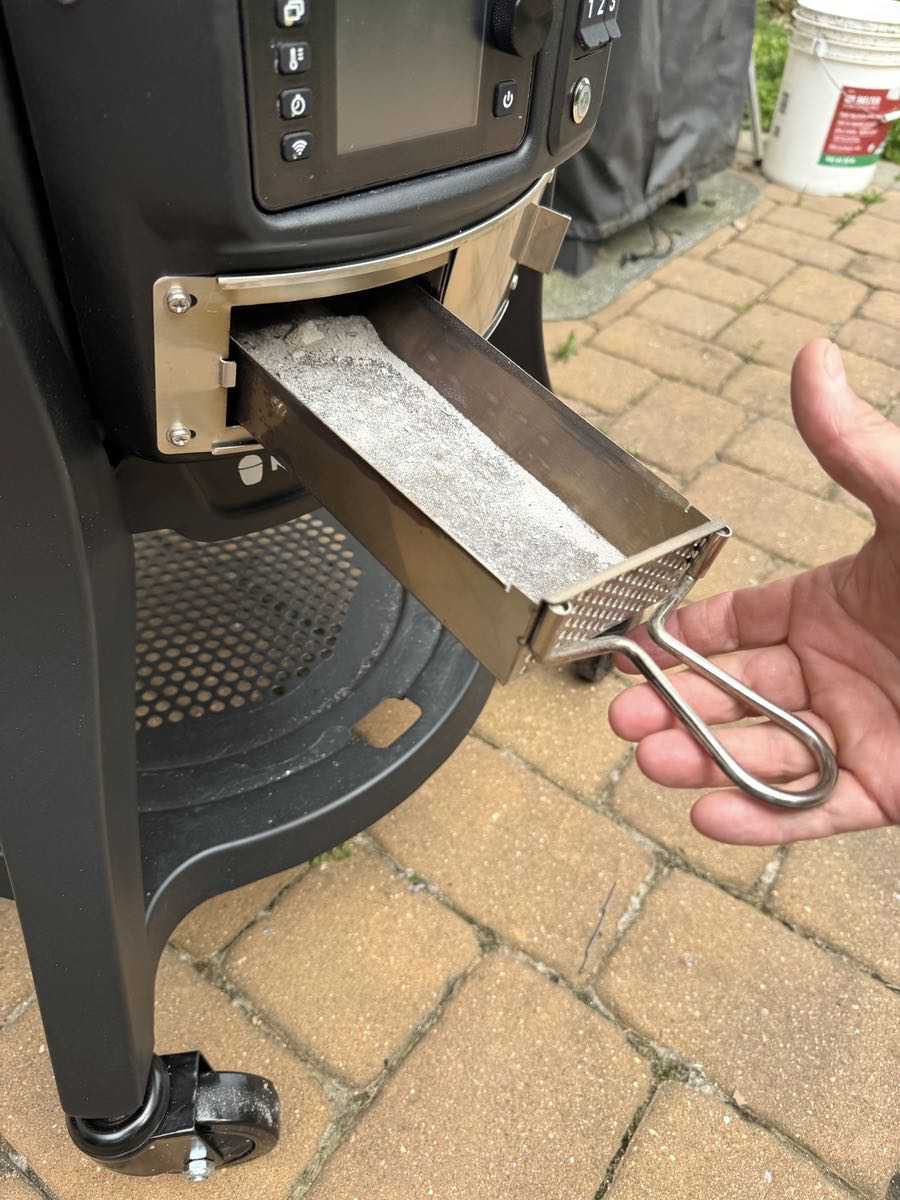
Working our way around to the front of the Konnected Joe Digital Charcoal Grill & Smoker, your control panel and ash catcher are at the bottom of the unit. We’ll get into more details about that control panel shortly.
The aluminum sliding panel below the control panel serves two purposes. It slides back and forth to help manage airflow if you’re not using the electronic temp controls. It also hides the ash catcher. Whe you’re done your cook you’ll brush all your ashes into the bottom of the chamber where that ash catcher sits to scoop them out.

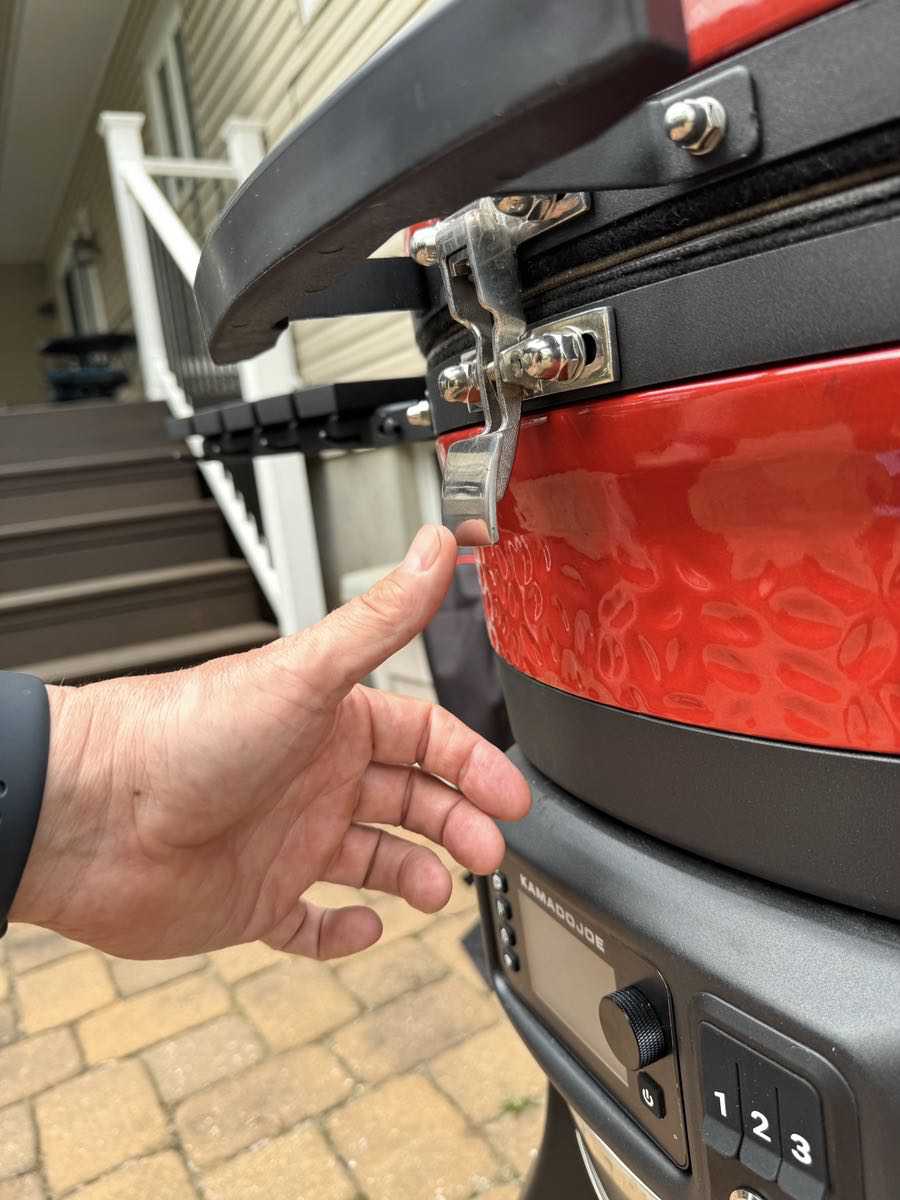
The grill has a lock lever mechanism to keep it sealed during operation. You’ll push the bottom of that lever to unlock it, and the lid slowly opens…
… revealing the guts of the beastie. Check out those heavy gaskets that serve to seal the grill for temperature control!
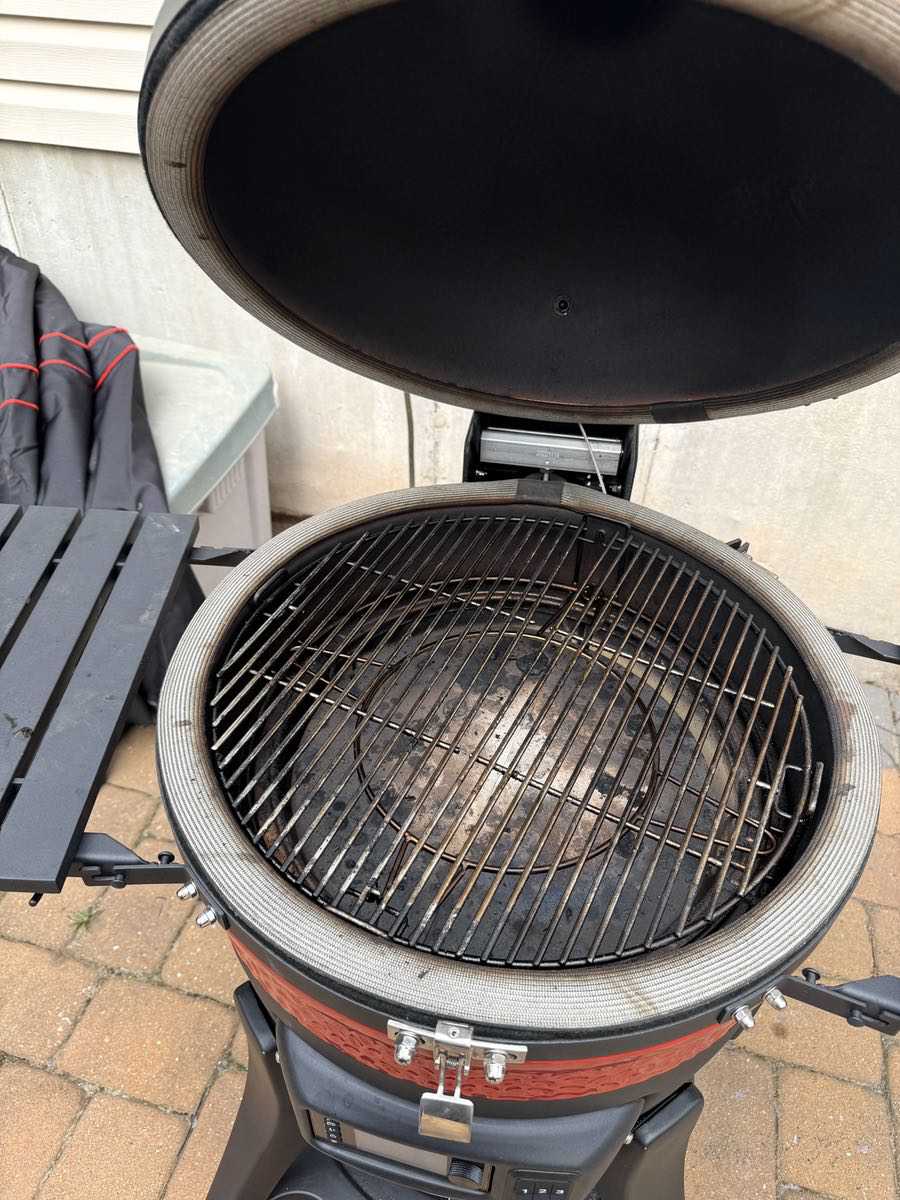
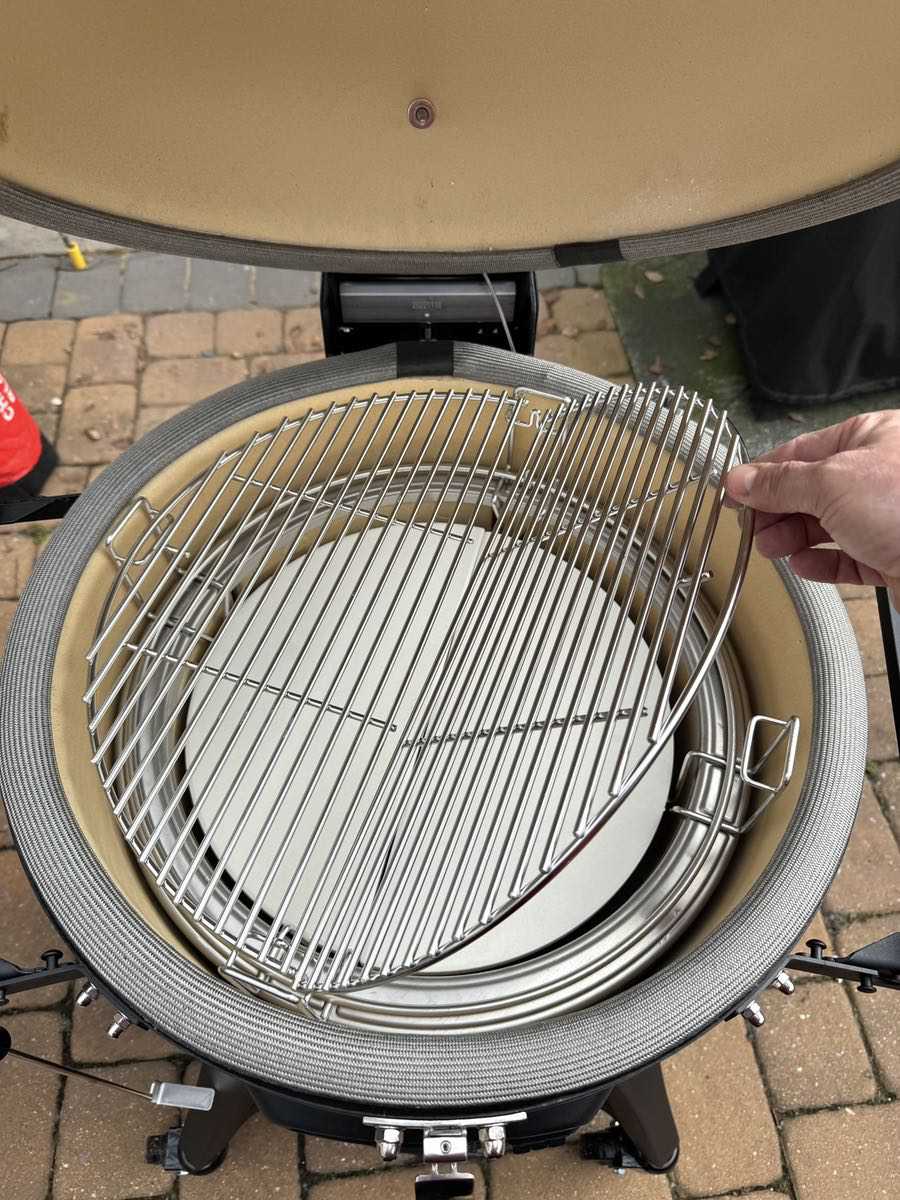
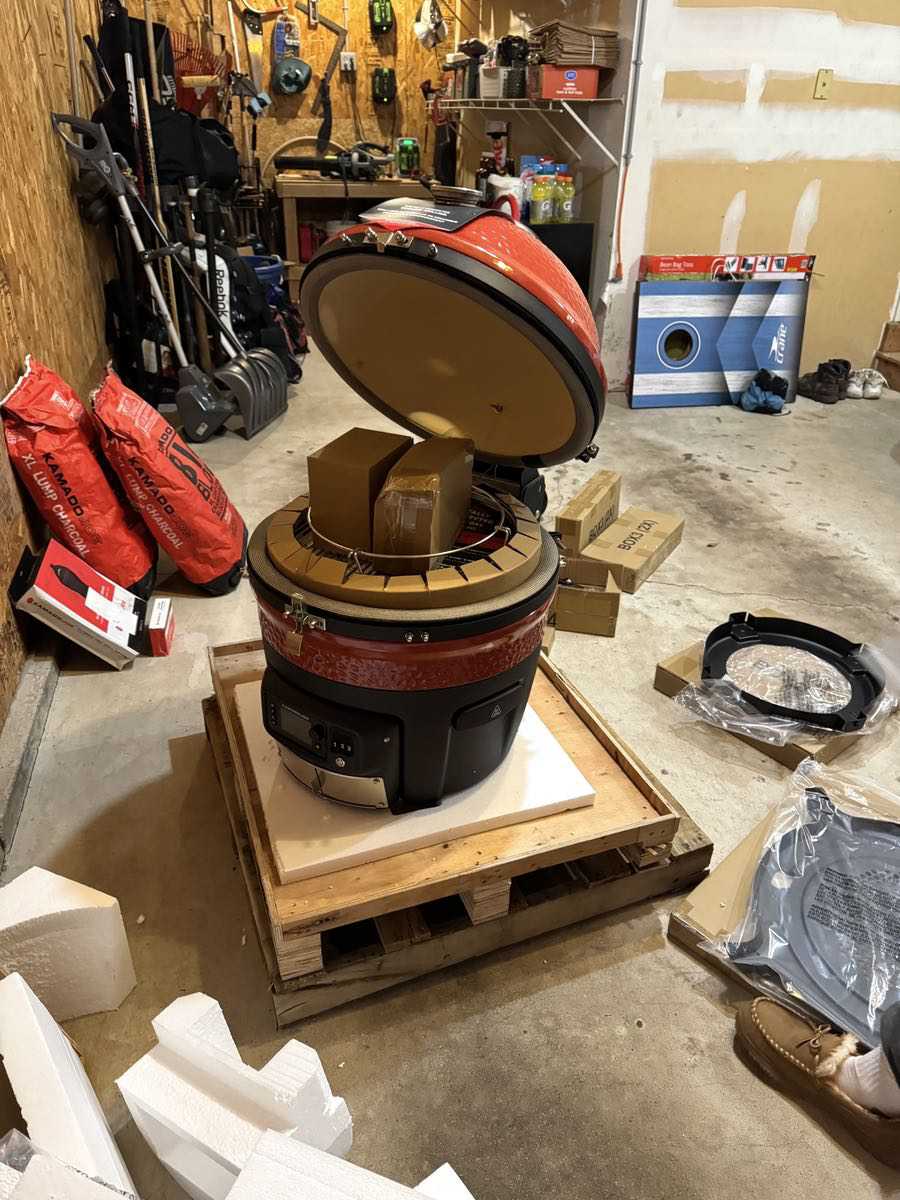
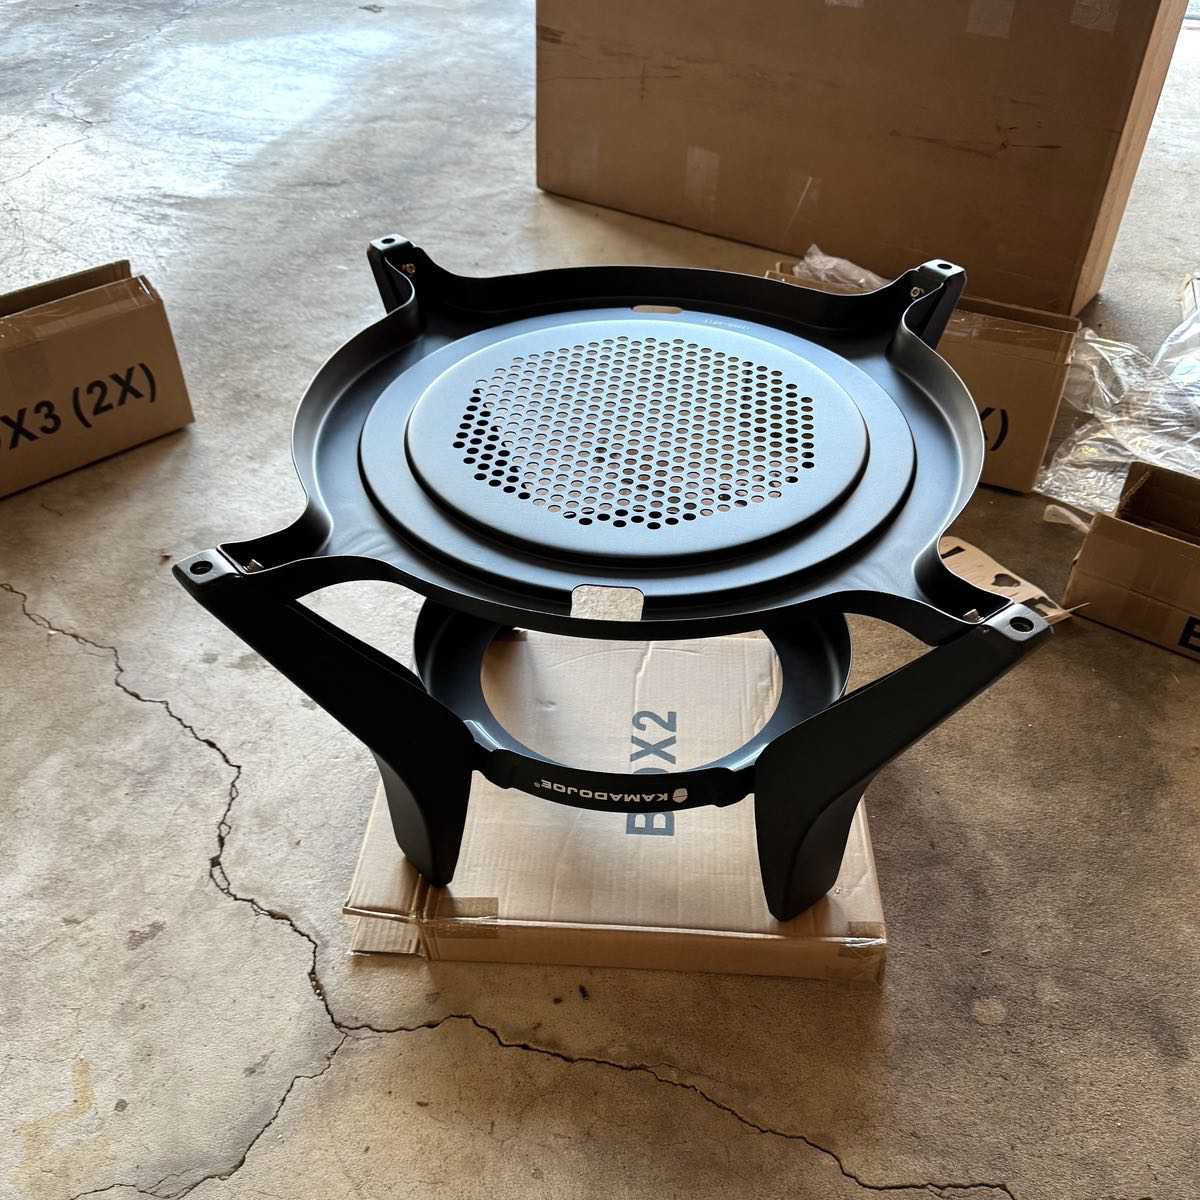
The Kamado Joe Konnected Joe Digital Charcoal Grill & Smoker uses an intriguing multifunction rack system that allows you to control the type of cooking you’re planning to do. It took these pics before the first cook so you can see it better, You’ve got a two-tiered ring system that sits inside the grill, above the charcoal and wood chips I loaded in for my first cook.
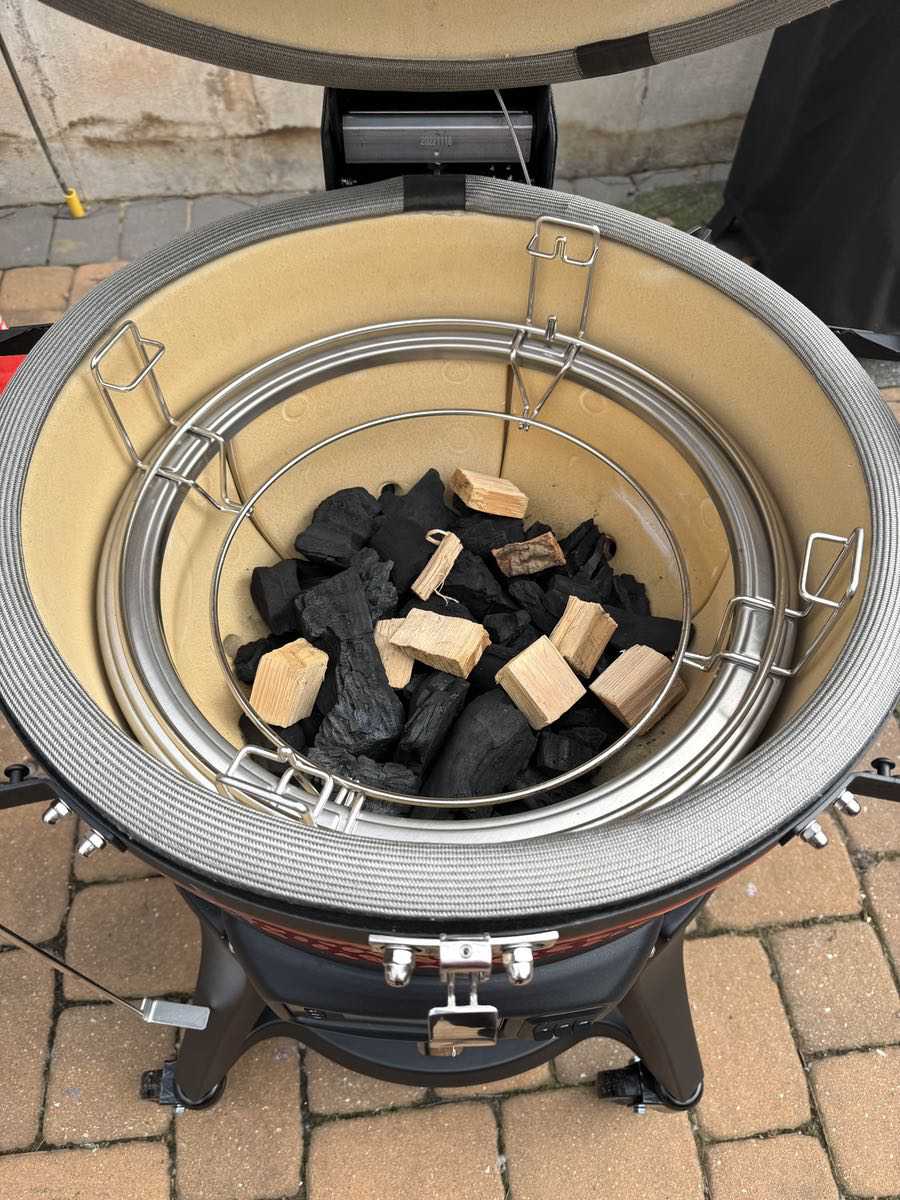
There’s a lower ring that is designed to fit the ceramic heat deflectors if you’re doing indirect cooking, slow barbecue, or baking/roasting.
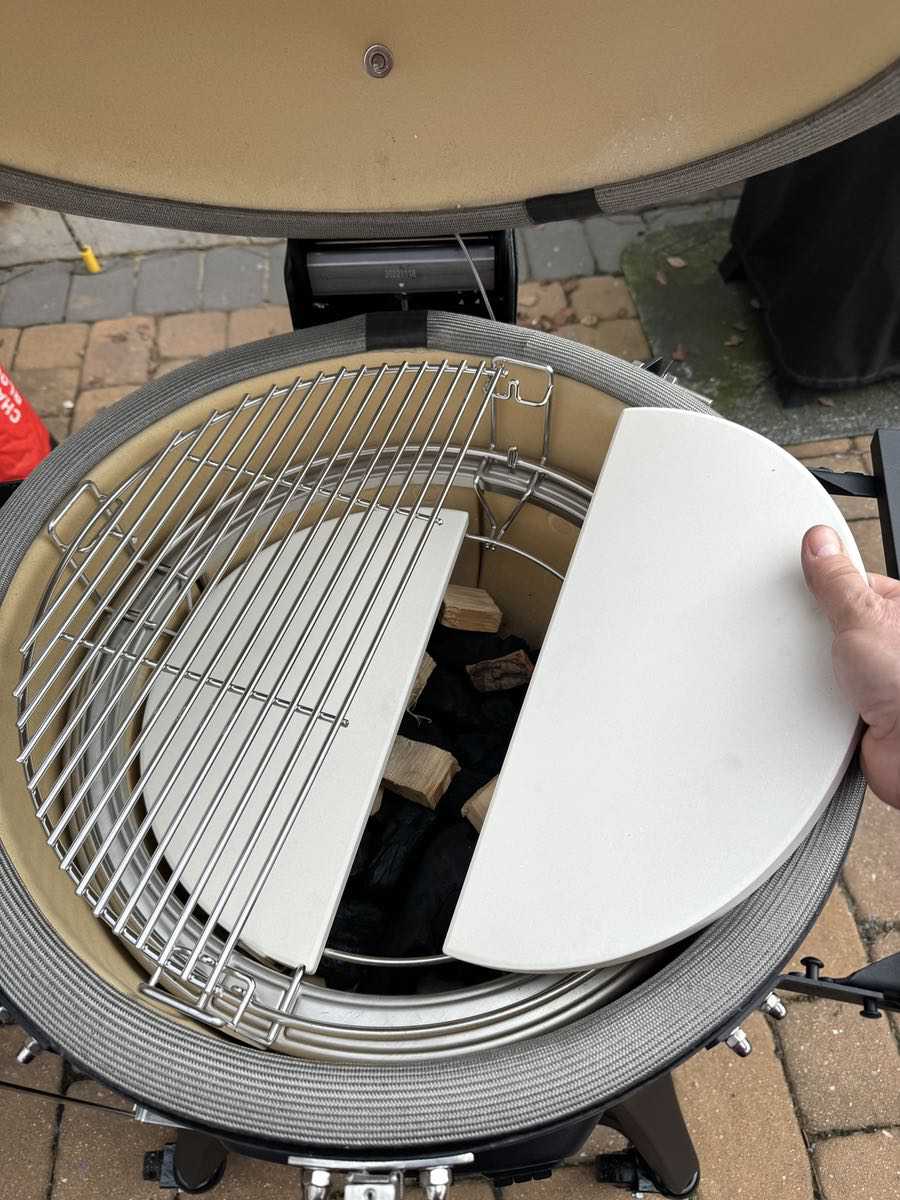
You have two positions (low and high) for the grill grates that you can set based on the type of cooking you’re doing.
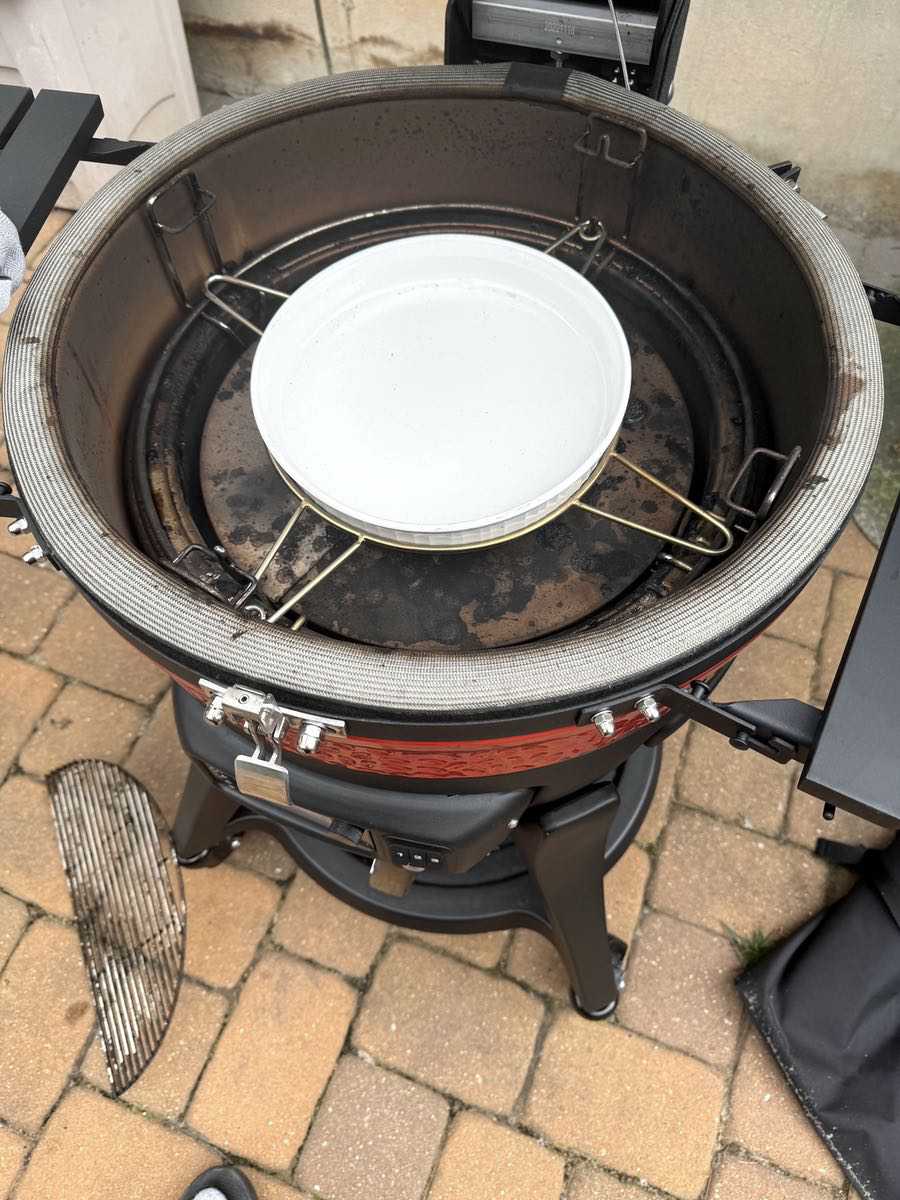
There’s also another accessory ring that’s included with the kit, designed to sit on the upper or lower tier. In the pic below I put a ceramic pie plate in that ring to catch drippings from a roast chicken I was doing, but you could use it for a water pan, a drip pan, or even a round bottom wok (Kamado Joe sells a cast iron wok just for this accessory ring).
The onboard thermometer is big, sturdy, and easy to read. Note that it reads up to 900 degrees (!). Not sure if you can get that high under normal conditions, but you can get to 700 degrees on this unit if you want to.

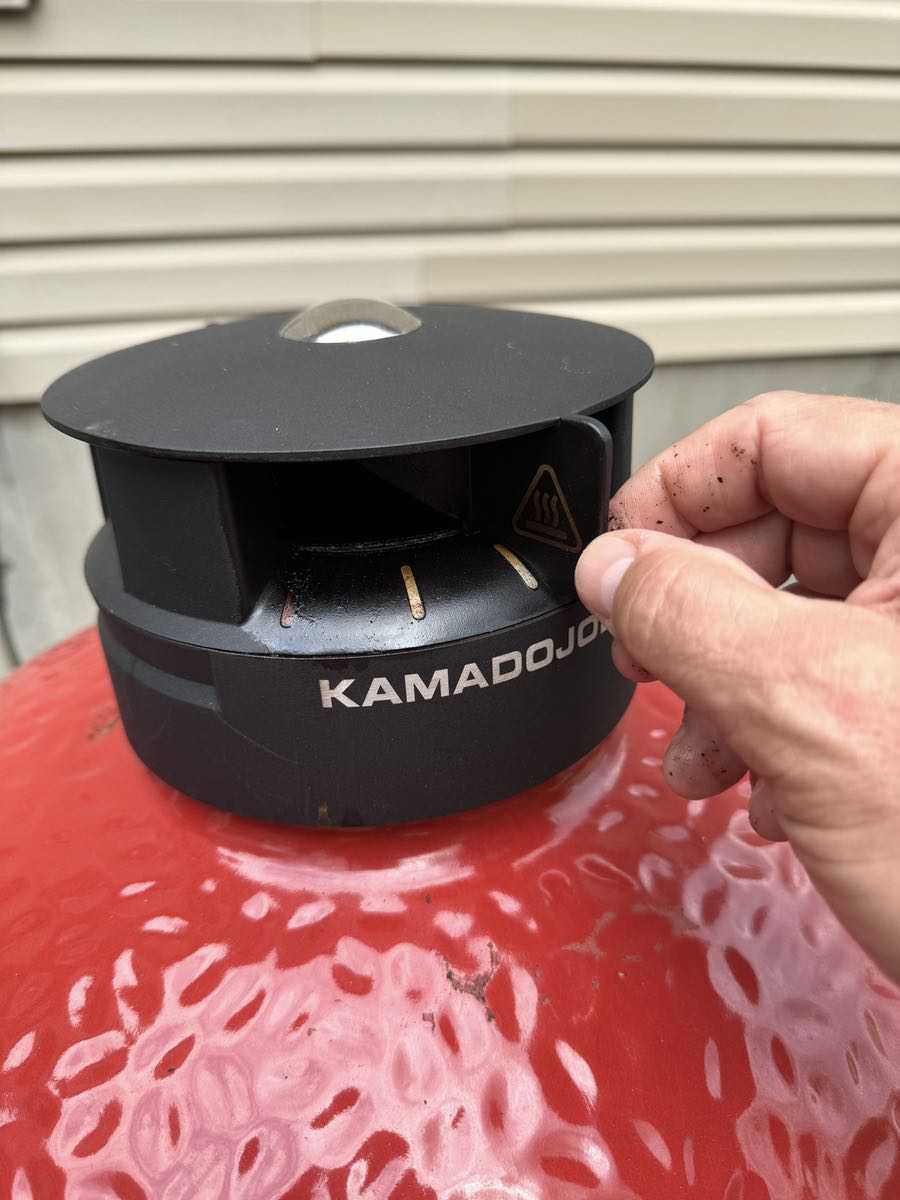
Finishing the walkaround is the top vent, which includes a big tab for easy manipulation with gloves or tongs if you have to adjust it during your cook. It has clear markers to help you adjust up the rate of airflow from 25% to fully opened for maximum burn.
Onboard digital controls and using the app
The Konnected Joe Digital Charcoal Grill & Smoker works in analog mode, no power required. You could light your own charcoal, adjust the top & bottom vents, and use the onboard temperature gauge to do all the things. But you’re looking at this grill for the digital experience, right? Let’s explore how that works.
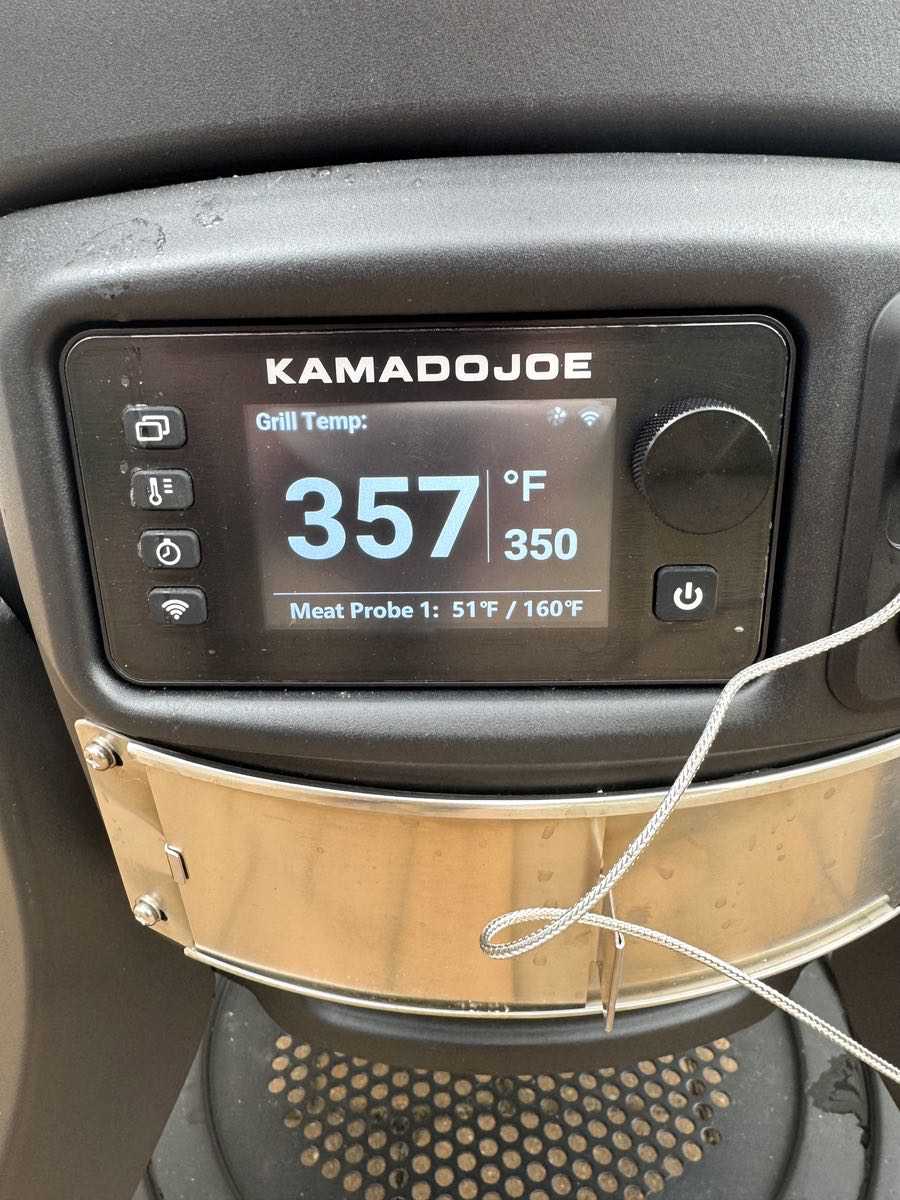
You’ll start by loading your grill with your charcoal. Plug your grill in and flip that rear power switch, followed by hitting the on button on the bottom right of the control panel to activate the LED screen. You’ll see that the internal temperature guage immediately starts monitoring the ambient temperature.
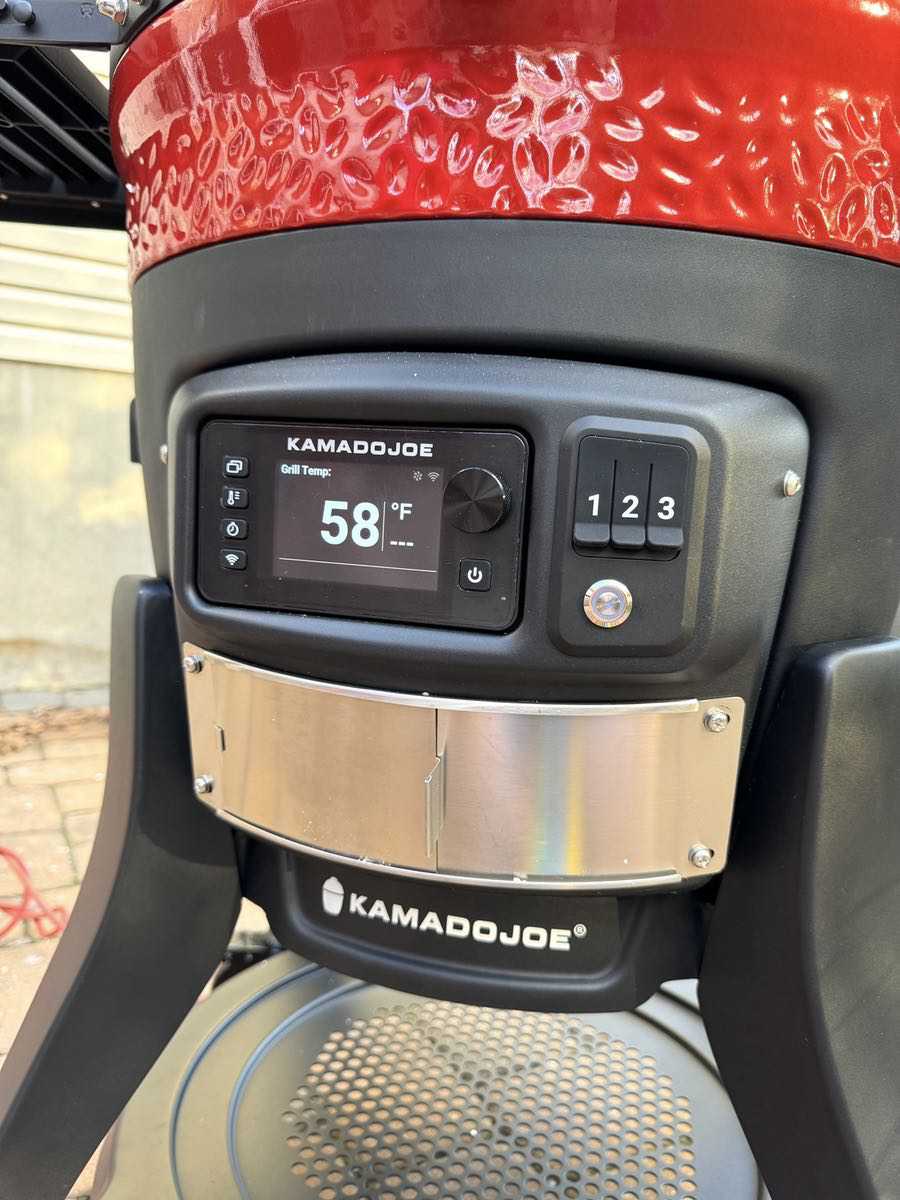
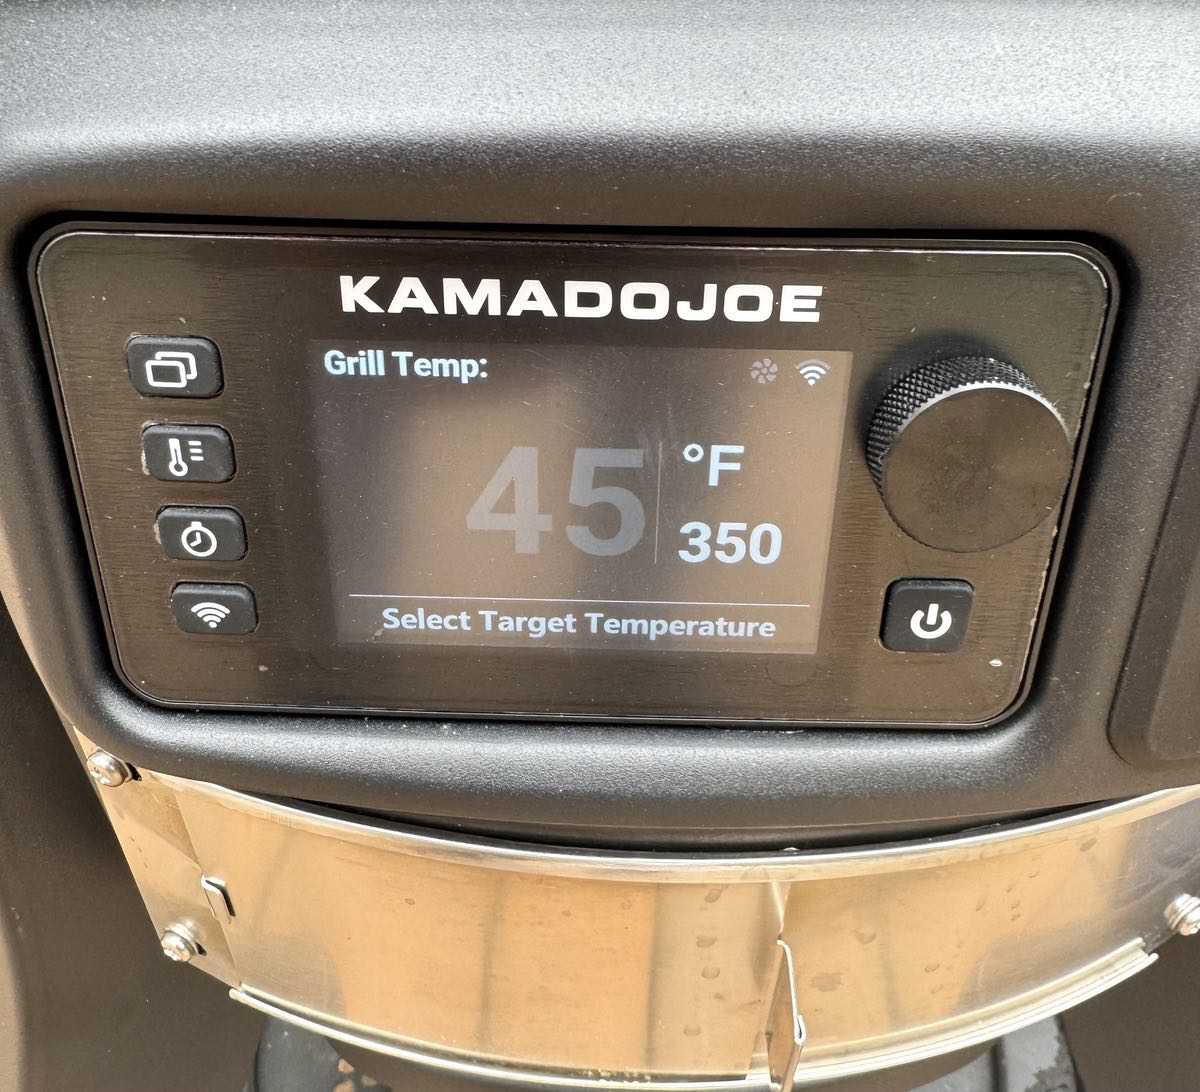
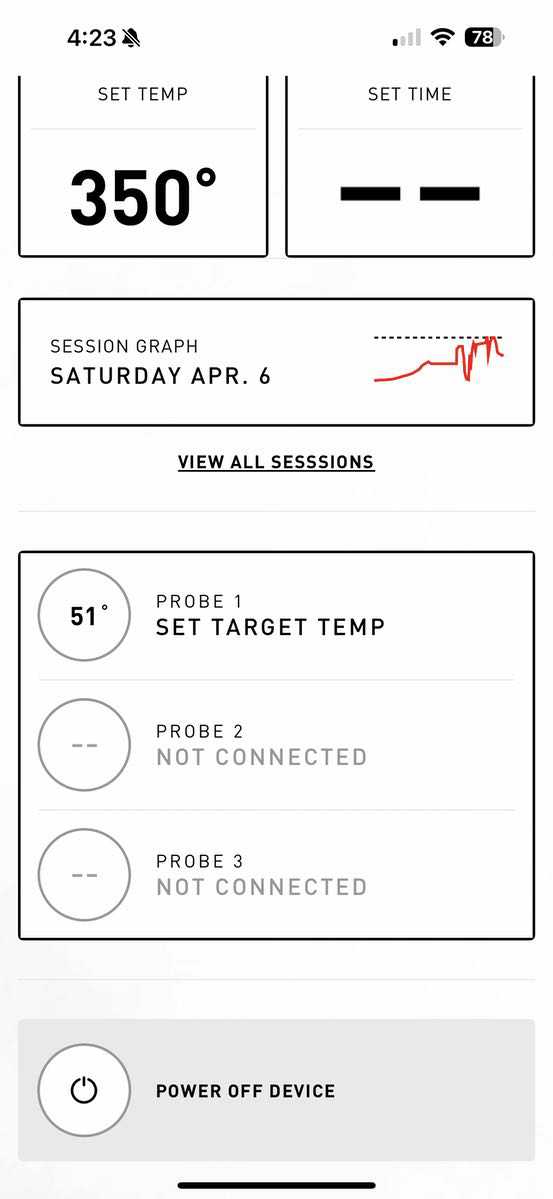
Now you’ll push that thermometer button (the second button down on the left), and spin the wheel to set your desired temperature. Hit that thermometer button again, and the system will tell you to shut the lower panel and to set the top stack vent to the appropriate opening for the temp you want to get to (1/4, 1/2, 3/4 or wholly opened).
Now you’ll push that silver button on the lower right. When it goes red, that indicates that the electric charcoal starter inside the unit is engaged. You’ll also hear the internal digitally controlled fan come on to assist in getting things heated up.
Now you close the lid, kick back, and wait. Seriously. The grill takes it from there.
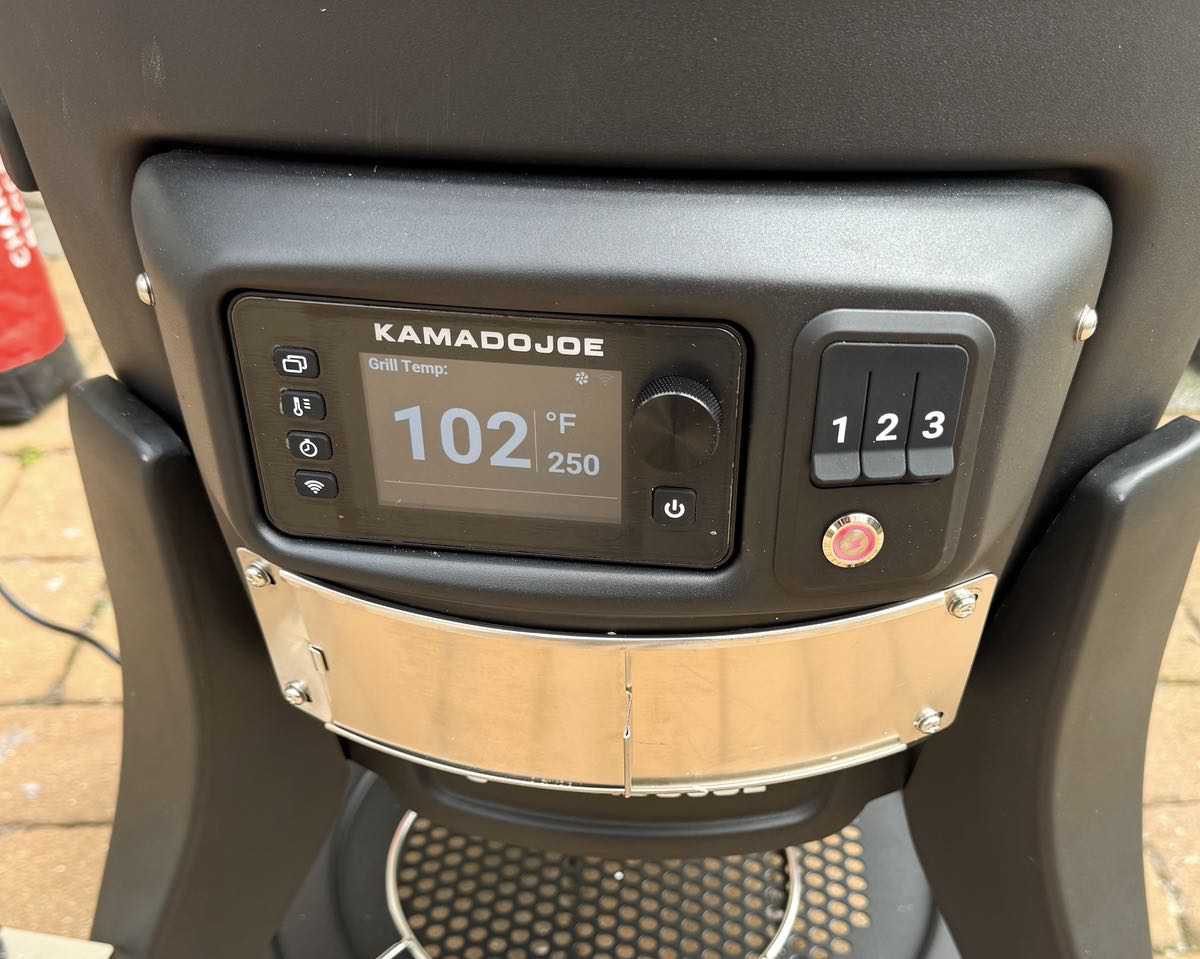
Over the next 15-20 minutes the Konnected Joe will monitor the internal temperature and automatically adjust the digital fan to land at your desired cooking temperature. You can watch the progress on the screen. No manual intervention required!
Once the temperature is hit it, the grill will continue to maintain that temperature throughout your cook until you tell it to stop or you change the desired temperature. If you open the grill to add food, the fan will re-engage when you close the lid to get you back to your cook temp as quickly as possible. You can set a timer (third button down on the left) if you’re looking for a specific cook duration as well.
You can also monitor your meat’s cooking temp from inside the grill through the integrated temperature probe unit. Kamodo Joe includes a meat probe in the kit. Stick the pointy end in your protein…
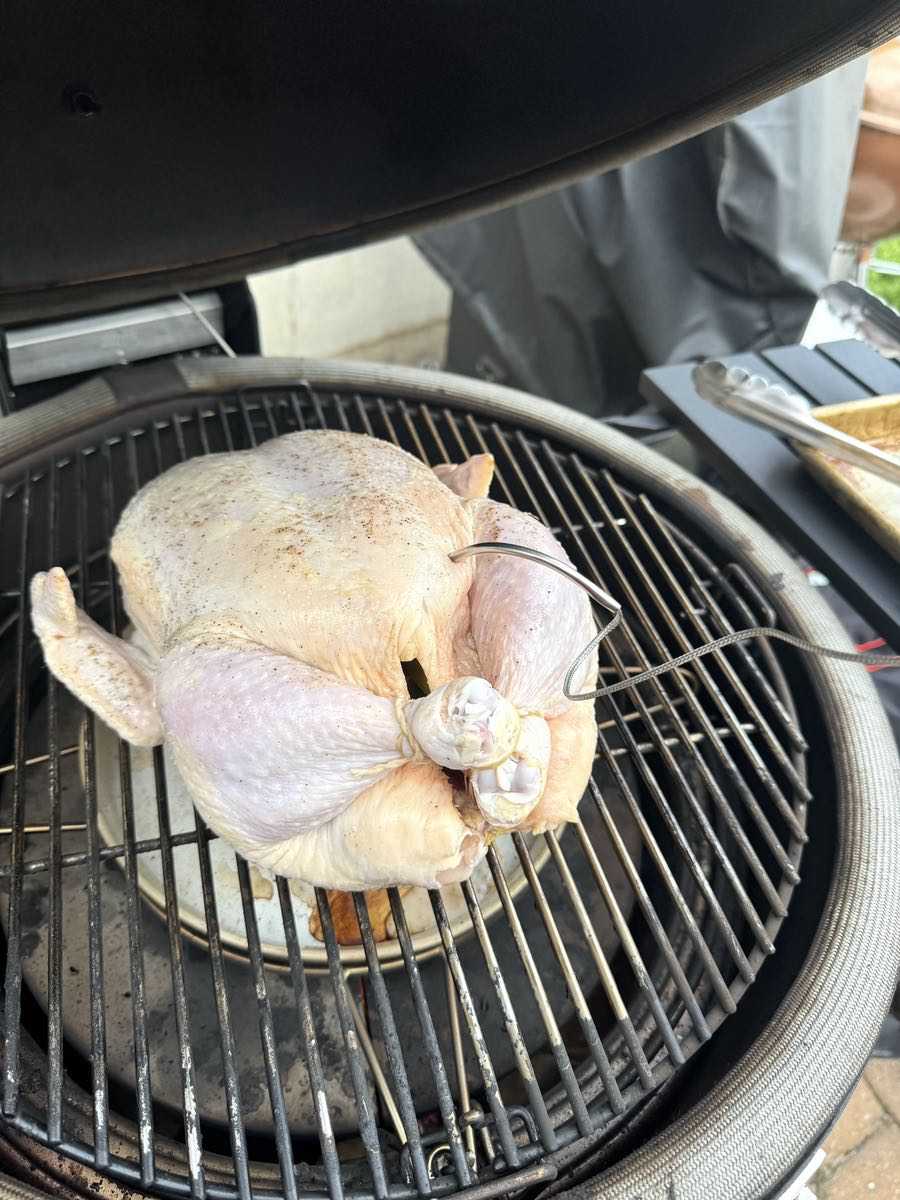
… then plug that probe into the port on the control panel…
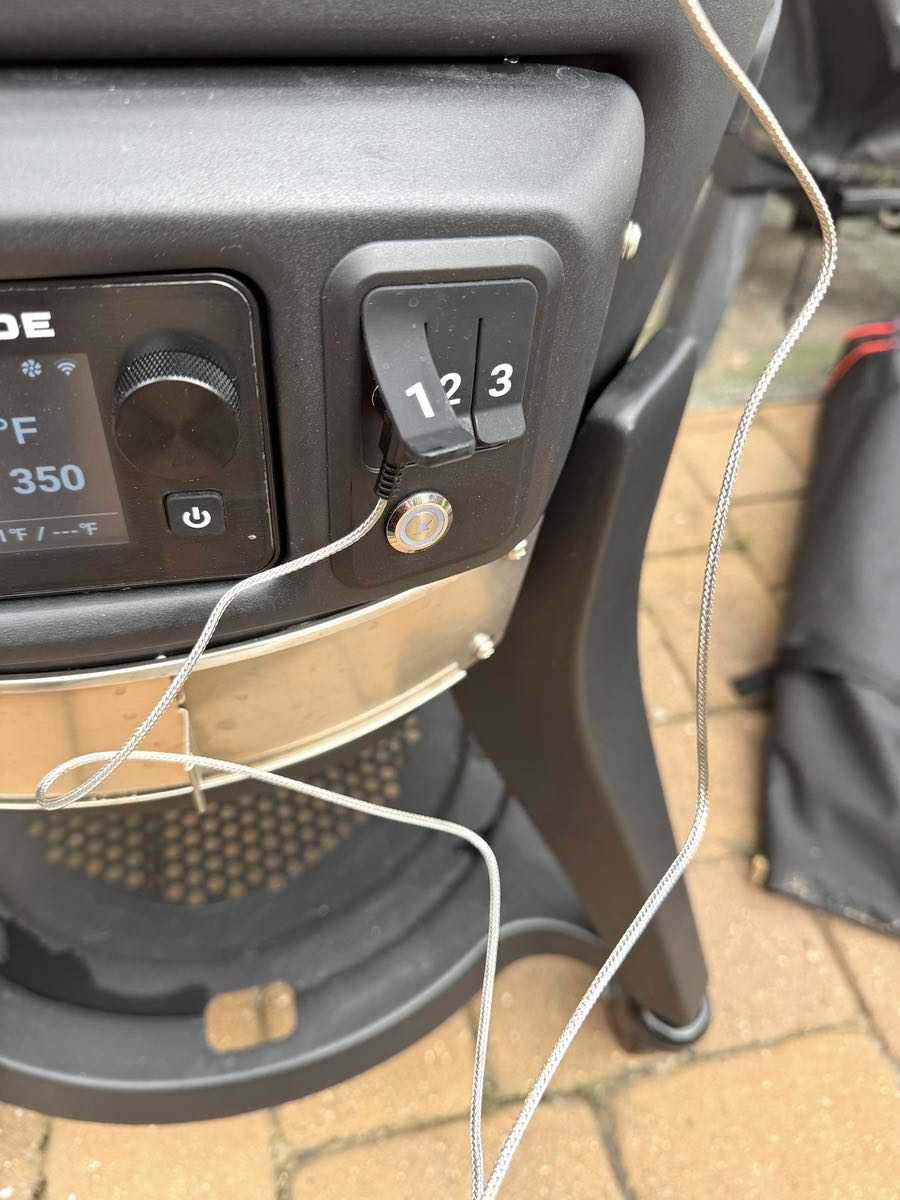
… and now you can monitor your meat temperature without opening the grill! The unit has three such slots for probes if you want to monitor multiple items, but there’s only one included with your basic purchase.
That top button on the left enables you to change your display options on the panel, which includes things like temperature graphing monitors.
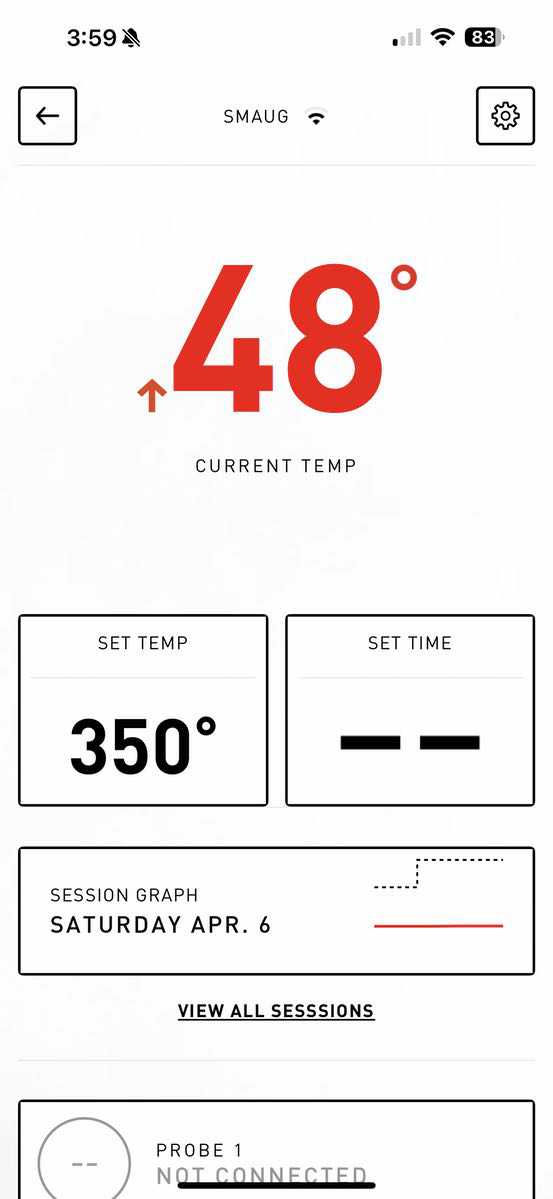
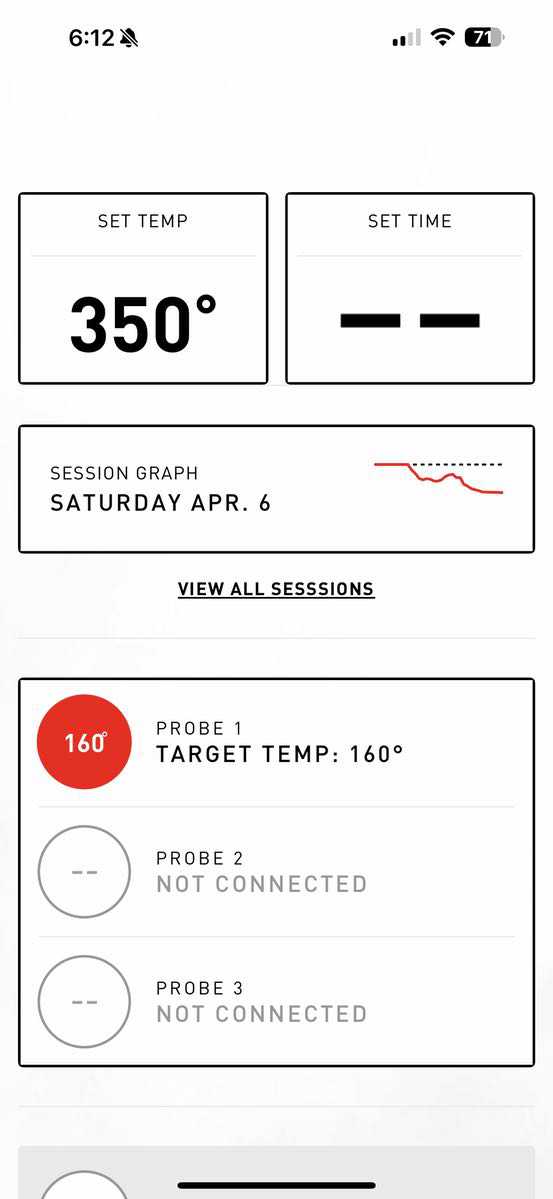
Now you can do all of these things without the app, but the app adds even more tools to your arsenal. Fire up the app and select your grill to enable real-time monitoring of the grill temperature from anywhere as shown below:
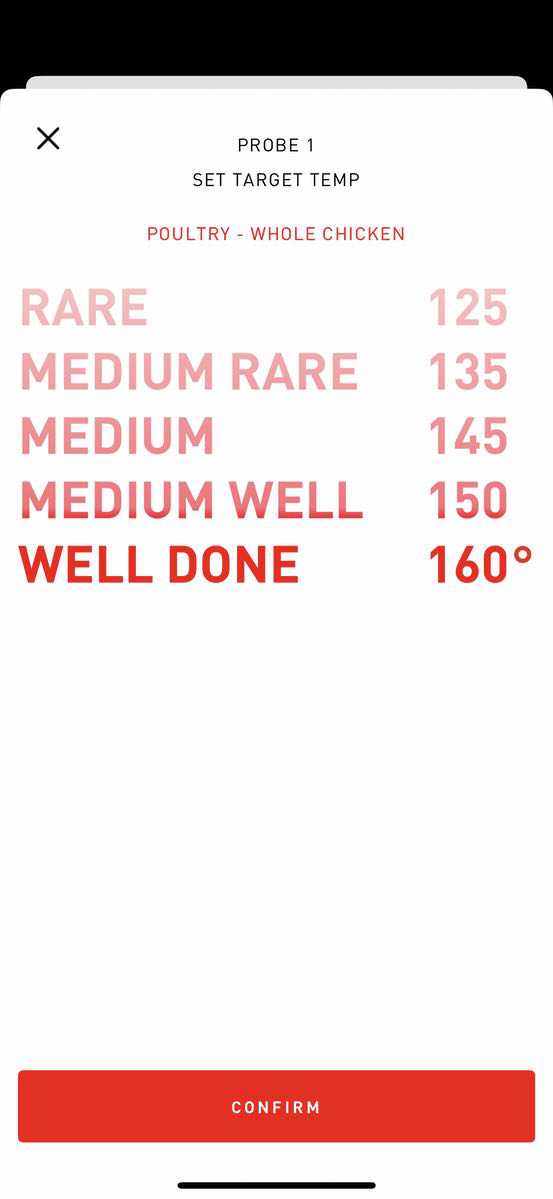
Plug in your probe and the app automatically picks up that it’s connected. It also gives you the option to set your target temp for the meat.
I was kind of impressed that I could pick my protein (poultry) and my cut (whole chicken) from the menus.

I did find it odd that I could not set anything higher than 160 degrees for the finish, though. I would set chicken at 165 and let it rest on the board.
Once you have selected your end points, the app will provide realtime updates on your progress while you’re working around the house, watching the game, entertaining, etc.
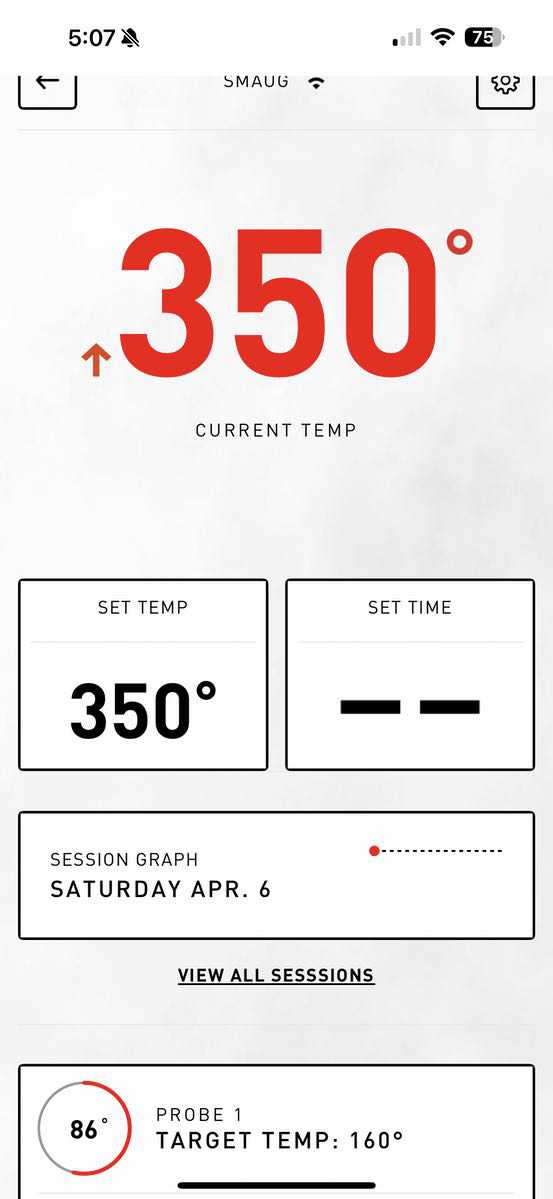
The app will alert you when the target temperature is achieved for the grill so that you can drop your food, then it will notify you when the meat has reached the desired temperature.
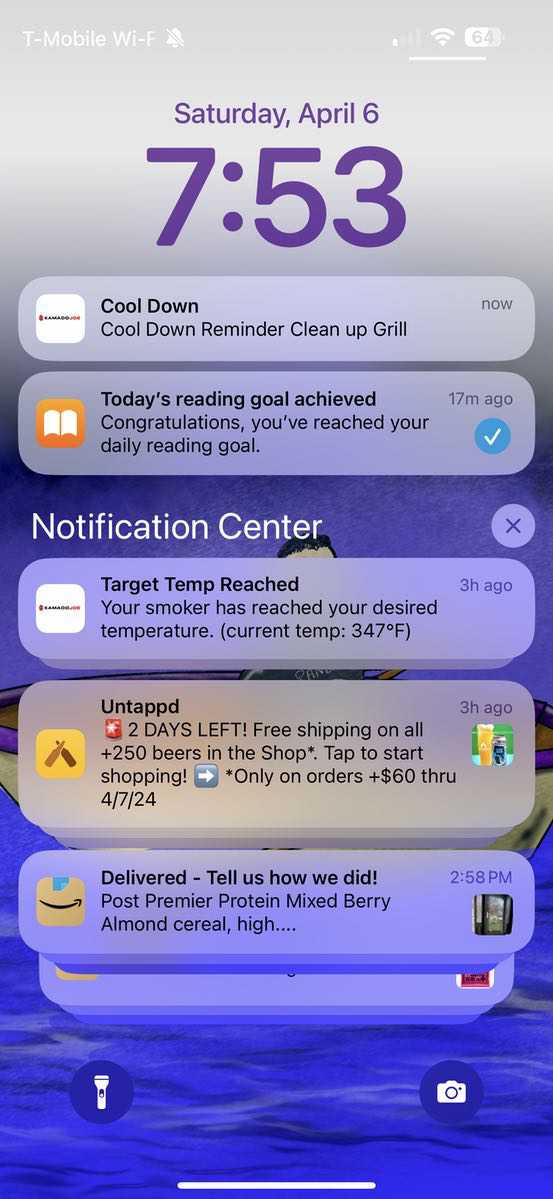
You can also get alerts through your phone’s notification system if that turn that feature on. You can see a couple of mine here in my history… the app even sends you a reminder to clean up your grill a few hours after you have turned it off!
The app also includes a small library of recipes that you can browse by food type and cooking style. You can also review the time & temp graphing for previous cooking sessions in the app.
Assembly, Installation, Setup
The assembly of the Kamado Joe Konnected Joe Digital Charcoal Grill & Smoker is a good news/bad news thing. The good news is that the instructions are pretty straightforward. The bad new is that it is HEAVY. This is how the grill arrived in my driveway, topping 250 pounds between the unit, the packing materials, and the bags of charcoal included in the kit. The finished weight of the grill itself if about is just under 220 pounds.
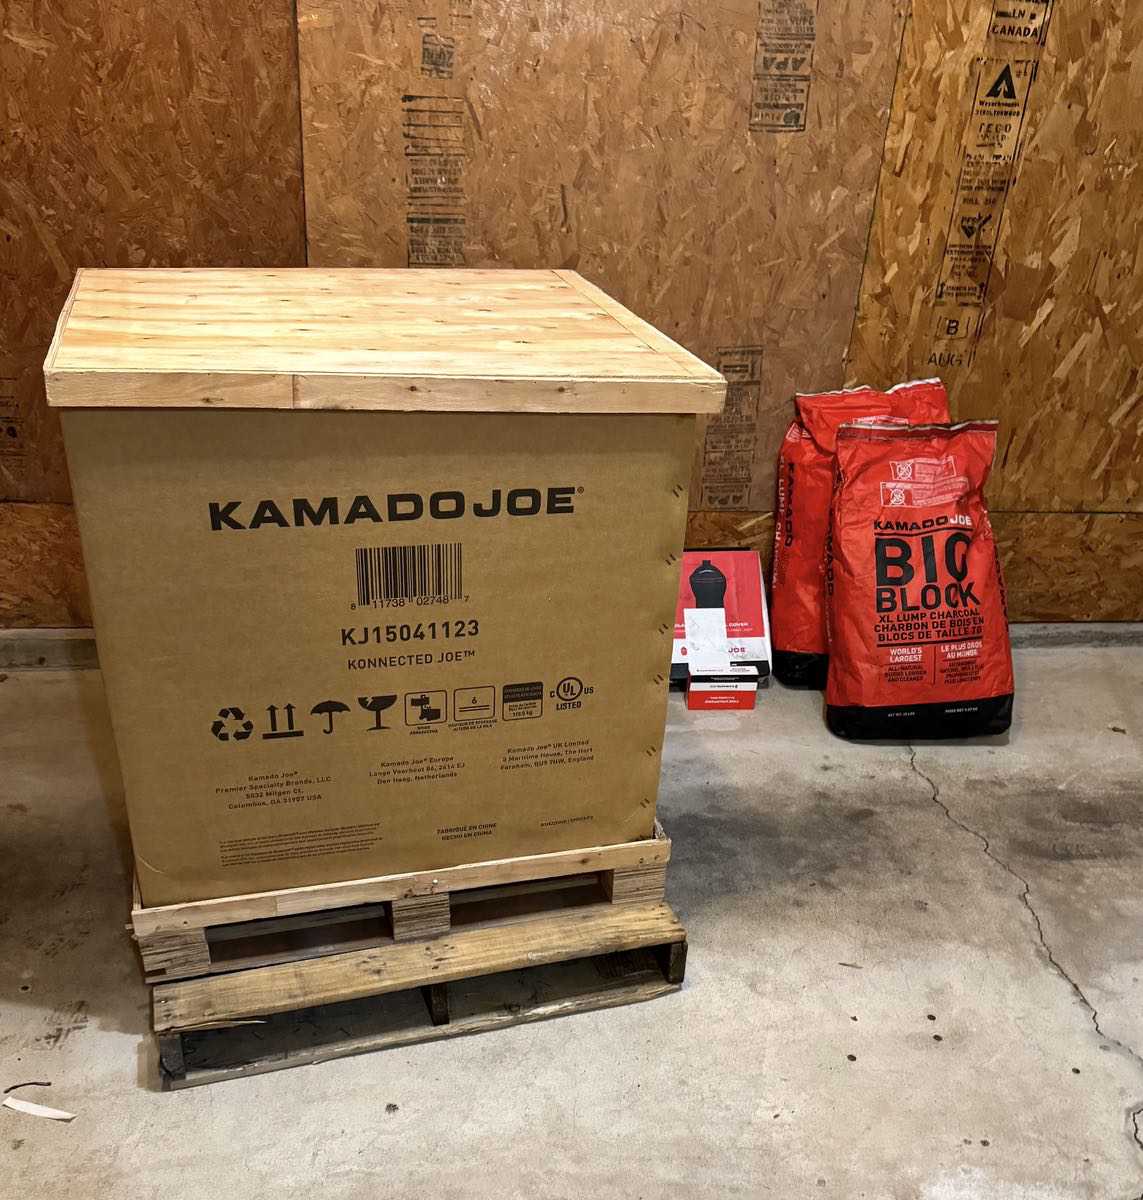
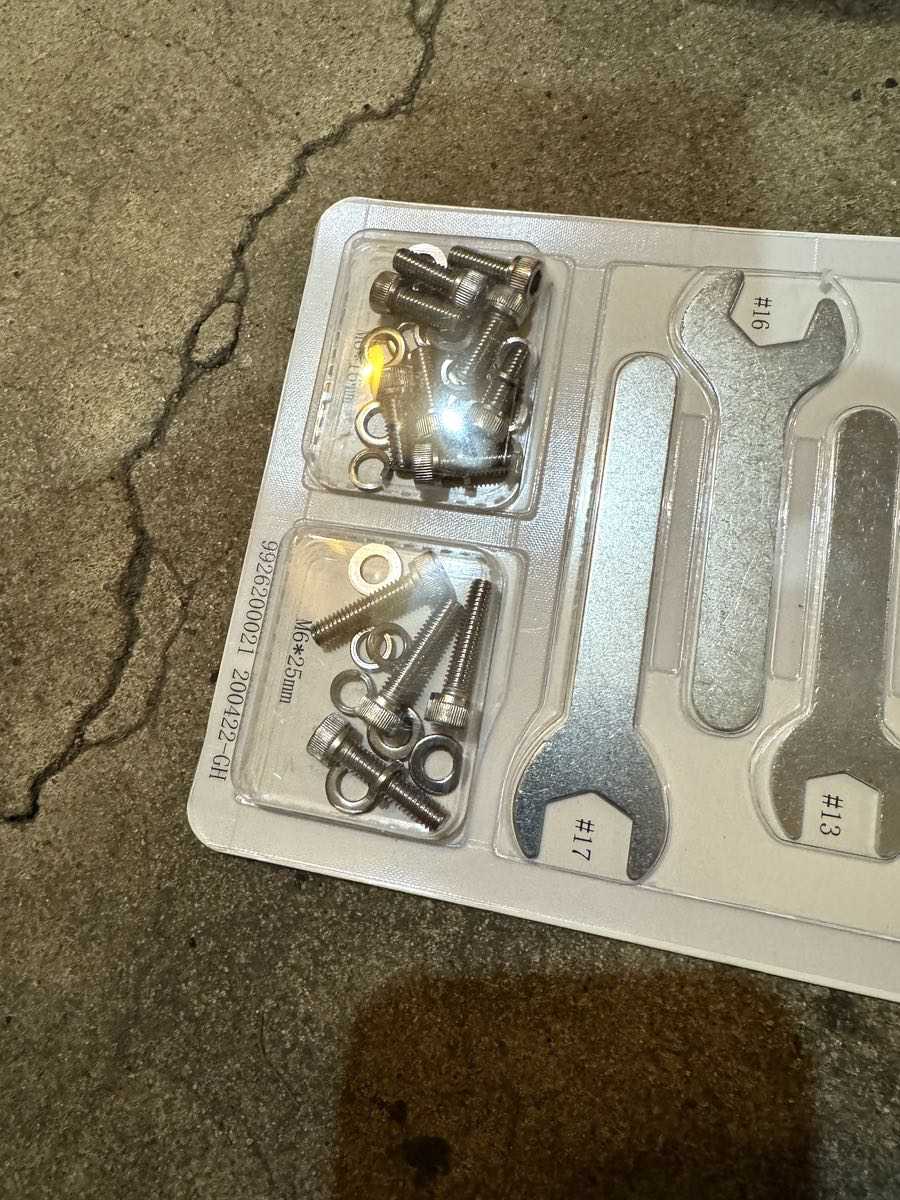
That said, Kamado Joe does a nice job simplifying the assembly. You’ve got a set of nicely labeled boxes that include the materials needed for each step in the process. This is all packed in and around the body of the unit in that big box.

The unit itself also contains the internal components and extra bits, so you’ll want to pull that all out and organize yourself to get started.
The directions use clear illustrations and codes to align the parts you need at that step with the install. You also get a set of tools and nuts/bolts similarly organized, so there is no guessing about what to use when.
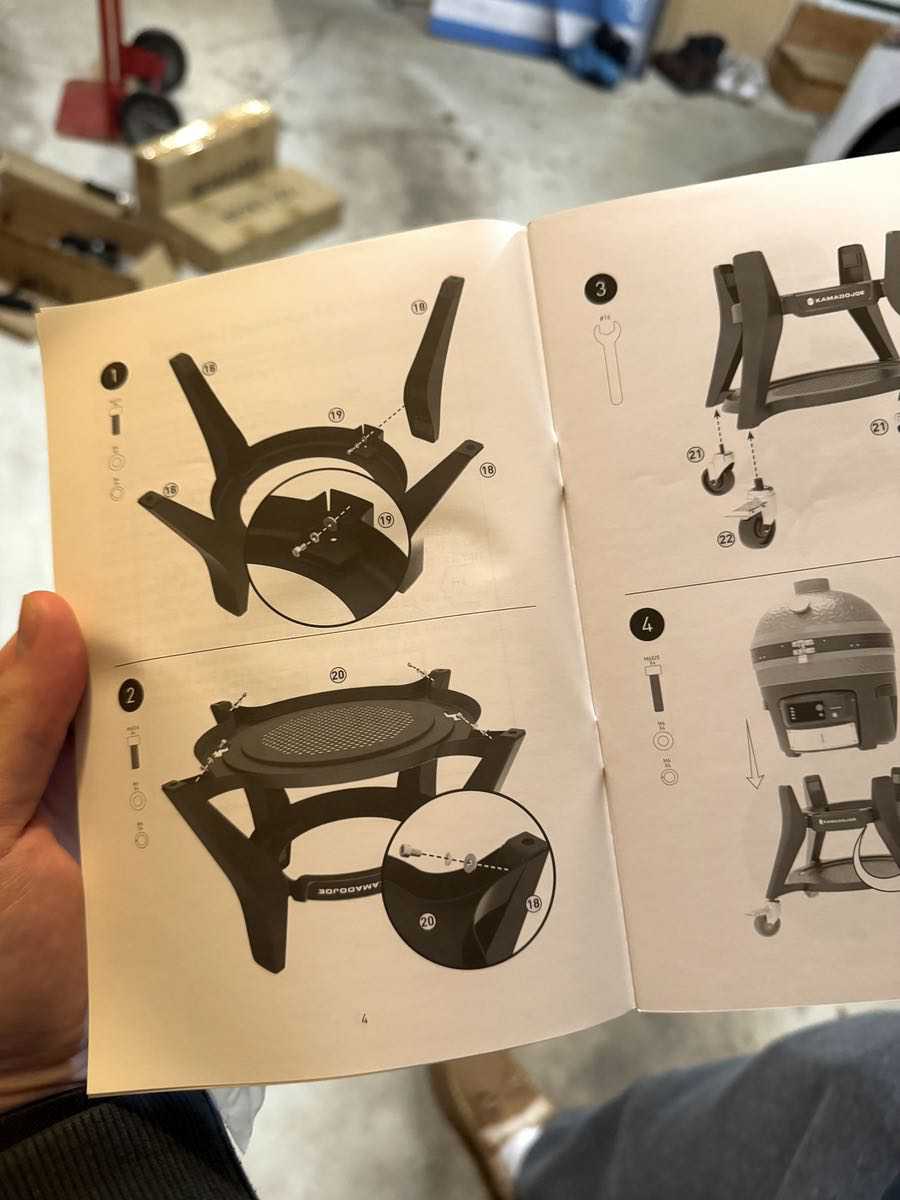
The actual build process itself took us under an hour. You start by assembling the base, including the installation of the wheels.
The main body then goes on that base. This is the heavy bit, and you’ll want extra hands here to help moving it about without cracking any importasnt components. It does slide on the base pretty smoothly into predefined tracks after which you bolt it in place. All of the electronics, the lid hinge, the thermometer, etc. are pre-assembled in place so there is no messing with that stuff required… just make sure you don’t bang it up when you’re installing it.
The trickiest bit here is installing the heat shields inside the body. They are heavy individually and come packed in the grill, which is why you’ll want to take them out before you install the main unit on the base (it will save you a bunch of carrying weight). Then they slide/slot together inside the body. I was extra careful here so I didn’t crack one!
This is also a good reference shot for the charcoal starter heating element, which is that dark ring in the pic below. All those holes you see in the floor are where you’ll brush your ashes into the ash catcher.
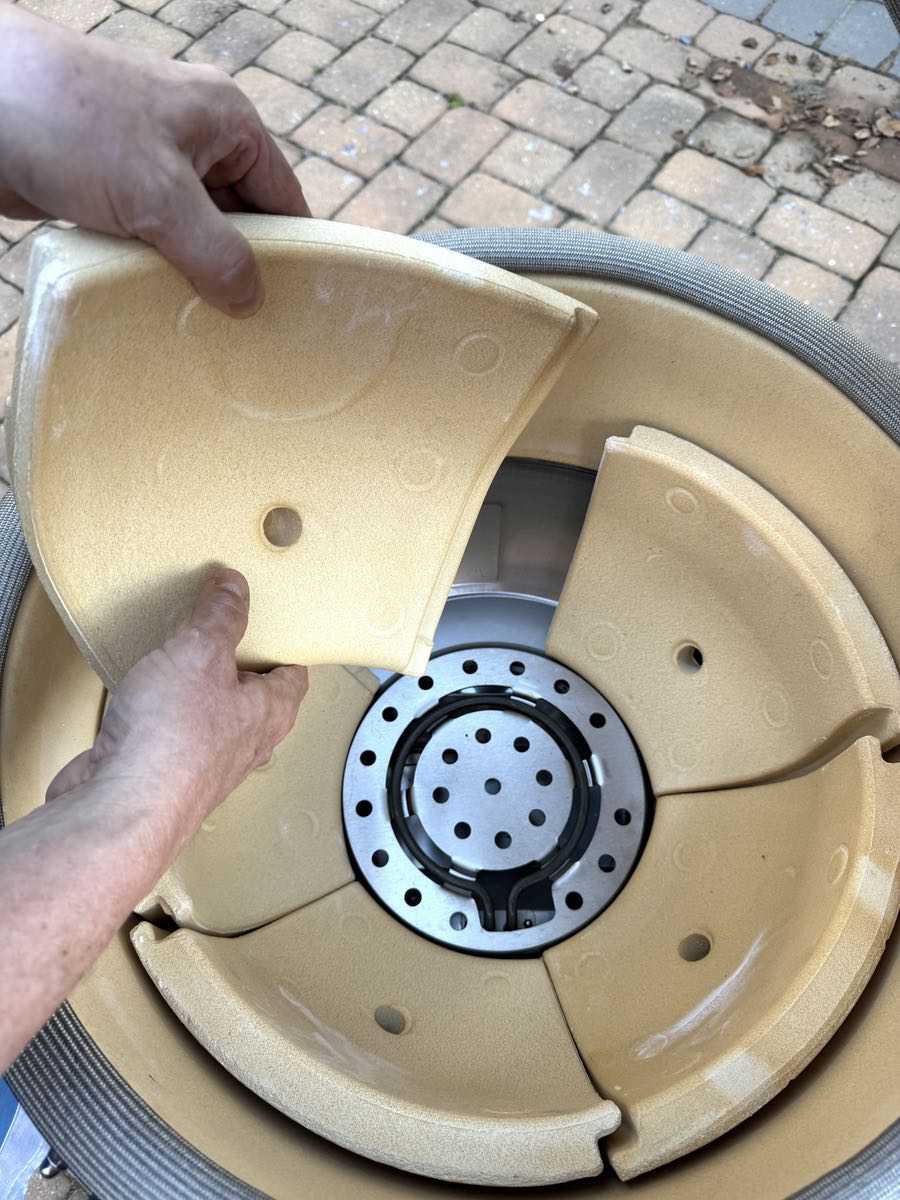
Once you have the shields in place, there’s a metal ring you’ll install that keeps them all together and creates an air gap between them and the sidewalls. Once you get that shuffled into place, it’s just a matter of setting up your grilling racks.
Finally, you’ll install the handles and side shelves. Note that you’ll need to connect the power cord to the rear port if you’re going digital. That power cord requires a 110-120VAC, 4AMP, 50/60HZ, 500W 3-prong grounded plug to support the heating element.
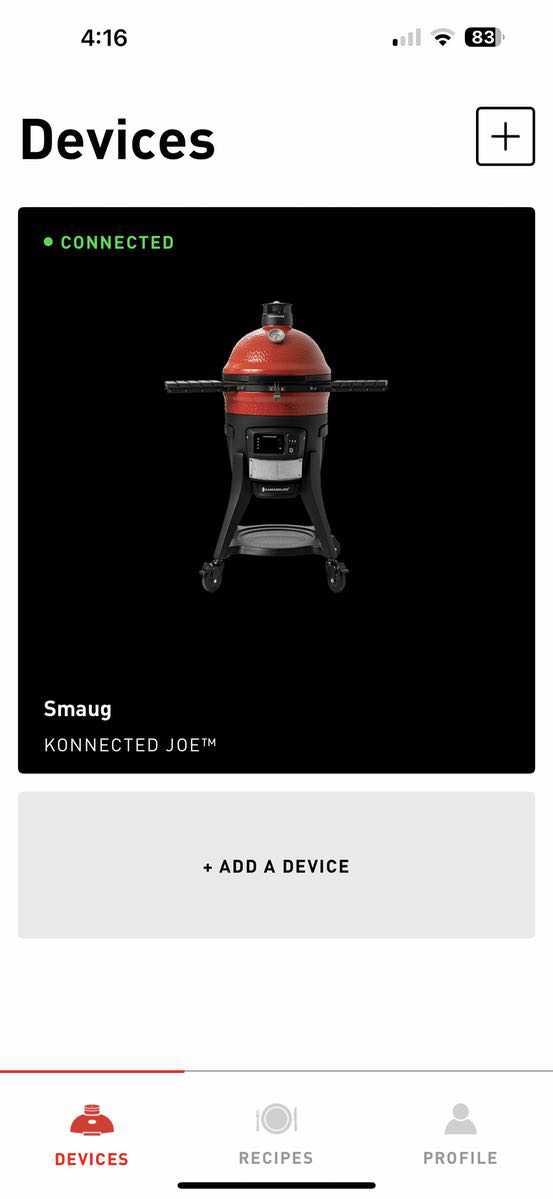
Once you download the Kamado Joe app, you’ll want to pair it with your grill. Here the app walks you through the process. You’ll hit the add device button on the app, turn on the grill, then press and hold the wifi button as shown below.
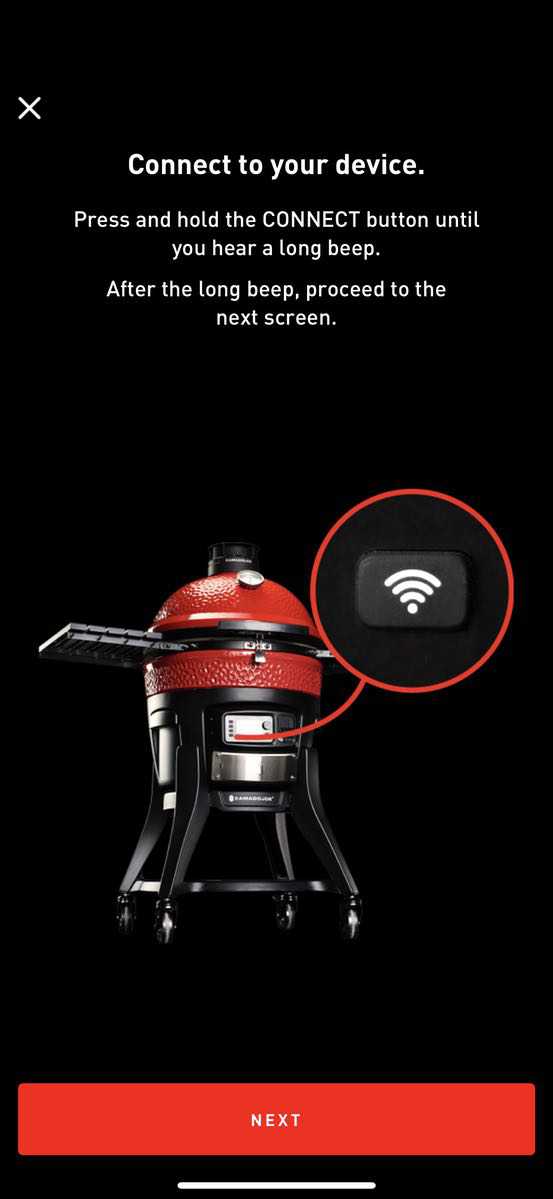
The app will then detect the grill through Bluetooth and prompt you to finish the connection via your WiFi network. It will ask for a network ID and password, and ask you to name your grill in your list (in case you have multiple devices).
I noticed that this gave me trouble at first because I run a mesh network overlaying my incoming WiFi. I had to make sure that the device and my phone were on the same network among other things. After much tinkering, I also figured out that I needed to reboot my phone AND the app AND the grill to get everything talking to each other. This is a problem I have seen with other WiFi-connected devices.
Once you work through that, however, you’re good to go. Whenever you turn on your grill it is recognized by the app, and business proceeds as usual. I’ve had no issues with connectivity once I have the app opened and the grill turned on.
I do want to point out that the customer support for the Kamodo Joe Konnected Grill was not good in my experience. They have an online chat function, but I could never seem to get them when someone was available. The example below was from a Friday afternoon.

When I tried sending a message or using the form from either the app or their web site I could not get through. There was some buggy captcha app that kept blocking my requests even after trying it on multiple phones and devices. I also found Kamado Joe’s online support forums to be pretty basic, and I could not find a phone number for support.
I honestly had much more luck googling stuff and hunting Reddit forums for any support I was looking for. Hopefully, this is a result of the off-season review (I’m doing this in March of 2024) and not an indicator of regular customer support during peak grilling season.
Performance
I’ve read about the versatility of Kamado-style grills, but this is my first experience with this design. I am not gonna lie: the combination of the ceramic grill and digital control found in the Konnected Joe Digital Charcoal Grill & Smoker has been seriously impressive.
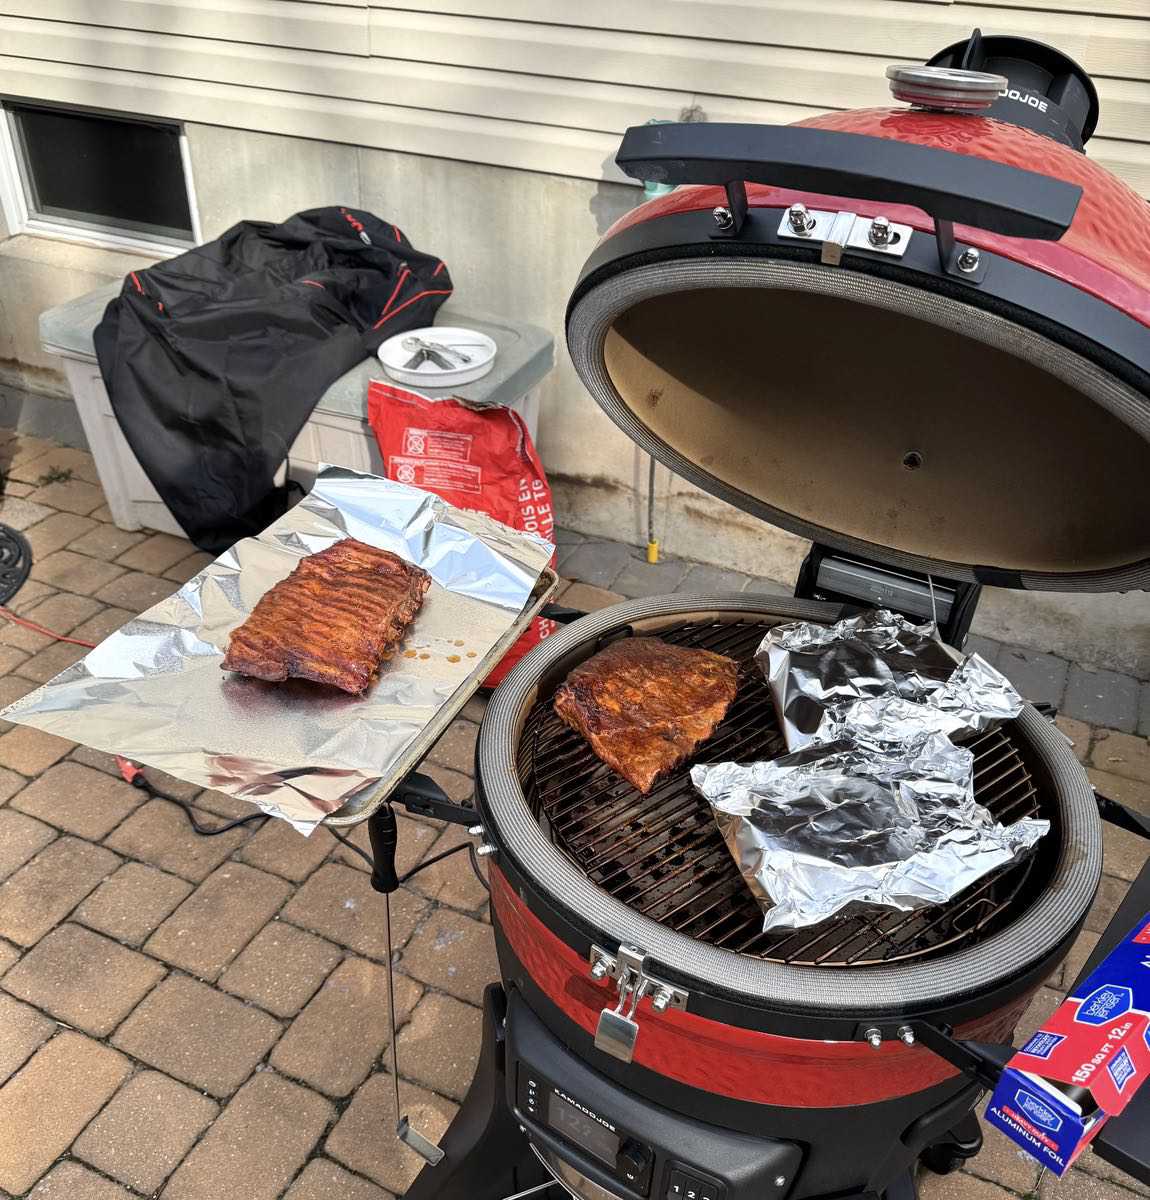
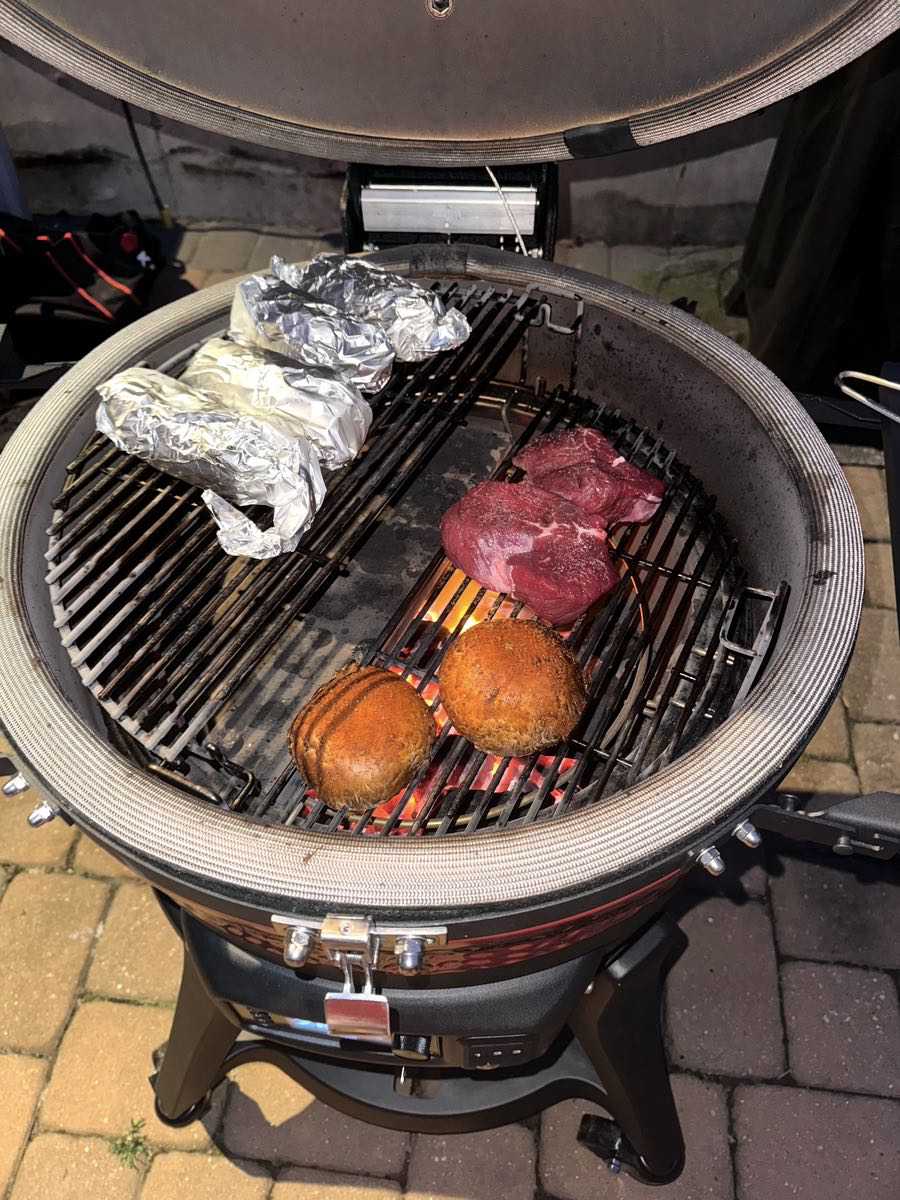
For my first cook I decided to go all in and do baby back ribs. The surface area is enough to do two full racks, halved to fit. I loaded the grill with a mix of lump charcoal and hickory chunks that you can see in the pictures above, set up the heat deflectors for indirect cooking, set the grill temp to 250, and let ‘er rip.
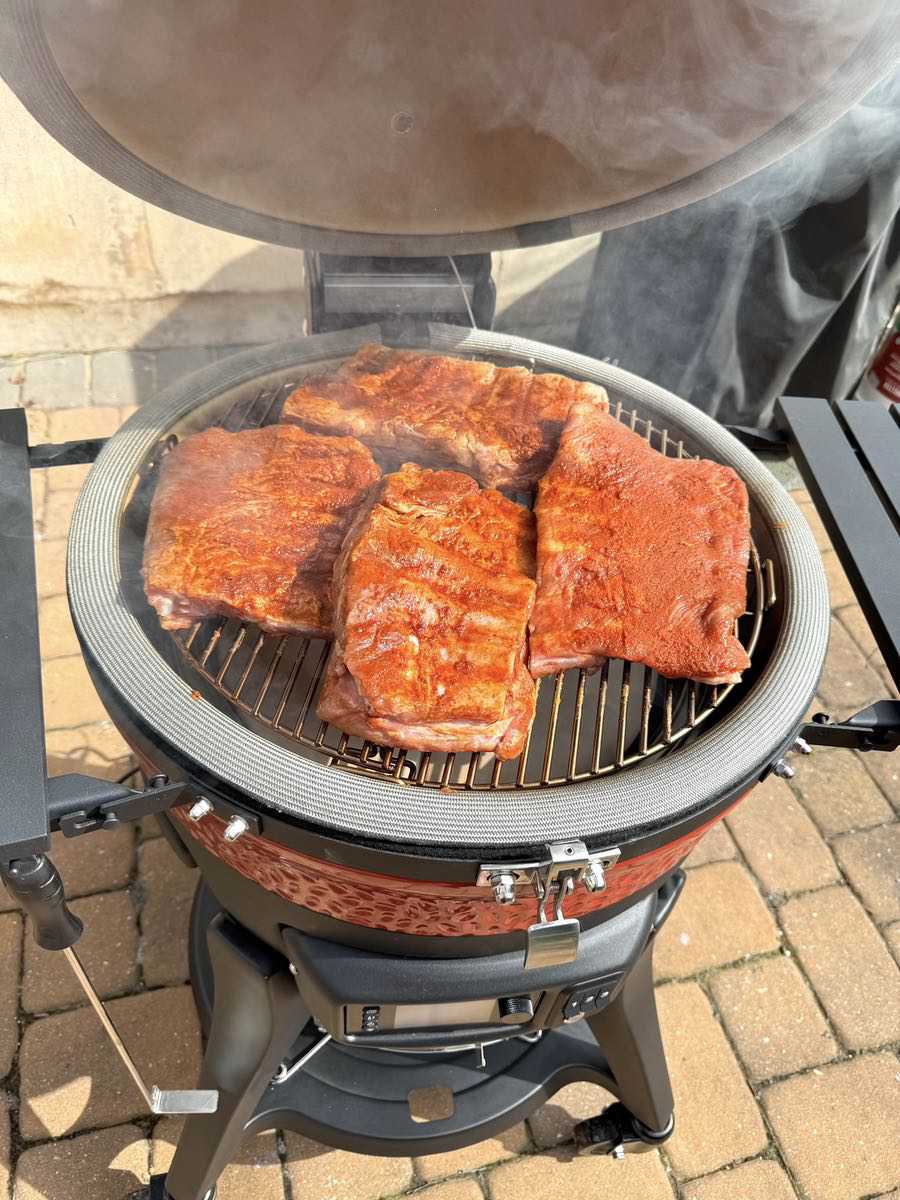
For this recipe I used my own sauce & rub, but I followed the app recipe for cooking times: two hour cook, wrap in foil for another hour, then back without foil for the last hour followed by glazing with sauce. This shot below is what we’re looking at just before glazing.
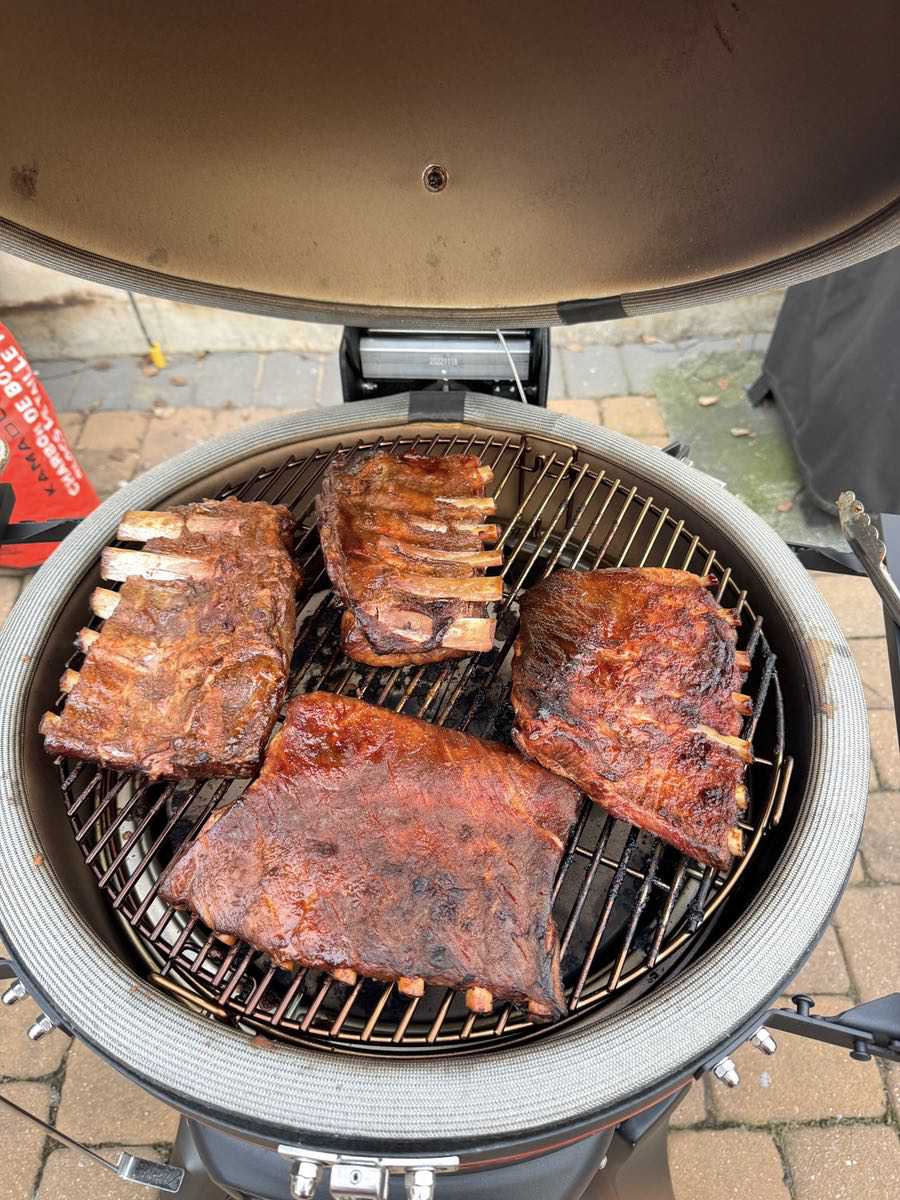
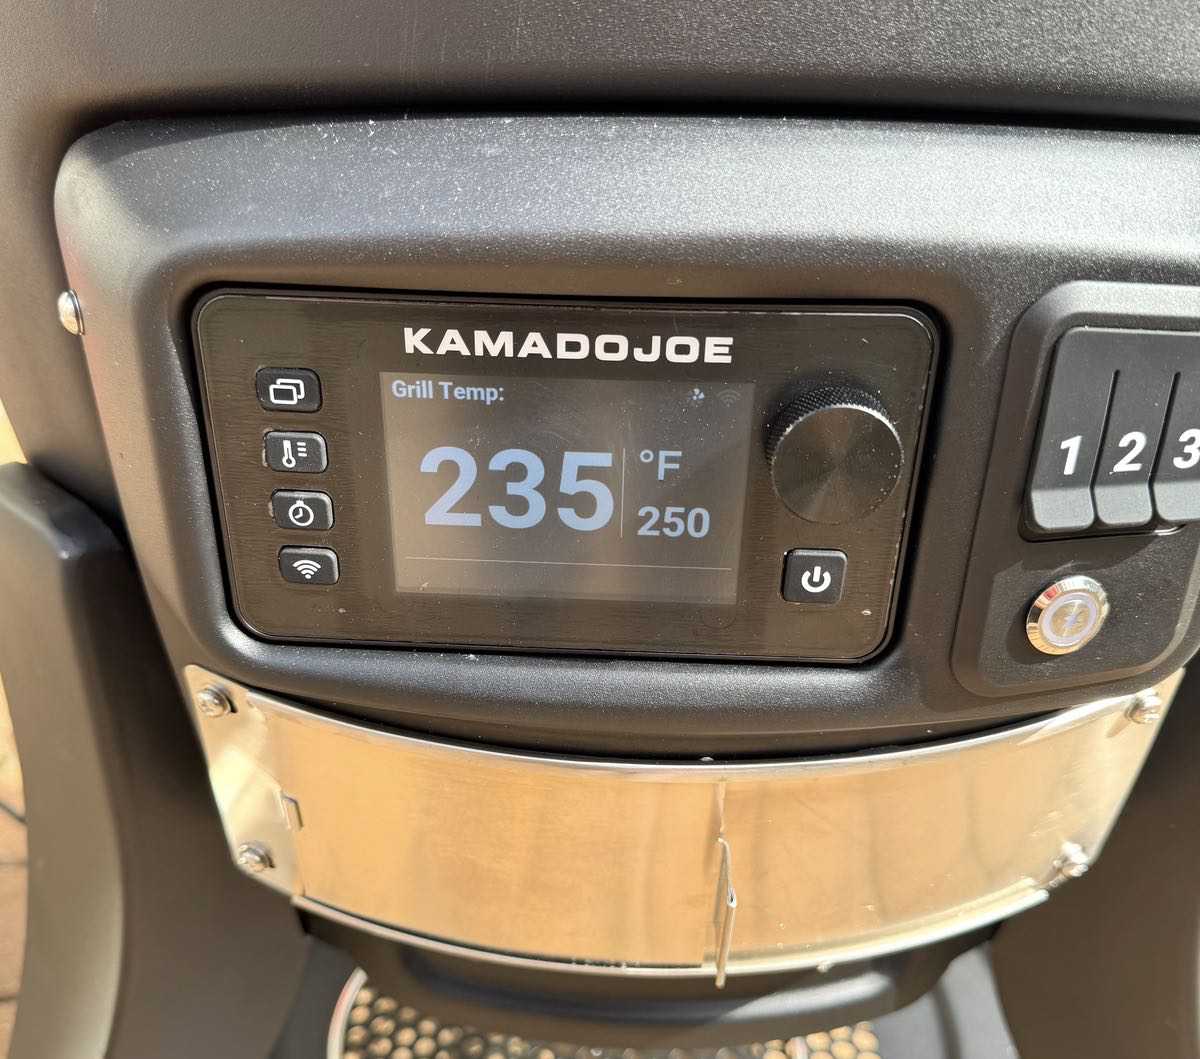
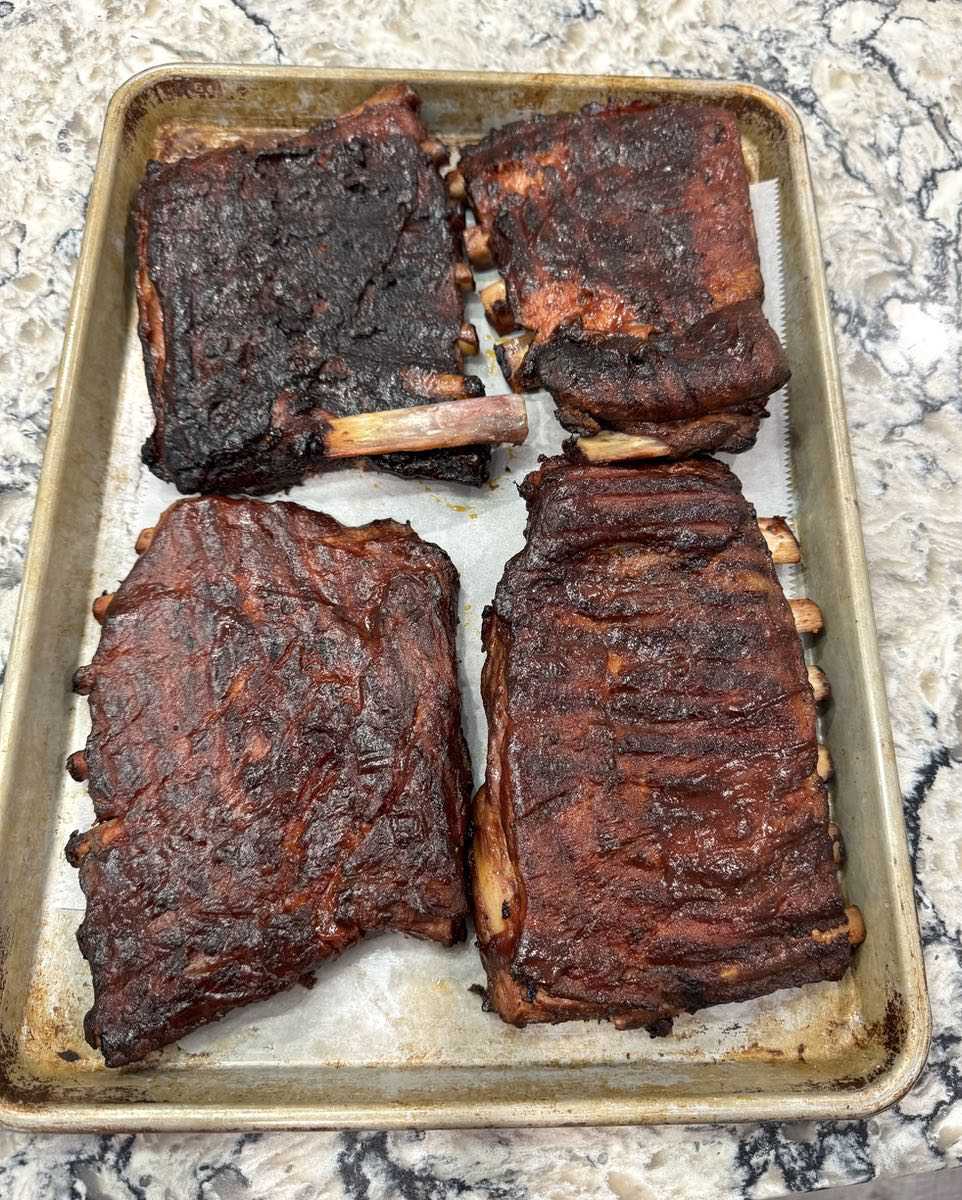
And here’s the finished product which was just about perfect the first time. The temperature control is amazing, locking in at a steady 250 degrees for the entire four hour process. No refilling of charcoal. No messing with vents to adjust the airflow. No tinkering of any kind. It just does its thing. And whenever I would open the grill to adjust the meats, the fan would fire again upon closing to get back the desired temp as quickly as possible.
After the cook was done, I then cranked the temp to 500 degrees to clean it. The fan kicks up to launch mode. Then I turn off the electronics and opened both vents to speed the process along to burn it out. The Kamado maintained heat for hours after my cook was done with the lid shut. That sucker went for 8 hours plus on the same load of charcoal I started with!
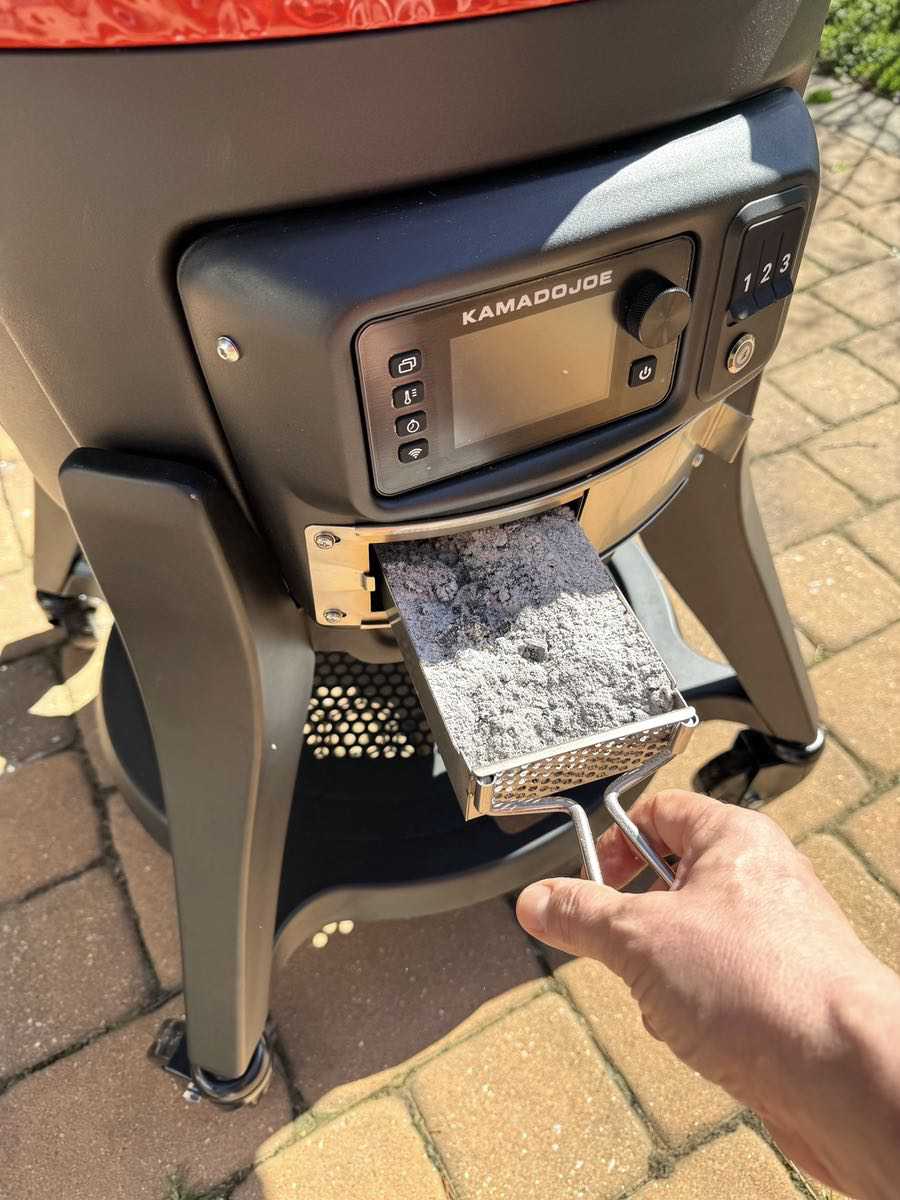
When it’s all cooled down you can use the ash tool and/or a brush to shuffle all that ash through the holes at the bottom of the grill to the waiting ash scoop. All the racks are removable for easy cleaning.
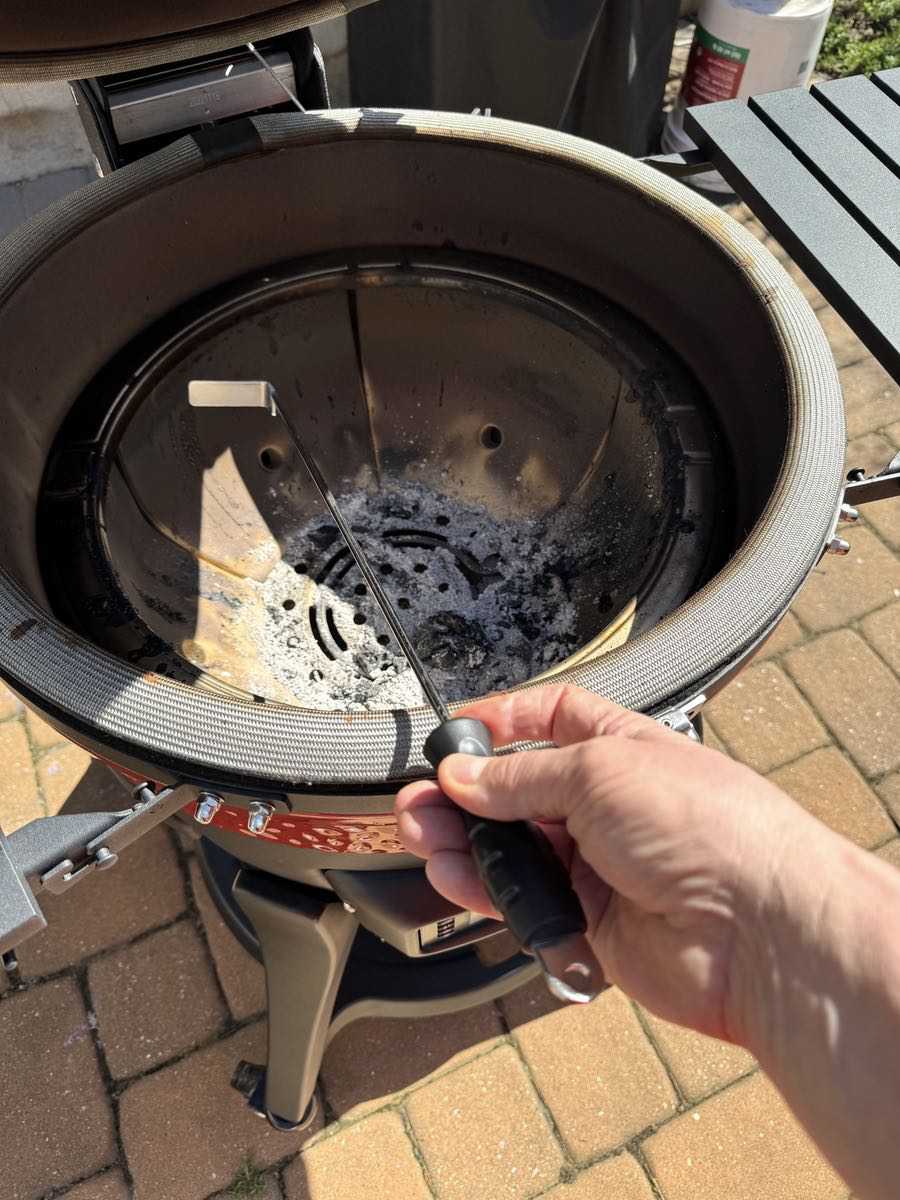
Pull the scoop, dump the ashes, and you’re done. Super efficient design. I did notice some ash lingers in the chamber. The ash tool helps to pull that out of there; Kamado Joe also recommends taking a shop vac in there from time to time to clear out any corners.
The flexible rack system is a very smart design. You can do direct grilling at either the low or high set point on the rack, or use the heat deflectors for indirect grilling/roasting, or a combination of the two if you want to create cooking zones. That’s what I did below. I used one of the deflectors and positioned it under the high rack on the left side, and set the other rack in the low position on the right side. This set me up to bake potatoes over indirect heat on the left, then I came back after 45 minute and seared steaks & portabello mushrooms on the right. I then moved the steaks & mushrooms to the left side to finish cooking.
That accessory rack has come in handy to set a drip pan above the deflector plates when I was roasting a chicken. If you look closely at this picture, you can see that it too can be set on the upper or lower level of the rack system. I’m REALLY looking forward to testing out my round-bottom wok in there (removing the heat deflectors), but I haven’t quite gotten to it yet. This will also be great for a water pan for longer, lower smoking sessions like brisket or pork shoulder. You could drop a cast iron pan or pot on there, too.
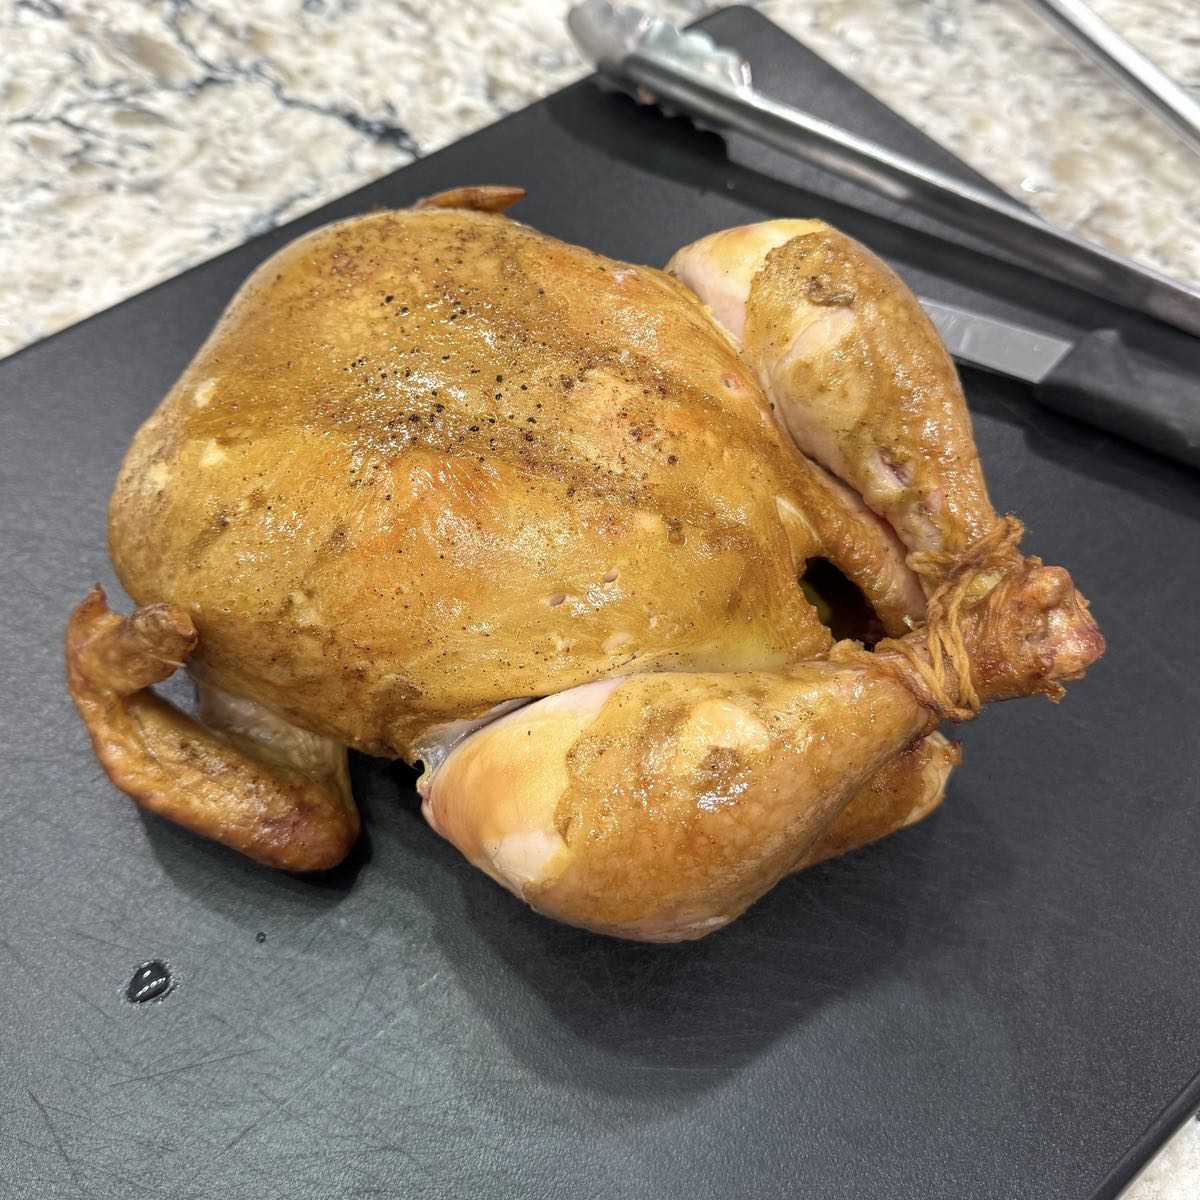
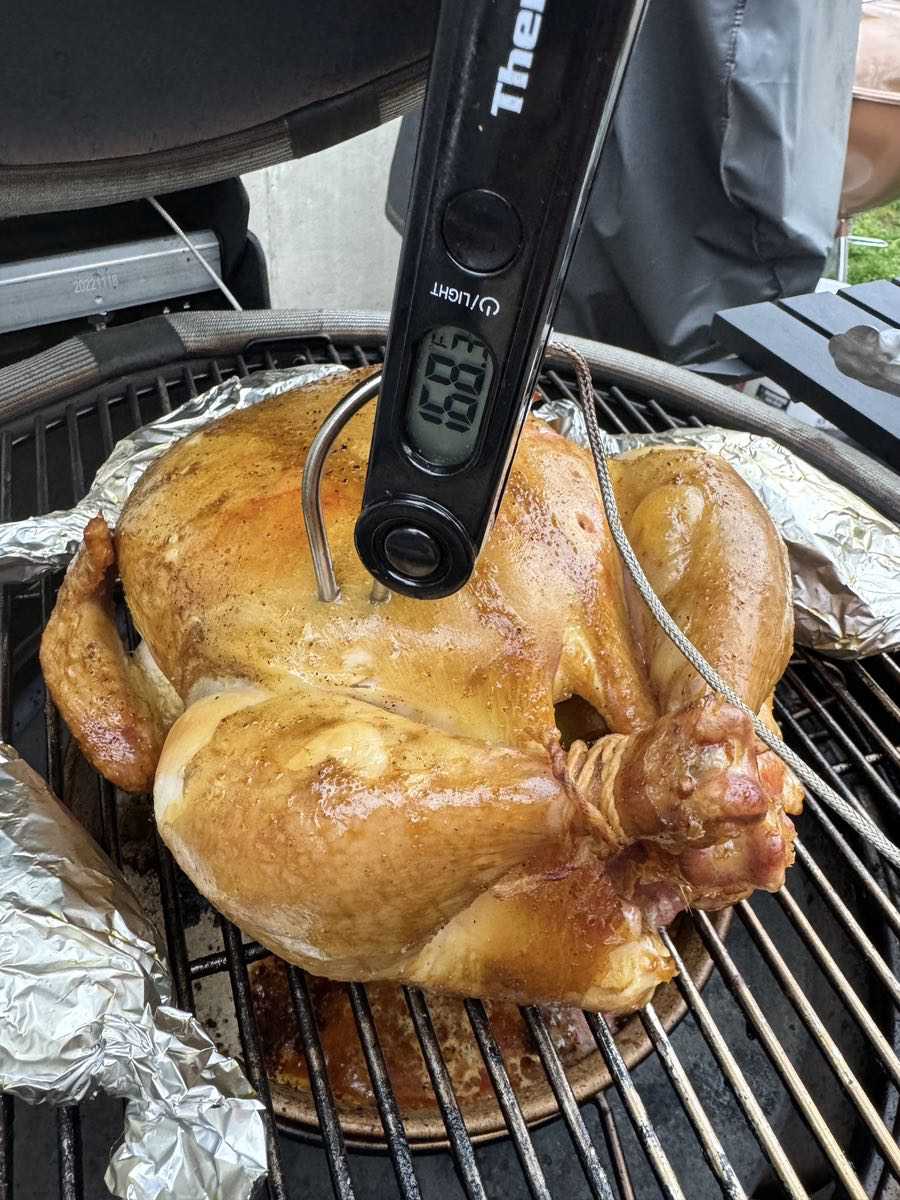
Speaking of chicken, here’s the bird I roasted in the Kamado. It was honestly just about as easy as roasting it in the oven. Fire up the grill to 350, set the probe in the bird, 20 minutes to get the coals going with the automatic starter, and roughly 2 hours to complete the job. And it was a mighty tasty bird when all was done!
I did find this interesting: when testing the probe temp against my Thermopen, the Kamado probe temp was registering about 8-10 degrees lower. I took this measurement when the app told me the bird had hit 160 degrees, and I trust my Thermopen to be pretty accurate. I’ll need to do some more calibration testing as I explore roasts and briskets.
The app has some kinks that need to be worked out. I think it does a good job of accurately syncing to the onboard digital display with respect to temperatures, and you can adjust your settings from the app after you get things started. But I did find that the app had a tendency to crash on my iPhone while I was monitoring my cooking. When I would restart the app it would pick up the settings from the grill, but it would reset the session graphing back to zero and I would lose the recorded data. That being the case, the session data hasn’t been very useful. The ability to monitor and adjust the cook while moving around the house, however, is fantastic.
Temperature control in general is amazing and efficient. You set the goal temp and it just takes all the guesswork out for you. I’ve run it anywhere between 250 and 500 degrees for various applications and it just gets there and holds that temp until you want to stop. I’m really interested in trying baking on the Konnected Joe this spring.
I also appreciate that Kamado Joe includes all of the accessories with this product. Between the adjustable rack system, the heat deflectors, the accessory rack, tools, and the side shelves you get a fully-realized kit out of the box that allows you to do just about anything without buying more accessories. You even get a grill clamp (not shown) in addition to the ash tool to help with cleanup. This is stuff that should be included with a grill at this price point, and Kamado Joe delivers there.
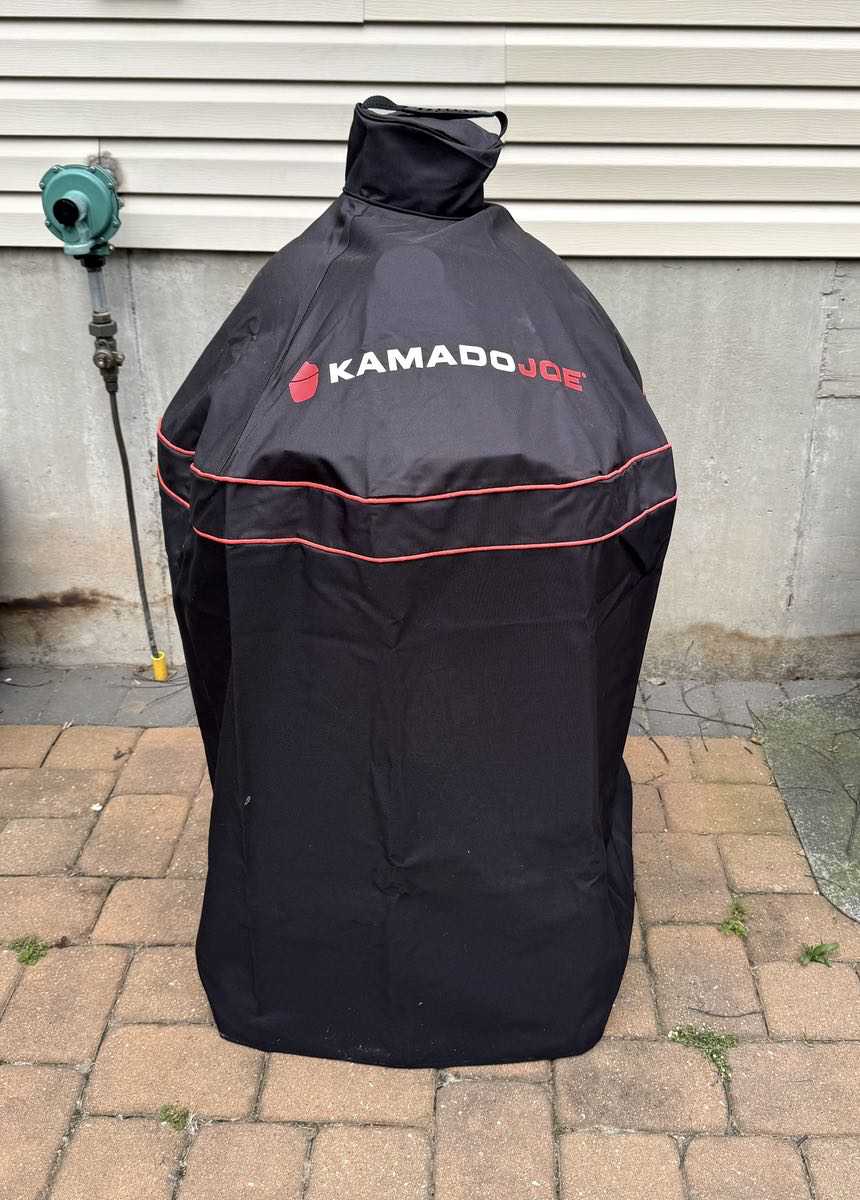
A note about weather: Kamado Joe states that you should not expose the grill to water for extended periods of time like torrential rain. I believe the electronics carry an IPX4 from what I was able to find. You’ll certainly want to cover it when not in use or roll it under a protected area. I did get the cover included with my test kit, and it’s excellent. We’ve had a few nasty spring storms here, and the cover fits all the way down to the ground to protect the wheels as well. Highly recommended to protect your investment unless you can wheel it into a dry place when not in use.
One final note about power requirements: check your outlet ratings for where you want to set up this grill. My grounded outdoor outlets work just fine, but non-grounded wall outlets will not work given the power requirements.
What I like about the Konnected Joe Digital Charcoal Grill & Smoker
- Precise temperature control
- Easy to use digital interface
- Flexible setup for direct grilling, indirect grilling, low & slow barbecue, 2-zone cooking, smoking, baking, etc.
- Fast heat up with built-in charcoal lighter — gets to temperature in 15-20 minutes
- Works with and without the digital assist tools
- Heavy-duty, durable build throughout
- Brainless & painless operation
What needs to be improved?
- App is a bit twitchy
- Meat thermometer seems to register lower temperatures than hand-held digital units used during testing ( need to validate calibration)
- See notes about weather resistance
- Customer support was not good; I had better luck with Reddit forums
Final thoughts
The Kamado Joe Konnected Joe Digital Charcoal Grill & Smoker is an impressive cooking tool for hardcore charcoal grilling enthusiasts. You can truly do just about anything on it from grilling to smoking to baking to grilling out of the box. The integration of all the components is marvelous for intuitive, low maintenance, stress-free management of your grilling tasks. You can also add an assortment of accessories (like a rotisserie, a carbon steel wok, etc.) that enable you to tackle just about any cooking challenge on this monster if you want to expand your arsenal of capabilities.
The elephant in the room, of course, is the price. Kamado-style grills of this size have a wide range of price points. I’ve seen entry models in the $800-$1200 range depending on brand & feature set. Higher end full-featured models (larger sizes, expanded feature/accessory sets) start at around $2000 and keep on going up. I’ve also seen some third-party accessories that you can add to your “traditional” Kamado to enable some of the features found here. But given what the Konnected Joe provides out of the box, it feels like the price point is right compared to what I’ve seen in my research. It’s really a matter of whether or not you want the digital experience vs. a traditional non-analog approach.
I’ll keep things updated as I use the grill throughout the summer!
Price: $1699.00
Where to buy: Buy at the Kamado Joe web site.
Source: The sample of this product was provided for free by Kamado Joe. Kamado Joe did not have a final say on the review and did not preview the review before it was published.

Gerber Gear Suspension 12-in-1 EDC Multi-Plier Multitool with Pocket Knife, Needle Nose Pliers, Wire Cutters and More, Gifts for Men, Camping and Survival, Grey
(as of May 4, 2026 18:41 GMT -05:00 - More infoProduct prices and availability are accurate as of the date/time indicated and are subject to change. Any price and availability information displayed on [relevant Amazon Site(s), as applicable] at the time of purchase will apply to the purchase of this product.)
Gadgeteer Comment Policy - Please read before commenting
I wonder how it would do with a 14 – 16 pound Prime brisket with a finish temperature of 203 F? I trust my handheld temp prob also, versus the one on my pellet smoker. Seems like a nice grill/smoker (using a smoke tube, though), but $1700 is expensive. One can get a nice pellet grill for that price.
That is very true. I have not worked with a pellet smoker, but I hear all the good things. This grill has put my beloved Weber kettle into retirement, though.
I have brisket on my list for the summer. I’ll let you know how it turn out!
Hey, Bob!
Great review. few questions for you:
1) Do you think having this all-in-one solution is better than doing the “lego” approach? I see a lot of KJ users, especially on reddit, recommend to get an “analog” KJ, then add on a fan kit from Fireboard/Thermoworks. I think many are still (rightfully) upset about the iKammand fiasco, and don’t trust KJ (To add insult to injury — the CS is atrocious now)
2) Do you know what type of antenna is being used for WiFi? Is it 2.4GHZ or 5GHZ?
3) How many people are you usually cooking for/entertaining? One thing I’m worried about is “outgrowing” the Konnected Joe in terms of size. I’ve always been a person of “have and not need it rather than need it and not have it”. I’m usually cooking for a family of 5, but obviously when you started to add guest, this can swell to 15+ people (Just adults, imagine adding in kids). I think this is where pellet grills shine. When you consider the high end ones, those can be absolutely gigantic (Those are, essentially, “smart” offset smokers in terms of size IMO).
Thank you! I have a few thoughts.
Regarding the “lego” approach: the Konnected Joe is a $400 upgrade from the current base model (the Series II), and you can get the older models on closeout for even cheaper if you want to build out your own solution you could probably save some money. I do like the integrated electronics (no fuss, no mess) and I really like that built-in electric starter… but there is nothing here that you couldn’t do with aftermarket options if you’re handy.
The CS issue is real. I had issues contacting them myself. Something to consider if you’re thinking about building out your own mods, since you’ll be able to replace components easily. Since my test model came direct from the manufacturer, I don’t know what local sellers are doing for support.
WiFi antenna is 2.4 GHZ.
Size is a very real issue if you’re doing a lot of crowd cooking, depending on your food choices. I had a cookout for 30 people this weekend, and I had three grills going. The KJ had 16 full size chicken drumsticks smoking, but I could squeeze up to 24. I also had my vertical smoker going with thighs and breasts, and my Weber Genesis working with other sides. (I also had a bit of whisky. It was glorious.)
Short answer: I don’t see any issue with big pieces of protein (like a brisket, pork shoulder or whole chicken), but you could be challenged with stuff that requires extra grate space like chicken parts or ribs. You can buy a second set of grates with that two-tier system, though, and I think they sell some additional gadgets like rib racks.
I hope that helps!