REVIEW – I’ve always loved bicycles… and gadgets and while electric bicycles have been around a while now, it’s only within the last 10 years that their sophistication and affordability has brought them front and center. Electrifying a bicycle enables one to go further with less effort, charge harder, or arrive at work without having broken a sweat. Velotric’s newest offering, Thunder 1, seamlessly blends bicycle with a power train and gadget-ness in a way that just puts a smile on your face. I’ve been able to spend a solid month on this beauty, so read on for my take.
What is it?
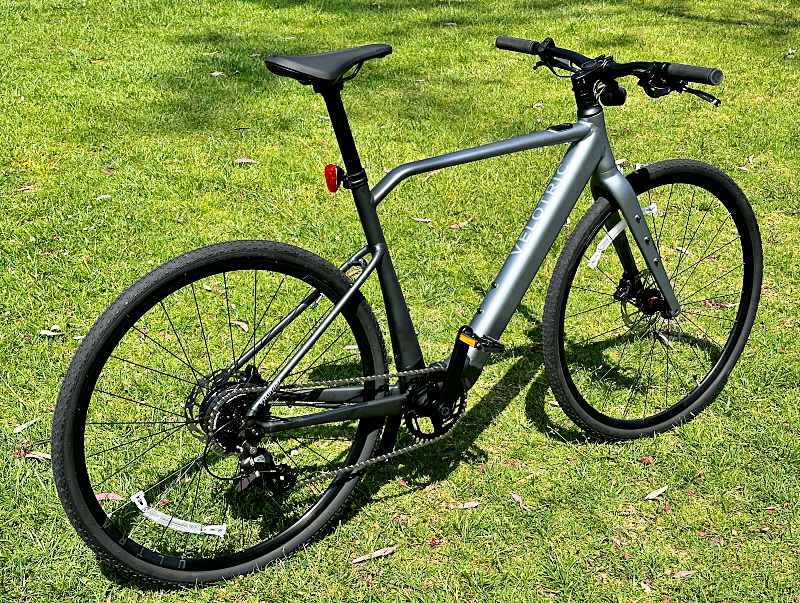
The Velotric Thunder 1 is a looker of an 8-speed electric bicycle with a pedal-assist system including a full 350w motor and battery. Integrated smartphone connectivity lets you manage settings, use your phone as a display and even have recovery options should your bike be stolen.
What’s in the box?
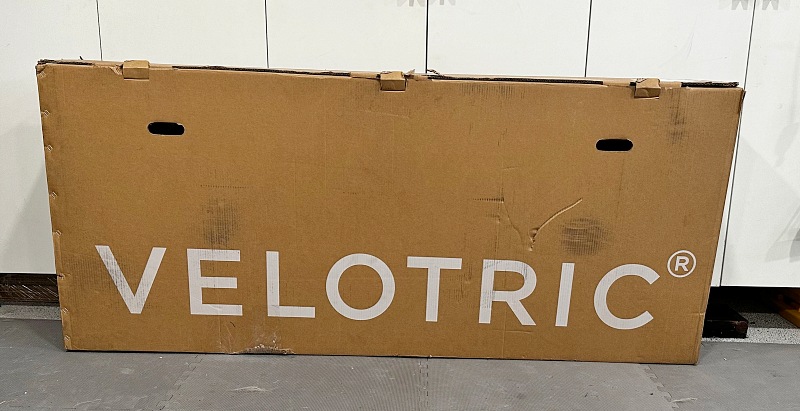
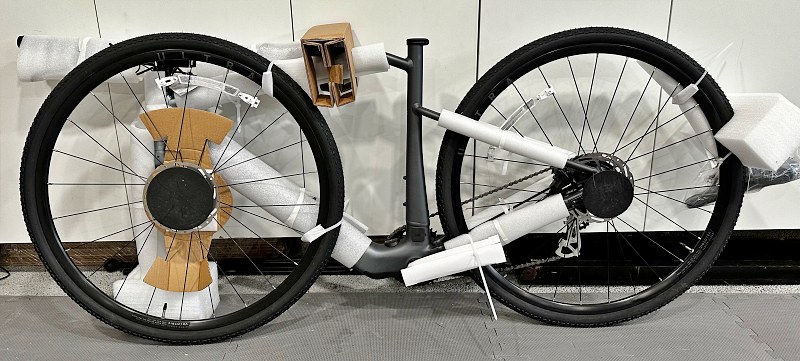
- One large box with solid product protection
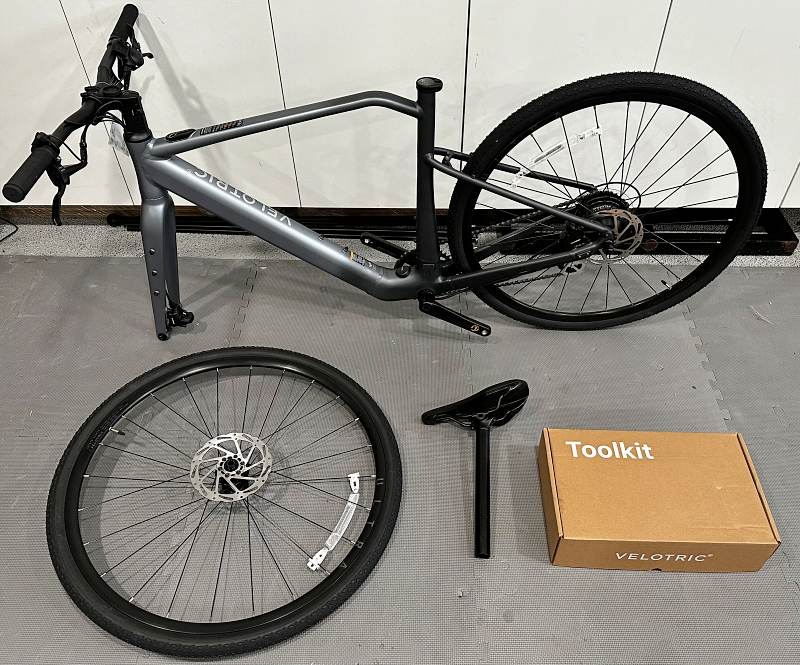
- Velotric Thunder 1 (mostly assembled)
- Front wheel
- Seatpost and saddle
- Toolkit
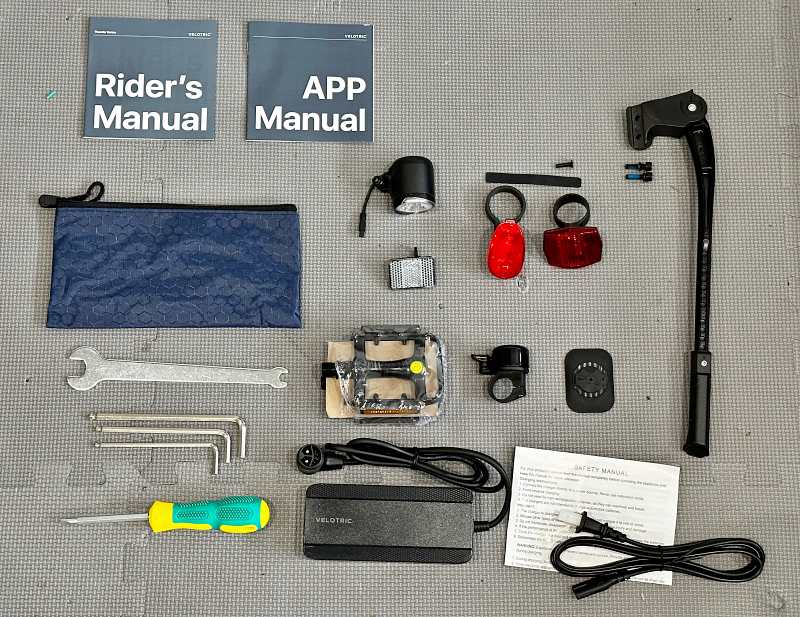
- And here’s what’s in the toolkit…
- Manuals for Rider and App
- Tool bag, Wrenches and Screwdriver
- Headlight (wired) and Tail light (battery powered)
- Reflectors and bell
- Pedals and kickstand
- Battery charger and cable
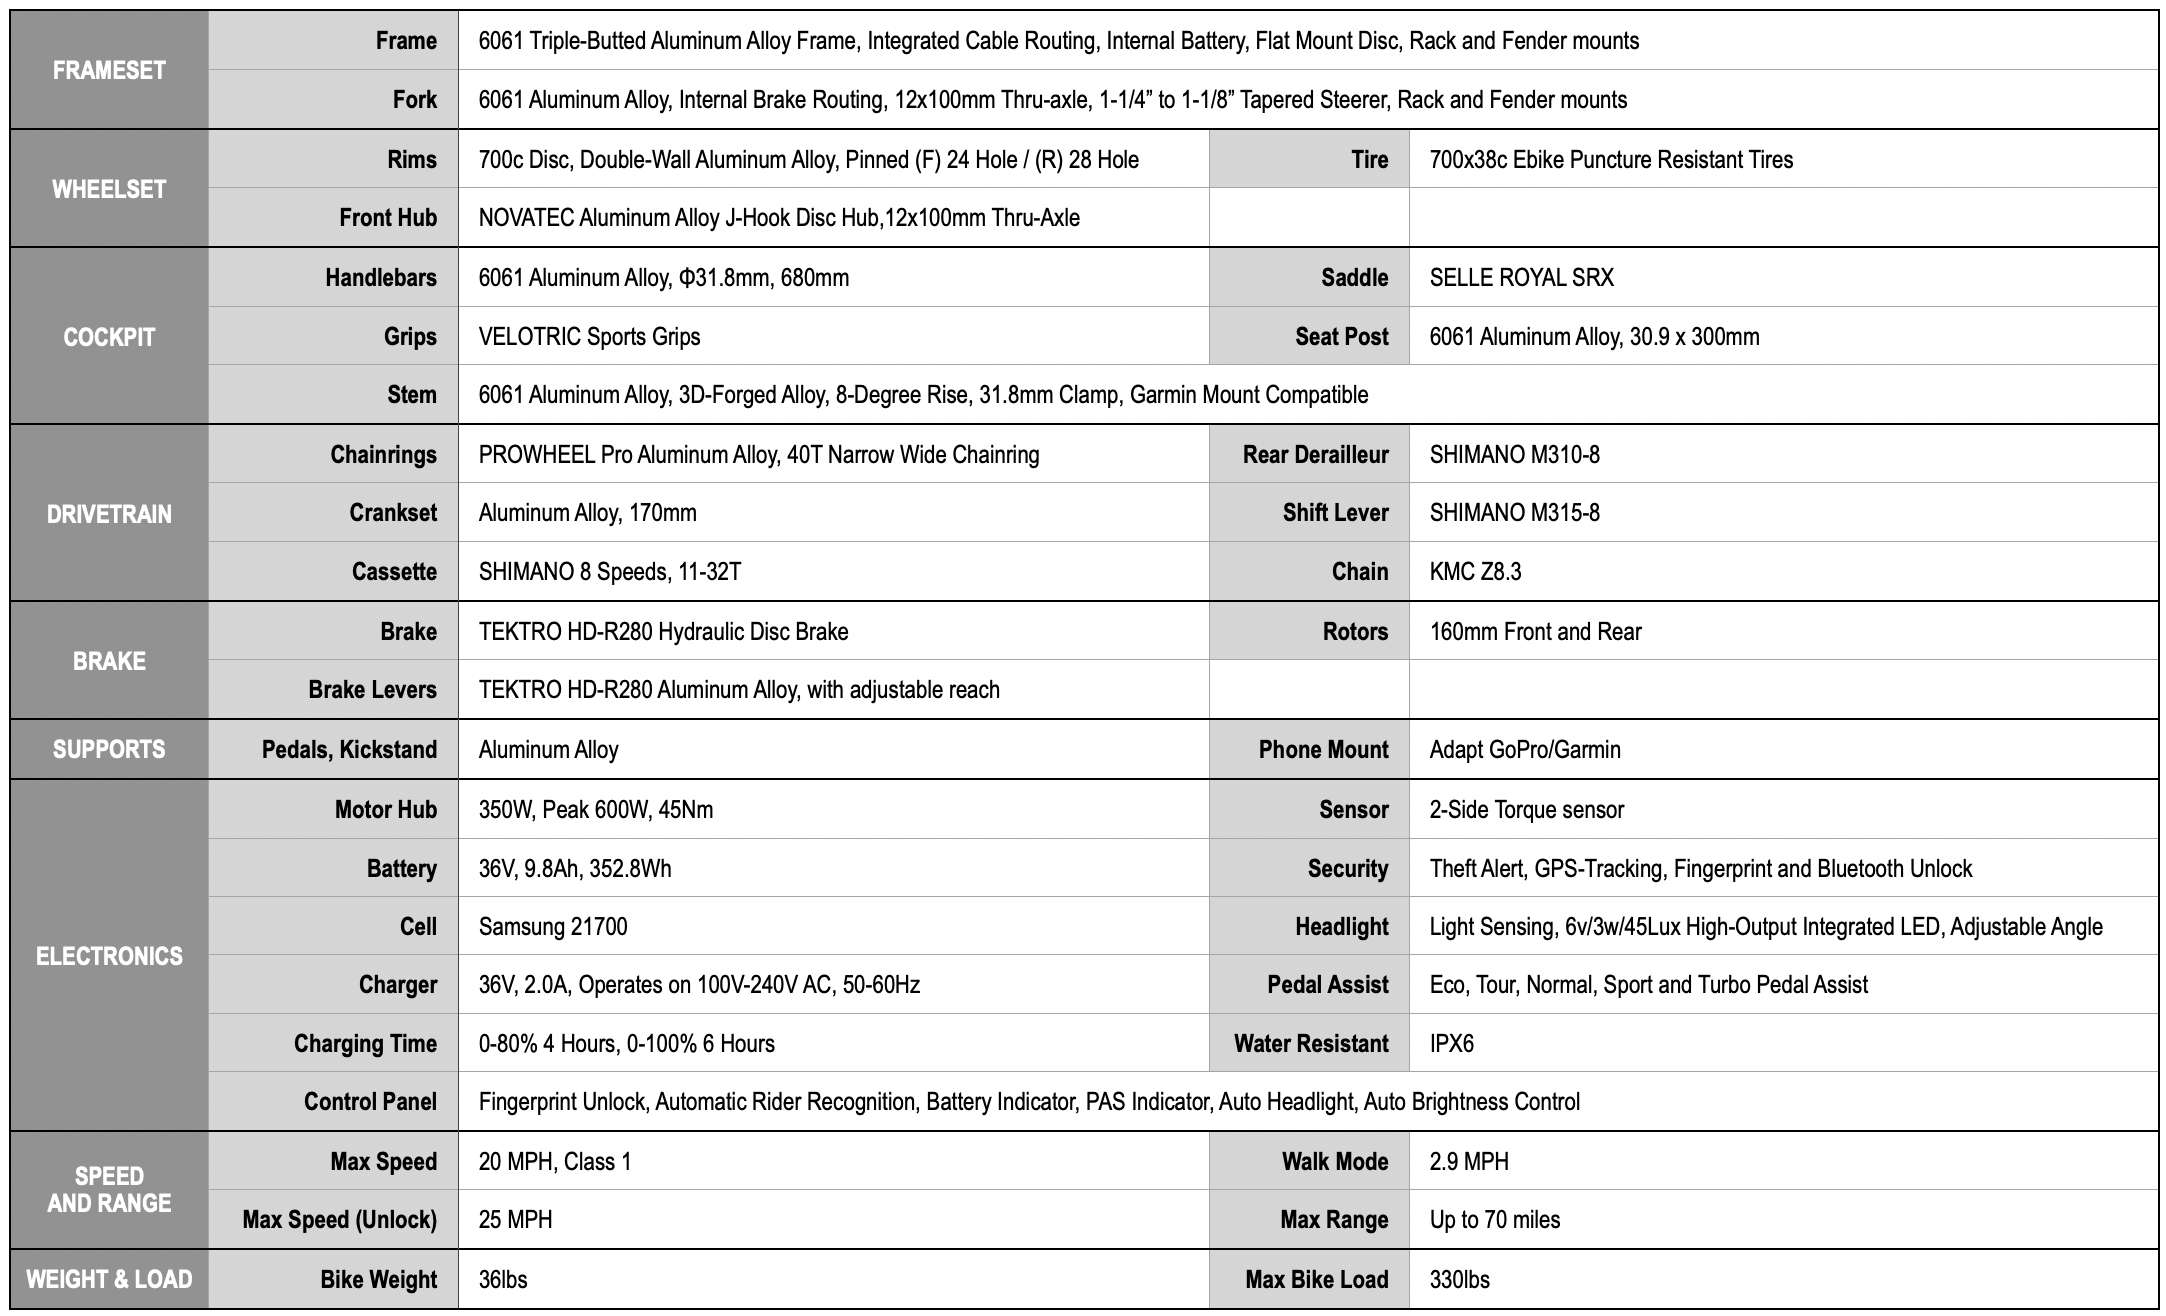
Hardware specs
There are a lot of components and specifications on an eBike. Here’s a reformatted version of those from Velotric’s website.
Design and features
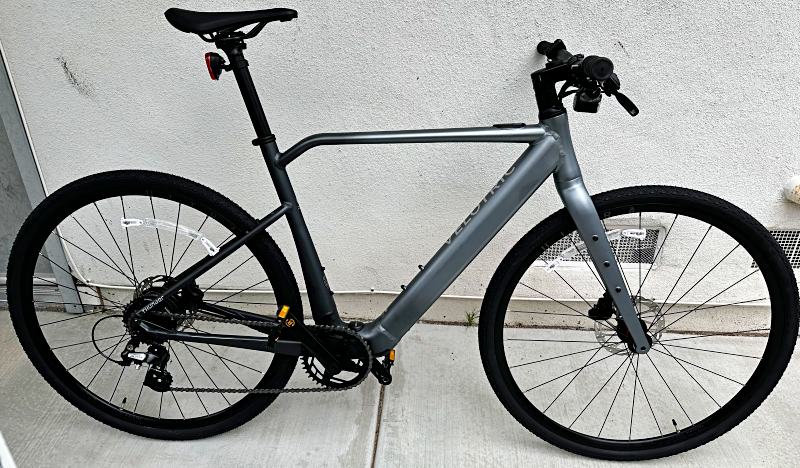
The Velotric Thunder 1 is a seriously cool bike that almost completely cloaks its ebike nature at first glance. The back-to-front fade on the paint job is gorgeous. The color I received is called Crystal Black. It’s also available in Frozen Blue which fades from blue to white.
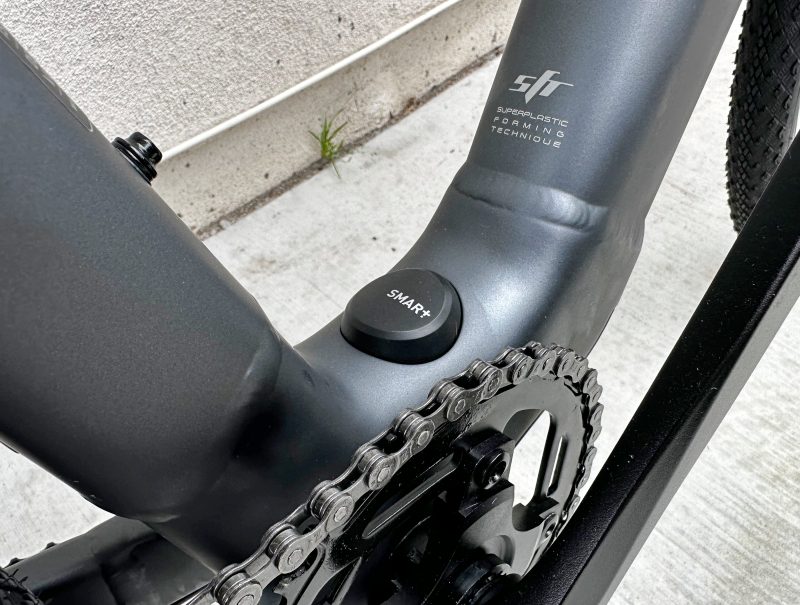
The first indicator that there’s more to this bike is the multifunction control module integrated into the top tube. It’s a power button, fingerprint sensor and color-coded level indicator all in one.
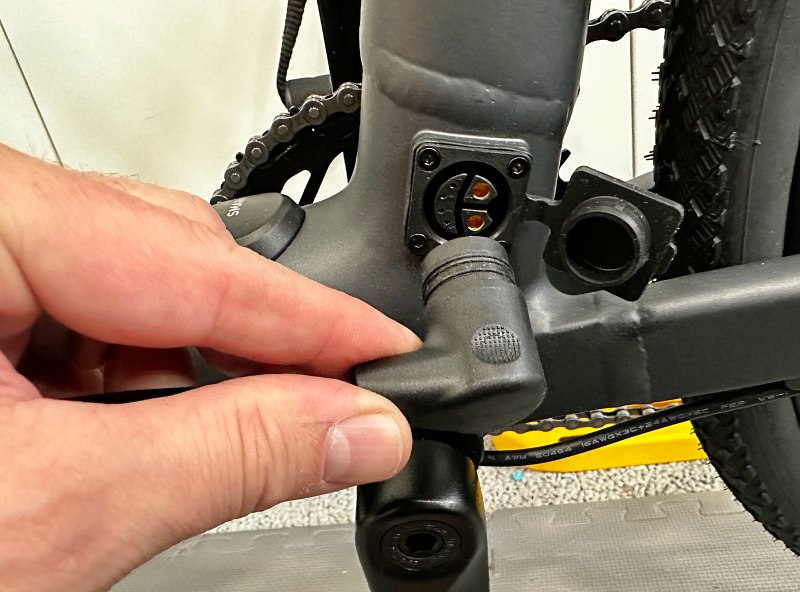
This small puck is another and it’s the central connection from Thunder 1 to your smartphone.
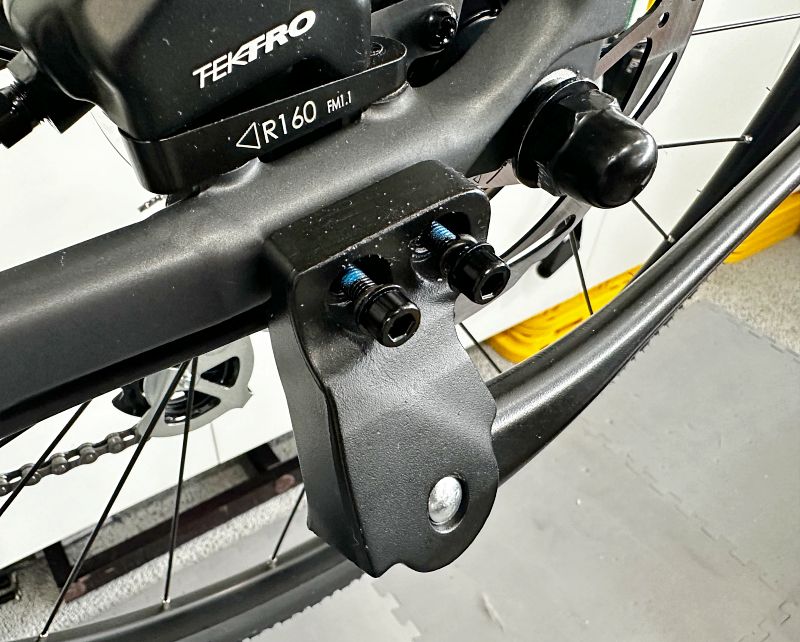
The rear motor hub has 350w of power and is small enough to hide between the brake’s rotor and the Shimano 8-speed cassette.
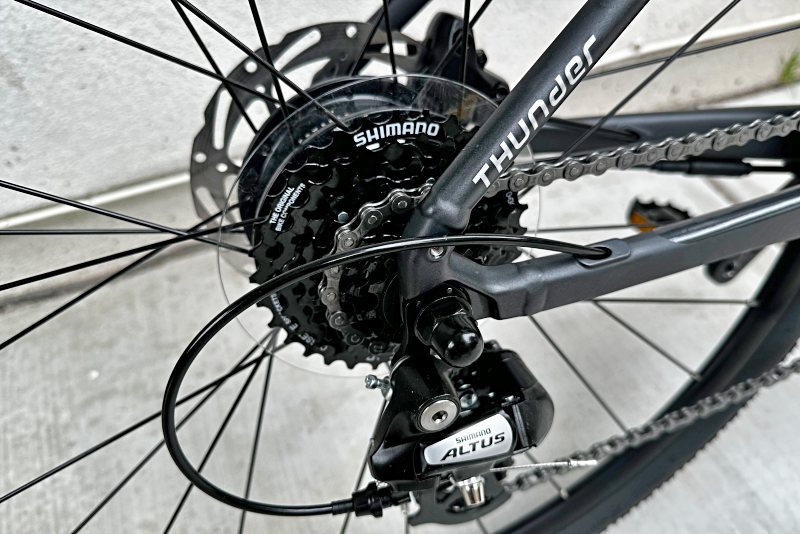
The shifter and gears are an all Shimano affair, and Tektro provides serious hydraulic stopping power.
Setup
Let’s assemble the Velotric Thunder 1 and get it dialed in…
First, we need to remove all the carefully prepared shipping protection. You’ll need some snips for the cable ties. Be careful not to scratch the frame or cut anything you’re not supposed to.
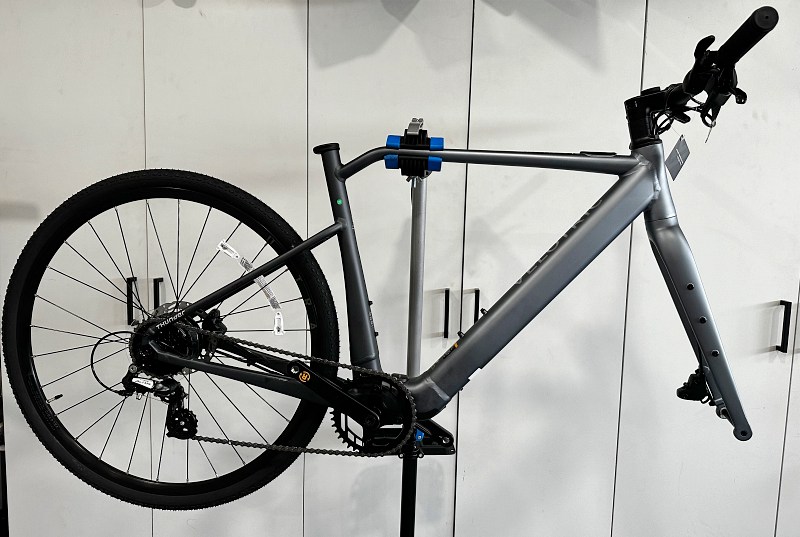
Next, secure the frame into a repair stand if you have one, or work slowly and methodically to prevent the bike from tipping over while you’re working. If needed, you can install the seatpost/saddle first and then flip the bike upside down to rest on the seat and grips, using some foam blocks if necessary.
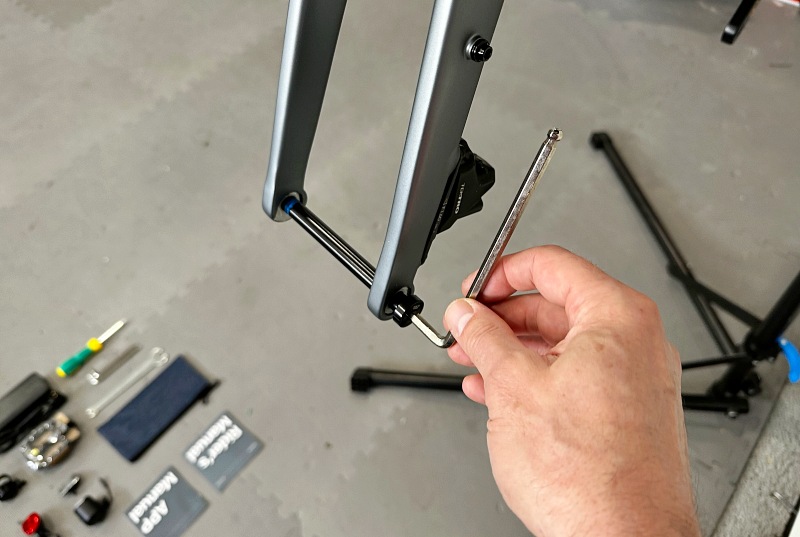
To install the front wheel, remove the thru-axle with the correct included hex wrench.
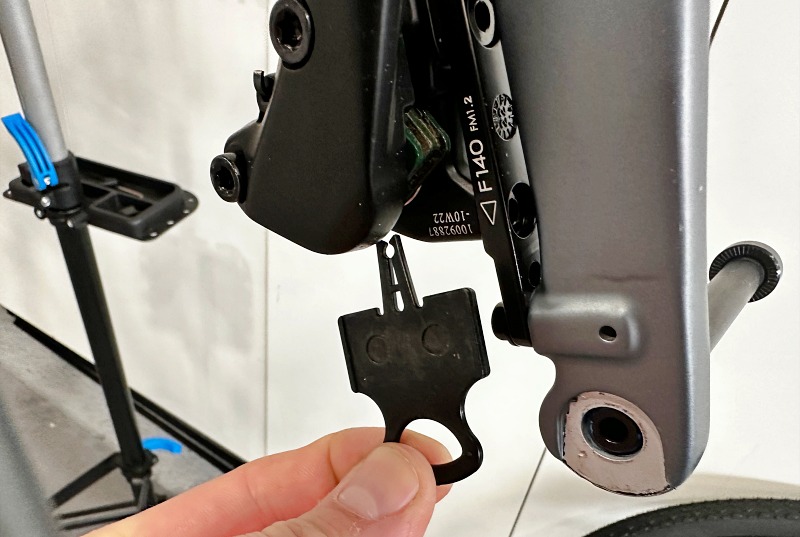
Then remove the shipping spacer from the front brake caliper. Note that these are hydraulic brakes, and once you remove this spacer, do not pull the front brake lever until the front wheel and brake rotor are correctly installed to avoid having to perform some unnecessary steps.
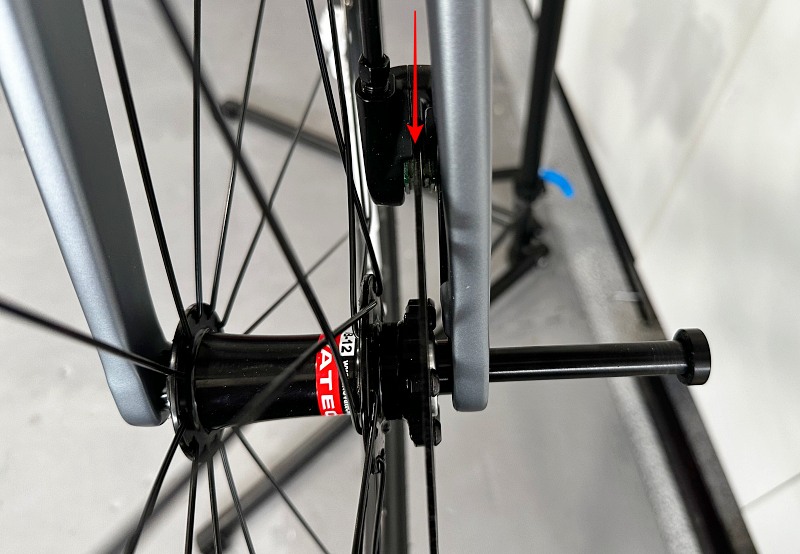
Place the front wheel between the fork legs being careful to align the brake rotor between the pads in the brake caliper as shown by the red arrow below. While holding the wheel, reinsert the thru-axle and turn gently to engage the threads in the far fork leg. Tighten securely with the hex wrench.
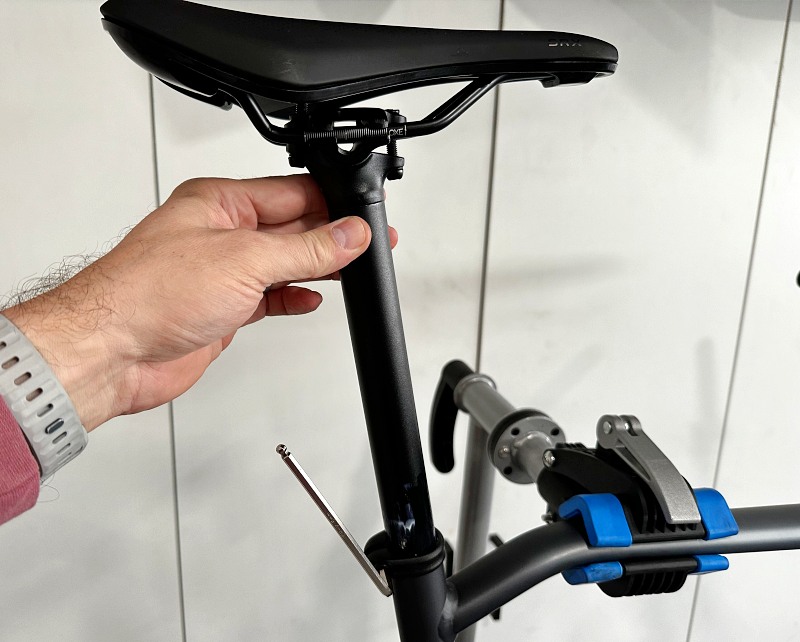
Install the seatpost into the frame, using a little grease to prevent the metals from seizing down the road. Align the nose of the saddle with the frame and tighten with hex wrench.
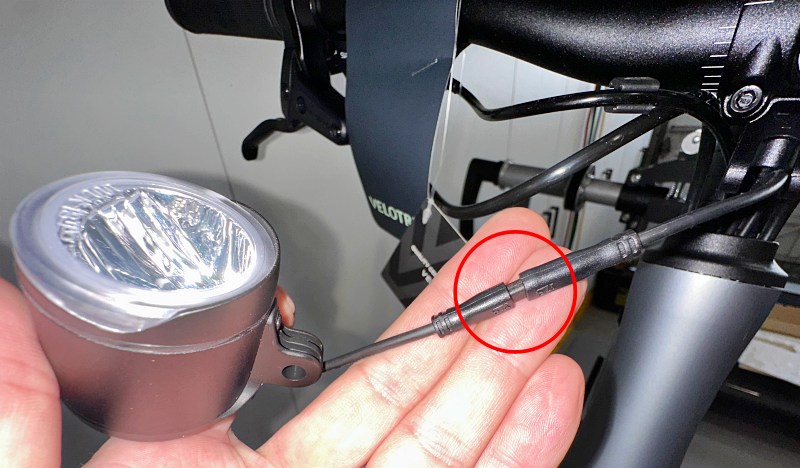
Install the headlight by aligning the two arrows and pushing the press fit cable ends together.
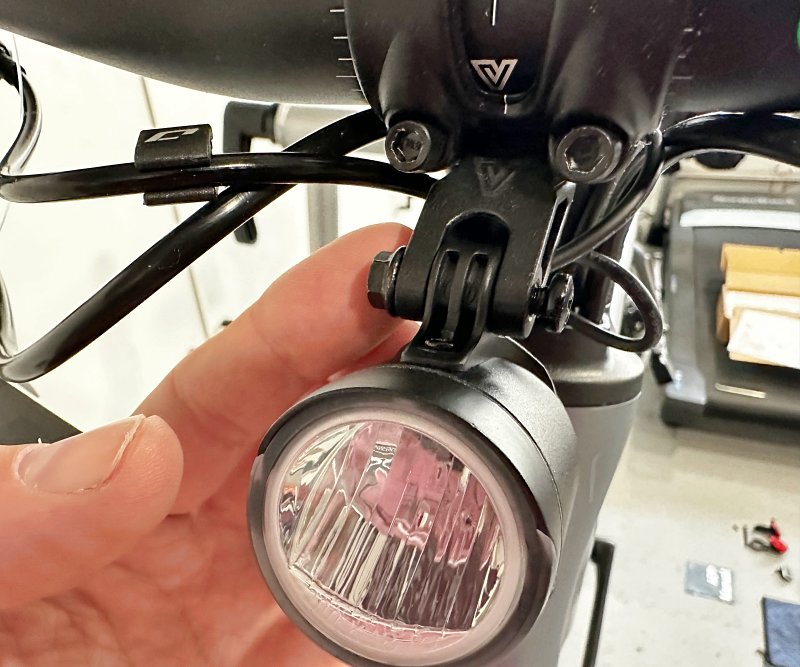
Slide the headlight’s mount into the receiver of the handlebar stem and tighten until snug. You’ll want to circle back later and adjust the angle when you have the bike upright and on its wheels.
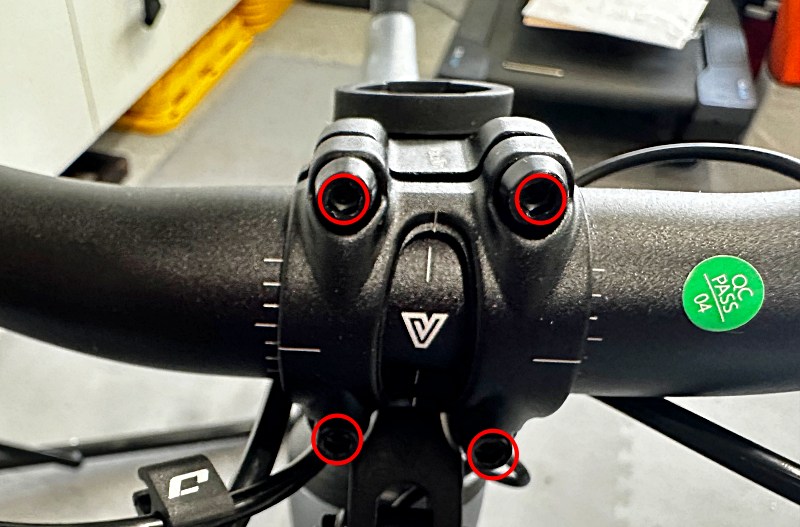
The handlebars come already aligned to the fork, so adjust the fore/aft rotation of your bars for your preference. Loosen these four bolts slightly until you can rotate the bar to your liking, then retighten.
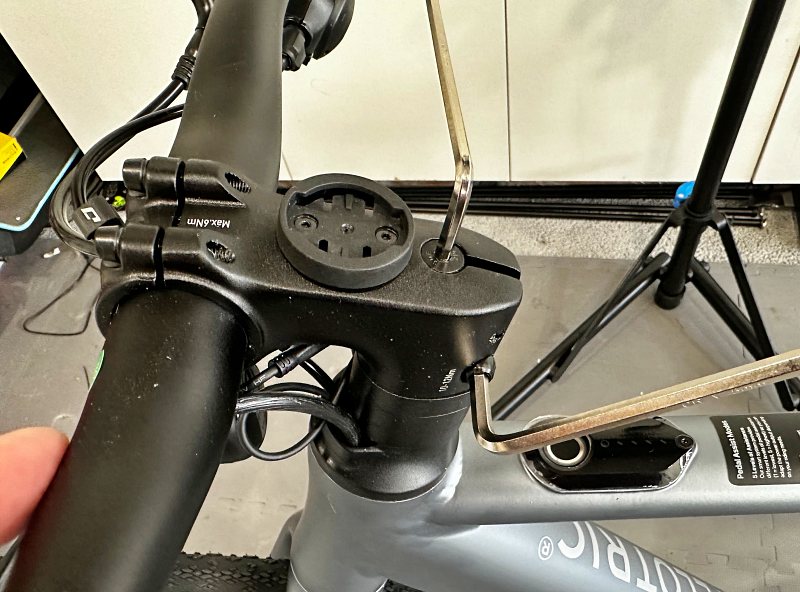
Double check that your bars are perpendicular to your front tire and that the headset is tight without binding. This is done by loosening the two bolts on opposite sides of the stem (lower wrench in the photo), then adjusting the top center bolt. With both tires on the ground, squeeze the front brake and try to roll your bike forward and backward. If you feel any shifting/knocking, tighten the top bolt a little. If it feels good, lift the front wheel and turn the bars to make sure they move freely. If they have too much friction, back that center bolt off a little. When you’ve got it dialed in, retighten the lower two bolts. Note that the Thunder 1 uses internal cable routing that runs next to the headset. This does add some rotational resistance that can easily be confused with headset adjustment.
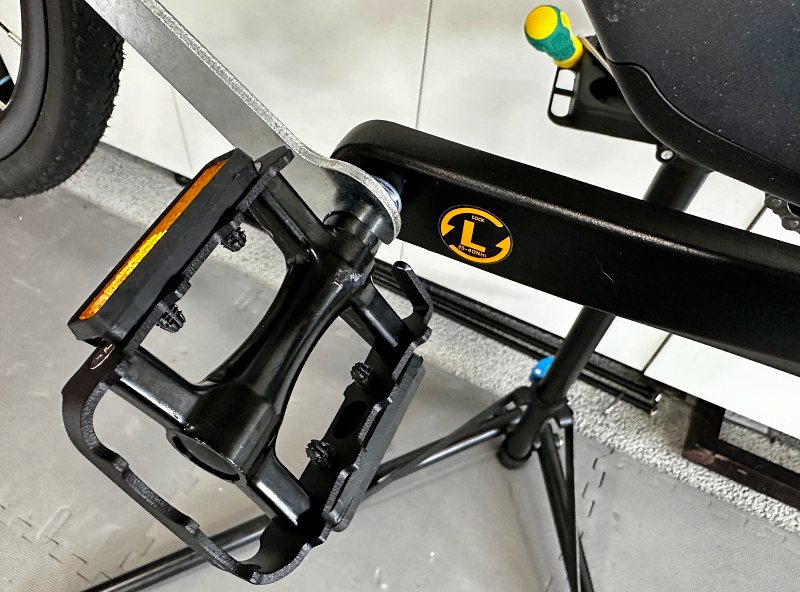
Use the included wrench to install the pedals. They are clearly marked left and right along with the thread direction, which is opposite for each pedal.
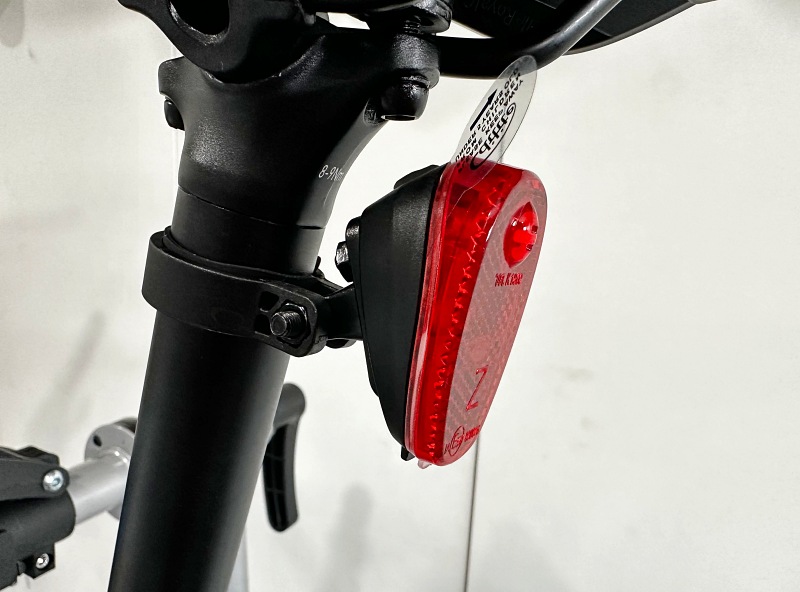
Install the rear tail light using the included clamp and small strip of rubber for traction. Placement on the seatpost is up to you, but closer to the top keeps it more eye level for cars behind you and won’t interfere with saddle height adjustment later on.
If desired, install the kickstand with the two included bolts. Another bolt on the back of the foot lets you adjust the amount of lean when it’s on the stand. Make sure to tighten that one until snug to prevent the foot from rattling when riding (super annoying otherwise).
Go ahead and charge your bike. Plug the charger into a wall outlet and then connect the awesomely robust bike-side connector into the charging port on the lower seat tube. Let it charge until complete when the charger’s LED shows green.
The last step is to download the App, create an account and connect your bike.
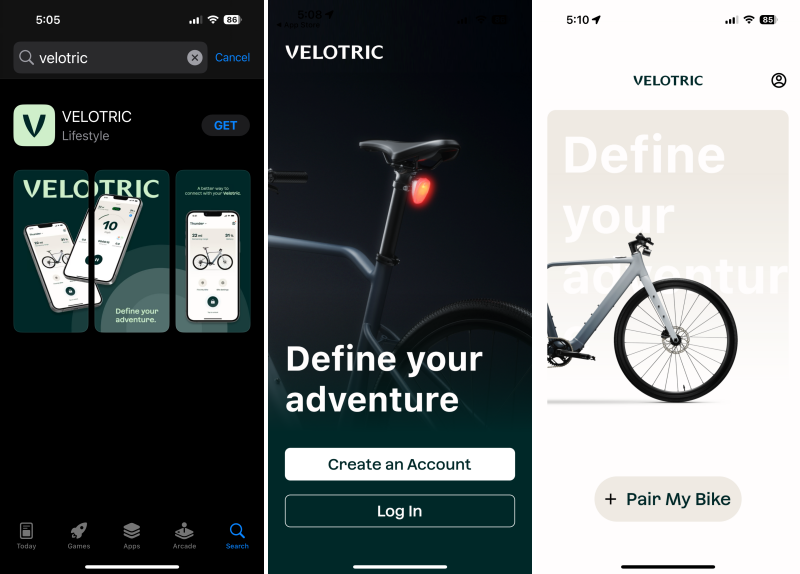
Follow the steps which include pairing to Bluetooth and entering the pin code from the label on your bike.

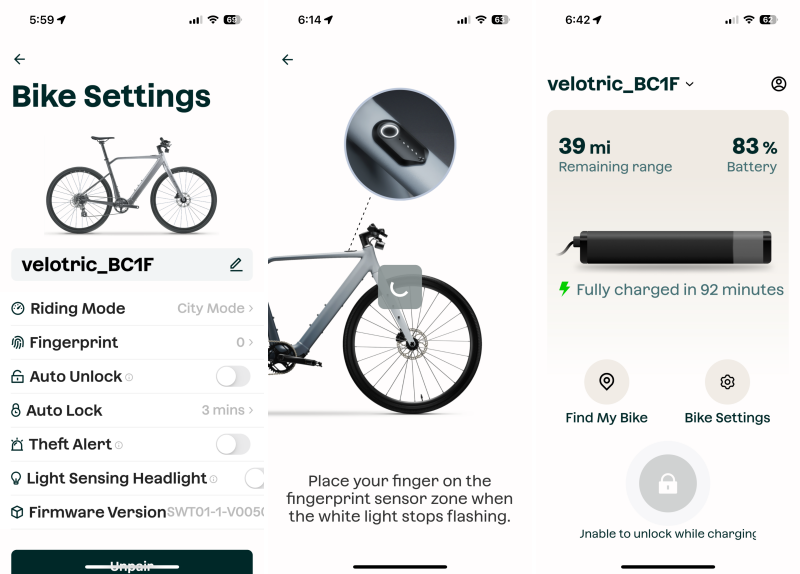
In the bike settings, you’ll have full access to customize the features, one of which is setting up your fingerprint which works eerily similar to setting up one on past iPhones. You’ll also be able to see the charging status.
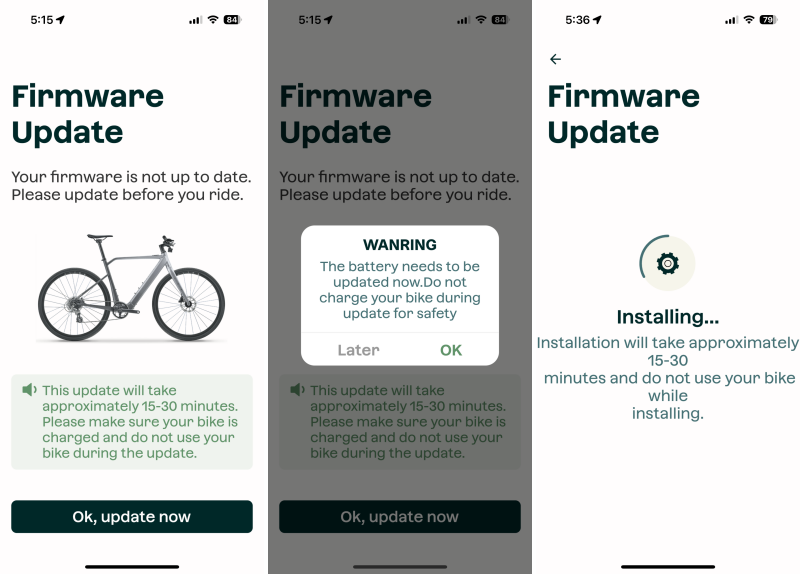
You’ll also have access to firmware updates, which happen over Bluetooth VERY slowly, and according to the the ‘WANRING’ you need a full charge, but can’t be connected to the charger.
Performance
Hands down, from an out-of the-box performance perspective, the Thunder 1 is a fantastic ebike. The overall cohesion, design, materials, component specification, electronic integration is impressive and it’s straight up just really fun to ride. Let me jump into some specifics.
First, with any bicycle, there are a few key touch/control points that can make or break how it feels and fits you. The Thunder 1 comes in 2 sizes; M for riders 5’6″ – 6′ or L for those 5’10” – 6’5″. At 6’3″, I chose the Large size. The frame size isn’t the only part of correctly fitting a bicycle. Here are the few things I needed to swap out for a better fit and feel. These are all subjective and may not have the same result for every rider.
- Pedals: These were way too small for my size 12 feet and I felt like the outer 1/3 of my foot had no support, so changed to some large Crank Brothers Stamp pedals I had on hand.
- Grips: I have really large hands (3XL in bike gloves) so a larger diameter grip helps my hand tension. The factory grips were thin and very firm so I swapped them for something with some cushion. ODI Reflex XL Grips with a 34.5mm diameter are my current go to.
- Saddle: The stock one was actually pretty good, but I switched it out to a Brooks Cambium I was already used to riding.
- Handlebar: The stock bar is a pretty narrow 680mm for both the M and L sizes. I changed to an 800mm bar for my shoulder width. That’s pretty wide for road/gravel bike, but I’m an MTB guy and it just feels natural.
With those changes, the bike immediately felt familiar and fit almost perfectly. I’ll probably switch to a slightly longer stem to really dial it in when I’m ready to adjust cable lengths and deal with the cables routed through the headset. If that’s a new concept to you, here’s the overview.
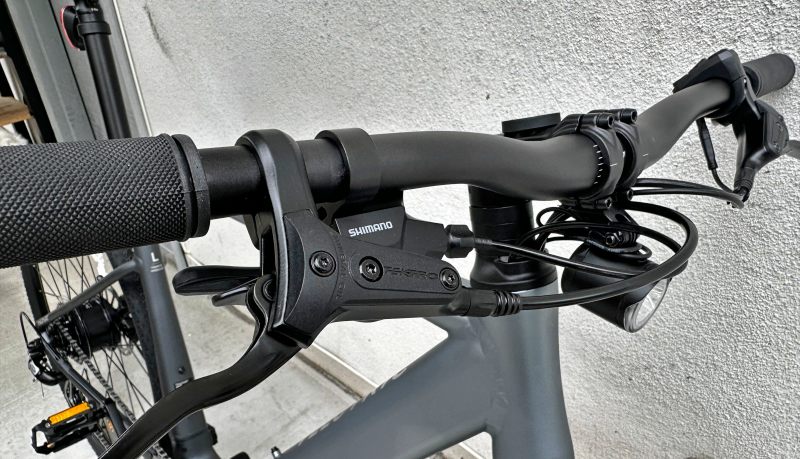
Bicycle companies have continually worked on reducing, hiding or outright eliminating cables. The Thunder 1 is one of the cleanest looking bikes specifically because there are almost no visible cables. Sure, they’re there on the handlebars, but they enter the bike underneath the stem into an oversized head tube and then only pop out again very close to the end locations they need to like the brake on the front fork or near the shifter and rear brake on the rear chainstays.
One of the challenges for this type of routing is that changing cable lengths can be quite challenging. That’s exacerbated with hydraulic brakes which you have to cut, and then re-set up with a fluid pressuring process called bleeding. I digress slightly, but it came into play for me because I needed to move brake levers, shifter and the level switch further inboard due to my thumb and finger lengths. Doing so left the brake and shifter cables with nasty bends (almost kinks) in them. The shifter cable specifically created enough friction that the derailleur’s spring return wouldn’t shift to harder gears on demand but instead when it got around to it. The wider handlebar relieved the bend and fixed the issue, but at some point, I’ll adjust the cable lengths for my ideal settings. For non-mechanic types, any reputable bike shop can get you dialed in on fit and re-cabling if needed.
I don’t hold any of that cable routing against Velotric as the entire bike industry is navigating this at the moment. And, as more companies switch to electronic, cable-less shifting it’s also becoming a non-issue other than the increased cost of electronic components over standard ones. But I do think that they need some stem and pedal sizes as well as bar widths to help get proper fits.
Okay, back to the bike. To turn it on, place your finger on the fingerprint sensor embedded in the top tube. It will acknowledge with a flash of color and then the four small LEDs will illuminate in sequence to show you the battery level. You can now start riding. Alternatively, you can tap to unlock in the App or you can go into settings and set it to unlock when you are nearby with your phone.
As long as you don’t have the assist set to OFF, one of the things you’ll notice is that when you start pedaling, the bike responds instantly. That might seem obvious, but it’s not. Velotric uses a 5-level torque sensor which means the bike’s system knows almost immediately to provide power. More common methods involves a single wheel magnet and sensor which could result in needing the wheel to make a full rotation before detecting speed, or a ring of magnets around the crank spindle and one sensor which could be better by a factor of multiples. Neither of those is as smooth or instant as the torque sensor which is literally reading when you put torque on the pedal and drivetrain.
As you’re riding, you can use the 3 button remote on the left side to switch between assist levels. I’ll repeat the gif from before here. The handy color coding lets you visually know which level you’re in once you’ve committed the color order to memory.
As you flip through the assist levels while riding, there is a definite difference between each level, so it’s really easy to find one that fits the terrain you’re on, the amount of battery you want to keep in reserve, or help you demolish that bear of a hill ahead.
Additionally, there are 3 riding modes that you can set in the App to define how the system applies power across the assist levels. There’s a noticeable difference between each and you’ll want to set it with the App before riding. Those are…
- City Mode – Recommended for paved roads. The most battery-efficient mode.
- Adventure Mode – Perfect for the off-road trails, gravel roads and adventure.
- Max Mode: When you feel the need for speed. Enjoy but stay safe.
One thing I’ll call out to avoid is the included phone mount. There are much better options out there from companies like Peak Design, Quad Lock and Rokform. Here’s a quick video showing my concerns which I think you’ll agree are valid.
As you can see, both the interface and the adhesive to the phone adapter are suspect. I cleaned my phone case before applying and was very worried by what I experienced (and having years of GoPro and 3M use under my belt can assure you I know how to do this).
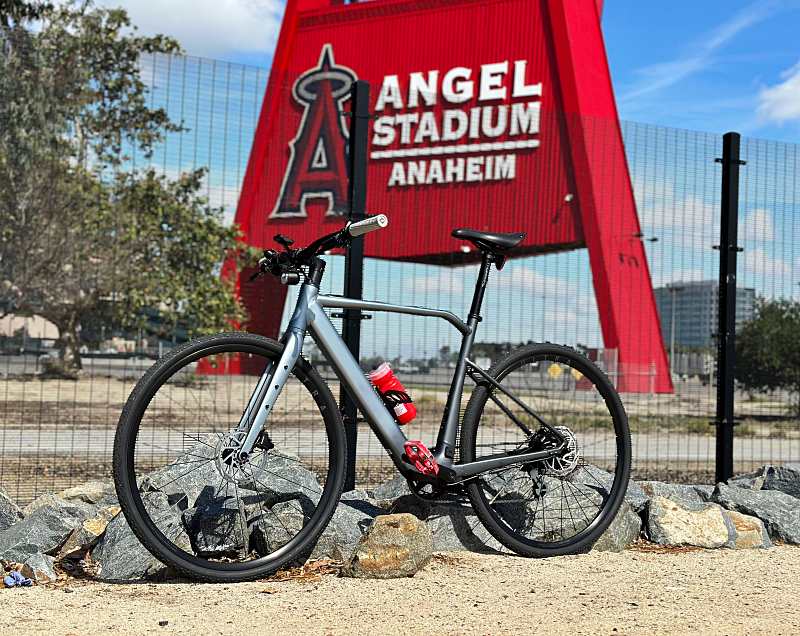
Okay, back to performance, I took a quick morning ride to Angel’s Stadium and back. The Thunder 1 was an absolute blast to ride and I was able to get the 15 miles done in just over an hour and get a great workout in Eco Mode because I wasn’t just letting the bike do all the work.
Here are some of the additional things you can control in the app…
- Fingerprint: Used for phone-free unlock of the electrical assist system
- Auto Unlock: Letting the bike auto unlock when you are nearby with your phone
- Auto Lock: Automatic lockout of the electrical assist system when idle and immobile for the time period you set
- Theft Alert: Push notifications when your bike is moved while locked
- Find My Bike: GPS location of the bike (as long as it still has battery, even if locked)
- Light Sensing Headlight: Have the headlight turn on automatically when bike is unlocked and it’s dark out
- Firmware Updates: Install any updates right from your phone
- Stats: Remaining range and battery charge (for the mode and level you’re currently in)
- Ride Logging: Auto maps your bike use and shows ride summaries
I will mention that anti-theft is a bit of a strong claim since the bike is very much rideable even without the assist system active. You will absolutely need to provide your own lock or locks to keep it secure because there is nothing that prevents someone walking or riding away with your bike. As the owner you will get notified if it’s been moved, and you will be able to track its location. The bike’s battery is internal and while it can be removed, that process requires a fair amount of disassembly so you should have plenty of opportunity to track it down before that happens. So, instead of anti-theft, I’d consider it more theft-aware or pro-recovery. Having once tracked down my own stolen car using its embedded app connection and an AirTag, I can absolutely say that Velotric’s approach is a compelling and useful feature.
Overall the bike is amazing and I expect it will only get better with future updates; Velotric has hinted at crash detection coming soon. I did have a few small issues which I’ll mention here just in case they help anyone identify an issue and I’ll update the article as I see improvements.
- During initial setup, the App demanded I install firmware update before I could finish the setup process. This wouldn’t be an issue except that the update won’t let you proceed if the charger is connected, and since you didn’t finish setup, you can’t turn the bike on to perform the update so you get stuck in this loop. Normally I’d back out of the update, continue setup and then perform the firmware update later. Unfortunately, there’s no way to do that. The firmware update pop-up cannot be quit which renders the app useless. Force quitting the app doesn’t help either. After a lot of trial and error the solution I found was to delete the app, forget the bike in Bluetooth settings, reinstall the app, then VERY quickly, sign in, accept pairing, tap to unlock the bike then update the firmware when moments later the popup appears. I hope this is something Velotric can quickly remedy with an app update. It should be some limitations around setup having to have been completed before a firmware update can happen and as easy as adding a ‘not now’ option in the dialogue box.
- Additionally, I had an issue with my app refusing to connect to the bike, and some quick Googling looks like I’m not alone. The good news is that as long as you’ve set up your fingerprint, you don’t need the app to ride the bike. Again, here’s hoping that an App update can resolve the issue for anyone affected.
What I like
- Great looking bike! Great riding bike!
- Lightweight, solid, non-rattling build quality
- Awesome paint job
- Seamless electronic integration
- App integration with data logging
What I’d change
- Size specific specs (pedals, bar width, etc)
- App reliability
- Firmware update process
- Insecure phone mount
- Improved speed on FW updates
Final thoughts
I’m frequently asked for recommendations on ebikes and while I’ll tell you the answer varies from person to person, the Velotric Thunder 1 has a bike that I recommend to just about anyone if they can squash the App issues. I’d like to see them add a smaller size and address the finer component sizing points, but until then, the similar, and more affordable Thunder 1 ST (step thru) is available in a small and a medium. Again, this is a great bike and if you can get through initial setup, you might just never open the app again anyway.
Price: $1799.00
Where to buy: Velotric
Source: The sample of this product was provided by Velotric
![[MINI SIZE. ULTRA PORTABLE CHARGER]: Roughly the size of an AirPods Pro case, this smallest power bank packs 10,000mAh of long lasting power into a tiny, nano footprint. Easily slide this ultra slim, credit card size charger into your skinny jeans, a...](https://m.media-amazon.com/images/I/41rATpm6dyL._SL160_.jpg)
INIU Portable Charger, Ultra Mini 10000mAh 45W Fast Charging with Detachable Cable, Flight-Safe Travel USB C Power Bank External Phone Battery Pack for Xiaomi iPhone 17 16 Samsung S26 Google iPad etc
(as of June 28, 2026 19:14 GMT -05:00 - More infoProduct prices and availability are accurate as of the date/time indicated and are subject to change. Any price and availability information displayed on [relevant Amazon Site(s), as applicable] at the time of purchase will apply to the purchase of this product.)
Gadgeteer Comment Policy - Please read before commenting
I have a mountain bike, a trail bike, and two road bikes. Due to age (78) and health, I am transitioning to the T1 for fitness. The T1 has impressive specs. The weight is only 6 lbs heavier than my trail bike so I can load and unload it without assistance. I have moved my Race Face Ride Pedals and my Peak Design Out Front Bike Mount to the T1. I use a Peak Design Everyday case on my phone. I have Ergon GP3 grips ready to install. I have a Garmin Cadence Sensor 2 on the left crank arm and a Garmin Speed Sensor 2 on the front hub. I wear a Polar H9 Heart Rate Monitor. I use the free SuperCycle app on my phone which collects data on time active, time paused, distance, elevation gain and loss, average and maximum speed, cadence, and heart rate, percentage of time in my target heart rate zone, and calories. If you switch to a longer stem, please update this article. I echo your comments on the stem, the firmware update, the phone mount, and the App. I sent the App developer a detailed list of improvements for the App and its manual. I look forward to putting many miles on this bike.
How do you manually turn this bike off?! My app won’t connect(but I did get one fingerprint set up) and I have no way to try out any of the other modes or turn the dumb bike off. Help?
Hi Dennis,
It’s not obvious, and I didn’t spot it anywhere in the manual, but if you press and hold the headlight button on the handlebar remote for about 5 seconds, the bike will turn off. It does feel like the fingerprint sensor should let you do this though. Hope that helps.
Thanks for the helpful review! I just ordered this bike, can’t wait for it to arrive. I’m also a Brooks Cambium fan. This will be my first e-bike. I’m curious about how the riding position will be for me. All reviews state it has an aggressive riding position, but all reviews seem to come from people taller than me. I wonder if as a 5’6″ female will I have to mess around much with the handlebar position to dial in the proper reach. I’m looking for something slightly more upright and relaxed than my current ride (Trek Checkpoint). I was worried that if I changed the stem I’d loose the phone mount, but thanks to your review it sounds like I should probably lose and replace the phone mount anyways.
I am 5’10” and have a Medium T1. The riding position is aggressive. When I was younger and flexible this would have been okay, but it is too aggressive for me now. In the past, I have changed the riding positions of my Specialized Allez and Crosstrail by changing handlebars and stems. I have ordered a new handlebar and stem for the T1. The cable lengths are going to limit what I can do since I am not interested in swapping out the cables. When I am done experimenting, I will post another review. My guess is I can change the handlebars or the stem, but not both. Losing the phone mount is a good thing. I would never trust my expensive phone to that type of mount. But it appears that the light bracket is attached to the stem which is a bummer.
I upgraded the handlebars. The original bar specs are 31.8mm clamp diameter, 680mm width, rise 30mm, backsweep 6 degrees. The new bar is the PROFILE DESIGN ULTRA FR OS MTB BAR with specs 31.8mm clamp diameter, 660mm width, rise 60mm, backsweep 10 degrees. There was enough cable slack to accommodate this bar. This increase in rise and backsweep and decrease in width feels comfortable to me. For years, I have been riding a 2011 Specialized Crosstrail with a 640mm bar. A similar result can be obtained using a MSW 25 Stem with specs 60mm length, 31.8mm clamp diameter, 25 degrees, 40mm stack height. This stem could be drilled and tapped to accommodate the light bracket. The bar upgrade is easier. FYI, a Velotric T1 ST reviewer appears to have upgraded using the Amazon bar BW 31.8 clamp diameter, 700mm width, 96mm rise; he states that there was enough cable slack to accommodate this bar. Shortening handlebars is easily done if desired. See YouTube. Link to a photo of the upgrade https://photos.app.goo.gl/cpK8zX6k7qBTNFPw8 .
The linked PDF discusses fit for the Velotric T1 and T1 ST, and reports on stem and handlebar upgrades. A photo is also linked.
PDF: https://drive.google.com/file/d/1olkohKd6o4PiRbF5P-sr9yqj-QK7-Y97/view?usp=drive_link
Photo: https://drive.google.com/file/d/1_bdek41ej7EgfIT3CB7A71sciHKk4rPf/view?usp=drive_link
Updated article
Velotric T1 and T1 ST Fit v2.pdf
https://drive.google.com/file/d/1wVaE33I8Nzf2dtJL_2W5U33JjxJlxL9V/view?usp=drive_link