REVIEW – Drones are cool and they’re both easier to fly and more affordable than ever. They also provide a cinematic point of view that there’s really no other way to get. Holy Stone recently released a new model called the HS720G and I got the chance to check it out.
What is it?
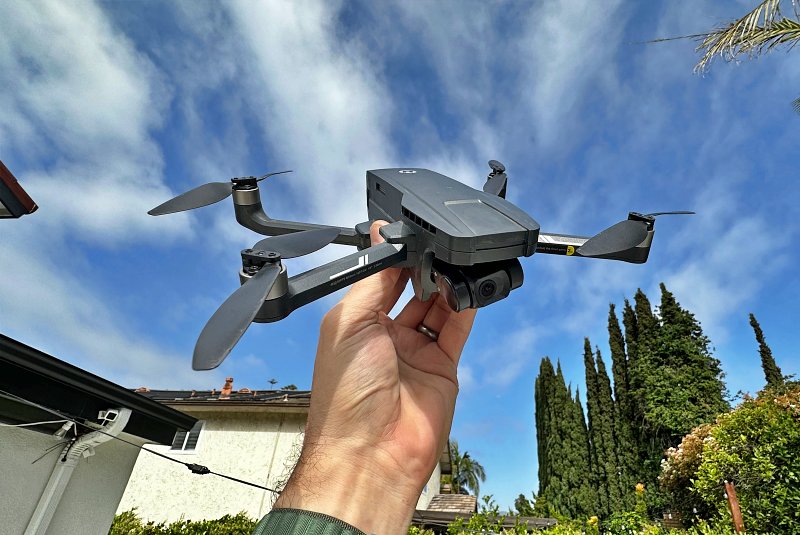
The HS720G is a compact, easy-to-fly drone equipped with 4K video capture and a bevy of features designed to help you capture great photos and video as well as just have fun flying.
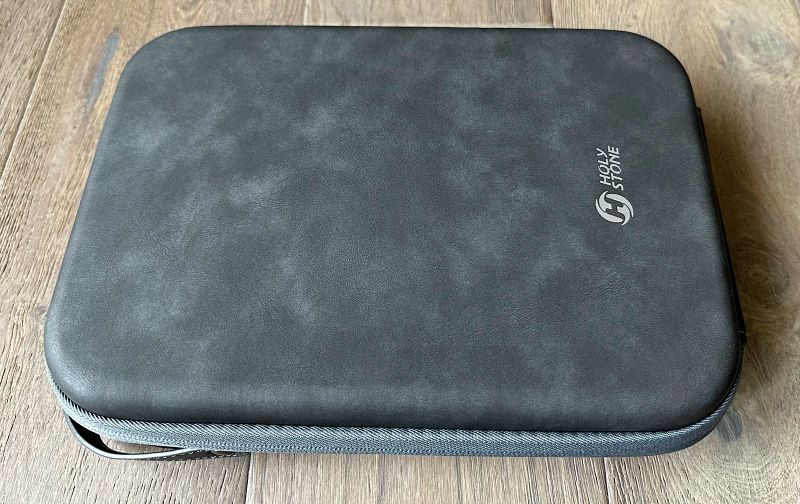
What’s in the carrying case?
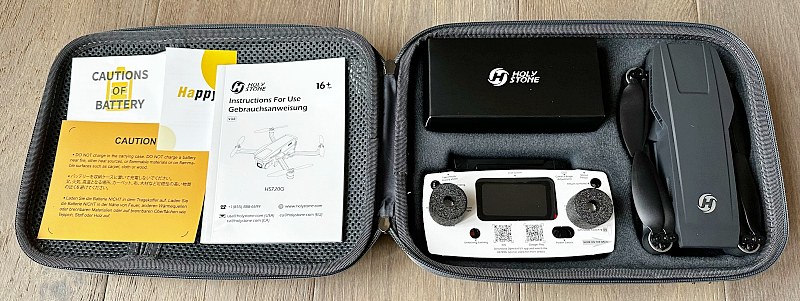

- HS720G Drone with 2 axis gimbal
- Transmitter
- Battery
- USB Charging Cable
- Extra propellers (4)
- Screwdriver
- Manual and assorted info cards
Hardware specs
Dimensions: 164*90*63 mm (folded), 305*230*63 mm (unfolded), 377g/13.30oz
Distance: 3277 feet / 999 m (flight), 1640 feet / 500 m (FPV)
Flight Time: 26 min (flight), 5 hours (charging)
Operating temp: 32°F to +104°F (0°C to +40°C)
Battery: Lipo, 7.7V 2950 mAh, 22.715Wh
Transmitter: 2.4Ghz, requires 2×1.5V AA batteries (none included)
Camera: 120º FOV, -90º~0º range, 5 Ghz operating frequency
Resolution: 3840x2160P photo and video, video at 30fps
TF Card: Supports up to 128gb (none included)
Design and features
One of the best parts of the design is by far its portability. Clearly taking some design cues from another well-known drone company, it’s hard to find fault with a drone that’s this pocketable.
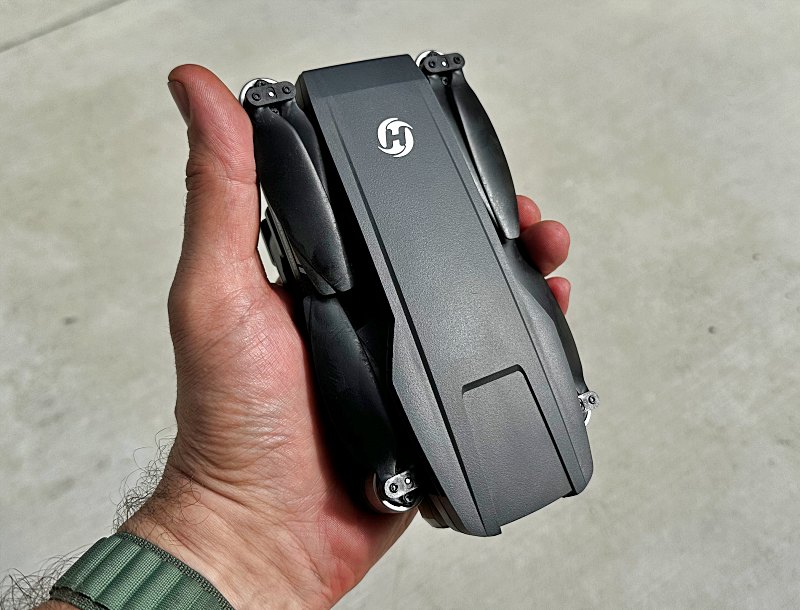
Unfolded it has a slightly larger footprint that just a few years ago wouldn’t get any smaller.

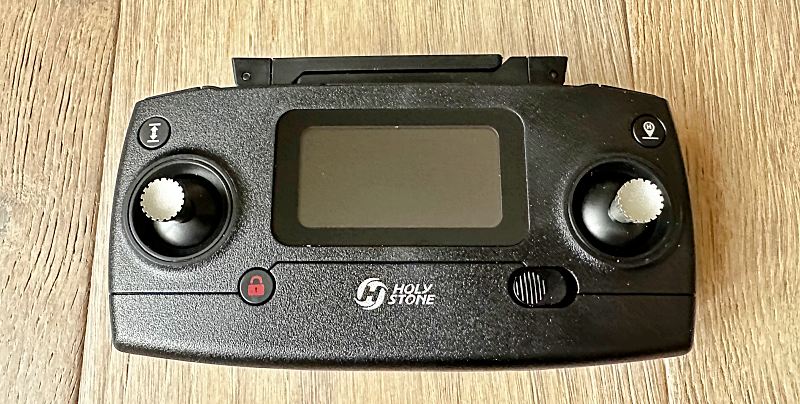
The transmitter is also nice and compact in its stowed position.
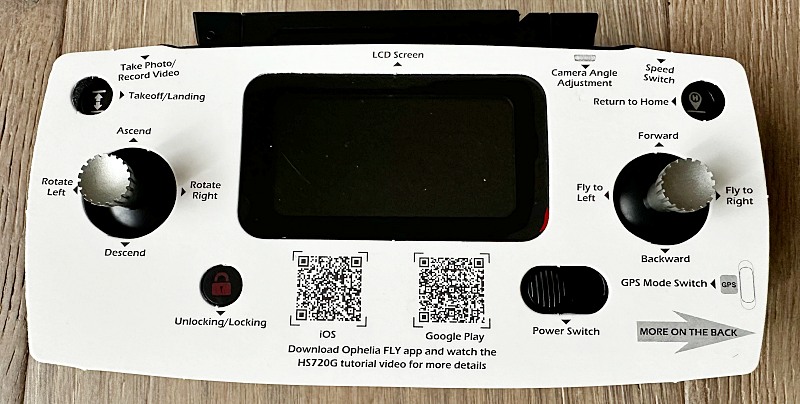
And included, is a great little double-sided cheat sheet to help you learn the ropes.
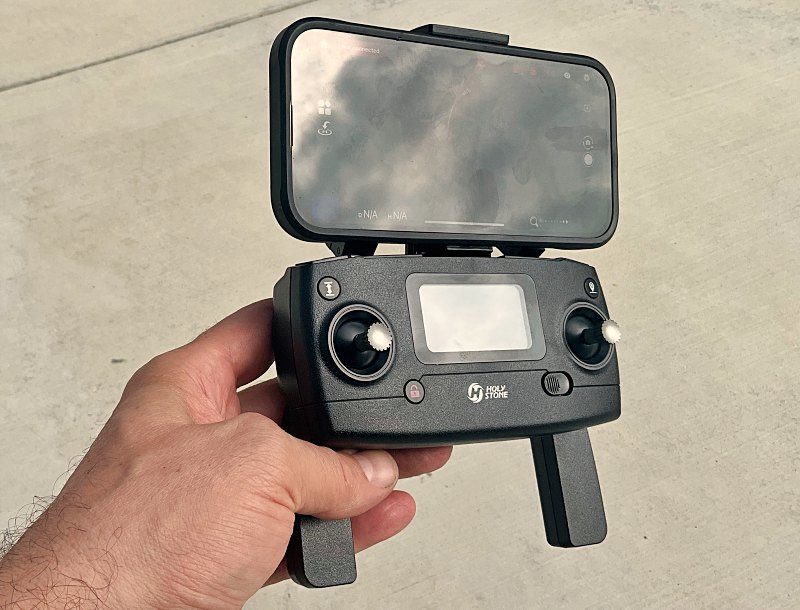
It looks like this completely unfolded with a phone installed.
Setup
Before we get any further, you need to drones are not RC cars and it is not legal to just head out and start flying. It’s actually one of the things that most advertising, media coverage and even product manuals don’t cover or spend enough time on if they do. The good news is that if you just want to fly for fun and take cool videos, you can study, get tested and registered very quickly, and be on your way. This applies to any drone weighing more than 8.8oz (250g), which is almost all of them including this Holy Stone HS720G. This FAA link is a great place to start.
Ok, with that out of the way, the HS720G Drone comes almost ready to fly. Go ahead and use the USB cable to connect the battery to power supply while you familiarize yourself with the rest of the setup.
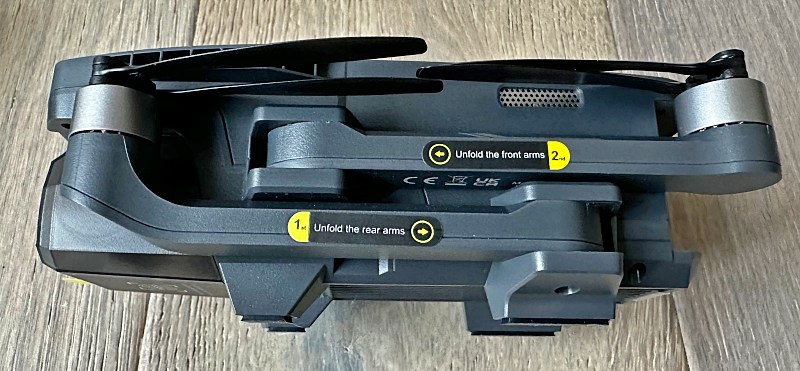
Unfold the drone by swinging the two lower arms out first. They’re handily marked with step 1 stickers. Then you can unfold the upper arms. When you go to fold it up, rewind that order and do the upper arms first.
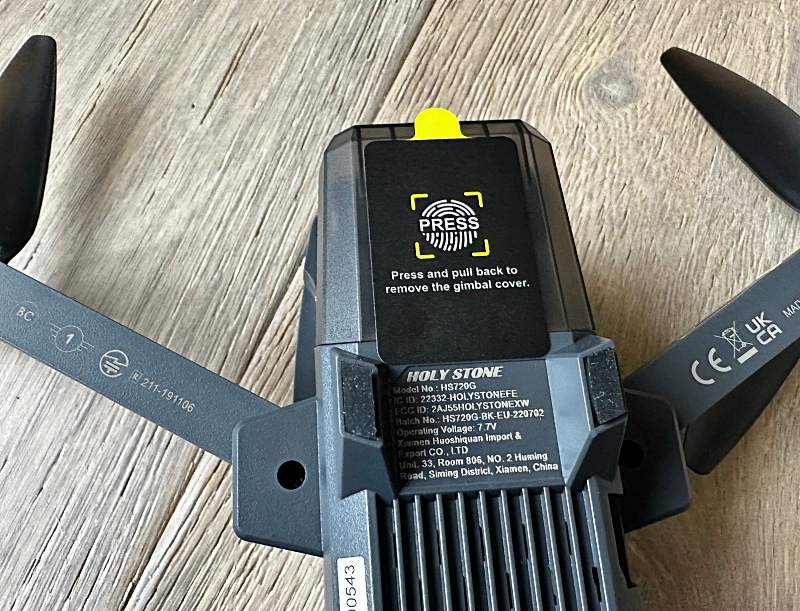
Next, take a moment to learn how the protective camera cover is removed and reinstalled. The camera’s gimbal is pretty robust even though it feels a little unsupported. You’ll want to make sure that cover is reinstalled before storing the drone to prevent any unintended damage.
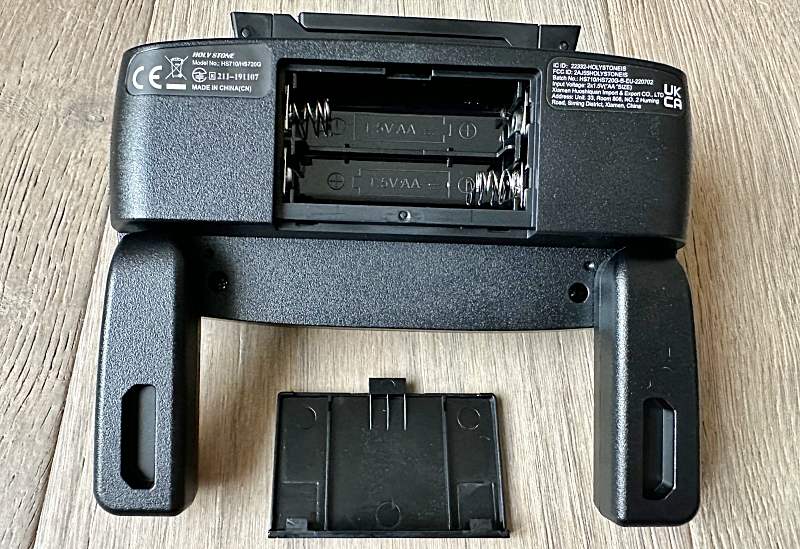
Grab the transmitter and learn the unfolding process here. At the bottom are two leverage arms that unfold to give the transmitter more of a gaming remote feel. On the backside is the battery cover where you’ll need to supply and install two of the AA variety.
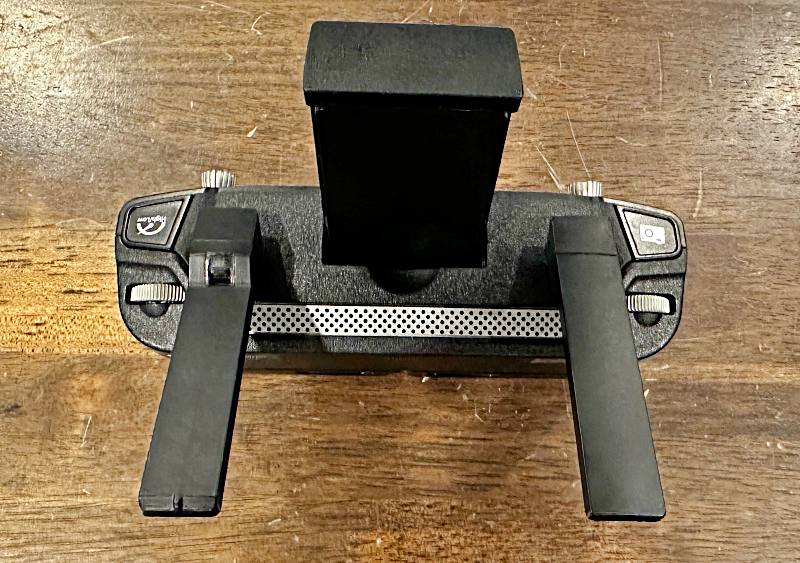
On the top side, the two antennas unclick from each other and rotate down. In between them is finger scoop which extracts the phone cradle. Pull that out and then flip the small catch which holds the bottom edge of your phone stable for the sliding top portion.
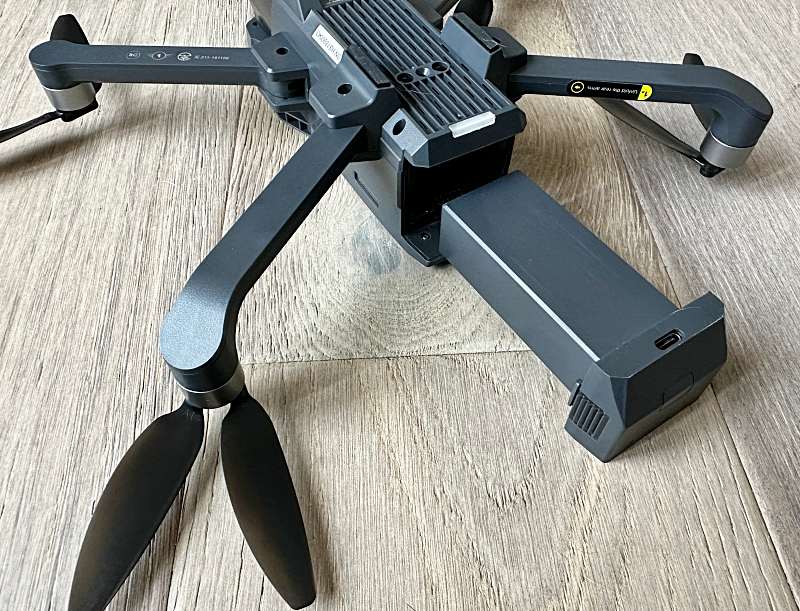
When the battery is fully charged, install it into the drone until it clicks and is secure. It only fits one direction so it’s obvious if you’ve got it flipped over.
You’ll also need to download the Ophelia FLY app and register for an account. Follow the instructions to pair your phone to the drone so that you don’t need to do it later when you just want to fly.
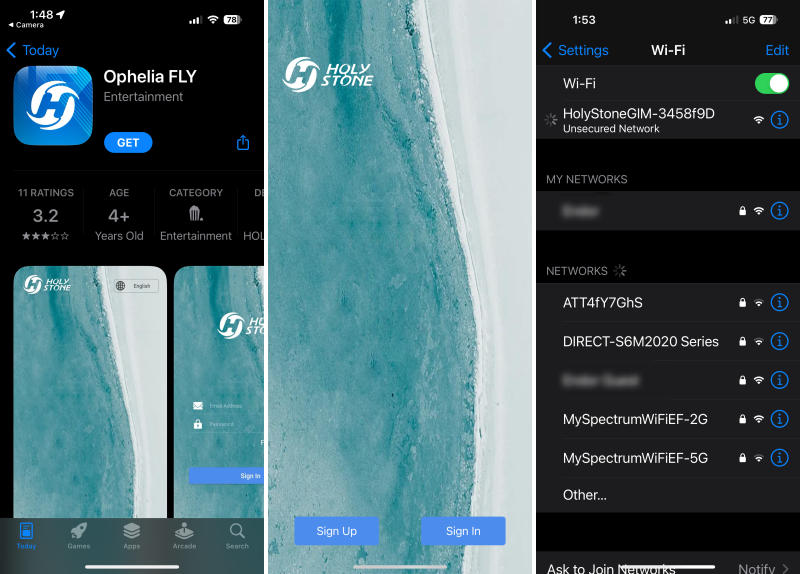
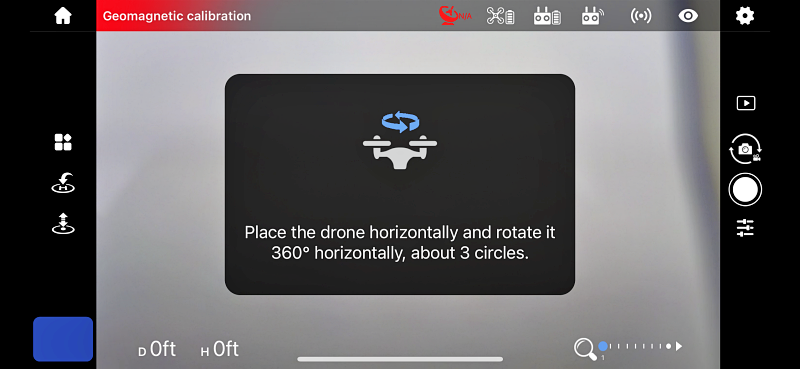
If you’re ready, head on out to a nice clear open space where you can learn the basics or brush up on how this drone compares to another you’ve used. The first step is to power up the transmitter, install your phone in the holder with the app open and turn on the drone after unfolding it. Give them about 15 seconds or so to connect and lock GPS. Pull both the joysticks down to the right to start the calibration process. Pick up the drone and keeping it flat to the ground, spin it clockwise 3 full rotations. You will hear a beep. Now point the camera towards the sky and spin it to the right 3 full turns keeping the camera pointed up. You’ll hear a beep and you’re now calibrated.
Set it back down in a flat area where the rotors are free to spin. Back up and give the drone some room before hitting the unlock button once. The rotors will spin up and then you can hit the takeoff button on the upper left of the transmitter. The drone will automatically take off and hover in place about 4 feet above the ground. Press the same button to initiate a controlled automatic landing. This takeoff and landing feature is awesome and lets you just focus on learning how to fly.
You’ll want to familiarize yourself with the controls. The left stick is altitude and rotation. The right stick is forward/backward and left/right. At your fingertips are the camera controls. The left dial adjusts the camera angle and the left button toggles the speed mode. The right dial pans left and right and the button has two functions. A short press takes a photo and a long press records a video.
At this point, you’ll just want to fly and practice.
Performance
Compared to the last drone I reviewed a while back, the HS720G drone is super compact. The drone folds down and easily fits into the carrying case along with the controller, tools and even a spare battery (should you choose to pick one up). Even the carrying case is small enough to fit in a backpack making it easy to head out for some quality drone time.
The calibration process is thankfully very quick since it should be done prior to flying every time. Once powered up and calibrated it’s as easy as pressing the rotor unlock button and then the takeoff button. Pressing the return-to-home button simplifies landing as well. Just keep an eye on the inbound trajectory it takes if you need it to come in high and then straight down. The drone will also auto-engage return-to-home if it hits a critically low battery alert, or if it exceeds the range of the controller.
There’s a TF card slot that supports up to 128GB. That HD quality video takes up a ton of room though and that card fills up fast. The good news is that if your phone has a lot of extra space, it records directly to the app as well and will do so even if no TF card is installed. Note that the resolution direct to the phone is knocked down to 720p which is what you’ll see in videos in this review. So pony up for a couple of 128GB cards or keep your flights short.
Flying the drone is pretty straightforward. Personally, the hardest thing to retrain myself on was looking at my phone instead of up at the drone. The further away you fly, the more you need to be using the phone screen. That becomes non-negotiable if you’re also trying to control the camera’s gimbal. The more you fly (and film) the smoother you’ll be able to get. The videos posted here aren’t even using the gimbal as I still haven’t had enough flight time to work on it. Here’s a video I took during my first long flight. This is just some of the crazy bloom going on here in California as a result of all that recent rain.
I was pleasantly surprised by the length of flight time. Holy Stone states about 26 minutes per battery which I’d say is pretty accurate. I’ve yet to actually run out of battery during a flying session. The recharge time for a battery is a little on the slow side as it seems to be USB 2.0 even though they’re using a USB-C port on the battery itself. This means if you use a USB-C to C cable it won’t charge. You need a USB-A to C cable. A spare battery runs about $90 and it’s worth picking one up if you plan on flying a lot.
One cool feature that I definitely want to spend more time figuring out is the ‘follow me function’. I tried it quickly in an isolated area where I was riding a bike in a closed loop. As you will see, it was definitely tracking me, but I assumed it would keep the remote (on me) centered automatically, and I clearly didn’t set it up to do that.
There’s also a certain amount of redundant control between the transmitter and the phone screen, with some controls only being in one place or the other. Features like point-of-interest in which the drone will circle around a defined point, and TapFly which lets you define a few points that the drone will fly past consecutively are all done directly from the phone screen. Here’s a shot of the screen before calibration where you can see just how busy the screen can be before you start trying to just fly.
A couple of last things to mention.
- Depending on your phone (and or phone case) the phone retention might not be as solid as you’re hoping. Make sure you check it out ahead of time to avoid any possible phone drops.
- Use the included USB-A to C cable and a USB-A power source. No USB-C to USB-C cables, or USB-C power supplies. If you swap out either or both, confirm your power source and cable will charge the battery before assuming they will.
- Take time to understand the distance from your drone objects in real life vs what you see on your phone’s screen. They are not the same. Case and point, this video (taken with a chest mounted GoPro) shows me crashing into vegetation thinking I had more room.
The video also shows a typical takeoff and landing as well as providing an idea of the general volume level of the drone.
So, all in all, there’s a lot to like and a lot to learn and grow with this little guy. I plan on spending a good bit more time learning how to be a better pilot and learning to control the camera’s gimbal for smoother video.
What I like
- Ease of use
- Good flying time
- App integration
What I’d change
- Faster charging time for the battery and actual USB-C support
- Better retention on the phone clamp
Final thoughts
There are a lot of drones available these days and it can be hard to know where to start. What I can tell you is that the HS720G from Holy Stone feels and flies like a tremendous value. It’s small, portable, has a ton of features, doesn’t assume you already know how to fly, and will challenge you to keep learning. At the full MSRP of $339 it’s a great deal and only gets better when Amazon has coupons in play. If you drop in on one have fun!
Price: $209.99
Where to buy: Amazon (Save 5% with code: THEGADGETEER )
Source: The sample of this product was provided by Holy Stone.
Gerber Gear 22-47162N Fast Draw Folding Assisted Opening Pocket Knife, Fine Edge, Black
(as of June 22, 2026 18:55 GMT -05:00 - More infoProduct prices and availability are accurate as of the date/time indicated and are subject to change. Any price and availability information displayed on [relevant Amazon Site(s), as applicable] at the time of purchase will apply to the purchase of this product.)
Gadgeteer Comment Policy - Please read before commenting
from Amazon:
Question: No remote id for this holy stone hs720g that i just bought,does this mean it becomes a useless brick sept 22 2023
Answer: Possibly, yes. The current Holy Stone drones do not have an FAA approved remote ID system. It is possible Holy Stone will implement a fix by Sept. They have said nothing thus far. It is also possible to meet the Sept requirement by installing an aftermarket device, but so far such devices cost 1.5-2x the cost of the HS drone.
By T. Maynard on March 23, 2023