REVIEW – I previously reviewed a bike conversion kit from Swytch late in 2019. It was a well-thought-through system that converted your existing bicycle into a pedal-assist e-bike. I was very impressed at the time and so three years later when they announced a new and updated version, I was keen to find out exactly what improvements and changes this kit had in store. Let’s go for a spin…
What is it?
The Electric Bike Conversion Kit from Swytch magically turns almost any bicycle into a pedal-assisted e-bike. The kit comes with almost everything you need including a new front wheel with motor, battery, battery mount, display controls and even tools.

For any of you that prefer videos, here’s a quick overview that shows the bike in action and a lot of what you’ll want to know.
What’s in the box?
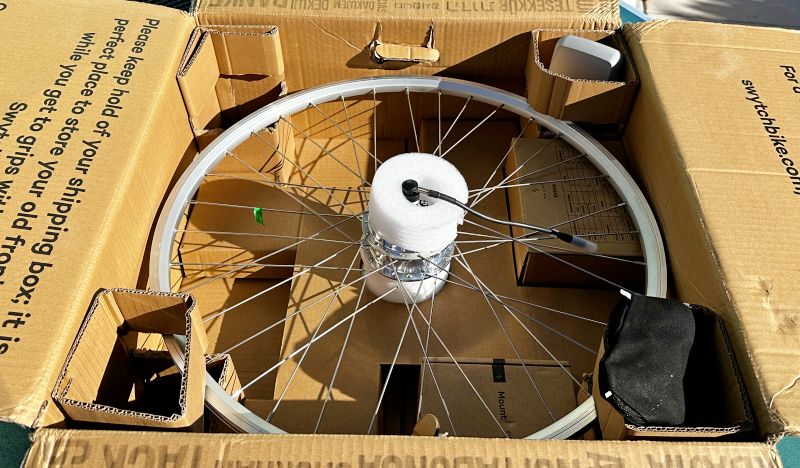
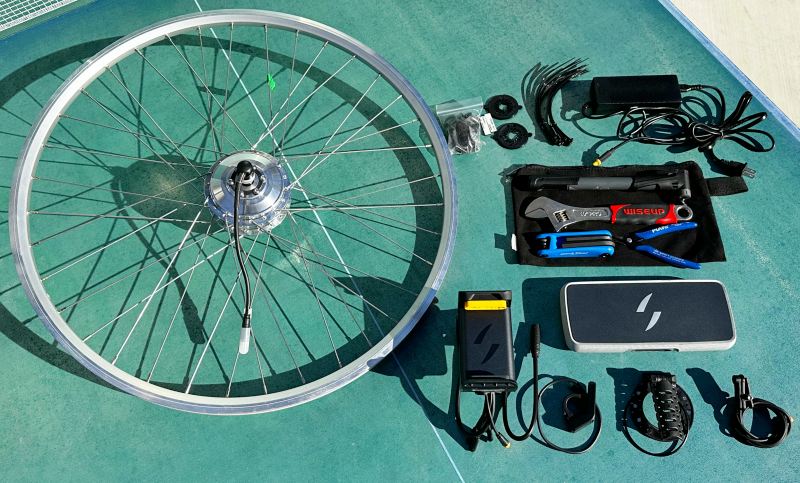
The Swytch Electric Bike Conversion Kit comes well packaged ensuring that all components arrive intact. Enclosed are the following…
- Hub Motor Front Wheel
- Swytch Power Pack and Charger
- Swytch Handlebar Mount for Battery
- System control and display
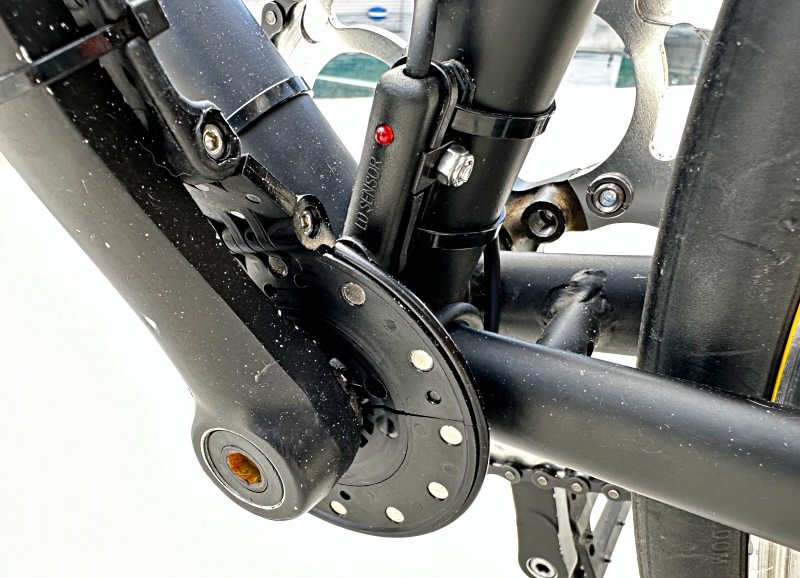
- Crank-mounted 12-magnet cadence ring and fitments
- Tube-mounted cadence sensor
- Connection cables and cable ties
- Canvas Tool Bag including crescent wrench, hex keys tool, snips and a tire pump
Hardware specs
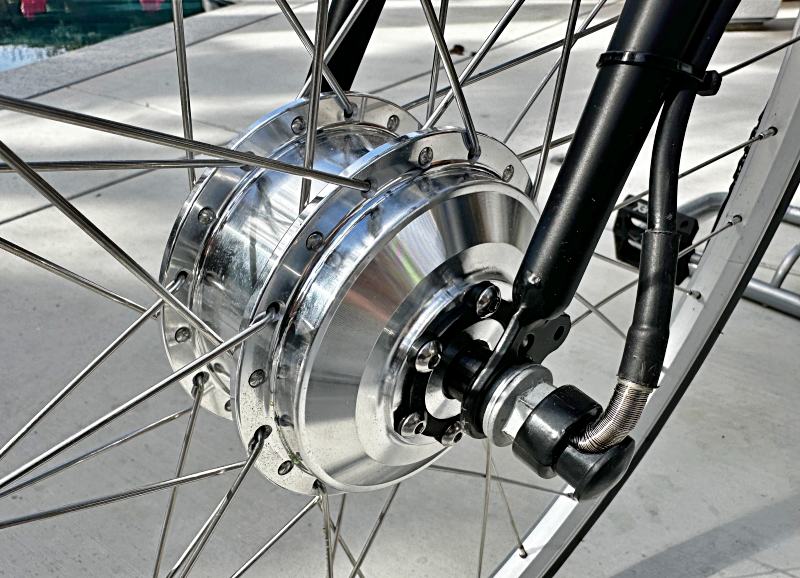
Hub Motor Front Wheel – 250W geared, 40nm torque, motor-hub pre-laced into one of 16 rim sizes (from 16″ to 29″)
Power Pack – 36v Lithium Ion Battery (2 sizes – Air @ 98Wh (15k range) and Max @ 180Wh (30k range)
Controller – Sine-Wave controller built into the handlebar mount
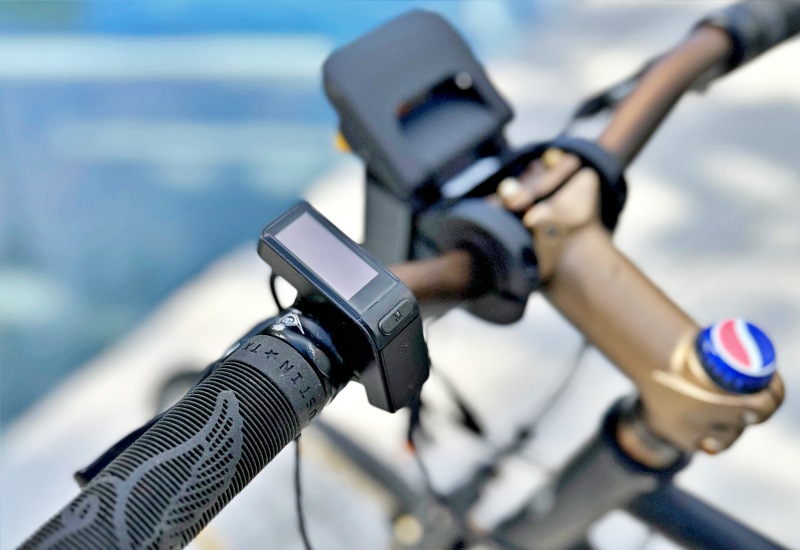
Display – Low-profile display with controls for on/off and assist levels
Dimensions – Air Power Pack (25 x 100 x 212mm and 700g) | Max Power Pack (36 x 100 x 228mm and 1100g)
Kit Weight – 4.85lbs (2.2kg) or 5.7lbs (2.6kg) for Air and Max respectively. (Note the wheel swap means actual added weight will be less)
Design and features
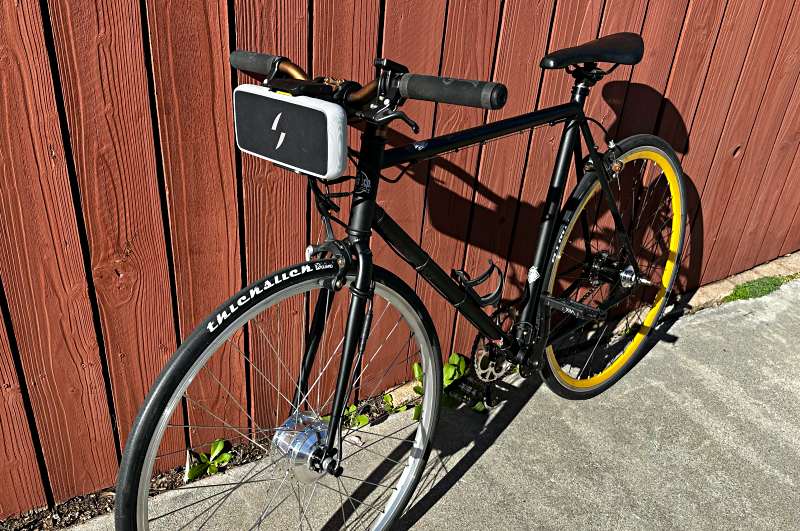
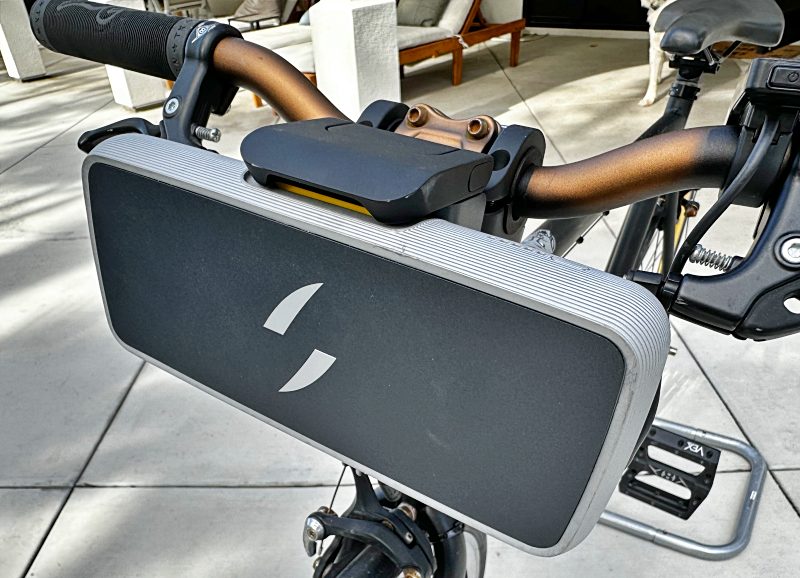
E-bikes can seem quite complicated, but Swytch has done a lot to keep things easy with minimal parts. The most visible components are the Power Pack and its handlebar mount. Unlike traditional e-bikes, this battery mounts in a second and removes just as quickly making security and charging a breeze. The Power Pack is available in the 15k range Air or the 30k range Max.
The motor hub is a beautiful polished silver and not so much bigger than a standard hub that it draws any unnecessary attention. It’s compatible with disc brakes out of the box and the kit I reviewed came with a 700c rim with sidewall brake surfaces for the bike I was to install it on. The rim is available in either silver or black.
The PAS system helps the system know how fast you are pedaling by measuring how fast 12 equally spaced magnets pass a static sensor relaying that info up to the motor controller to vary the assist level.
Lastly, the handlebar display provides speed info and lets you adjust assist levels on the fly with handy thumb buttons all in a small compact package that doesn’t scream e-bike.
Install
Before you can install the Swytch Electric Bike Conversion Kit, you need to order a kit with the correct parts for your particular bicycle. There are really only two key variables; wheel size and power pack size.
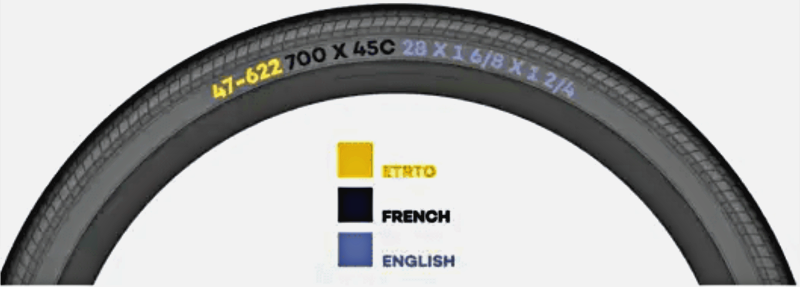
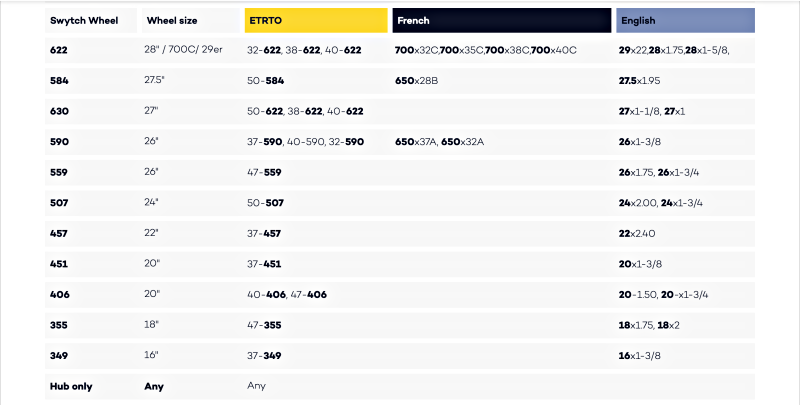
If you don’t know the wheel size of your bicycle, you can find it on the sidewall of the tire. Being from the UK, Swytch uses the ETRTO system which stands for European Tyre and Rim Technical Organisation. It’s a group that was founded to help make sure pneumatic tires and rims remained compatible. A translation between inch and ETRTO sizing and a tire example are shown here.
As for the Power Pack, the decision to make will be how much range you would like to get between charges. Options are the Air 15k (9.3 miles) or Max 30k (18.6 miles). The Max Pack is about 10mm thicker, 10mm wider and 400g heavier with a higher price tag. Keep in mind that your bike will still function as a non-powered bike if you choose not to turn on the system or happen to deplete the battery, so lighter may be better in that regard.
Okay, let’s talk install. It’s very similar to Swytch’s 1st Gen version. This can be as quick as 20-30 minutes or take much longer depending on how particular you are with cable routing and dialing things in. Here are the steps…
- Install the handlebar mount: This mounts on both sides of your stem, and you’ll need to use a pair of the included shims on each side to match the diameter of your handlebar to the diameter of the mount clamps.
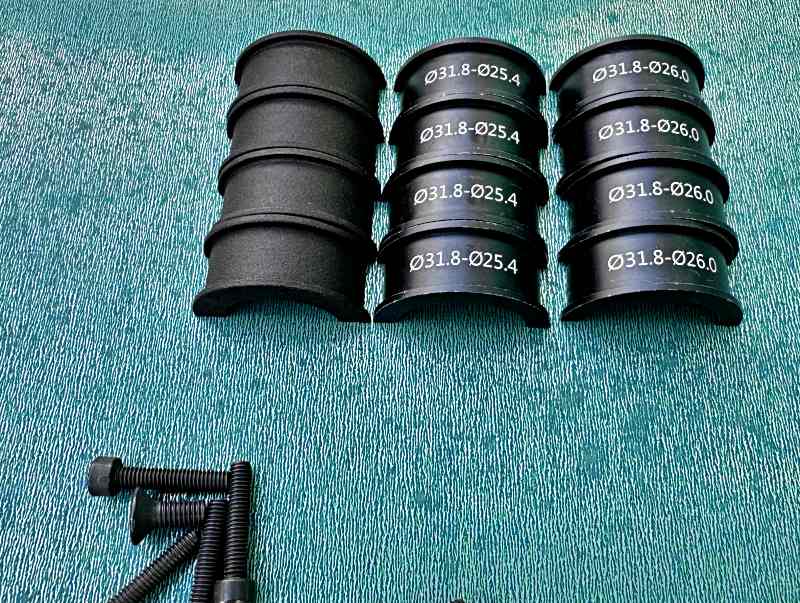
Install the selected shims and then tighten the 4 bolts evenly until the mount is secure. Make sure not to over-tighten.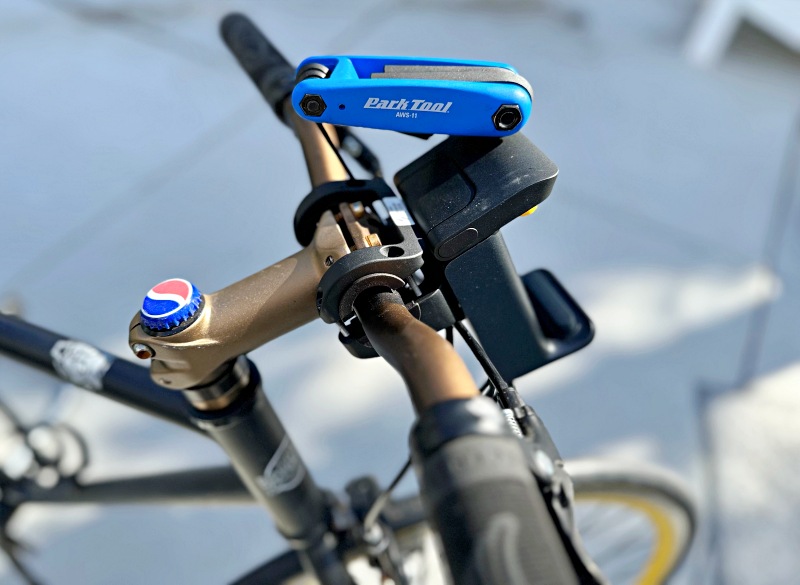
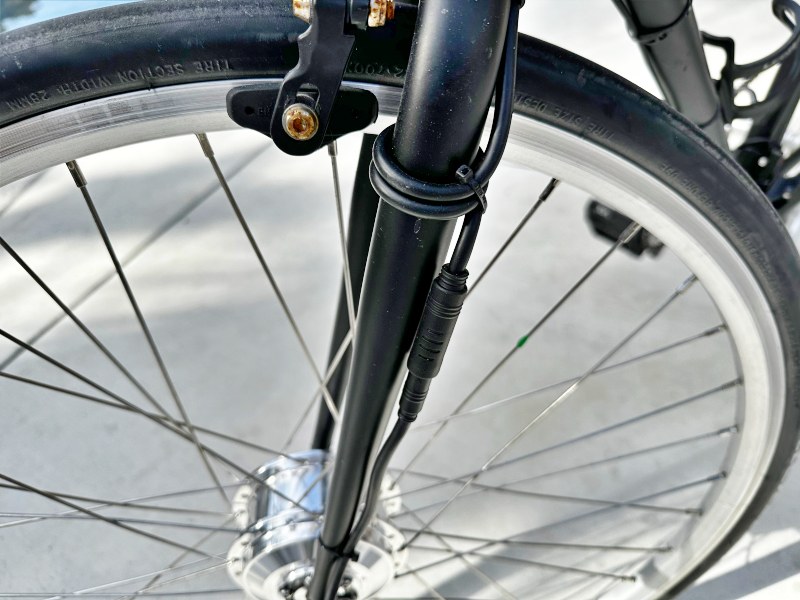
- Install the front wheel: Remove your front wheel, let the air out of the tube/tire, and then remove the tire from your wheel. If your bike has disc brakes, make sure to remove the brake rotor from your old wheel and move that over. Install your tube/tire on the new Swytch front wheel and inflate the tire. Install your freshly tired wheel onto your bicycle. Connect the cable up to the black receiver cable coming from the handlebar mount by aligning the arrows and pushing them together. You can see in this photo that I wound the cable twice around the fork leg to deal with some of the extra length that’s needed to fit multiple bike sizes. NOTE: I found that the cable ties included with the kit were super brittle, so you’ll want to supply your own. The last thing on this step is to please, please make sure to properly tighten the axle nuts and readjust your brakes for the new rim surface or disc brake alignment. We want anyone heading out on the road to have a well-secured wheel and working brakes.
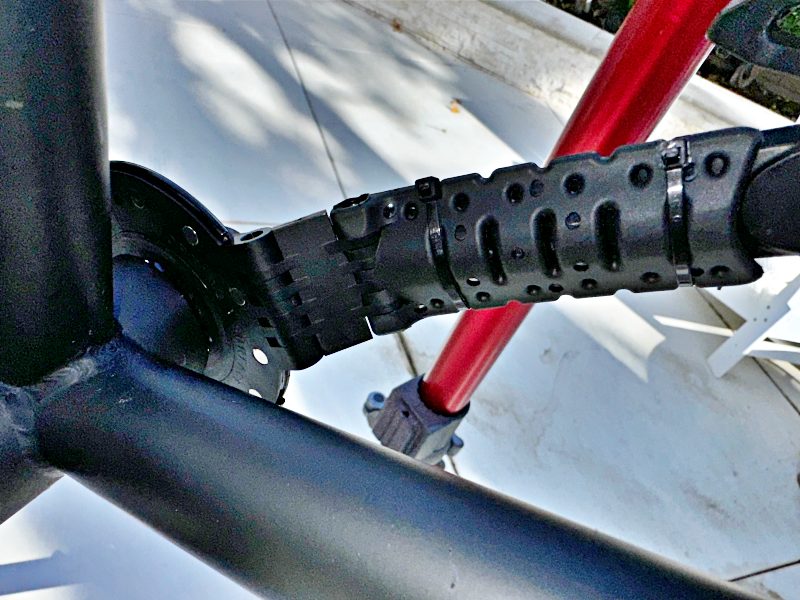
- Install the PAS system: Assemble the two semicircle parts around the crank spindle on the left (non-drive) side of your bike and then trap them into the crank arm fixture with the retention spring ring. Then use the cable ties to secure the segmented fixture around your crank arm. Next, you’ll locate where to place the sensor on either your seat tube or down tube so that the sensor is aligned with the magnets ring you just installed. The sensor should be close so that it can sense each magnet pass, and you’ll want to make sure that the magnet ring stays parallel during its rotation. Peel and stick the sensor and then use cable ties to really lock it down. Finally, run the cable up the bottom tube towards the handlebar. NOTE: You may want to use some painter’s tape or velcro straps instead of cable ties until everything is connected and working. Then you can circle back and cable tie everything in place once.
- Install the Display: You’ll want to mount this near your grip as you’ll adjust your assist levels while cycling. It’s usually mounted on the left side since the right side often has gear shifters that shouldn’t be interfered with, but it could be mounted on the right side if required. NOTE: The provided tool does not have the 2.5mm hex key that you need for this. And be very careful not to over-tighten the clamp bolt. I haven’t had issues with this unit supplied by Swytch, but have broken two identical looking units from Bafang and EggRider in the last couple of years where there isn’t a lot of material around the hinge pin.
Run the cable along the underside of your handlebar (cable tie in place) and connect it to the corresponding green cable from the handlebar mount cable cluster by aligning the groove and snapping them together. They make a very satisfying pop sound.

- After connecting the greens, the yellow flat connector on the far right (above) connects to the PAS cable coming up from step 3. The remaining cable connections are for additional accessories that are available separately. The blues are for brake sensors that cut power to the motor if they detect you’ve applied the brakes. The last yellow is for connecting a thumb or twist throttle. Check regulations in your area as that may or may not be legal.
Performance
A couple quick notes to follow up on the Swytch Electric Bike Conversion Kit install process.
- The kit I received did not come with any written instructions. I did find an online manual in their support section along with a full PDF manual that is very detailed.
- The display installs with a hex wrench size that is not included in the tool kit.
- Use your own, good quality cable ties. I’m a huge fan of these low-profile Cobra ties any where your limbs might brush a cable tie.
- I’m particular with keeping cables neatly tucked away, and my favorite thing to do is work on bikes so the install (and maintenance) took me a couple of glorious hours. It could definitely be done in under 30 minutes for just an install.
Okay, so performance notes. The battery is the key component to an e-bike and also the most frequently stolen part out on the streets. Compared to the 1st generation Swytch, this battery and the way it attaches to the handlebar mount are MAJOR improvements. The top lever (shown below) opens the jaw of the mount to let the battery be easily inserted before clamping it back down.
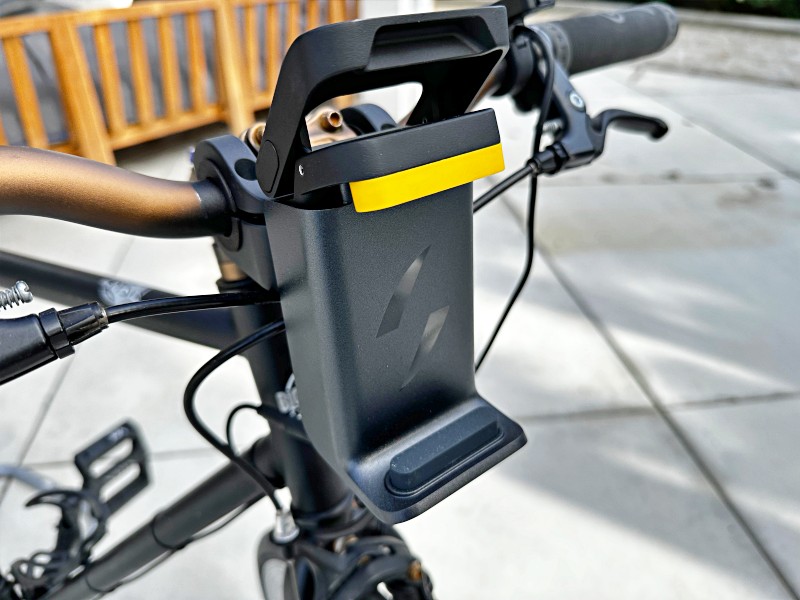
This new Power Pack easily fits into almost any bag and even some jean pockets, but the weight will likely keep you from doing that. Battery installation and removal is perfectly executed and the only challenge will be remembering to grab it as you lock up your bike.
To start up the system, press and hold the button on the top of the display and then you can start riding. My unit was defaulted to Mode 0 (no assist), but a quick press on the up arrow of the display move to 1 through 5 increasing the amount of assist. The system remembers your setting from here out even through battery removal cycles.
If you get to a particularly steep hill that has you walking (happens to all of us), there’s a welcome “walk assist” mode that you access by holding the down arrow continuously on the display. It provides power to the front wheel and moves the bike along for you as you walk. Pretty handy since your bike does weigh a bit more with this kit.
The stock setup of 5 assist modes (+ off) worked great. Keep in mind that it’s set to only provide assistance up to the speed limit set for your country or region. In the US that’s 32kph/20mph for a class 1 e-bike. In Europe, it’s 25kph/15.5mph. The only time you’ll really notice the limit is if you’re cranking along right around that cutoff speed. When you hit the limit, the bike can suddenly feel heavy like you’re doing all the work which is actually the case. After reading the manual, it does looks like some of the stock settings can be adjusted, but I haven’t found a reason to mess with it.
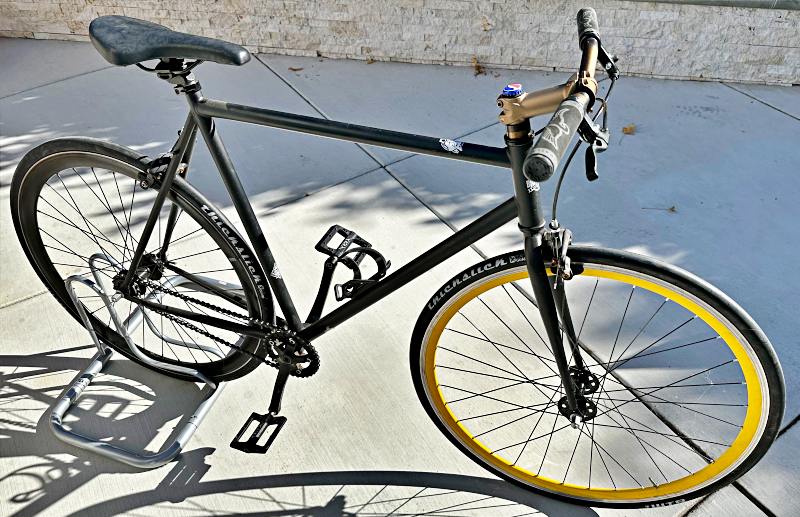
The power assist is super smooth otherwise and you’ll find yourself smiling, like a lot. The particular bike I installed this on is my son’s single speed from State Bicycle. Here’s a before photo.
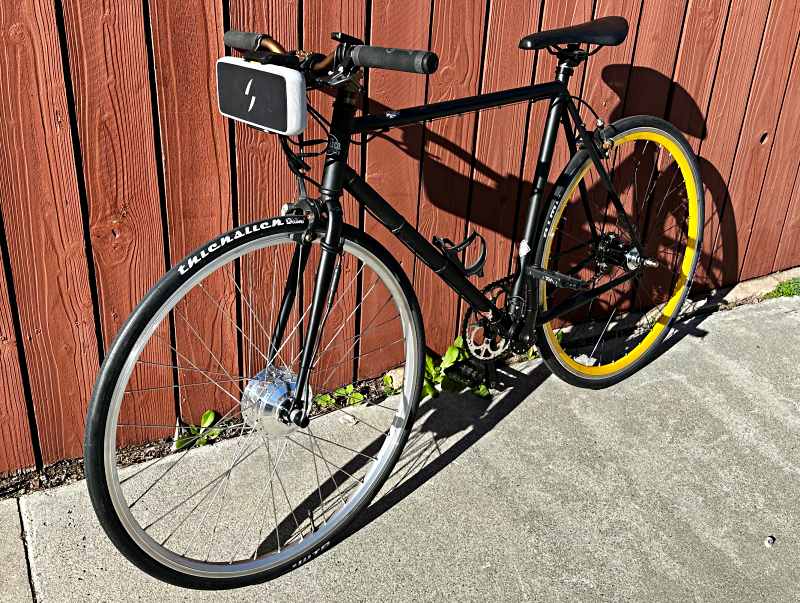
I had built a new wheel set for him a while back with a rear SRAM 2-speed kickback hub. It’s a cool system that switches between 2 gears by backpedaling momentarily. Pairing this with a front wheel motor worked great as you’re able to switch to an easier gear before a hill without cluttering up your handlebars with more controls. Here’s the after photo.
The only real issue I ran into is that the battery does not sleep if you leave it attached to the handlebar mount. The LEDs stay lit if the battery is mounted and over the course of (a very rainy) week it drained by 3/4. This does not happen if you remove it from the mount which is what you’ll need to do to charge it anyway. That process is as simple as connecting it to the included charger. The LEDs increment as the charge level increases. Expect charge times of around 1 hour for the Air battery pack and 2ish for the Max.
What I like
- Well thought through system that converts almost any bike
- Awesome battery system that’s light and deters theft and doesn’t eat up space in the main triangle
- Small display with just the info and the controls you need
- Love that they included real tools and a bag to keep them in
What I’d change
- The battery needs a sleep mode if left attached to the mount
- Needs to include a 2.5 hex key for the display mount (or spec a 3mm head screw)
- Need quality cable ties that don’t break instantly
- Durability concern on the display hinge clamp
Final thoughts
The Swytch system is honestly a bargain. It installs easily, even without a whole lot of bike knowledge and all but guarantees a big smile on your face. If you’ve already got a bike you like, this is an inexpensive way to get an e-bike with quality power components and one of the best battery configurations on the market all on the bike you already have. What’s not to like about that?
Price: ~$500 (depending on battery choice)
Where to buy: Join the waitlist at swytchbike.com
Source: The sample of this product was provided by swytchbike.com

Now retrieving an image set.
2-Pack LED Video Light Kit, NiceVeedi Studio Light, 2800-6500K Dimmable Photography Lighting Kit with Tripod Stand&Phone Holder, 73" Stream Light for Video Recording, Game Streaming, YouTube
(as of July 14, 2026 14:09 GMT -05:00 - More infoProduct prices and availability are accurate as of the date/time indicated and are subject to change. Any price and availability information displayed on [relevant Amazon Site(s), as applicable] at the time of purchase will apply to the purchase of this product.)
Gadgeteer Comment Policy - Please read before commenting
With a front wheel motor there should be a possibiliy to recover energy when rolling downhill – is there?
No, the Swytch doesnt do that
My kit did not come with any tools. Also the display unit you show was an optional upgrade when I ordered, a more basic one supplied as standard. And you’ve fitted the wheel with the axle upside down. The electric cable should exit the end of the axle downwards, not upwards.
Like you I had trouble with the supplied cable ties breaking easily. Thankfully there were plenty supplied.
Sounds Interesting
I Need A Power-Assist Trike.
Thank You Very Much For The HeadsUp InFormation
Is there a kit for a beach cruiser type bike? I would guess the only difference would be the wheel dimensions.
Yes like some one has said bad install with wheel upside down,no tool kit and display is extra.
The display is too small for lots of handlebars.
I got one for the Brompton. At top speed it says I’m doing 36kph but I reality when riding alongside say a Lime or Santander e-bike, it’s actually only doing 20kph. I’ve contacted Swytch but they’re v slow to respond. I think it’s to do with the smaller wheel size of the Brompton (despite getting the Brompton specific kit). There’s no way to adjust the settings as far as I can see.
Does you have any suggestions? 🙂
I purchased this kit and really regret my decision. Me, along with many other customers, are experiencing major issues with this company (such as receiving kits with missing parts, receiving the wrong wheel size, having the battery totally die or other components malfunction after a few rides, or not receiving the kit at all). Swytch has responded publicly on social media and on customer review sites, most likely to save face, but have not actually resolved these issues, and have completely stopped communicating with many of us, to the point that people are questioning if they are even still in business.
It took 8 months to receive my kit, during which time Swytch was (and still currently is) advertising an 8 week turnaround to new customers, knowing that there was a severe backlog. The wheel I received is not universal, and does not fit my bike’s dropout slots. After contacting Swytch about this I was sent to another online order portal, with an estimated 8 week turnaround time for the correct wheel.
Knowing that the last ‘8 week shipment date from order’ with this company ended up being 8 months, I requested a refund. After emailing this request six times over the course of a month, Swytch finally contacted me to submit a date for return pickup, but I have to pay the return shipping fee of $60. Overall, this has been a time consuming and frustrating experience that has cost me money.
Terrible product as an owner of the first and second generation version of the kit. At least the first generation worked. The new flat battery design is slick, but the power assist is unreliable and delivers power occasionally late…eg 2 to 5 peddles over the first rotation I have from the first gen unit. It dies not help that I purchased the kit summer of 2022. It took almost a year to find out this issue. Don’t buy it…
Took two days to assemble. No tools pro idea. Six months to deliver. Most of all; won’t work!
I echo Christina Bryant’s comments above.
I’m from Canada.
Swytch confirmed my order on May 5, 2022. Almost 10 months later, there is no confirmation of delivery, despite many empty email promises. I have advised the company (name on email is Samir) on January 25, 2023 that I would formally request a refund on March 1, 2023 to the credit card used to place the purchase. Effectively, giving the company another five weeks grace.
My credit card company has advised that once I initiated the refund request, they would pursue to recuperate the funds from Swytch’s financial institution, if Swytch failed to do so.
I’d appreciate any advice in dealings with Swytch in obtaining a refund.
I just received and fitted my Swytch kit to an alloy road bike. The main issue I faced was fitting the 10mm hub motor wheel into my 9.5mm fork dropouts which was resolved by judiciously and carefully filing the axle (even though Swytch say this is not recommended, I don’t think the small amount of metal removed will cause structural problems). The rest of the kit was a breeze to complete and there is enough flexibility built into the design to deal with the wide variety of frame tubing sizes apparent on different bicycles these days. The other problem was the control unit which did not fit my drop handlebars wrapped with decently thick tape. Although the clasp on the unit is far too small to secure using the nut supplied, in its fully open form it grabs onto the handlebar tape sufficiently well that I can leave it ‘undone’ while cable tying its wire onto something else for security. Overall, the kit appears to be of good quality and works well with my setup so I don’t know why other people are declaiming it, other than they might have installed it incorrectly or done so on a poor quality bicycle or have received a dud kit, which is always a possibility. I echo the comments about the difficulty in receiving customer support from Swytch and would relate this to the company being overwhelmed; I decided to file the axles of the hub motor down to avoid a long wait as a result.
The use of electric power to assist bicycles is transformational and this kit has made that a reality for me.
Having been burned by Van Moof and not wanting to pay them ridiculous sums for out of warranty repairs that will probably fail again (including having to courier the bike from Belfast to London or Utrecht since home repair is impossible), I have recently fitted the Swytch to my S2. Ok so the VM may not look as slick as it did, but the Swytch system is actually better than the original VM power unit – the VM is a heavy bike even without its in-built battery, but the Swytch motor pulls really well and is responsive enough. Getting the pedal sensor in place was tricky and the wheel only just fitted (including having to file down part of the washers) but now I’ve got a working e-bike again (and never have to try and contact Van Moof ever again), so I’m a happy rider.
Do not buy this product. They say it fits 99% of bikes but it absolutely DOES NOT. I ordered this product, waited months to get it, then the skewer would not fit the fork. They have no customer service and no people to actually speak to. Their website has a link about returns with a hyper link and when you click it…it goes to nowhere. This company is a joke. There are a litany of videos that show people having these same issues and then filing the fork of their bike to make the product fit. They are lying in their claims. Avoid this company!!
You may be too fast off the mark. While I found Swytch slow in responding to queries about delivery, their tech folks have been responsive. Yes, I found the hub axle was too wide for my forks, but it was only half a coat of paint difference, and gently sanding made a good fit. The kit is high quality, and does not change the original feel of the bike. Well worth persevering with.
Hi. I’m in the middle of the installation of my kit. I have the LED display, which was a mistake (it’s single button). It looks like the OLED display, during normal use, displays current speed, battery level, assist level but I wasn’t able to confirm that. Is that right?
Thanks.
certainly cannot be fitted in half an hour…or even half a day…pedal sensor attachment requires ingenuity..