REVIEW – Ever since another car backed into my previous car and damaged it, I have always wanted a dashcam to make sure I could have video evidence of any accident. Lucky for me, the person who caused that accident owed up to it and let me file a claim on their insurance. I am not sure, but I think Texas has to be one of the states with the most uninsured motorists. I hear of hit and runs almost daily on various social media outlets. The problem with many of the dashcams is that they are rather large, and I thought it would be a pain to wire up the camera in my car. The Vantrue Element 1 is one of the smallest dashcams I have seen, so I thought I would try it. Let’s see how it worked out for me.
What is it?
The Vantrue Element 1 is a small and smart dash cam that gets the basics right. It contains almost all the functions you want from a dash cam: 1944P resolution, smart voice control, free APP, wireless controller, GPS tracking, useful 24/7 parking surveillance, automatic emergency recording, etc.
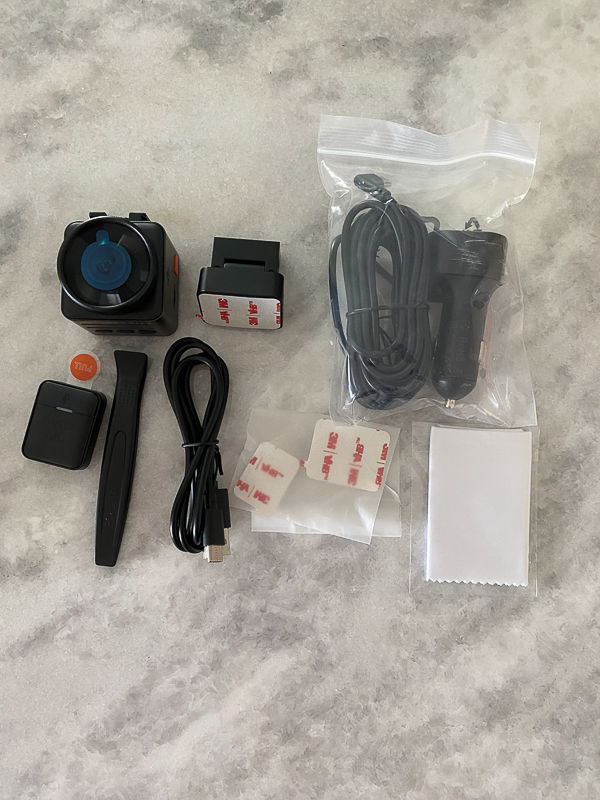
What’s in the box?
-
1x Vantrue E1 Dash Cam
-
1x Magnetic-Assist Mount with GPS Module
-
1x Wireless Hotkey Remote Controller
-
1x Car Charger with 11.4ft Type C USB Cable
-
1x Type C USB Data Cable 3ft
-
1x Warning Sticker
-
2x Adhesive Stickers
-
2x Electrostatic stickers
-
1x Trim Tool
-
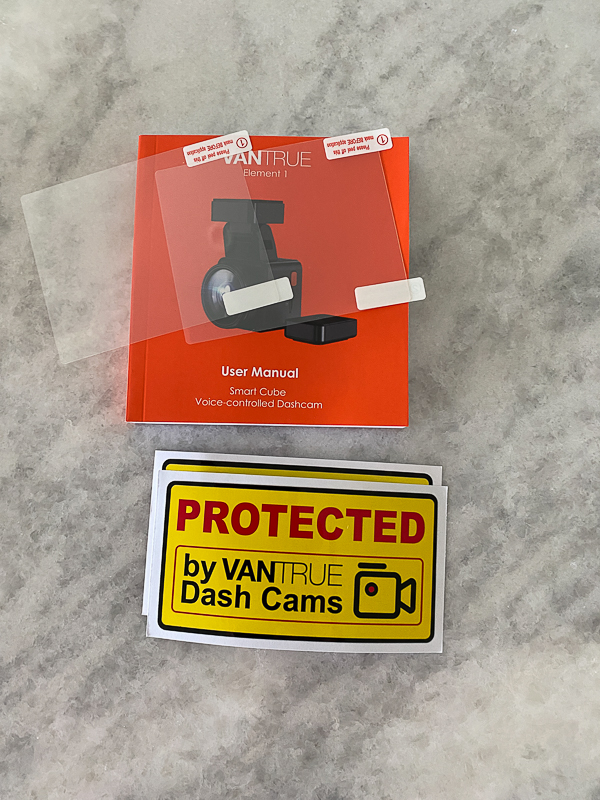
1x User Manual
-
1x Quick Guide
Hardware specs
- Chips: Novatek high-performance processor
- Resolution: 2592x1944P 30FPS; 2560x1440P(HDR) 30FPS etc
- Image Sensor: Sony CMOS Sensor
- WiFi: Built-in 2.4G
- Lens: 160° wide viewing angle; F/1. 8 wide aperture
- Audio: Built-in microphone and speaker
- Video File Format: MP4
Design and features
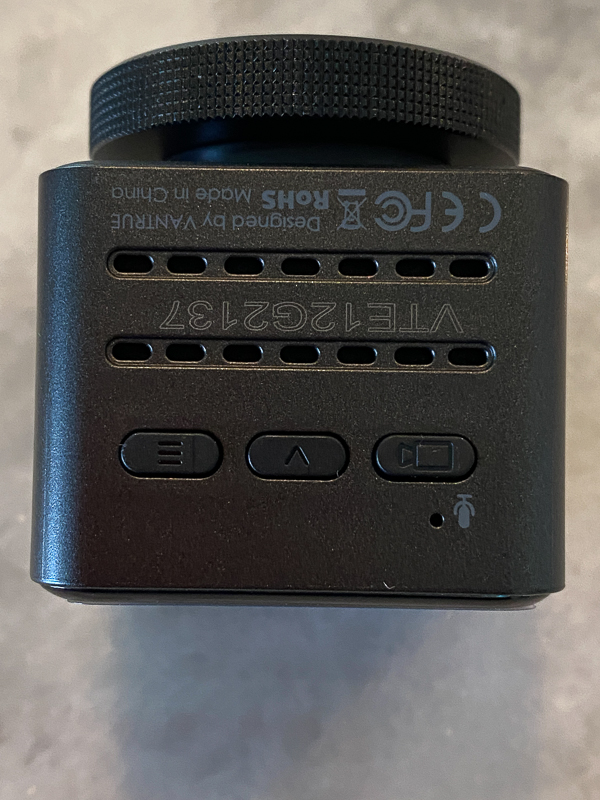
Under the bottom of the Vantrue Element 1 dashcam, there are three buttons and a microphone hole. From right to left, here are the descriptions of the buttons:
- Video camera button – During video recording, long press to turn off the screen, short press to stop video recording, and enter standby mode; you can confirm the selected option in the menu; when playing back files, you can play/pause files.
- V button -During video recording and standby, long press to quickly enter parking mode, and short press to turn on/off the microphone: in menu settings, long press to scroll through menu options, and short press to display the next menu option: during file browsing, long press to scroll to display file, short press to display the next file: in playback mode, short press to pop up the delete file menu.
- Lines button – During video recording and standby mode, long press to turn on/off WiFi.
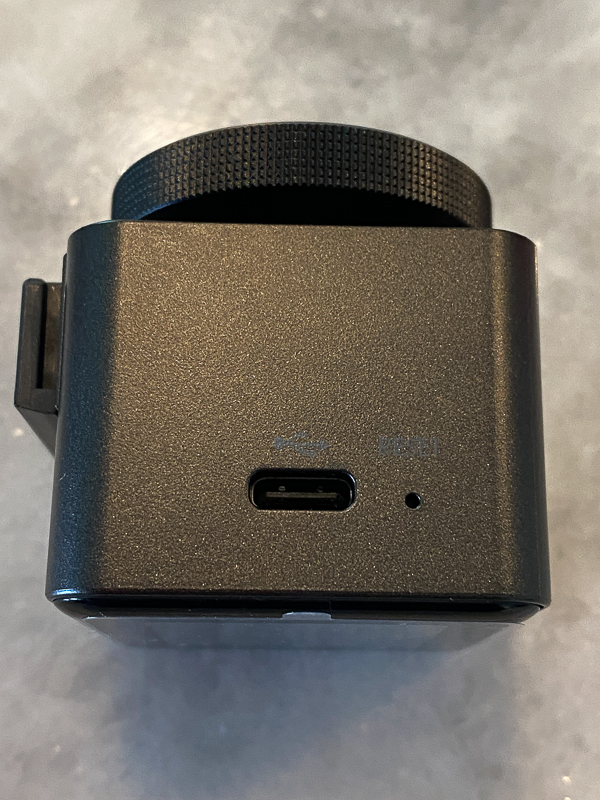
As you face the back of the camera on the right-hand side, you will find the USB-C port for power and a small pinhole reset button.
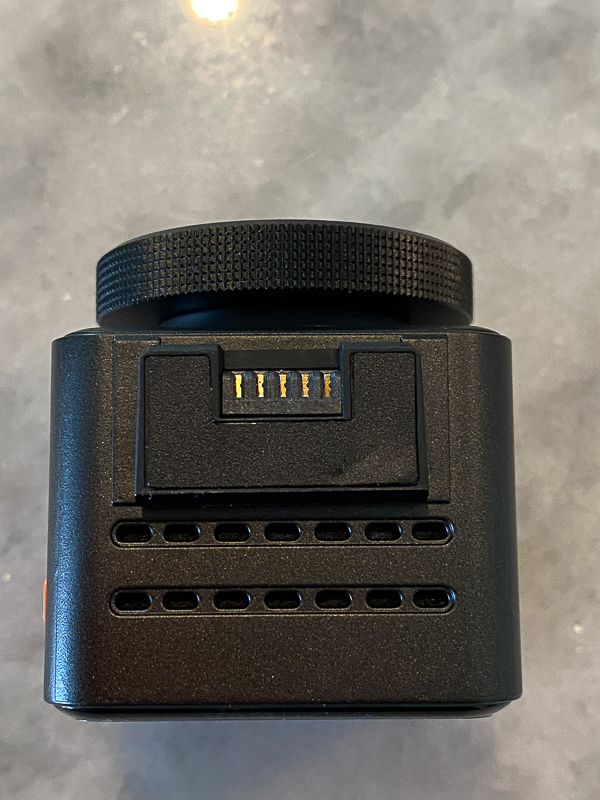
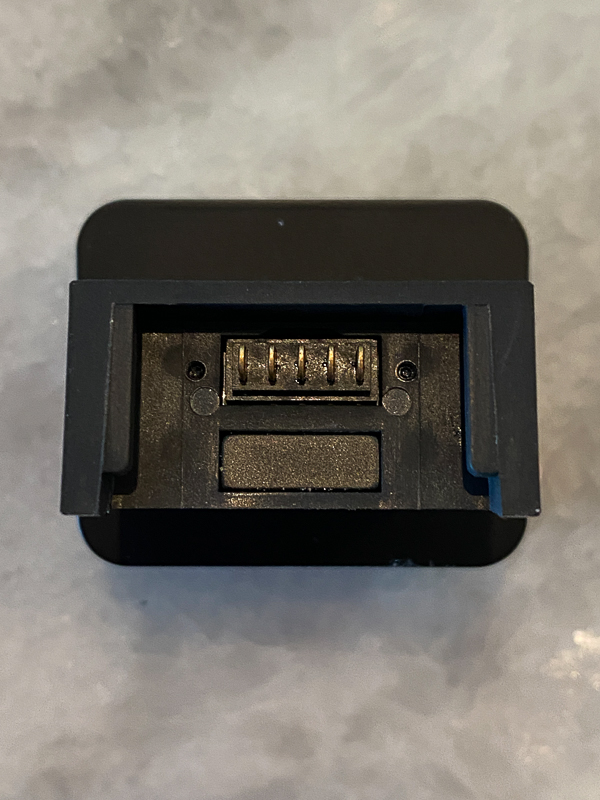
You can find where the base gets attached to the bottom of the camera. The metal you see is strictly for magnets to use. There is no power on the base. The camera uses a combination of a magnet plus a slide on the base to keep the base solidly attached to the camera to eliminate shaking.
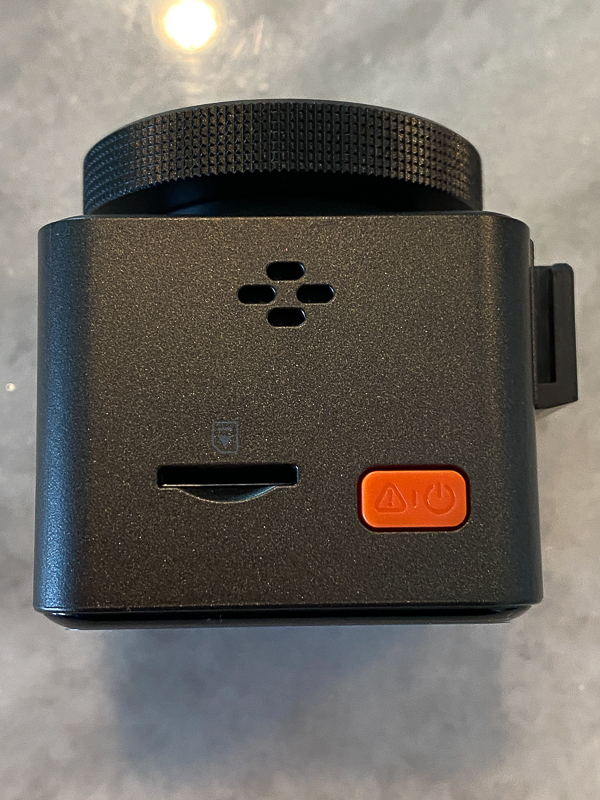
On the camera’s left side, you can find the micro SD card slot and power button. You will also see the holes for the speaker.
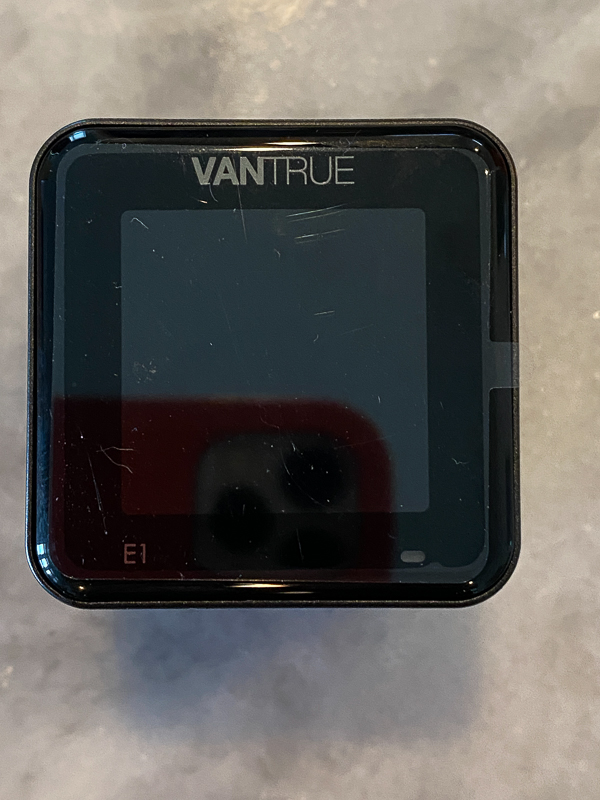
This is a close-up shot of the LCD display of the camera. You can see the embossed E1 on the bottom left. At the bottom right is an LED that will blink green when the camera is recording and hold steady when it is in standby mode.
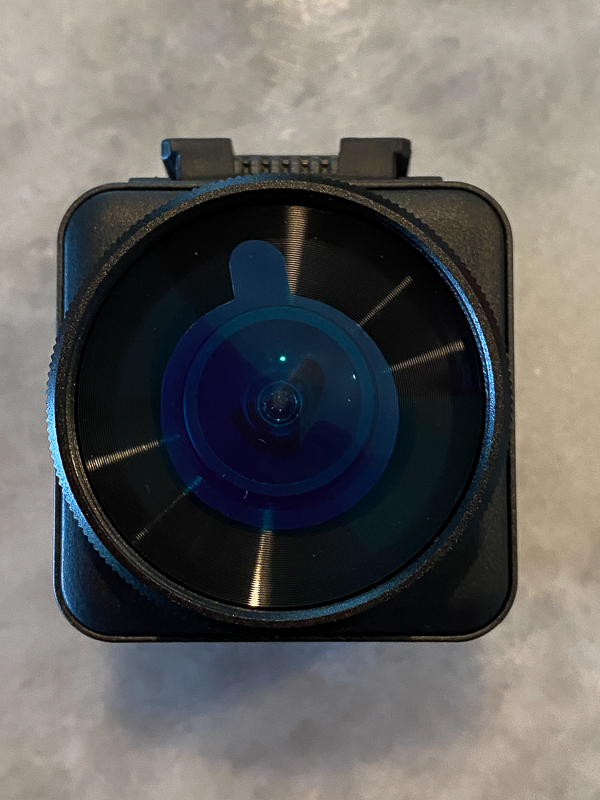
This is a shot of the front lens of the camera. I still had the protective film on at the time. Note that you can buy a separate polarizing filter that can screw to the front of the lens.
This is a picture of the bottom of the mounting base. You can see the slot for the camera to slide in and the magnets that will catch the camera’s base.
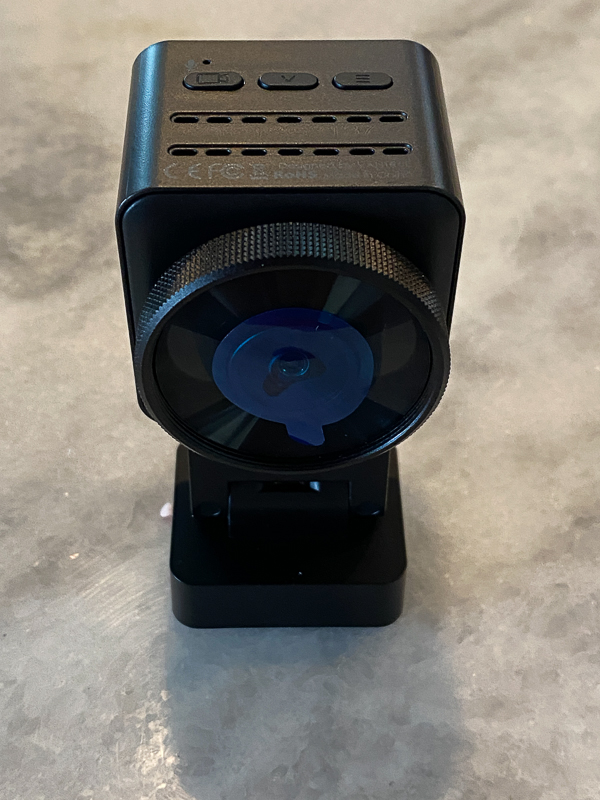
Finally, here is a shot of the camera mounted on the base.
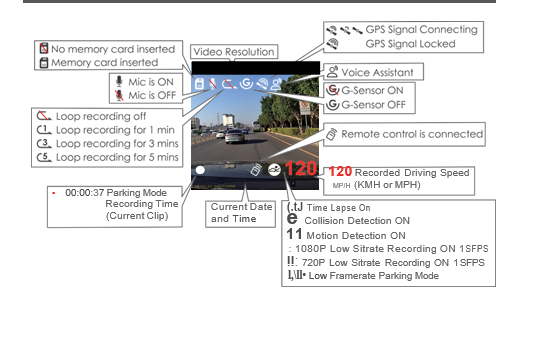
I included a screenshot from the manual so you can see all of the features available on the LCD screen. I was unable to test the parking mode because I did not have the camera hardwired to direct power on my car.
There are a ton of recording settings available for the Vantrue Element 1 dashcam. I have them listed below.
-Resolution: Press the Button to switch the resolutions: 2592xl 944P 30FPS; 2560xl 440P(HDR) 30FPS; 2560xl 440P 30FPS; l 920xl 080P 60FPS; l 920xl 080P(HDR) 30FPS; l 920xl 080P 30FPS; l 280x720P(HDR) 30FPS;
l 280x720P 30FPS.
-Loop Recording: The default setting is 3 min. You can choose among l /3/5 mins and OFF.
-G-Sensor: Select the level of G-sensor you need, then you can set 3 directions (Front+ Back/Left+ Right/Up+ Down). The G-sensor value in each direction can be selected as l /2/3/4/5/Off. The higher the sensitivity level, the easier it is to trigger emergency recording. G-sensor is most sensitive when set to 5.
-Audio Recording: The default is ON. Set recording to on or off.
-Exposure: The default value is +0.0. Adjust the exposure of the lens.
-REC Status Light: The default setting is ON. You can choose to turn on/off the recording status light.
-Rotate Display: Default is off. You can choose to flip the video screen up and down(180 Degree).
-Number Plate: Press the GQ button to select the number or letter to be set. After setting, your license plate number can be displayed in the recorded video.
-Stamp: Enable or disable the watermark stamp on video and photos. The watermark stamp includes a date and time label, VANTRUE label, license plate number, GPS location information, and speed label. All are enabled by default. NOTE – I turned off the speed timestamp.
-Time Lapse: The default value is disabled. You can choose to enable 1FPS/5FPS/10FPS/15FPS.
-Parking Mode: You can choose the parking mode you need, including Collision Detection/Motion Detection/Low Bitrate Recording/Low Framerate Mode/OFF.
-GPS Setting: GPS is enabled by default. GPS ON/OFF settings, speed unit settings, and GPS information are all set here.
There are also quite a few system setup features which I have listed below.
-Language: Available languages are Engish/Francais/Espanol/Deutsch/ltaliano/Polish
-WiFi: The default setting is Off. After WiFi is enabled, mobile phones can connect to WiFi and operate the dashcam through mobile phone interfaces.
-Display Setting: The default setting is Full-Screen mode. You can switch it to panorama mode.
-Voice Assistant: The default sensitivity is Standard. Voice commands can be recognized after the option is turned on. You can choose low sensitivity /high sensitivity/standard/off.
-Voice Content: Voice recognition commands. You can use different commands to remote control the camera.
-Format Memory Card: Format all data on the memory card.
-Format Reminder Setup: Select the reminder options: 15 Days, l Month, and Off. The default is off.
We have added a format reminder time setting to prevent you from forgetting to format the memory card regularly. You can choose to be reminded after 15 days or l month. When the time is up, you can choose “OK” to format or choose “Next.”
Note: If changing the format reminder option, the timing will restart as soon as the option is changed.
-Date & Time: There are two ways to set the time and date: l. GPS automatic update, 2 Manual date/time setting. GPS automatic update is enabled by default.
GPS automatically updates the date and time based on your time zone, so you must select the correct time zone first: you can also turn off GPS automatic update, turn on the Manual date/time setting, and manually correct the date and time.
The date format and time zone settings can also be set under this menu.
-Auto LCD Off: Set the time to automatically turn off the LCD display after no operation.
If you set the Auto LCD Off to 3 min, the camera’s LCD screen will auto light off after 3 min, but the recording will continue. If the setup is Off, the screen will not turn off. Press the Button to choose the option you want: 30s, l Min, 3Min and OFF.
-Device Sound: Set the volume of the device. The default volume level is 3, the lowest is 0, and the highest is 5.
-Prompt Tone: According to different situations, the dash cam is set with five kinds of prompt tones, which are power-on/off sound, Keys sound, File locked sound, Format sound, and abnormal stop recording reminder. All prompt tones are turned on by default.
-Frequency: Different countries have different frequencies. To avoid affecting the video, you can choose 50Hz or 60Hz frequency according to different regions.
-System Info: Check the current model, firmware version, and the Vantrue official website.
-Certifications: You can view the certification information for the E1 camera.
-Default Setting: Reset the device back to factory settings.
Setup
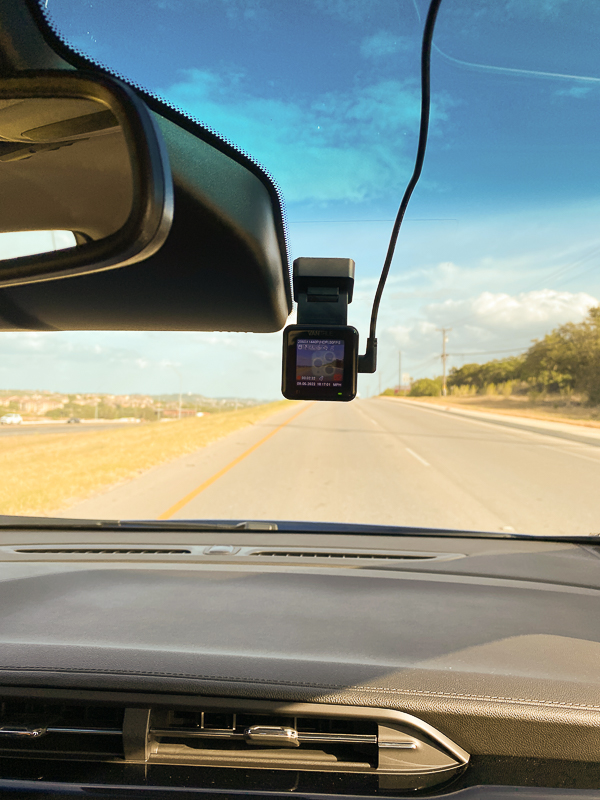
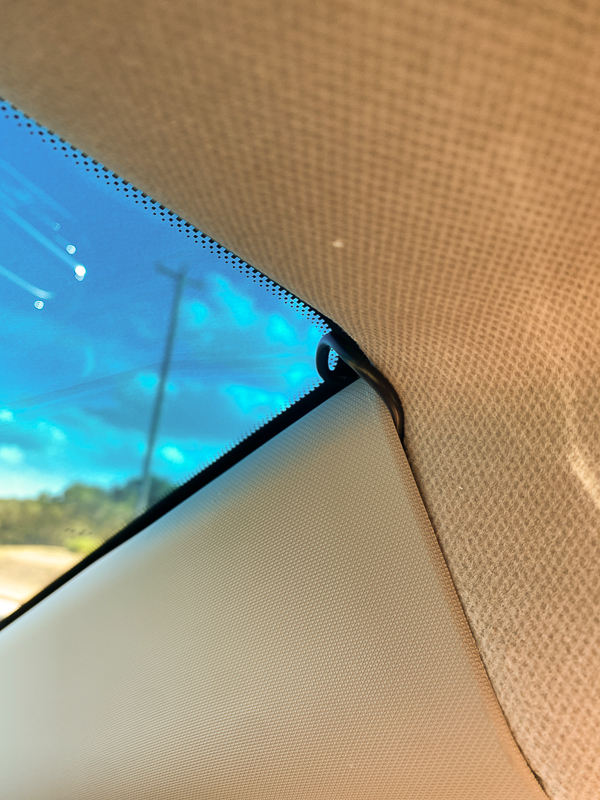
The setup for the Vantrue Element 1 dashcam was surprisingly easy for me. I have a new 2022 Chevrolet Bolt. As you can see in the picture above, there is a rather large plastic case behind my rearview mirror. This holds the front camera for the car. I had to mount the camera lower than I liked because the lens on the camera was so wide it was picking up the case. I still have a bit of the case showing in the top left corner of the video. I also wanted to be below the extra UV protection line of the windshield. It is mounted on the passenger side, and I do not even notice it when driving.
To mount the camera, I first affixed the static cling to the window. I then pulled the strip to expose the 3M tape from the back of the base and mounted it on the static strip. That is nice, as now I don’t have glue directly on my windshield. I then plugged it in and ran the power cord up to the top of the window and under the ceiling of my car. I was fortunate in that there was plenty of give on the edge, and the cord could slip behind the roof easily.
When I hit the side pillar on the passenger side, I ran the cord between the airbag’s seam and the car’s roof. I ran the cord under the rubber gasket down to the floor along the door edge.
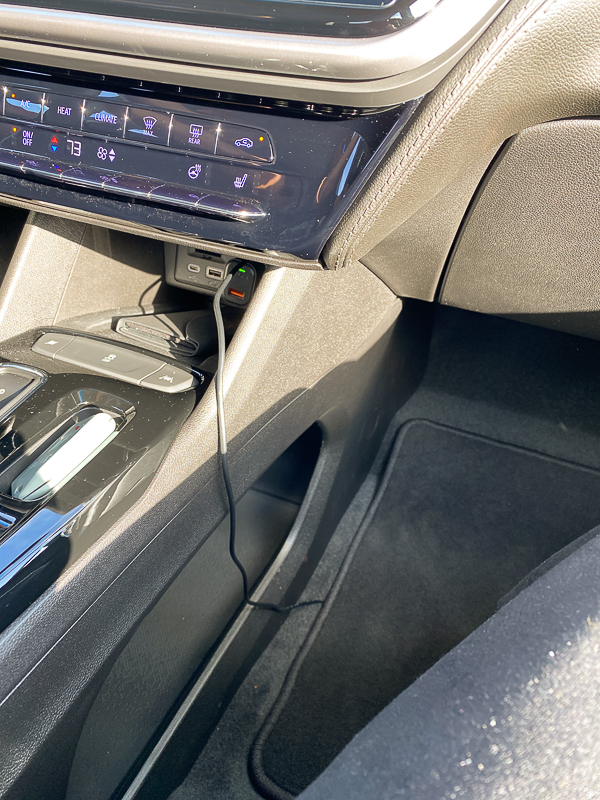
Once I hit the car’s floor, I ran the cord under the floor mat to the middle console, where I could plug the adapter into the cigarette lighter port. If you look closely, the adapter gives you another USB port which I feel is a nice touch. The adapter has a green LED that lights up, showing that it has power.
Performance
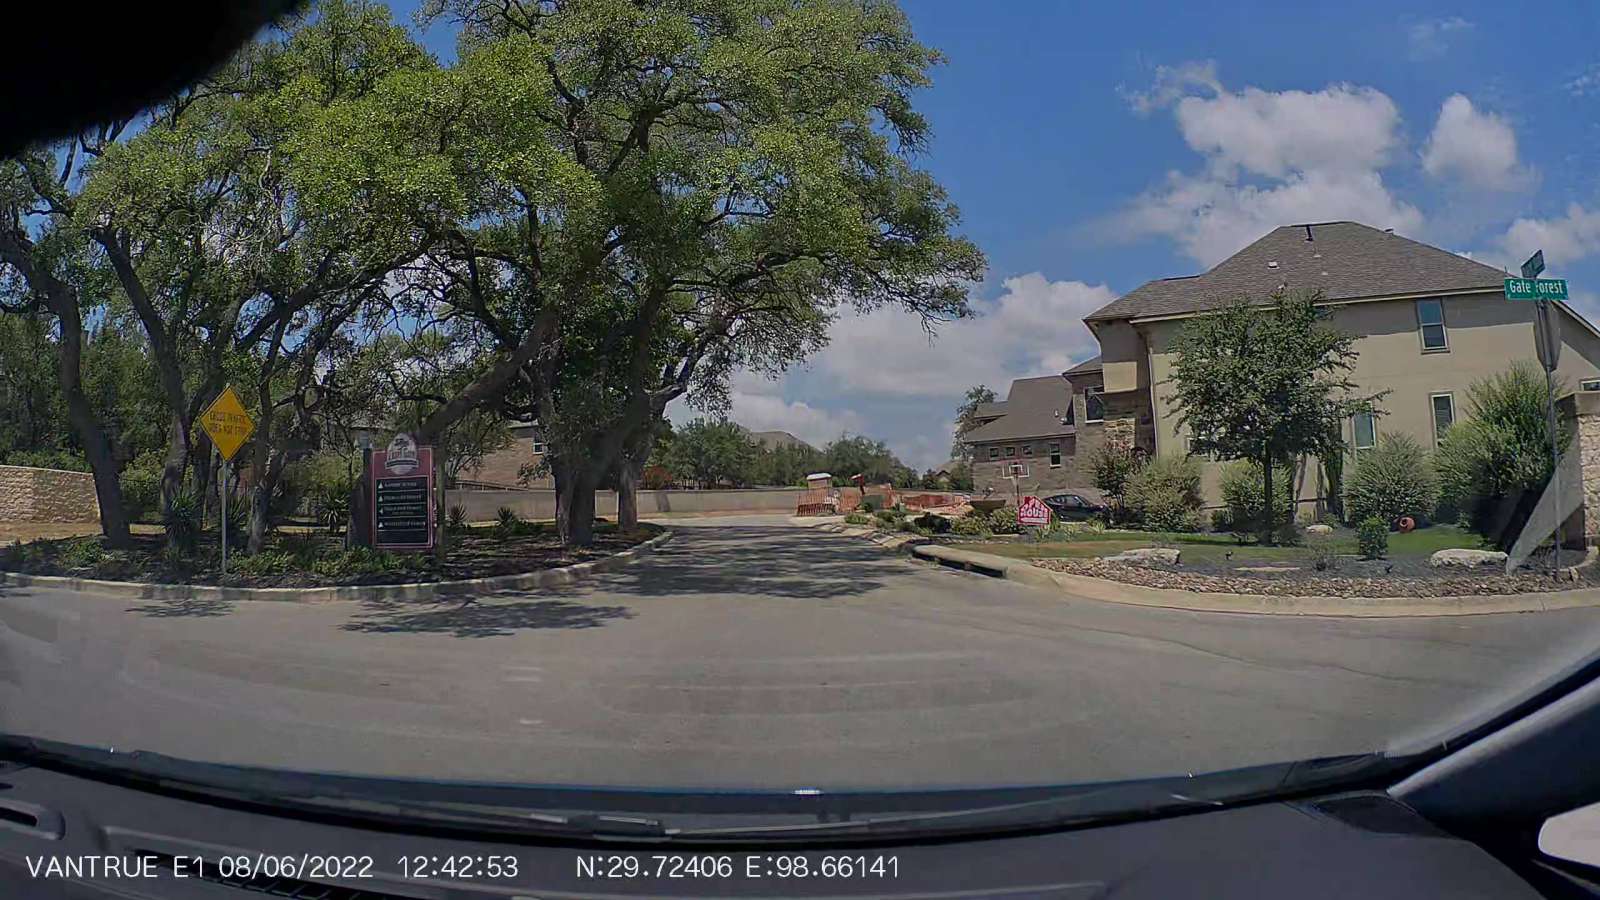
I had the Vantrue Element 1 dashcam set on a three-minute loop recording. When the camera detects an event triggered by the G-Sensor, it automatically locks the recording to prevent it from being overwritten. This first video was recorded in the daytime. I was not provided with a polarizing filter, so none was on the camera. I feel that the video is very clear, and I can read license plates pretty easily. Make sure you view the videos in full HD.
This next video is also in the daytime when I am stuck in a bit of a traffic jam. This lets you see license plates.
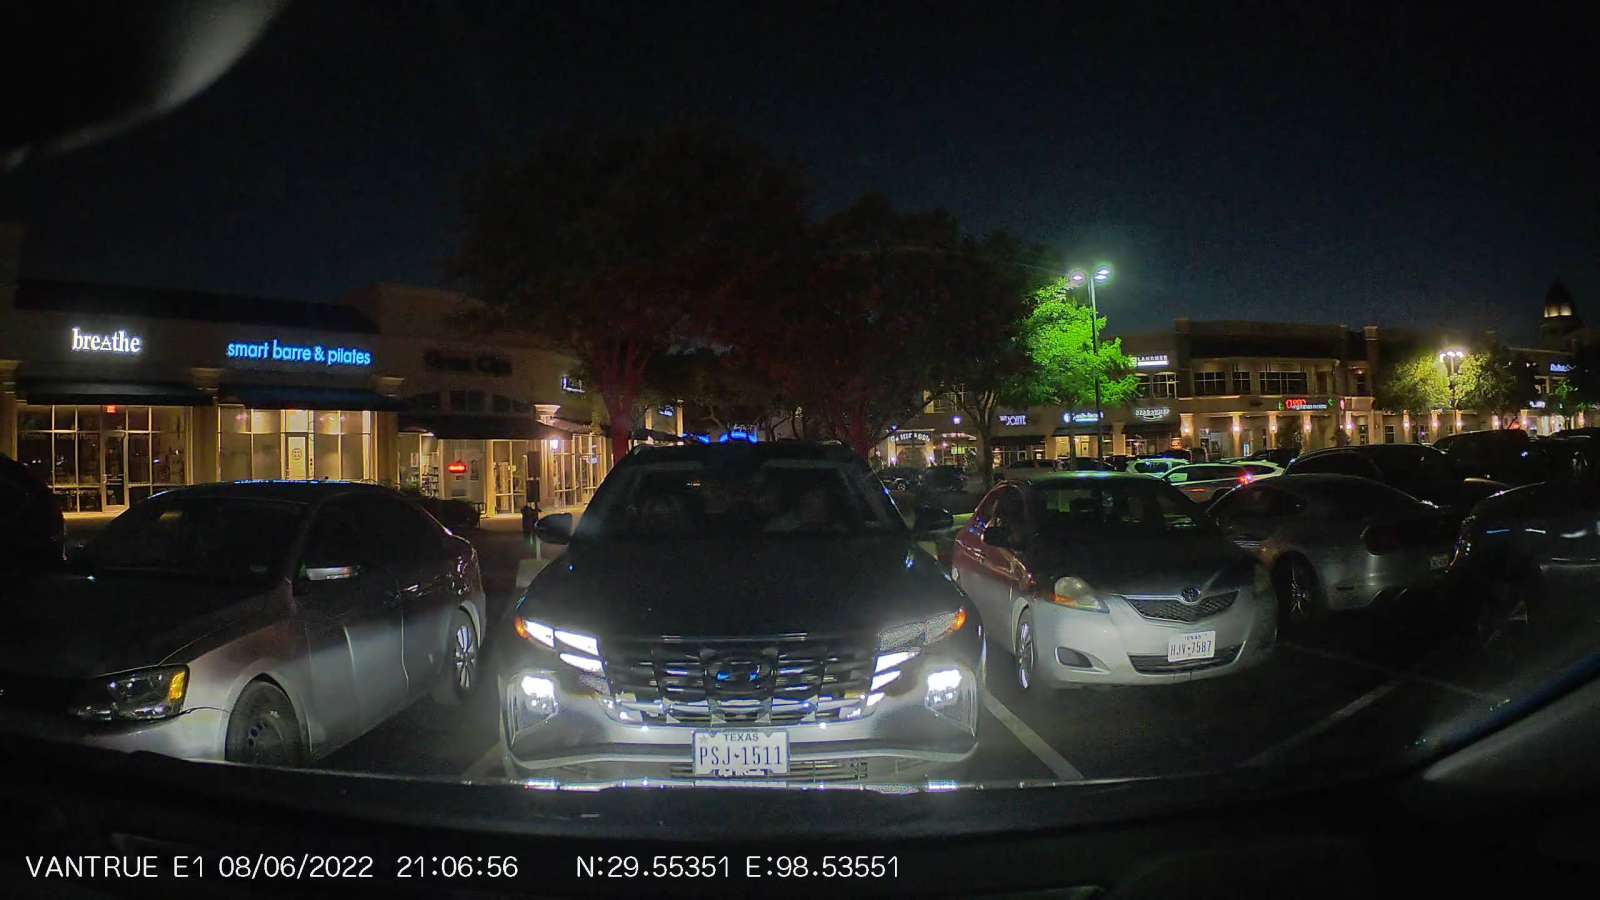
Here is a nighttime video.
I downloaded the app and could connect to the Vantrue Element 1 dashcam via the Wi-Fi on the camera. I could see videos and play them. I know that the app has many negative reviews in the Apple store, but it did seem to work fine for me. The big plus is that I did not have to create any login or account to use the app. Going forward, I will not be using the app. I prefer to pull the card from the camera when I need it. I hope I will never have to pull the card since I will only do that should an accident occur.
The remote worked exactly as it should. I liked being able to press the button to force the camera to take a snapshot. I posted daytime and nighttime photos from the camera below.
What I like
- Compact camera size
- Simple and easy to mount to the car. No glue on my windshield
- They gave two static stickers if you needed to move the camera or screw up (yes, I did!)
- The cigarette power adapter added an additional USB port to the car.
- The timestamp will record the date, time, latitude, longitude, and speed
- The app seemed to work perfectly for me
- Includes remote control that allows for voice and one-click photos and event locking
What needs to be improved
- Include the polarizer
Final thoughts
The Vantrue Element 1 Dashcam has been a great little camera. I have enjoyed having it in my car. It takes great video and does not take up a lot of windshield space. I find that valuable in a car that does not have a good place to mount a dashcam. I was able to easily read license plates during both the day and night time. They sell a circular polarizer for $19.99 and a hardwire kit for $18.99.
Price: $149.99
Where to buy: Amazon
Source: The sample of this product was provided by Vantrue.

KAMRUI Pinova P2 Mini PC 16GB RAM 512GB SSD, AMD Ryzen 4300U(Beats 3500U/3550H/N150/N95,Up to 3.7 GHz) Mini Computers,Triple 4K Display/HDMI+DP+Type-C/WiFi/BT for Home/Business Mini Desktop Computers
(as of March 3, 2026 17:40 GMT -06:00 - More infoProduct prices and availability are accurate as of the date/time indicated and are subject to change. Any price and availability information displayed on [relevant Amazon Site(s), as applicable] at the time of purchase will apply to the purchase of this product.)
Gadgeteer Comment Policy - Please read before commenting
Does the vanture element 1 mini dash cam have loop recording?
Yes it does.
Can I use the usbc data transfer cable to power the cam as I’d prefer to configure it from a power socket in my home rather than the cigarette lighter in my car