Product Requirements:
Device:
All Handspring Visors (except Edge)
SnapNPlay.PRC 14K
PDAs are useful productivity tools. They keep track of your daily
appointments, tasks and contact lists. They are very important devices for
keeping you organized and efficient… Uh huh… sure they are! We all know what
the REAL purpose of a PDA is, it’s to have fun and play games! ;o) And, what better
way to do this then with a snap-on game pad that has a vibration feedback
feature right?
The SnapNPlay Shock Vibration Game Pad is designed by
TT Tech Limited and is compatible with all
of the current Handspring Visor models (excluding the Edge). This module is from
the same company that produces the
SnapNType keyboard which I recently reviewed. It is actually very similar to
the SnapNType in that it slides onto the bottom of the Visor, connecting to
the hotsync/serial port.
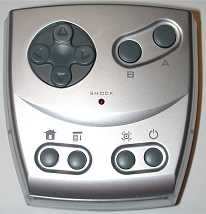
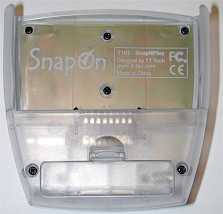
The entire module is made of plastic and has a nice sturdy feel to it. The
front has an 8 directional D-pad, 2 fire buttons, 4 application/function
buttons, and an LED. The D-pad and fire buttons have that familiar Gameboy-like
feel and layout. The D-pad looks like a raised cross and has neither too stiff
or too mushy action. The fire buttons are also easy to activate. All the buttons are hard and have a slick surface.
The 4 application buttons perform various special functions. From left to
right: Application list (HOME), Menu pull down, Shock feedback toggle, and Power
toggle which turns the Visor on and off.
The LED in the middle of the module indicates the on / off status of the
shock vibration feature. If the LED glows red, it is enabled, if it’s off, it’s not.
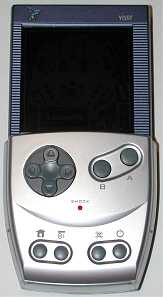
The SnapNPlay module snaps on to the Visor easily. It actually covers the application
buttons, power button and graffiti area. Because the back of the SnapNPlay is
open, it allows the Visor Prism which is thicker than the other Visor models to
connect to it just fine.
Before you can use the SnapNPlay as a game pad for your favorite games, you
must first install a small driver (14K) that is on the floppy which is included
with the module. After this driver is installed, you then have to enable it
before you attach the SnapNPlay. If you don’t do this, pressing a button on the
game pad will initiate a hotsync. You also have to disable it again before you
can hotsync and / or beam. They really need a driver than can automatically
enable or disable the game pad when it is connected.
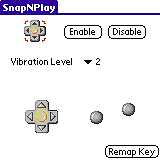
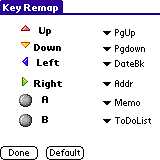
Besides enabling and disabling the game pad, the driver also allows you to
set the vibration level and remap keys. I’ll talk about the key mapping first
and then get to the vibration feature. By default, the game pad is already
mapped as you would probably expect. The UP and DOWN directions are mapped to
the PgUP/PgDN scroll buttons. The LEFT and RIGHT directions are mapped to the
DateBook and Address Book buttons respectively. While the two fire buttons are
mapped to the Memo and ToDo list buttons. For most games, you probably won’t
need to adjust the UP and DOWN directional mappings, but you may have to adjust the
other buttons in order for different games to operate correctly. Using the driver,
it’s really easy to make these changes.
Of course, it goes without saying, that the SnapNPlay will only work with
those games that utilize the hardware buttons. Games that require you to use
your stylus to play them, will not work with this device. There is the
beginnings of a
compatible games list on the TT Tech site.
For this review, I tested the SnapNPlay with the following games:
3DBlockout
Frogs vs. Cars
Galax
Pinballz
Rayman
Zap!2000c
Froggy
The first two game above didn’t work at all for me even though they are both
on the compatible games list. None of the buttons worked or moved the characters
on the screen.
The other games worked great as far as controlling the game. Playing with the
SnapNPlay made the games more fun and I think I was able to play better using
it. In my opinion it is more comfortable to hold and use than the
GamePad for the Palm III series.
Now about the vibration feature… I guess there’s no easy way to say this…
It just sucks! First of all, you must install a AAA battery in order to use the
vibration mode. That in itself isn’t a big deal, if it actually did a good job
of providing force feedback. It is supposed to synchronize the game sound into
vibrations. Instead, it usually just vibrates continuously which is totally
annoying. The instructions that are provided with the module say that this only
happens when the game is playing sounds non stop. During my tests, this happened
even while the games were playing no sounds at all. There was only one time when
one of the games (Rayman) seemed to be vibrating correctly. Another problem that
I noticed was that if you had vibrations turned on, the module would vibrate
sometimes when you turned the PDA on. Obviously, the driver still needs
some work… At least you can turn this feature off. I personally am not a very
big fan of the force feedback on PDAs. It just doesn’t work as well as the force
feedback PC joysticks. So, the fact that this feature doesn’t work that well,
really doesn’t bother me all that much…
If you like playing games on a Gameboy and wish your Visor had this same
feel, then you should consider buying the SnapNPlay. But if force feedback in
your gaming is what you are mainly interested in, the SnapNPlay will not impress
you.
Price: $29.95
Pros:
Makes your Visor feel and react like a Gameboy
Gives you better control in action games
Cons:
Vibration feature doesn’t work well at all
Must manually enable driver before using the game pad
Must manually disable driver in order to hotsync and beam
INIU Mini Portable Charger, Small 45W PD Power Bank, 10000mAh USB C in&Out Fast Charging Pocket Size Battery Pack, Travel Essentials Powerbank for iPhone 17 16 15 14 Pro Air, Xiaomi, Samsung S24 etc
(as of February 11, 2026 01:00 GMT -06:00 - More infoProduct prices and availability are accurate as of the date/time indicated and are subject to change. Any price and availability information displayed on [relevant Amazon Site(s), as applicable] at the time of purchase will apply to the purchase of this product.)DEWALT Heavy Duty 3-in-1 Mini Stylus Pocket Pen, Tablet Pens for iPad, EDC Touch Screen Pens, Ballpoint w/Touchscreen Tip, Keypad Tip, Compatible iPhone Stylus Pen, Extra Ink Cartridge, Gifts for Dad
(as of February 10, 2026 17:31 GMT -06:00 - More infoProduct prices and availability are accurate as of the date/time indicated and are subject to change. Any price and availability information displayed on [relevant Amazon Site(s), as applicable] at the time of purchase will apply to the purchase of this product.)Product Information
| Price: | 29.95 |
| Manufacturer: | TT Tech |
| Pros: |
|
| Cons: |
|


Gadgeteer Comment Policy - Please read before commenting
Post your comments here on the Kensington WiFi Finder Review.
http://www.the-gadgeteer.com/kensington-wifi-finder-review.html
Just click the POST REPLY button on this page.
I’ll have to agree with the original review I found:
http://www.the-gadgeteer.com/kensington-wifi-finder-review.html
as well as was CNET discovered:
http://reviews.cnet.com/Kensington_WiFi_Finder/4514-3284_7-30468829.html
The unit doesn’t work very well.
At home I have an Access Point 802.11b wireless network – totally open, broadcasts SSID and no WEP. The Kensington unit rarely, if ever finds a signal.
At work I have a Linksys 802.11b wireless network – this one is secure, and again the Kensington unit has never found it (even when I made it unsecure for the purpose of testing the unit).
When I travel, I stop at Starbucks to connect my Sharp Zaurus SL-5500 or Dell Dimension 8600. Both of which have no problem instantly connecting, yet the Kensington unit has never found a signal in any Starbucks.
I originally bought the unit last summer (this is written July 2004), and after trying to use it to find any WiFi spots anywhere, and never finding any, I contacted Kensington support. They claimed that they had some defective units, and were kind enough to send me a brand new unit.
I didn’t even take the brand new unit out of it’s original packing, since I could press the button to work the unit through the packaging. I tried it at home, it didn’t work, I tried it at work, it didn’t work, and finally I tried at my favorite Starbucks and it didn’t work.
So, I sold the replacement unit on eBay for what I paid for it, and I still have the original unit. I guess I can still use the battery in it!