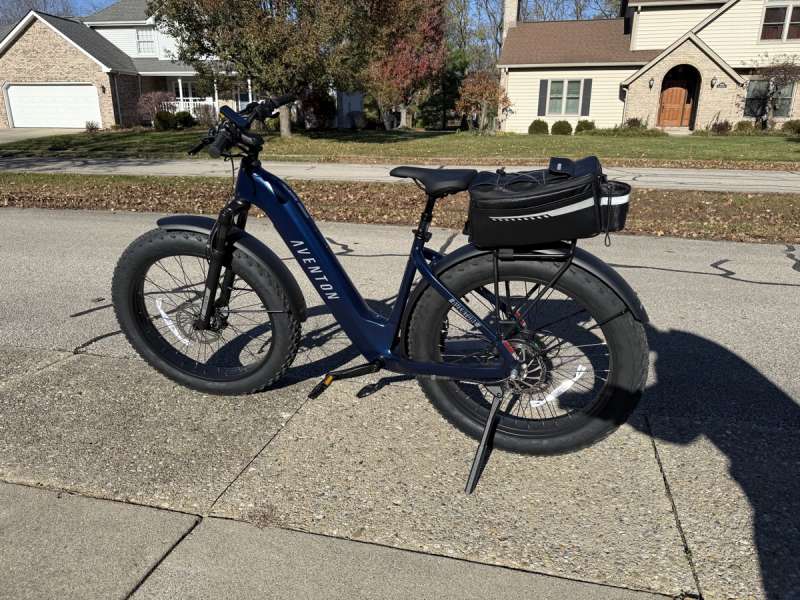
REVIEW – Aventon is one of the more recognizable entry level electric bike brands and I was thrilled when I was identified to review their all new Adventure 3 class 2 E-Bike. I have previously reviewed two hub drive class 2 E-Bikes along with owning one of those higher priced mid drive class 1 E-Bikes. Read on to see how Aventon’s Adventure 3 stacks up against these other E-Bikes.
⬇︎ Jump to summary (pros/cons)
Price: $1,999
Where to buy: Aventon
What is it?
The Aventon Adventure 3 E-Bike is a full sized, fat tire, 8-speed hub-drive, class 2 electric bike.
What’s included?

- Aventon Adventure Level 3 Step-Through E-Bike
- Accessory Box containing:
- Right and Left Pedals
- Bike Wrench
- Hex Key Set
- Reflector Mounts
- Front / Rear Reflectors
- Spare Derailleur Hanger
- Grease
- Charger
- Owners Manual
- LI-Ion battery Owners Manual
- Hang Tag
- Rubber Clamp Spacer
- Stickers
- Headlight
- Purpose of Incidental Items sheet
Tech specs
- Max Speed: 20 mph / 32km
- Motor: 36V 750W Brushless Hub
- Range / Charge: Up to 64 miles
- Max Load Capacity: 400 lbs / 181kg
- Battery: 36 Vdc 19.88 Ah Li-ion
- Charging time: 4-5 hours
- Weight: 79 lbs / 36kg
- Water resistance: IPX5
- Charger: 42V 4.0A
- Lights: front, back, brake, blinker
- Wheel Size: 26″ x 4.0″ (Fat Tire)
Design and features
Due to my advanced age and the debilitating effects of arthritis, I chose the Step-Through version of the Adventure 3. For those who feel comfortable navigating over the middle of the bike, there is also a Step-Over version available.
Each configuration of the Adventure 3 is available in two distinct colors, with no overlap between the versions of the bike. The Step-Over model can be chosen in Matcha, a subtle greenish hue, or Stealth, a sleek black.
Meanwhile, the Step-Through version offers Java, a light coffee shade, and Cobalt Blue, a rich deep blue. In all instances, the colors feature a matte like finish rather than a glossy shiny appearance.
Each configuration is available in two frame sizes: regular or large, each tailored to specific rider heights. For the Step-Over model, the regular size accommodates riders between 5’3″ and 5’10”, while the large size fits those from 5’10” to 6’4″. In the Step-Through model, the regular size is designed for riders ranging from 4’11” to 5’7″, and the large size suits individuals from 5’7″ to 6’1″.
The website features a sizing tool designed to help buyers select the appropriate bike size. It’s also important to note that Aventon bikes can be found in various bike shops across the United States, allowing one the option to purchase an assembled bike from their local retailer. By navigating to the “Find a Bike Shop” section on the Aventon website and entering your zip code, one can easily discover bike shops that stock their models. For instance, I typed in my zip code and found a local shop in Columbus that carries some of the bikes from the Aventon line.
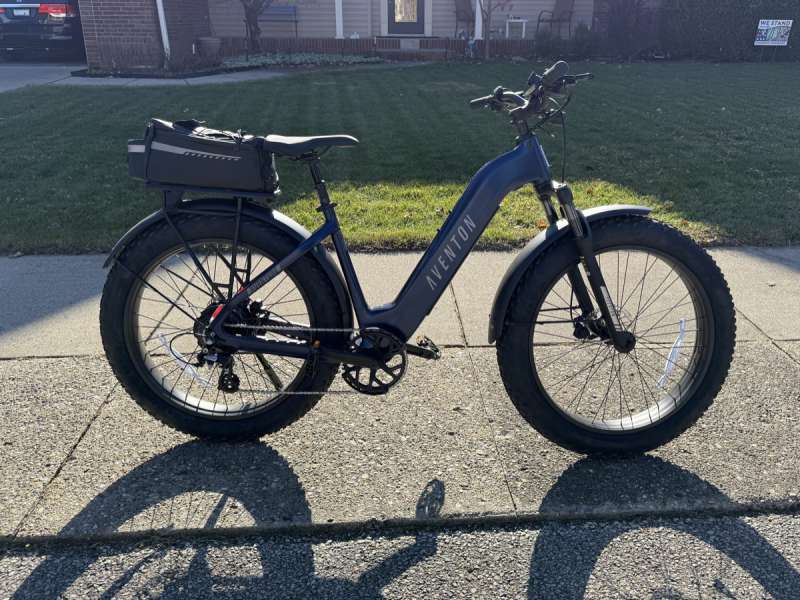
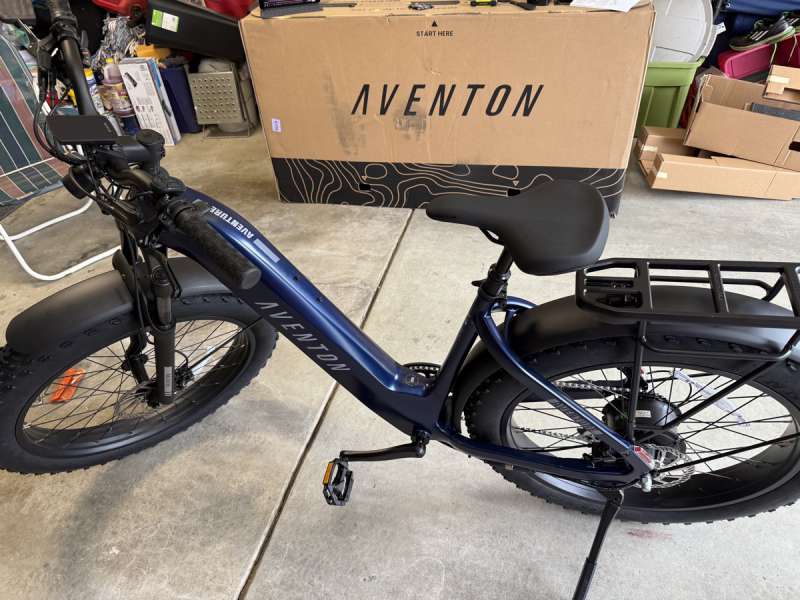
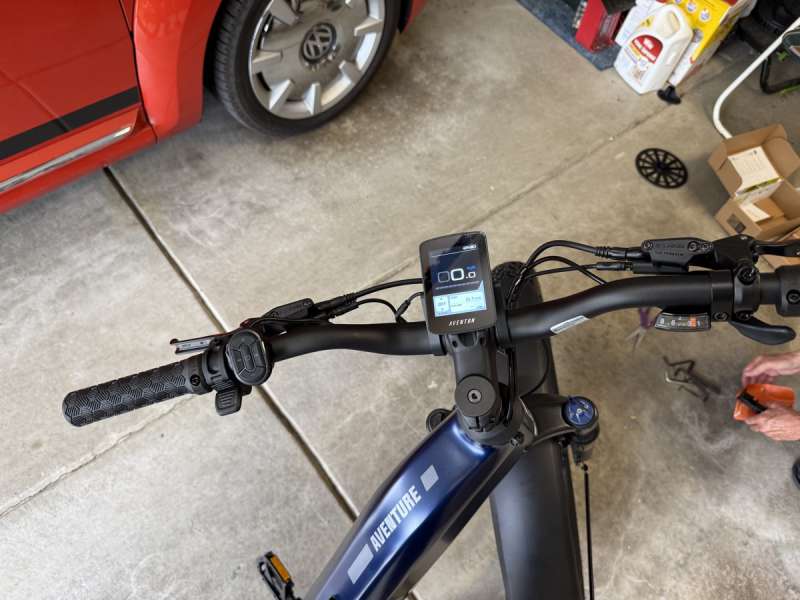
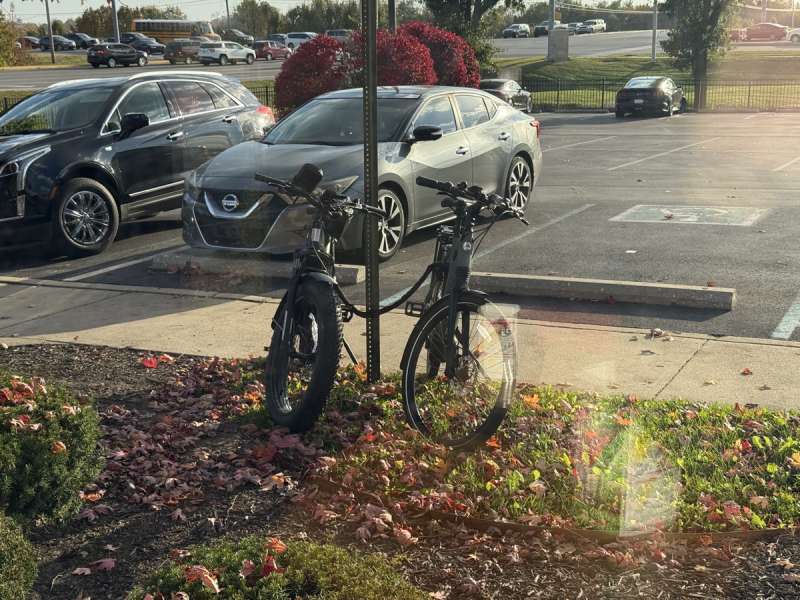
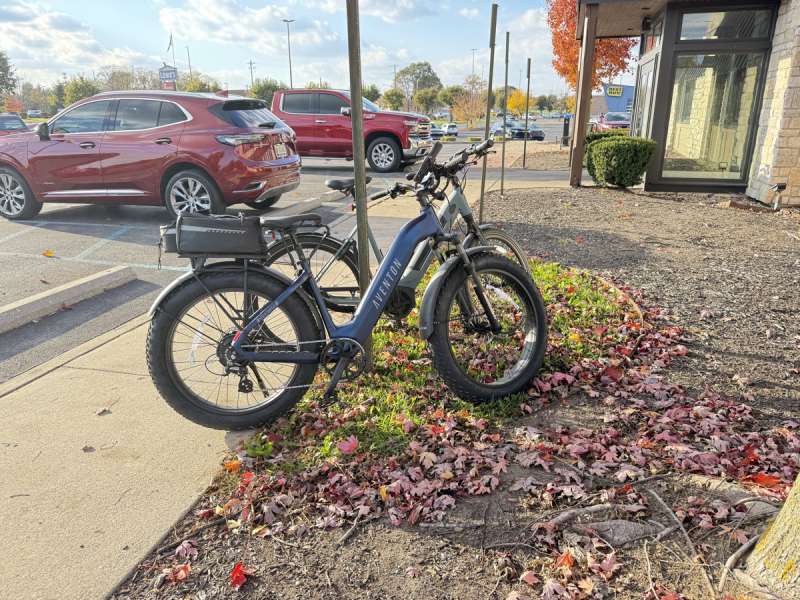
The Aventon Adventure 3 I was sent to review was a large sized Step-Through model in Cobalt Blue. Simply put, the bike is outstanding looking.
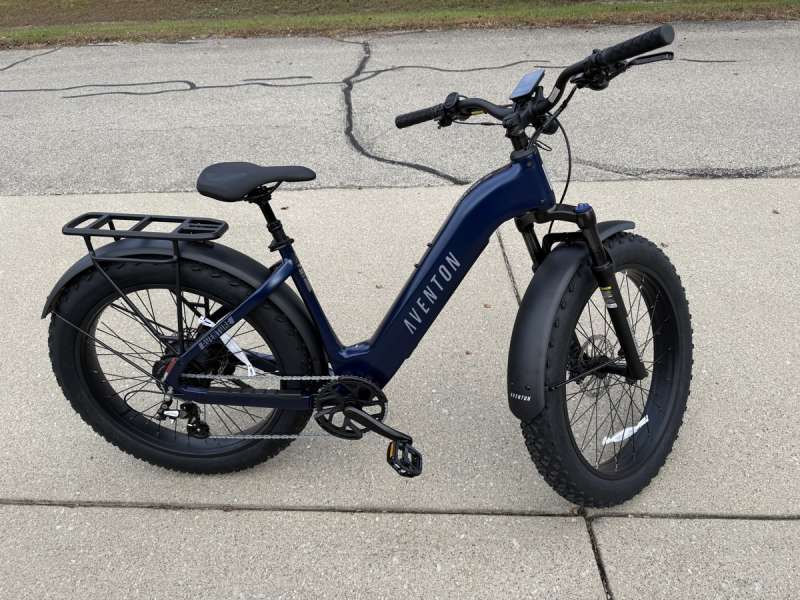
The Aventon Adventure 3 E-Bike boasts an impressive feature set that significantly outshines the simpler Heybike Mars folding fat tire E-Bike and even outshines the Ride1Up 700 E-Bike. To be fair, the features of the Adventure 3 more closely align with those of the Ride1Up. In contrast, the Gazelle high-end mid-drive E-Bike, while a quality option, offers a more limited feature set, operating more like a traditional bicycle supplemented by an electric motor. More details on this will follow.
I attempt to address each feature individually here and speak about most of them. This first pass will be more descriptive of each feature, while the second pass below in the performance section will focus more on how some of these features behaved.
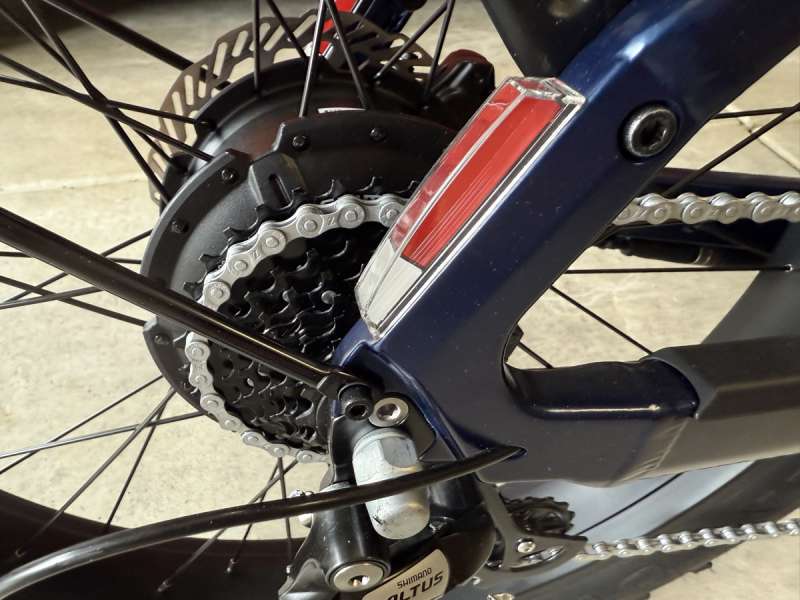
A great starting point for any E-bike is its powertrain, and the Aventon Adventure 3 definitely excels in this area. Equipped with a robust 750 W hub motor and a battery designed to deliver up to 65 miles of range, the Adventure 3 can handle a wide variety of biking situations. Its lithium-ion battery operates at 36 VDC with a capacity of 19.88 Ah, providing an impressive total of 715 Wh of charge. Additionally, Aventon’s Ride Tune technology intelligently ensures that the motor uses only the necessary amount of battery power to meet the rider’s immediate needs.

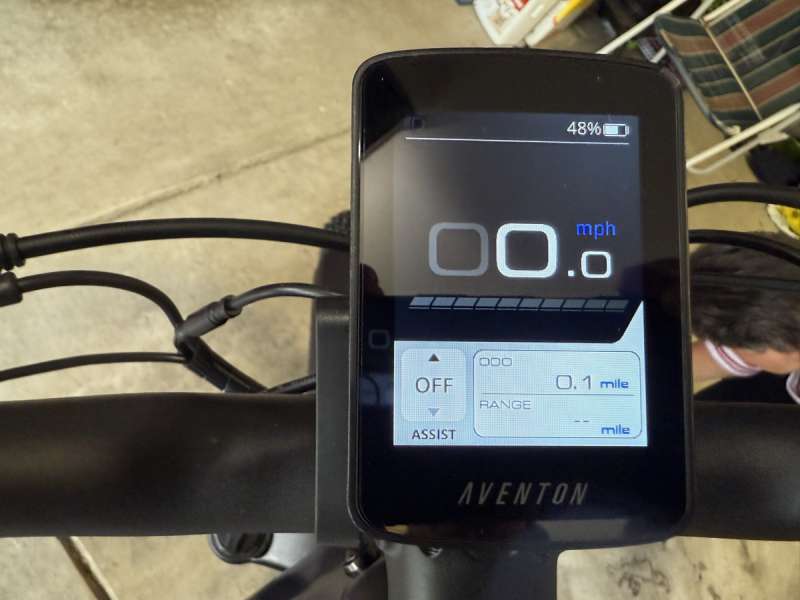
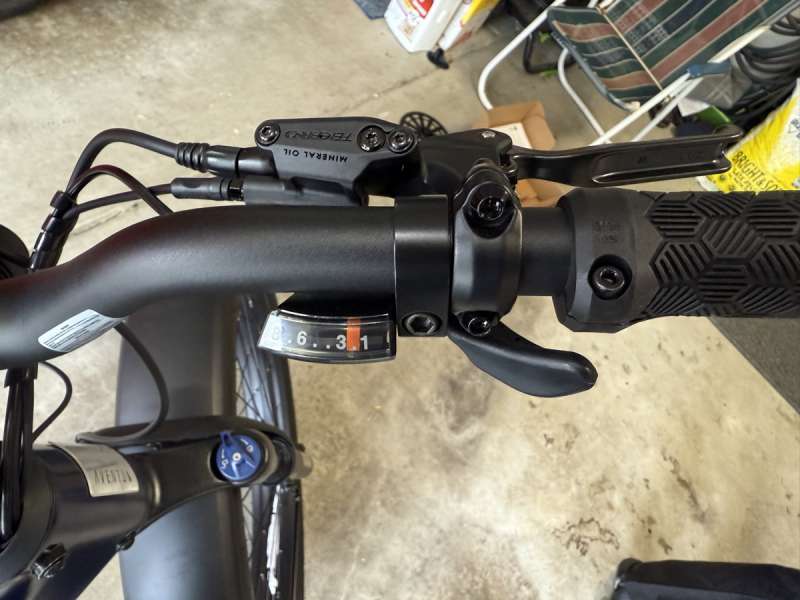
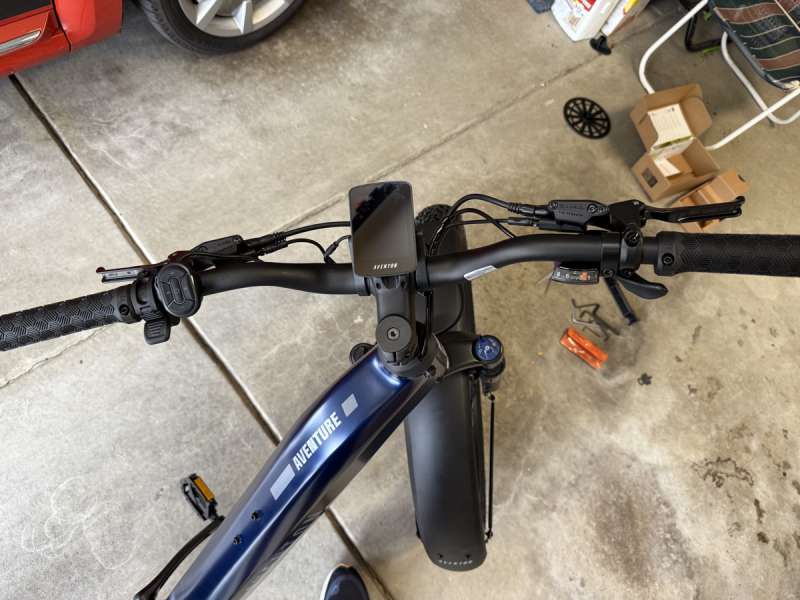
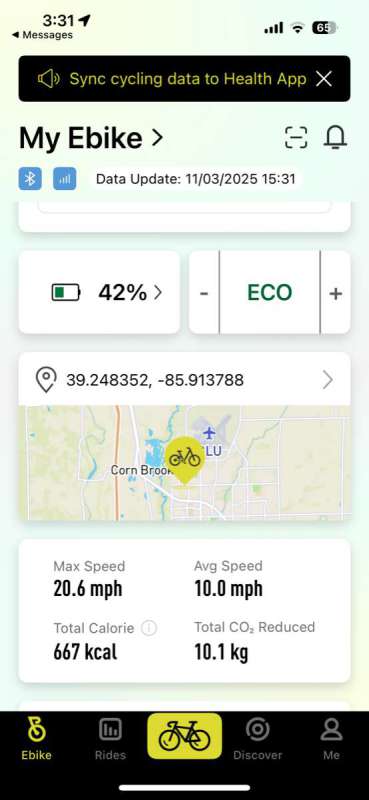
Next, let’s explore the Aventon Adventure 3’s stunning and highly informative Color Display Screen. This compact screen packs a wealth of information. It is primarily divided into two main sections: the current speed of the bike is prominently displayed at the top, while the Pedal Assist level and selected riding data page are shown just below. The two halves of the screen is separated by a faint power bar showing the amount of power being supplied by the power train. In addition, there are a plethora of status / mode indicators that are fully detailed in the users manual. Throughout this review, I’ll also highlight additional small indicators and features that contribute to what makes this E-Bike truly impressive.
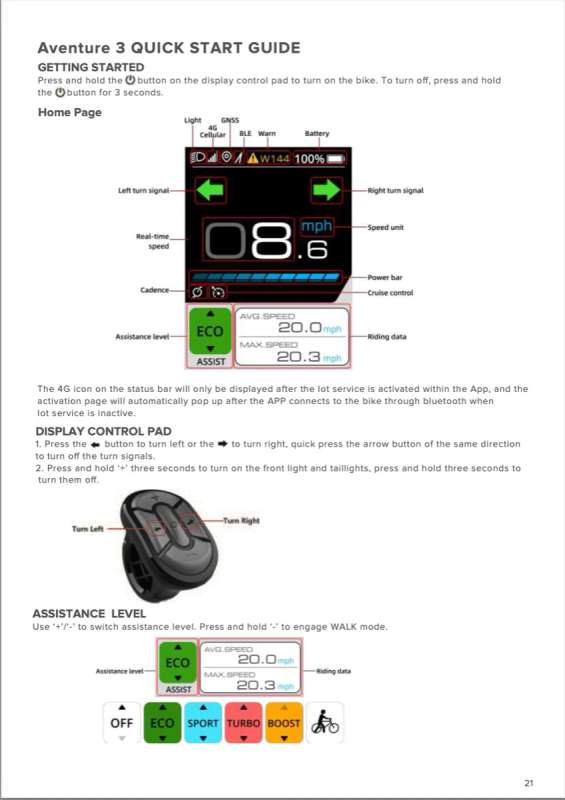
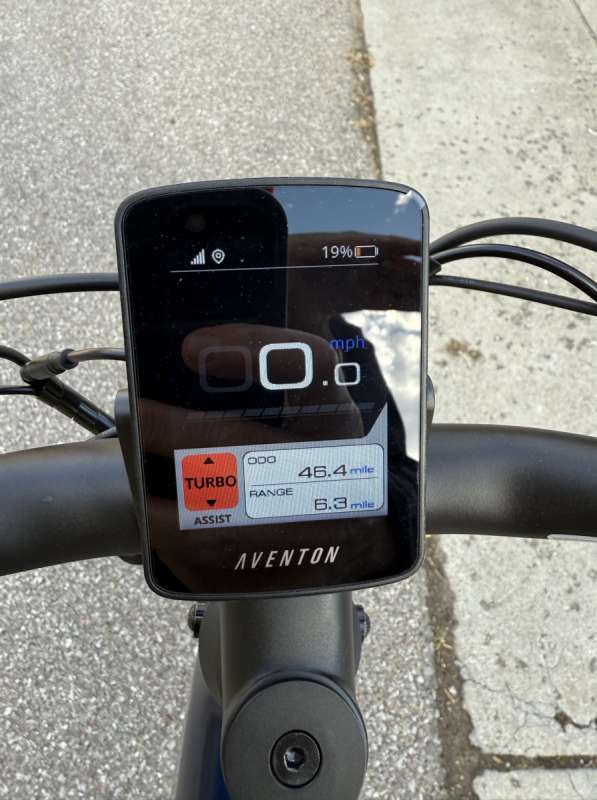
One standout display feature is the battery state of charge (SOC) indicator, conveniently located at the top, offering a clear and precise zero to 100 percentage reading instead of relying on a simple segmented battery level. This SOC readout also uses color, as it turns amber when at and below 19%, and red at 5% and below.
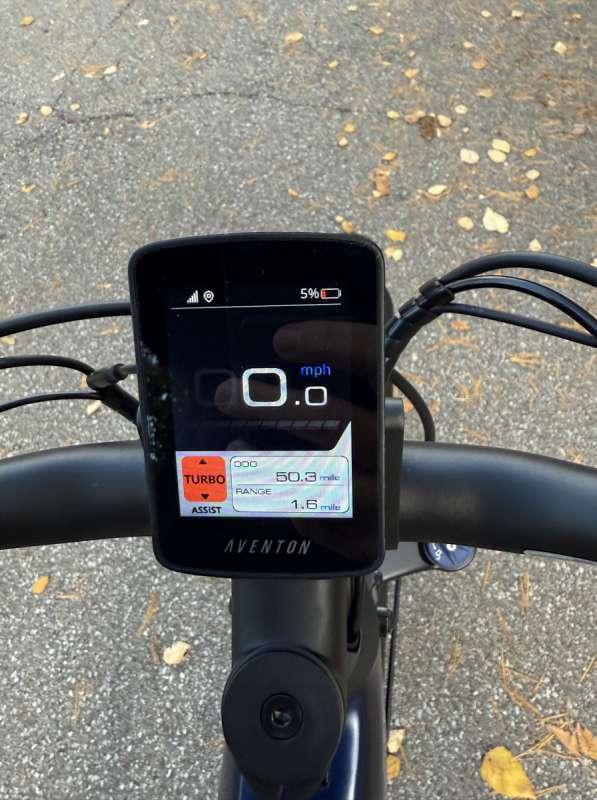
Flanking the display in the middle are turn signal indicators, a thoughtful addition, as the Aventon Adventure 3 is equipped with blinkers! I’ll provide more details on that feature later.
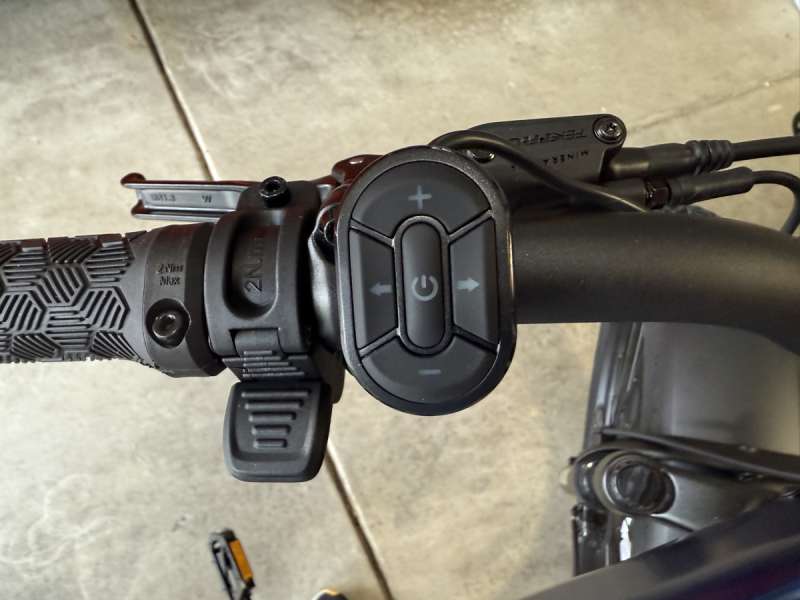
Before diving deeper, I want to highlight the bike’s control pad, which the manual refers to as the Display Control Pad. This pad consists of five buttons: a central on/off button, left and right blinker controls (⬅︎ and ➜), and ‘+’ and ‘-‘ buttons for adjusting the bike’s Pedal Assist settings (PAS). Each button is multifunctional, making it advisable to download the PDF version of the manual to your phone. This way, you can easily reference it while riding if you need a reminder about a particular feature.
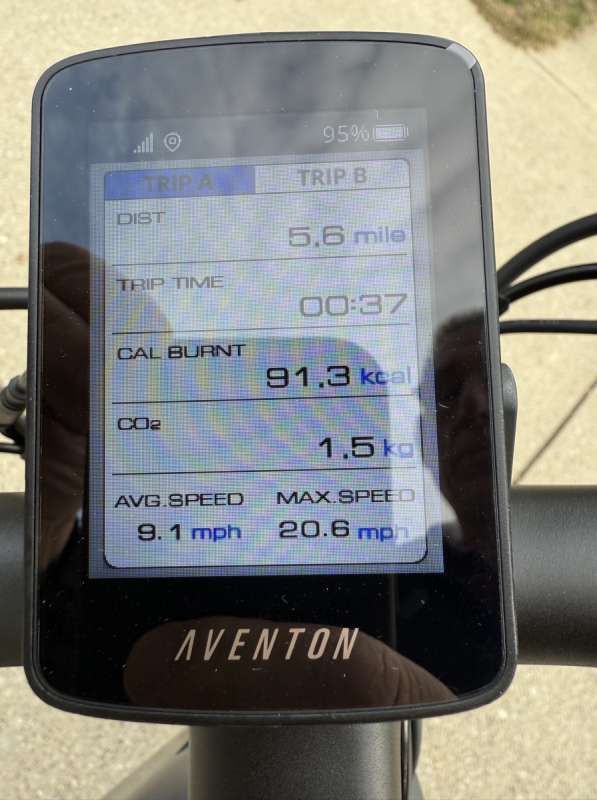
I briefly mentioned the riding data pages earlier. There are three screens, each featuring two stacked fields that provide key bike statistics. The first screen shows the bike’s odometer reading above the estimated remaining range based on the battery state of charge (SOC) and the current pedal assist setting. Pressing the On/Off button briefly will take you to the next screen, which displays the bike’s average speed above the maximum speed achieved. A second press of the On/Off button brings you to the final screen, revealing the total riding time, accompanied by a somewhat gimmicky indication of the CO2 saved while riding. Since there are two trip pages (which I’ll describe below), I would have preferred to see selected information from Trip A or B displayed on these last two data screens. Pressing the On/Off button a third time returns one to the original screen again showing the bike’s odometer and estimated range.
As previously noted, the Aventon Adventure 3 features turn signals, which are activated by the blinker buttons (⬅︎, ➜) located on either side of the control pad. Pressing one of these buttons will illuminate the corresponding green arrow on the display, as well as activate the amber blinker light at the rear of the bike. If you press the same blinker button again, it will turn off the indicator. Additionally, if you forget to deactivate it, the blinker will automatically shut off after 15 seconds.
Since the Aventon Adventure 3 features blinkers, it seems only logical for it to include a brake light as well. Unlike the Heybike Mars, which has a blinking brake light, the Adventure 3 operates more like a car or motorcycle. When either brake is engaged, the taillight illuminates steadily, shining brighter than the standard tail lights when the bike lighting is turned on (long press of the ‘+’ button).
The pedal assistance levels of the Aventon Adventure 3 differ significantly from those of the Heybike Mars, aligning more closely with the Gazelle. While I won’t delve deeply into the Heybike’s power system which operates based on speed rather than being directly linked to pedal input, aside from the activation of the pedals themselves. In contrast, both the Aventon and Ride1Up hub-drive bikes function similarly to my mid-drive Gazelle, offering true pedal assist that responds directly to the rider’s pedal input.
One notable distinction of the Adventure 3 is that it features only three pedal assist modes: Economy, Sport, and Turbo. In comparison, if I recall correctly, the Ride1Up offers five modes, expandable up to nine. Additionally, there is a unique pedal assist mode called BOOST, accessible only from the highest PAS Turbo setting, which introduces some intriguing characteristics to the riding experience.
What exactly is the BOOST mode? Unfortunately, this feature, along with some others, are absent from the printed manual. This oversight is quite concerning, especially since we’re not just talking about minor edits. The absence of important features in the printed manual is unacceptable, and to be fair, could be addressed in future shipments of the bike.
Here are some pages from the online manual, in some cases containing information that is not in the printed manual.
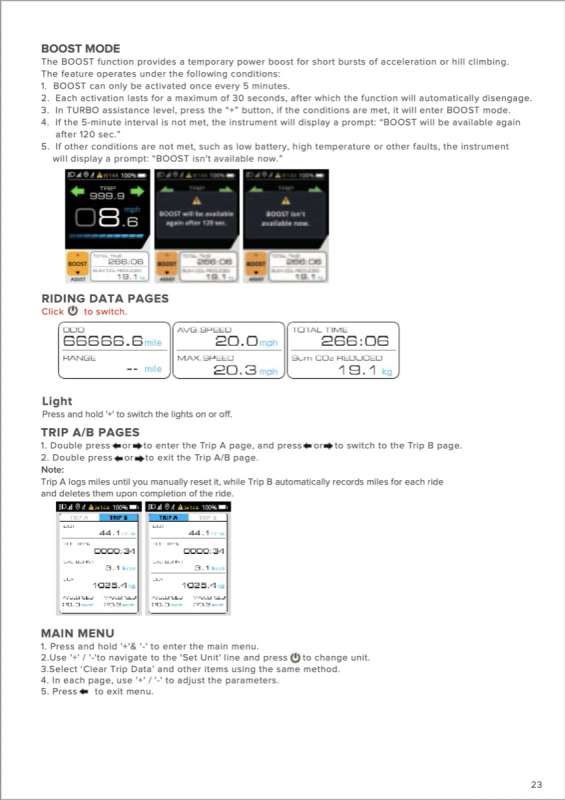
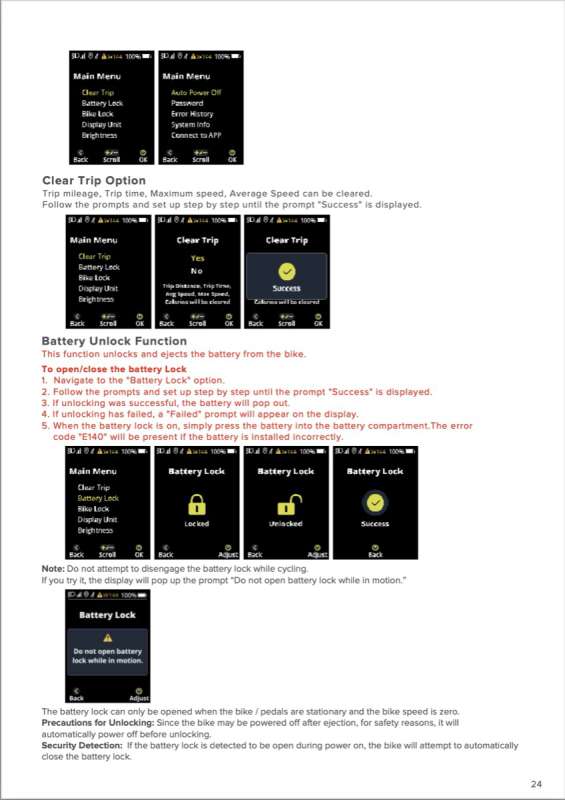
Let’s return to the BOOST feature. The BOOST function offers a temporary surge of power for brief periods of time when climbing hills as an example. However, there are a few important preconditions to keep in mind. Most notably, it can only be activated once every five minutes and will provide additional power for a maximum of 30 seconds.
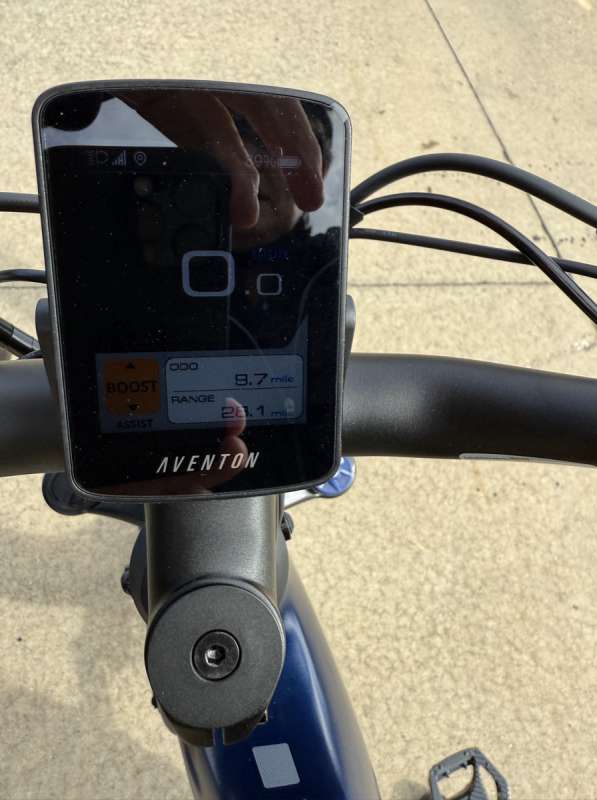
Assuming all preconditions are met, the BOOST feature is accessible when the rider is in TURBO mode and presses the “+” button. BOOST will remain active for 30 seconds unless the rider presses the “-” button. While in BOOST mode, the PAS section of the display will show “BOOST” in an orange box.
If less than 5 minutes have passed since BOOST was last used, the rider will see the following error message: “BOOST will be available again after 120 seconds.” Additionally, if any other conditions, such as battery state of charge (SOC), temperature, or other faults, are not optimal, the rider will receive the message: “BOOST isn’t available now.”
Given the above, I suspect that BOOST mode is hard on the motor / electronics, and probably should only be engaged when absolutely necessary.
The next unique feature that I, a casual cyclist, truly appreciated is Cruise Control. Like the BOOST function, this feature isn’t mentioned in the printed manual. Essentially, Cruise Control operates just as one would expect. To engage it, the bike must first reach a minimum speed of 10 km/h (6.2 mph). Once you’re traveling at or above that speed, one of the three PAS levels is selected and the battery state of charge is above 15%, Cruise Control can be engaged. Simply press and hold the right ➡︎ blinker button to activate Cruise Control. After that, you can stop pedaling and enjoy the ride, as the Adventure 3 will maintain your chosen speed until either you press and hold the blinker button again or activate one of the brake levers to deactivate it. When Cruise Control is engaged, a tiny universal Cruise Control symbol will appear under the speed display, right above the data page information.
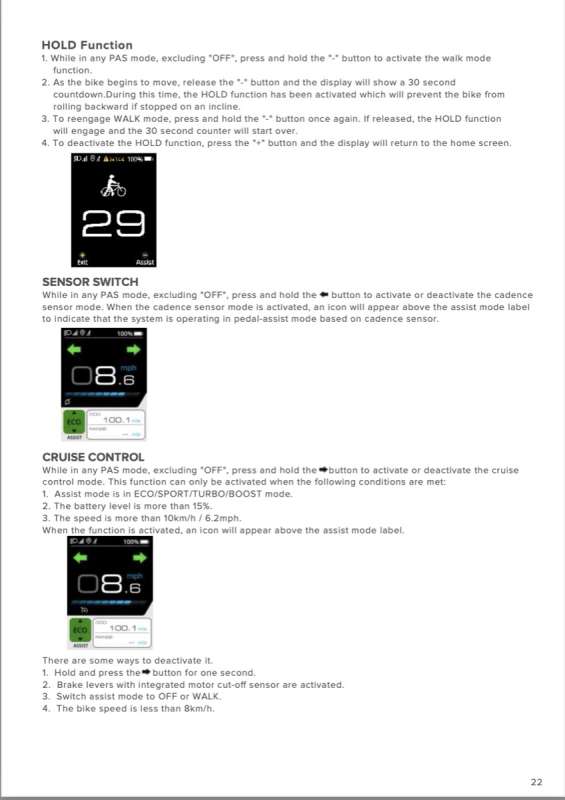
In addition to its many features, the Aventon Adventure 3 boasts an intriguing walk mode. Most readers are likely already familiar with the function that allows the bike to propel itself alongside the user while walking. On the Adventure 3, walk mode is activated by pressing and holding the ‘-‘ button. As long as the button is pressed, the bike moves forward at a steady pace, driven by the motor. If the speed becomes uncomfortable, simply release the ‘-‘ button to allow the bike to coast. Should you need extra assistance, just press the button again to reengage the motor.
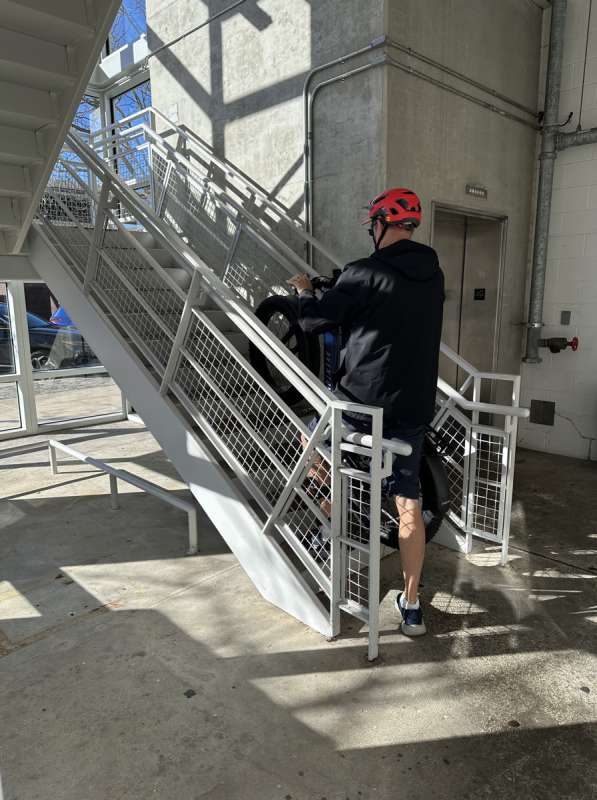
What sets the Adventure 3 apart is its impressive ability to maintain its position without rolling backward when the walk mode is momentarily paused by releasing the ‘-‘ button. In this situation, a 30-second countdown appears on the display, while the motor actively prevents the bike from rolling backward. This clever enhancement significantly increases the overall utility of this feature.
However, I later wondered if this feature could be utilized to assist the bike in ascending a flight of stairs, allowing it to rest after each step without the risk of rolling back. Curiosity got the better of me, and I attempted to have the bike power itself up a set of stairs in a parking garage. Unfortunately, the task proved more difficult than anticipated, and I ultimately decided to abandon the effort before risking a drop of this beautiful bike mid-ascent.
The Aventon Adventure 3 is equipped with a versatile Sensor Switch that enables riders to choose between two sensor modes: a torque sensor and a cadence sensor. The torque sensor measures the pressure applied by the rider, allowing for more natural and smooth motor output, while the cadence sensor tracks the pedaling speed. By default, the torque sensor is activated when the bike is powered on.
To toggle between the two modes, simply press and hold the left arrow ⬅︎ button. This functions similarly to the Cruise Control switch, allowing you to easily turn the cadence sensor on and off as needed. Also like the Cruise Control, the Sensor Switch is indicated by a small icon on the left side of the display.
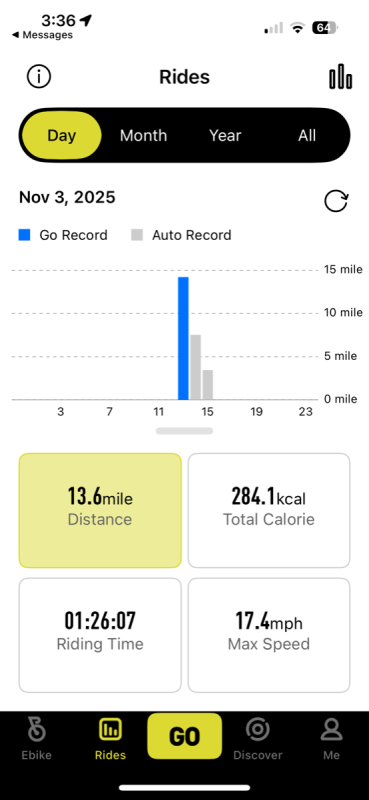
The Aventon Adventure 3 has two trip pages. One is tied to each ride of the bike, and automatically resets after each power cycle of the bike. I really like that, and again, wish that data could be displayed on the main display screen. The other trip page is manually cleared as most riders are accustomed to. The one thing I do not like about the Trip Pages is that it requires a double tap on either the left or right blinker (⬅︎,➜) buttons to toggle them on and off. I know for me, I inadvertently turned on the blinkers many times trying to activate these pages. Once one of these pages is selected, a single press of any blinker (⬅︎,➜) button will take the rider to and from each trip page A or B.
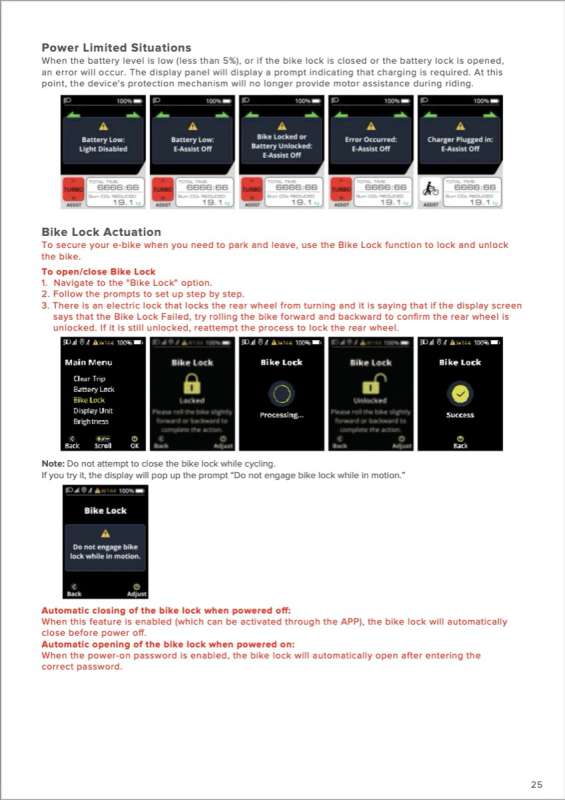
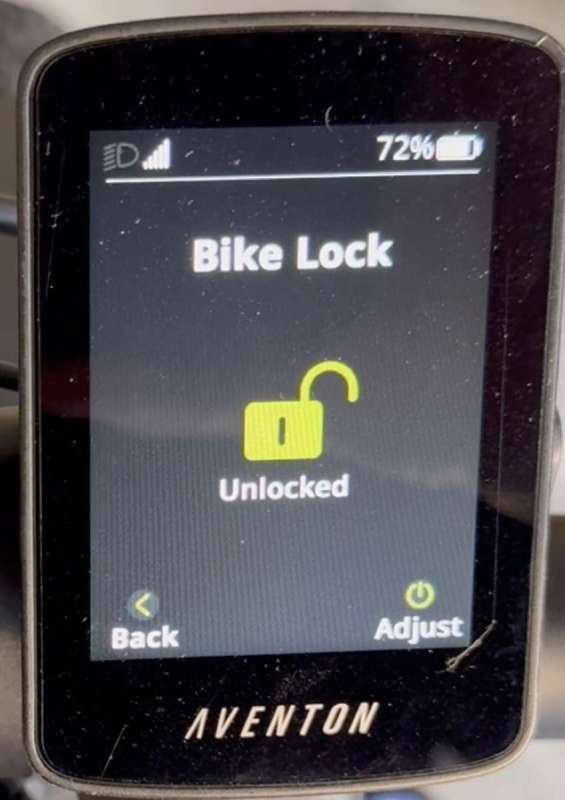
Similar to the Gazelle, the Aventon Adventure 3 features an integrated cafe bike lock. For those unfamiliar, a cafe lock is built into the bike and secures the rear wheel, preventing it from rolling. However, the two brands approach this feature quite differently. The Gazelle employs a mechanical physical key based locking mechanism, while the Aventon utilizes an electronic system. With the Aventon, the lock can be engaged or disengaged using either the display screen or the companion Aventon App. One can hear the bike lock engage and disengage, also accompanied by a set of electronic beeps, when activating or deactivating the bike’s built in bike lock.

The companion app, which isn’t available for any of the other bikes I have access to offers a range of features that are simply not found on these other E-Bike platforms.

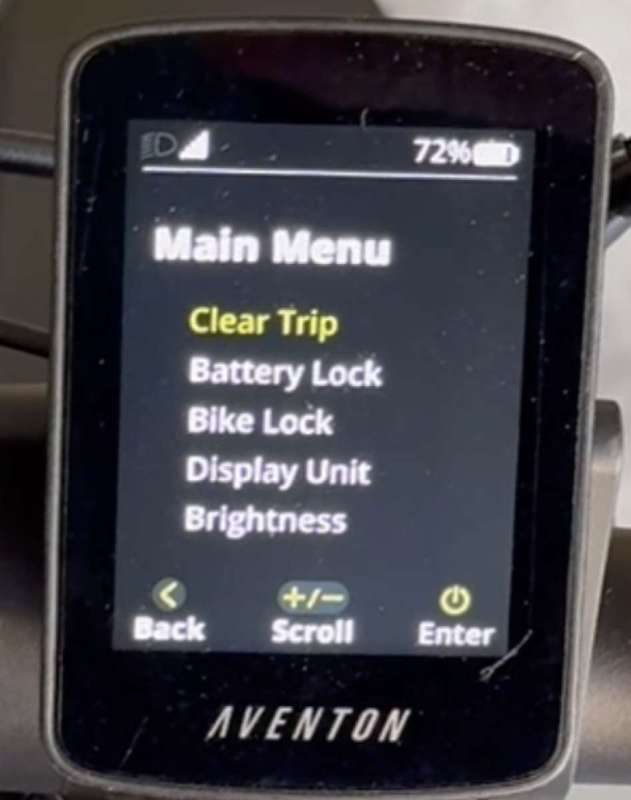
Like most E-Bikes, the Adventure 3 includes a control panel on the display that allows access to various settings and features, depending on the E-Bike’s capabilities. This is accomplished by hitting and holding both the ‘+’ and ‘-‘ buttons simultaneously. For many of the functions mentioned earlier, the display screen offers visibility into options such as clearing Trip A, engaging and disengaging the bike lock, removing the battery, adjusting display units, and modifying display brightness, among others. Additionally, most of these features can also be conveniently accessed through the Aventon companion App.
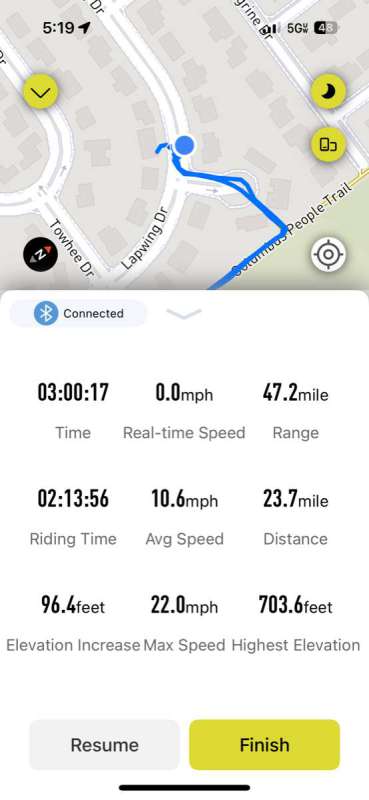
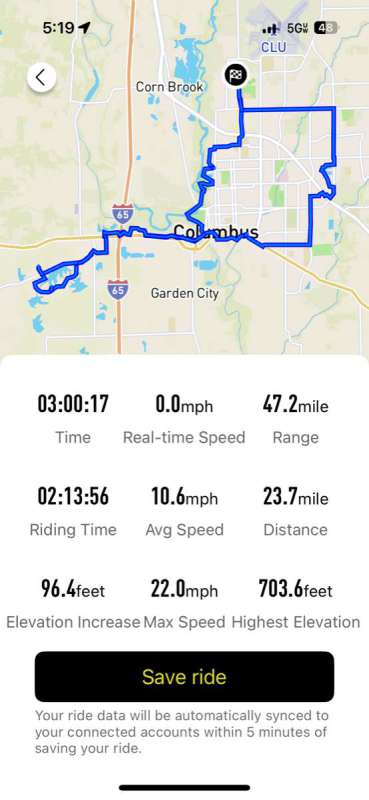
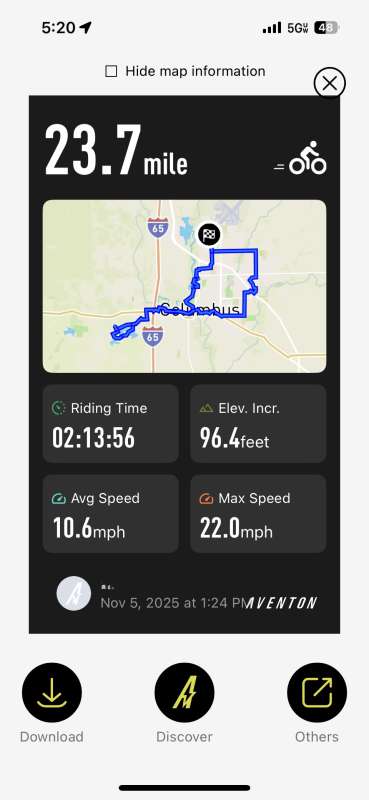
Furthermore, the Aventon App allows you to track your trips on a map.
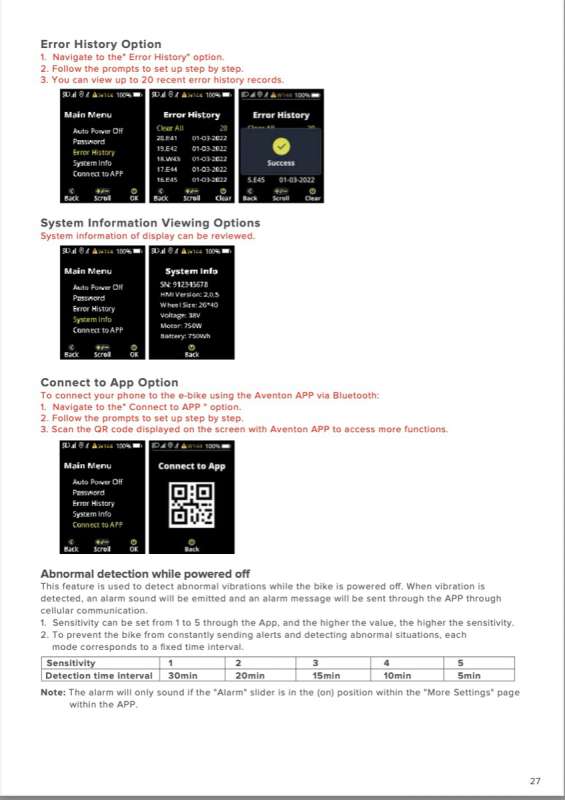
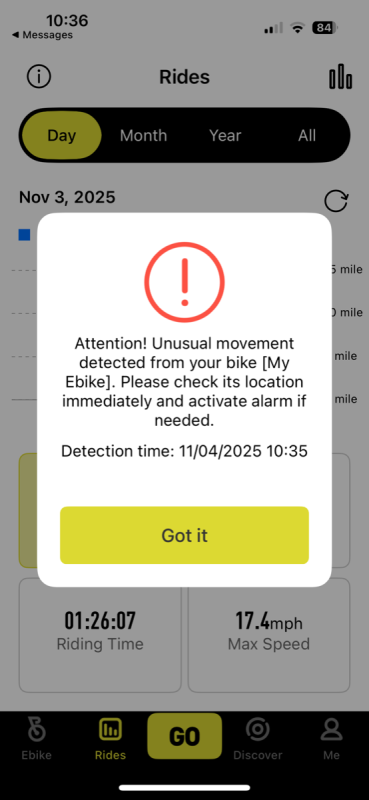
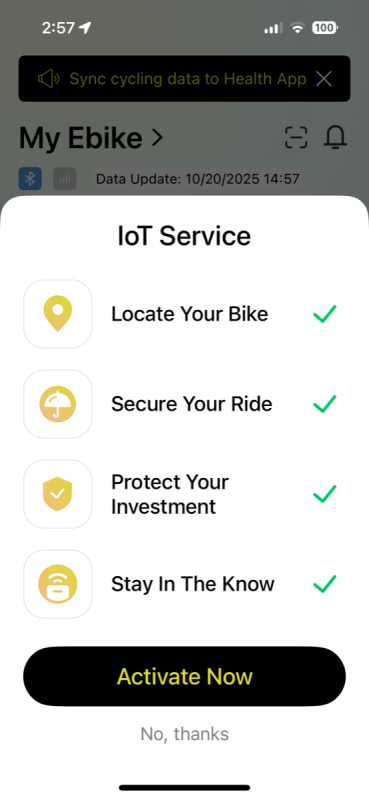
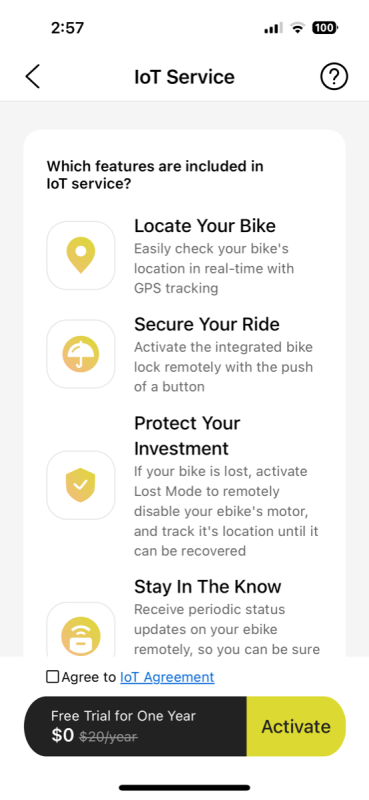
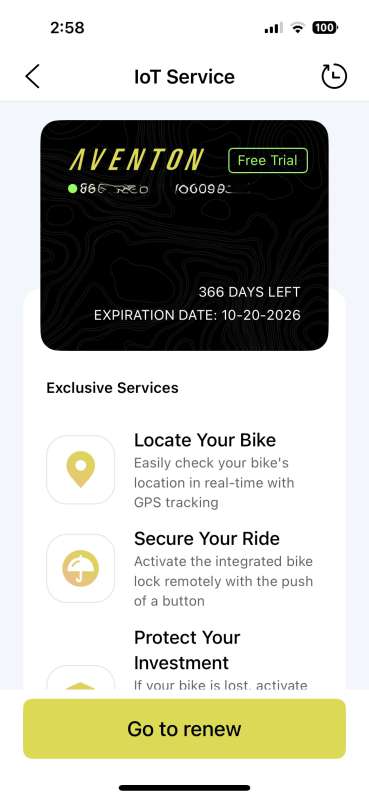
One of the Adventure 3’s standout features is its integration with the bike’s Abnormal Detection capabilities. The Adventure 3 features an advanced Aventon Control Unit (ACU), which includes a range of Internet of Things (IoT) capabilities. Equipped with a 4G radio, GPS chip, and an inertial measurement unit (IMU), the Aventon Adventure 3 is capable of detecting bike movement when it is at rest, further enhancing the bike’s security. When the Adventure 3 is locked and powered off, it triggers what I feel is a too soft alarm on the bike but sends a notification to the owner’s smartphone, provided both the bike and the phone have reliable cell service.
Speaking of cell service, the first year is complimentary; however, from what I understand there is a $2 monthly fee to maintain this cellular connectivity. Additionally, the ACU’s GPS tracking feature allows users to monitor the location of their Adventure 3, making it easier to keep tabs on their ride.
Assembly, Installation, Setup
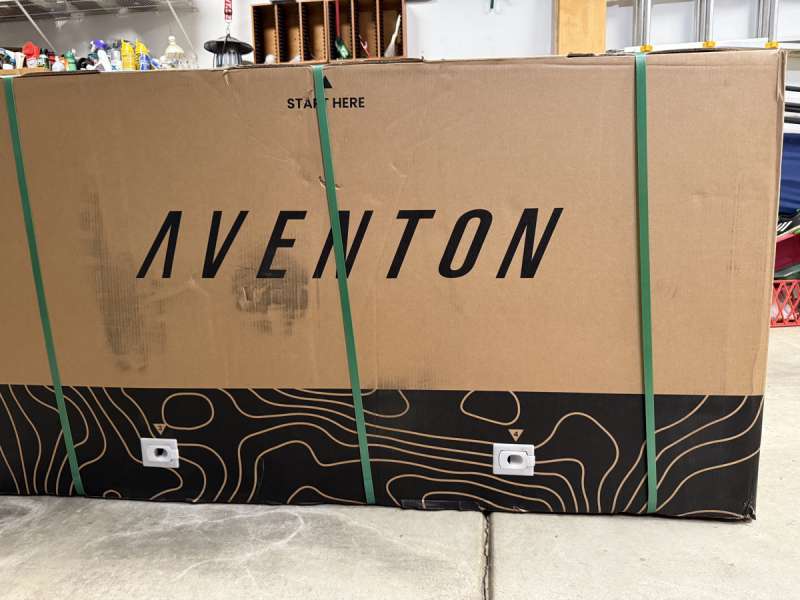
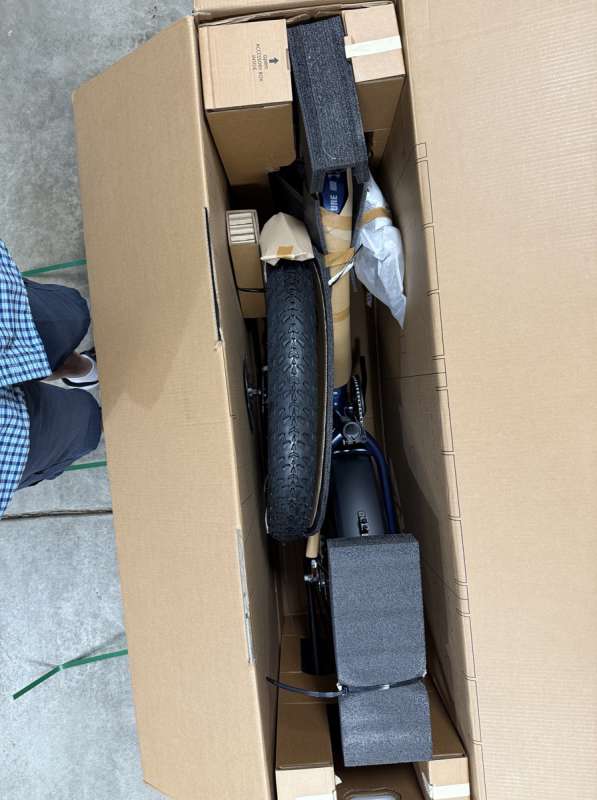
Overall, I found the assembly of the Aventon Adventure 3 Step-Through E-Bike to be pretty straight forward. To me the bike was very well packed. I was so excited to get started with the assembly that I neglected to get some shots of the bike all strapped together. Thankfully, the installation video shows instructions beginning from opening the box, to give the reader an idea of just how well the bike assembly is packed. I can assure you that the Aventon Adventure 3 was really packed out very well, with heavy duty zip ties, and in some cases they were protected by a cloth liner to protect what was underneath the zip tie. These ties were so thick that they were a little bit of a challenge to cut with standard office scissors. They are very tightly attached and I did not want to risk a scratch or end up with a punctured tire using a utility knife or other sharp object.
One thing I did find interesting was the shipping weight of the bike was over 100 pounds, while the bike itself is only 79 pounds. I think this weight differential is a testament to just how heavy duty all the packing material was. Quite simply, it was rock solidly held together.
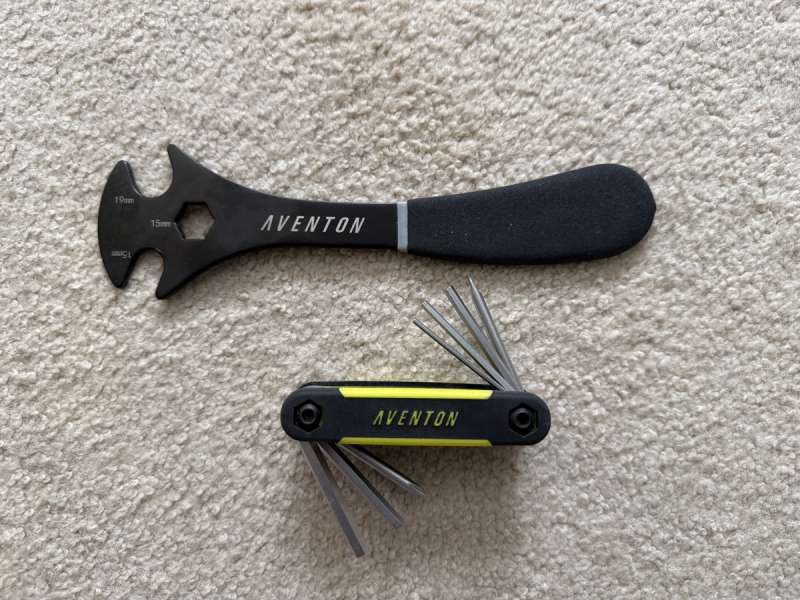
All the little pieces, pedals, really nice bike tools which were primarily the only tools used during the assembly of the bike, head light, manuals, and other incidentals are all neatly packed in the accessory box mentioned at the beginning of the video.
Since I do not have a bike stand, there are a couple of steps that just require a second person to hold the bike, for instance in case of attaching the front wheel, and really the attaching of the handle bars.
Compared to the Ride1Up 700 series E-Bike I found the assembly to be what one would expect, given I am not a bike mechanic in any way shape of form. Unlike the Ride1Up 700, with the exception of the front wheel and fender, seat, handle bars, and pedals, pretty much everything else was assembled. Far less assembly then with the Ride1Up. Working with my wife, we assembled it in under 2 hours, using the Aventon’s installation Video Link as a the primary guide, accessible by many QR codes located on the box, manual, etc. While the video was essential to me, I did find it a little too broken up from an edit standpoint as certain tasks moved too quickly to the next thing and I was constantly backing up and replaying. The order of operations did not exactly match the order of assembly compared to what was in the manual, but it was pretty enough. Like I mentioned earlier, I leaned on the video to a much greater extent than the manual. While the manual is nice, the print is entirely too small in many places. Interestingly, the installation instructions are completely in black and white, while later in the manual, all the display screens are in color. Thankfully, the manual is available online, however I did not download it during the assembly steps.
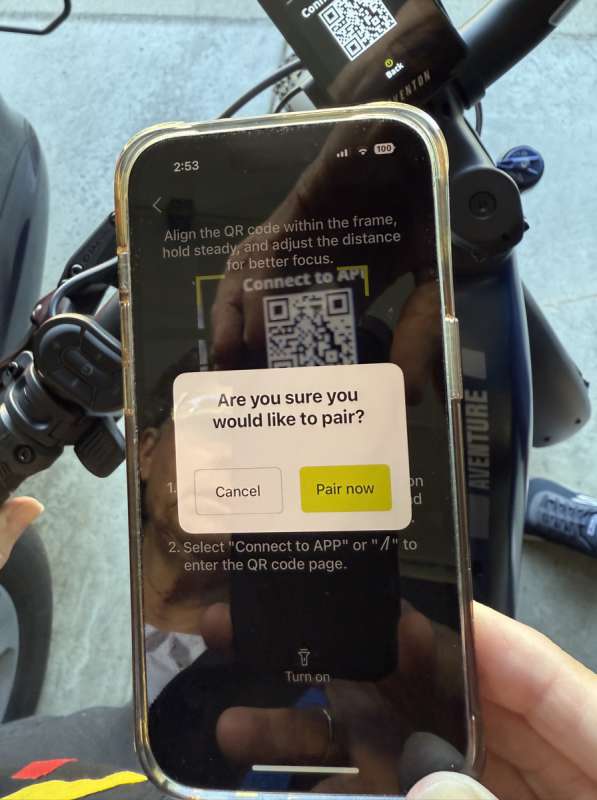
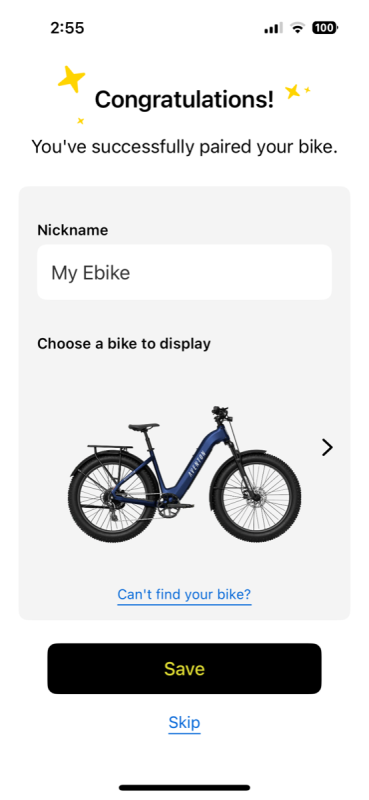
Once the Adventure 3 is completely installed, there is the downloading, registering and pairing of the companion App. There is a QR code in the manual and inside of the accessory box. I will spend more time on the companion App below.
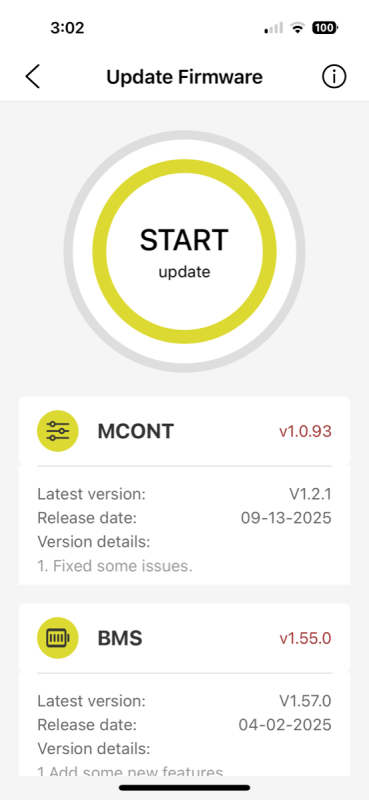
One of the first things that one may have to do when pairing the Aventon companion App is to see if there are any firmware updates available. In my case, there were.
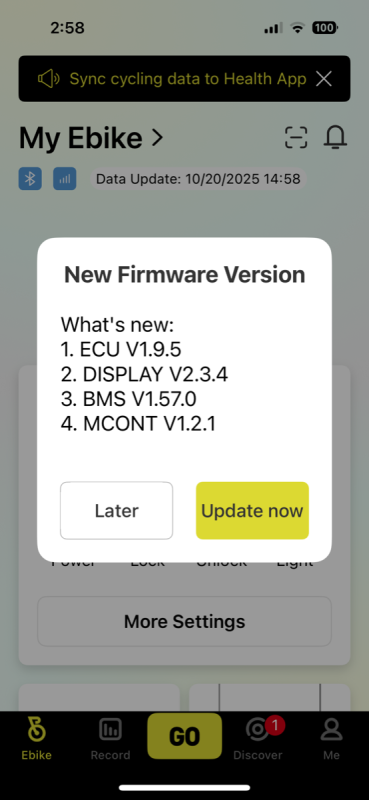
Performance
Let’s begin with the basics: first, I’ll explain how to turn on the Aventon Adventure 3, and then we’ll take it from there.
A long press on the center button (On/Off) will turn the bike on and activate the display screen, initially showing the Aventon logo before transitioning to the primary display screen. It should come as no surprise that if bike is on, a long press of the center button will turn the Adventure 3 off.
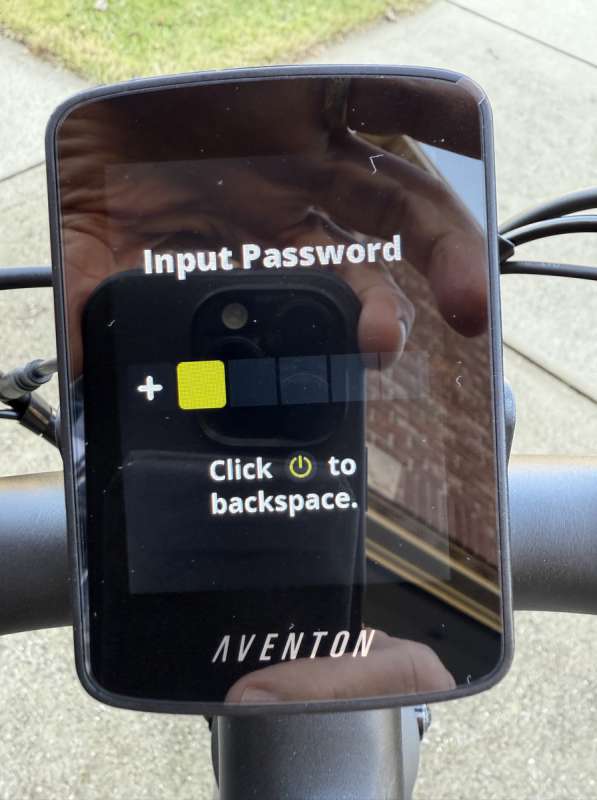
However, if the Adventure 3 is configured to require a passcode, the passcode entry screen will be the first screen displayed upon power up.
To set up the passcode, navigate to the display’s settings screen. The passcode must be composed of six characters, using a combination of ‘+’ and ‘-‘ symbols. Once configured, all functionalities of the bike will be locked until the correct sequence of these characters is entered.
The Aventon App offers a range of functionalities, including the ability to turn off the Adventure 3. However, it’s important to note that these control features operate exclusively via Bluetooth, which is only active when the bike is powered on. Consequently, if the Adventure 3 is off, the Aventon App cannot communicate with the bike and cannot make any adjustments to its settings.
Now that we’ve covered how to turn the bike on and off, I want to take a moment to express just how remarkable the Aventon Adventure 3 is in nearly every aspect.
I had planned to revisit each of the features mentioned above in detail, but this review is becoming excessively lengthy. Instead, I’ll focus on the elements that stand out, as well as those that fall short of expectations.
With that in mind, I think a good place to start is to talk about either the Aventon Adventure 3’s range or power. Flipping a coin, I am going to start with its range.
The Aventon Adventure 3 boasts an impressive range. As previously mentioned, it offers three levels of Pedal Assist System (PAS).
While the display refers to these PAS levels as ECO, SPORT, and TURBO, the manual labels them as Low, Medium, and High, along with corresponding range estimates of 64, 48, and 33 miles, respectively. Additionally, a purely throttle-based ride is expected to achieve a range of about 45 miles. I believe this is similar to the range one could expect when using the Adventure 3’s Cruise Control feature. The manual also includes a table that outlines the conditions under which these estimates were calculated.
I believe these estimates are likely accurate and should be satisfactory for most riders. During my initial charge, I achieved over 50 miles, even while pushing the bike in many cases. I spent a decent amount of time in Cruise Control, a feature that is bound to delight all but the most hardcore cycling enthusiasts.
Speaking of Cruise Control, I really cannot say enough about it. Here is just one example of just how awesome the Adventure 3’s Cruise Control and power is.
I live in Columbus, Indiana, where finding a hill to test an electric bike can be quite a challenge. However, there is one county park that features a steep grade leading down to a riverfront. We decided to conduct a couple of tests with the Aventon Adventure 3 to evaluate its climbing power from the bottom of the park up to the entrance on the street. It’s important to note that this hill poses a significant challenge for my nearly twice as expensive mid-drive Gazelle.
In contrast, the Aventon Adventure 3 climbs the hill with remarkable ease. During one particular test, I had my wife set the Adventure 3’s Cruise Control to around 13 mph as she approached the hill while I attempted to ride alongside her in the Gazelle. Not surprisingly, she literally left me in the dust. This experience clearly demonstrated to me the impressive power of the Adventure 3.
While I could elaborate further on its capabilities, I’ll simply mention that it was common for me to leave the bike in its lowest pedal-assist setting, ECO most of the time. This mode provides ample power to handle all but the most demanding situations. If I need the bike to be more responsive, I can keep the PAS setting the same and engage the Sensor Switch (cadence sensor), allowing the Adventure 3 to accelerate with minimal additional effort on my part.
For someone wanting to purchase an electric bike for commuting to work, and that commute happens in hot summers, the Adventure 3’s Cruise Control may just be the way to ensure that the rider arrives at work without looking like they just finished a workout.
I previously mentioned the Aventon companion App, and this is yet another area where the Aventon Adventure 3 truly excels. The ability to manage various functions of the bike remotely is incredibly empowering. However, the standout feature, in my opinion, is the bike’s capability to send notifications if it detects movement while locked, and let me tell you, it’s impressively sensitive. Additionally, it’s worth noting that the Aventon App can help you locate your bike, thanks to the integrated GPS and cellular connection in the ACU in the event that it does walk off.
I have to admit I can be quite paranoid. When my wife and I ride our bikes to a nearby restaurant, we always choose to eat outside, ensuring we sit within sight of our bikes. Even though they are securely locked to a sturdy fixture, I can’t shake the feeling of wanting to keep a watchful eye on them.
We have never considered leaving our bikes locked up if one of us can’t keep eyes on them, even for a brief moment. However, I genuinely believe, something we’ve discussed, that it might be feasible to lock up the bikes now since we can receive notifications almost in real-time if anyone tries to tamper with the Adventure 3.
To ensure full functionality, both the Adventure 3 and the phone must have an internet connection, either through WiFi or cellular for the phone, and cellular for the bike. With this setup, riders can receive notifications if anyone tampers with the Aventon Adventure 3, which provides considerable peace of mind, especially for those like me. It’s important to note that while the first year of cellular coverage is complimentary, there will be an ongoing charge once that year ends. This process is managed through the app, and this review will be completed well before I need to decide on continuing the coverage.

Despite all the positive aspects, it’s difficult to overlook the poor decision Aventon made regarding the placement of the charging port on the bike’s battery. This design flaw is particularly concerning. In my opinion, having the battery hang beneath the bike frame is not ideal either, especially considering the weight of these batteries, though I acknowledge that the Ride1Up bike features a similar design. However, the real issue lies with the diminutive, hard-to-access keyed charging port which is located at the bottom of the battery. This positioning places it precariously close to the wheel, making it highly susceptible to splashes from water or other debris.
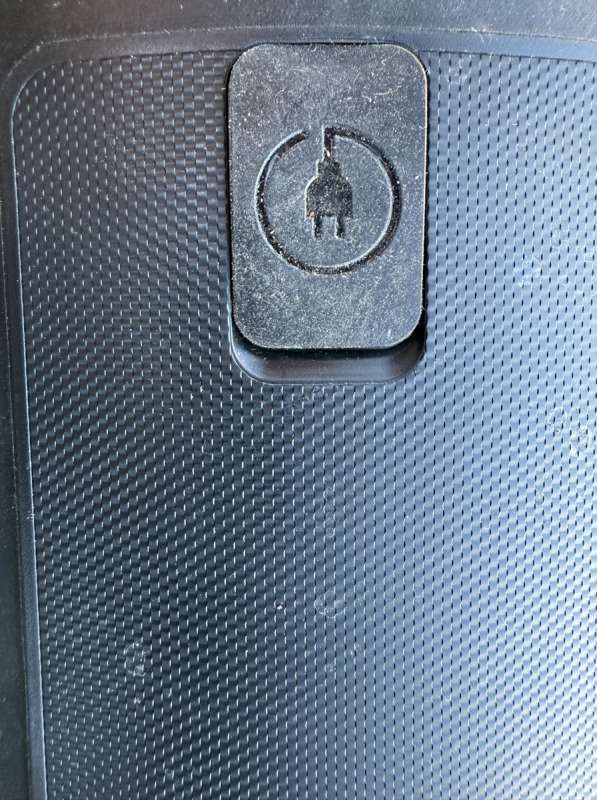
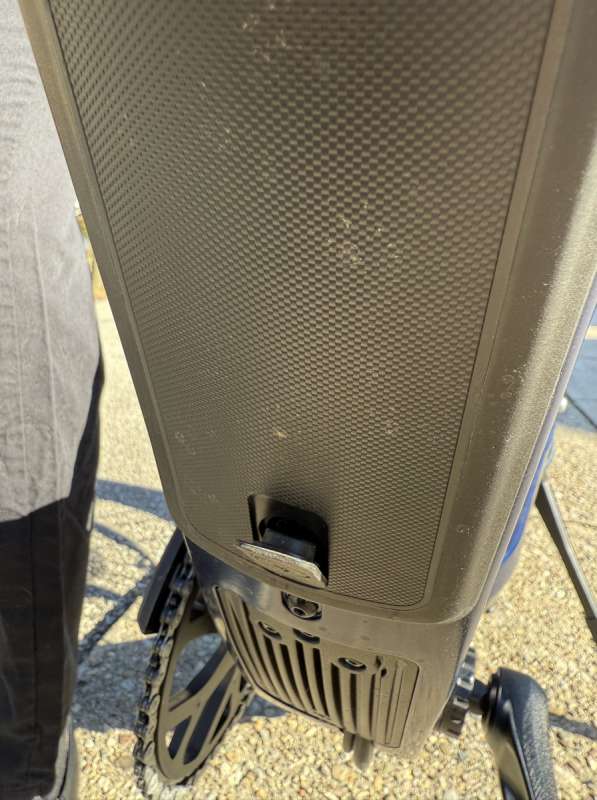
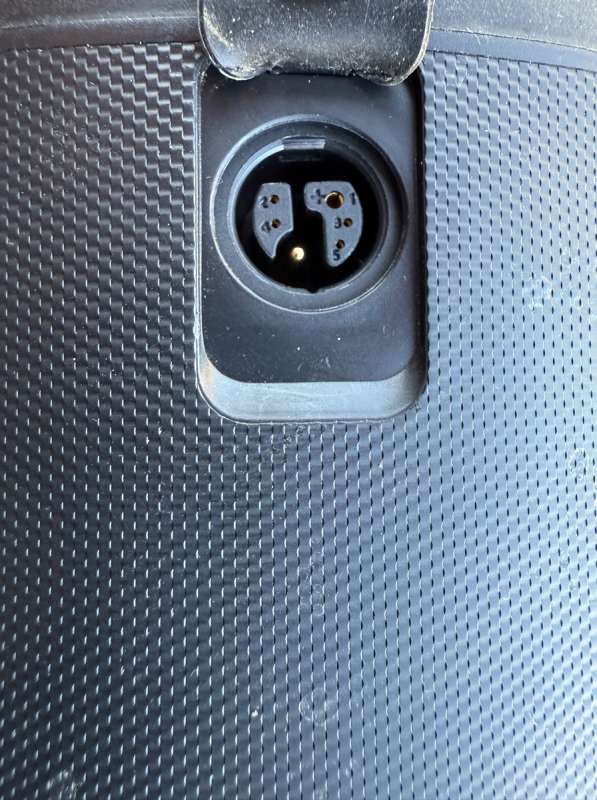
It truly baffles me why anyone would choose to place the charging port in its current location, rather than on the top of the battery where it would be far more accessible. Positioning it on the side, as seen on both the Ride1Up and Gazelle models, seems not only more convenient but also better protected.
In the case of the Gazelle, the battery is positioned on top of the bike frame rather than hanging beneath it, which eliminates the need to rely solely on a locking mechanism to secure it. Given the timing of this review, when riding conditions can be less than ideal, I only needed to recharge the bike once, accumulating a total of 103 miles during my testing. It’s worth noting that I don’t include the initial charge, as the bike arrived with roughly half a charge.
Since I only charged the battery one time from about 4% to 100%, at 50 miles I should mention that it took right at 5 hours. The Aventon battery charger will transition from a large red Aventon A to a green one when the battery is fully charged.
I absolutely love the two-page trip recording feature of the Aventon Adventure 3. The inclusion of a manual trip page (Trip A) alongside an automatically resetting trip (Trip B) is a fantastic touch. However, the process to access these trip pages involves a frustrating “button dance.” To activate the trip screens, you have to double-tap either blinker button, which can easily result in accidentally turning on the blinker instead. It’s also worth noting that when the trip pages are displayed, the blinkers become disabled, as the left and right blinker switches are repurposed for navigating between Trip A and Trip B.
Another minor issue is the screen brightness when activating the bike’s lights. It would be beneficial if the system could save the user’s preferred display brightness for both lighting settings instead of only recalling the default values. It always dims when turning the bike lights on, and then one has to turn the display back up during daylight riding, which is pretty much all we do.
Finally, I realize that I kind of left the standard boring stuff out of the review so I will just mention that the Aventon Adventure 3 of course has hydraulic disk brakes front and rear which seemed to provide good stopping power. Front fork and seat post suspension which provided a comfortable ride, and a throttle which enables the bike to just accelerate from a standstill in situations where that is needed. Any E-Bike that has a throttle is rated as a class 2 E-Bike.
Final thoughts
Before formulating my final thoughts, I took the time to revisit my conclusions on the other two bikes I reviewed: the Heybike Mars and the Ride1Up 700 Series. In doing so, I realized that I overlooked an important detail in my earlier comments. Specifically, the Ride1Up’s motor generates more noise compared to the Heybike. In contrast, the motor of the Aventon Adventure 3 appears to be even quieter than that of the Heybike. This observation is purely my own and is based on my recollection of the experiences with each bike.

The Aventon Adventure 3 just feels so robust while riding it, equipped with those massive tall fat tires, and all of that power. It really does feel as if one can just ride over just about anything. If one comes across a part of the bike trail that is under water, it is a no brainer to leave the path, riding around the puddle and back on to the path once it has been passed.
To be honest, my experience with the Aventon Adventure 3 makes me a bit envious, especially when I compare it to the nearly twice-as-expensive Gazelle. It’s not just the added capabilities of the Aventon app that have me questioning my choice. Features like the Aventon Adventure 3’s cruise control, unmatched power, comparable or superior range, turn signals, brake lights, motion detection, and keyless operation really make me wonder if I made the right investment in the Gazelle. I recognize that the individual components of the Gazelle are likely of higher quality, but are they really worth twice the price?
In conclusion, as I was finishing up my tasks, I decided to remove the battery to take some pictures. After spending a bit of time with the battery in my hand, I was taken aback when the ACU suddenly sounded the alarm while I was attempting to reinsert the battery. To add to the intrigue, the phone received a notification alerting me that someone was tampering with the bike. How cool is that? I have no idea where the power was coming from to both detect the movement and broadcast that notification to my phone. As I mentioned earlier, I feel the Aventon Adventure 3 is somewhat under-documented, and I can’t help but wonder what other surprises await me as I continue to explore this bike.
What I like about the Aventon Adventure 3
- Cruise Control
- Multi-color Display
- Bike’s Smooth Power
- Really nice bike tools.
- Literally most everything but the charge port location
What needs to be improved?
- Charge Port location is terrible
- Display should have unique brightness settings for headlight status
- Printed manual should include all features, boost, cruise control, etc.
Price: $1,999
Where to buy: Aventon
Source: The sample of this product was provided for free by Aventon. Aventon did not have a final say on the review and did not preview the review before it was published.
Check out these other reviews!

kate spade new york Morgan Magnetic Phone Wallet/Card Holder - Compatible with MagSafe Phones and Cases - Cream
(as of March 20, 2026 14:10 GMT -05:00 - More infoProduct prices and availability are accurate as of the date/time indicated and are subject to change. Any price and availability information displayed on [relevant Amazon Site(s), as applicable] at the time of purchase will apply to the purchase of this product.)