REVIEW – Since I initially began evaluating the eufyMake E1 UV printing system, I’ve been trying all sorts of things. I received what’s included in the full Kickstarter deluxe bundle, so I’ve had a chance to figure out the DTF sticker system to understand its usefulness. Many backers are still interested in figuring out if they need the additional hardware.
In short, I think for most users, the DTF system might be more expensive than it’s worth, but it really depends on your specific scenario(s) as a producer. For hobbyists, it’s too expensive to justify the associated costs, especially when much cheaper options are available. So with the thesis out of the way, let’s get into the details.
⬇︎ Jump to summary (pros/cons)
Price: $1970.00 (E1 and UV laminator bundle)
Where to buy: Kickstarter
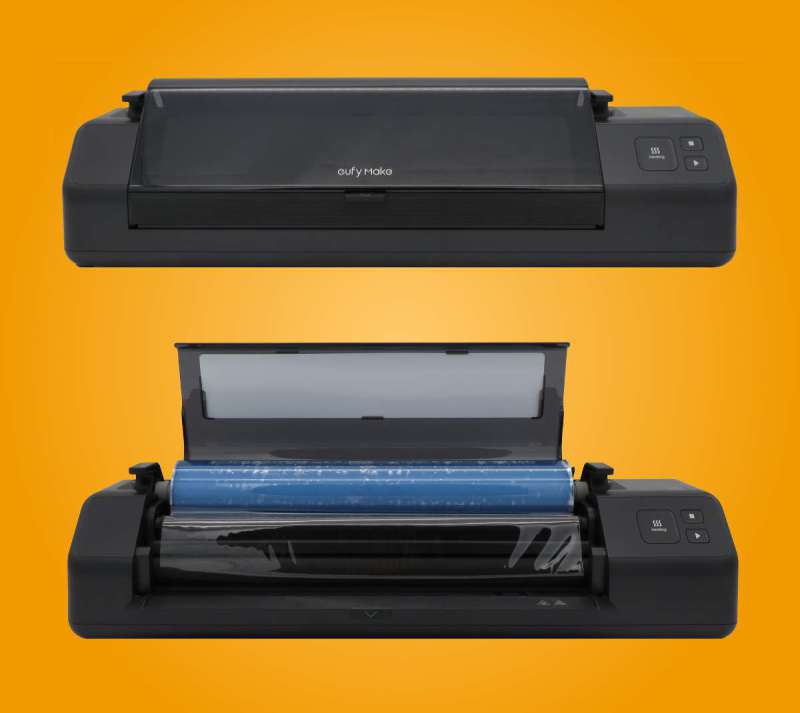
What is the eufyMake UV DTF Laminator?
Importantly, DTF with eufyMake’s system is not at all like regular DTF printing. In basic terms, DTF hardware (and the associated films used for each print) turns a UV print into a sticker by applying adhesive to the back surface of the printed sticker. Because UV prints can be sealed when printed with transparent UV resin, none of the UV DTF hardware I’ve read about appears to actually laminate the surface of the sticker.
The basic idea behind UV stickers is pretty straightforward: UV resin can be printed in any arbitrary shape, and the resulting print, provided enough resin is used to make a solid, stable layer of cured resin, can be used as a decal or sticker on all kinds of things. This makes it possible to make intricate decorations without the need for a computer-controlled plotter to cut out the printed shapes. If you’ve ever played with Cricut’s Print-Then-Cut feature, you know what an absolute nightmare this can be. Perfect alignment of cuts along a printed image can be extraordinarily tedious; UV printing gives you a perfect custom shape with a perfectly-aligned image every time.
What’s included?
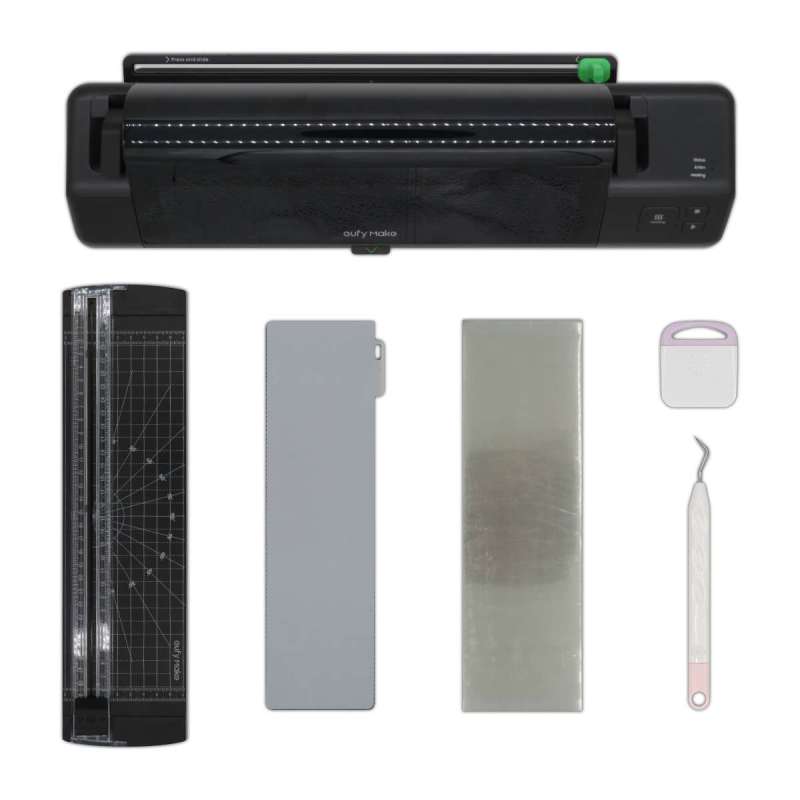
- DTF laminator
- Compact trimmer
- Mat for plastic A-film
- (50) Plastic A-film for mini printbed
- Plastic scraper
- Metal hook tool
- Ungrounded standard power cord (not pictured)
Anker offers both paper- and plastic-backed A-film, but since this backing material is removed and discarded prior to applying the sticker, I’m not sure there’s much purpose to the plastic carrier. For evaluation purposes, Anker sent me an extra 50-packs of paper-backed A-film, both in the mini and standard (12×16″) sizes.
How does it work?
Let’s take a look at how this hardware is actually used.
- Print your design face-up on the A-film, which is a very thin, permanent adhesive layer (it’s some kind of polymer) sitting on a carrier sheet, either paper or plastic.
- Run your printed A-film through the laminator, which applies a sheet of clear PVC over the sticker and all the adhesive in the negative space.
- Trim the excess negative space, leaving a small margin for applying the sticker.
- Peel off the A-film carrier and discard it.
- Apply the sticker, using the B-film as transfer material.
- Burnish the edges.
- Peel off the B-film carrier.
If you’ve seen or used Xyron products, you’ll be familiar with the adhesive used for UV DTF stickers. It’s a permanent polymer adhesive film applied as a very thin layer on the A-film carrier. This adhesive is chemically stable and advertised as permanent, so it’s probably similar to the solvent acrylic adhesive used by Orafol for many of their permanent adhesive vinyls. It’s very, very fragile – just removing the cellophane protective cover from the A-film will tear the edges of the adhesive.
Like the Xyron, the negative space around the sticker is unused adhesive, and this needs to be removed before applying the sticker. The system eufyMake offers accomplishes this by rolling transparent PVC over the printed sticker and adhesive A-film. Trimming the PVC reduces the amount of excess adhesive that might be left behind when you apply the sticker.
This means of adhesive application comes with some downsides, which are an issue regardless of the system used – be it Xyron, a UV sticker machine, or some other similar solution. One big side effect is the bits of adhesive inevitably left behind around the edges of the sticker.
This is trivial to clean up before application using an adhesive or glue eraser, but it’s tedious and difficult if the sticker has already been applied. Any adhesive left around the edges of the sticker will pick up bits of debris, making the sticker edges look dirty. Careful removal with an adhesive eraser results in a significantly cleaner sticker. The trouble is, eufyMake’s DTF system’s application of the PVC B-film results in a sticker that is loosely attached to the B-film for application, meaning there’s no easy way to remove excessive adhesive around detailed sticker elements.
Although eufyMake has not yet released the MSRP of the consumables used by the DTF machine, I doubt it’s cheap – transparent PVC sheets aren’t particularly inexpensive to manufacture. Not only that, but the eufyMake hardware wastes a ton of material every time you use it – there’s a five inch margin at the top of anything passed through the machine. I suspect the cost of materials is going to be a bit ridiculous, and I really dislike wasting so much PVC – it’s not good for the environment at all. I think the reason eufyMake went with PVC is because it’s thick and flexible, and thus will protect the integrity of the sticker until it’s used. It also does a very good job of cleanly picking up the waste adhesive.
However, in my experiments, I think there are better, less expensive, and more reusable alternatives to the DTF lamination system eufyMake built as part of the E1 package. I have done a lot of experimenting with UV printing in general since I published by original E1 printer review. I’ve learned some very interesting things about polymers (plastics of all kinds), and have put my extensive knowledge of vinyl decal application with great results. So let’s talk about the bigger subject of UV stickers, and how to minimize failures.
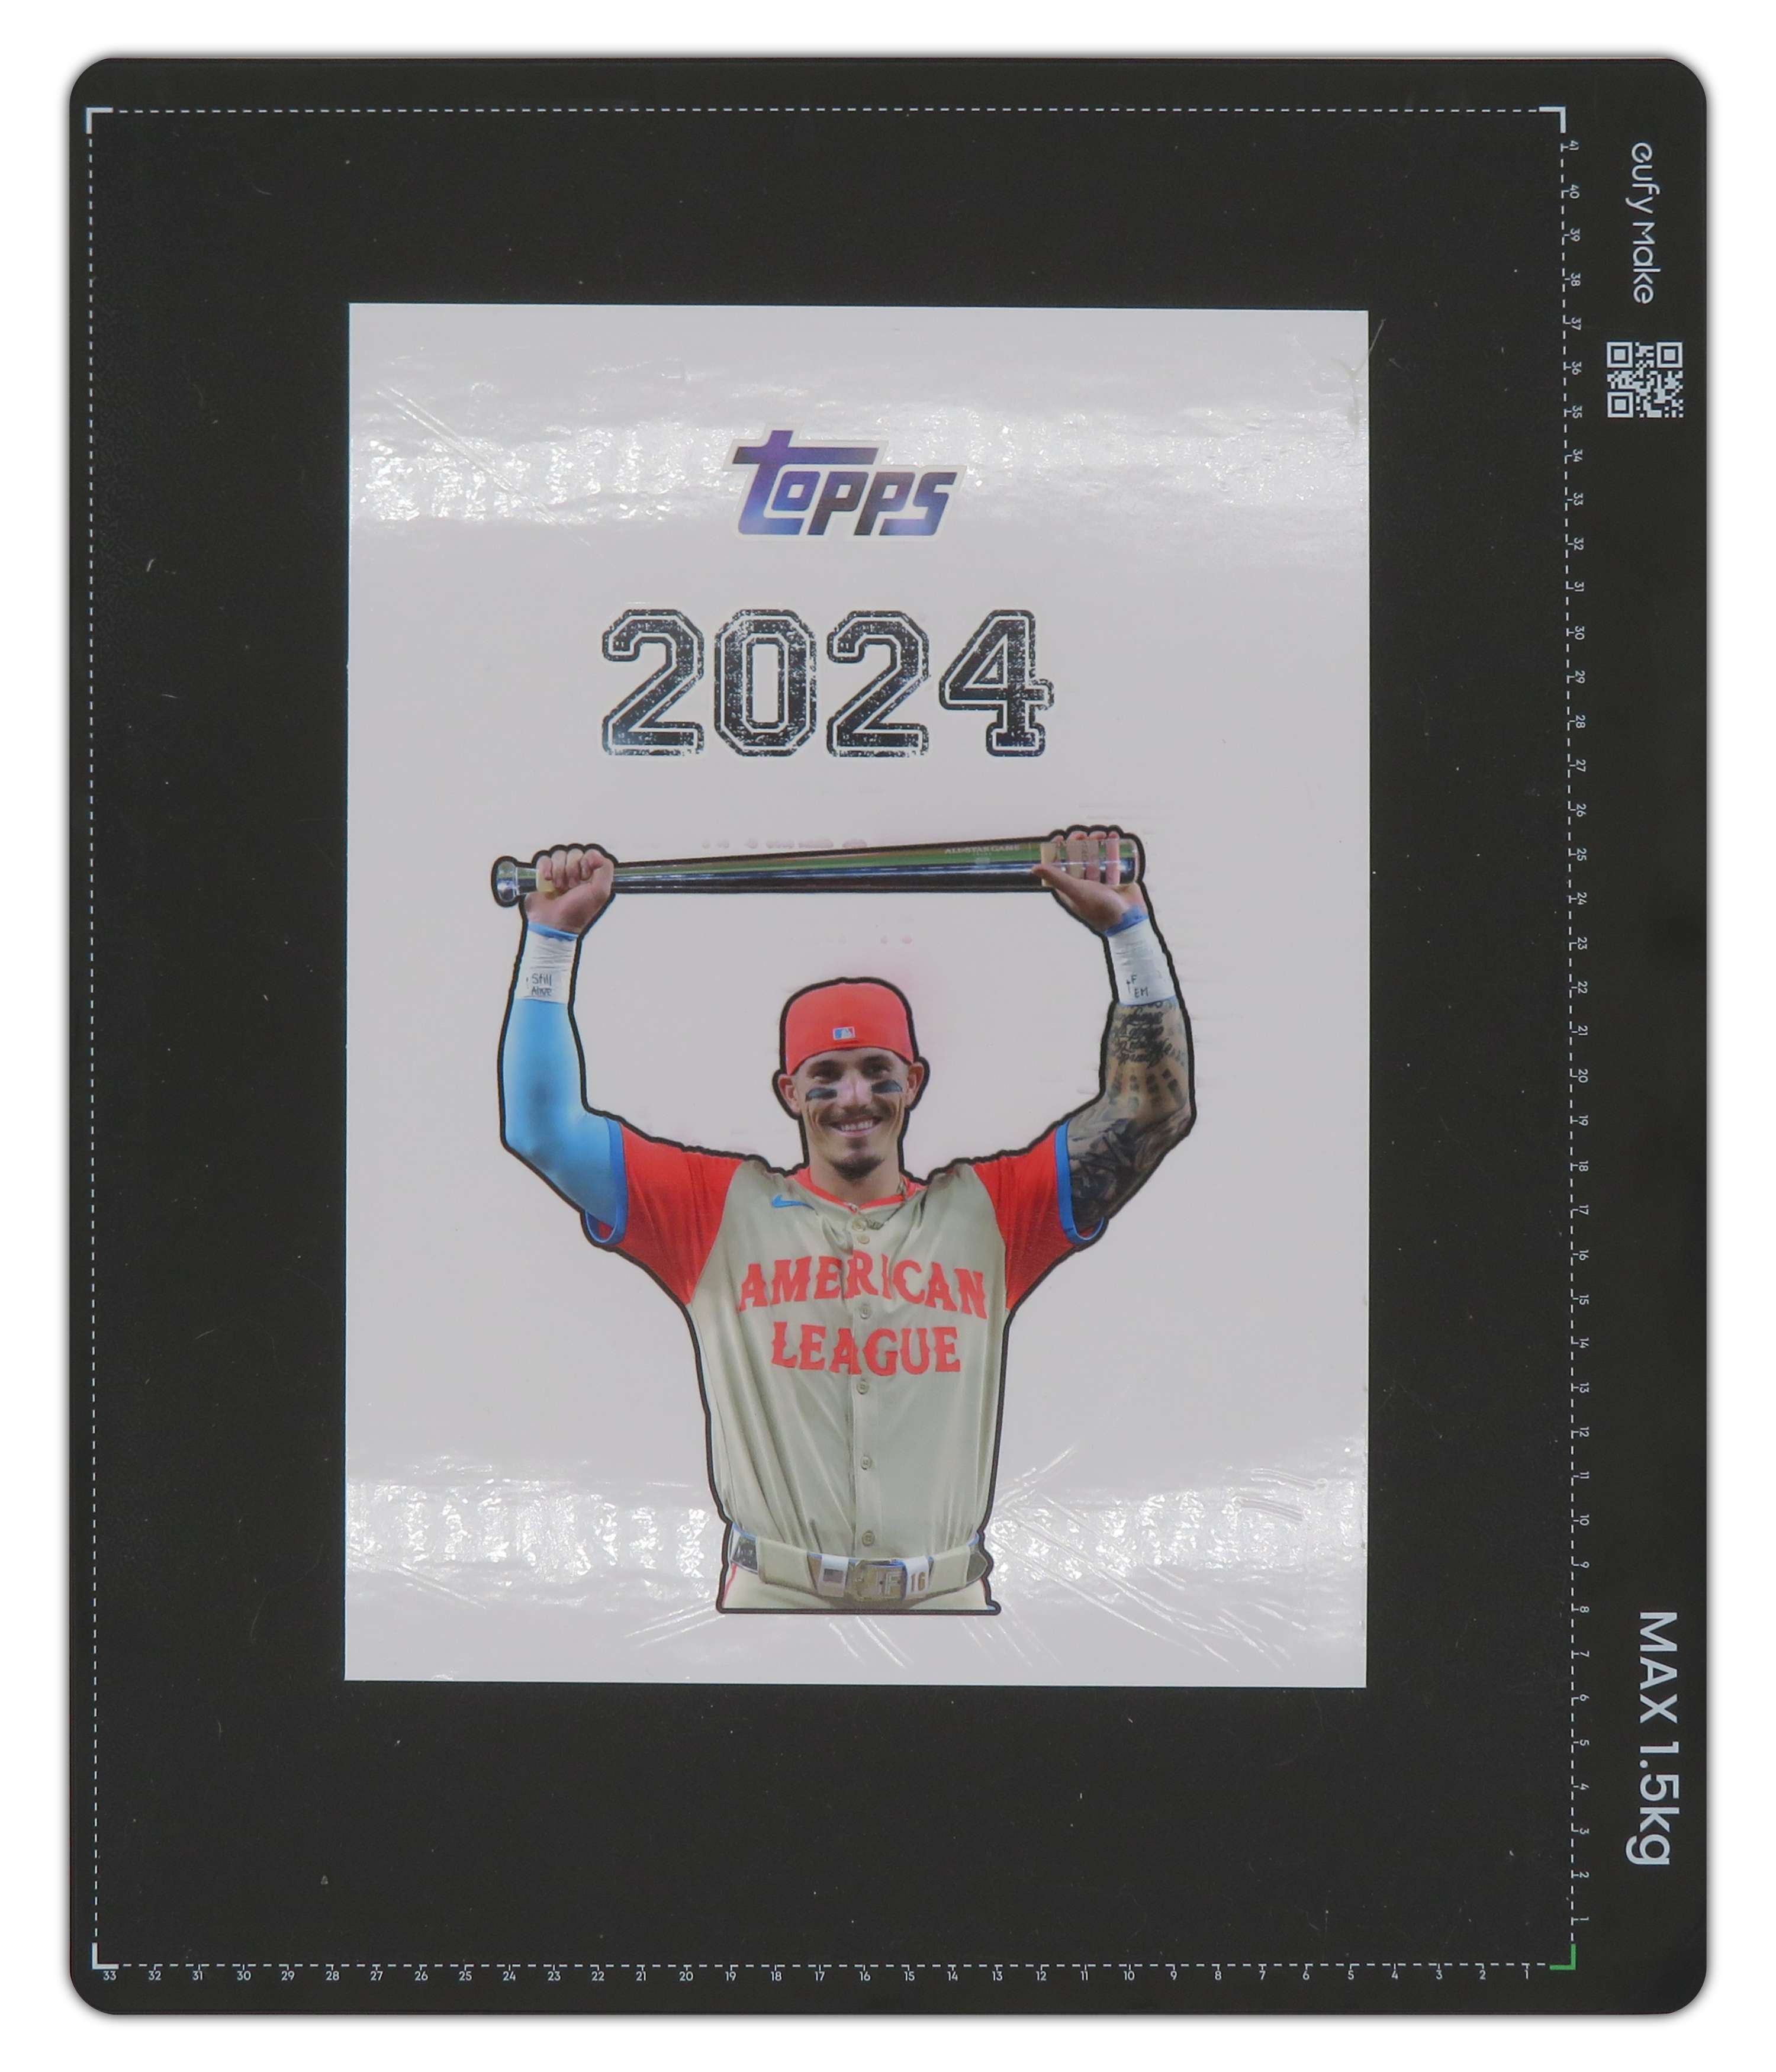
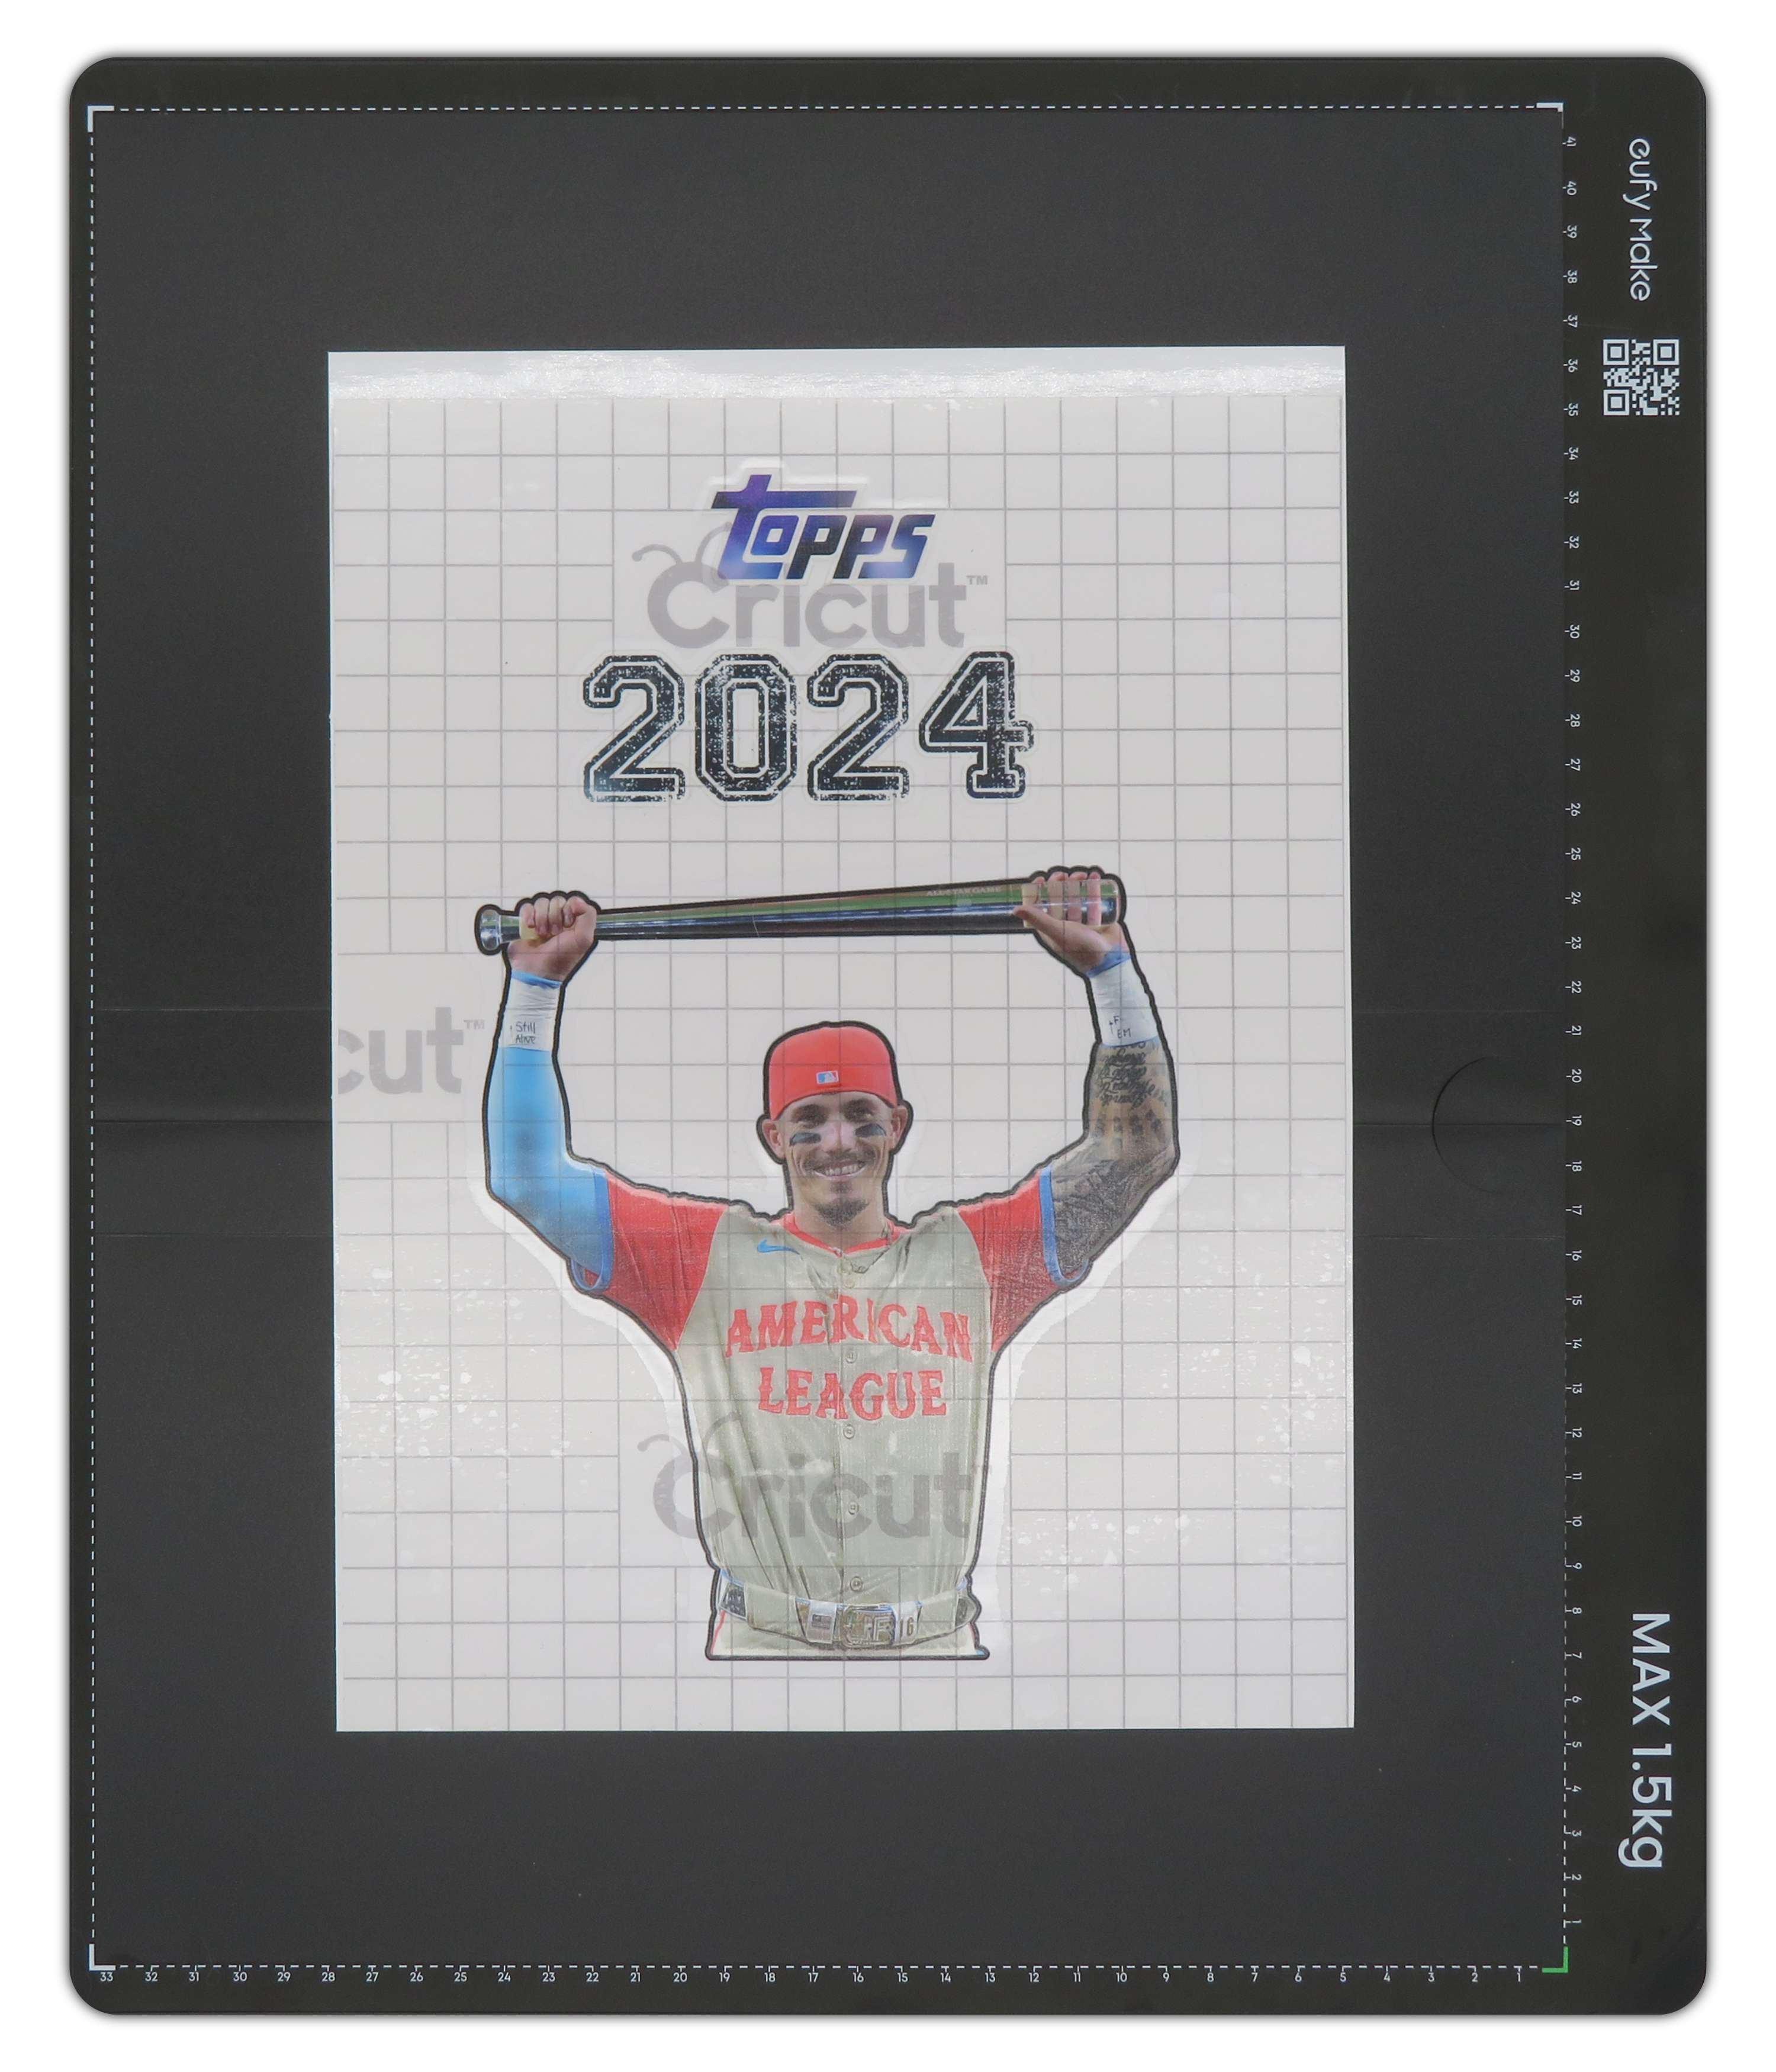
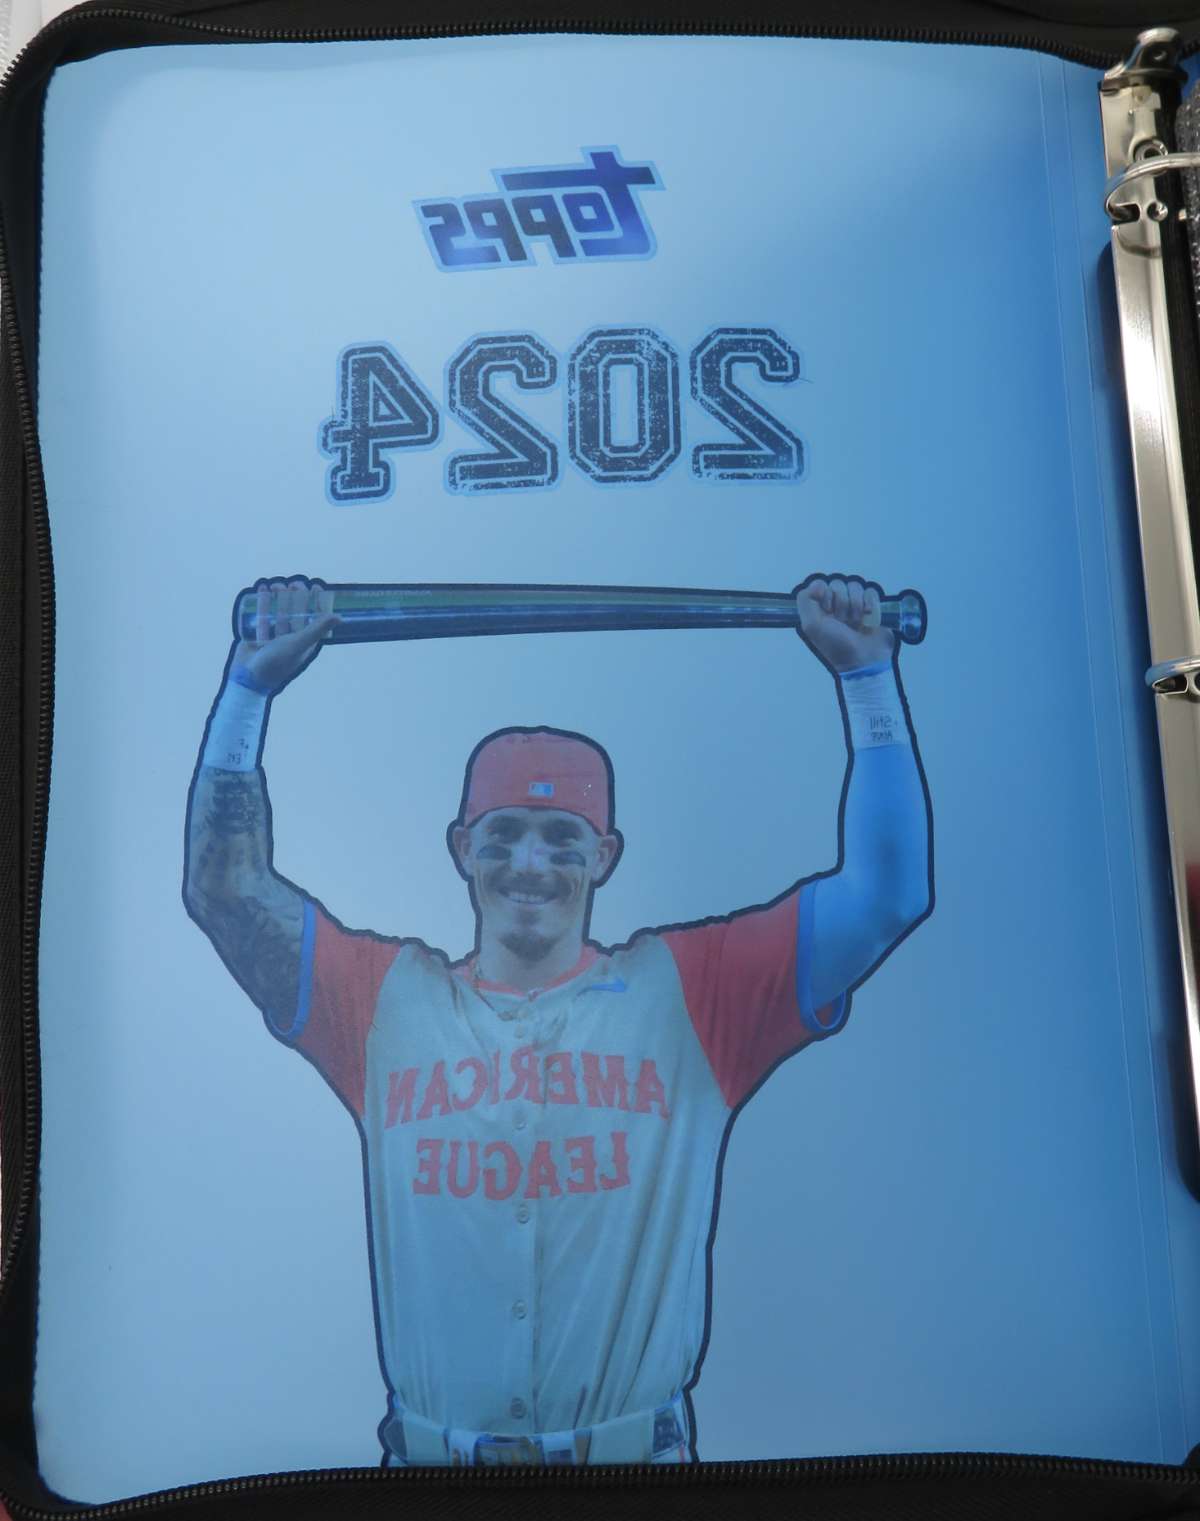
The Project: A binder for baseball card collectors
My main project for this review is a cover I designed for my husband’s baseball card collection. We chose a very high-resolution press photo of 2024’s All-Star Game MVP (and one of my personal heroes), Boston Red Sox outfielder Jarren Duran. If you have no experience with large format printing, believe me – it’s worth it to use the largest resolution you can for any photos you plan on using with large projects. Image search engines are great at finding original, full-resolution press photos of major events, and Wikimedia is filled with high-resolution scans of famous artwork. These make great material for large stickers and prints. Just remember, press photos are copyrighted, so you can’t use them for anything but your own personal projects.
You can’t do any of my process past the first step if you use eufyMake’s DTF laminator hardware, but the hardware is less time-consuming to use. If you value quantity over quality, the DTF laminator system will definitely make it easy to produce a whole lot of DTF stickers very quickly. If you’re mostly interested in custom projects where quality matters more than your output volume, this more manual process, using only the A-film and leaving the DTF machine out of the equation, is a better option.
Step One: Printing the sticker
This is the only step which uses eufyMake’s own consumables: you will need to print on the A-film, or you will use the A-film to make a glossy sticker (more on that later).
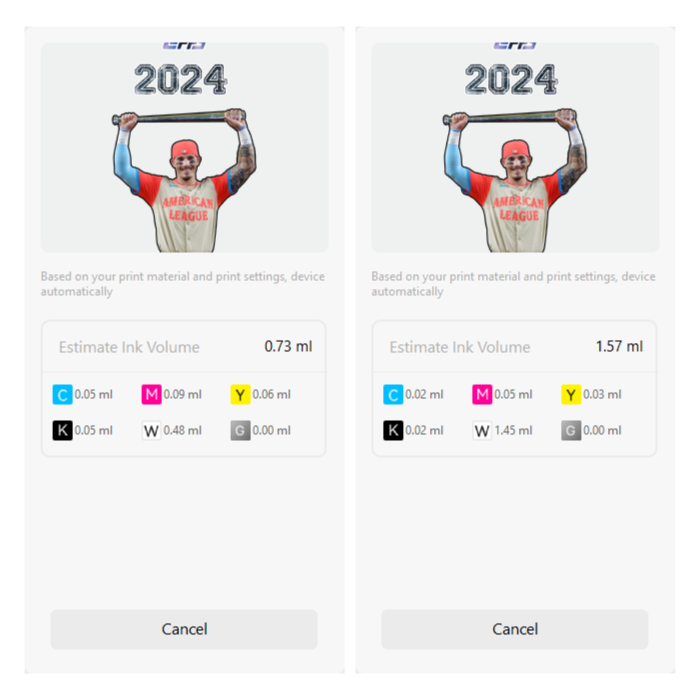
eufyMake includes a sticker mode in their software. This automatic setting (1440dpi only) prints twelve layers of white resin as the sticker base, followed by four layers of CMYK ink, then topped with two layers of gloss varnish. The large number of white layers ensures the base of the sticker is totally opaque. It also uses a lot of ink. I did some test prints with the sticker mode, and I’ve been really happy with the results with double-sided prints, which I produce using the CMYK+White+CMYK ink mode with high quality (1440dpi).
Each layer of resin is very thin, and a three-layer sticker isn’t appreciably much thinner than the 18-layer print created by eufyMake’s sticker print mode…and it doesn’t appear that the sticker mode makes a more durable sticker. I’ve also been happier with the results from not finishing a sticker with the gloss varnish. The CMYK ink on a single white base layer is less reflective, making the whole image easier to see in various lighting conditions. It’s easy to seal a completed sticker with Mod Podge (or watered-down PVA glue; use distilled water), and this option probably makes for a more durable gloss layer, since it’s applied as one continuous spread of glue, rather than printed as tiny dots.
As an added bonus, it seems the CMYK+White+CMYK print mode consumes much less white ink compared to the regular White+CMYK mode. I’m not sure why this is, but I was happy to see it! I’ve been printing all my UV stickers double-sided so I can put them on windows around my house. The significant difference in white ink consumption makes me think it’s probably a good idea to prefer this print mode, but you should always check your ink consumption before hitting that big start button.
I recommend cutting down the sticker A-film to whatever you’re printing, or you’re going to waste a whole lot of material. Just stick a piece of regular office tape to the cellophane cover for removal.
This next part is important: keep the cellophane cover. Don’t wad it up and discard it. You’re going to need it to remove the excess adhesive from your printed sticker.
Step one and a half: Making glossy stickers without the gloss varnish
I accidentally discovered a pretty neat trick with the A-film, because I forgot to remove the cellophane cover before printing a test sticker. It turns out top of the cellophane is either polypropylene or PET, because UV resin releases with very little effort. This means you can print on a slick PET surface to get a perfectly glossy, smooth sticker surface. You’ll need to mirror your image before printing, and use the CMYK+White+CMYK print mode for best results. Be sure to use an A-film with a perfectly smooth cellophane cover (just double-check), because any minute wrinkles will leave a depression in the cured ink.
Once your sticker is printed, carefully remove the cellophane from the A-film. Pay close attention to the sticker, so you don’t accidentally break it. It’ll patch up fine, and the material bends a lot without breaking, so as long as you don’t try to rip the cellophane from the A-film quickly, it should pull up nicely. Now you can move on to step two. Note that I haven’t tried this glossy sticker hack with large stickers, but it’s worked really well for small (smaller than 3.5″ square) stickers.
Step Two: Cleaning up the adhesive
As I previously mentioned, this adhesive is very similar to Xyron’s various solutions. I discovered by accident that the top of the cellophane cover over the A-film’s adhesive behaves exactly like Xyron cellophane – it not only pulls up all the excess adhesive; its very thin profile means it’s possible to pull up almost all the adhesive around a sticker, even in small cutouts and crevices.
Flip the protective cover from your now-printed A-film, and carefully place it over the full printed sticker area. Use a cardboard squeegee to press it down, and run the edge of the squeegee along the entire shape of the sticker, paying special attention to tight areas, inside corners, and small cutouts. I recommend cardboard over plastic here to avoid tearing the cellophane and damaging the surface of the sticker. A bit of foam core board works really well.
Note that the top side of the cellophane loves this adhesive layer. Once you start placing it, you’re committed to your position, so go slowly. For large stickers like this project, it’s a good idea to secure the printed A-film to something before flipping the cellophane. You can leave it on the printbed, or just tape the corners of the A-film to your work surface. This prevents it from sliding around while you’re applying the cellophane.

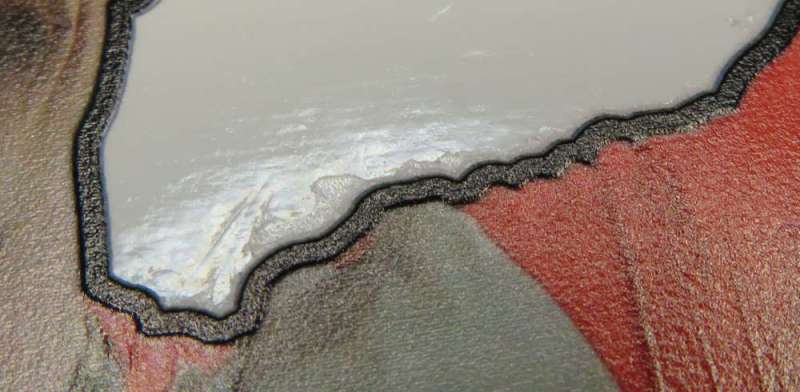
Once you’re satisfied with your work, carefully start pulling the cellophane off your sticker. This is a slightly hairy process if you’re working with detailed sticker shapes, but if you’re mostly doing large decals, it’s pretty painless. I had no problem pulling the cellphane from the cutout shape of Jarren Duran, but the sticker pulled up and broke on part of the 2024. Fortunately, tears in UV resin are clean, so it’s easy to piece back the material for a seamless result. You can make this even more resilient by coating the sticker in a thin layer of Mod Podge after removing the excess adhesive.
Now you need to use a rubber cement eraser to meticulously remove all the excess adhesive left behind around the edges of your sticker shape. This isn’t actually that tedious, because the material is very forgiving in this process. Just go slowly, and only rub the eraser in one direction (don’t go back-and-forth like you’re redoing a test question in school). The plasticized surface of the A-film release paper makes this a pretty fast process. For tiny details, a magnifying desk light is indispensable. The more thorough you are in this step, the easier your final application will be, and the cleaner your results.
Step Three: Applying a transfer carrier
Once you’re happy with your results, it’s time to transfer your sticker. The best way to accomplish this is with transfer material, and so far, I’ve had the best success with vinyl-based carriers, rather than paper, which tears too easily and risks breaking the sticker. The other benefit of using vinyl is that it’s reusable across many multiple uses, provided you put it back on its original backing paper between uses, so the adhesive stays clean. I didn’t realize this until after I’d cut out the overall sticker shape from my vinyl carrier.
I also recommend a carrier with a printed grid, like the Cricut material I used for this project. This makes it significantly easier to properly align the sticker to your target material. The transfer carrier is thick enough vinyl to safely use a plastic scraper to make sure you press the carrier very thoroughly into the sticker – the transparent vinyl will visibly flatten out. You’ll want to secure the A-film carrier material for this step, too, especially for larger stickers. That said, it’s easy to pull up the transfer carrier and reposition it if necessary.
Step Four: Applying the sticker (finally!)
Removing the backing paper from the adhesive side of the sticker can be finicky around fine details. I tore a tiny bit of the Topps logo in my design, but it’s easy enough to put back in place. Put the sticker face-down and remove the backing paper by carefully pulling it back from the sticker. Some of the adhesive around the edges of details might not want to release, so keep a precision knife handy to cut it loose if necessary.
Apply the sticker. Keep in mind this adhesive is very permanent, and the tendency for cracks to form in the sticker means once you start placing actual sticker, you’re 100% committed. The best way to avoid this happening is to leave plenty of margin around your sticker, so you can line up the transfer material before the sticker adhesive ever touches your target surface.
The finished product is clean, professional, and looks great!
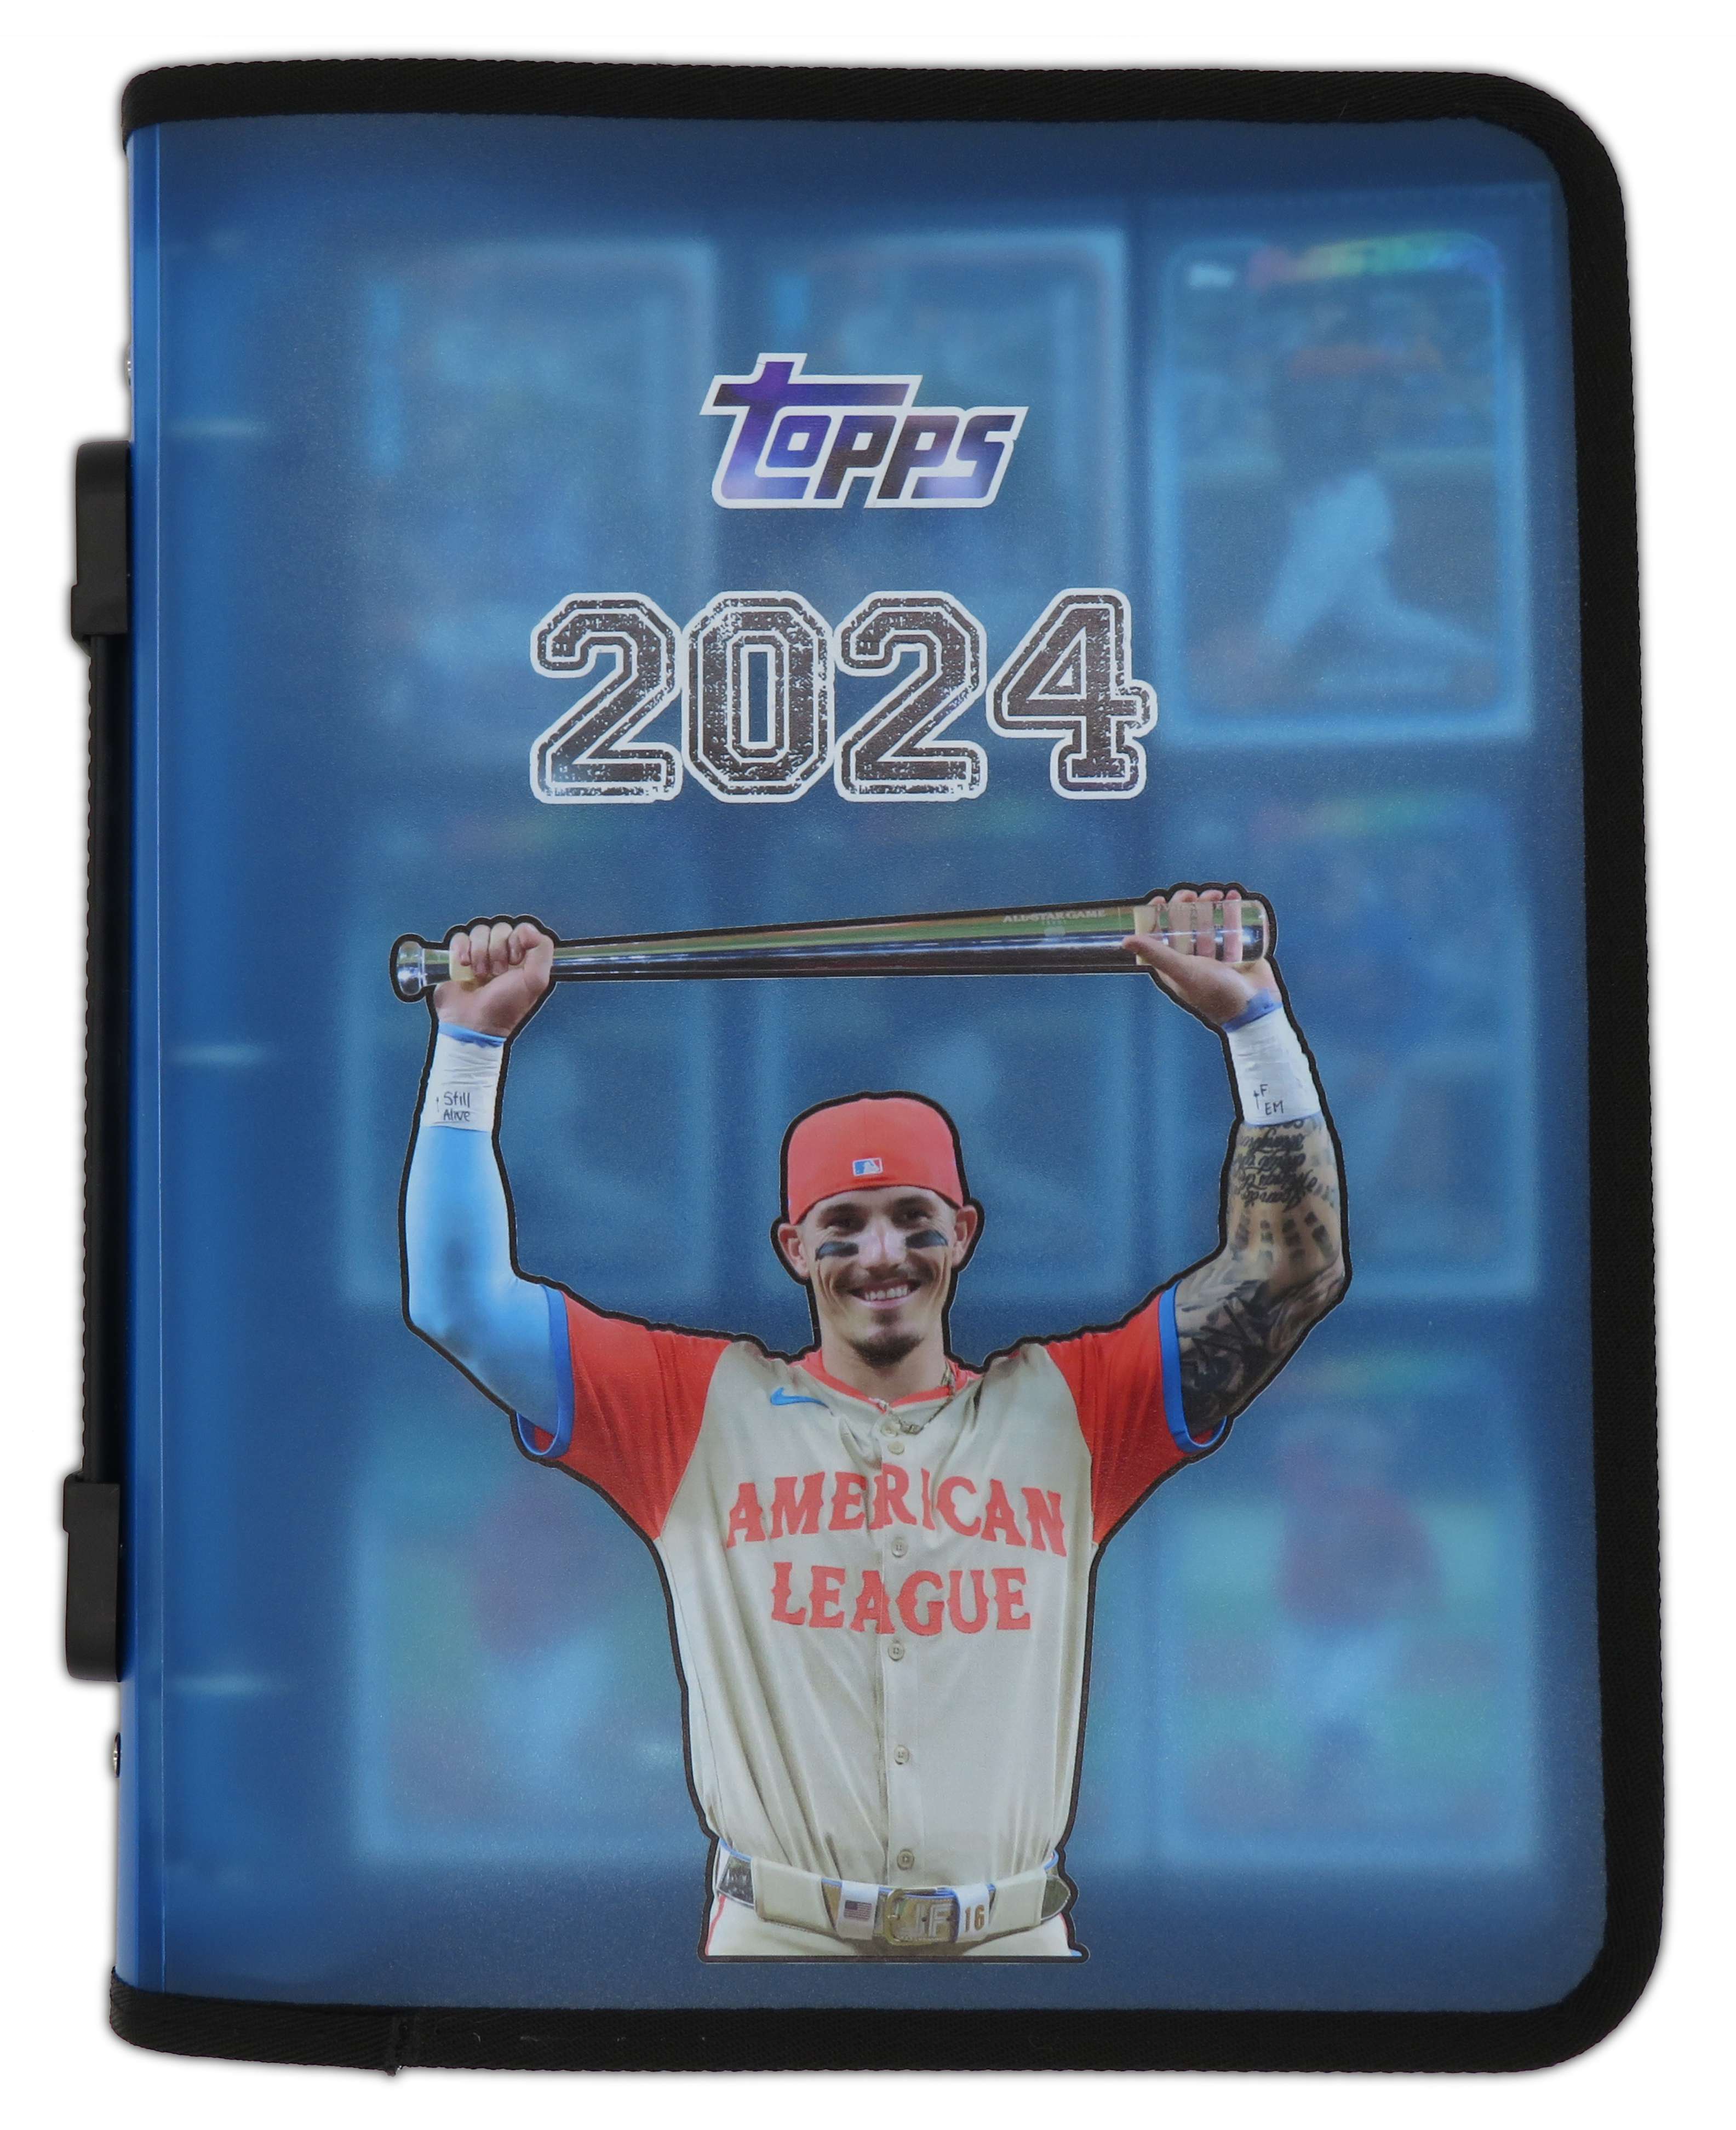
Double-sided stickers are great on polypropylene products, since these often are made with somewhat translucent plastic – and even thin opaque poly is translucent with print placed directly against it.
The ins and outs of UV decals
Lesson One: All polymers are not equal.
This is the preface to all UV printing. Curing polymer resin requires a surface that can accept that resin and hold onto it. There seem to be two primary factors at play here: surface (free) energy and molecular structure, which practically applies mostly to polymer substrates.
Surface free energy, or surface energy, is a scientific measurement which looks at the free energy available at the surface of a material (liquid or solid, but we really only care about solids here). This free energy exists because molecules at the surface of a solid have fewer neighboring molecules with which to bond, and those molecules are such that they have excess energy (the molecular structure factor). Low surface energy is the magic behind polytetrafluoroethylene (PTFE, also known as Teflon), and it’s the magic behind pretty much every As Seen on TV nonstick cookware on the market today. Certain polymers are manufactured with very long chains of molecules that are so tightly bonded, they can’t react with anything that contacts them. This is good for cooking, but bad for printing, since it means ink doesn’t hold on well to certain polymers.
It also means it’s very easy to make UV resin decals that aren’t adhesive at all, so you can work with them more easily. Polypropylene – the thin, textured plastic used to make inexpensive poly folders, binders, and envelopes – has very low surface energy. Thia makes it an excellent material for both catching overspray from full-bleed UV prints, and as a temporary substrate for printing UV decals. Because the resin is printed on a microtextured surface, the back of the sticker is slightly textured, which makes for a better adhesive bond, no matter what adhesive you use.
If you want to decorate polypropylene items, stick with the A-film adhesive, or a similar permanent acrylate adhesive. The stickers I made for the baseball card binder seem to have bonded very well – the edges don’t pull up at all, even when the cover is curved.
Polyester-based polymers, including polyethylene terephthalate (PET), have higher surface energy, but the specific molecular structure of polyesters means UV ink doesn’t bond at all (I think – this is a specific interaction I still don’t understand myself!). It’s easy to find PET and polyester films that are perfectly smooth, and if you print on these substrates, the underside of your sticker will be smooth and glossy. If you print a mirror of your sticker design, you can use this to your advantage, using the glossy side as the sticker surface.
A tiny detour…
There’s a lot more to this story, if you’re interseted in the finer points. Sublimation blanks use polyesters, because sublimation ink only bonds to polyesters. There are potential workarounds for this, when dealing with hard blanks that have a baked-on enable sublimation treatment. That whole molecular structure bit can be temporarily altered through several means – flame, plasma, and corona treatments use exposure to a whole lot of energy to disrupt the molecular bonds on the surface of the material, making it more receptive to ink. This disruption is impermanent, though, and you typically need to print shortly after treating your substrate. There’s more to the molecular chemistry, too, as my reading of industry and scientific literature has revealed that polypropylene in particular often can’t be treated after it’s initially produced and cured. Additionally, some polymers can’t withstand the heat of even a quick pass from a torch, so pretreating isn’t always feasible.
Since ceramic and metal sublimation blanks are relatively heatproof, I’m planning on doing some tests to see whether they are viable for UV printing. This is important – the white ink used by the E1 is expensive, whereas sublimation blanks are not only cheap, they are always bright white. If it’s possible to print on sublimation blanks, the E1 can be used to produce goods at a much lower per-unit cost.
For hobbyists and small outfits, the easiest way to experiment with pretreating polymer substrates is with a butane torch. Plasma and corona treatments require specialized hardware that is expensive to operate (because it uses so much energy). Since playing with fire is very dangerous, always do loads of research and check all fire safety protocols before attempting any sort of heat treatment on plastic!
Lesson Two: Printed UV resin is both flexible and fragile.
This is important. At a microscopic level, UV inkjet printing is laying down tiny dots of ink, which means the resulting print isn’t going to be a perfectly smooth, shaped layer of cast resin. While it’s quite flexible, it is susceptible to cracking, and once an edge cracks, it’ll spread far and wide, because the microtexture of the print doesn’t have enough structural integrity to maintain the print once it starts separating.
Regardless of the methods you might use for working with UV resin as a decal material, the sticker or decal is fragile. The PVC used by eufyMake’s system is thick enough to help, but it is not perfect – if your sticker is applied to a surface with any raised defects (or you accidentally wrinkle a tiny bit of the sticker), it’s going to crack, and a bit of resin will break off. eufyMake has signaled they’re working on an ink formulation that is softer and more flexible when cured, and this will probably be a considerable upgrade in print durability.
This being said, the material is very amenable to smooth, curved surfaces. It should be possible to apply a full face decal to an unfinished (sanded) electric guitar body, for example, with a contoured face, using PVA glue as both the adhesive and the sealer over the print.
Lesson Three: You don’t need to print on adhesive.
Because a high-resolution (1440dpi) UV print is sturdy enough for gentle handling, you can make decals with your eufyMake E1 printer with nothing more than the appropriate acrylate glue for your target surface. Mod Podge, which is a watered-down PVA glue and sealer, works great, which means PVA-based wood glues will work, too. The great thing about water-based PVA glues is that they’re slow-setting, so you can shift the position of your decal until it’s exactly perfect every time without too much frustration and mess.
Cyanoacrylate glues (i.e. Super Glue, Gorilla Glue, Krazy Glue) will work fine, but they’re too quick-setting to be very useful for UV decals, unless your target material demands it. I used PVA glue to secure a reprinted colored surface of a failed 3D texture print, and it worked really well.
Lesson Four: Polymers are complicated!
I’ve learned more about polymers in the last month than the entire rest of my (long) life. If you’re still on the fence about buying into the eufyMake E1 Kickstarter, my recommendation is to consider how willing you are to get scientific about your projects. It’s going to take both experimentation and real research – including reading scientific research papers on the properties and behaviors of polymers – to get the very best results, especially since UV printing is brand new in the consumer market. There’s not a whole lot of information out there for non-commercial users, so your willingness to experiment will go a long way toward successful results in any project involving this system.
The need for adhesive or glue (as opposed to printing the UV resin directly) is totally dependent on your substrate. In my experiments, ABS plastic, which is the material used for most hard LEGO parts (transparent pieces are made with polycarbonate) holds onto UV resin really well. Polyester hates UV resin and releases it without any effort at all – I was able to lift the entire ink layer off my sublimation dog tags with nothing more than a piece of Kapton tape. I’ll need to do some experiments to figure out whether sublimation blanks are viable for UV printing.
Final Thoughts
I really love my E1, but I don’t think this lamination system is a very good buy, unless you plan on doing high-volume production. I obtained superior results by using my more manual method, and for my needs, I’m definitely going to continue using my process for the majority of my projects.
I also don’t think high-volume UV stickers are a good use of this hardware. Since I published my original review, eufyMake has announced the pricing and warranty options for the printhead. It’s a costly – and totally proprietary – part, clocking in at $600 per replacement. Stickers printed with eufyMake Studio’s sticker mode will wear the printhead out faster than doing simpler three-layer prints like what I’ve detailed in this review, and it may be that the cost of replacement printheads is too high to make high-volume sticker production economically viable over the longer term.
If you’re interested in making UV stickers more than anything else, you’re probably better off investing in a (much) more expensive printer designed for this purpose. Everything is more automated, making the total process less tedious, less wasteful, and less error-prone. Otherwise, figure out a process that works best for your needs, and save your money on this particular accessory.
What I like about the eufyMake UV DTF Laminator system
I can’t figure out a real need for this product, to be honest. I might be missing something in the utility of how it works, but for me, it doesn’t serve any useful purpose.
What needs improvement?
The hardware itself is too expensive for what it does, and the refills are undoubtedly expensive, if only because rolls of transparent PVC aren’t cheap to produce or ship.
Price: $1970.00 (E1 and UV laminator bundle)
Where to buy: Kickstarter
Check out these other reviews!
- Liene PixCut S1 Photo Sticker Printer and Cutter review – Sticker fanatics will want this!
- Canon PIXMA G620 Photo Printer review (Part 3) – We can make stickers!

HP 14 Laptop, Intel Celeron N4020, 4 GB RAM, 64 GB Storage, 14-inch Micro-edge HD Display, Windows 11 Home, Thin & Portable, 4K Graphics, One Year of Microsoft 365 (14-dq0040nr, Snowflake White)
(as of April 11, 2026 11:29 GMT -05:00 - More infoProduct prices and availability are accurate as of the date/time indicated and are subject to change. Any price and availability information displayed on [relevant Amazon Site(s), as applicable] at the time of purchase will apply to the purchase of this product.)