REVIEW – Can the Toshiba ML2 EC10SA-BS 8-1 Countertop Microwave with Air Fryer Microwave Combo, Convection, Broil, you name it, really accomplish all that it is advertised to do? Read on for a complete breakdown of this full-featured kitchen appliance.
What is it?
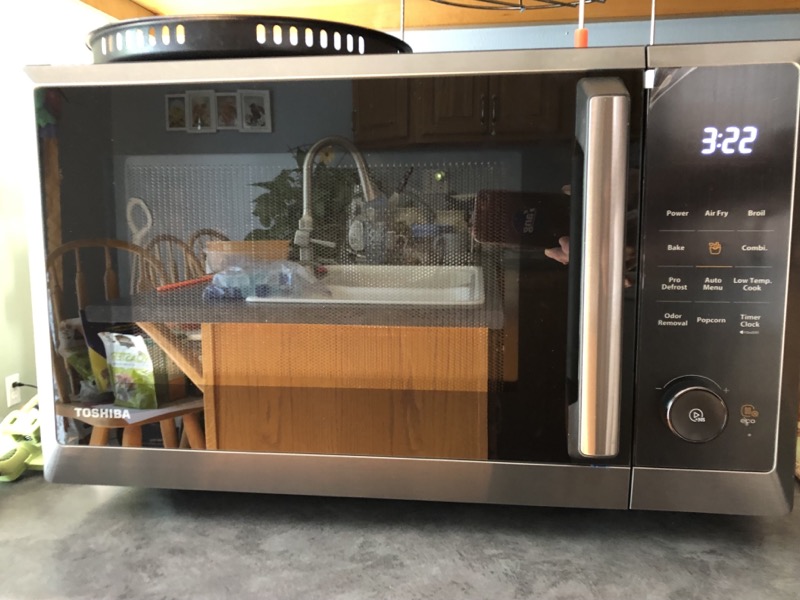
The Toshiba ML2 EC10SA-BS 8-1 is a one cubic foot countertop oven with many capabilities. At the highest level the modes are Microwave, Convection Oven, Broiler, Griller, Air Fryer, and combinations of these. In short, it is a tough product to summarize in a sentence or two.
What’s in the box?
- The Toshiba ML2 EC10SA-BS 8-1 oven itself
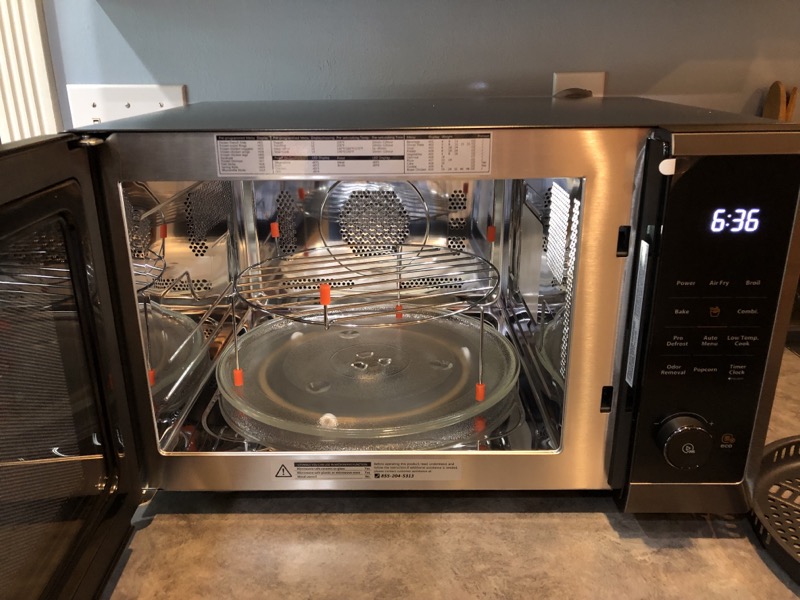
- Glass Turntable
- Turntable Ring Assembly
- Turntable Shaft
- Bake-rack
- Bake-tray
- Instruction Manual
- Recipe Book
Setup / Operation
The setup for the Toshiba ML2 EC10SA-BS 8-1 microwave is straight forward. The components listed above under the oven itself are simply placed in the oven in their obvious places. The Shaft is placed in the bottom center, followed by the Ring Assembly, with the Glass Turntable on top of both.
The oven can get hot, and they have clearance requirements that should be followed. Basically, 3 inches for all sides, but the back, which can be as close as 1 inch.
The operation of this oven is not nearly as straight forward as one might be used to as it is not just a microwave oven, but also Air Fryer / Convection Oven, and has a broiler coil, plus some combinations. Both the included Bake-rack and Tray are not compatible with any of the microwave operations, and you really need to understand which features are, and which features are not, in use with the multitude of cooking modes. It would have been a much-welcomed feature had these two elements be not only oven safe, which they are, but also Microwave safe, which they are not.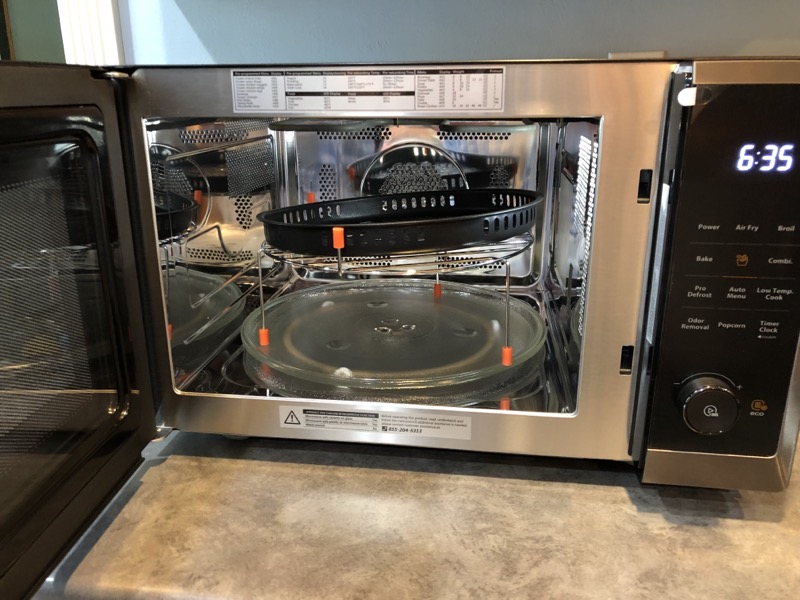
There is a table in the Toshiba ML2 EC10SA-BS 8-1 microwave manual that lists the following cooking modes as headings: Microware, Grill, Convection, and Combination. The left side headings of the table are the various cooking materials, plates, pans, paper towels, etc.
Right away you will notice that Air Fry is not mentioned there, and that is probably one of my biggest gripes with the product. This product is marketed as an Air Fryer and yet it is not even mentioned as one of the primary cooking modes in this table.
Before I get too far, I need to comment on the quality of the manual. The manual is just not consistent and really lacks a bunch of what I feel would be relevant information given the complexity of this product. It is very superficial in lots of areas. I hope to highlight some of that stuff in this review, but it will not be my goal to completely review the shortcomings of the manual as there are far too many.
One of the very first things I noticed is that some things are just not worded correctly. Check out the instructions for setting the clock (manual text in italics).
Suppose you want to enter the correct time of day 12 min 30 secs.
Nobody enters only minutes and seconds for the time of the day. After 10 reads I think they are trying to say that the normal minute part of the microwave time display will hold the hours and the seconds part will hold the minutes. I do not think I have ever seen instructions where the display only has a minutes and seconds display go through the gymnastics that this instruction manual does to instruct one on setting the time.
Additionally, with respect to the clock, every single example that involves setting the cooking time, refers to that value with the phrase Enter the correct time of day. This should clearly be, enter the desired cooking time, or something along those lines.
Lastly, with respect to cooking time, the Toshiba ML2 EC10SA-BS 8-1 microwave does not include a numeric keypad. Instead, cooking time, and other selections are entered by turning a volume like knob at the bottom of the front panel. In short, it is a very inefficient way to set the time for anything. Basically, with the wheel, which also has an embedded button (Start/+30Sec ) which acts as an enter-button for the system and adds 30 seconds for microwave only tasks, requires many turns to set a cooking time at 6:30.
Here is how the circular input device works. The first click in the clockwise direction sets the cooking time to 5 seconds (00:05), and each click adds 5 seconds until 1 minute is reached. At that point, each click increments the time by 10 seconds up to 5 minutes. From there the increments are 30 seconds per click, up until 6:30. Here is the complete breakdown.
- 00:05 – 01:00 by 5-second increments
- 01:00 – 05:00 by 10-second increments
- 05:00 – 10:00 by 30-second increments
- 10:00 – 30:00 by 1-minute increments
- 30:00 – 95:00 by 5-minute increments
It should be clear to anyone that this is just not the most efficient way to do this. There are 39 clicks if I counted that right to set a cooking time of 6:30. Compare that to ‘6’, ‘3’, ‘0’ ‘start/enter’ like many microwave ovens support. Forget 6:15 as there is literally no way to get to that. Very limiting. For completeness sake, counterclockwise rotations perform as expected in the opposite direction.
Design and Features
As was mentioned above there is some confusion in the manual, where Air Fryer is mentioned on the front page and is in the actual product name however it is not mentioned in the materials to be avoided table. In addition, there is no icon for the Air Fryer in the display, however there is a front facing control button for it. The icons which can be displayed are for; Microwave, Grill, Conventional Cooking (selecting Air Fryer function will also use this), Defrost, Child Lock, Auto Menu, Timer Settings, Oz (for entering in food weights) and a Temperature Indicator Bar.
I am going to go through each feature/function of the unit as they appear in the manual as I feel it may contribute to the unit’s focus on the features.
Microwave: This is the main feature of the unit in my opinion. There are two ways to invoke the microwave. The first and easiest way is to just hit the overridden Start/+30Sec button in the middle of the timer dial, which will immediately start the microwave and add 30 seconds to the time. Continued hitting of the button, will add 30 seconds to the cooking time, possibly up to 95 minutes.
The second method involves hitting the front facing Power button, and then either continuing to hit the Power button to modify the power level by 10% from PL100 (100% power) down to PL0 (0% power) or rotating the rotary time dial mentioned above on the bottom of the unit to select one of the 10 power levels. Once one has the power level they want, they can hit the Start/+30Sec button (acts like enter in this situation) and they are next expected to enter the cooking time. This is accomplished as one would expect by the rotary dial at the bottom. Once the cooking time has been entered, push the Start/+30Sec to begin the cooking process. One thing to keep in mind is that once the power level has been selected, the user has no way to modify the power setting. Not sure how common that is, but our other microwave oven allows for that.
Broil (Grill) Cooking: This feature is initiated by hitting the Broil button. After doing so a G-1 is displayed. This is the only choice, so I am not sure why it is presented to the user. From there, the user selects the cooking time. There is no setting of the temperature like in some of the other modes. Since the broiler is located at the very top of the oven, I would think one would have to use the Bake-rack to get the food close to the heating element.
Combination Cooking: Combination Cooking utilizes the microwave and the convection oven, or the broiler (grill). This is one of those features that the user needs to be cognizant that the microwave is being used, and therefore they cannot use either the Bake-rack or Tray. When the user presses that button, C-1 is displayed. If they hit it again, C-2 is displayed. C-1 seems to be 25% microwave along with the convection oven while C-2 seems to be microwave at 40% along with the broiler. Both of these microwave power values were constructed by me timing the cycle of the microwave and calculating the result. There is nothing mentioned in the manual about how to use these settings and how one would modify the microwave time suggestion to even know what to set the cooking time at. So, the way this feature works is you select either C-1 or C-2, based on whether or not you want to combine the microwave with either the convection oven or the broiler. Then you dial in the cooking time and hit Start/+30Sec to begin the cooking process. One of the challenges of this cooking mode is finding a cooking utensil (pan, paper, etc.) that is both Microwave and oven safe at the same time. You can’t use paper and you can’t use metal.
Convection Cooking: Here is where things get a little confusing. The steps for this are to hit either front facing Air Fry or Bake button. This seems to indicate that the oven’s Air Fryer capability is literally no more than a standard convection oven’s capability. Note again that both of these share the same display icon when the oven is operating in either mode. Convection / Air Frying both allow the oven to be pre-heated. This is done by hitting the Start/+30Sec after setting the desired cooking temperature twice. The user can skip the pre-heating, by hitting the Start/+30Sec button once, and then dialing in the cooking time. When selecting the desired cooking temperature, you might have noticed that the previously mentioned Temperature Indicator Bar had some activity while you were picking the temp. The segment at the bottom will move from the left to right as one increases the desired cooking temperature. As the temperature increases (during pre-heat, or if skipped, while it is heating up to the desired cooking temperature) the segment will grow up to the segment corresponding to the cooking temperature. The unit will beep once it has reached that temperature. At that point, you simply place the food in the unit, shut the door, and set the cooking time, then hit the Start/+30Sec button to initiate the cooking sequence.
Home Fry Presets: This might be where the Air Fryer marketing feature is derived from. There are 10 automated predefined cooking times for things like frozen French fries, onion rings, chicken nuggets, wings, legs, escalope, fish sticks, spring rolls and mozzarella sticks. This function is invoked by selecting the front facing, yellowish French fry looking button in the center of the controls, and then rotating the time dial to display H1 – H10 on the display which corresponds to the item you are cooking. Thankfully, the definitions of each of these are located on the inside front of the oven when the door is opened. This is true for the other symbolic codings the unit has. Please refer to the picture of definitions screen to see what each value corresponds to.
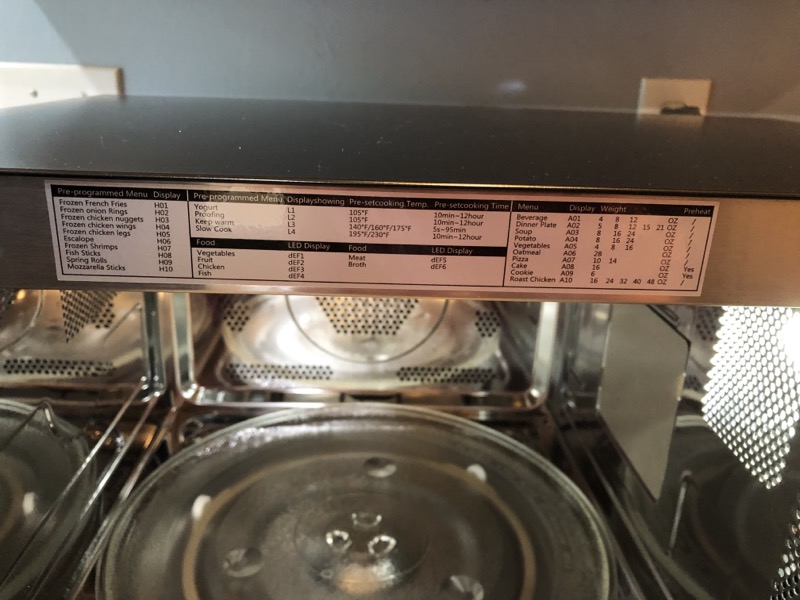
Low Temp Cooking: This is a unique cooking mode which I did not get to test. There are 4 settings, for yogurt, proofing, keep warm and slow cook, identified with L1 – L4. These temperatures range from 105 degrees F up to 230 degrees F and from 10 minutes – 12 hours (yep 12 hours!) depending on the setting, and like with other presets, they are defined on the inside front of the oven when the door is opened.
Custom Defrost: This is accessed by the Pro Defrost button on the front panel. Once hitting this, the user is presented with DEF1 – DEF7, using you got it, either the rotating dial, or continued hitting of the Pro Defrost button. These values correspond to defrost settings customized to the special defrost demands for Vegetables, Fruit, Chicken, Fish, Meat, Broth, and Timed defrost. After selecting the desired custom defrost setting, the user is presented with a method to enter in the weight of what is being defrosted. I spent a little time trying to understand what the oven does in these modes. I selected 10oz for each setting DEF1-DEF6, and as expected there are differing defrost times. The shortest was associated with Fish (DEF4), with the longest associated with Meat (DEF5). There were three groupings that I noticed. DEF4&6, at a little over two and a half minutes are the shortest, DEF1-3 are about a minute longer, and DEF5 being about three and a half minutes longer that those middle values. I did a deep dive on three of the settings, and in all three there is close to a 50/50 duty cycle (50%) for the magnetron being on and off for the first half of the defrost period, followed by the second half being on for 17% of the time until the end. Before I understood this I defrosted two pork steaks, weighing 24oz, which resulted in a total defrost time of 15:36. The manual states that when 40% of the defrost time is done, the unit will beep twice to all you to turn over the item and continue the defrost. At that time, I thought the edges of the once frozen package felt really warm. Not knowing what the second half would be like at this time I just stopped the process. When I was ready to cook the meat, I noticed some cooked pork on the edges. Knowing what I know now, leaving the meat in for the duration of the defrost time might not have resulted in much more cooking of the meat since the cycle time was about 5 seconds on followed by 25 sec of it being off, up until the end of the defrost time.
Popcorn: There is a front facing Popcorn button, and after hitting it, the user is presented with three specific popcorn package sizes, 2.7, 3.2 and 3.5 oz, accessible by you got it, the rotary dial or continued hitting of the Popcorn button. Now I think all microwave popcorn that is purchased today explicitly states not to use the Popcorn feature of the microwave. The particular brand that I had specified that there is almost never a need to go more than 4 minutes. Selecting 3.2 oz (my package size) resulted in 2:30 of cooking time, and the popcorn was popped almost completely. Very nicely done.
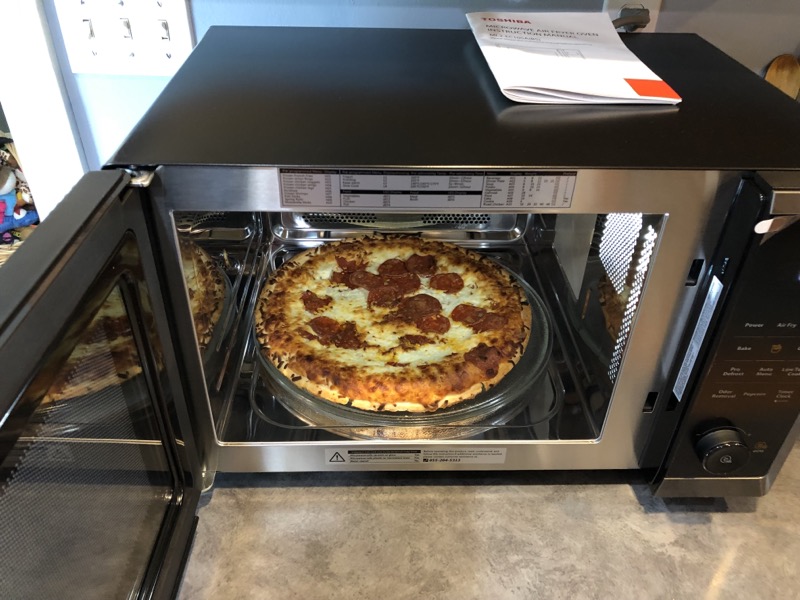
Auto Cook: This front facing button is where the user has access to 10 auto cook microwave / convection modes, A1-A10. The cooking presets are Beverages, Dinner Plate, Soup, Potato, Vegetables, Oatmeal, Pizza, Cake, Cookies and Roast Chicken, again viewable on the front with the door open. Choosing most of these will result in a further selection based on the weight of what is being cooked. In addition, some of these selections have varying microwave settings, preheats and combinations of both convection and microwave, depending on the selection. The user will need to be aware of when the microwave or convection is being used so as not to utilize metal in the microwave, or paper in the convection oven.
I tried the Pizza (frozen) setting twice, selecting 14 oz as the pizza size. Since this is using both the microwave followed by the Air Fryer / Convection Oven you can’t use the included cooking rack or tray in the beginning. The preselected cooking time was set to 14 minutes, and the microwave runs for the first 4 minutes, with only the Convection Oven being utilized for the rest of the cooking time. What I did was place the frozen pizza on a piece of parchment paper, and then placed it on the Bake-Tray on the top Bake-Rack to finish up the cooking time. The busy display video shows this on the second step. The following picture shows the result putting the pizza on a Corelle plate and just leaving it there for the entire cooking sequence. I thought it did a good job. Using the parchment paper method resulted in crisper crust.
Miscellaneous: There are some other interesting features that are really not cook modes but are worth mentioning about the unit.
- There is a lock function where you can lock out the keyboard to prevent a child from accidentally starting the oven.
- There is an energy saver mode, which will turn off the display. I connected a watt meter, and the savings was a paltry 180 milliwatts. If one extrapolates that out over a month and assume $.10 per kWh it would have saved a whopping cent. I think more meaningful marketing for this feature is that there is a way to black out the screen on the oven. This allows the oven to be completely black and therefore would not be annoying if it were visible from a sleeping area, dorm, studio, etc., i.e., it will not keep you awake at night.
- There is a turntable reset feature that will return the turntable to the starting position after the cooking mode is done. Think of putting a cup of coffee in the oven to reheat, and you have the handle facing out. When the oven is done, the turntable will be rotated back to where the handle is facing out after it is done so you can take it out. Kind of cool.
- There is a deodorizing function where the fan is run for 5 minutes to air out the inside of the oven. I have used this to cool down the oven almost after each use that involves the convection oven or broiler.
- The beeps of the oven can be muted. This is nice if you want the oven to operate almost silently.
Lastly, I want to talk about the Toshiba ML2 EC10SA-BS 8-1 microwave’s display. There are a lot of things blinking on and off while the oven is in use, depending on the mode of operation. In the busiest modes, there is the time changing as well as the Temperature Indicator Bar segments blinking, possibly two icons for the various modes. I would like to see the display just illuminate any active mode icons vs having them blinking at almost the same rate as the time. This almost the same rate results in just constant chaos on the display in my opinion as the icons move in and out of sync with the clock throughout the cooking cycle. When the oven is used in some of the more complex modes of the unit, you sometimes get a Christmas tree of lights look.
Some Specs
- Rated Input Power (Microwave) 1500 watts
- Rated Output Power (Microwave) 1000 watts
- Rated Input Power (Grill) 1150 watts
- Rated Input Power (Air Fry) 1800 watts
- Oven Capacity 1.0 cu ft
- New Weight Approximately 40.6 pounds
- External Dimensions 20.5 x 20.0 x 12.8 inches
What I Like?
- Lots of features
- Deodorizing function
- The Black and Stainless-steel design is very pleasing to the eye.
What I’d Change?
- The manual needs to be updated in many areas.
- Rotary Dial for the inputting of cooking time.
- Busy Display when unit is in operation.
- Equating Air Fryer to a Convection Oven
- The Bake-tray does not fit cleanly on the Bake-rack. It is a tad too large to easily place the Bake-tray on the low setting.
Final Thoughts?
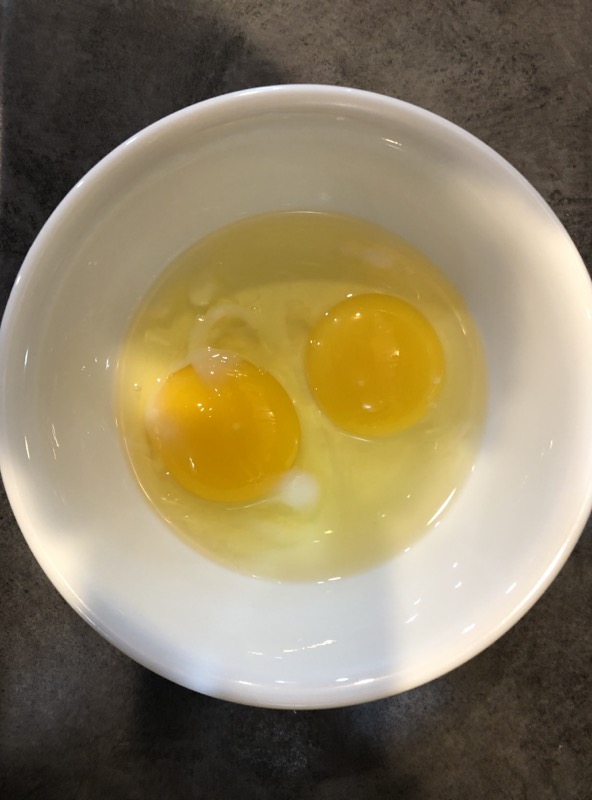
After spending some time with the Toshiba ML2 EC10SA-BS 8-1 microwave, I am still not convinced it is an actual air fryer. In fact, I wrote the previous line before I did one final test. My Alaskan cousin told me that their air fryer did an awesome job cooking hard boiled eggs. She shared the recipe (https://feelgoodfoodie.net/recipe/air-fryer-hard-boiled-eggs/) that she used (check out the video in the link), and I proceeded to attempt it with two eggs in the this oven. I was so excited to partake in some air fried hard-boiled eggs. So I preheat the oven to 250, and put the eggs in and set the cooking time to 15:00. This last photo illustrates the results of this test.
I think you can see that as an air fryer, the Toshiba ML2 EC10SA-BS 8-1 Microwave / Air Fryer oven falls a little bit short.
Ignoring that failure, it does have a lot of capability in one single unit and in a kitchen with limited counter space, the many features of the Toshiba ML2 EC10SA-BS 8-1 are more than welcome. I must admit that given how poorly the documentation is that came with the oven that it has kind of grown on me some, although this dropped somewhat after the hardboiled-egg test.
Finally, the Toshiba ML2 EC10SA-BS 8-1 microwave is small, and I worry about the probability of burning oneself when using the oven in any of the non-microwave modes. The oven is very tight and when using the Bake-rack it takes a conscious effort to not touch the very close stainless-steel sides of the oven when placing or removing food into or out of the oven.
Price: $229.99
Where to buy: Amazon
Source: Toshiba provided the unit to review. Note that this unit is not available on their website.

HP Pavilion 15.6 Laptop Computer for Daily Work & Student Home Study, Lifetime Office 365, Intel N100, 16GB RAM, 512GB SSD, Fast Charging, Long Battery Life, Windows 11 Home, Type-C to RJ-45 Cable
(as of May 19, 2026 09:11 GMT -05:00 - More infoProduct prices and availability are accurate as of the date/time indicated and are subject to change. Any price and availability information displayed on [relevant Amazon Site(s), as applicable] at the time of purchase will apply to the purchase of this product.)
Gadgeteer Comment Policy - Please read before commenting
Where have all the microwaves with a numeric keypad gone? I moved back to the US last year after four years in Australia, and when I went shopping for a microwave in Wal-mart, out of maybe 10–15 models exactly ZERO of them had a keypad for input. Is it so much to ask to be able to just input a time in a few key presses?
In a way, though, this turned out to be a blessing in disguise, since in the process of spending more time trying to decide which to get I noticed one (by Galanz) which, similar to the one reviewed here, had microwave, air fryer, and convection capabilities. I ended up getting it and I’ve been quite happy with it; it’s actually replaced my oven almost entirely except for particularly large pans that won’t fit in it. (Unlike this one it has buttons for things like +5 minutes, +1 minutes, +10 seconds, etc., which I have to grudgingly admit generally work pretty well with only a few extra button presses over a keypad.) I find the form-factor more convenient than that of more “traditional” standalone air fryers, and I’m not sure I could go back to having “just” a microwave now.
One minor note to end on, I’m not aware of a material that could be used to make the baking tray etc. both oven-safe AND microwave-safe. They need to be sturdy and heat resistant for the oven mode, but can’t be metal to be used in the microwave. Maybe very thick silicone, but I’m not sure that’d be sturdy enough.
Cheers!
Thanks for the comment!
I do agree that the all in ones do have a very nice feature set and am literally always trying to think of new ways to use it.
The + buttons of 10 sec, 1 min and 5 min does sound like a better solution than the radial dial. Can you take time off if you over shoot?
The combination features of the oven are really interesting, however the included rack/tray cannot be used in those modes.
As for the one true microwave/oven safe rack/tray. I purchased one of those microwave oven cooking plates which said it was good up to 425 F I think it was, but it was just a tad too wide to allow for it to rotate in the oven, so I did not get to use it. But I am wondering if something could be created with material like that which could be used. I think if it could, it would be a very popular addition to these kinds of ovens.
For completeness, there’s a +5 minutes, +1 minute, and “+” and “−” buttons which add or subtract different amounts, depending on the mode you’re in. If you’re microwaving something (the default), they do 10 seconds, while in setting up a baking or air frying duration they instead work in 2 minute increments. (You can also hold any button down to speed up long durations.) I’m still grumpy about not having a keypad, buy I have to admit, in fairness, that it works fine; I rarely overshoot (and not for any particular skill on my part), and when I do it’s simple enough to correct that honestly doesn’t bother me much.
Yeah, there might be materials I’m not familiar with out there that would work. The unit I have only goes up to 400 °F so something like that would probably work if it fit.
Just wondering if you read any of the reviews for items tested on Amazon? I always start with one star.
You know to be fair, I read some from all the categories. More so to learn about the oven. I even watched some YouTube vids! I don’t think I used any input from anything I saw to really influence my review. Just to understand more about it in general.
WHERE can I buy this in UK?
Unfortunately, I am not sure. Is it not available on the Amazon UK site?
We have had ours for about 2 years now. I rank it up there with my LG TV as one of the worst appliance purchases I have ever made. And I have made some doosies. The Mircowave is hard to operate. Why not a number pad? Sometimes I just want 18 seconds. (heating home made dog food is a delicate task.) I would have learned to live with that. Just set it, walk away for a few and it cools correctly. Except you do NOT want to walk away from this microwave. It will randomly start adding minutes to your clock. I just came back from heating some sausage gravy for 2.5 minutes. I found the clock showing 16+ minutes on the screen. How dare I try to get a bathroom break in while microwaving? Then I tried to cancel it. The thing refused to cancel. you have to open the door while in operation to get it to stop. Thankfully that does work. For now.
This all started shortly after buying it. I have a pretty busy life. taking time sit down and corresponding with CS and boxing up a heavy object for return is not a good use of my time. Most days that would cost me as much as it would to just keep it.
This product was crap from the time it left the box. there is no fixing that. And my experience is that these companies at best want to send you a different pile at best. So I have learned to live with it. BUT don’t make my mistake.
I totally agree that the rotational dial is just not a good input device for a microwave oven. Not as bad for the other features, however in both cases, just not efficient for keying in larger values.
I have not ever noticed the time auto incrementing. I wonder if you have some kind of hardware issue that is causing that on your particular unit.
Hi Dwight,
I rather enjoy this microwave and my LG C3 TV. We seem to have complete opposite taste. Any other items I may enjoy?
I just bought the 7 IN one and made the perfect Sunny Side Up Eggs in 5 minutes with 370 F
Ruthy,
Interested in more details as that is a fried egg. Did you preheat? What did you put the eggs on/in?
I put only 2 eggs. I have to say that I am not happy with my new 7-1 as it is in the function of guess on Air fryer H1-H10. and I think I am going to return it. They sell it as Microwave Air Fryer and it is not good for someone that cooks in an Air fryer stake. and I have another issue with how safe to take out the tray. My silicone glave too big for that function.
I have a question about the Toshiba ML-EC10SA: what is the difference between the Air Fryer and Bake function?
I could not find one, and if my memory serves, there was no difference identified in the manual either.
Do you read any of the reviews for the products that have been evaluated on Amazon? I always count out one star first. Thank you.
Sanjida,
I am not sure I understand your question? I read many reviews on this product during my review.
It’s very helpful information. Thank you.
It’s very useful information. Thank you.
Given its size and multi-use convenience, I really want to like this oven enough to buy it. The other Toshiba combo ovens use inversion and we don’t want it to interfere with the Wi-Fi. I have seen reviews where people said that you CAN use the rack and pan in combo mode as the microwave doesn’t run for more than a few seconds at a time so doesn’t present a problem. I wondered if you’ve tried testing this. Thanks.
Kathy,
I did not test this mainly because the manual specifically calls out that the microwave function cannot be used with the tray and rack. In addition there is a table in the manual listing all the cooking modes, where both the rack and tray are listed and they are not to be used in the combination mode either.
Sorry.
I have the rather large TOSHIBA 7-in-1 Countertop Microwave Oven.
On it, pressing Broil/Convection shows the “G-1” you saw, and turning the knob allows a temperature to be selected: 100°F, 150, 250, 275, 300, 325, 350, 375, 400, 425. Setting the temperature changes to the fan icon, whereas on G-1 it shows a sine wave icon.
It has no “L” settings.
I agree, I *think* air fry is just convection with preset times, which feels like a rip-off.
Oh, and according to the manual for my 7-in-1, both wire racks and the air fry tray (solid) and the air fry basket (perforated) *can* be used in “Combi” mode.
Thanks for the thorough review!
T,
I am going to reply to both comments in this one reply.
Glad you liked the review.
Hitting Broil on my unit does not reveal temperatures, and only reveals time. Maybe the firmware of your device is different.
With respect to the using of the Tray and Rack with combination Page 17 of the manual specifically says in a caution at the bottom of the page the following:
“Only use the bake rack and bake tray when operation in grill or convection cooking mode. Never use in conjunction with the microwave function as this may cause arcing / sparks.”
As you stated the combination mode uses the microwave functions and therefore should not be used with the rack and tray.
In August of 2023 I purchased this multi-use oven. Toshiba made great laptops in the 1990’s, so I hoped this oven would be good Japanese engineering and ergonomics.
***It is CRAP!!!***
I could not even figure out how to start the microwave function without reading the manual!!! I could not find a “cancel” button anywhere (turns out there is one, doesn’t look like a button, and is labeled ‘eco’).
It is clearly designed and manufactured in China. The ergonomics are terrible. Think of the volume and channel knobs on your car radio — rotate clockwise to increase volume or move to a higher-freq. radio station. Turn this microwave’s knob clockwise, and the power-level of the microwaves goes down!
I heated 1 glass of water to see that it actually worked. I wrote instructions on a post-it note on how to use the microwave function for others in the house. I then boxed it back up and returned it — if I have to write instructions for others in the house to use the microwave function, this product does not deserve to be in my house.
I’m a product-design engineer (software and hardware) and if I could redesign the UI, I think this hardware could have some utility in the kitchen. It really would be cool to microwave a frozen pizza to warm it up (but then the crust is all wet and gooey) but then place the pizza on a rack and use a broiler and air fryer for 4 minutes to crisp up the crust! Sadly, to accomplish this simple take is impossible with the CRAP user interface.
===Oven Info===
Toshiba Microwave Oen
Model: ML2-EC10SA(BS)
Input: 120V~60Hz
Input: 1500W
Output: 100W 2450 MHz
Air Fry: 1800W
Manufacture Date: October 2021
FCC ID VG8XC028AYY
UL LISTED 54NJ E214180
BOG,
There is not much in your response that I disagree with. The interface is not good, no argument, and your final paragraph is exactly what I would like to see. The combination modes (conventional heat combined with microwave heating) are really clever but I could not find a cooking container (pan/plate/ whatever) which really worked well in that mode. I mentioned in the review that had they included that, then one could really take advantage of that useful and novel mode.
One question, did you see my review before you purchased the oven?
Sadly, no, I did NOT see your review b4 buying. I was in the store, oven was on sale, it was 15 minutes b4 closing, and I made an impulse buy. If I would have googled ” ML2-EC10SA(BS) reviews” and found your post, it would have saved me a big headache. Thanks for what u do. -Bog
Here in U.K.
I have the Toshiba 5 in 1
It does not come with Manual like the U.S. according to Toshiba so am at a lost to convert the supposedly Airfryer H01 to H10 etc etc
Anybody know these conversions?
Joy,
Sorry, I am not sure I understand your question. What kind of conversions are you specifically looking for?
Hi, Im Emma M. Crochet Thank you for such a detailed and insightful review! Your thorough breakdown of the Toshiba ML2 EC10SA-BS 8-1 Microwave oven with Air Fryer has been incredibly helpful. I appreciate the honesty about the manual’s shortcomings and your hands-on testing of its various features. It’s evident that you invested time in understanding the product, and your experience adds tremendous value for potential buyers. Keep up the great work!
Emma,
Thanks. Sorry for the delayed response.
I bought it BECAUSE it had a dial for the temp. I hate push pads. So far I like everything about it but it has a learning curve. True as a convection oven/air fryer it is slightly slower than my basket type air fryer but i like the larger capacity and have gotten used to lower rack or upper rack depending on what I am doing.
Ron,
You might be in the minority to favor that dial, but hey, that is why we have variability in all product lines. I am glad that you like it. Every time I set a time for over a couple of minutes, I pretty much curse that dial. 🙂
How do I do crisp jacket potatoes in this? The Air fryer mode only allows presets H01 to H09, none of which are for Jacket spuds. I’m hoping it would do a better and quicker job than my main oven which takes about 2 hours.
Our last Panasonic combi did them in 20 mins or so as microwave and convection, not as nice as the main oven but much quicker. I need this to be at least as quick as my old trusty Panasonic. So far we are not impressed by this Toshiba.
Neil,
I must confess that I had to look up what a Jacket Potato was. According to the internet, seems like they are the same thing as a Baked Potato, and is the term used in the UK. Learn something new every day.
First, I did not try cooking a Jacket Potato in the review, but skimming through the review, you would want to use the Auto settings (designated with A 1-10) vs the Home Fry settings (Designated with H 1-10) that you mentioned in your comment. There is a potato setting A-4. Interestingly, there is a further setting based on the weight of the spud(s) at 8, 16 or 24 oz, corresponding to 5, 9 and 12 minutes of combined microwave / convection oven operation.
I am not big on microwave baked/jacket potatoes so maybe this will give you what you are looking for, and will try this the next time I cook one of these, if I think of it beforehand of course.
Hope that helps
I was wondering about the practicality of setting with the knob. Thank you so much for the video and detailed explanation! NO ONE ELSE mentions it. It’s a deal breaker for me. So this saved buying and returning.