REVIEW – I am the type of person that is frequently working on something around the house, whether it be in the yard, garage, or attic. And when I’m working, I really get frustrated if I don’t have enough light to see. In some areas (the attic especially) having adequate illumination is critical. I have several LED headbands that I use frequently, but I find that I really go through the batteries because if I’m working for a few hours in the attic or outside at night, I have the light on constantly. So when the HEADSPIN Convertible Light System with a rechargeable LED light came available to review, I jumped at the chance to check this out.
I found that the HEADSPIN performs really well, and provides really bright light and is comparable to my other LED headlamps, and the Li-ion battery provides a long run time and quick recharging. It is ruggedly made and has four separate buttons to allow you to more easily select the mode (flood or spot) and intensity so you can select exactly the right amount of light and runtime. The flexibility to be able to use the light in a headlamp, rail mount, flashlight, or magnetic configuration is really awesome, although I found the headlamp to be the most useful. Unfortunately, the rail mount won’t work for some bikes with smaller handlebar diameters, and the magnetic attachment is somewhat weak. Also, it is somewhat expensive, but if that doesn’t bother you, then this is definitely a winner for the outdoorsman or handyman.
What is it?
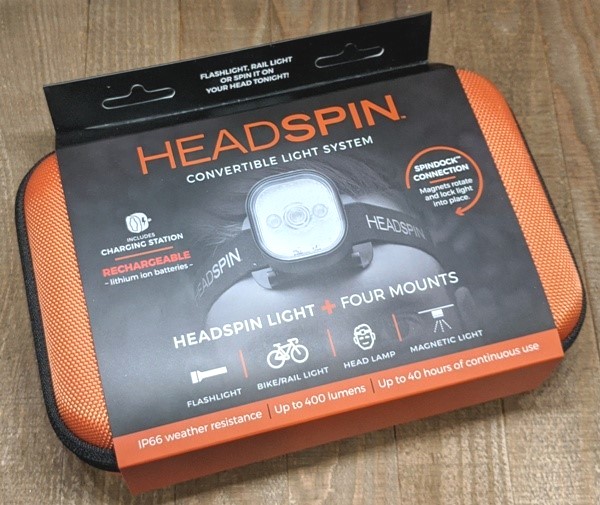
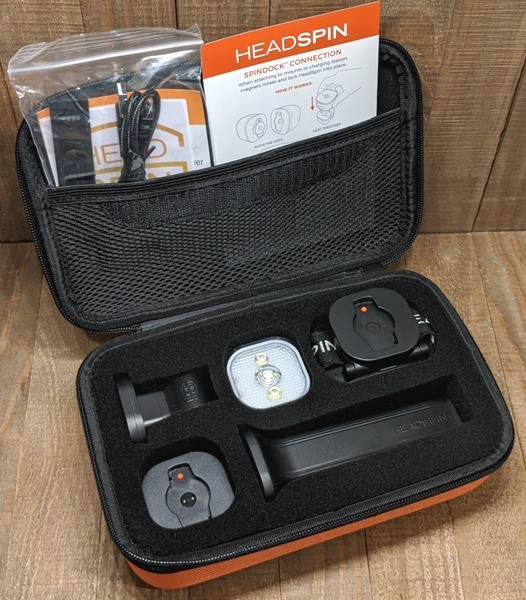
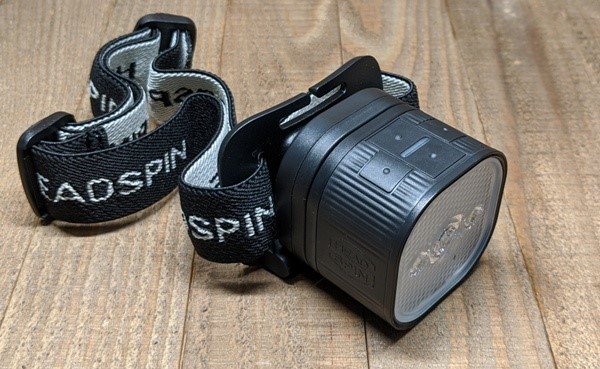
The HEADSPIN Lighting Kit is an LED convertible lighting system designed for outdoor use that contains a rechargeable LED magnetic light that can be attached to various types of mounts; headlamp mount, rail mount, and flashlight mount. This set also includes a wall charging unit, and all five pieces are organized in a rugged case. The light uses the patented SPINDOCK technology which allows the light to be easily attached and removed to each mount, yet remain securely fastened during use.
What’s in the box?
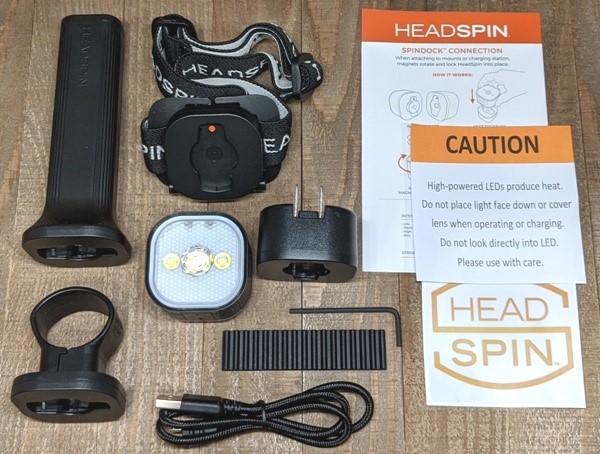
- HEADSPIN Light
- Wall Charging Station
- Headlamp Mount
- Flashlight Mount
- Rail Mount
- Grab-and-Go Case
- USB-A to Micro-USB charging cable
- Sawtooth Rubber Grip (for Rail Mount)
- Allen wrench (for installing Rail Mount)
- HEADSPIN sticker
- User Guide
- Caution Statement
Hardware Specs
LED Light
- Modes: Spot, Flood, Flash
- Weather Resistance: IP66 [Dust tight and protected against jets of water]
- Battery: 1700 mAh Li-ion
- Drop Test Rating: 2 m
- Weight: 2.2 oz / 62 g
- Brightness – Spot Mode
- Low – 10 lumens
- Med – 80 lumens
- High – 175 lumens
- Max – 330 lumens
- Brightness – Flood Mode
- Low – 10 lumens
- Med – 100 lumens
- High – 200 lumens
- Max – 400 lumens
- Runtime – Spot Mode
- Low – 30 hours
- Med – 7 hours
- High – 3.75 hours
- Max – 1.5 hours
- Runtime – Flood Mode
- Low – 40 hours
- Med – 6 hours
- High – 3 hours
- Max – 1.5 hours
- Memory: YES [The light will remember what mode it was last in when you turn it off and return to that same mode when turned back on]
Wall Charging Station
- Input: 110V – 240V / 50-60 Hz / 0.5A
- Output: 5V, 2.4A DC
- UL listed
Flashlight Mount
- ABS construction
- Weight: 3.9 oz (110.56 g)
Headlamp Mount
- Low profile design with adjustable strap
- ABS construction
- Four distinct tilt positions
- Magnetic “closed position”
- Weight: 1.7 oz (48.19 g)
Rail Mount
- Fits handlebar / rails 25 mm – 32 mm (0.98 to 1.26 inches) in diameter
- Sawtooth rubber grip for durable mounting
- Low profile design with a forward-facing mount
- Weight: 1.0 oz (28.35 g)
Design and Features
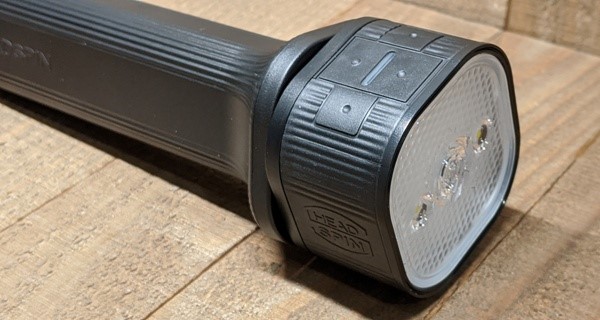
The HEADSPIN lamp is small and compact and enclosed in plastic. It appears to be fairly rugged and well sealed.
There are four buttons on the top of the light. Looking at the top with the LEDs pointing upward (as shown in the pic above), the upper button is the intensity control, which selects from four levels of light intensity (Low, Medium, High, and Maximum). Moving clockwise, the button on the right controls the Spot/Flood Mode, which allows you to select between the Spot or Flood mode (obviously). The button at the bottom is the On/Off button. It has a small raised bump to differentiate it from the other three buttons (the others have a single recessed detent) which makes it easier to find without looking. The button on the left controls the Flash Mode, and allows you to turn this off (where the light is constantly on) or on (where the light flashes about twice per second). The buttons are not labeled, so you’ll have to remember what they do, or just start pushing and you’ll figure it out. There is also a small LED light in the center that provides battery level indication. When the light is on it illuminates to provide battery level indication; it is normally green but will turn red when the battery is at about 5%. The light flashes during charging and goes off when the battery is fully charged.
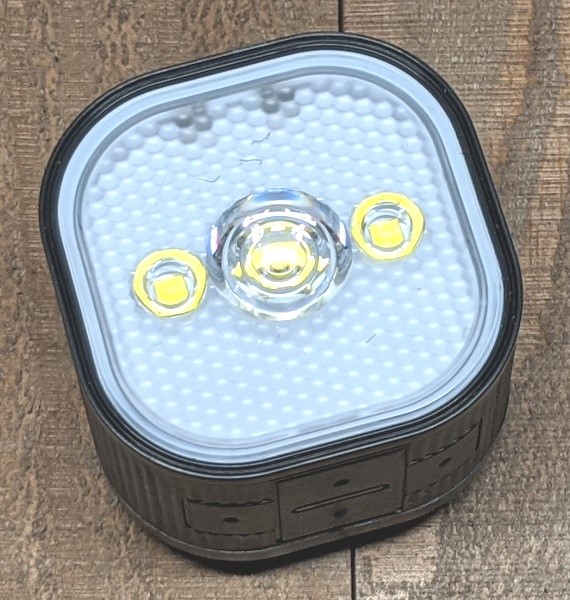
From the front you can see that the light has three LEDs. The one in the center is illuminated in Spot mode, and the two on either side are illuminated in Flood Mode. There are no modes that use all three at the same time (bummer). The plastic lens on the front helps to diffuse the light to provide a less harsh but more spread out illumination; even in spot mode it is fairly diffuse. Note that per the HEADSPIN website, the light output of the LEDs is reported in “usable lumens” which is a more realistic measure of how much light you actually get. Many manufacturers may be reporting the theoretical maximum number of lumens the LED can produce, but this does not consider thermal losses (the LED will produce less light as it heats up), optical losses (due to clarity of the lens), and assembly losses (due manufacturing tolerances). After all these losses are taken into account, the intensity of the light will be less than its theoretical maximum.
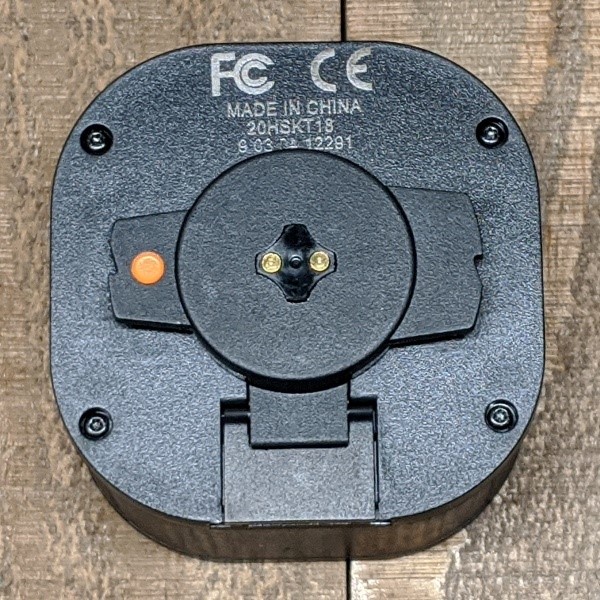
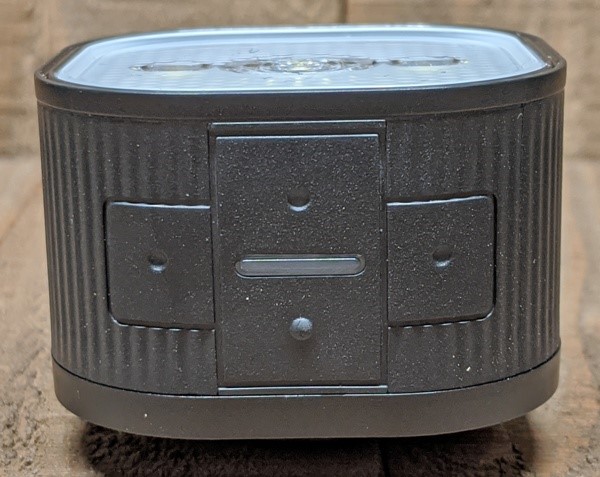
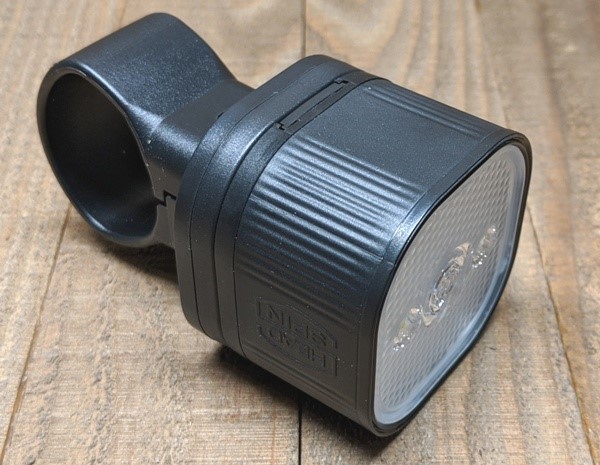
The back has the contacts for charging and a built-in internal magnet, plus the SPINDOCK tabs. The orange dot allows for easily determining the correct alignment. This SPINDOCK connection is configured to fit into any one of the various types of mounts as well as the wall charger. Note that there is also a small cover that can be opened to access the micro-USB charging port. To open the cover you slide it out with your fingernail and then it swings open to expose the port.
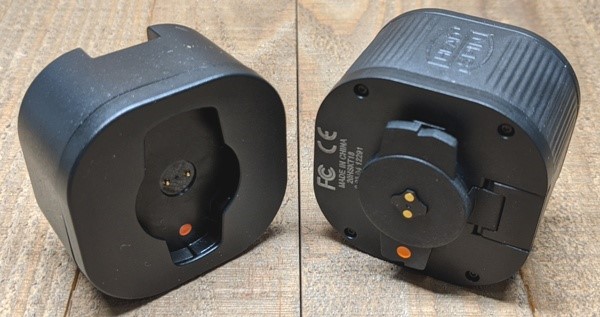

The wall charging station has the SPINDOCK mount on the front. There are two metal terminals in the center of the mount that contact the terminals on the light to recharge the battery. Also, the prongs for the electrical outlet fold in for compactness.
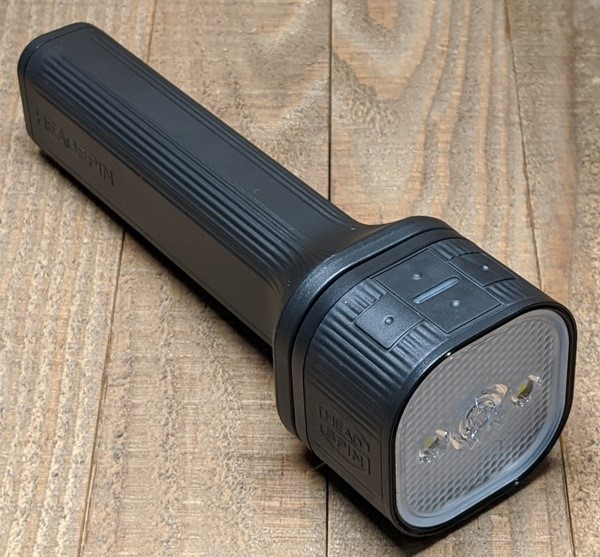
The flashlight mount is just over 5″ long, is made of black ABS plastic, and has grooves along the length to improve grip. It has the SPINDOCK mount on the front for attachment of the light. Since the buttons are on the light, the flashlight body itself is nothing more than a plastic holder for the light. It is weighted so it feels more robust, and with the light installed it feels as heavy as a normal flashlight with larger batteries and is well balanced.
The headlamp mount consists of a black plastic assembly that contains the SPINDOCK mount and is attached to an adjustable elastic band. The light mount tilts down in four distinct positions. The uppermost (horizontal) position is magnetized. The elastic band is 1″ wide, has a plastic buckle for adjusting the length, and appears to be very well made.
The rail mount consists of a plastic assembly that contains the SPINDOCK mount attached to a clamp intended to go around a bicycle handle or rail that is between 25 mm and 32 mm in diameter. The mount includes a sawtooth rubber grip to provide a tighter mounting. To install the rail mount, it is necessary to use the included Allen wrench to loosen the screw and allow the mount to be installed around the rail. Like all the other components, this mount is made of black plastic and seems fairly rugged.
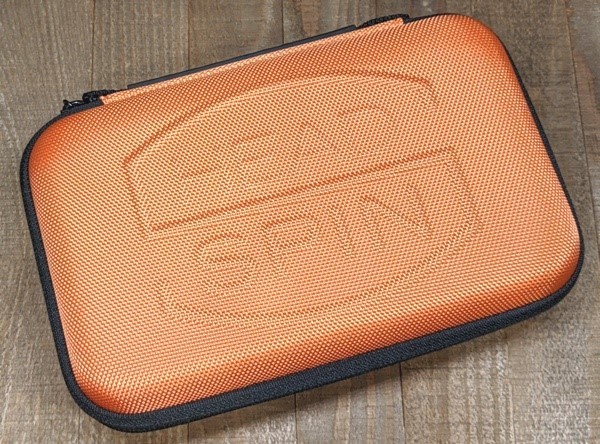
The case is made of rigid plastic with a fabric covering and a carrying handle. The case has a top cover that is opened with a zipper on three sides and swings open. Inside, the foam padding was pre-cut to perfectly hold the five pieces of the kit. There is also an internal mesh pocket with a velcro closure that allows storage of the other items (like the charging cable and Allen wrench, for instance).
SPINDOCK Attachment
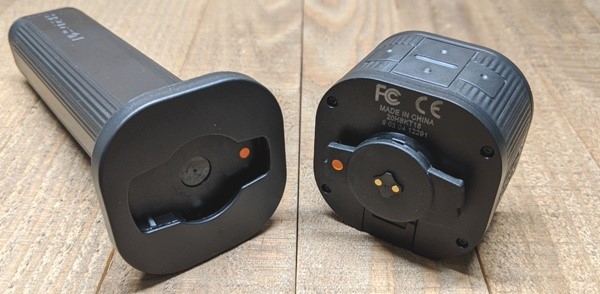
To attach the light to any of the mounts, you line up the orange dots and rotate the light clockwise one-quarter turn and it clicks into place. There is a magnet in the light that opposes another magnet in the mount, which provides some help with rotating the light for installation. The intent of this patented design is that you simply align the orange dots, place the light into the mount, and let go and the magnets rotate the light into place for you with minimal to no effort on your part. To remove the light you simply turn the light one quarter turn counter-clockwise and the tabs will be disengaged. This feature allows the light to be moved to any one of several different types of mounts and provides flexibility in how the light is used.
Performance
The most common configuration I would use the light in is as a headlamp. This is because I’ve been doing work in the attic of our house, and it is important to have both hands free when you are walking around on joists that are buried in insulation. One wrong move and you will put your foot through the ceiling of the room below, so having both hands to maintain balance is critical. However, it also helps in darker places (like closets or under a car), or anywhere you need both hands free (like working inside an electrical box). The light is primarily marketed towards outdoor enthusiasts and a headlamp is just as useful if you are out in the wilderness at night. Having the added flexibility to also use the light as a flashlight, as a bike headlamp, or even just attaching the light to any metal surface with its built-in magnet makes it very versatile.
I like the design of the SPINDOCK attachment. The first few times you use each mount, it takes a little more force to install and it takes a lot of force to remove … so much so that I was worried I would break it. But it did not break, and after installing and removing the light several times, it loosened up a bit. It was at this point that the light would twist itself into position due to the magnets, as advertised by the manufacturer. I had no issues with the light coming loose at all, and it seems that the magnets and plastic tabs securely hold the light in place. In the headlamp mount configuration, I was under my car and I bumped it quite a few times as I was working and it did not come loose at all. Only time will tell if the plastic tabs that hold the light in place will loosen up or eventually break. But even if they do, the magnets will always help to keep the light attached.
I found that HEADSPIN LED lamps provide a very bright light on its maximum intensity setting. I was initially a little disappointed that I couldn’t use all three LEDs at the same time, but I believe that would probably have drained the battery too quickly. The ability to choose the intensity as well as the shape of the light is very beneficial. This is fairly common for other headlamps, but the HEADSPIN has more settings than my two other headlamps and more control over the light. My Coast FL65 headlamp (400 lumens) has only one LED with three intensity settings, so you can’t adjust the focus of the light beam (although Coast does make more expensive units with a rotating lens that allows this to be adjusted). My Energizer HDD32EH (315 lumens) has three LEDs with two intensity settings but allows continuous adjustment of the focus of the beam. Having four intensity settings is a plus and also gives you more control over how long the light will operate before it needs to be recharged. It is important to note that unlike other headlamps, the HEADSPIN does not have the red LEDs for night vision, which was not personally a drawback for me, but certainly would be for some campers and hunters.
HEADSPIN chose to provide four different buttons on the lamp to allow for more control over the intensity and mode setting. Most other headlamps have at most two buttons and it is sometimes difficult to find the right mode or make a change in intensity. I found this to be both a good and bad thing. I definitely liked being able to precisely choose the light intensity and mode of operation. However, when using this as a headlamp, it is pretty difficult to find the buttons without looking at them, and also a little difficult to remember which button controls intensity (the one in the front) and which one changes the spot/flood mode (the one on the right). I think most other headlamps have fewer buttons because it is easier to find one button without looking instead of four. However, when using the light as a rail mount on your bicycle or in the flashlight attachment, it is easy to see the buttons, but you still have to remember which one is which since they are not labeled.
In terms of brightness, I performed a subjective comparison the brightest HEADSPIN settings (reported as 400 usable lumens in flood mode and 330 lumens in spot mode) to the brightest Coast FL35 setting (reported as 400 lumens) and the Energizer HDD32EH setting (reported as 315 lumens).

As you can see in the pic above, the HEADSPIN light (on the left) is in its 330-lumen spot mode and is slightly brighter than the 400 lumen Coast on its maximum setting (on the right). This is a little bit of an apples-to-oranges comparison since the coast light clearly has a more uniform beam and the HEADSPIN has an intense center with a diffuse outer region. However, in my subjective opinion, it seems like I was getting more light from the HEADSPIN.
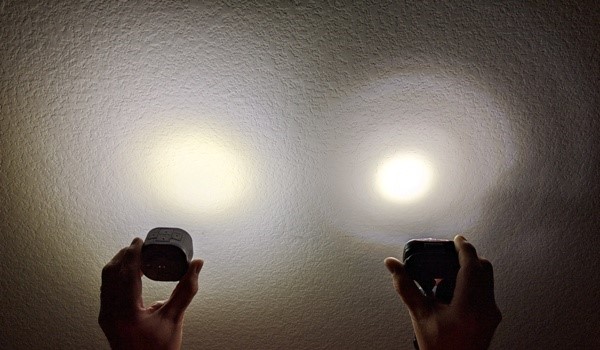
In the pic above, the HEADSPIN (on the left) is in its 400-lumen flood mode and is brighter than the 315-lumen Energizer on its maximum setting (on the right). Again, the HEADSPIN light is more diffuse while the energizer is more focused. I actually prefer the diffuse nature of the HEADSPIN to a more focused beam because it illuminates a larger area.
In terms of battery usage, the HEADSPIN is a clear winner when compared to the traditional headlamps that use AAA batteries. I know that I could buy rechargeable AAA batteries to solve this problem, but I never chose to invest in those. Instead, I’d use my headlamp for a few days, and when it was too dim to be useful, I’d put in new batteries. Being able to plug the HEADSPIN into its wall charger means that I won’t be buying batteries constantly. I found that the HEADSPIN would recharge from a completely drained battery to fully charged in about 2 hours using the wall charger. I also tested the recharging of the light using the provided micro-USB cable and found that it also charged the battery in about 2 hours.
The HEADSPIN also has an interesting feature when you are using the maximum intensity setting … when the battery starts getting low, the light will start flashing. It will not do this if it is in one of the three lower settings. This flashing is not a necessary feature and it is very annoying if you are in the middle of a task. This happened to me while I was working on my car, and my hands were covered in grease and gunk, so I had to endure the flashing for a few minutes. It was very disorienting. It would be better if the light just automatically switched to a lower intensity setting. If you are susceptible to having a seizure as a result of flashing lights, I wouldn’t use the brightest setting, ever. Once the light is flashing, you can then turn it to a lower setting and get some more runtime out of it. However, you won’t get much more time. I found that if you switch to the lowest intensity setting, you will get about 30-40 minutes of additional runtime before the battery goes dead.
I measured the run times of all 8 modes of operation and compared them to the published times on the HEADSPIN website:
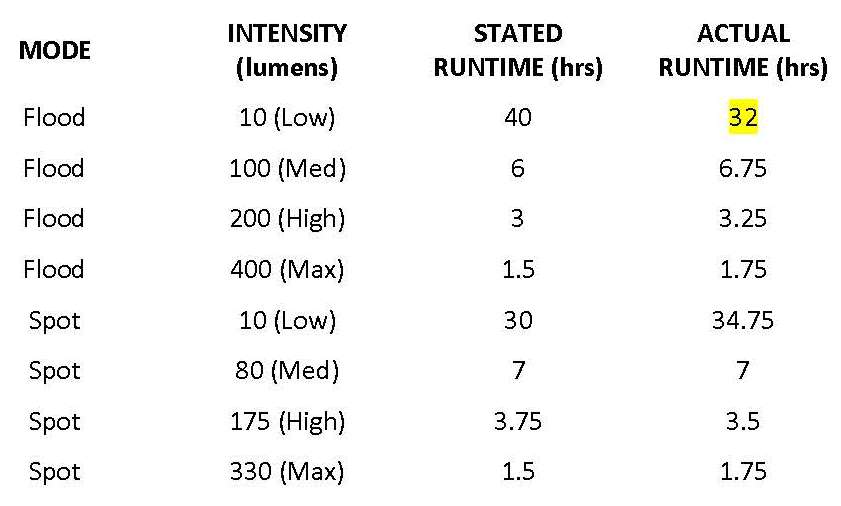
Each time I ensured that the battery was fully charged and I let the light run until it shut off. My measurements showed that in most cases the light exceeded the manufacturer stated runtime. The most significant exception was in the low setting in flood mode, where it fell well short of the stated runtime of 40 hours. I’m also wondering if the manufacturer stated runtimes in the low intensity setting are accurate … it seems like the flood mode (with two LEDs on) should have a shorter runtime than in spot mode (with one LED on), like they are for the medium and high intensities. Even if the 40 hour runtime is supposed to apply to the spot mode, it still didn’t make it. However, I think that overall the runtimes are acceptable and what you’d expect from a 1700 mAh Li-ion battery.
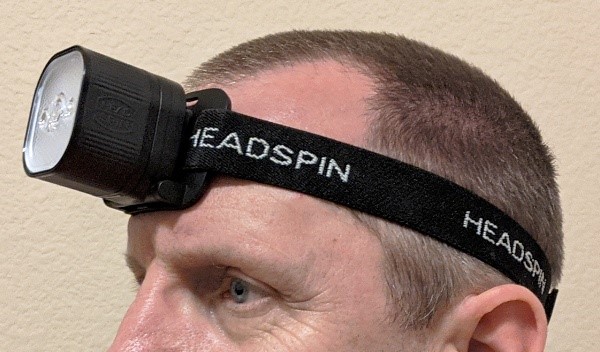
There were no issues with using the light in the headlamp configuration. The headband is comfortable and easily adjustable, just like my other headlamps.
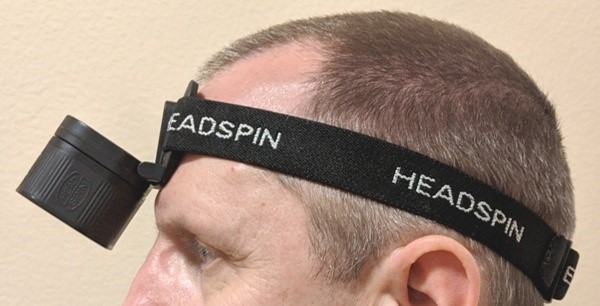
The HEADSPIN also allows rotating the light down. There are four positions, and the pic above shows the light in its lowest position. This is an essential headlamp feature that I use all the time, and I had no problems with the HEADSPIN.
Although my primary usage for this will be in the headlamp mount configuration, this light provides a lot of flexibility by allowing it to be used in multiple ways. This is marketed towards outdoor enthusiasts and I can certainly see the benefit of the added flexibility when camping.
There were no issues with the flashlight attachment. However, I have a lot of flashlights around so I probably won’t use this one very much.
Unfortunately, I could not install the rail mount to the handlebar of my bicycle. It seems the HEADSPIN is designed for more pricey bicycles with handlebars that are at least 1″ in diameter. All four of our bikes (one of which is a Schwinn) have handlebar diameters less than an inch, so I cannot use the rail mount attachment. Oh well, I probably wouldn’t go bike riding at night anyway.
However, I think the rail mount attachment might be useful for campers because it could be used in conjunction with a carabiner, bungie, or string to hang the light in a tree or at the top of a tent to illuminate a larger area.
The light itself can also be directly attached to a metal surface, and the magnet that makes the SPINDOCK work will allow it to be held in place. The magnet was definitely strong enough to hold the light up, but because of the metal prongs on the back used to charge the light, it won’t sit perfectly flat on the surface … it wobbles a bit. It doesn’t appear to be a very firm attachment, and if bumped it will move easily. I get the impression that this particular feature of the light was probably an afterthought. A dedicated magnetic mount with a much larger magnet and a flat surface would be much better.
The light has an IP66 rating, which is appropriate for outdoor use. It means that it can get rained on and get dirty and it should work fine, but you can’t submerge it. I ran a spray of water from our kitchen sink sprayer over the light in the flashlight mount and rail mount configurations, and also just the light with no mount for a few minutes each with the light on, and there were no issues. Afterwards I opened up the micro-USB cover and found that no water had gotten into the port.
The kit includes every possible mount that HEADSPIN makes at the time of this writing and costs $169.99 (currently on sale for $135.99). You don’t get much of a discount when buying the kit since it equals the cost of all five individual parts when purchased individually, not including the case. So basically the benefit of getting the kit is that you get the case for free. It would be more economical to only buy the components you need a la carte (mounts and charger are normally $21.99 each, currently on sale for $17.99). Note that the light and the charger are sold separately, which is frustrating with a proprietary connection such as the SPINDOCK. It is good that they designed this to also be charged with a micro-USB cable, so you can get by without the wall charger if necessary. So in my case, if I was only interested in getting the headlamp and I decided not to get the wall charger, it would cost me $101.98 (at current sale prices $81.98). That is a higher price for a headlamp when compared to the simple (non-rechargeable) Coast or Energizer that I can get at Home Depot for about $30, but is probably comparable to the more expensive Coast models that are rechargeable. Also, the individual mounts seem a bit pricey considering they are mostly plastic with a magnet. However, if you have a use for all three mounts, then it may be worth the cost to get the kit instead of buying all the individual pieces. I can’t complain at all about the performance though, and it is definitely a benefit to not have to change batteries all the time.
What I Like
- Flexibility of usage with multiple attachments
- Rechargeable Li-ion battery / charges in 2 hours
- Very bright light
- Multi-button control with 8 modes of continuous light operation
What I’d Change
- Needs a better magnetic surface mount
- Moderately expensive (especially the mounts)
- Include the wall charger with the light
- Label the four buttons
- Get rid of the automatic flashing in the max intensity setting when the battery is getting low
- Add red LEDs for campers and hunters
Final Thoughts
The HEADSPIN Convertible Light System is really versatile and very well made. The kit contains three mounts, and with the built-in magnetic attachment, it means you can use the light four different ways. In terms of performance, it really shines bright, runs for a long time, and recharges fairly quickly. It is also ruggedly made and designed for a dirty and wet outdoor environment. The different mounts work well, except the rail mount only works on more expensive bikes with thicker handlebars, and the magnetic attachment is weak. Despite these minor weaknesses and some other minor nitpicky issues (like no red LED), this lighting system is great and the kit would be ideal for the outdoor enthusiast to take on a camping trip. However, I think the kit is a little bit expensive for most of us other than the outdoorsman who would use all the different mounts and has plenty of money to spend.
Price: MSRP $169.99 (currently selling for $135.99)
Where to buy: HEADSPIN and Amazon
Source: The sample of this product was provided by HEADSPIN.

Gerber Gear Suspension 12-in-1 EDC Multi-Plier Multitool with Pocket Knife, Needle Nose Pliers, Wire Cutters and More, Gifts for Men, Camping and Survival, Grey
(as of July 29, 2026 09:33 GMT -05:00 - More infoProduct prices and availability are accurate as of the date/time indicated and are subject to change. Any price and availability information displayed on [relevant Amazon Site(s), as applicable] at the time of purchase will apply to the purchase of this product.)
Gadgeteer Comment Policy - Please read before commenting
I think this is the first review of yours that I’ve read on The Gadgeteer, and I’m here daily. Well written, good job!
Thanks Chris!
I’m a Gadgeteer spouse (meaning I’m married to a Gadgeteer), which is why I don’t do as many reviews as the real Gadgeteers.
I appreciate the positive feedback!