The news announcement came with little recognition, but in July 2016, Funai Electric produced the last video cassette recorder (VCR) as the only remaining manufacturer of this technology. Although VHS cassettes will continue to be manufactured, this effectively signaled the official death of the format. Most people won’t be impacted by these announcements since VHS doesn’t factor prominently in most people’s day to day viewing and for a vast number of people the VHS ship has long since sailed. But, there is a whole generation of people that may still have archival footage in VHS format. It is important to transfer these videos to another format before functional VCRs (or TVs with analog inputs) become impossible to find. Vidbox has created a product that converts analog video and audio signals into MPEG format and provides software to compress the footage into .mp4 files or burn the captured video to DVD. Let’s see how well it works!
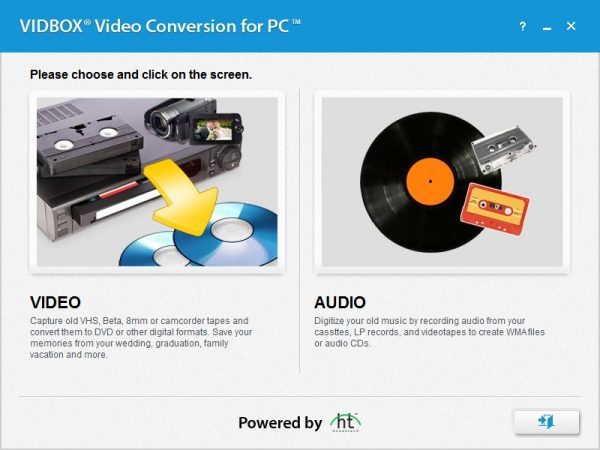
What’s in the Box
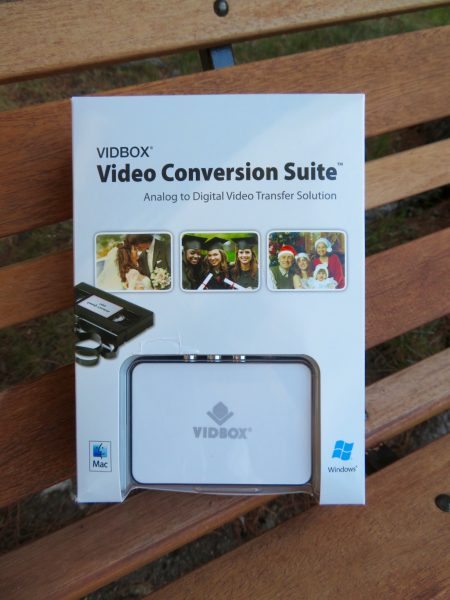
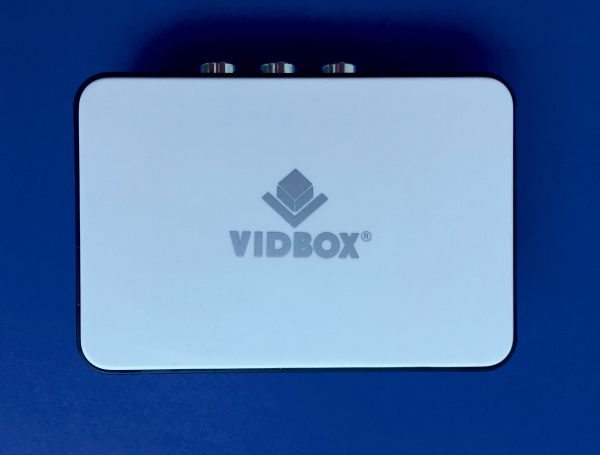
The Vidbox Video Conversion Suite includes everything you need to connect an analog video source to a computer and convert the analog signal into a digital recording. Specifically, this includes: RCA type cables for composite video and left and right audio, an analog/digital converter box, a mini-USB to USB cable, and necessary software for mac or PC on two included CDs. The converted box is about 3 1/2″ x 2 1/2″ x 7/8″ and weighs just about 2 oz.
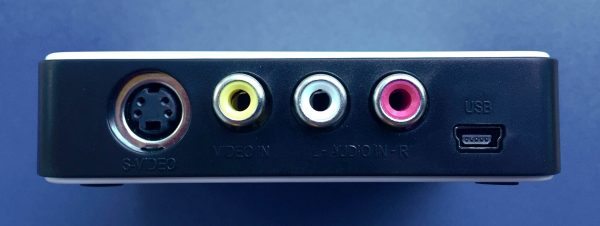
The converter box also accepts S-video input. No S-video cable is included, but if you have used an S-video cable to connect your VCR to your TV then this will be acceptable.
The front of the converter has a blue LED that glows while the converter unit is powered by the USB cable.
Software
I installed the Windows version of the software but I expect that the wizard-type interface will be similar on a Mac. The first menu asks if video or just audio will be recorded. I suppose that the pre-amplification that this provides is better than just plugging an RCA to 3.5 mm adapter into the microphone jack of the computer. Maybe. Truth is, I really don’t have an objective way to judge the veracity of the recording. Therefore I’ll focus on the video conversion process.
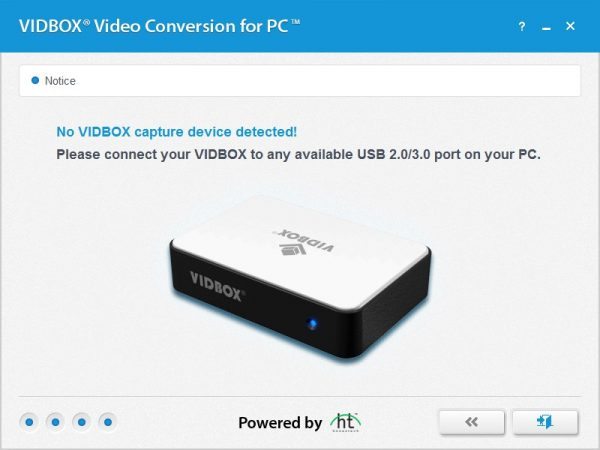
Note that for the wizard to continue beyond this screen the converter box must be attached. Otherwise, the following screen is displayed.
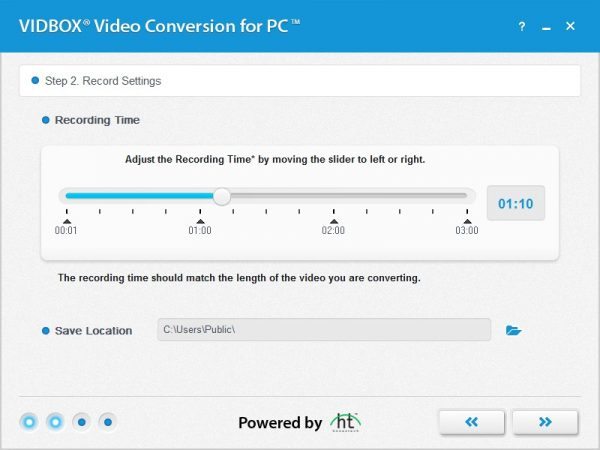
After the converter box is found the wizard asks for the recording time of the video. The transfer will occur in real time, so this is a useful feature if you plan to start the recording and let it continue unattended. We will see later that the recording can be stopped at any time by the user.
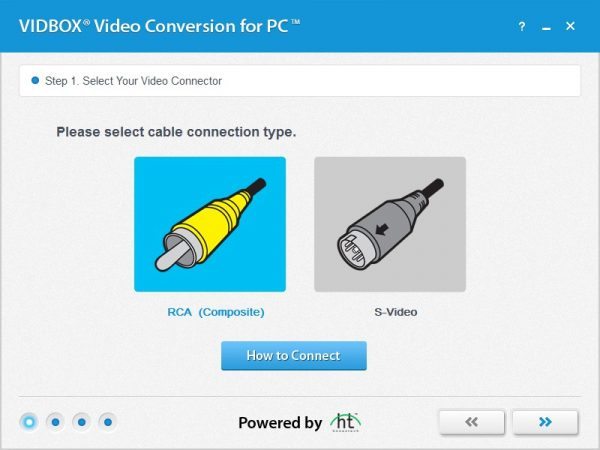
This screen allows the input method to be selected. S-video is a standard that separates the color data from the intensity data and should produce superior results (except for B&W, obviously). The unit comes with a composite video cable and this is what most VCR systems that cost less than about $350 new have as an output.
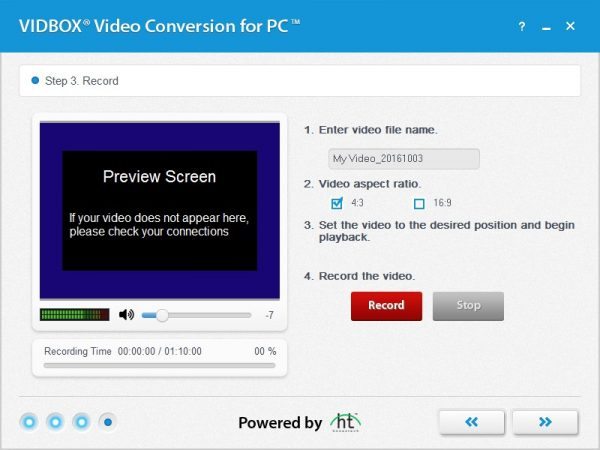
Now we’re finally ready to record. From this screen, you can choose the aspect and the sound recording level. Note that the converter box does not include a pass through so unless your video equipment supports broadcasting over multiple outputs the video preview in the screen below will be the only view of the video while you are recording. The window cannot be resized so the video preview window is rather small. As indicated above, there is a “Stop” button on this screen that will allow you to stop the recording session at any point. The converter box outputs a 720 x 480 resolution video in either 4:3 or 16:9 aspect ratio, so there is some benefit to selecting the correct display.
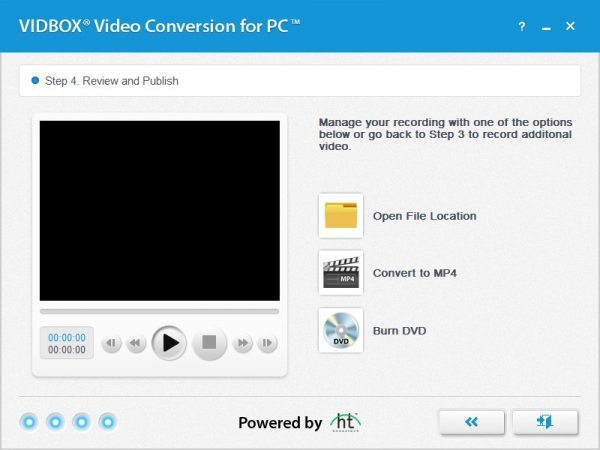
After the recording is complete you have the option of opening the file location of the recorded MPEG file, converting the MPEG to and .mp4, or burning the MPEG to a DVD readable format.
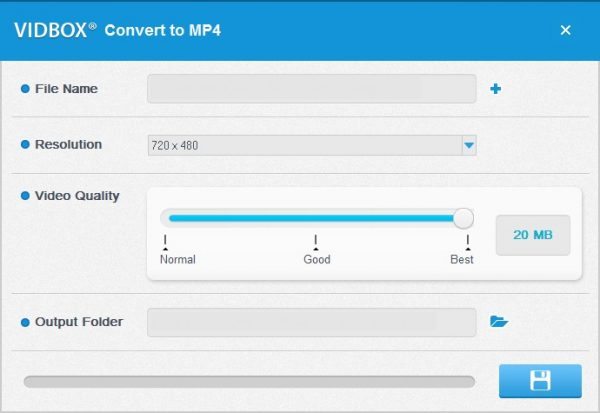
The dialog box for converting to .mp4 allow you to select a file name, resolution of 640 x 480, 720 x 480, 720 x 576, or 1024 x 768 and some arbitrary quality scale that will show you the estimated file size.
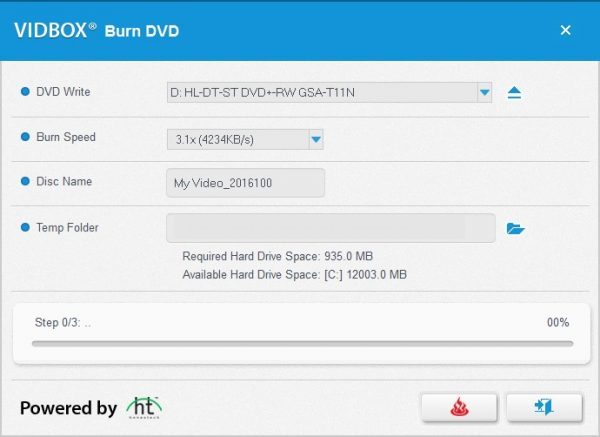
If you prefer to burn to a DVD then load a blank DVD into the RW drive and start. Note that the disc is burnt without a title screen and the video starts on title 1 chapter 1. There are no other chapters automatically generated by the conversion software.
Results
So I have a bit of a confession to make. I didn’t actually own a VCR at the start of this review. I borrowed a unit from a friend, but it was an old model (circa. 1997). So I ventured to a local thrift store and purchased a VCR with integrated DVD recorder for a deal-of-the-century $7.99. Now I had a benchmark for evaluating the Vidbox.
I will admit that the conversion process using Vidbox is extremely easy. The wizard driven system did not produce any error messages about buffer under-runs, media write fails, or other messages typical of DVD burning. Also, The Vidbox system seemed to ignore any Macrovision protection on the VHS.
My first impressions were that the Vidbox output was very pixelated compared with the raw VCR output. When I used the built in DVD recorder of the VCR, the output seemed almost identical to the original VHS. The Vidbox produced a MPEG with a constant bit-rate (CBR) video signal of 8000 kbps, whereas the DVD recorded a variable bit-rate recording of about 9500 kbps. I’m not sure if the different recording strategies and bandwidth are sufficient to explain the difference in quality. Anyone who wants to express their opinion about bit-rate, macroblocks, temporal coding, motion vectors and how these compression attributes can explain the video results is welcome to do so in the comments.
I have made some side by side comparison videos to illustrate my experiences. The first video shows the output from a VHS recording of Four Weddings and Funeral. (Don’t judge me…actually the several pan scenes in this intro allow viewing of the same scene on both sides of the screen simultaneously.) The DVD output is on the left and the Vidbox output is on the right. The videos were compressed to .mp4 using VLC, made side by side on Cute CUT for iOS and uploaded to YouTube. The frame skips that are visible in the Vidbox output were there in the MPEG. Vidbox warns that skips may happen if other programs are running but this was not the case. Obviously, based on the description above, the videos have been through several transformations but the video quality below is very similar to the original DVD and Vidbox output.
The video below was made from a DVD of When Harry met Sally and a Vidbox conversion using the DVD players S-video out. In the video below the gray bands are again obvious on the right side of the screen, which is the Vidbox side. In this video the left side was ripped from the DVD and converted to .mp4 using VLC. The right side was converted to .mp4 using the Vidbox program. The video actually transferred smoothly from Vidbox but some pauses are seen in the video below. I think that when I combined the video ripped from the DVD and the video obtained from the Vidbox there were some frame rate inconsistencies. For purposes of comparison, ignore the pauses, but pay attention to the color of Castlerock after the sun has fully risen, and observe the apparent resolution of the “y” in Billy Crystal on each side of the screen.
In summary, Vidbox may win points for being easy, but if the best quality output is what you are looking for from your video conversion, then I would suggest purchasing another conversion system. The pixelating effect is too strong to consider this system be used for VHS archival.
Source: The sample for this review was provided by Vidbox. Please visit their site for more info and Amazon to order.

ESR for MagSafe Wallet, 5 Card Holder with RFID Blocking, MagSafe Sticker Included, Slim Magnetic Wallet for iPhone 17e/17/16/15/14/13/12 Series and Selected Samsung Devices, Not for 13/12 Mini, Black
(as of June 29, 2026 09:43 GMT -05:00 - More infoProduct prices and availability are accurate as of the date/time indicated and are subject to change. Any price and availability information displayed on [relevant Amazon Site(s), as applicable] at the time of purchase will apply to the purchase of this product.)
KRTALS Stronger Magnetic RFID Leather Mag-Safe Card Holder for iPhone 16 Series, Mag-Safe Accessories Stick on Series of iPhone 17/16/15/14/13/12 and Pro/Promax, Black
(as of June 28, 2026 16:57 GMT -05:00 - More infoProduct prices and availability are accurate as of the date/time indicated and are subject to change. Any price and availability information displayed on [relevant Amazon Site(s), as applicable] at the time of purchase will apply to the purchase of this product.)Product Information
| Price: | $79.99 |
| Manufacturer: | Vidbox |
| Retailer: | Amazon |
| Requirements: |
|
| Pros: |
|
| Cons: |
|
Gadgeteer Comment Policy - Please read before commenting
Do you have a recommendation for a system to purchase should one wish higher transfer quality?
I was happy with the used model I purchased. Here are some other options
Sorry, Link above didn’t work.
Toshiba DVR620 DVD Recorder/VCR Combo MFR# DVR620
FUNAI ZV427FX4 Funai DVD Recorder/VCR Combo MFR# ZV427FX4
The flickering and pixeling effects could also very well come from the VCR one is using.
True. However, in this test I used the VCR to create both sides of the comparative recording. The VCR to DVD recording is made with the same composite signal as the signal to the Vidbox recorder so the appearance of the final product has only to do with the digital conversion equipment and not the analog VCR output. After the test videos were made I verified the output of the VCR and determined that there was no skipping or flickering of the VCR tape master.
I found this article when searching for tips on editing videos after transferring with Vidbox. I agree it’s easy to use. My challenge was really more with the use of the VCR I bought on Amazon, since it’s been over 20 years since I used one, but the seller was so easy to reach and helpful that I got nearly 15 years of home movies transferred in less than a week of 24/7 recording. What I’m trying to find out is if I can convert from MPG to MP4 after I’ve transferred. I stopped converting after transfer to speed up the process, thinking I could convert them later using just the Vidbox software. However, when I arrived at my next work location with my laptop, but leaving the Vidbox equipment at home, I found nothing could be used without having it attached. The promotional information made it sound like Vidbox also offered editing software for clipping and editing MPG’s into custom films. I want to create montages for my family rather than make all 15 of the 3 hour films available online.
Am I missing something here, or do I need to buy another software program to perform these simple video conversion/editing functions? Thank you.
I’m not sure of vidbox’s options in this setup, but you might try VLC to convert from MPG to MP4.
I have checked the output audio and video of my VCR on my TV, and they work.
However, when I attempt to record a VCR in the Vidbox system, the video plays fine in the viewing screen, but the audio is only a rhythmic thumping sound. I have checked the connections from my VCR to the Vidbox many times, I have put in commercial VHS videos (that are not copywrite protected) and get the same result.
Any ideas
Sorry. I didn’t experience this and I’m unable to duplicate this with my current setup. My component out DVD player died since I wrote this but is it possible you have a component out video accidentally feeding the audio? This is my only guess. Maybe the manufacturer can help. Good luck.
My branded version of this video capture device ‘Honestech’ VHStoDVD, has software with Wizard, Advanced and Audio options at start.
Using the advanced mode, you can set a long recording duration and maximum capture quality, to store the Mpeg file on HDD.
This will be at a constant high bitrate, equivalent to or exceeding the highest bitrate of a VBR capture direct to DVD (via software or a DVD recorder). Then you can edit the footage and convert the Mpeg edit file to MP4, or write to DVD.
Norman, that’s good info for that brand of converter. Thanks!
Hello,
I have the Vidbox. However when I transfer files to the Mac the audio goes audio out of sync. How can I fix this problem please.
Many Thanks,
Tissa
Do you have any video of that? I’d want to find out more details.|