REVIEW – Ever since I had my first banana seat with a flower basket on the front bicycle, I have always loved to ride bikes. After I graduated from college, I got my first real road bicycle, a Specialized Allez Comp. I rode that bike on several MS 150 rides and made some lifelong friends by joining a local cycling club. I can no longer handle some of the ultralight race bicycles’ aggressive postures and now own a Norco Carbon Search gravel bike. I have given up on riding on the road due to the increased traffic and driver unawareness. I have been seeing more and more electric bikes on the trail and have wondered if they were really that much fun. I have also wanted to get my hubby back out riding more often and wondered if an electric bicycle would help him out. So when the Magicycle Jaguarundi folding electric bicycle came up for review, I asked to review it and was lucky enough to get it. Let’s see if an electric bicycle is something we really need to have.
What is it?
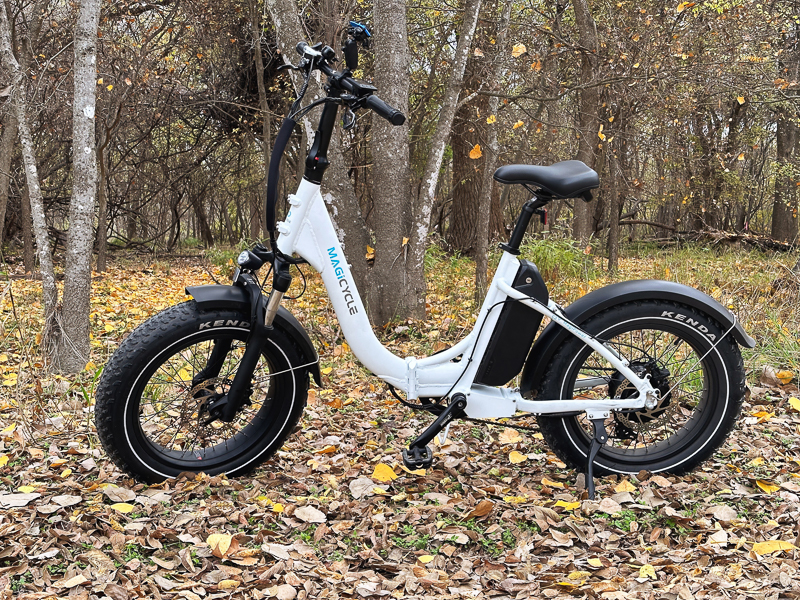
The Magicycle Jaguarundi is a foldable electric bicycle. It stays compact by using 20-inch fat tires and has a 52V/15Ah battery along with a 600W with 750W max power rear hub electric motor.
What’s in the box?
The Magicycle Jaguarundi folding electric bicycle was delivered in a very large and heavy box. Thank goodness my husband was home, and he had the driver put the box in the garage.
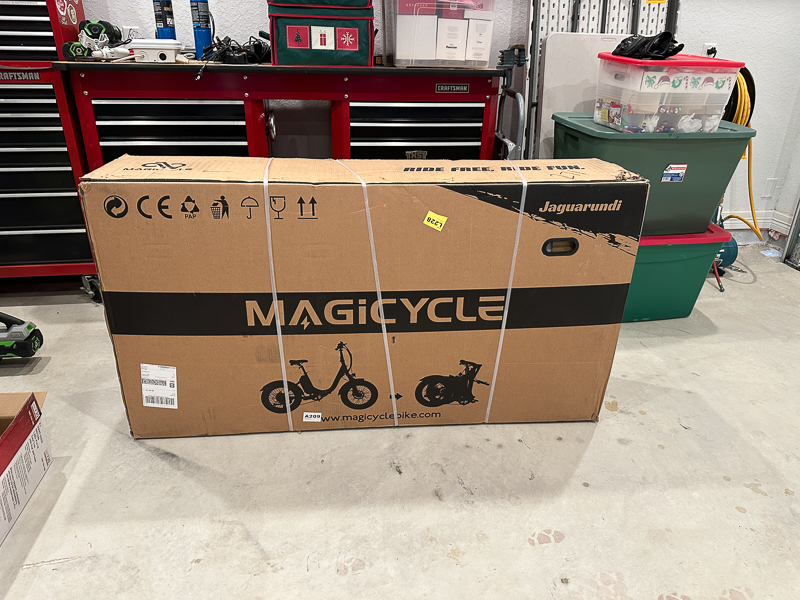
Although you can’t see it in the picture above, the box had a very large hole on the back side of the box due to the fault of the shipping carrier. Luckily, the ebike was well-packed and protected. Thanks Magicycle! All parts of the frame were wrapped in foam wrapping.
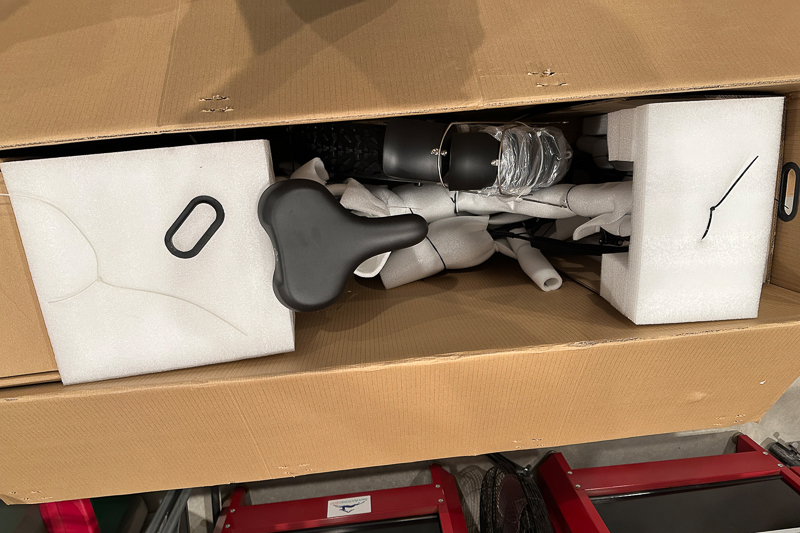
In addition to the main part of the Magicycle Jaguarundi folding electric bicycle that had the frame, front forks, handlebar, and rear tire all mounted, there were the following items in the box.
- Front tire with wheel and brake rotor attached
- Seat with seatpost attached
- Front and rear fenders
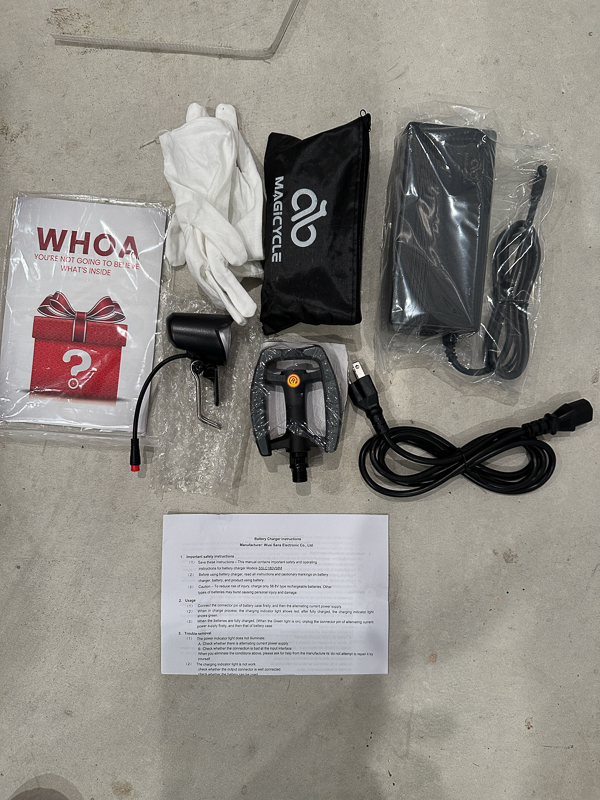
- User manual
- Front light
- assembly gloves – no I did not use them!
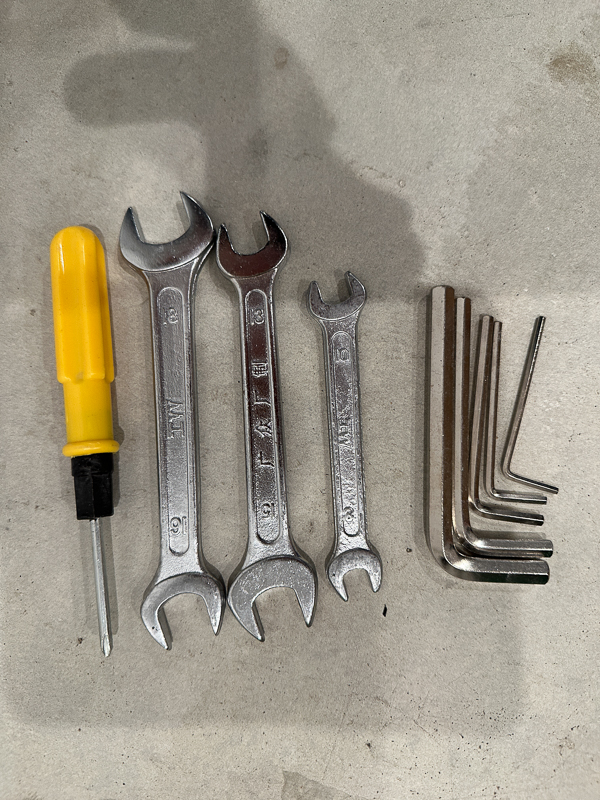
- Tool kit
- Battery charger
- Pedals
Hardware specs
- Battery 52V 15Ah lithium battery
- Charger Short-circuit proof 3.0A fast, smart charger
- Range 30-55 miles
- Controller 52V 600W FOC smart controller, Current Range 7-22Ah
- Hub Motor 600W brushless gear motor
- Display Backlight Display with USB charging
- Total Payload Capacity 350lbs
- Weight 72lbs/32.5kg
- Frame size 18″
- Pedal Assist Intelligent 7-level pedal assist with a 12-magnet cadence sensor.
Design and features
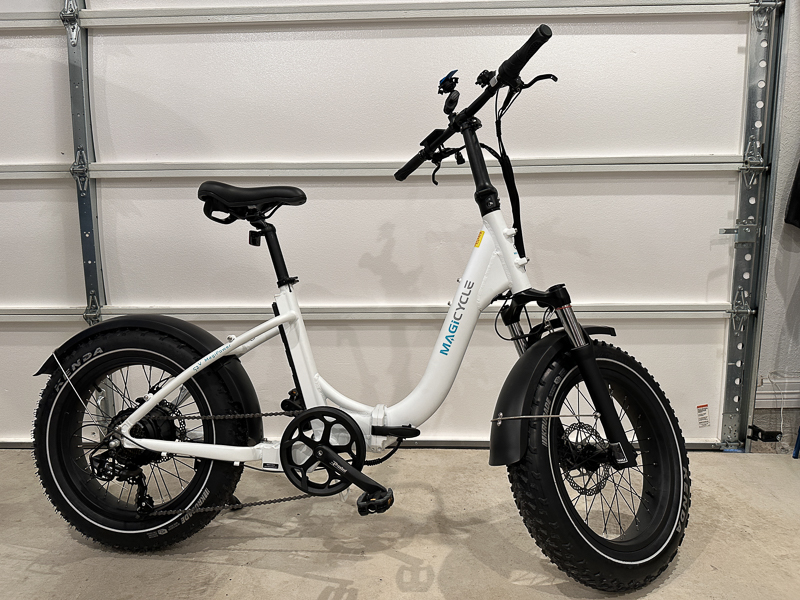
As I stated earlier, the Magicycle Jaguarundi is marketed as a folding electric bicycle. In my mind, the folding part should serve two features. One, it will be easy to store in a home, garage, or office location if you ride it to work because it takes up a lot less space. Two, because it folds, it should be easy to fit into a vehicle. The first picture below is the bicycle in its unfolded position and ready to ride. The second picture shows the bike folded up.
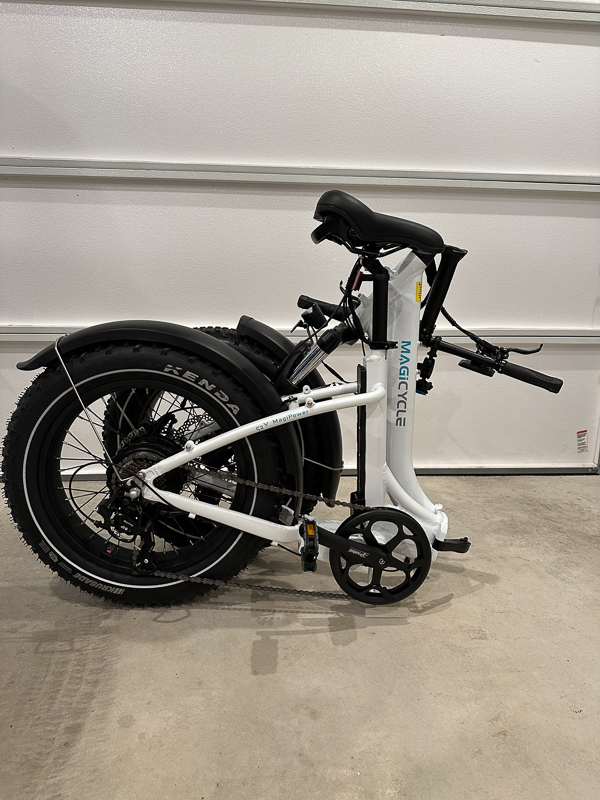
You need to unlock a couple of levers to get the Magicycle Jaguarundi into a folded position. The first is at the frame’s bottom right side (as you sit on the bike). There is a tab on top of the lever you must push in first before the lever can be pulled out. This is a nice feature and will prevent you from trying to fold the bike accidentally. Pulling that lever out lets you swing the entire front half of the frame to the left, so the front tire is right next to the back tire.
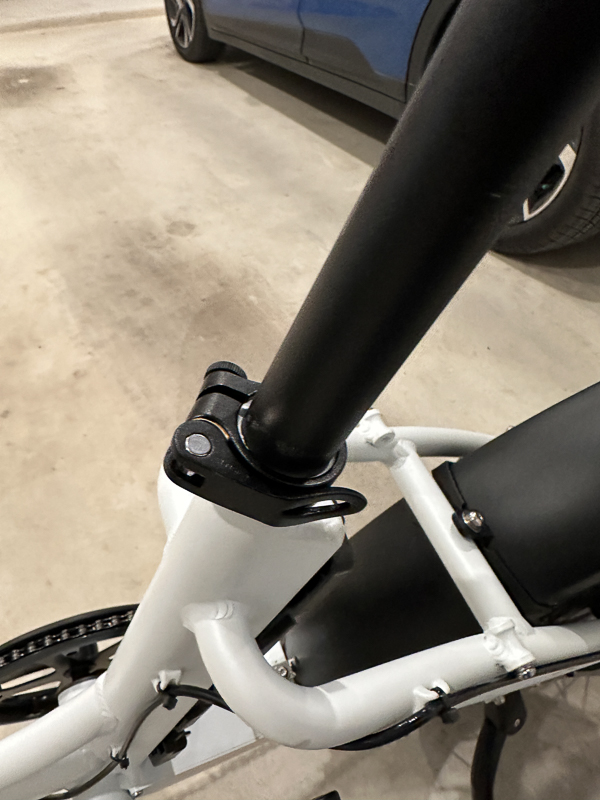
The next lever is where the handlebar mounting tube meets the top front of the frame. This lever also has a safety feature. You must push the red button first to be able to flip the lever down and fold down the handlebars to the right side of the front wheel.
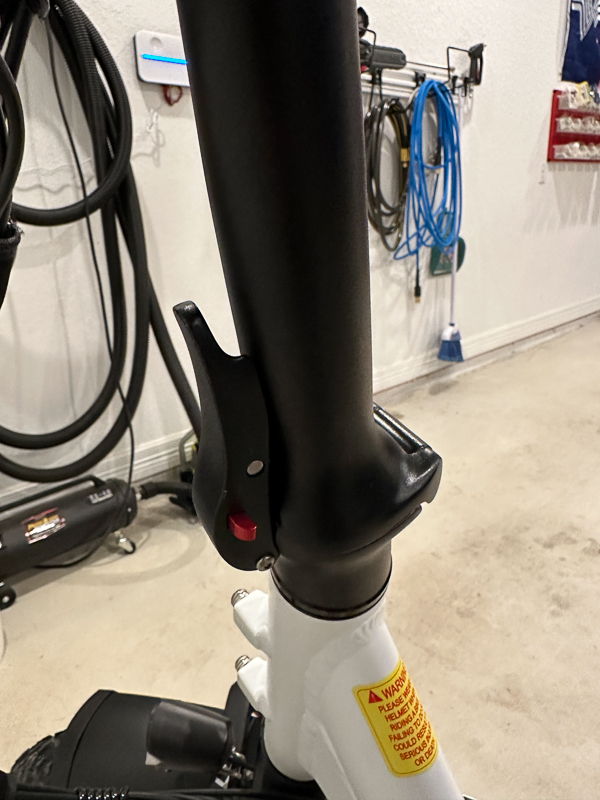
There were also quick-release levers at the bottom of the seat post and the bottom of the handlebar tube, allowing you to adjust the seat height and handlebar height easily. This comes in handy when loading the bike into a tight car space.
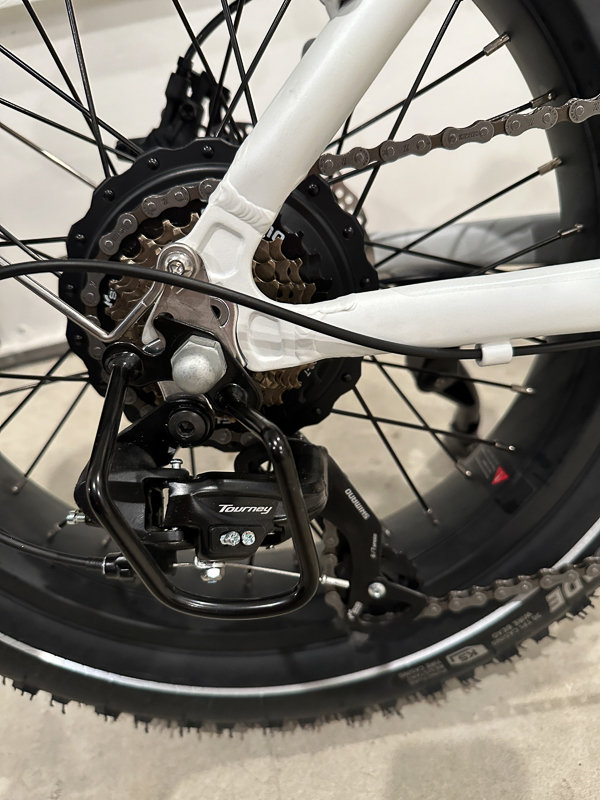
The picture below shows you the rear seven-speed Shimano cassette. It did come with the rear derailleur guard installed. It should be noted that there was no quick-release skewer for the back wheel. They did have one for the front wheel. I plan on purchasing one for the rear wheel because 90% of the flats I have had on a bicycle are always on the rear tire because that is where most of the weight sits on the bicycle. I don’t want to carry a wrench and socket to get the rear tire off to change a flat. I also want to mention that the chain had no oil or lubrication when it arrived. I had to add that myself before I took the first ride.
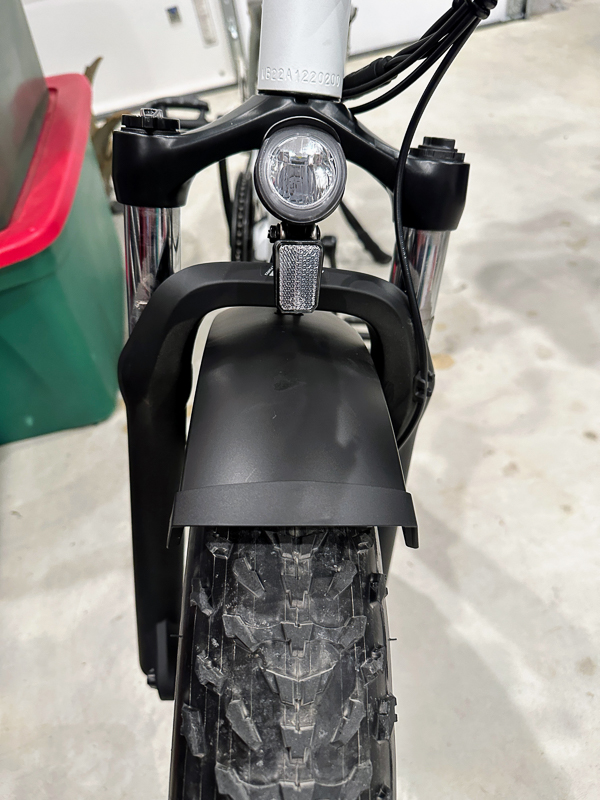
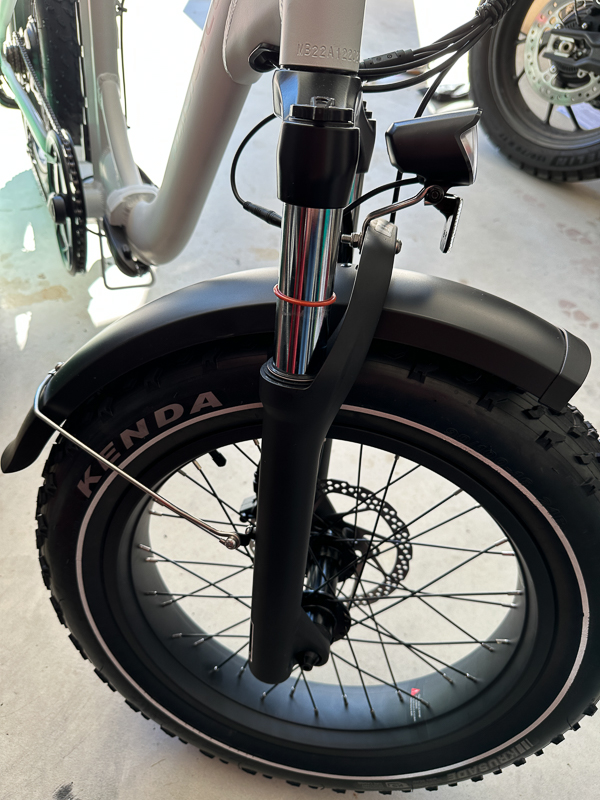
This is a shot of the front of the Magicycle Jaguarundi ebike showing the forks, front light, and front fender that all come as standard on the bicycle. On the right side of the forks, as you sit on the bike, you can turn the lock nut at the top of the fork and lock out the shocks if you wish. There is no option to increase or decrease their compression amount.
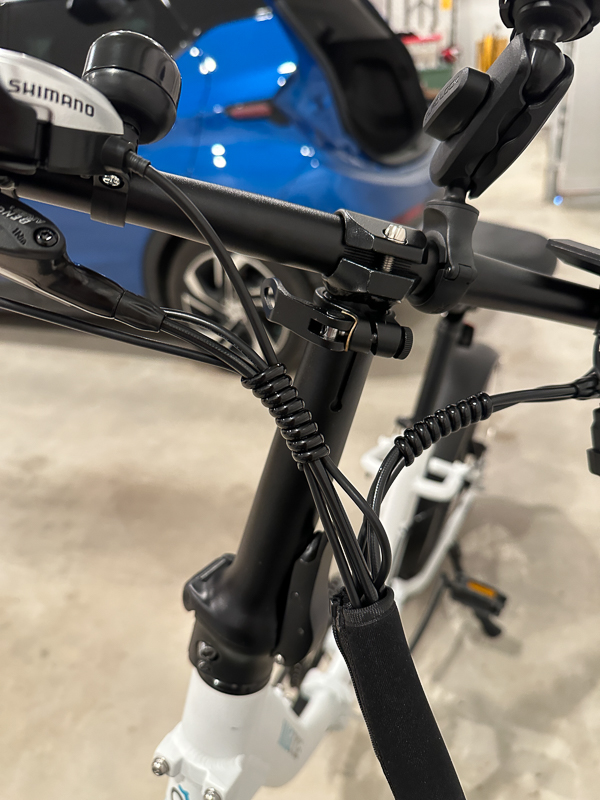
This next picture shows you the quick release on the handlebars. It lets you raise them quite high. I personally left them at the lowest position as that was most comfortable for me. I also took this picture to show the cable management on the bike. That black sleeve on the bottom is zippered in place. I really like how they organized the cables on the bike.
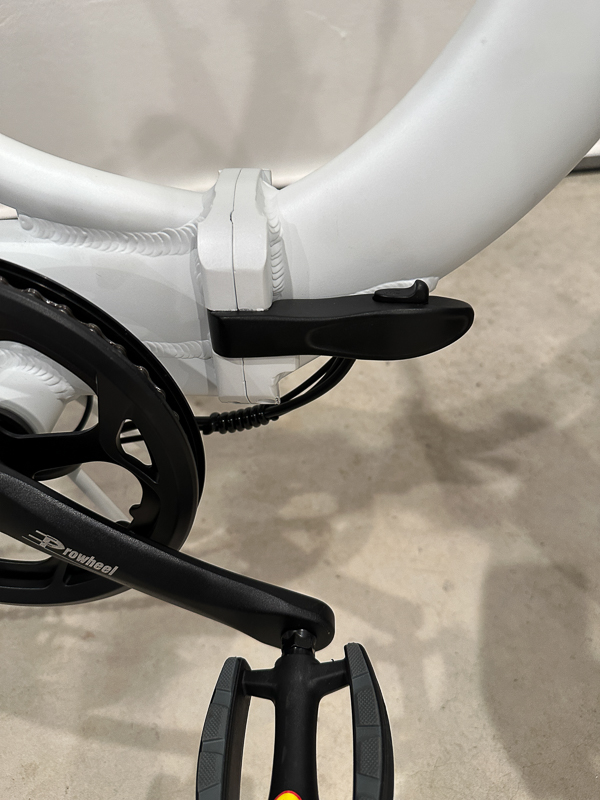
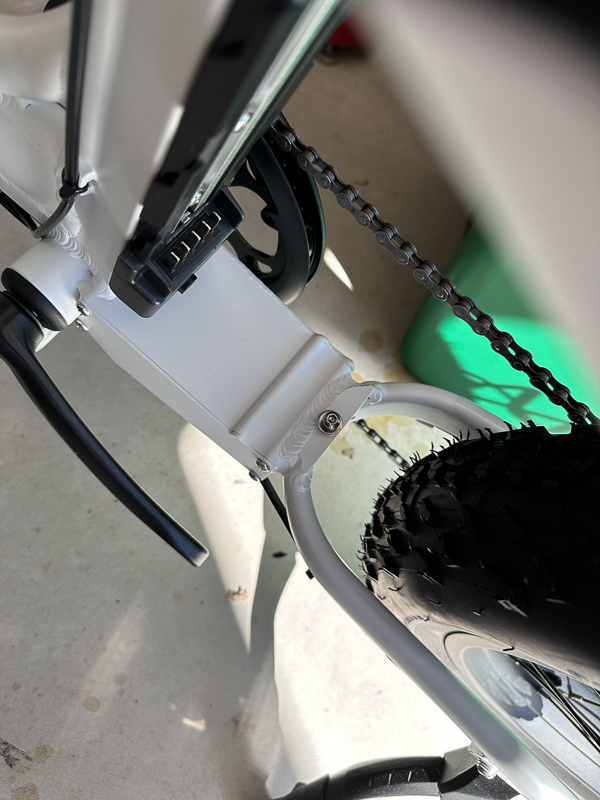
This box area on the bottom bracket would allow you to remove the cover to access the port where you would plug in the rear light that comes on the optional rear rack accessory.
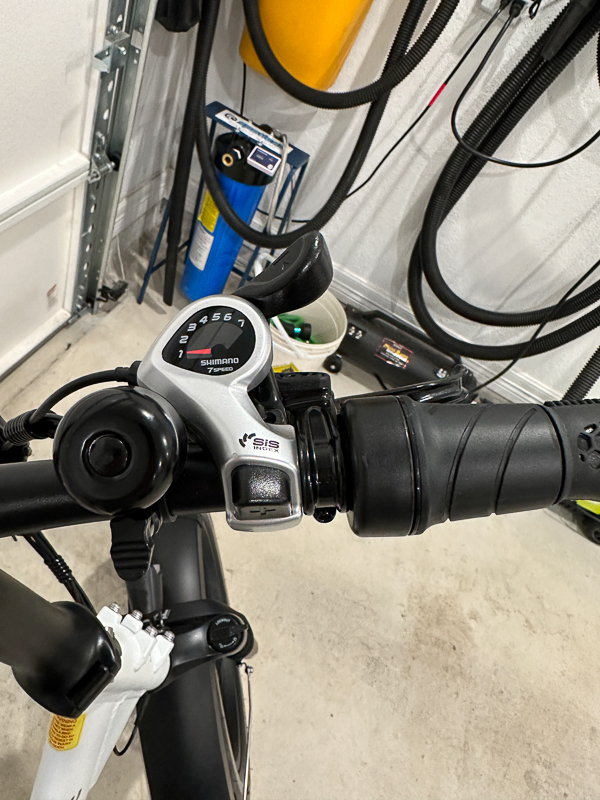
On the right-hand side of the handlebar, you will find the included bell and the Shimano seven-speed shifter. To the right of the shifter on the grip is the throttle. The throttle is unlike a motorcycle throttle, which consists of the entire grip. The throttle on this bike is only that small section on the left side of the grip.
On the left front side of the handlebars, below the computer, there is a USB port. This is there so you can plug in your phone and charge it or any other electronic device while riding.
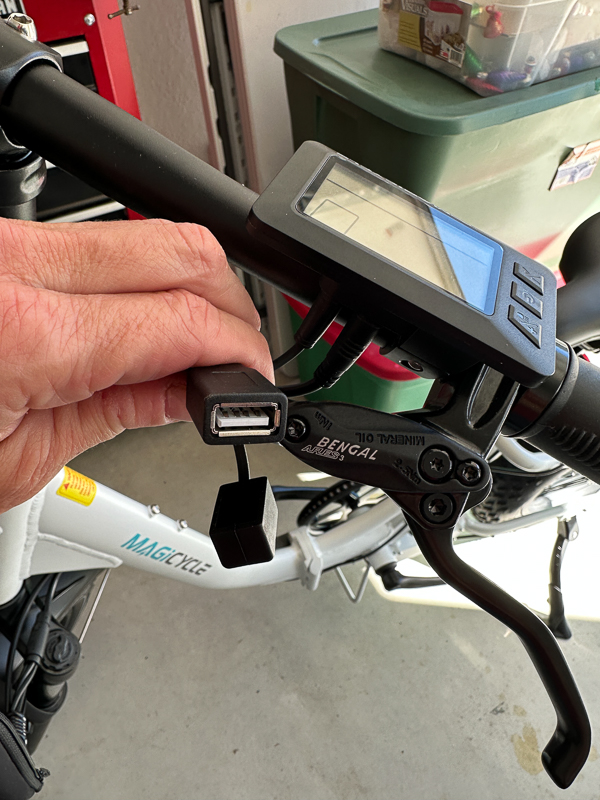
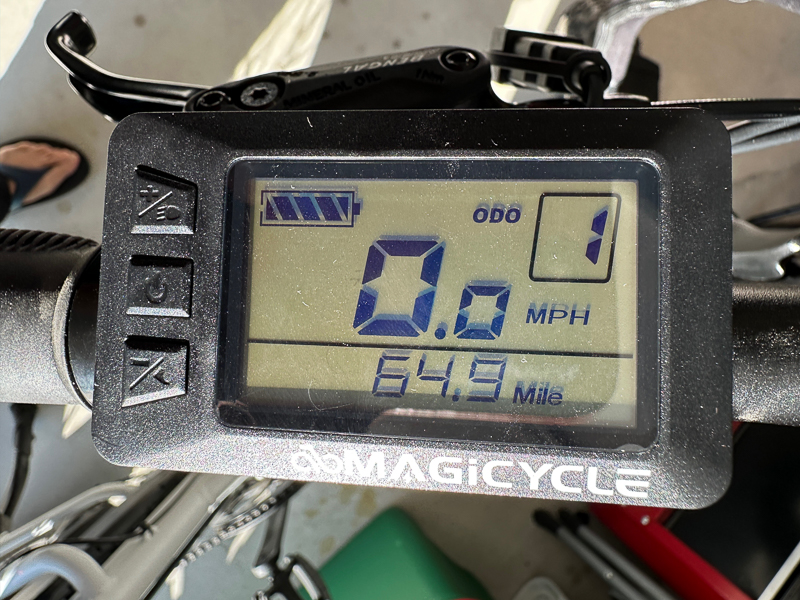
The computer to control the motor is on the left side of the handlebar. In the picture below, you can see that it has three buttons. The middle button is the power button. You press and hold it for a few seconds to turn the computer on. The top button is the plus button and the light button. You press and hold the plus button for two seconds, and the light will come on. Pressing and holding it again for two seconds will turn it off. The plus and minus buttons will increase or decrease the amount of pedal assistance you have. My Magicycle Jaguarundi ebike came with the default set to 1, but it can go from 0-5 levels of pedal assistance. The minus button also has a ‘foot’ indicator on it. Pressing and holding the down button for two seconds and keeping it pressed turns on the walk assist button. This turns the motor on to a 6km/hr speed so you can walk more easily without pushing a 72lb bike. Letting go of the minus button turns off the walk assist.
Pressing the power button quickly once it is powered on will display the following: ODO, trip, trip time, motor power (W), max speed, and average speed. It will cycle around again if you continue to click the power button. Pressing and holding the up and down buttons simultaneously will take you into the general settings. From there, you can adjust: clearing the trip distance, backlight settings, and unit of measure. Once in general settings, you can simultaneously press the down button and power button for two seconds and get into the general parameters. In general parameters, you can change: wheel diameter and speed limit. The initial setting for the bike limits the speed to about 22 mph. I bumped that limit up to the max of 40km and achieved 28mph on a flat road. You can then get into Personalized Parameter settings by holding the up and down buttons simultaneously for 2 seconds. In that section, you can adjust how many power assist levels you want, wattage at each level, speed sensor info, throttle function info, over/under cut information, and password settings.
I did find that pulling the battery off the Magicycle Jaguarundi to recharge it did reset my settings for the max speed. I did not test changing anything under personalized settings, so I am not sure if those also reset.
Setup
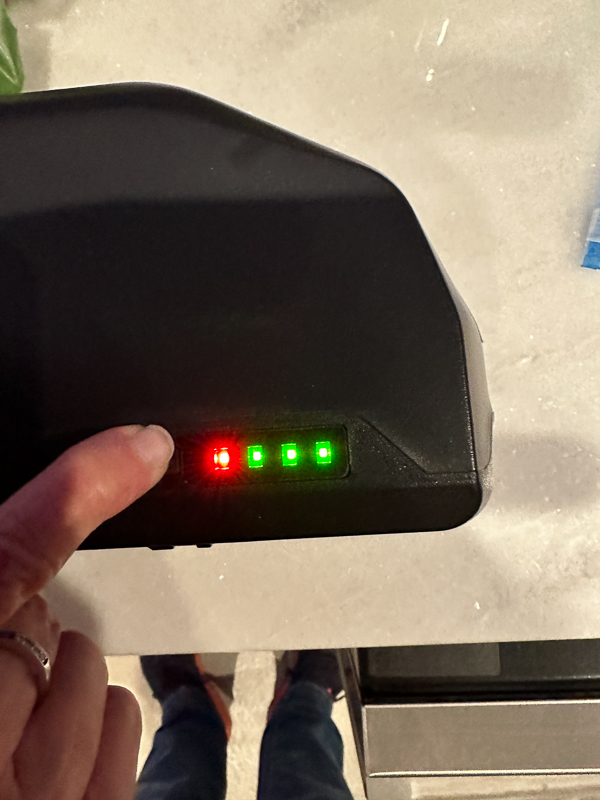
The first thing I did to set up the Magicycle Jaguarundi ebike was to test the battery level and set it up to full charge. The battery has a button you can press that will show you the amount of charge it has. The battery was at least 75% charged when I got it.
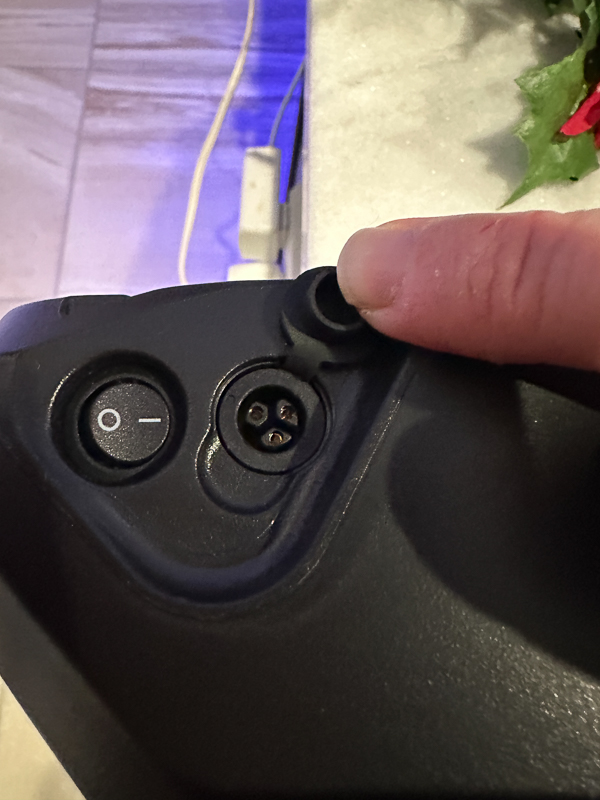
Next to the power button, you will find the charging port covered by a rubber cover.
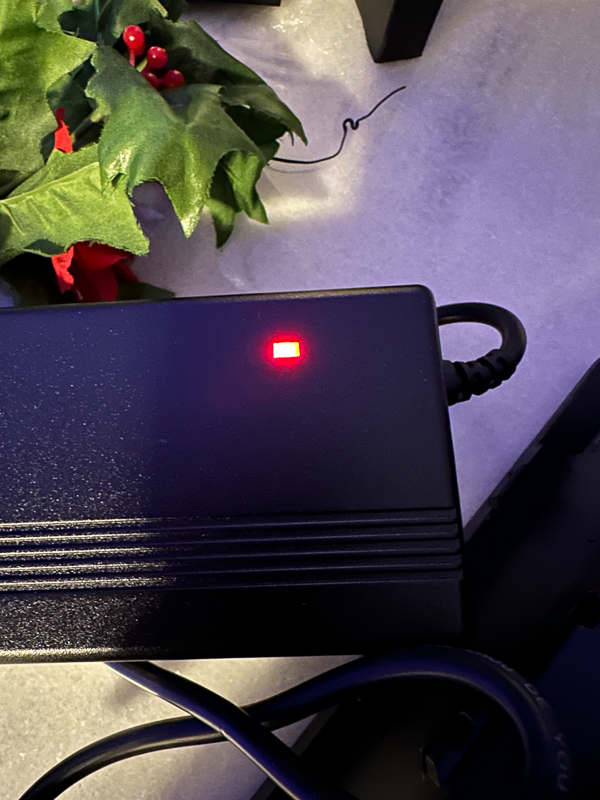
Plugging in the charger results in the adapter LED coming on. It lights up red and will turn green when the battery is fully charged. The adapter has a fan in it, and it kicks on immediately. You might want to plug it in in a place where the fan noise will not be bothersome.
I then set about building the Magicycle Jaguarundi. The first thing I had to do was to install the front wheel, which came with a quick-release skewer. I then installed the front fender and the headlight. The picture below shows that the headlight plugged into an existing wire that was already on the bicycle.
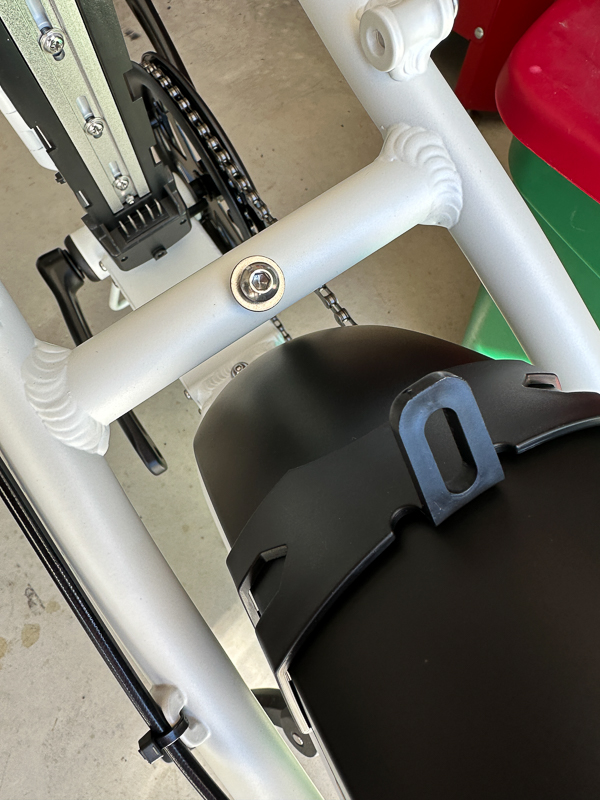
Next, I installed the kickstand on the back right side of the bike. The rear fender was the next step. It was a bit different in that it had one mounting point on the top of the bottom of the frame. The first picture below shows the screw it used right next to the tire. The second picture shows the second mounting point on the bike.
I then installed the pedals and lubricated the chain.
Performance
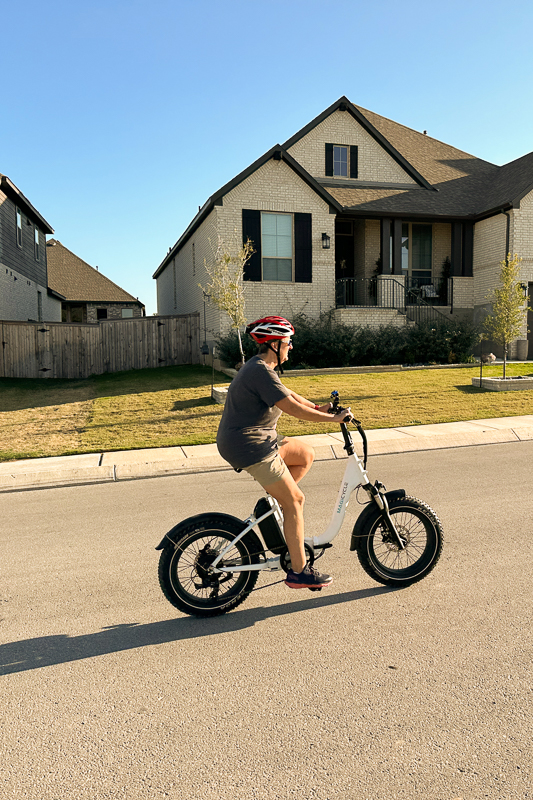
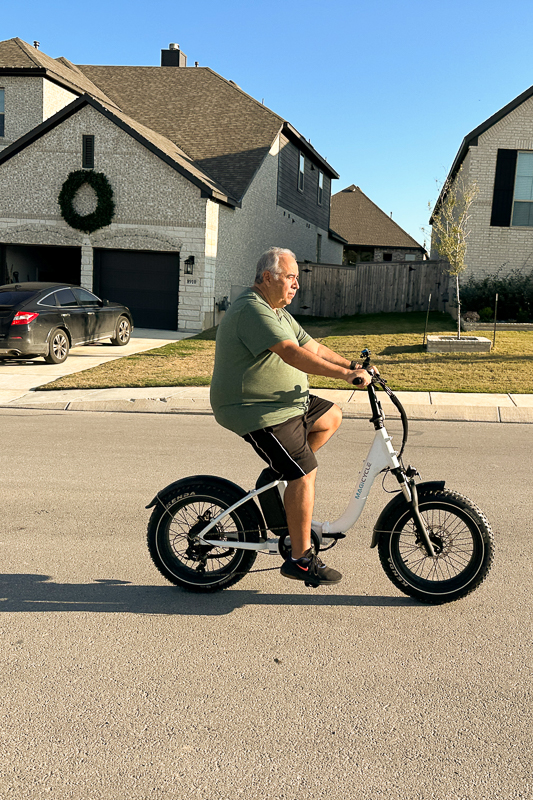
I was pleasantly surprised at how well the Magicycle Jaguarundi ebike rode and how much power it had. I learned pretty quickly that even on a flat surface, trying to pedal a fat tire 72lb bicycle was no fun. I rode around for a bit on level one pedal assist but quickly started to use higher levels. Level three would put me around 14mph with pedal assist. Jumping to level four gave me 17-18mph, and level five was close to 20. This was all on a flat surface. We have a ton of really steep hills in our neighborhood. When I mean steep, I mean there was no way you could pedal this heavy bike manually up those hills. With pedal assist three, I could start at about 18mph in seventh gear and drop down to easy pedaling at 15mph up the steepest one we had. I never felt like the bike was struggling.
I am five feet seven inches tall and weigh about 175 lbs. My husband has an additional 100 lbs and is five feet 11 inches tall. The Magicycle Jaguarundi ebike fits both of us really well. My only complaint is the amount of clearance between the seat and handlebars. When stopping the bike I felt like I was right on top of the handlebars when I hopped off the seat. I found it easier to hop off the side of the bike.
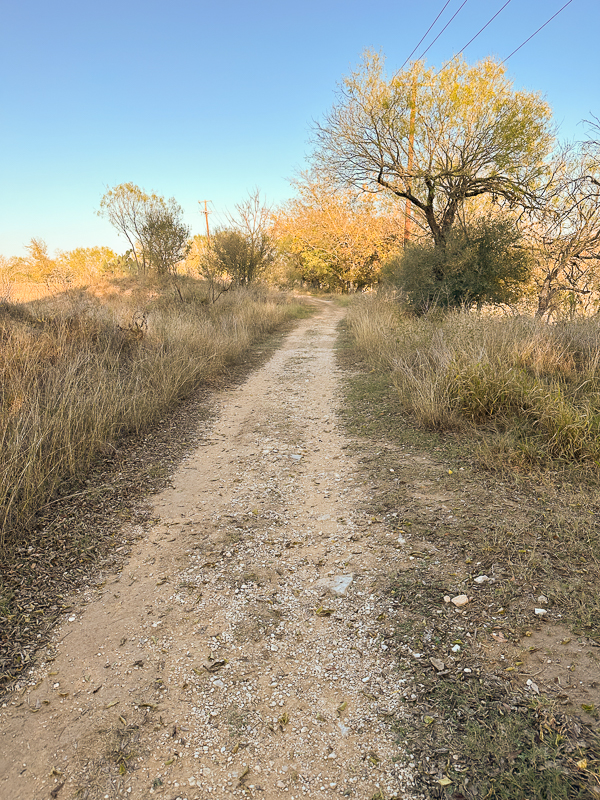
I did take the bike offroad on a trail in our neighborhood. The picture below shows you what that trail looked like. We have been very dry and in a pretty rocky area. The second picture shows you the roughest part I took the bike over. I did have the tire pressure set to the max 30 psi, but it still handled the trail pretty well. Of course, I ended up standing on the pedals when I went over that area in the second picture.

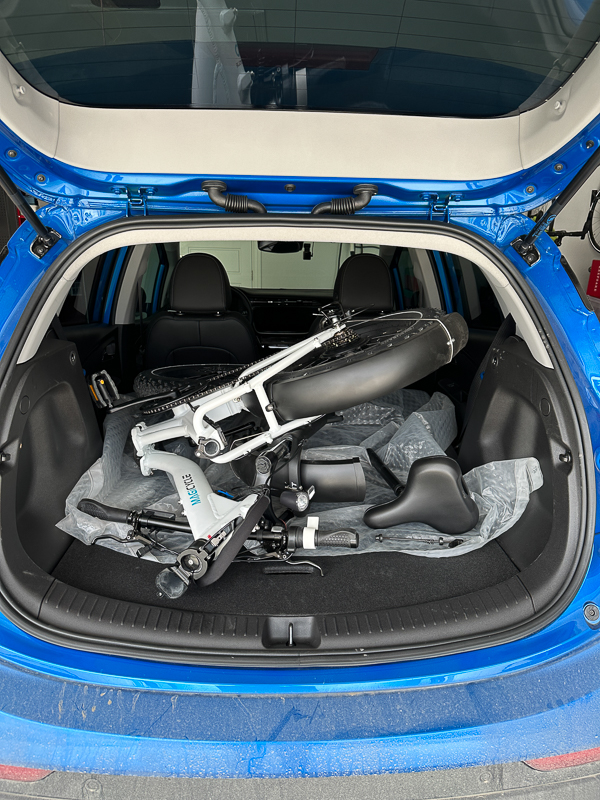
Next, I wanted to take the Magicycle Jaguarundi ebike to one of our trail systems in San Antonio. That meant I needed to load it into the back of my Chevy Bolt. I removed the battery, front wheel, and seat from the bike. This was necessary for two reasons. For one, lifting up 72 lbs into the back end of that car was a real workout and near impossible without scratching some part of the car. I also could not fit the bike in the car with the front wheel attached. As you can see below, it fits but takes up the car’s whole back area.
I ended up riding a total of 40 miles that day. I still had one bar on the battery left. It was all paved, and I used pedal assist 3 for at least 75% of the ride. The rest of the ride was at pedal assist four, or my full throttling of the bike with no pedaling. I did not realize till halfway through the ride that the computer had reset my settings, so the fastest speed I could go with the throttle was 22 mph. I did miss having clips on the pedals as I have on my road bike. Without those clips, I could only push down on the pedals and not use my hamstrings. I did find the seat surprisingly comfortable. I took this quick picture in one of the more scenic areas of the ride. Note that the tall bar rising from the handlebar with the blue top is the Quadlock attachment for my phone. I used that on my motorcycle and my bicycles, and it did not come with the bike.
I want to mention that the Magicycle Jaguarundi ebike has a cruise control feature. This only applies when you are using the throttle and not the pedal assist. If you hold the throttle down at the same speed for eight seconds, it will start the cruise control. Simply touching the brake or moving the throttle will cancel the cruise control.
The bike also has hydraulic brakes. That means it will stop really quickly. That is great news because if you are flying along at 28 mph, you need brakes that can stop you quickly if you need to.
What I like
- Great torque
- Plenty of power to handle the toughest hills.
- Plenty of battery power to get you where you are going on a single charge. Especially if you use pedal assist and not full throttle all the time.
- Hydraulic brakes!
- Front forks
What I’d change
- Heavy as heck. Using some lighter components would be nice.
- I would appreciate some larger gearing to handle higher speeds when pedaling.
Final thoughts
The Magicycle Jaguarundi ebike really surprised me. I had doubts as to whether this folding bike would be able to handle the steep grades in our neighborhood. It did a wonderful job. It has great range and torque. The hydraulic brakes are a big plus, along with having front shocks. The Shimano gear set performed flawlessly. My only real complaint with the bike is that it is so darn heavy. I realize for the price point, it is a great bike. Because it is folding, it takes up very little room in our garage. If you are looking for a folding bike with great range and torque and don’t have to worry about lifting it up too often to put it in a car, this is a great bike to get. I love that it gets my husband out riding and exercising more often because riding it is so fun.
Price: $1199.00
Where to buy: Magicycle and Amazon
Source: The sample of this product was provided by Magicycle.

Samsung 14" Galaxy Chromebook Go Laptop PC Computer, Intel Celeron N4500 Processor, 4GB RAM, 64GB Storage, ChromeOS, XE340XDA-KA2US, Student Laptop, Silver
(as of June 22, 2026 19:00 GMT -05:00 - More infoProduct prices and availability are accurate as of the date/time indicated and are subject to change. Any price and availability information displayed on [relevant Amazon Site(s), as applicable] at the time of purchase will apply to the purchase of this product.)
Gadgeteer Comment Policy - Please read before commenting
Great review and interesting product.
You won’t be able to install QR on the rear wheel, first there Is too much torque, second the wiring for the motor it’s in the way
Is the Jaguarundi 72 pounds with the battery or without it?
The bike weighed right around 72 lbs with the battery, wheels and seat on it.
So, about 60 pounds without the battery, seat and the seatpost? Is there a brand name on the motor?
Very good review, by the way!
Tengo problems con la pantalla led la batería está cargada a lo máximo pero en l barra de la pantalla led solo muestra 2 rayas alguien que me pudiera ayudar les agradezco
Hi Ezequiel, I would recommend contacting the company. I know a lot of these batteries on different bikes and tools often have the led displays go bad. Hopefully they will send you a new one if it is still under warranty.