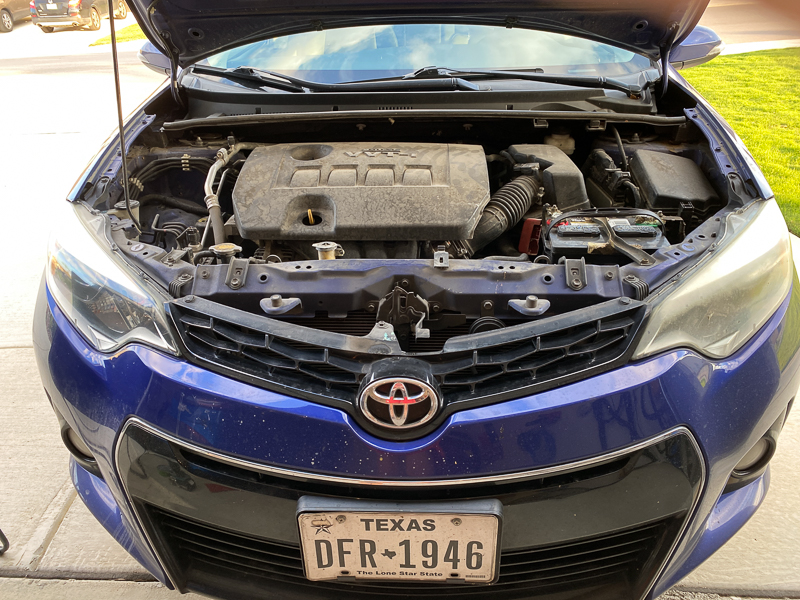
REVIEW – I love cars! I am one of those people who end up with a new car at least every two to four years. Fortunately for me, my husband likes to keep a car for the long haul. He also puts a ton of mileage on his cars due to his job. When you keep a car for more than four years, you will likely start seeing your plastic headlight lenses start to fog up. The UV rays do a serious number on them and can fade the plastic. My husband’s car is a 2014 Toyota Corolla with almost 160k. I restored the headlights once before about five years ago. Back then, it required a multi-step polishing process. The Chemical Guys sell a drill-powered headlight restorer with a one-step polisher for your headlights plus a protectant coating to go over the lens when you are done to protect the plastic for up to one year. Let’s see how well it can restore the headlights.
What is it?
The Chemical Guys Drill Powered Headlights Restoration & Protection Kit is a kit that comes with a Flex Pro backing plate and adapters to attach to your drill like you would a drill bit. It also includes a heavy/medium cutting pad, headlight restorer and protectant, and a Jet Seal sealant and paint protectant.
What’s in the box?
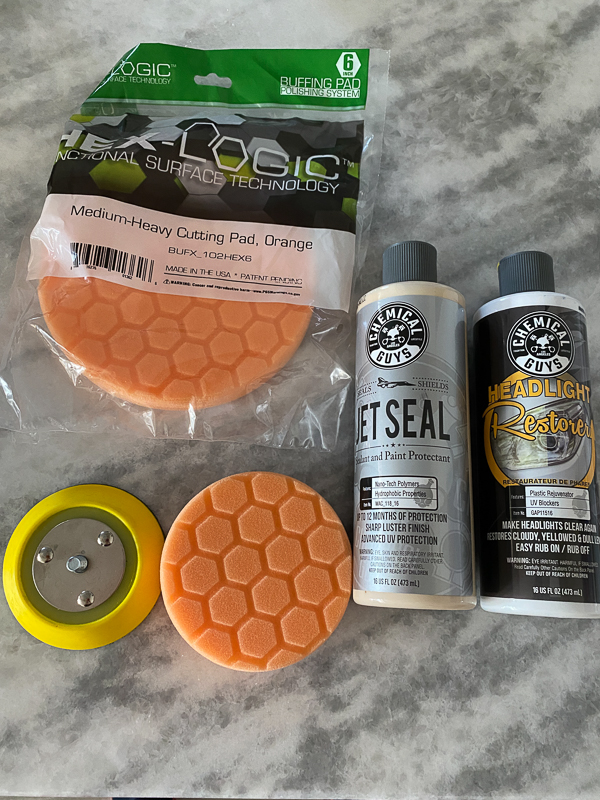
- They threw in an extra 6-inch heavy/medium cutting pad that is not included in the normal kit.
- 4-inch medium cutting pad
- Headlight Lens Restorer and Protectant
- Flex Pro professional backing plate – mine had a screw-in adapter that I could still use in the drill. The kit online includes two different drill adapter pins.
- JetSeal Durable Sealant and Paint Protectant
Setup
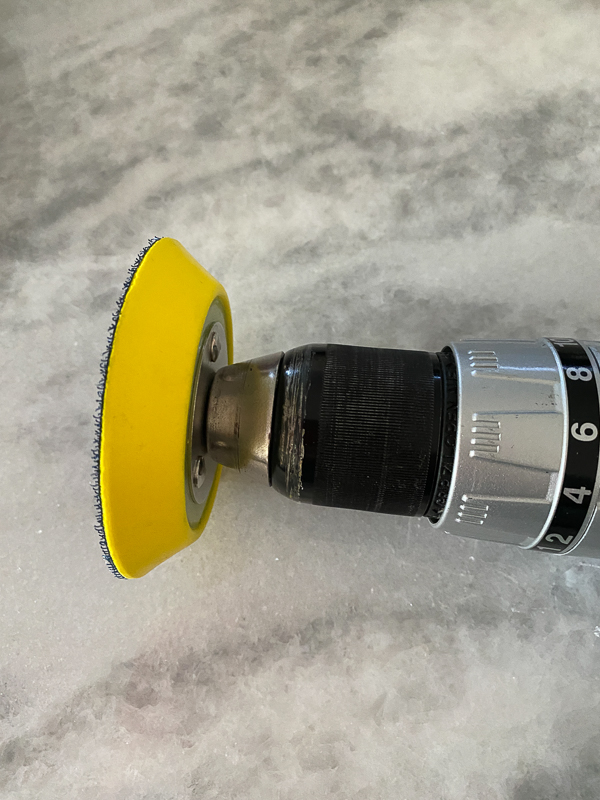
The first thing I did was screw in the backing plate into my portable drill. I used a Mikita cordless drill. It had more than enough power and performance to perform the task and I did not have to worry about a cord getting in the way.
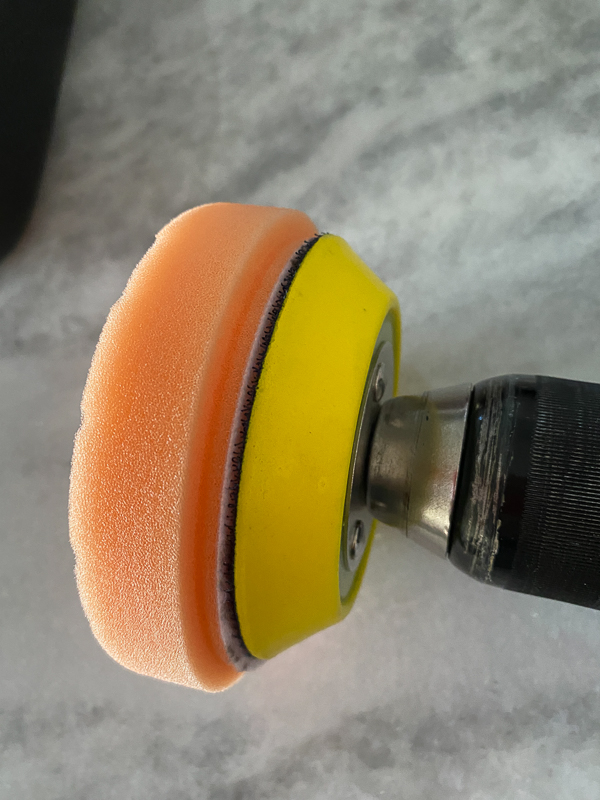
I then attached the four-inch cutting pad to the plate. The plate has loops for velcro, and the pad has a soft side. Once it was on the backing plate, it was solid.
Next, I began the process of restoring my headlights. The bottle of the restorer polish states that if your headlights are pretty fogged, you will get better results by wet sanding the headlight first.
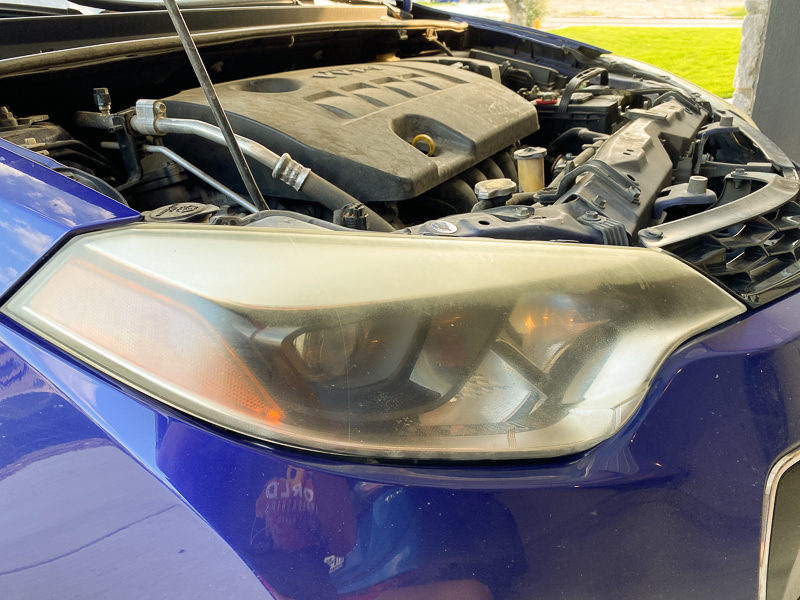
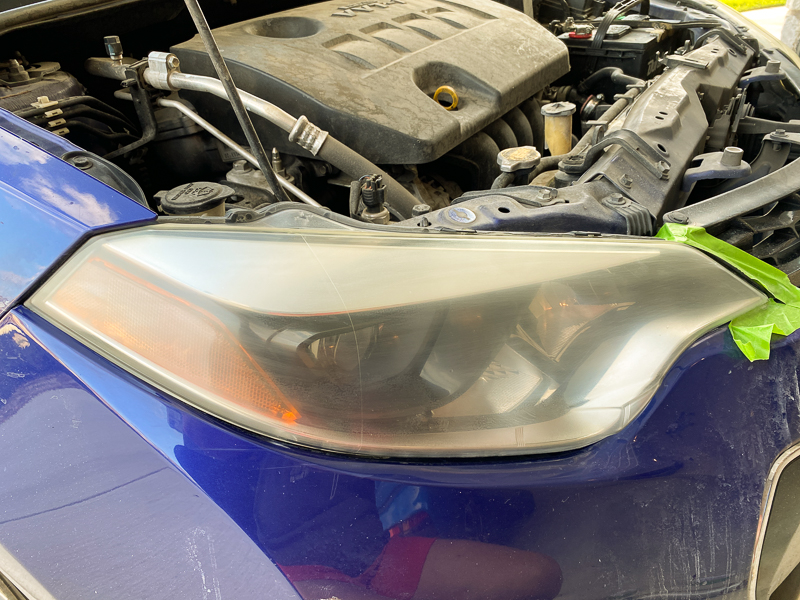
You can see that the headlights are pretty bad. I knew right away running a polisher over them would not get them as clear as I would like them to be.
The first thing I did was clean the lens with some glass cleaner to get any bugs off of it. I also raised the hood so I did not have to worry about over sanding on to the paint of the car.
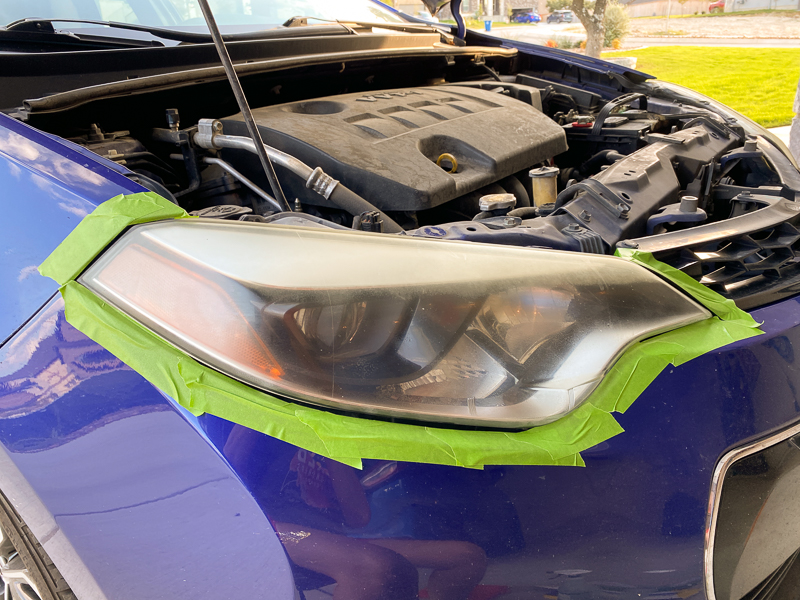
I then put some ‘Frog’ tape around the paint surrounding the lens to protect the paint in case I got overzealous in my sanding endeavors.
I purchased 2000 and 3000 grit sanding sponges from my local auto parts store. I then filled a spray bottle with some water. I sprayed down my 2000 grit sanding sponge and the headlight. I started to sand down the lens. You always want to sand in the same direction. In my case, I sanded horizontally across the headlight. As I started to sand, you can see in the picture below all the dead and fogged plastic coming off as a milky watery substance. I continued to respray the headlight and the sanding sponge with water and sanded until I was no longer getting any white runoff from the headlight.
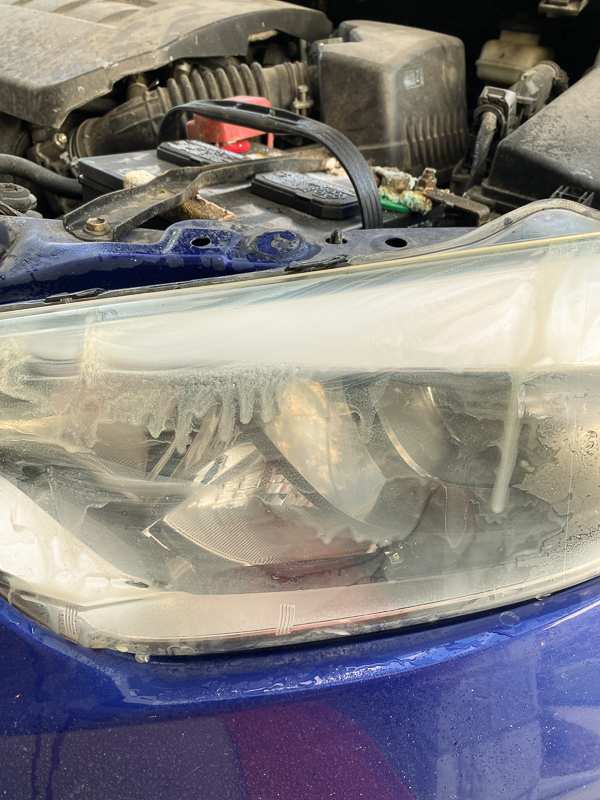
Once I was no longer getting the milky runoff, I took a picture of the headlight.
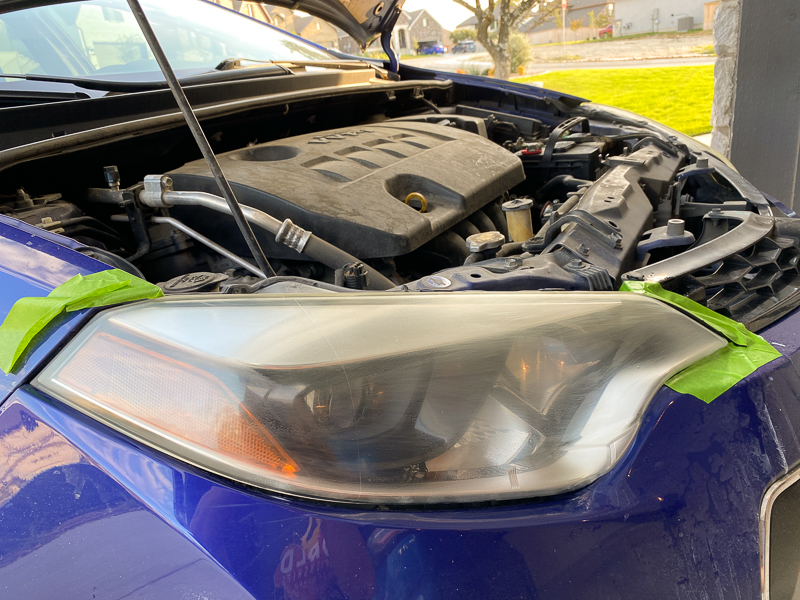
You can see now that the entire headlight is uniformly foggy. When I ran my hand over the headlight, it felt as smooth as glass. Next, I grabbed the 3000 grit sanding sponge and my water and made finer lines on the lens. This time I was not getting any kind of milky runoff. I sanded in the same direction and sanded the entire headlight. This second step was much quicker than the first sanding.
The picture above shows a more uniform and finer sanding pattern. Now it was time to break out the polish and drill!

The directions say to place three drops of the polisher on the pad.
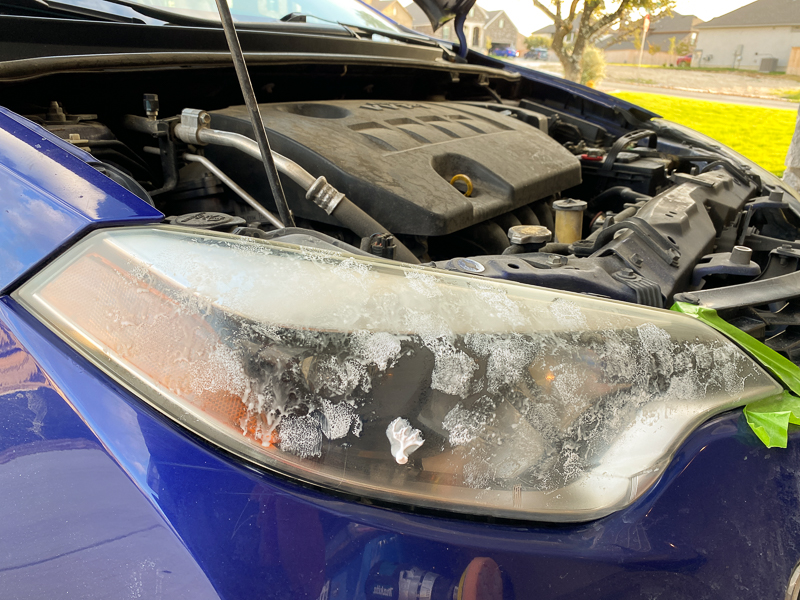
Then you take your drill and push the pad all over the area you want to polish. This distributes the polish around the headlight and will keep you from splattering the polish when you first fire up the drill. I then turned the drill on and began to polish the headlight. The directions state to polish until the polish turns clear. Once the polish was clear, I grabbed a microfiber towel and buffed off the polish.
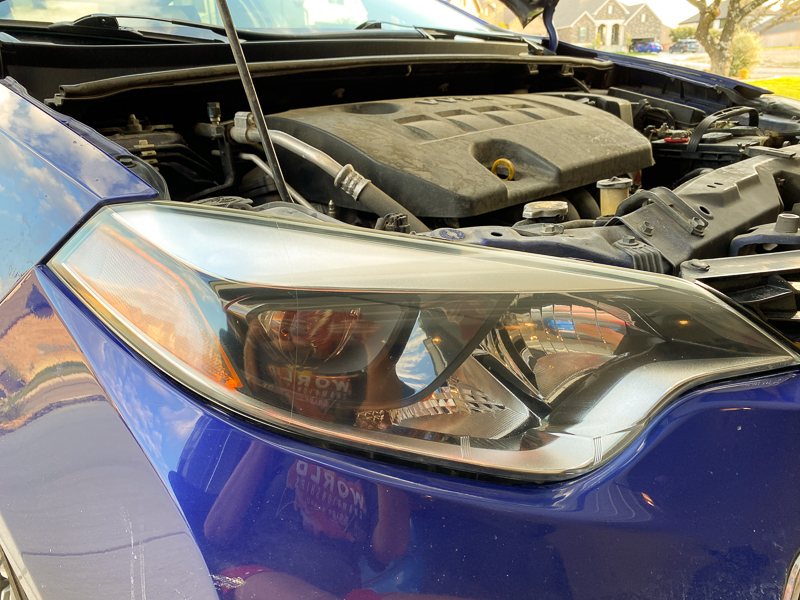
Wow, the headlight looked brand new! It was very clear and felt as smooth as glass.
Here is a picture of the front of the car where the left headlight has been restored, and the right headlight is in its original state of fogginess. I then proceeded to do the same process to the right headlight. After I finished both headlights, I applied the JetSeal manually to both headlights with a microfiber towel. Per the instructions, I needed to let the sealant sit on the headlights for 20 minutes before buffing off with another microfiber towel. The bottle of sealant says it should protect the plastic or paint you apply it to for a year.
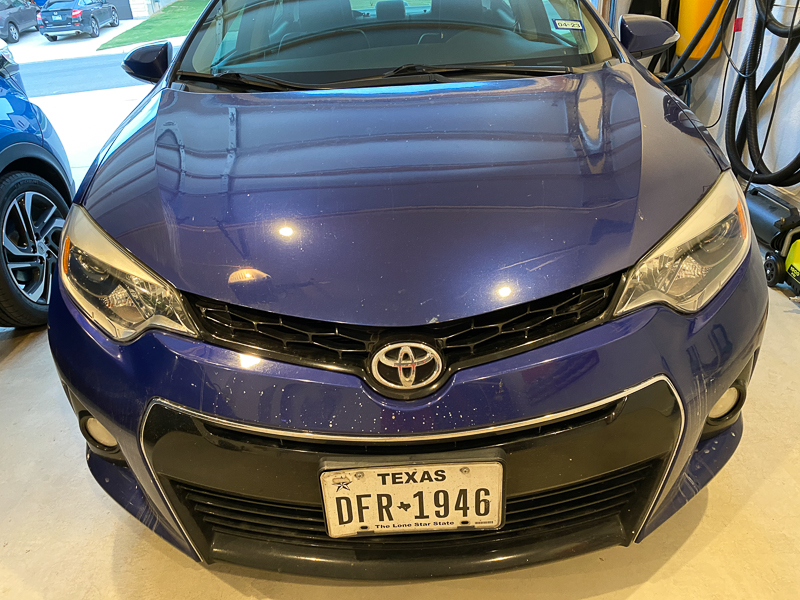
Here is a picture of the final product. The headlights are clear, and the lights shine nice and bright at night. Now, if I can only get the rest of the car to look this good! This car spent most of its life parked outside and driving many highway miles. It still runs like a champ, though.
Performance
I love the results of the Chemical Guys Drill Powered Headlights Restoration & Protection Kit. It took me about an hour and a half to sand, polish, and apply the sealant to the headlights. Then I waited 20 minutes before I took a minute to buff off the sealant.
I want to note that it is all about the preparation and process to get great results when it comes to detailing and cleaning up your car. If I had not gone through the wet sanding process before I applied the polish, the results would not have been nearly as good. My old process had me go through 4 steps of various levels of polishing, while this new process had me go through two levels of wet sanding and one step of polishing. I found this new process faster and provide just as good or better results.
What I like
- The kit includes the pad and backing plate to use with any home drill
- There is only one step to polish.
- The kit includes a sealant to protect the headlights.
- You could restore many headlights with the amount of polish and sealant in the kit.
What needs to be improved
- Including the Chemical Guys sanding block and sandpaper in the kit would be nice.
Final thoughts
If your headlights are foggy and you have a drill sitting at home, using the Chemical Guys Drill Powered Headlights Restoration & Protection Kit is an easy way to restore them in less than two hours. You can buy the sanding sponges from your local auto parts store for less than $15. There is something totally satisfying to see how clear and clean they can become as you work on them yourself.
Price: $59.99
Where to buy: Chemical Guys
Source: The sample of this product was provided by Chemical Guys.

2-Pack LED Video Light Kit, NiceVeedi Studio Light, 2800-6500K Dimmable Photography Lighting Kit with Tripod Stand&Phone Holder, 73" Stream Light for Video Recording, Game Streaming, YouTube
(as of June 19, 2026 21:17 GMT -05:00 - More infoProduct prices and availability are accurate as of the date/time indicated and are subject to change. Any price and availability information displayed on [relevant Amazon Site(s), as applicable] at the time of purchase will apply to the purchase of this product.)
Gadgeteer Comment Policy - Please read before commenting
Great review and nice job on the lenses Lynn ! I used a different product but it has no sealer, making Chemical Guys a plus. I’ve been able to touch up my lenses twice over 18 months with cheap, white toothpaste on the drill buffer pad. I buff with the toothpaste, then wipe it off with a damp then dry cloth. The lenses get as clear as when I finished the initial process with steps similar to yours. I’m doubtful toothpaste would work well as a very first step.
If you keep a car any real length of time (mine is 19 years old) the headlight plastic will become irretrievably fogged. However, replacing the entire headlight assembly is not that expensive. Often you can get a pair of new headlight assemblies for well less than $200. It took about an hour to replace mine.
Another tip is about every couple months clean the headlights thoroughly with glass cleaner and then with a bit of rubbing alcohol (to get off any old protectant residue). Then spray them with 303 Marine Aerospace Protectant (on Amazon). This stuff has superior UV protection. This little effort can extend the time between rehabs for years.
I clean my 2012 Altima headlights with plain old metal polish. Just a microfibre rag and elbow grease. Keep rubbing and watch the cloudy film come off on the rag. Nice. Follow it up with a good wax and you’ll have clear lights for a long time. Any old metal polish will do…I use Mothers however it doesn’t matter.
This is a great review. Thank you very much. I just used your method today, and my headlights, which were almost all yellow/foggy, are totally clear. Not entirely new car clear, but very close to it. I did not get the Jet seal, as I got my stuff ad-hoc off amazon. The wet sanding did the trick. Thank you, I have used many different products, and for under 30 dollars with sanding paper and drill bit accessories, I got clean headlights. Significant savings from $200+ for new headlights and installation. Chemical Guys are great. I am definitely purchasing more of their products to maintain my old CRV.