An NVIDIA graphics chip can help clean up a noisy photo, run a chatbot on your PC and turn a 3D design into a finished image. The useful part is finding an app that puts that chip to work. CUDA and RTX are two names that help explain how it happens.
They’ve been around for years. NVIDIA’s new RTX Spark Windows PCs bring them into another kind of computer, built around an Arm processor. This guide starts with the basics, then gives you seven practical things to try across the wider NVIDIA ecosystem.
CUDA and RTX, without the alphabet soup
A GPU is a processor that handles lots of similar calculations at once. That makes it useful for drawing graphics and for jobs such as processing images or running AI models.
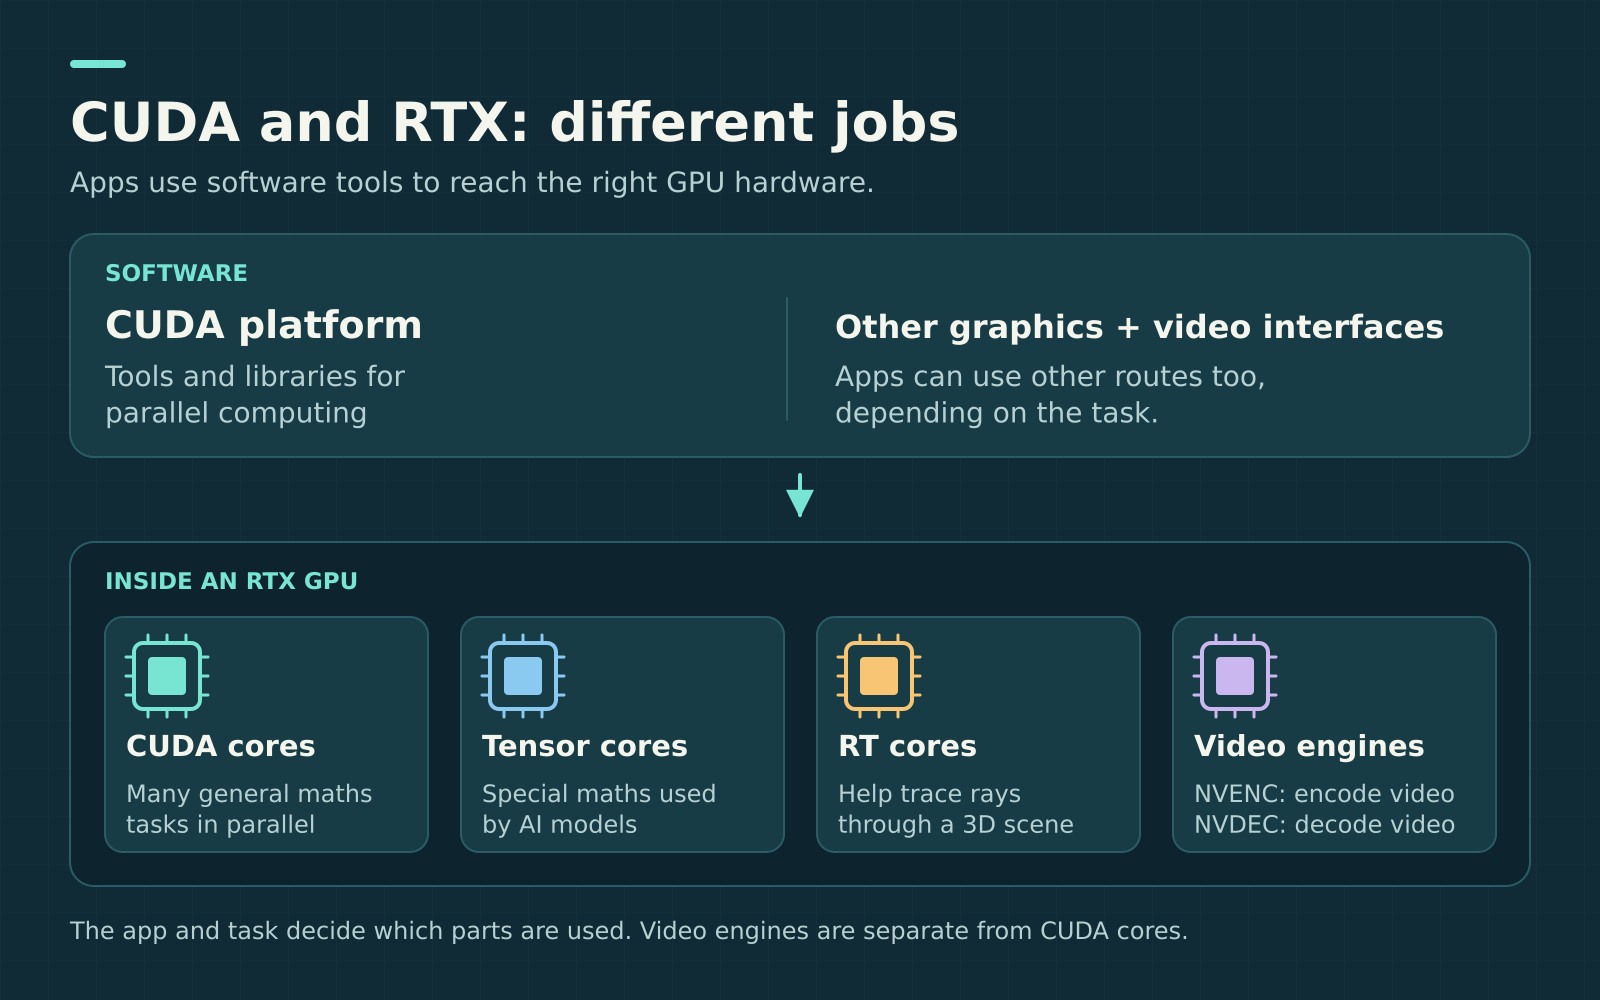
CUDA is NVIDIA’s computing platform. It gives software developers the tools to send suitable work to an NVIDIA GPU. Most readers use CUDA through an app. You don’t need to learn programming or install a developer toolkit just because a laptop advertises CUDA support. Follow the app’s setup instructions.
RTX is NVIDIA’s graphics and AI technology family. Its GPUs combine different kinds of processing hardware:
- CUDA cores do general-purpose calculations in parallel, including work used in graphics.
- Tensor cores specialize in the kinds of math used heavily by AI.
- RT cores help trace how light travels through a virtual scene, supporting realistic shadows and reflections.
Those parts work together when software supports them. A core count alone won’t tell you how fast your app will run, and GPU acceleration doesn’t always use CUDA. Games, photo tools and video features can take different routes to the hardware.
1. Run a chatbot on your own computer
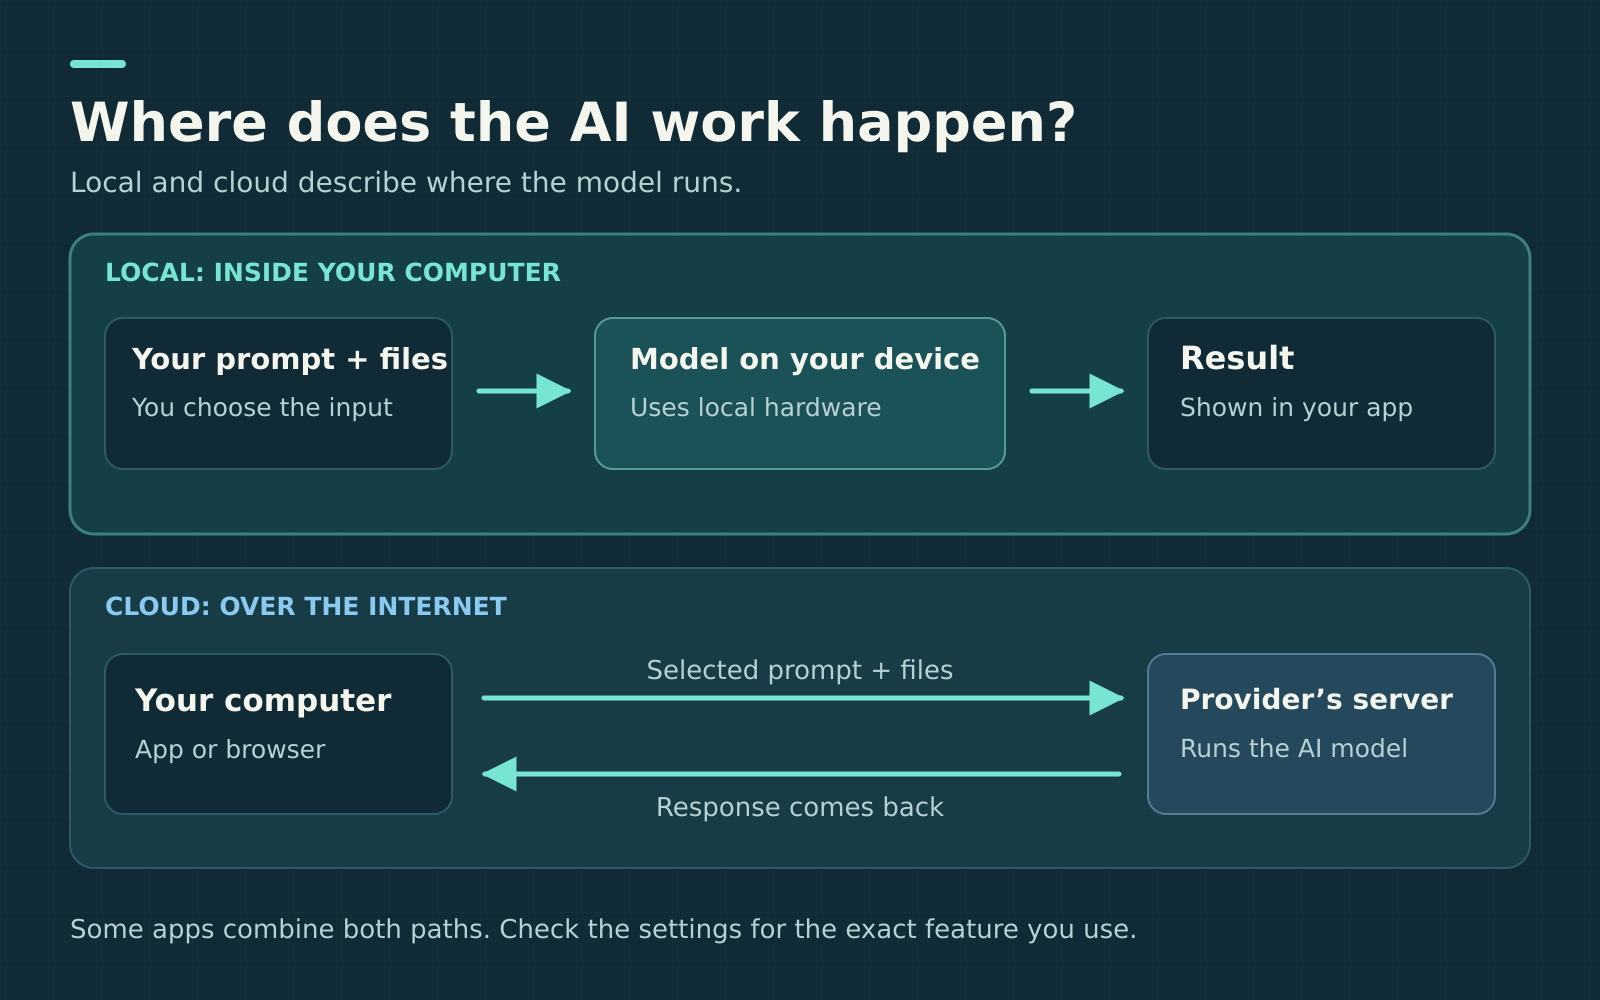
A local chatbot is useful for drafting ideas, explaining a passage or summarizing text you give it. Downloaded model files supply the AI; an app runs the model; the GPU handles suitable calculations. That work is called inference, which simply means using a trained model to produce an answer.
Ollama is one option for supported NVIDIA systems. Download a model that fits your available memory and start with a small, low-stakes task. Ask it to summarize a short document, then check the summary against the original. Ollama’s status command, ollama ps, shows whether a loaded model is using the GPU, CPU or both.
Local processing gives you control over where that step happens. Check the settings, though: Ollama also offers cloud features and a local-only mode. A connected web search or cloud model can still send information off the PC. Downloading models requires internet access, and local answers still need fact-checking.
The main requirement is enough usable memory for the model and its working data. Start small before buying hardware around a huge model. Running locally also uses electricity and ties up your computer; it doesn’t establish a particular saving over a cloud service.
An AI agent that organizes tasks or calls online services doesn’t automatically need CUDA. The GPU becomes relevant when the workflow runs a supported local model or another heavy processing task.
2. Turn an idea into an image
Try a concept for a party invitation, a fictional scene or a rough visual for a personal project. ComfyUI’s local image-generation workflow combines a downloaded model with your text description. On supported NVIDIA hardware, its software uses a CUDA-enabled version of PyTorch, the engine that runs the AI calculations.
Start with the supplied text-to-image example. Load its required model, enter a simple description and generate an image before adding extra tools. That gives you a working starting point you can build on.
ComfyUI’s requirements depend on the hardware and installation route. Model size and image settings also affect memory needs. Choose a documented workflow your computer can handle, and check the model’s license before using the output commercially. Treat unfamiliar add-ons as software you need to trust, and inspect the result for invented details. A generated picture of a product isn’t evidence of what that product looks like.
3. Clean up a grainy photo
Dim restaurants and indoor events often leave photos with visible noise. A supported GPU can help an editing app process those images.
In Lightroom Classic’s Detail panel, select Denoise on a supported image and adjust its strength. Zoom in on faces, hair and fabric as you compare the result. The aim is a cleaner photo that still looks natural.
This is a good example of a useful GPU feature that isn’t exclusive to NVIDIA or CUDA. Adobe lists compatible graphics hardware for Windows and Mac. Its recommended full-acceleration requirements include 8GB of dedicated GPU memory or 16GB of shared memory on Windows. That’s guidance for those Lightroom features, not a minimum for every photo edit.
You’ll need the appropriate Adobe subscription, supported image format and compatible app version. Keep the original, and compare the result rather than assuming the strongest setting is best.
4. Make video editing and exports easier
Video work gives the GPU several jobs. It can help process supported effects while you edit, then assist with turning the finished timeline into a video file.
In Premiere, GPU-accelerated effects carry an icon in the Effects panel. Start with a short project using your own footage. Check that GPU acceleration is available, then compare playback with the effects you actually use. For a supported export format, select hardware encoding when the option is available.
There’s an important distinction here. NVIDIA’s NVENC and NVDEC video engines are separate from CUDA cores. NVENC handles encoding, which creates the compressed video file. NVDEC handles decoding so footage can be played and processed. A faster export isn’t automatically a CUDA result.
Your camera format, GPU generation, app version and export settings determine which hardware features Premiere can use. Keep storage speed, system memory and the CPU on the checklist too. A GPU upgrade won’t fix every choppy timeline.
5. See a 3D design with finished lighting
If you’re learning 3D modeling, the GPU can help turn a scene into a finished picture. That’s rendering. You might use it to explore a desk layout, a lamp design or a small animated scene.
Blender’s Cycles renderer supports CUDA and OptiX on compatible NVIDIA hardware. OptiX can use RTX ray-tracing hardware to help with the lighting calculations. In Blender’s preferences, choose a supported Cycles rendering device, enable the GPU, then set the scene to GPU Compute.
Start with a small scene and change one light or material at a time. Large textures and complex scenes need more memory, so the graphics chip’s memory capacity matters alongside its processing power. Blender is free, and it also supports other hardware through routes including AMD HIP and Apple’s Metal. Check the requirements for your exact Blender version and operating system.
6. Reduce background noise on a call
A loud keyboard or nearby fan gives an AI noise filter a clear job. NVIDIA Broadcast uses RTX hardware for effects such as noise and room-echo removal. It also offers webcam background effects.
Choose your microphone in Broadcast, enable the effect, then select NVIDIA Broadcast as the microphone in your call app. Make a short recording first so you can hear how it treats your voice. Try one effect at a time rather than stacking everything before an important meeting.
The app’s listed GPU baseline starts at a GeForce RTX 2060, Quadro RTX 3000 or TITAN RTX, with other system and driver requirements. Some effects need more capable hardware. This is a specific Windows app, so verify support for your PC rather than assuming every machine with an RTX name can run it.
7. Choose better lighting or smoother play in games
RTX hardware can support ray tracing in compatible games, making lighting and reflections behave more like they do in the real world. Those effects add work for the GPU. DLSS offers several AI-assisted graphics features to help manage image quality and performance.
The easiest one to understand is Super Resolution: the game renders at a lower resolution, then AI helps reconstruct a higher-resolution picture. Frame Generation is a separate feature that creates extra displayed frames. The available options depend on both the game and your GPU generation.
In a supported game such as Cyberpunk 2077, start with a DLSS quality preset and compare the image in motion. Then adjust ray tracing and check how the controls feel. Choose settings you enjoy rather than chasing the largest frame-rate number. You don’t need to install the CUDA developer toolkit to switch these game features on.
Where RTX Spark fits
N1X-based RTX Spark PCs combine NVIDIA graphics with Windows on Arm. NVIDIA documents a Windows Arm64 local-AI route using llama.cpp, so there’s a concrete starting point for that job.
Treat the other examples above as ways to understand the wider RTX ecosystem, rather than a tested N1X compatibility list. The app, its plug-ins and any hardware drivers all need to work on the platform. NVIDIA’s compatibility guidance explains why running an existing Windows app under emulation doesn’t settle every dependency.
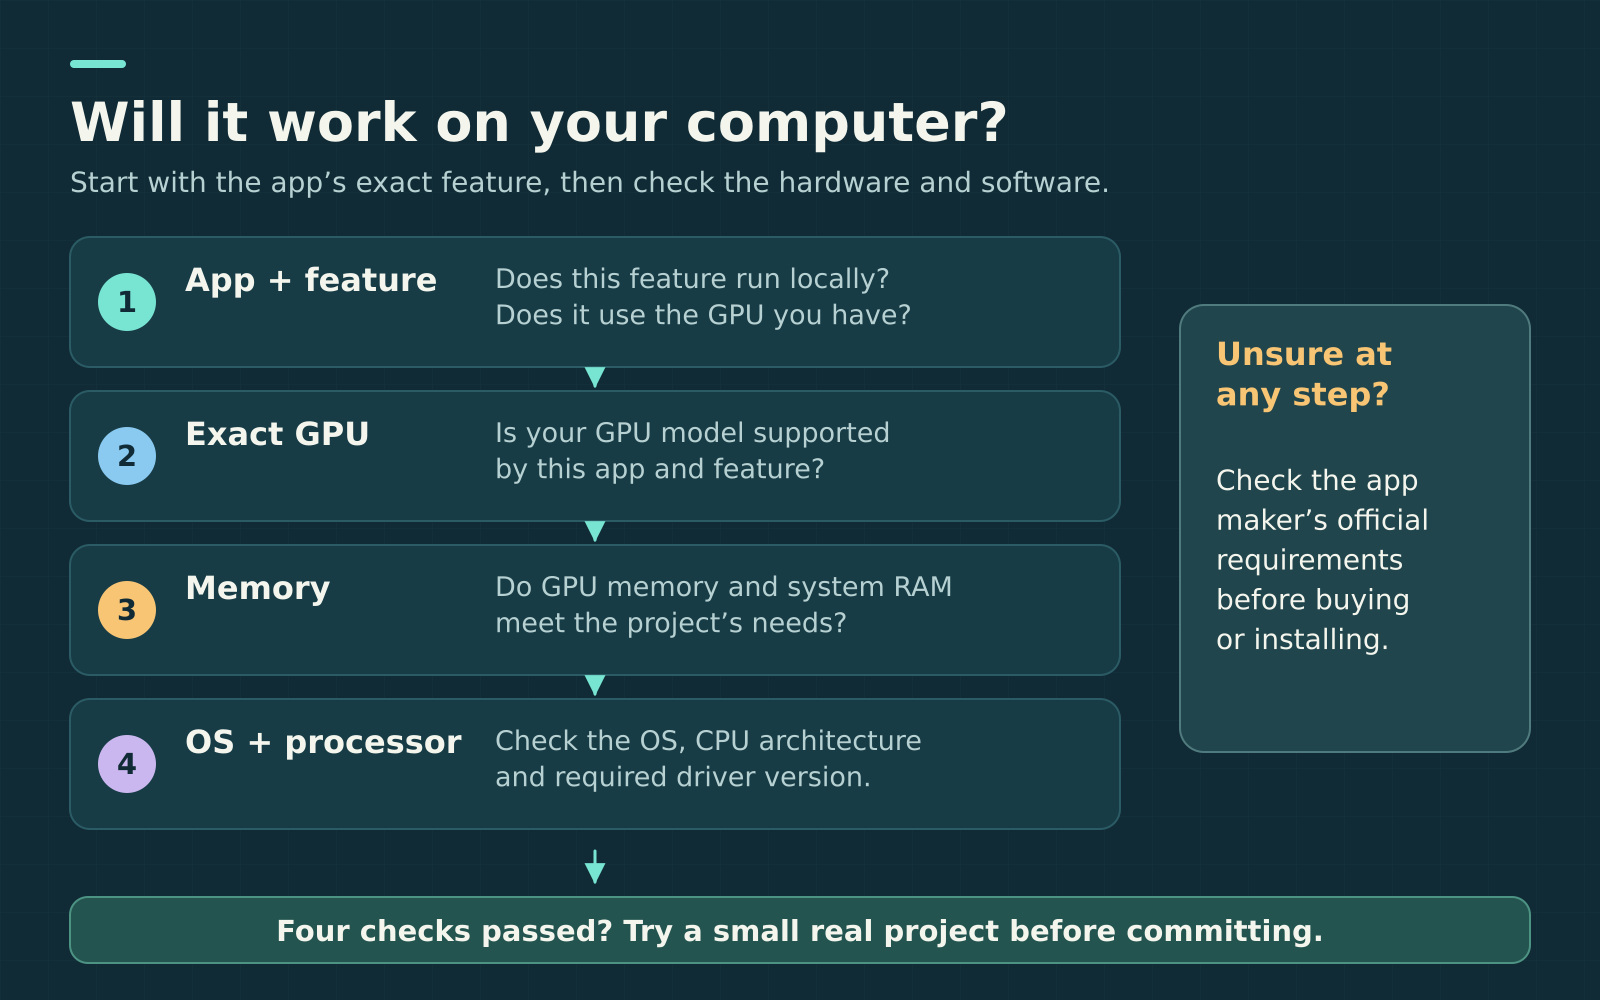
Choose one job you already care about, find the supported app and try a small real project. If you’re happy with the result on an AMD or Apple system, CUDA alone isn’t a reason to replace it. The worthwhile upgrade is the one that helps you finish your work, with the software and memory that work needs.