REVIEW – SoCal has HARD water. Enough so that we have mineral deposits on the water fixtures and our fridge’s ice maker refuses to function. Every now and then a review opportunity comes along that simply could not be timed better. This was exactly the case with the E-3000UV from Kind Water Systems. My wife and I had literally just sat through a 2-hour presentation on a water treatment from a local service and we were astounded at the cost (and thoroughly confused by the mysterious free soap program) when this review offer popped up and I jumped on it. It has made a tremendous difference in the quality of our water and I’m here to let you know that yes, you can install one of these yourself. Read on my friends.
What is it?
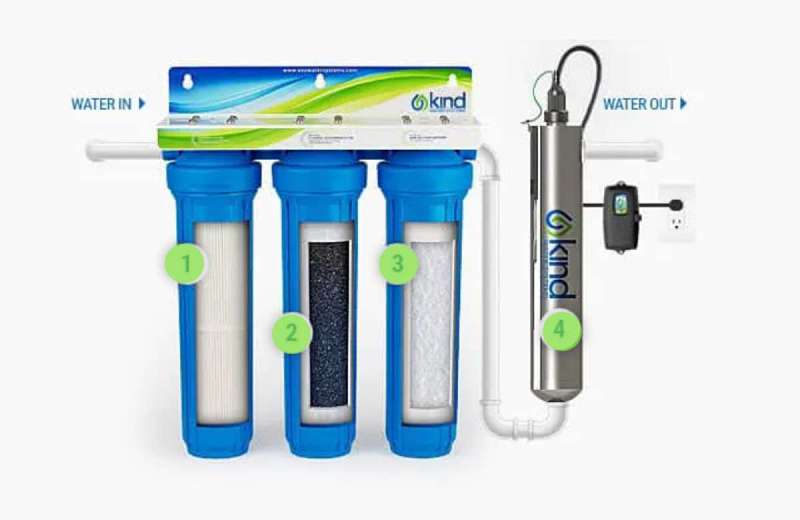
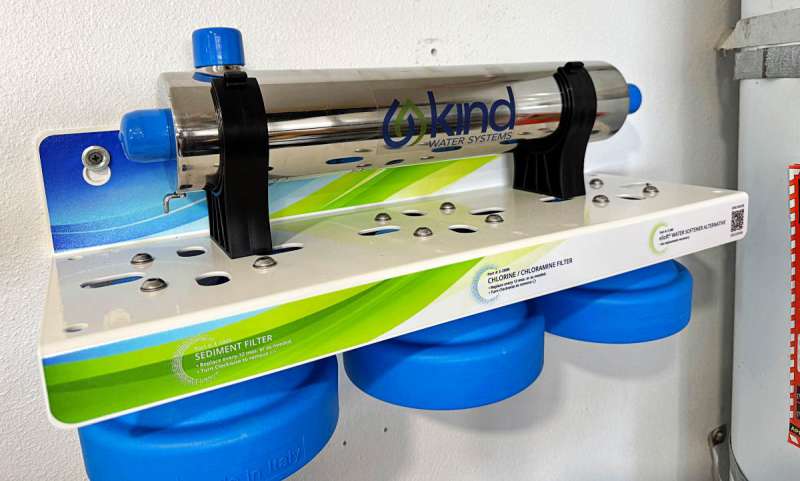
The Kind Water Systems E-3000UV is a 3-stage, water softener system with UV disinfection that has enough capacity to treat water for your entire home. It includes a 5 micron pleated sediment filter, a chlorine/chloramine carbon block filter, an eSoft salt-free softening cartridge, plus the UV disinfection system. All in a well documented package that should be easy enough for many to install by themselves.
What’s included?
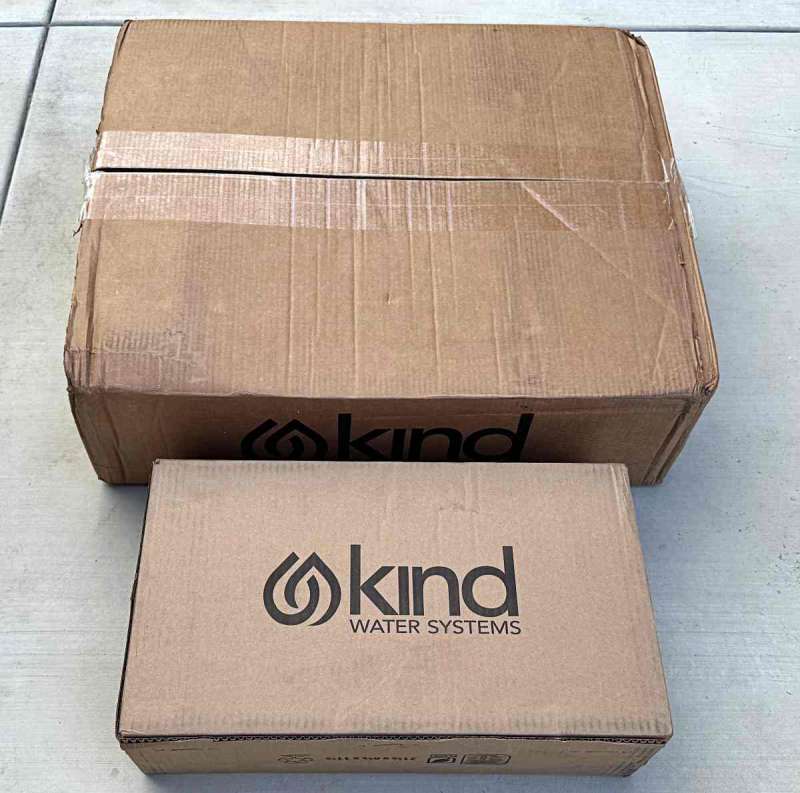
The smaller one is the UV system and arrived a day ahead of the the larger box which contains the main system.

- Instruction manual
- Installation shelf
- Manifold
- 3 separate enclosures, each with their own filter
- 3 large 0-Rings with lubricant
- Wrench for installing/removing the filters
- Installation hardware
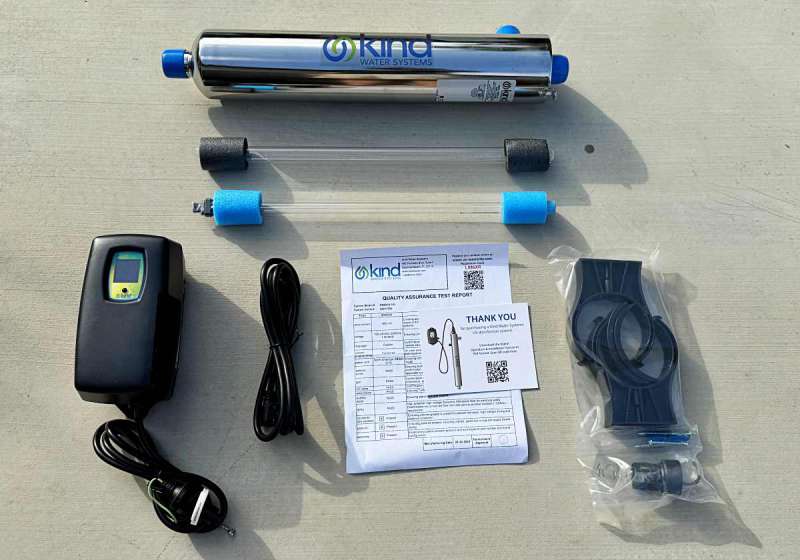
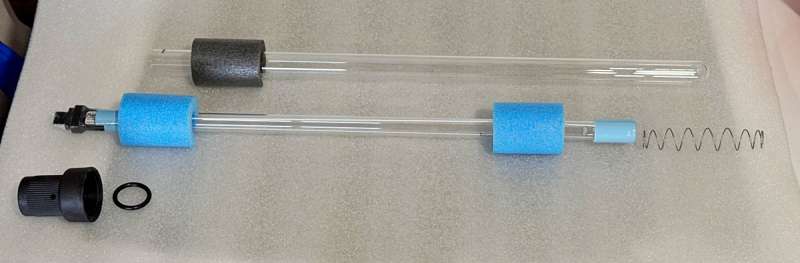
- UV tank
- Glass tube
- UV module (with key)
- Power/control module w/ cable for UV
- Mounts, hardware, and UV cap/spring
Tech specs
Click to expand
E3000 Specs
- Max Flow Rate: up to 15 GPM (Gallons Per Minute)
- Max Capacity: up to 6 Bathrooms
- System Dimensions: 29″(H) x 31¼” (W) x 8″ (D) – Includes UV System
- Max Hardness: 1282 PPM or 75 GPG
- Connection Size: 1” FNPT
- Operating Pressure: 25 to 120 psi
- Operating Temp: 36 to 120 F
- PH Range: 6.5 to 9.5
- Max Iron: 0 mg/L
- Max Hydrogen Sulfide: 0 mg/L
UV Disinfection System Specs
- Max Flow Rate: up to 15 GPM (Gallons Per Minute) 30mJ/cm2 @ 95% UVT
- Connection Size: 1” MNPT
- Operating Pressure: Max 150 psi
- 110V systems with North American NEMA 5-15, 3-wire plug
- Lamp Power (Watts): 50
- Power (Watts): 62
- Chamber Material: 316L Stainless Steel, A249 Pressure Rated Tubing
- Operating Temperature: 2-40° C (36-104° F)
- Iron (Fe): <0.3 ppm (0.3 mg/L)
- Manganese (Mn): <0.05 ppm (0.05 mg/L)
- Turbidity: < 1 NTU
- Tannins (organics): <0.1 ppm (0.1 mg/L)
You can remove this heading and section if it doesn’t apply to your review.
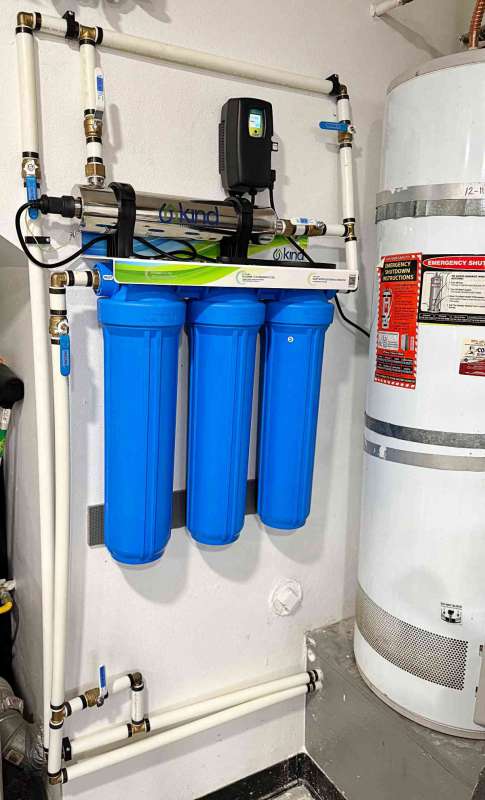
Design and features
 Kind Water Systems has created a water treatment system that is easy to install and addresses most of the issues you’re likely to have with your water. The system should be installed to the earliest point of water entry into your home so that all water is treated.
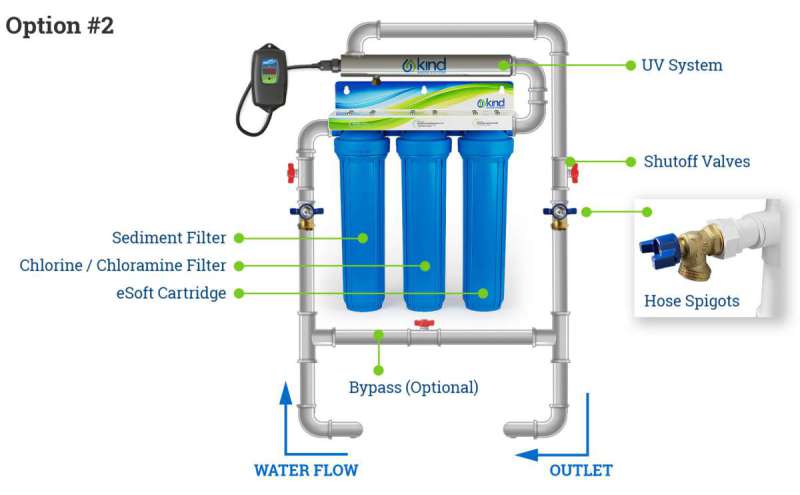
The stage one filter is a 5 micron pleated sediment filter that eliminates visible particulate matter like dirt, sand, silt, clay, rust, and other debris. The stage two filter reduces chlorine and chloramine along with other chemicals and contaminants usually present in municipal water via its carbon block filter. The stage three filter is a salt-free softening cartridge called eSoft that prevents future scale build up and even helps to descale current accumulation. Even cooler is that the process used physically alters calcium and magnesium ions forming inert micro-crystals that are released back into the water, meaning that the cartridge never needs replacing. Finally, the UV disinfection system uses a physical process to destroys chlorine resistant micro-organisms that can carry disease, leaving your water clean, uncontaminated and without any new compounds present.
It really is an install and let it work setup as replacement filters are only needed once a year for stage one and two along with the UV lamp.
Assembly, Installation, Setup
This is actually the bulk of the review because once the system is installed there isn’t much left to do other than enjoy the water. Here we go…
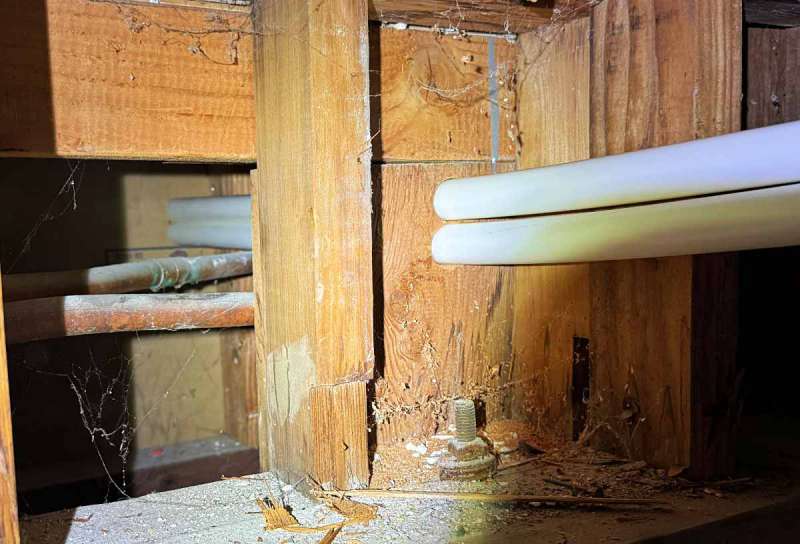
Step one is understanding the ins and outs of your current water system, where they are in your house and if the location for a system plays nice with what you find. My house presented some unique challenges that upped the difficulty slightly, but I was still able to get the job done on my own. Here’s where the main enters my house right by my front door. I was able to confirm with a 90º turn of that lower lever that all water was shut off to my house. That included any spigots mounted on my house, but not my sprinkler system or a spigot further out in the backyard. I confirmed that by running the sprinkler program while the lever was shutoff, and was very relieved that I didn’t have to do anything elaborate, or have a bypass anytime I needed to use the sprinklers. After figuring all this out, I turned the water back on and left it on until the point I was ready to tap into the supply line.
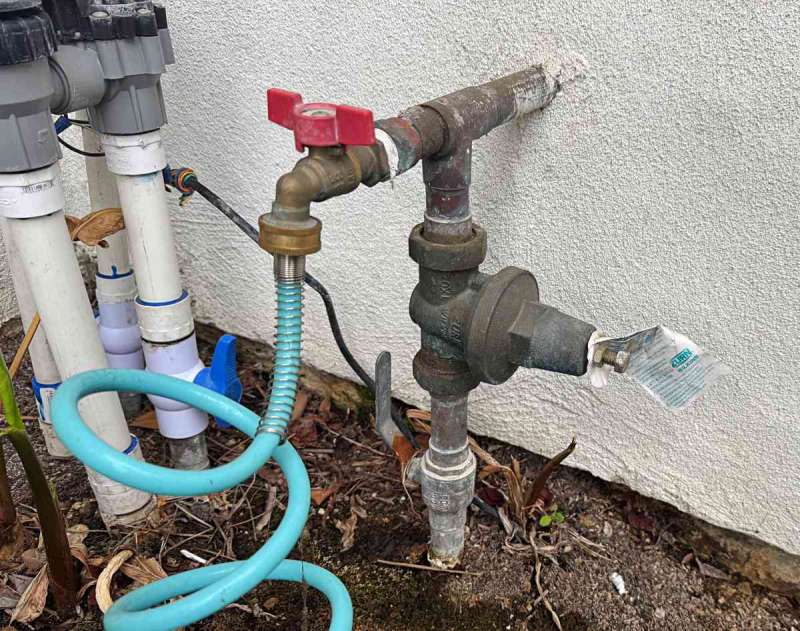
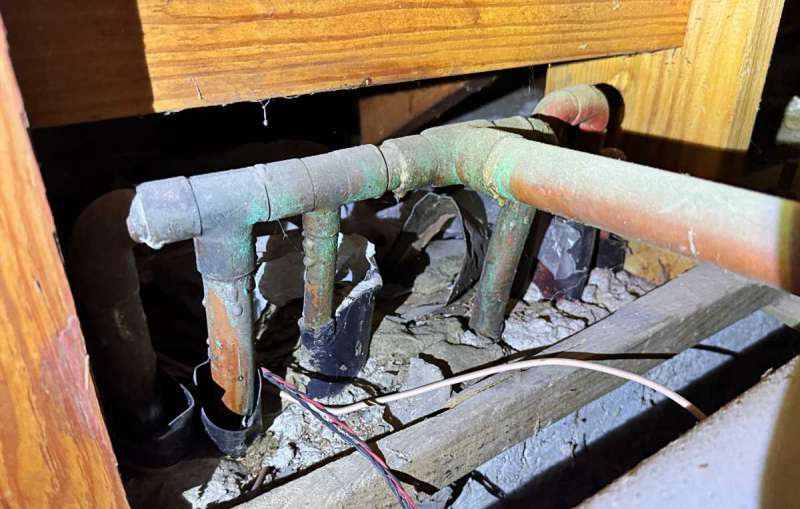
On the other side of that wall however, that 1″ pipe went into the 2′ crawlspace beneath my house, turned left and then immediately into a 4-way junction. I had suspected this when I realized that the only pipes near my water heater were into and out of the water heater itself. This meant I was going to have to run some longer pipe lengths to interrupt the supply line and get them into and back from the garage where the water heater lived.
Here’s Kind Water’s recommendation for the install that made the most sense for my scenario, based on available space and what I was going to need to do with the piping. As you’ll see a bit later, I just took that right outlet side pipe and moved it to the left side to run parallel to the intake pipe.
The next step was installing the shelf and manifold which was pretty straightforward, just make sure that you’re using the supplied hardware or something sturdy enough for the wall you are installing on. Additionally, be sure to leave enough height (a couple of inches) to allow room for the filter canisters to travel up or down during install or subsequent filter swaps.
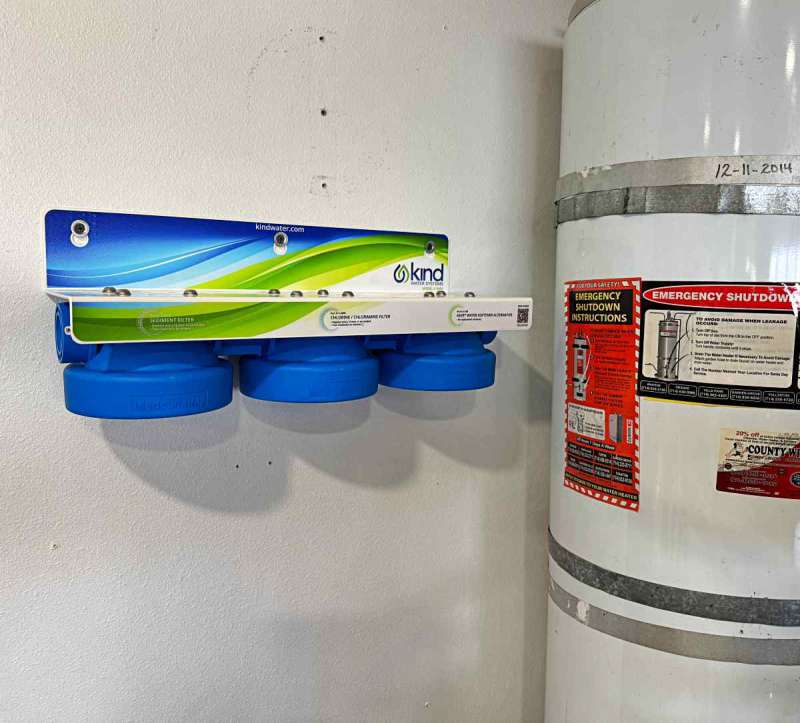
It was at this point that I realized I could mount the UV canister onto the top surface of the shelf using 2 of the manifold mounting locations if I supplied some longer screws. To be clear, this is not in the instructions, but I went for it and it worked out pretty well. I ended up sliding it further left for the final position as you’ll see shortly.
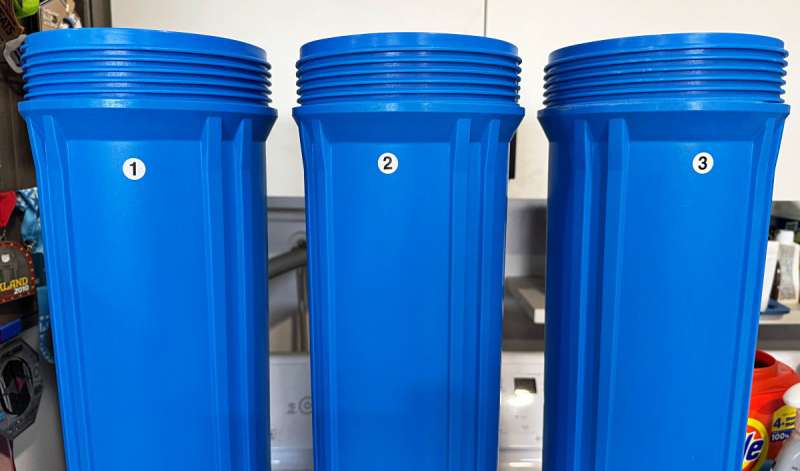
Installation of the canisters was also easy although they are heavier than they look and I would assume even more so when time comes to replace them as they’ll be full of water as well. They’re labeled in flow order, so if your system ends up with the intake on the left side, you’ll want to reverse number 1 and 3.
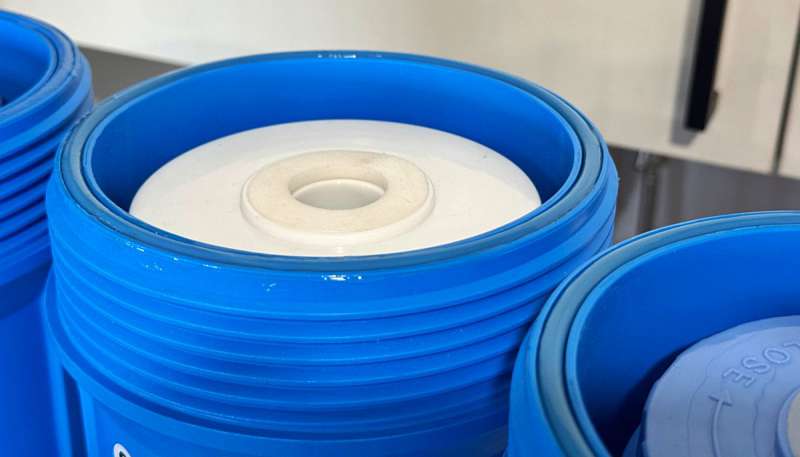
Make sure each filter is properly seated inside, then use the included lubricant on each of the O-Rings and set them into the groove around the top of each canister.
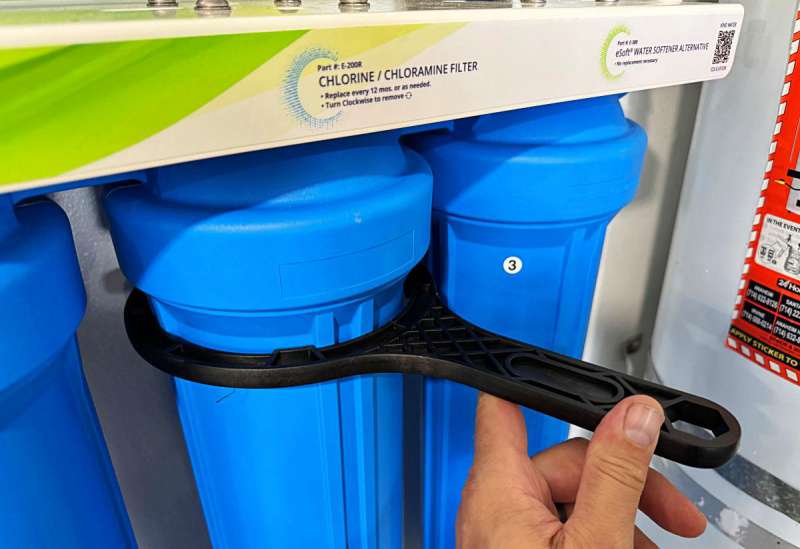
Carefully left each into place, and while supporting the weight, turn them clockwise a few turns until they are supporting their own weight. At that point you can use the included wrench to tighten them securely, making sure not to over-tighten.
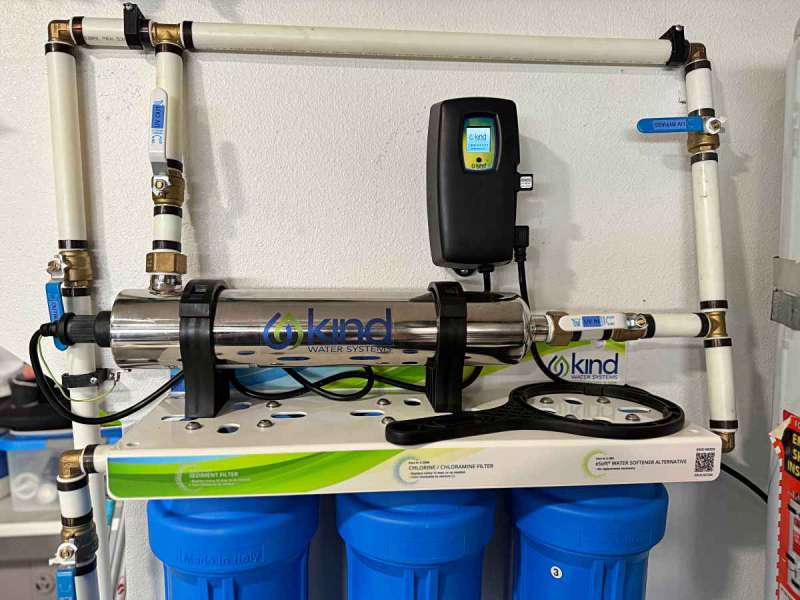
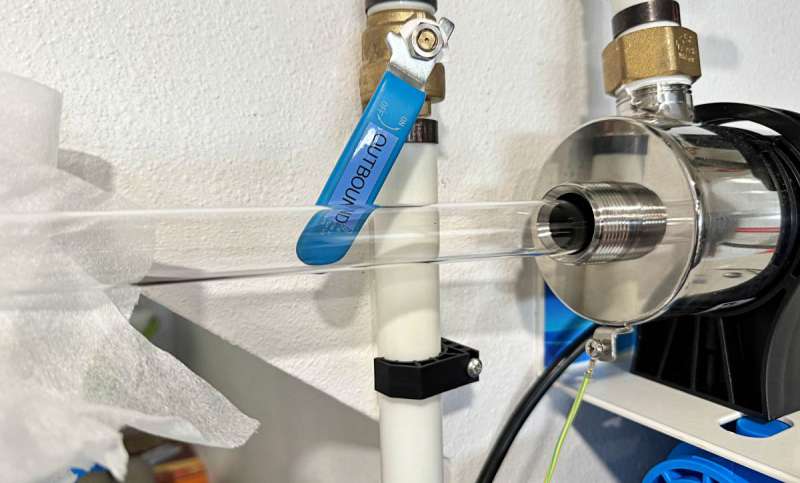
Again, I’ve done all this with my water supply on because I was not connecting the system to the house yet. Even when it came to all the piping, I wanted to get 95% of it installed and ready before going for that point of no return. As for the piping, I opted for 1″ PEX and clamps. The pipe, crimp rings, crimp ring tool, shut-off valves, elbows and some additional parts all added up to around $500. The fittings into the manifold on each side and onto the UV canister needed a healthy amount of plumbers tape to ensure the threads are water tight. Here’s what the install looked like (although the power supply was not yet connected).
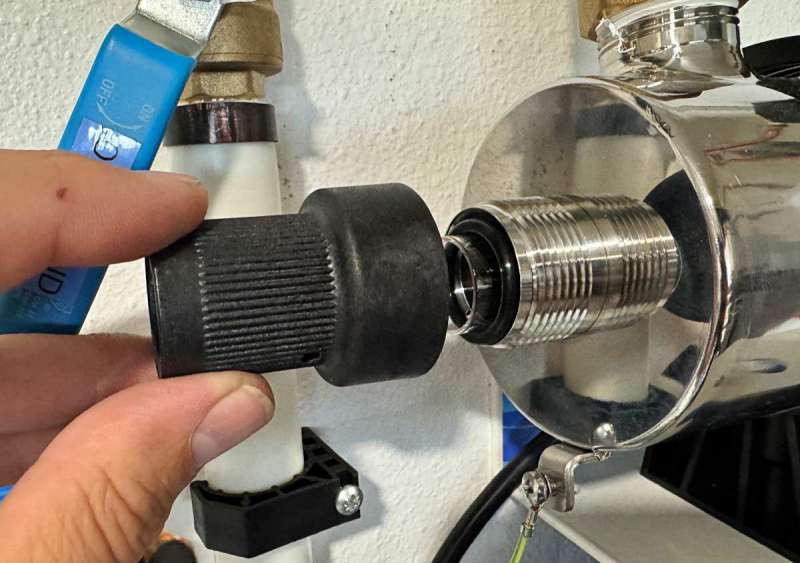
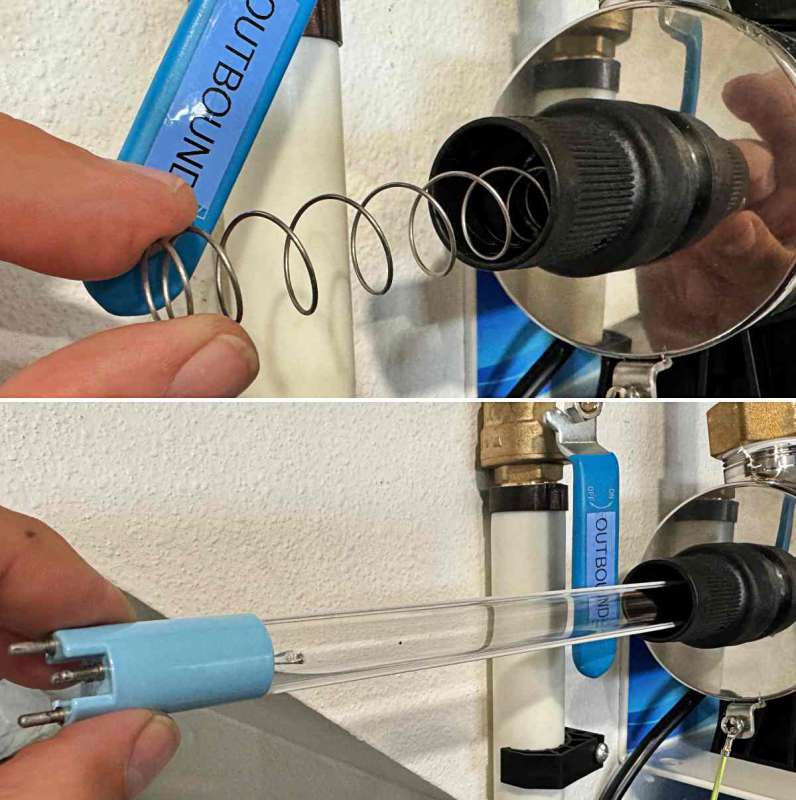
Note that I added shutoffs for the UV system. This was to be able to start up the system without the UV functioning, only because I managed to break the glass tube prior to install, and wanted to get the water filter up and running anyway. So, let’s show you the UV install. Here are the parts from top to bottom; glass tube, UV module, tension spring, retention cap and O-Ring.
Insert the glass tube into the UV canister carefully using gloves. This is actually easy, and not where I broke the tube. I tried to fully assemble the UV system before installing into the canister following a diagram a full page and half prior in the manual. By not reading ahead, I missed that it was a where things belong, not an instruction sequence.
Next is to seat the tube fully and install the O-Ring around the tube into the beveled edge of the fitting.
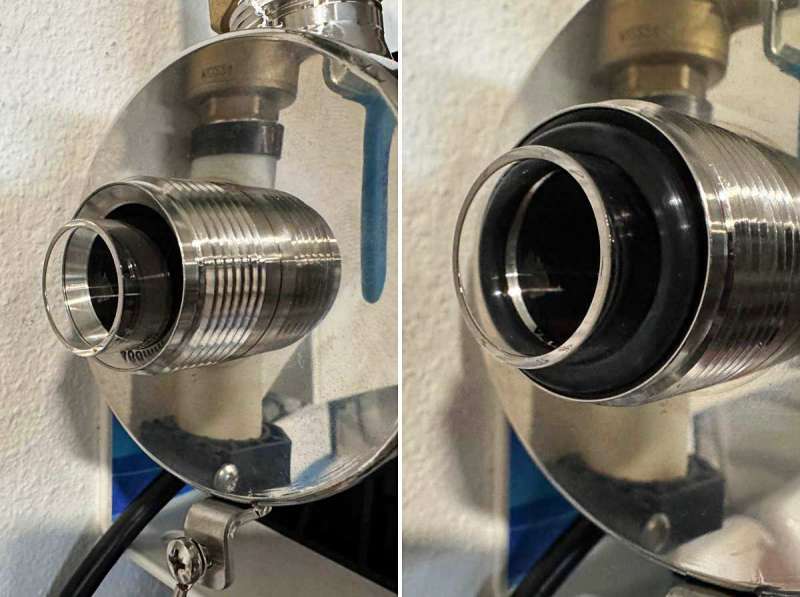
Then install the retention cap with threads down to a positive stop telling you it is in place securely.
Then you insert the spring into the tube followed by the UV module being careful not to touch the bulb itself.
Remove the black plastic “key” from the module’s pins and connect the module to the corresponding electrical fittings of the retention cap plunger as shown below. Insert fully pushing against the previously installed spring while making a 1/8th turn and letting the spring push the module into the catch. If the assembly wants to pop out, you’ve missed the catch. Then screw the connector on the green wire to the anchor point on the UV canister.
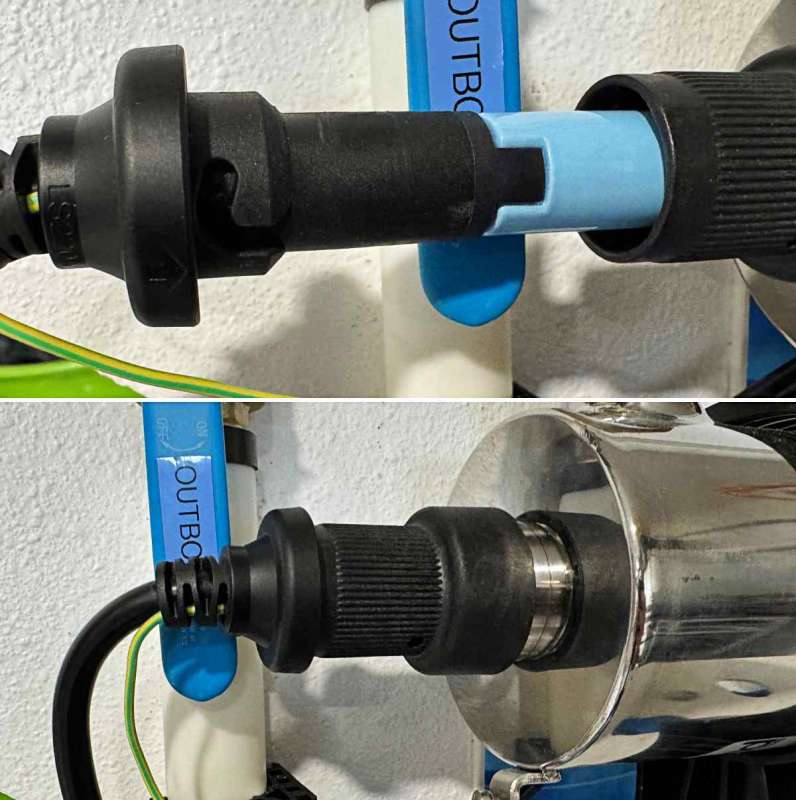
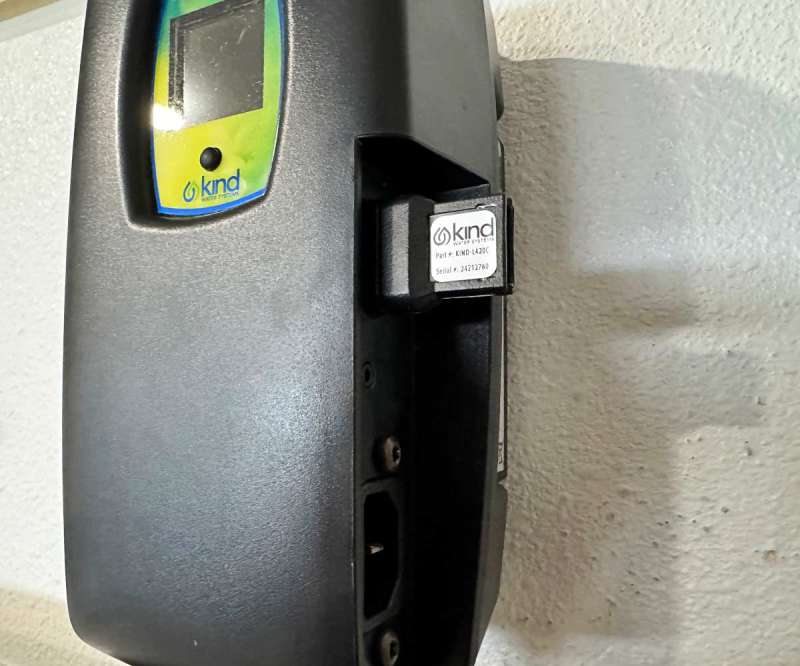
Install the power/control module onto the wall and insert the key your removed from the UV module. It lives on the right side as shown, just above the power cord connection.
It was finally time to crawl back under the house again to tap into the main water line, so I turned the shutoff valve at the front of the house, opened a faucet upstairs in the bathroom, and then opened the spigot out front past the shutoff valve. This allowed the water in the house to drain as much as possible.
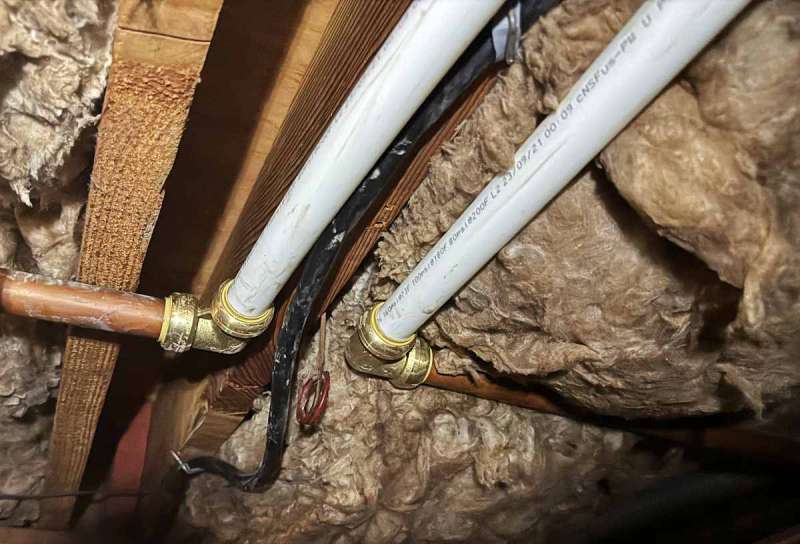
Down in the crawl space, you can see where I ran the two 1″ PEX tubes from the garage, through the podium that existed under my water heater…
and then another 10ft over to the supply line. I used a pipe cutter to remove about 4″ out of the 1″ copper pipe. Even after draining the house, I had a good bit more water come out of this pipe than I was expecting, but it slowed down after about 30 seconds. I cut the ends of the PEX pipes to the right length and then used Shark Bite 90º Push elbows to mate the PEX to the copper pipe. At this point I was feeling really grateful that I had been able to use 1″ pipe the whole time without changing diameters.
At this point, I should mention that on the system in the garage, I had turned the valves to that when the water came back on it would bypass the new filtration system and just use my out and back lengths to verify all my junctions. I called my wife from under the house and had her slowly open the outside shutoff while I watched for any leaks on these two joints. The upstairs faucet, as well the kitchen faucet were open to allow all the air in the to escape while the water found its way through. I then had her check the system in the garage to make sure there were no leaks with the bypass return. All was good so I was clear to crawl back out.
Once back in the garage, I opened the return and intake valves, and then gently opened the bypass shutoff allowing the water to make its way through the 3 filters. Remember that I had the UV filter sectioned off at this point. Once I could tell that the water had filled each of the filters and was now flowing all the way through, I slowly opened the bypass shut0ff all the way.
Kind Water recommends that you leave the water running for 15 minutes to get all air out of the house’s system. It was about that for us, maybe 20 minutes. During this time, faucets are stuttering and spitting to a point where it almost feels like you might have done something wrong. It helped to close off some faucets when they quieted down, and open others as well as flush toilets as air had crept in everywhere. Remember this is a whole home system so all water sources.
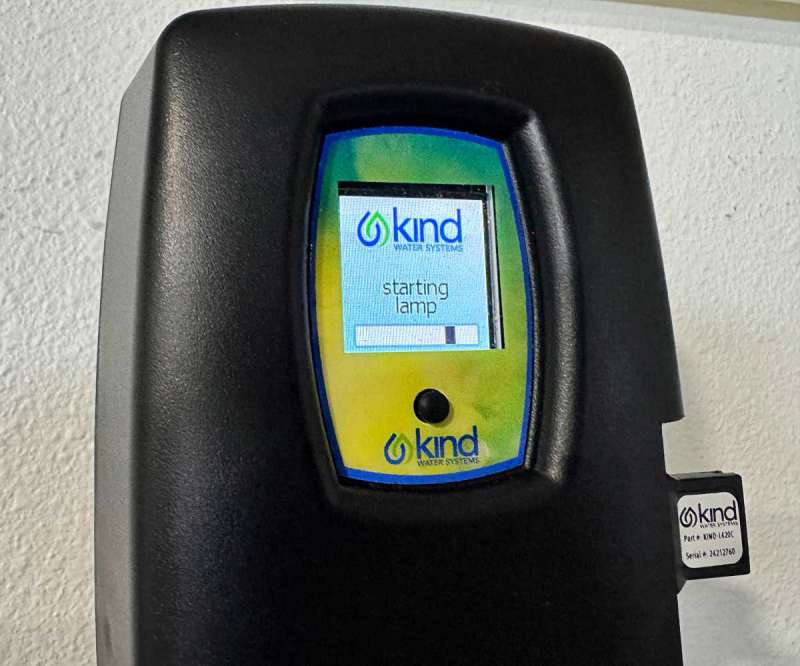
About a week later, I received the replacement glass tube. I was able to install that correctly this time, and then slowly open the valves I had installed for the UV system allowing the water to find it’s new path. Once that was good, I connected the power/controller to the AC outlet and turned it on. I was greeted with a bright screen that said starting lamp. A few minutes of automatic calibration and everything was up and running.
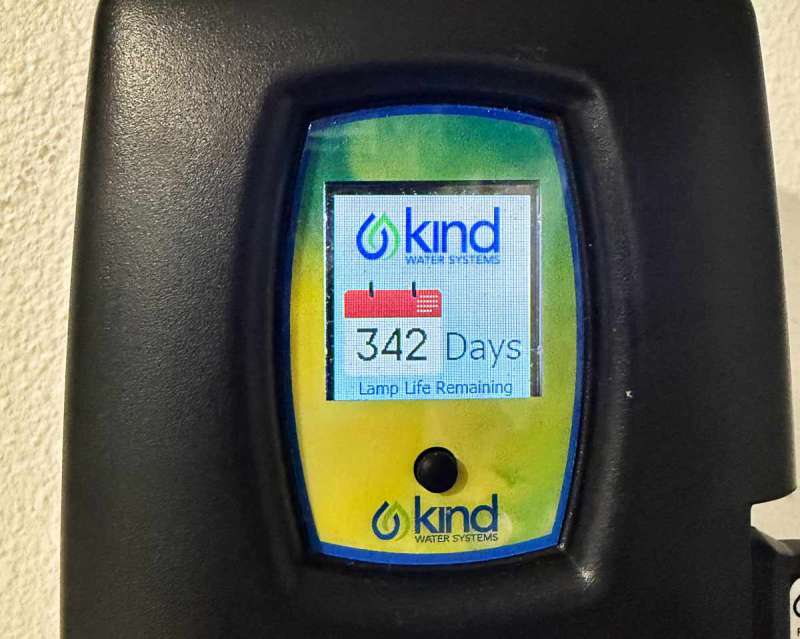
Once complete, you’re greeted with a calendar reminder for when the lamp will need to be replaced. The black button below the screen, toggles from that to a QR code for the manual and then some device information, should you need it.
So that was the install process and you know what? Not that bad. I think you can do it too.
Performance
The only thing I have not done in this review is test the water before and after, and I intend to do that. The water from my backyard spigot splits off from the main before it enters my home, so I’ll test that water and then some directly from the tap. Keep an eye on this review for an update as soon as I have the results.
In the meantime, here’s what I do know. The water definitely tastes better and so does our coffee and anything else we use water to make. Our shower has large glass panels and they were continually covered with a film as a result from the hard water. I cleaned those panels after installing the new system and I’m convinced the water made cleaning it easier along with keeping it clean. A quick squeegee before getting out of the shower and chore time is cut to a minimum.
I think the best thing is that I don’t have to think about it. Every tap or source in the house has this cleaner water now. That includes laundry (harder to measure a result) and the dishwasher where we’ve definitely seen a big reduction in spots. As for the shower, soaps lather faster, rinse cleaner and our skin and hair absolutely feel softer.
Up in that intro paragraph I mentioned a local service. They quoted $10k for a system, and then kept reducing the price if we added soaps, or committed right now. As much as the demo they performed looked good, it just felt off. The Kind Water System delivered on what we were looking for from a water system at a fraction of the price and the filter/UV lamp replacements should run about $250 once a year.
The only thing I can think to improve would be a resource for compatible valves, elbows, pipes etc. It wasn’t terribly hard, but having some verified “this worked for me” feedback with customers would go a long way towards helping new customers feel comfortable installing the system themselves.
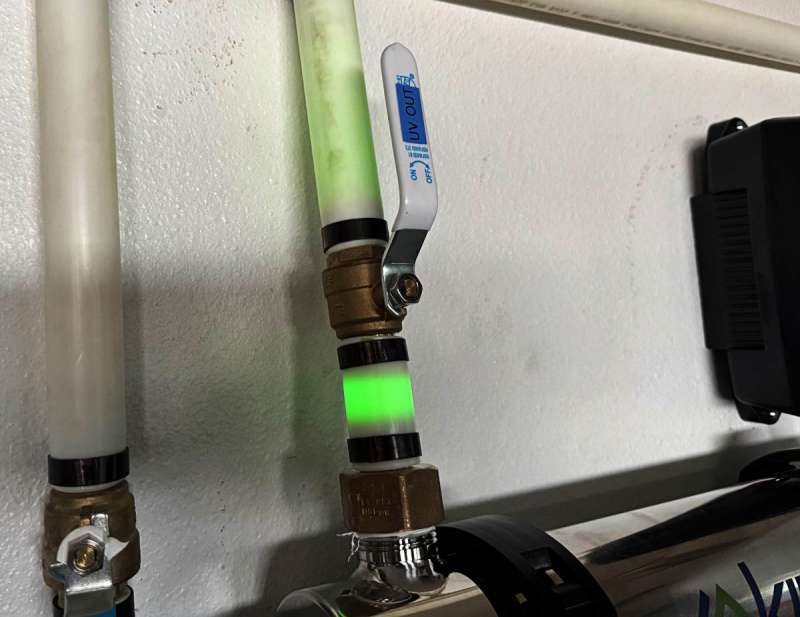
I did notice one unexpected thing after I had finished installing the UV system. In the moments after walking into the garage that evening, but before flipping the light switch I caught this glow out of the corner of my eye. It was the UV light glowing through the white PEX piping at the exit point from the canister. It’s actually pretty cool looking, and at some point I might have to move the valve up a bit to have more glow before it tapers off.
What I like about Kind Water System’s E-3000UV
- Tastes great and no scaling
- Whole home water – Every faucet, laundry, dishwasher etc.
- Reasonably priced and simple filter replacements
- DIY install – No contractors needed (unless you want to)
What needs to be improved?
- Maybe some easily available links to hardware people have used for piping, valves, joints etc.
Final thoughts
I’m super happy with the system I’ve put in. The water tastes great, it’s available from every water source in the house and I’m only going to have to think about filter replacements once a year which the UV display actually shows me. The only thing that even bothers me is that I could have installed this system 2 years ago.
Price: $2,998, currently 15% off at $2,548 for the UV version. A non UV version is available for $1,998 or $1,698
Where to buy: Kind Water Systems
Source: The sample of this product was provided for free by Kind Water Systems. Kind Water Systems did not have a final say on the review and did not preview the review before it was published.

INIU Mini Portable Charger, Small 45W PD Power Bank, 10000mAh USB C in&Out Fast Charging Pocket Size Battery Pack, Travel Essentials Powerbank for iPhone 17 16 15 14 Pro Air, Xiaomi, Samsung S24 etc
(as of March 6, 2026 17:23 GMT -06:00 - More infoProduct prices and availability are accurate as of the date/time indicated and are subject to change. Any price and availability information displayed on [relevant Amazon Site(s), as applicable] at the time of purchase will apply to the purchase of this product.)
Gadgeteer Comment Policy - Please read before commenting
Have you done the before and after comparison yet?