
REVIEW – When it comes to technology to track your personal athletic training en devours, there are a ton of options out there. When you focus in on bicycle computers that only lessens the field a little bit. The big players out there are currently Garmin and Wahoo. I have had my current bicycle computer the Garmin Edge 205 for well over ten years now. (Amazing considering how often I upgrade my personal technology!) That being said, I have been on the lookout for a new bicycle computer. I was offered the chance to review their Di-Pro bicycle computer by a company called Shanren. Let’s see how it worked out for me.
What’s in the box?
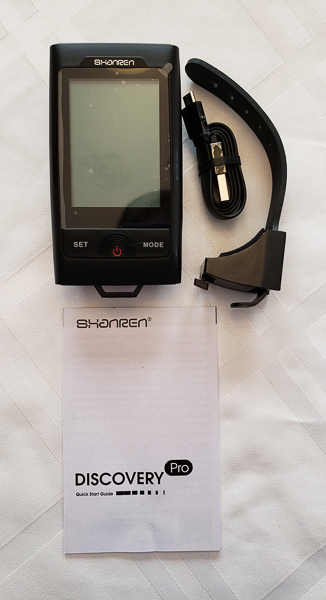
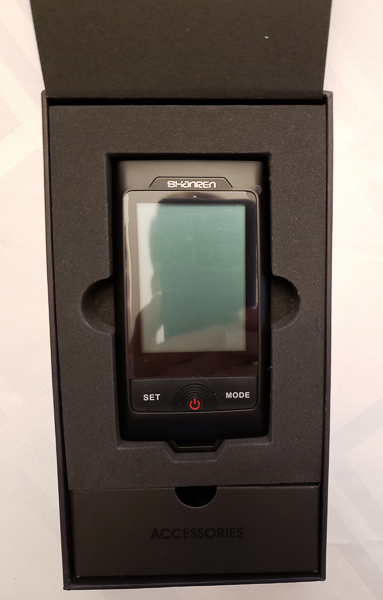
Shanren sent me three additional items along with the Di-Pro bicycle computer. They sent a speed sensor, cadence sensor and a fly out bicycle mount. I am going to focus on the Di-Pro bicycle computer first. What was inside the box was pretty simple. There was the computer itself which was nicely packed in cut out foam as you can see in the picture below.
In the box below the computer there were the bar mount and USB charging cable. Underneath the computer was the fold out instruction manual.
Design and Features
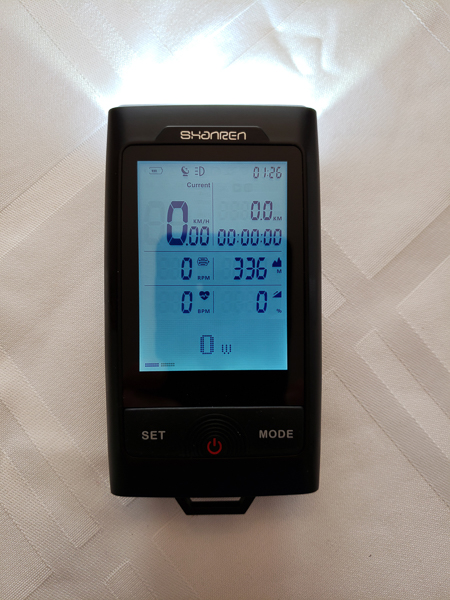
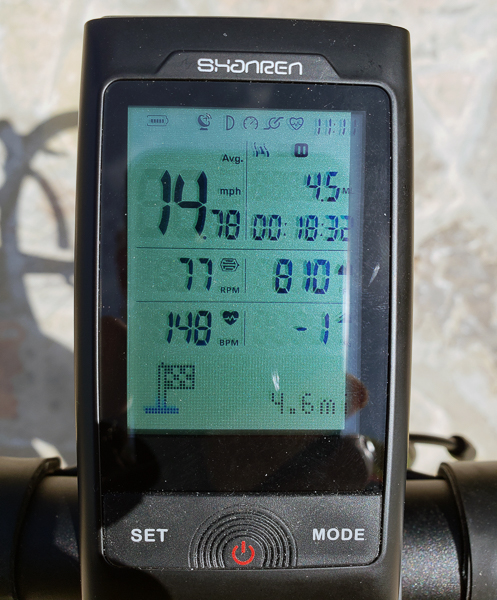
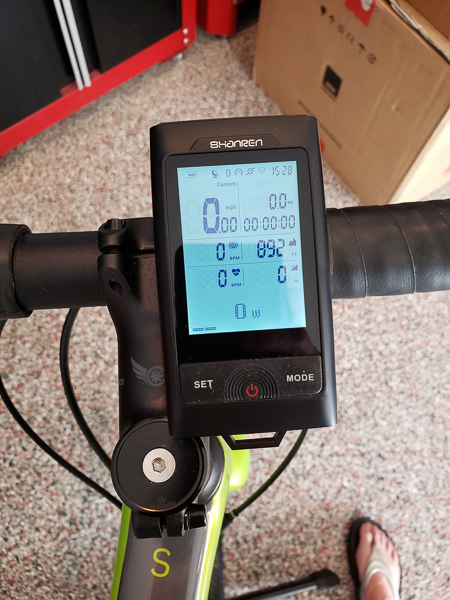
First off let me state that this is a big computer. It is trying to do several things along with being a computer. The first picture above shows you the layout of the screen. I could not find any way to adjust what was displayed on the screen. I know a lot of competitors will let you pick what fields are being displayed. I am going to assume that since it is such a large computer with a big display, they figured they will show everything because they can. Looking at that display you can see they show your speed, distance, total time riding, RPM (this is cadence and will only be available if you have a cadence sensor), elevation, heart rate (only available if you have a heart rate monitor) and an power meter wattage percent (only if you have an output sensor). The Discovery Pro supports both Bluetooth and ANT+. It will connect with ANT+ first and if that is not found use Bluetooth.
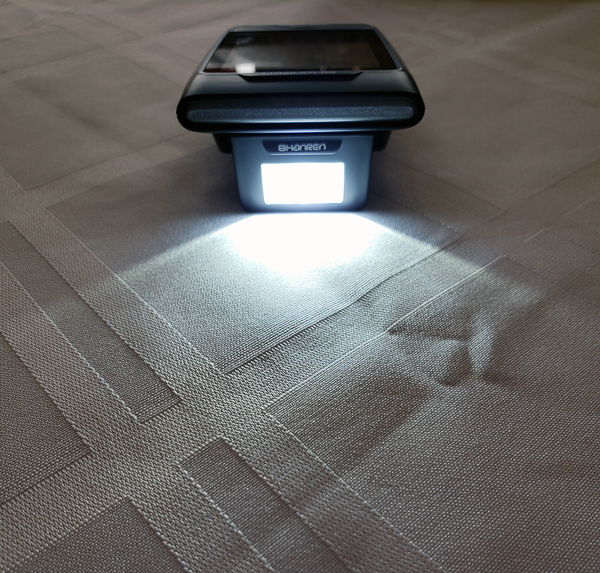
Part of what makes this computer large is that it has a couple of lights on the computer. The second picture above shows the highest level of light which is supposed to be 260 lumens. The light is a CREE LED light. The light is rated for 3-6 hours. I tested and the light will run out just before the computer does. Shanren states that the Discovery Pro is supposed to have an additional 150 minutes of GPS run time after the light goes out. I personally did not experience that, so when you see that light go out end your ride soon or data will be lost. Right above the Shanren logo is a set of multi-color LEDs which can show various colors for different options. The light is a nice option and will hopefully make you more visible as you ride on the road The colorful LED strip is a nice feature to quickly know what your heart rate is or your speed.
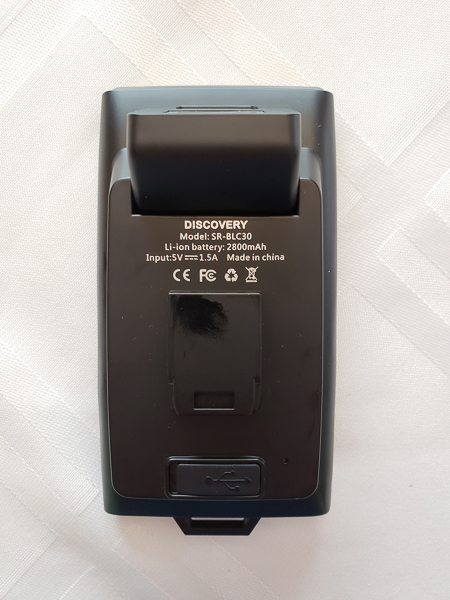
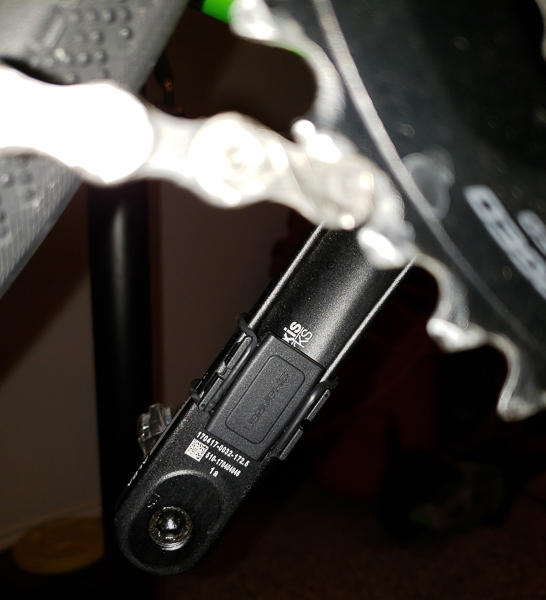
The back of the computer has the mounting point and a nicely sealed micro USB port to charge the computer. When you pop the rubber gasket off it dangles nicely by a small rubber cord so you can’t lose it and makes it really easy to attach the charging cable without having to worry about holding the rubber gasket out of the way.
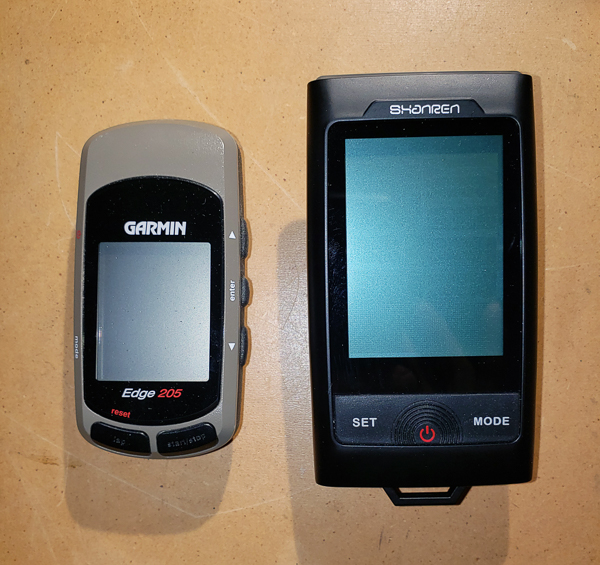
To give you an idea of the size of the computer I took a picture of it next to my Garmin Edge 205. You can see it is quite large. My manually measured dimensions are 4 and a quarter inches long and 2 and 3/8ths inches wide. The light makes it pretty deep at 1 and 1/4 inch deep. The weight is listed at 135g.
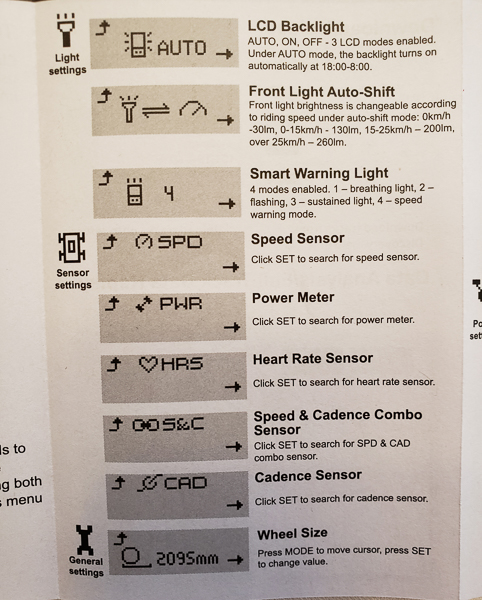
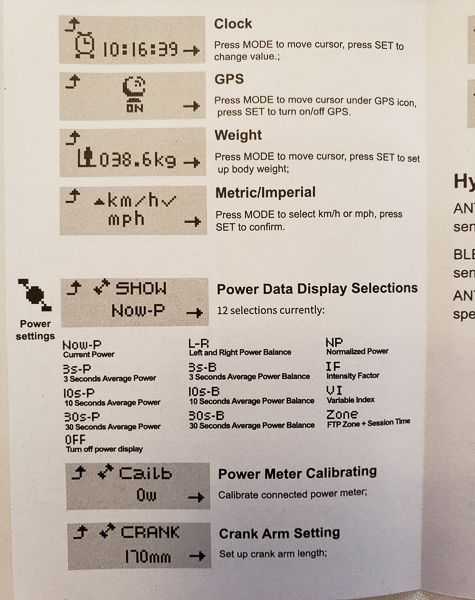
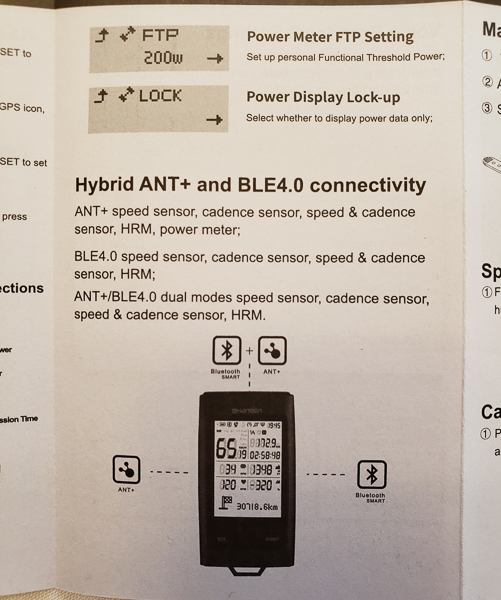
The three images above show the menu functions of the computer itself. This computer does a lot. A big plus is that you can set a lot of them through the app. However, setting up sensors requires quite a bit of clicking on the computer. Pressing and holding the Set and Mode buttons at the same time put a menu at the bottom of the screen where you can do several things. You can manage the light settings, manage sensor connections, handle general settings and handle power meter settings. The power meter settings are the most complicated. I have never owned a power meter except on the Peloton stationary bicycle I have at home. Looking at the power meter settings it seems like all of the options necessary to set one up and calibrate properly are there and ready to go. Now let’s get into the external accessory setups.
Speed Accessory Set Up
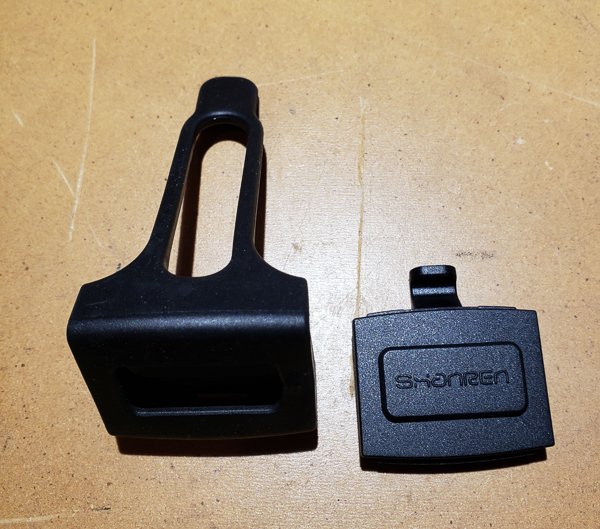
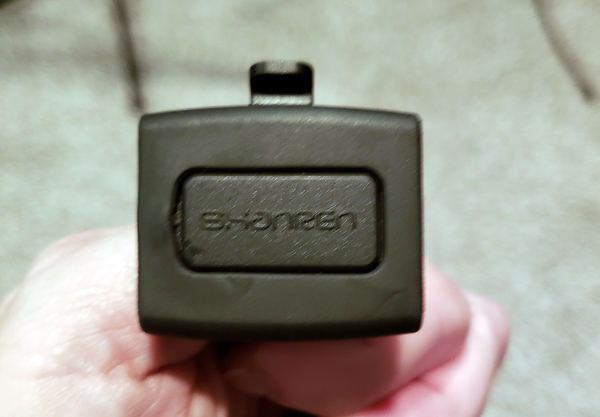
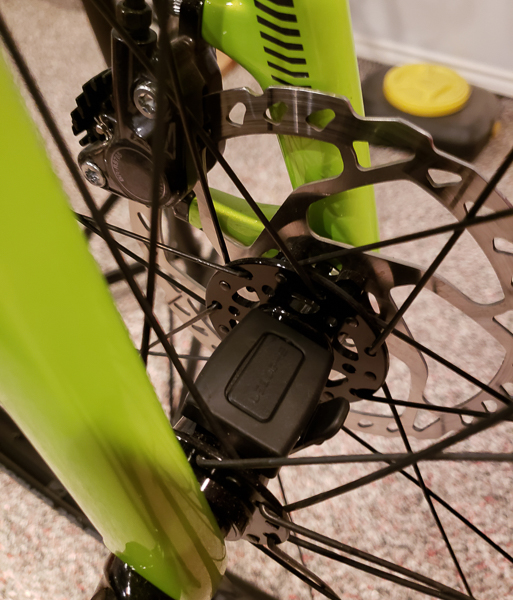
The first accessory I set up was the speed sensor. The first picture above shows what came in the box. You have the rubber mounting kit and the actual speed sensor. The sensor came with a battery already installed. Opening the cover on the back of the device was really easy compared to how I have had to get to some Garmin batteries on various sensors. It uses a standard 2032 battery and had a plastic liner I had to remove in order to allow the sensor to start working. It has a small red led that flashes in the bottom right corner below the logo to show it is working. In order to conserve battery, it will go into a sleep state until it recognizes movement which I thought was a nice feature. I don’t see why this sensor which is ANT+ and Bluetooth could not be used with any other bicycle computer out there that accepts ANT+ or Bluetooth. I slipped the computer into the rubber mount (that was a bit tricky, but I often make things harder than they should be!) The second picture above shows the speed sensor in the mount. Note that there seems to be a mark on the sensor. I put it there in my efforts to get it into the rubber mount. The third picture shows it mounted on the front axle of my road/gravel bicycle. I simply held the sensor in place and wrapped the rubber loop around the axle and caught it on the notch on the computer. It has held up nicely and I do not see any slippage of the sensor.
To connect it to the Di-Pro, I pressed the Set and Mode buttons to get to the setup menus. I had to press Mode once to set to the sensor setup and then press the Set button to get into the sensor setup. Once I was in the Sensor menu SPD or speed was my first option. I press mode again to highlight the SPD sensor and then pressed SET for it to start searching for the sensor. I made sure to rotate the front wheel so the computer could find it. I found it with no problem and immediately started registering a speed. I actually set the wheel size through the app which I will talk about later in the review.
Cadence Accessory Set Up
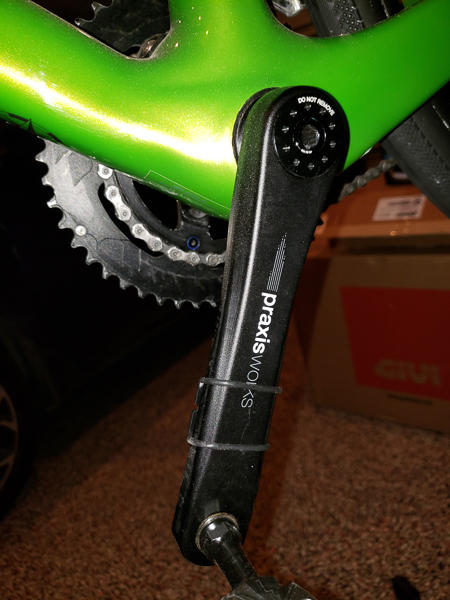
The next sensor I set up was the cadence sensor. It uses the same battery as the speed sensor. It was also easy to open the battery compartment and remove the plastic protecting the battery. Unlike the speed sensor, this device did not have a rubber mount for me to insert the sensor into. The sensor has lips on both sides where a Silicone loop can be attached to. The first picture shows the sensor mounted on the inside of my left pedal. The next picture shows the silicone loop going around the pedal and attaching to the sensor on the other side. Shanren provides 2 small and 2 large loops. I found the small loop worked for my bicycle. I then connected the sensor to the computer following the same steps I did above for the speed sensor. The only difference is when I got into the sensor menu I had to press Set and extra time to get to the cadence sensor.
Mounting the Computer with Off Bar Accessory
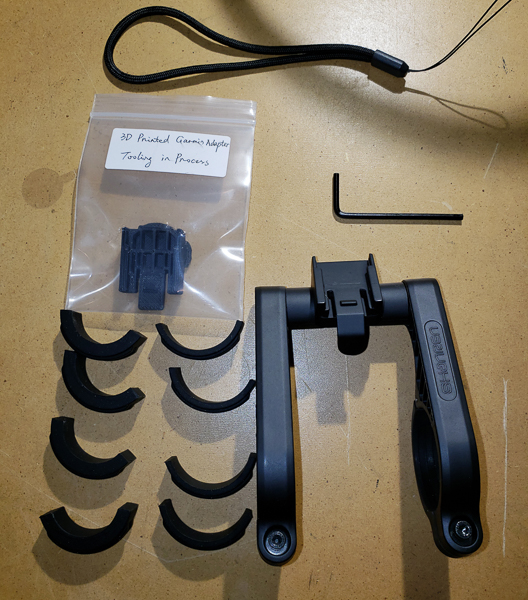

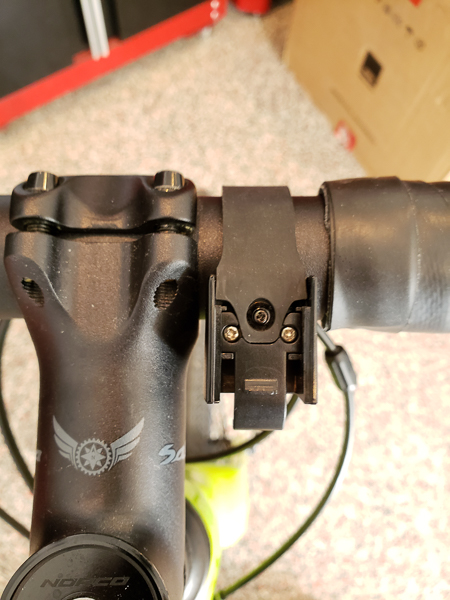
As I mentioned at the beginning of the review, the computer did come with a standard handlebar mount. Shanren does offer what they call a Fly Off computer mount. This mount lets you put the computer in front of the handlebars and not take up any room and the handlebar itself. This seems to be the trend for all bicycle computers out there now. I personally like this feature as it puts the computer in a better place to quickly see how you are doing on your ride. The first picture shows you everything that came in the box. There is the mount itself, an Allen wrench and two sizes of Silicone adapters you put in the mount to make it work with your particular handlebar size. The item in plastic is a 3D printed Garmin mount. They called it a prototype and it was a bit rough on the edges. I could see how it would go into the existing mount and then you could use it to mount various Garmin computers that are designed for that particular mount. I don’t own any Garmin devices that would work with it so I could not test it out.
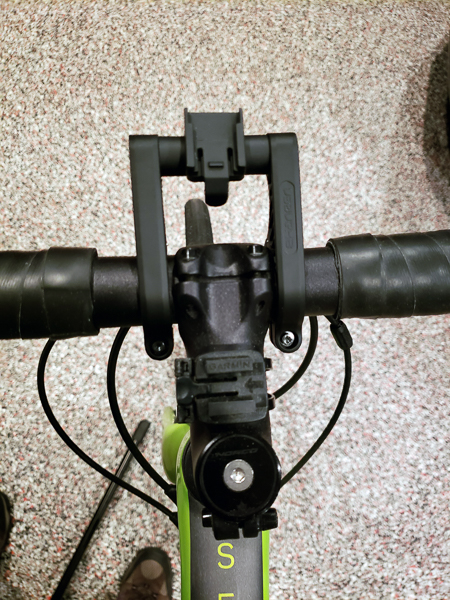
I used the smaller Silicone adapters and quickly mounted it to my bicycle handlebars as you can see in the second picture. The third picture shows the mount with the computer on. You can see how nicely the computer is mounted this way and how it would be in a better position to see how you are doing while riding.
Using the Shanren App
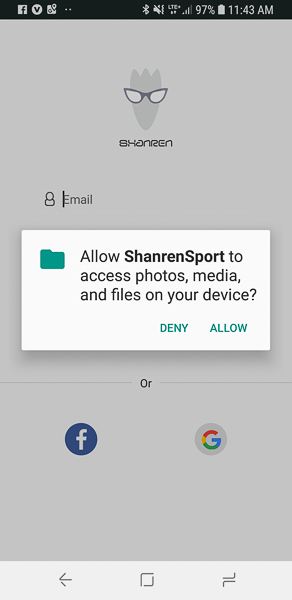
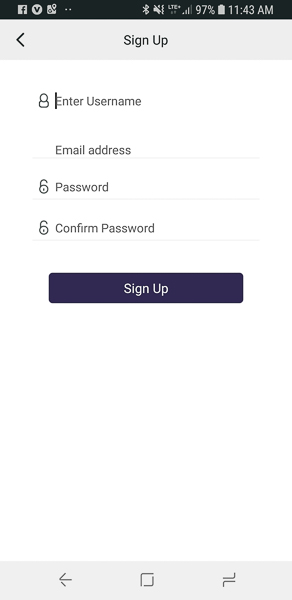

When I first got the Di-Pro I loaded the app on my Samsung Galaxy S9 which at the time was running Android 8. The first screen above shows what you get when you first get into the app. The next two screens show creating an account and setting up my personal profile. They do have an option for imperial settings along with metric but that was on another screen. Even though I did pick imperial later I found the app a bit inconsistent when it came to displaying numbers. Some were imperial and some were metric.
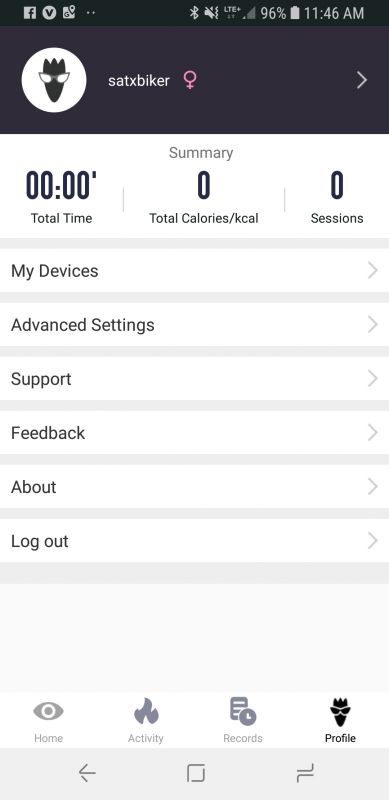
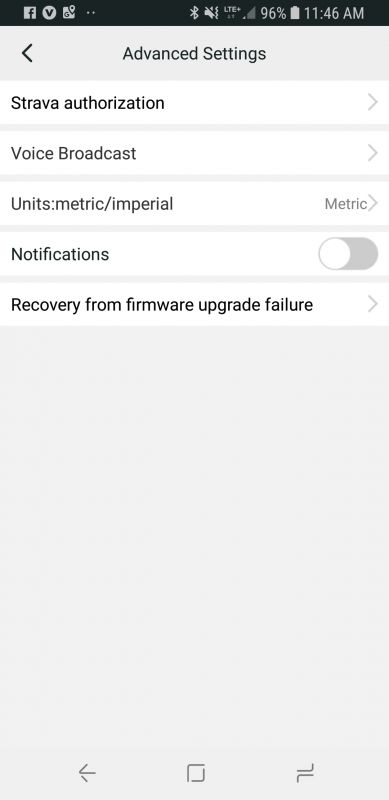
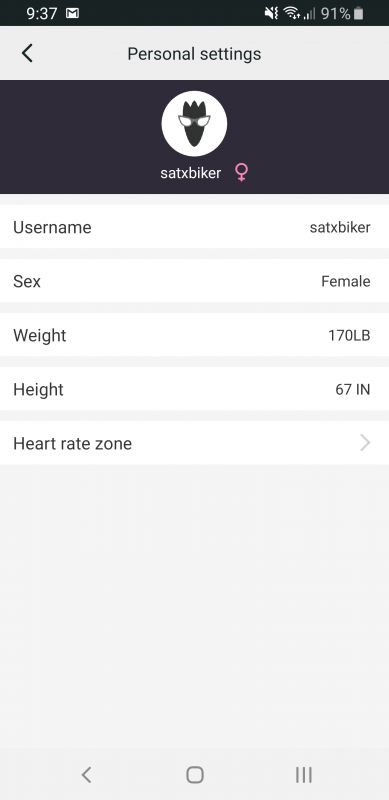
The next screenshot above shows the home page for the profile icon on the bottom right. You can click on the satxbiker at the top and it will take you to the personal settings page you see on the third screenshot. You can see it is now displaying in imperial units. The advanced setting screen is the second screenshot. There you can link to your Strava account. Note – I did connect to my Strava account and not once did the computer ever send data to Strava. My Garmin Fenix 5s sends data to Strava right after I end my exercise and press save. I never figured out how to get it to send data to Strava. There is also a voice broadcast option where you can get it to give you audibles on time or distance. I never turned that on but I assume it works like the app RunKeeper . The next setting is where you set your unit type and then there is an option for recovery from a firmware upgrade. I never had a firmware upgrade at any time.
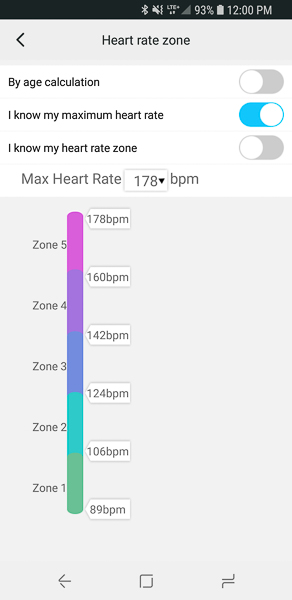
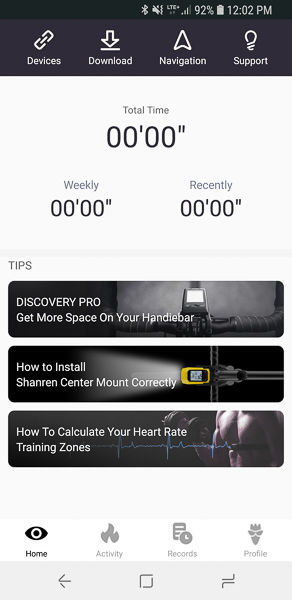
The next screenshot shows you what the heart rate zone screen looks like from the profile page. I think it is a really nice feature in that you can use the default age calculation for heart rate zones or set your own. I set my own as you can see. The next screenshot is the home page. I want to note that the Navigation link at the top does not work. When you click on it, it says it is coming soon. That really bummed me out because part of the reason I want a new computer is I want it to be able to upload maps and give turn by turn directions. I next clicked on the Devices link at the top. That will take you to the third screenshot. You only get this screen if the device is connected to your phone. Initially, when I tried to search for the Di-Pro the Android app did not work at all. It acted like it never even searched and kept telling me to turn on location services for the app which they were already on. So I initially set the computer up through my IPad Pro which could find the device.
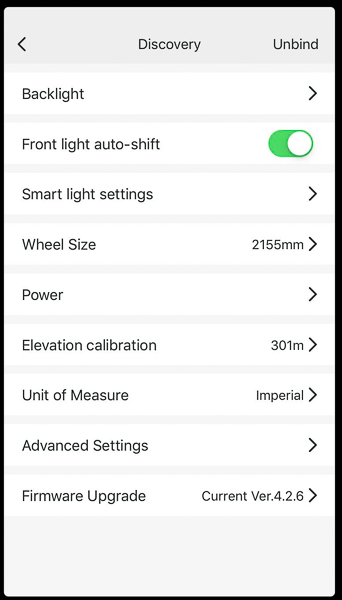
You can see you can set a lot of options through the app. The backlight option will simply turn the backlight on the display on or off. On Android, it is an on/off option. On the IOS it also offered auto. The next option was for the front light shift which supposedly changes the level of the main light depending on your speed. This is pretty cool because the faster you go, the more light you want. I could not test this because I try not to ever ride at night and I could not tell if the light got brighter the faster I got. The next option is for the smart LED light. You can set it to display different colors based on your speed or heart rate, just flash or stay on consistently. A nice color wheel is given and you can pick a specific color for it to be. The next option is your wheel size setting. This is a perfect example of the unit displaying metric when I have it set to imperial. When you click on that option you get a huge table of wheel sizes. I picked my wheel size (700 x 32c) and I got 2155 mm. You need to have a proper wheel size set so the speed sensor is calibrated properly.
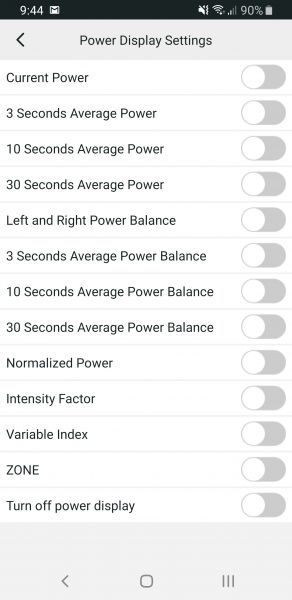
The next option takes you to all of the power meter settings. I have a screenshot below showing all of those options. The Discovery Pro supports a virtual power meter. I found out from their support it uses a combination of speed, cadence, heart rate and grade to give you the power output score. This of course means you need to have at a minimum a speed, cadence and HR sensor to make this work. I have recently discovered the benefits of having a power meter. If you know your highest average output value (you can get this by taking an FTP test – this is a 20 minute test where you go all out measuring your power output) you can set yourself up power zones. Then you can start zone training while you run, ride or whatever aerobic sport in which you participate. I can speak from experience that zone training will really increase your performance capabilities.
In the options below power meter, you can set your current elevation and check for firmware updates.
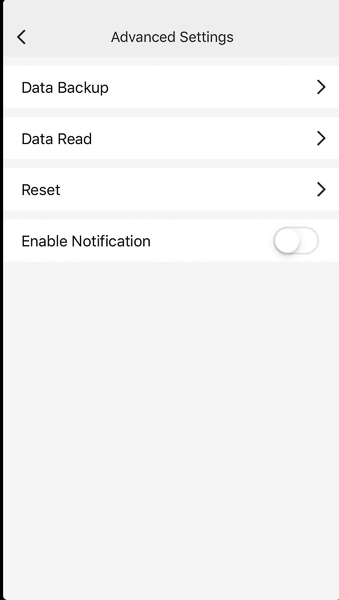
The screenshot above shows the advanced settings page. The data backup was supposed to back up all of your settings, but I found that did not work on Android. The data read would read those settings. The next option is enable notification. If you have this turned on and have it connected to your phone while you ride, it will display notifications from your phone. I never had it connected to my phone while I rode so I never tested that feature. Finally, I have a screenshot of the power meter settings.
End of Ride and Uploading Back to App
So with the computer all set, I took off on a short 14-mile ride. I was wearing my Garmin Fenix 5s. One really nice feature of the Di-Pro is that if I stopped the bike along my ride, the time stopped. This, in the end, provided a much more accurate average speed calculation than my Garmin watch. I stopped several times for stop signs and one time halfway through to talk to someone. What I want to mention and it was just a brief blurb in the fold-out manual is that to start a session and GPS tracking, you must press and hold the SET button. You will get a countdown from 3..2..1 and it will start tracking. IMPORTANT – when you are done with your ride, press and hold SET again and you will get the word FINISH displayed where you see the checkered flag. If you forget to press SET to stop it and just turn off the computer, your phone will not find any data to download. I spent a frustrating amount of time trying to find a data file to download and never did.
Luckily for me, the next weekend provided some nice weather so I wanted to try the computer again. The first thing I noted was the computer would not pick up the speed, cadence or my heart rate monitor. I had not connected any of the sensors except for the HR monitor to any other device. At a minimum I expected speed and cadence to automatically connect. I had to spend a frustrating 15 minutes going through the setup menu again trying to get the Di-Pro to discover the sensors. I got speed and cadence, but I never did get the heart rate sensor connected. I have a Scosche Rhythm 24 heart rate monitor. My Peloton and Garmin Fenix 5s always find it and the computer did the first time I rode but not the second time. This time after the ride was done I made sure to press SET again to tell it I was done. I want to mention that the Discovery Pro was saying it was connected to my HR monitor, but it never did display the actual heart rate.
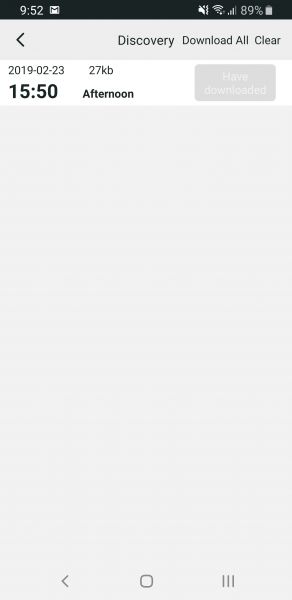
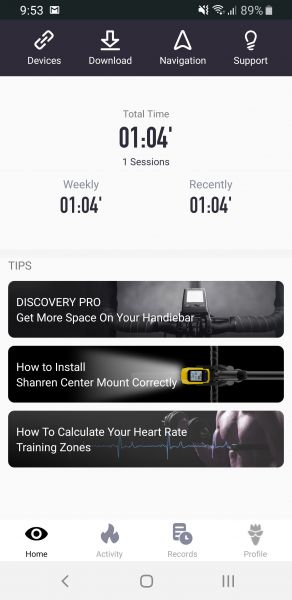
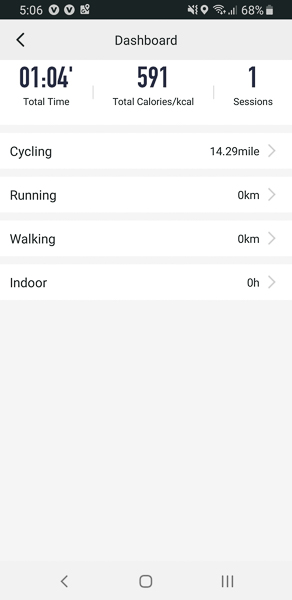
The first screen shows the file from the Di-Pro showing up on my phone. I want to note that the app was finally able to find the computer after my phone upgraded to Android 9.0. What it is displaying is that on 2/23/19 I rode at 3:50 pm. My home page on the app now shows I road a total of one hour and 4 minutes in one session If you click on that area where the total time is displayed you get the third screen showing calories burned (pure estimate I guess based on body weight and time because I had no HR connection).
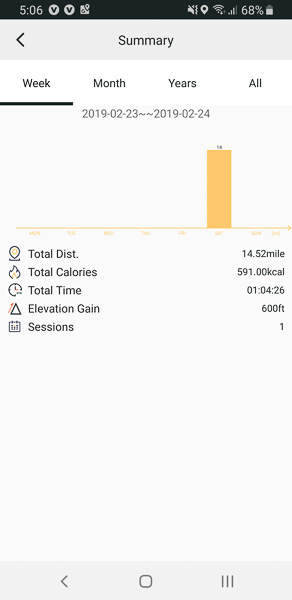
This last screen shows you the detail of the rides for the week. What disappointed me was there were no maps of my actual route anywhere on the app. Shanren states that the navigation feature should be coming some time around the end of April.
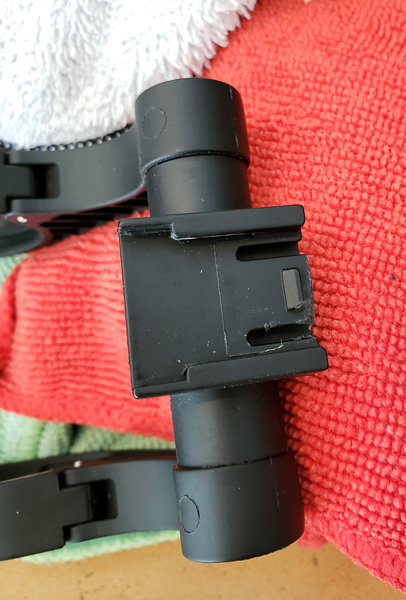
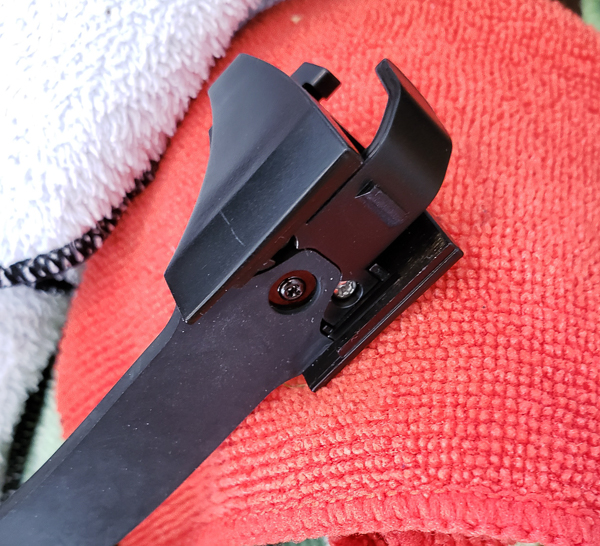
Another bad thing that happened to me after the end of my first ride was the Fly Out mount broke. The lever you push down on to release the computer just snapped off as you can see in the first picture. The second picture is the basic handlebar mount. You can see how the lever is much sturdier than the Fly Out. So for my second ride, I mounted the computer directly to my handlebars. Shanren has stated that they had a bad batch of mounts created due to a change in materials. They have since fixed the problem and it should not be an issue on future brackets.
This is a picture of the computer using the standard mount it comes with.
What I like
I like that it comes with a light. Anything to make you more visible on the road is a plus for me. It lasts quite a long time. I turned it on and left it at full brightness and it lasted over 5 hours. A pro is that because the screen is so big, you can see everything at once. This is also a con down below. It was very accurate on distance calculation and the cadence also seemed accurate. When my heart rate was displaying it was right along with the Garmin which was also connected to the same monitor. I also love the price of the bundles they have for the computer and sensors. You can buy the DI-Pro, speed and cadence sensors all for $199. I don’t think Garmin or Wahoo Fitness can beat that price.
What can be improved
This computer is trying really hard to play with the big boys Garmin and Wahoo and it is doing it at a lower price point. However, you do get what you pay for. There is no navigation yet. I also found the sensor lack of detection very annoying. When I am ready to ride, I don’t want to spend time messing around trying to get sensors connected. The app was flaky on displaying imperial units everywhere. The Android app still has a lot of catching up to do compared to IOS though I noticed the power meter settings in IOS were all in Chinese. Finally, I really need that app to communicate my rides back to Strava. If anyone is trying to compete in this space, they have to have a device that uploads to Strava. A lot of athletes and even low-letes (hah!) like me, want to see all of our training data in one place. My Peloton rides go up there and I really want my outside bicycle rides to be there also. UPDATE – I received a note from Shanren showing me how to upload to Strava via some screen shots. Apparently they have updated their app on Android. I went back into the app and now I can actually see a map of my ride and there is an option on the map page to upload to Strava. So they are pretty quick to respond to issues.
All in all, I recommend waiting a few more months to a year and see how they try to improve this computer over time. I will personally try to use the speed and cadence sensors with my new computer when I get one and report back how they work. They are slightly cheaper than what I see out there now by other manufacturers.
Price: $179.90 for the Di-Pro computer, $199 for the Di-Pro plus speed and cadence sensors, $26.99 for the cadence sensor, $34.99 for the speed sensor and $19.99 for the fly out bracket mount.
Where to buy: Amazon Shanren Di-Pro Bicycle Computer, Amazon Shanren Bike Cadence Sensor, Amazon Shanren Bike Speed Sensor, Amazon Shanren Fly Out Computer Mount
Source: The sample for this review was provided by Shanren
COOSPO Bike Computer Wireless GPS, Cycling Computer GPS Bike Tracker with Bluetooth/ANT+, Waterproof Bicycle Computer GPS Speedometer with Auto Backlight, 2.4 inch LCD Display
$49.99 (as of July 14, 2025 18:02 GMT -04:00 - More infoProduct prices and availability are accurate as of the date/time indicated and are subject to change. Any price and availability information displayed on [relevant Amazon Site(s), as applicable] at the time of purchase will apply to the purchase of this product.)
Gadgeteer Comment Policy - Please read before commenting
Thank you for the very detailed review Lynn.
I have been trying to establish whether the DiPro enables the sharing of live tracking as does my Garmin Edge 510. The company has not yet answered my query.
From your experience, is live tracking possible with the DiPro?
I do not think the computer itself will allow for live tracking. Now if you had your phone with you on the ride, the best I think you could do it do live tracking with google maps with their location sharing feature.
Hello Rodney, you can use Di-Pro for GPS tracking. Besides, the turn-by-turn navigation is going to be released soon by the end of this April.
GPS tracking is different from live tracking if I understand Rodney correctly. Live tracking lets you notify folks where you are. Is that correct Rodney? It does do GPS tracking where it will build a map showing exactly where you went.
That is correct Lynn. For me, it is a vital feature. The lack of response from the producers of the DiPro seemd to confirm that live-tracking isn’t available. I was an Indiegogo supporter of this device but have now cancelled the support. The very attractive battery life of the DiPro, I now realise, can be emulated by my Garmin 510 by simply installing a power pack, including o e that Garmin now offers. Thank you for the resonses.
For the life of me, I could not make the voice broadcast feature work. I want to hear my heartrate announced while I am cycling.