REVIEW – Around here, we’re big fans of the Butcher Box. It’s a monthly meat delivery service that sends boxes of meat straight to our house. Their beef is 100% grass-feed, and their chicken is free range organic, things that are important to us. When it comes to cooking meat, especially thick cuts like briskets and pork tenderloins, it’s critical to cook it until it reaches just the right temperature. Maybe professional chefs can just look at the meat and know if it’s done, but the rest of us use a meat thermometer. Traditional thermometers require you to open the oven or the grill every so often in order to check the meat, thereby wasting a lot of the heat that has built up. Wouldn’t it be nice if you could just put the thermometer in the meat one time and then have it tell you when the meat’s done, no matter where you are in the house? That’s exactly what the MeatStick Wireless Meat Thermometer does!
What is it?
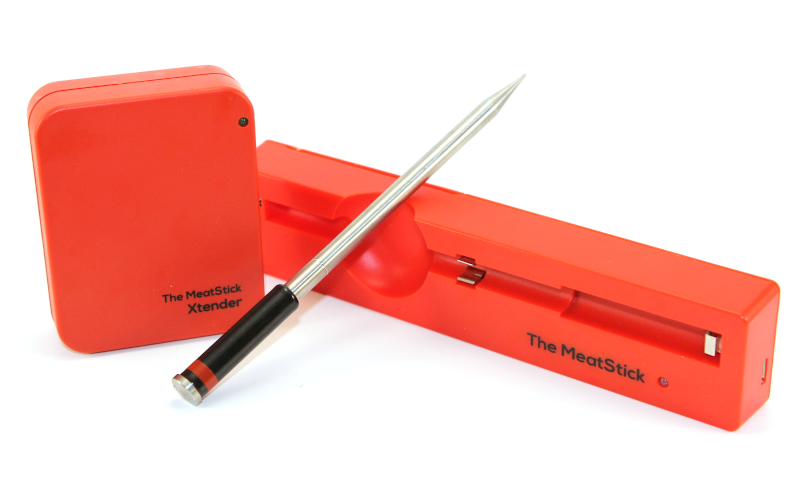
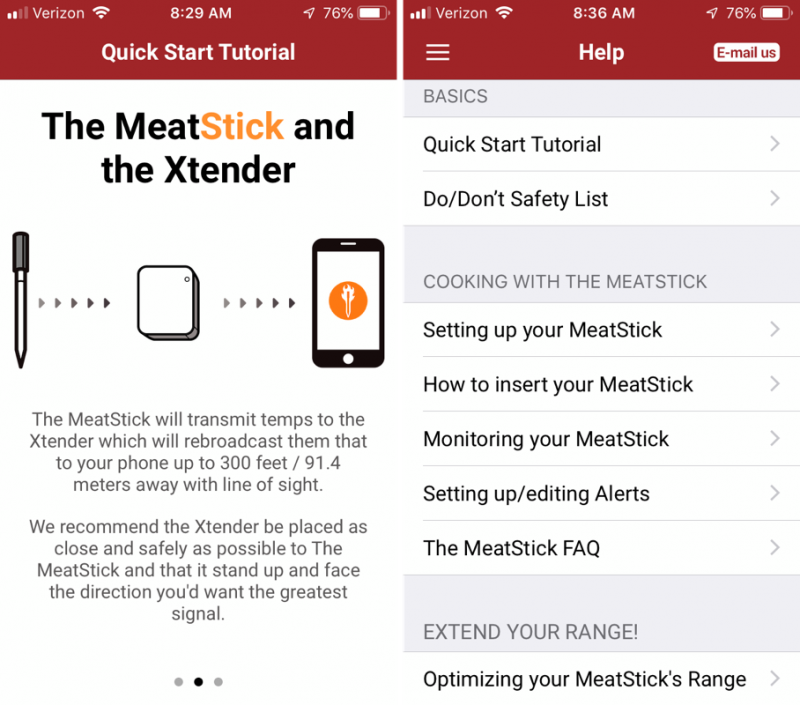
I have the MeatStick Xtender Set, which includes one MeatStick and one Xtender. The MeatStick is a wireless thermometer that you put into your meat and leave until it’s done. It communicates via Bluetooth through the Xtender to an app on your mobile phone to let you know the current temperature of the meat and its environment and how much longer until it’s done. Its goal is to take “the guesswork out of cooking.”
What’s in the box?
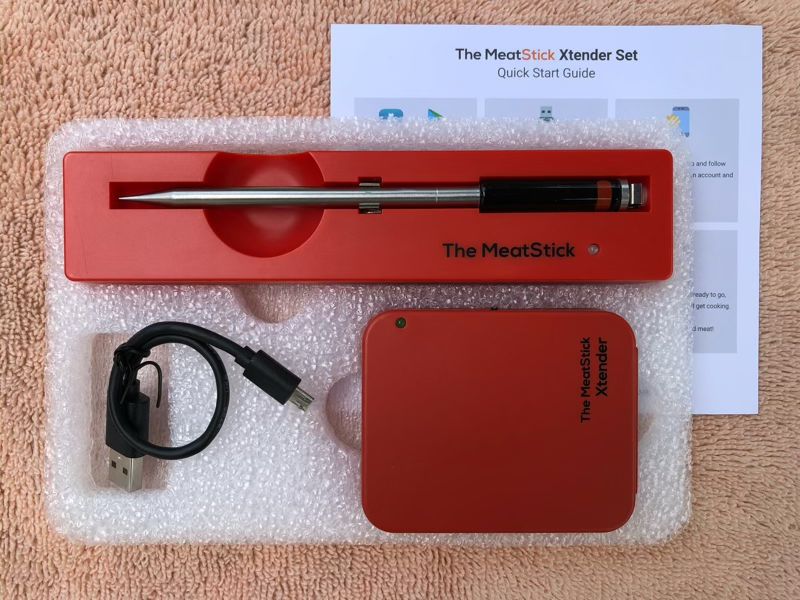
- 1 MeatStick True Wireless Meat Thermometer
- 1 Xtender
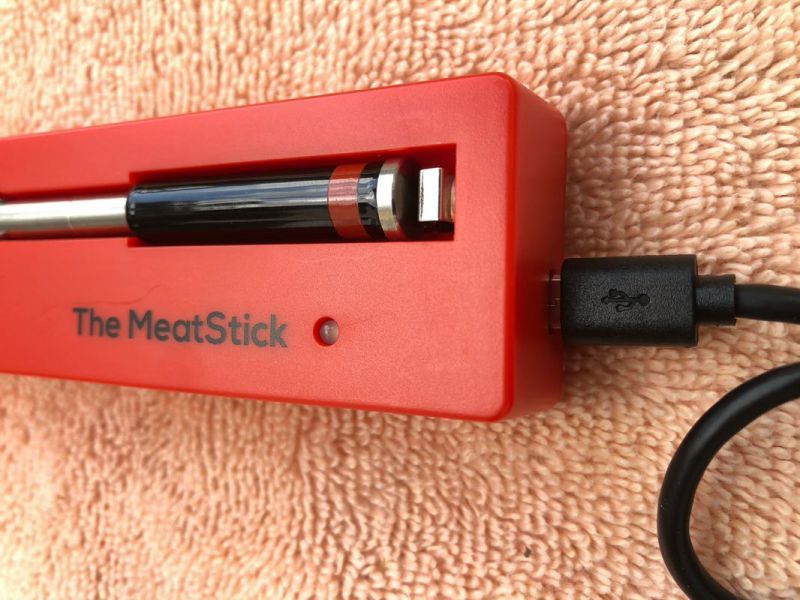
- 1 Charger with USB cable
- 1 Quick start guide with 2 pages of English instruction
Hardware specs
The MeatStick has been rated as food grade by FDA-approved labs; it is waterproof (rated IPX8), so it can be used in sous vide. The entire MeatStick is 6 inches long, and the steel part is nearly 4 inches.
There are two sensors in the MeatStick, one in the stainless-steel tube that measures the temperature of the meat and another in the ceramic handle that measures the ambient temperature. The former can withstand temperatures up to 212°F and the later up to 482°F (though it can go higher for short periods of time).
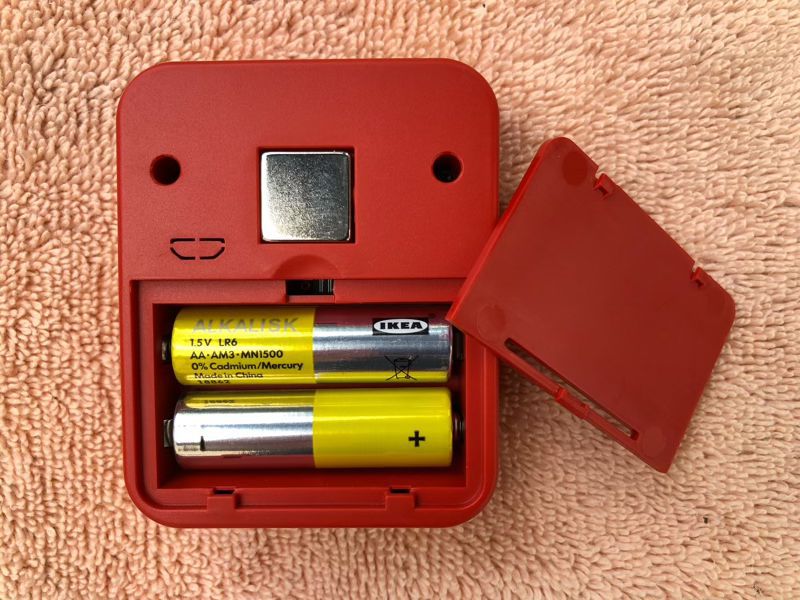
The MeatStick is charged via USB and lasts for 24 hours of use; the USB cable that comes with the charger is only 8 inches long. The Xtender requires a pair of AA batteries that are not included.
The MeatStick and the Xtender communicate with your phone via Bluetooth. The MeatStick has a range up to 6 feet when inserted into a cut of meat; the Xtender extends that range up to 100 feet when indoors. One Xtender can support up to eight MeatSticks simultaneously.
Design and features
Installation and setup
The quick start guide does a great job explaining how to get everything set up. First, I downloaded the free mobile app; there are links to Apple’s App Store and Android’s Google Play on their website. Second, I charged the MeatStick by putting it into its charger, connecting the USB cable, and plugging it into our Anker USB charging station. The quick start guide recommends letting it charge for at least 1 hour before first use and another 1 to 3 hours between each use; the MeatStick Support team, however, recommends 4 hours.
Third, I popped in a pair of AA batteries into the Xtender. There’s a strong magnet on its back, which allows me to securely attach it to my stove or grill, if I want. It just so happened that these yellow IKEA batteries that I put in were nearly dead. While cooking, the mobile app reported Bluetooth connection errors. When I inserted fresh batteries, everything resynced and started working again.
Fourth, I began to explore the mobile app. The MeatStick doesn’t come with a manual, and it doesn’t really need one. The mobile app does a great job explaining how to use everything. There’s an initial tutorial that walked me through how to use everything, and every time I accessed a feature for the first time, it gave me another tutorial. If I ever forget something, I can access any of the 15 tutorials from the Help menu. Someone has done a great job thinking about human factors on this app.
The one thing that concerned me about the setup process is that the mobile app requires me to turn on Location Services all the time, whether I am using the app or not; it refuses to work unless I give these permissions. Why does a thermometer need to know my location at all times? I’m unhappy with this, as it allows the MeatStick company to track my location, information that they have no need whatsoever to know. I recommend enabling Location Services while you’re cooking and then disabling it when you’re done. *See update below.
The app also has the option to create an account and store your cooks in the cloud, but I choose to skip this.
Attempt #1 – Brisket
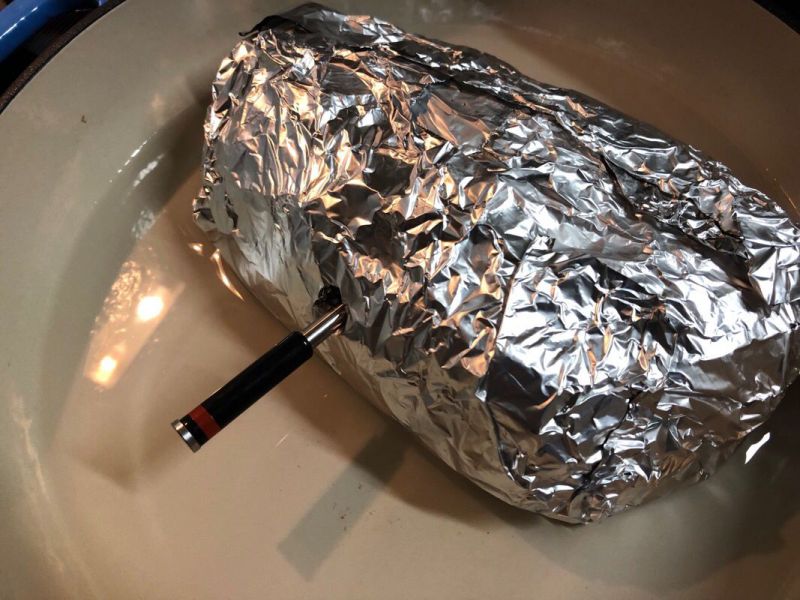
For our first attempt to use the MeatStick, my wife and I decided to cook a nice piece of brisket in the oven. In the morning she marinated it, and right before cooking, she wrapped it in aluminum foil. With the thermometer still in the charger, and the charger still plugged in—this detail is surprisingly important—we started the app. As it walked through the introductory tutorials, I learned my first lesson about the MeatStick: It’s designed to be completely inserted (not including the handle) into large cuts of meat. If it cannot be completely inserted, say I’m grilling quarter-pound hamburgers or baking some chicken thighs or searing filet mignon on a skillet, then this is not the right thermometer for the job, as the stainless-steel tube can only withstand temperatures up to 212°F. Fortunately, our brisket was plenty large, so we began.
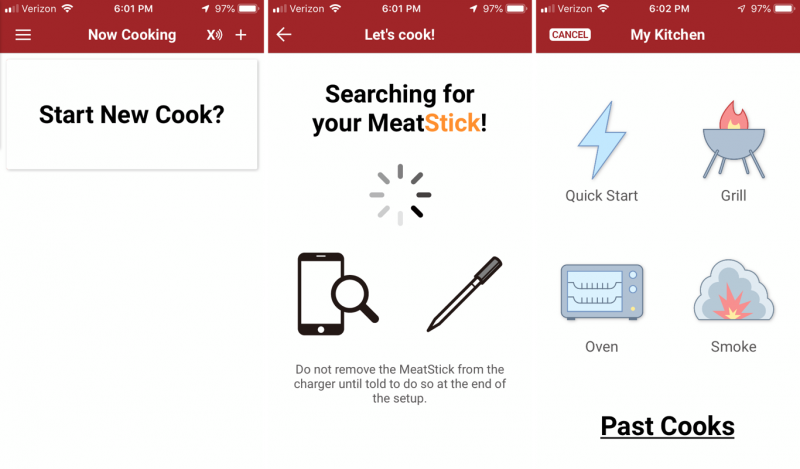
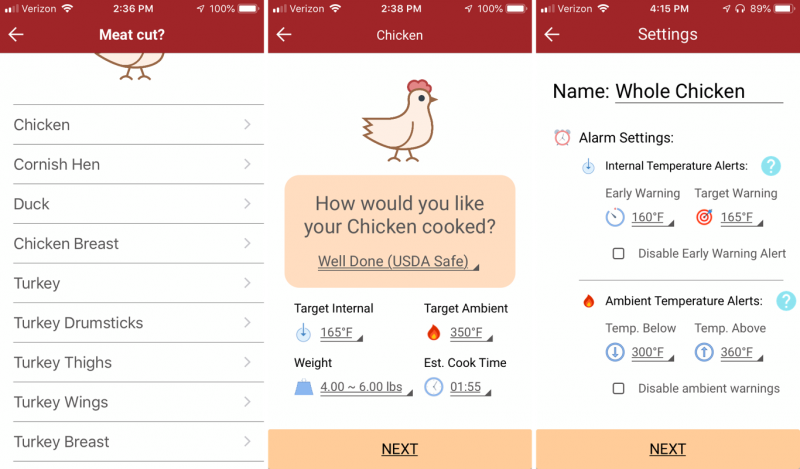
We selected “Start New Cook,” and then we waited until the app connected via Bluetooth to the MeatStick. Then we selected “Oven” from the “My Kitchen” screen.
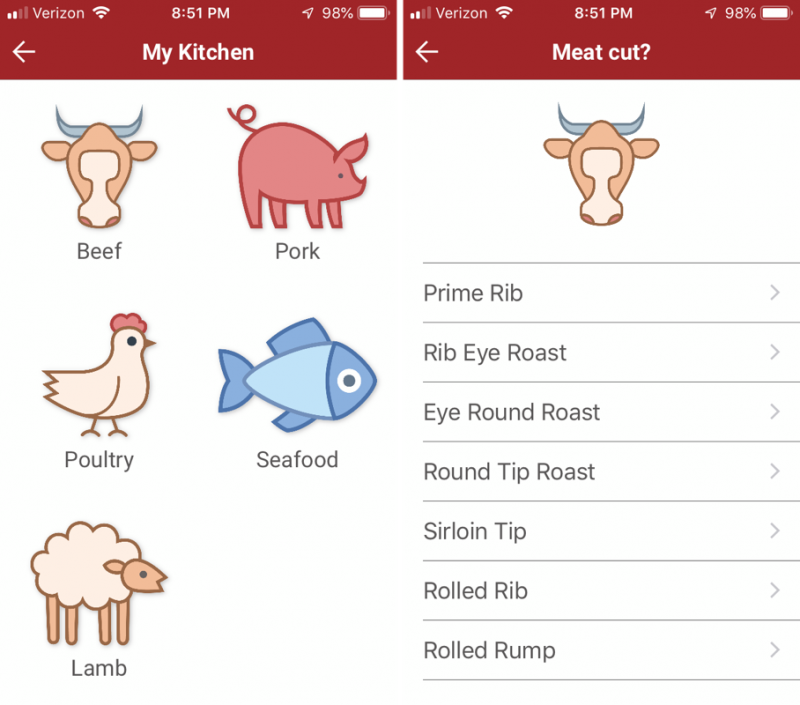
We selected “Beef,” and then I learned my second lesson about the MeatStick: The list of meat cuts in the mobile app does not contain every cut of meat; in fact, it has surprisingly few. There are at least 40 cuts of beef, but only 7 in the app; it can only provide recommendations for those cuts that are in the data. For everything else, I have to know this info myself.
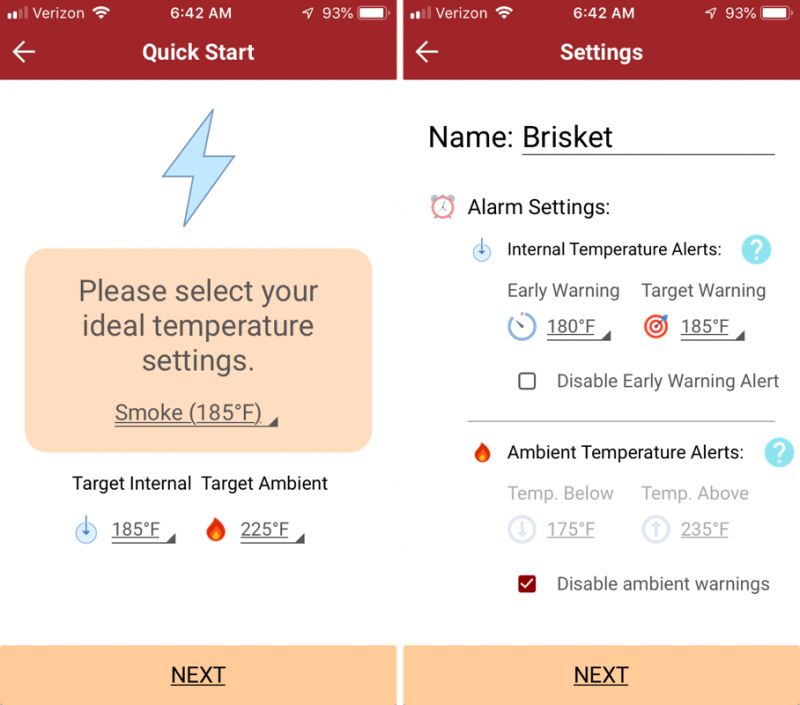
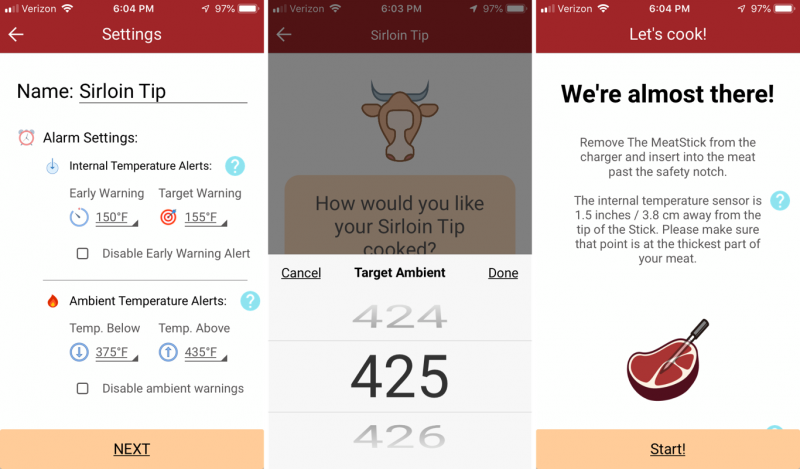
The good news is that the MeatStick is still useful for other cuts of meat. We hit the back arrow until we came to “My Kitchen,” and then we selected “Quick Start.” We selected how well we wanted the meat cooked and our temperatures. On the “Settings” page we specified when we wanted alerts, and then we gave it a name.
After hitting “Next” one final time, the app instructed us to insert the thermometer and put our brisket into the oven.
We turned on the Xtender and put it on the counter next to the oven, and then we watched as the MeatStick began feeding us data. Even when I took my phone to the opposite side of our house, the Xtender worked perfectly to forward data to the app. After a couple hours, the app sounded an alarm, letting me know that our ideal temperature had been reached. After taking it out of the oven and letting it rest for a bit, we unwrapped it and sliced it into strips. The brisket was cooked to perfection and tasted oh so yummy!

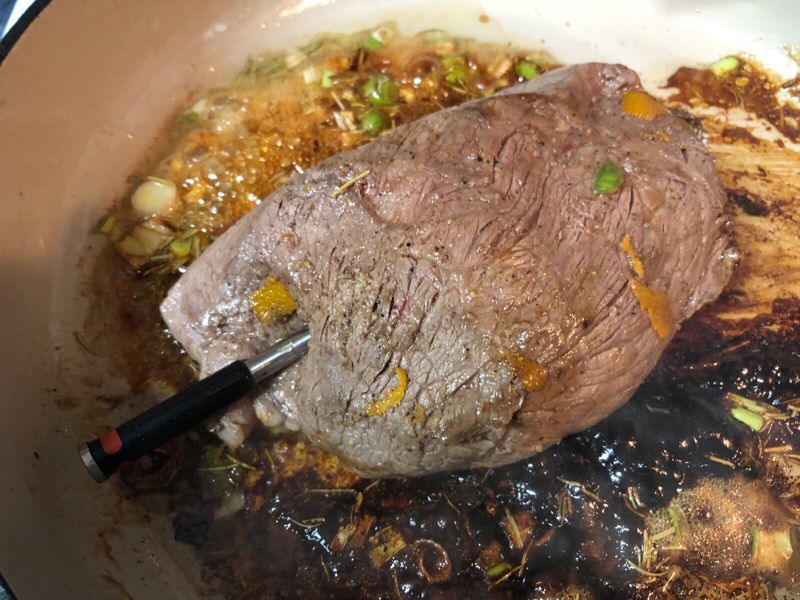
Attempt #2 – Top Sirloin Cap
For our second attempt we selected a top sirloin cap, as we thought this was one of the cuts in the mobile app. (It’s a bit of a pain that you don’t know what cuts are in the app until after you start the syncing process.) We browned the cap, sync’d the app with the thermometer, and then walked through the selection process, same as before. When we got to the “Meat cut” menu, however, we realized that it wasn’t an exact match. The app has a “sirloin tip,” but we had a “sirloin cap.” Are these the same? Are they at least close? This is where I learned my third lesson with the MeatStick: I really need to understand my meat cuts way better than I do. There are many different cuts of meat, and many times they are best cooked in different ways. The names can be misleading; the sirloin tip, for example, actually comes from the round primal, not from the sirloin. To make things worse, there are marketing names for various cuts of meat. The NY strip is also called the Kansas City strip, top loin steak, shell steak, and Delmonica steak. To most effectively use the mobile app, I need to know what I’m cooking and what cuts are in the app.
In the moment, however, we didn’t have time to go research all the cuts of beef, so we selected “sirloin tip” from the menu, hoping that good enough was good enough and finished the setup process. One minor annoyance that we encountered was the selection list for temperatures, which are available in 1-degree increments. It’s a hassle to scroll through a hundred degrees by ones; I think it would be better to have this list available in 5-degree increments.
We inserted the thermometer into our top sirloin cap and put it in the oven to cook.
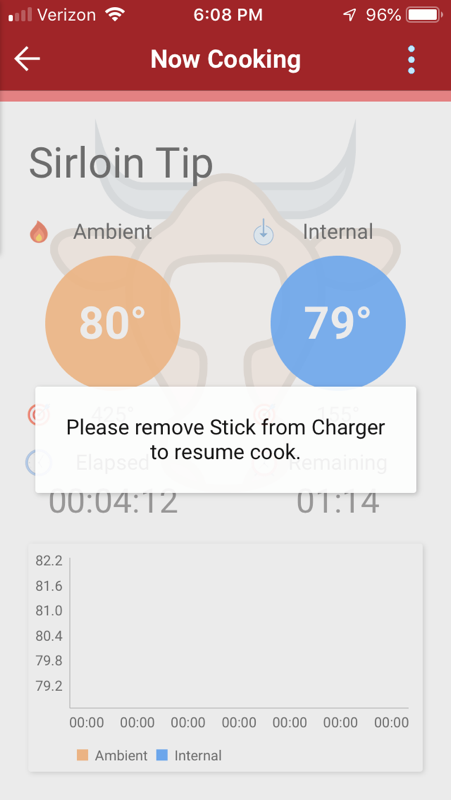
About 5 minutes later, the mobile app gave me an error message: “Please remove Stick from Charger to resume cook.” It seemed like there was a connection error. I brought the app closer. I turned the Xtender on and off. I took the meat out of the oven and put the phone and Xtender right next to it. Nothing I tried fixed this problem. This is where I learned my fourth lesson with the MeatStick: When the hi-tech solution doesn’t work, it’s good to have an old-fashion solution nearby. I put the meat back in the oven and used a regular meat thermometer to finish cooking. Our top sirloin cap was tender and delicious. I still don’t understand what this error means; my best guess was that the thermometer wasn’t sufficiently charged after cooking the brisket.
Attempt #3 – Whole Chicken
For our third attempt, my wife found a recipe for a whole roasted chicken. She prepared everything, and we walked through the setup process in the mobile app once again. We selected “Poultry,” “Chicken,” “Well Done,” and the weight, then we allowed the app to select the temperatures for us. It suggested 165°F—this seemed a bit low to us but we rolled with it—for about 2 hours.
We put the MeatStick in, and just to be safe we put in a wired thermometer as well, and then put the whole thing in the oven.
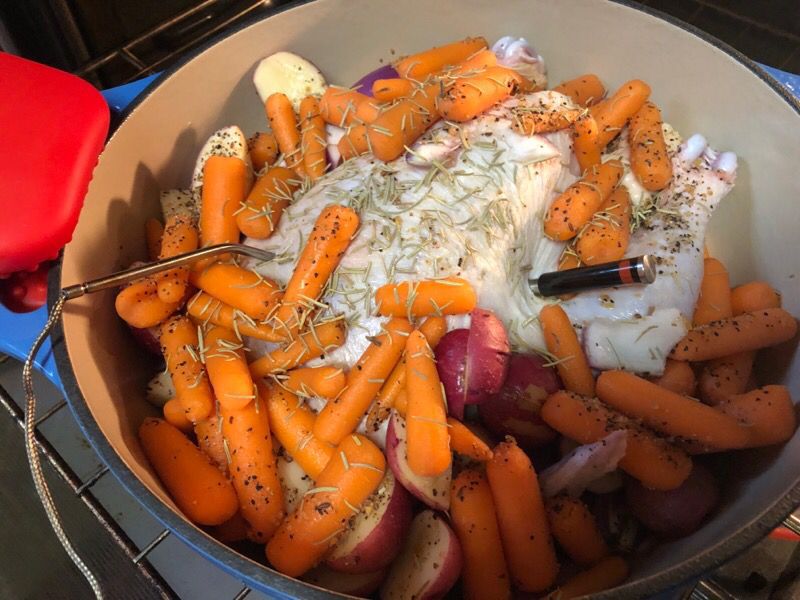
We put the Xtender and the temperature gauge on top, and then made sure the app was still working. Everything looked good.
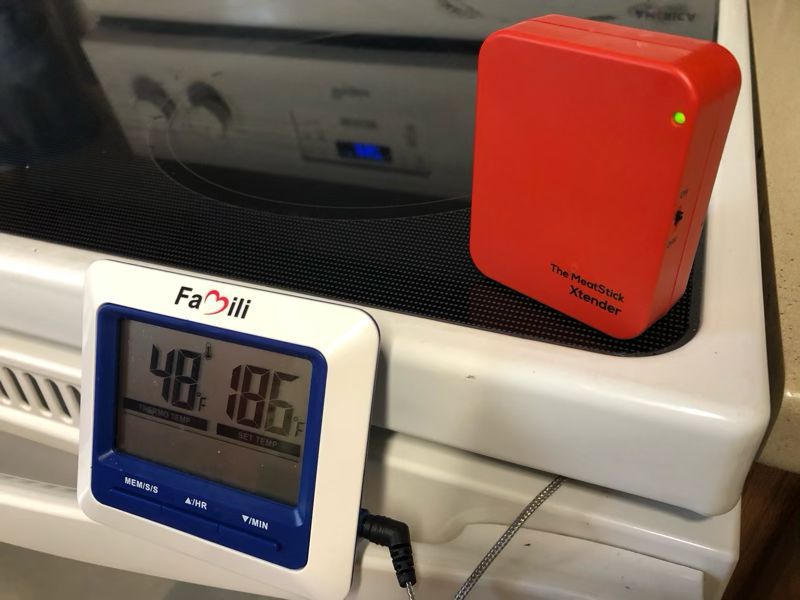
But 5 minutes later, we got the same error as with the top sirloin cap. We took everything out of the oven, cleaned the MeatStick, started everything all over again, and put it back in the oven. 5 minutes later we got the error yet again. At this point it seems pretty clear that there’s something wrong with my MeatStick, though I didn’t know what.
To get help with this problem, I sent an email to the MeatStick Support team, and I am happy to report that this is where I learned my fifth lesson with the MeatStick: They provided the best support I have received from any gadget company. They responded within minutes and politely walked me through a series of tests to verify that I was using the MeatStick properly and that it was charging and syncing correctly. (This is where I learned that they recommend charging for 4 hours between uses.) Once it became apparent to them that the MeatStick was not functioning as desired, they offered to send me a replacement MeatStick free of charge; I only needed to send them my Order ID, the serial number on the MeatStick, and a shipping address. How cool is that! On the one hand, I’m a little bit nervous about a gadget that stops working after one use. Was there a manufacturing defect? Maybe. Did I do something wrong that broke it? Possibly. I don’t know. On the other hand, MeatStick is clearly a company that stands by their products and are willing to do whatever it takes to help their customers out; that’s impressive. (By the way, when I first contacted Support, I did so incognito; they offered the replacement without knowing that I was a reviewer for The Gadgeteer.)
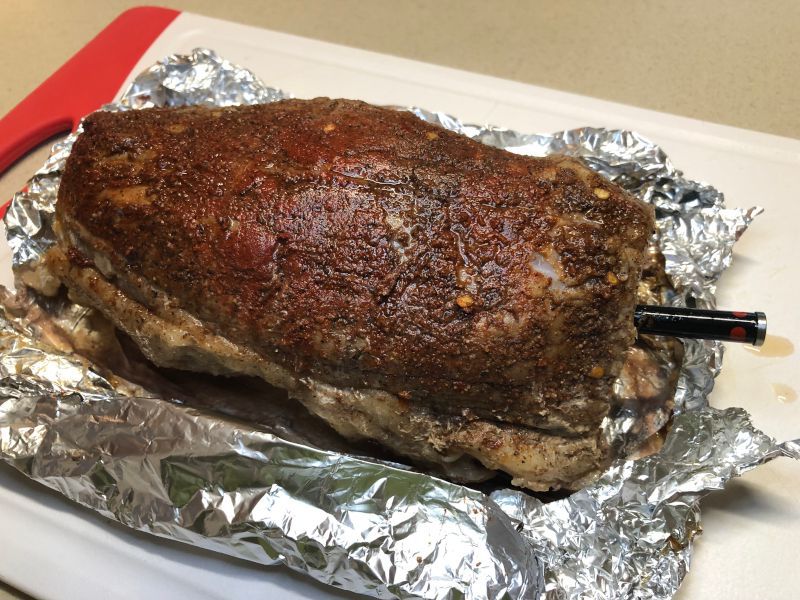
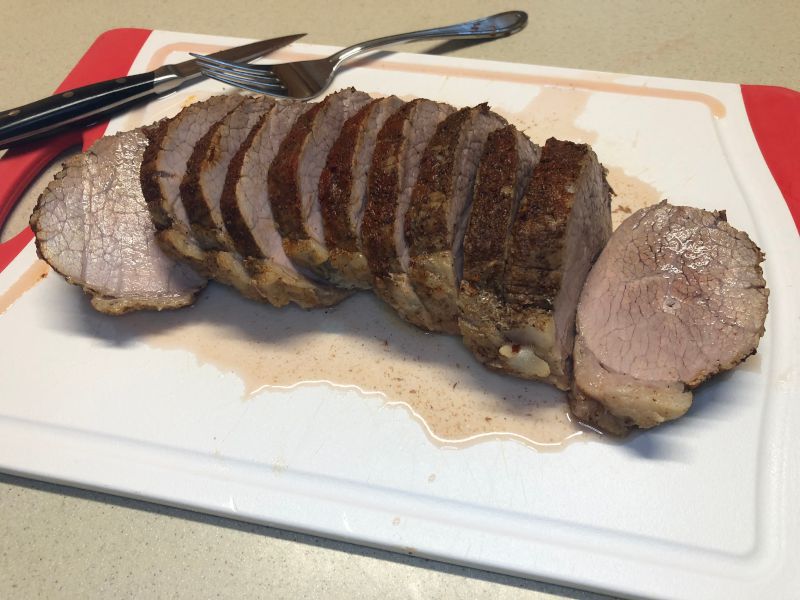
Attempt #4 – Pork Tenderloin
Once the new MeatStick arrived, I charged it for 4 hours for our fourth attempt, a pork tenderloin. We walked through all the steps for syncing, put everything in the oven and waited. Five minutes later, I got the exact same error as before. This was getting pretty frustrating. I communicated some more with the Support team, but we couldn’t figure out what was wrong. Then in the middle of the night—am I the only one who gets good ideas in the middle of the night?—it occurred to me that the MeatStick worked the first time that I used it, so I need to get back to the original state. The next morning I uninstalled the app and rebooted my phone, then I reinstalled the app and began testing. The MeatStick worked again! Both the original one and the replacement worked! So what was the problem? The Support team theorized that there was a problem with my phone’s Bluetooth that was fixed by the reboot; that might be, but my other Bluetooth devices were working just fine. I think that the app somehow got into an inconsistent state where it couldn’t sync properly, and so the reinstall fixed the problem. Whatever it was, we’re ready to get back to testing.
Attempt #5 – Eye Round Roast
My wife wanted to make some BBQ from an eye round roast, so she prepared it and wrapped it in aluminum foil. I went through the syncing process once again, and that’s when I found another problem with the mobile app: It can’t change the weight of an eye round roast. I went back and tried several other cuts of beef, and they allowed me to specify the weight of my cut. For some reason, the eye round roast is stuck on the default setting of 2 to 3 pounds. As ours is 4 pounds, the app was unable to correctly estimate how long it will take to be done. At this point, I’m having trust issues with the MeatStick, so we put the wired thermometer back in it again. The two thermometers stayed within 4 degrees of each other the entire time, so I’m confident that the MeatStick is correctly measuring the temperature.
After less than 2 hours cooking, a klaxon alarm sounded to warn me that I should probably take the roast out of the oven in order to let it rest. It’s only 140°, so this seems a bit too soon. I wonder if this is a side-effect of having the wrong weight of the roast. We decided to leave it in for a while longer and then take it out.
The result was perfect. Eye round roast has a tendency to dry out, as it’s rather lean, but ours was tender and still very juicy; it made for some delicious BBQ.
Attempt #6 – Whole Chicken
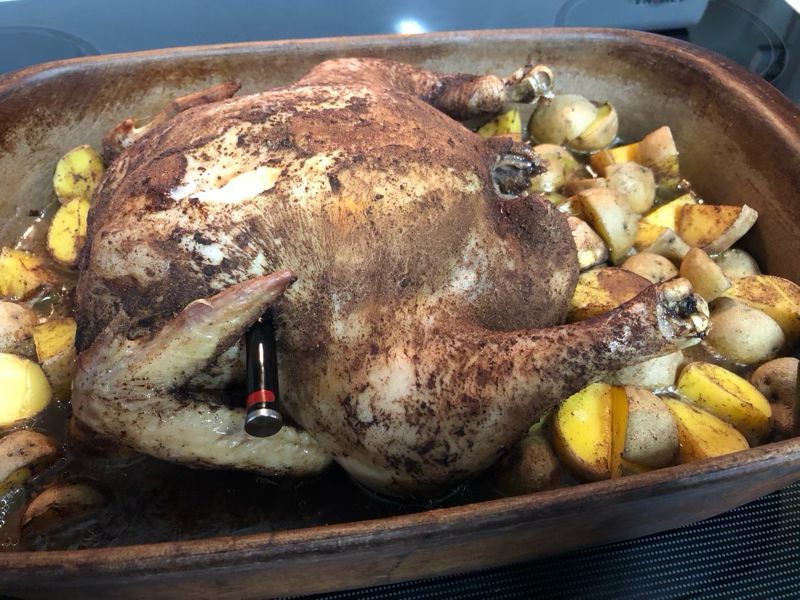
For our final attempt at cooking with the MeatStick, we decided to give whole chicken another try. My wife seasoned it, wrapped it in aluminum foil, and added some potatoes. We synced the MeatStick, inserted it into the chicken, turned on the Xtender, and put the bird into the oven. I’m happy to report that everything worked perfectly. Shortly before it was done, the app warned me that it was time to take it out of the oven. Once it had rested for it a bit, it warned me again that the ideal temperature had been reached.
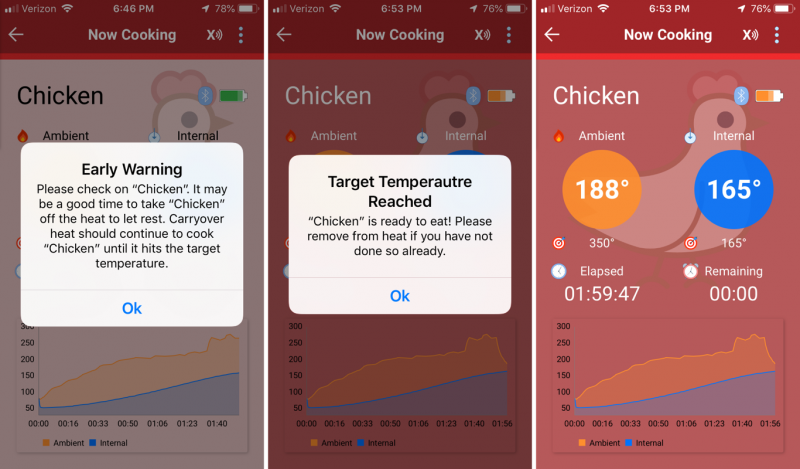
The chicken turned out perfectly. It was tender and juicy, just how we like it. It was a perfect meal and the perfect end to weeks of testing the MeatStick.
What I like
- No wires, long range
- Helpful tutorials in the app
- Solid construction
- Great support team
What I’d change
- Stop requiring my location
- Add additional cuts of beef to the app
- Change the temperature selection to increment by 5 instead of 1
- Address the “Please remove Stick from Charger to resume cook” problem
Final thoughts
I have mixed feelings about the MeatStick. On the one hand, it’s great to know when my meat is done cooking, no matter where I am in the house or yard; on the other hand, it only works with large cuts of meat. It’s a well-written app with great tutorials, but it always wants to track my location. The app works great when it works, but it still has a few kinks to work out and lacks many cuts of meat. The Support team was super helpful and dedicated, but even so I had to solve the problem myself.
In the end, the MeatStick wasn’t a hit with our family. I am not a fan of giving a thermometer company the ability to track me, and my wife feels like it’s only half a solution, because she still needs another thermometer for smaller cuts. But if these aren’t issues for you, the MeatStick might be just the gadget you need to help you perfectly cook your next cut of meat.
Updates 11/26/19
From vendor: We do not use the location services to track our users. We cannot do without this to have the full functioning of The MeatStick as it works as a beacon.
Price: $85.99
Where to buy: The MeatStick and Amazon
Source: The sample for this review was provided by The MeatStick.
Gadgeteer Comment Policy - Please read before commenting
You would think someone who does reviews for a commercial website would think to check with the manufacturer before dissing them about some quirk. Location services are REQUIRED BY APPLE, not by The MeatStick. Do your homework. You look incompetent when you publish nonsense like this.
Thanks for taking the time to respond, Will. As you might imagine, I have a host of Bluetooth devices in my house, many of which exchange information with an app on my iPhone. None of them require Location Services to be enabled, much less require them to run in the background. Just to double-check, I spoke with an iOS developer at my company, and he verified that reading information from a paired Bluetooth device does not require Location Services, unless the app overlays the information on a map, which The Meatstick app does not do. So I’m sorry, but no, Apple does not require this. But even if Apple did require it, then I would still not be happy about giving a company 24/7 access to my location just to cook large pieces of meat. I would choose to use a different thermometer. If, however, privacy issues like this are not a concern for you, then by all means enjoy The Meatstick!
Indeed some more research needed pal. Bluetooth services are required by iOS when you use a bluetooth beacon to broadcast information.
The Manufacturer doesnt have access to that information AT ALL.
I’m an app developer so I know what I’m talking about.
See yourself:
https://developer.apple.com/documentation/corelocation/determining_the_proximity_to_an_ibeacon_device
Cheers.
Who looks incompetent now, William?
Take the money your gonna spend on this, and go buy a thermometer you can see through the oven window. This meat stick is junk! Third meal destroyed. Ambient temp wrong, which causes alarm the whole time, loses connection, even puting bluetooth on a chair right in front of oven, 2ft from thermometer. Do Not Buy!!!!
I have a pellet smoker with built in meat thermometers and WiFi software to provide ambient and probe temps. What advantage would a wireless thermometer be for me?
Probably not much.
Best view i have ever seen !
Thank you.
It is a good device, thanks for sharing it.
Anyone problems with charging the probe ?
My charger is equipped with full batteries. When I press the button, the green led lights up.
After 6 hours the probe is still charged low… It is fully cleaned.
Any advice?