 Automating a home is fun – opening an app and adjusting the temperature in your house or turning on a light when you’re not at home is so useful and gives you such a sense of power. These are especially fun when you’ve left people at home – you know, just a little flicker of lights to freak them out and keep them on their toes. Okay, I don’t do that. Often. At least not on purpose. Most of the time. I do test products here in my home, so everyone knows that if unexplained things are going on around here, it’s most likely me. I love these products but I don’t like having a gazillion apps on my phone to control each one. Yet, I am a Gadgeteer who tests multiple products, so it is inevitable. That’s why I hunt for those that work with Alexa in order to have some semblance of centralized control while at home. When the Gadgeteer was offered the opportunity to review the Oittm Smart Touch Switch and the Oittm Smart Plug Socket, which work with Alexa and Google Home, I was eager to see how well they work and to see if they would be an asset to my home automation repertoire. The short answer is, yes, they work well and are a good addition to my home, but the app is a work in progress.
OITTM SMART TOUCH SWITCH

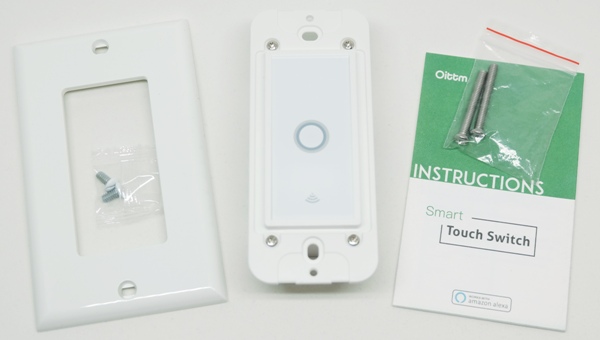
Package Contents
- Oittm Smart Touch Switch + two long screws
- White plastic cover plate + two short screws
- Installation/setup instruction manual
Technical Specifications
- Power supply: Neutral + Live wire
- Rated Current: 15A
- Rated Voltage: AC110V-125V / 50-60Hz
- Rated Power: 1 Gang (1800W)
- Wireless Standard: IEEE802.11 b/g/n (2.4GHz)
- Working frequency: 2.412~2.484MHz
- Safety: WEP/WPA-PSK/WPA2-PSK
- Encryption: WEP/AES/TKIP
- Static power loss: ≤0.3W
- Working Temp: -4 – 167℉
- Humidity: <95%
- Touch life: one million
- Control Distance: no limitation
- Dimensions: 1.4″ x 4.52″ x 2.75″
- Unit weight: 0.33 lb
Design & Build Quality

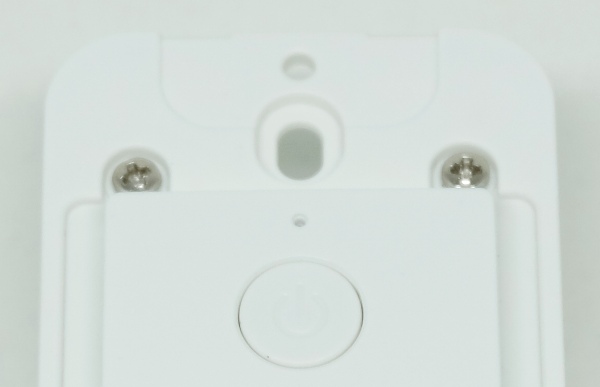
The Oittm Smart Touch Switch is made of white plastic and feels rigid and sturdy. The face of the switch is touch sensitive (capacitive touch control). It also has a WiFi status light to indicate whether or not the switch is connected to your WiFi and can help guide you to the light switch in the dark.
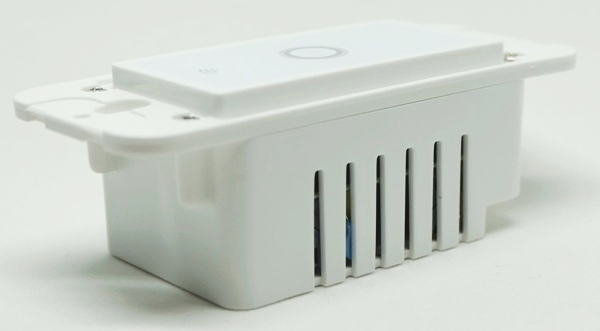
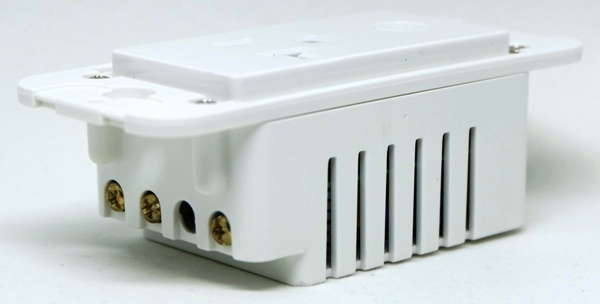
Each side of the switch is vented (to ensure adequate cooling of the electronics held inside the housing).
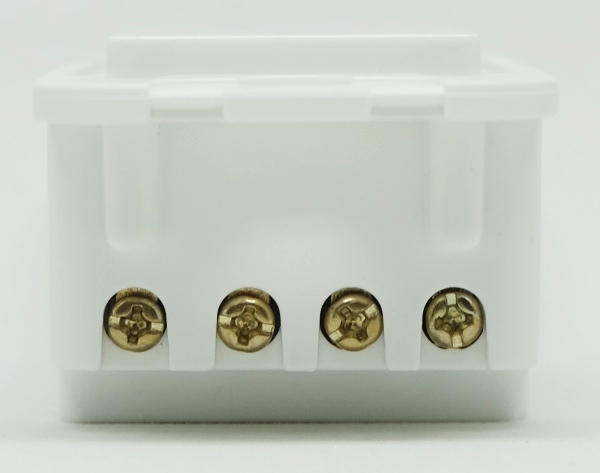
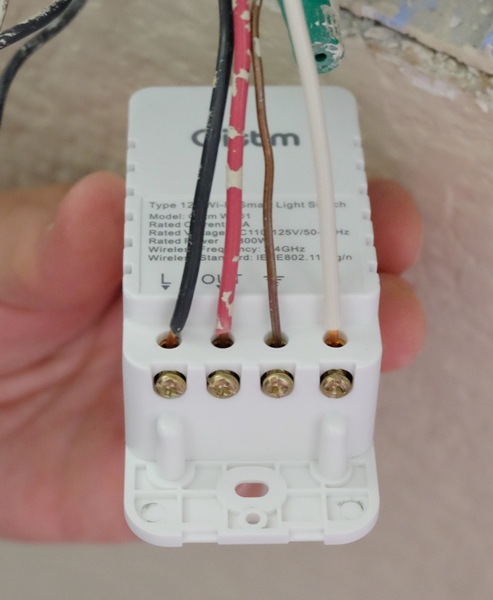
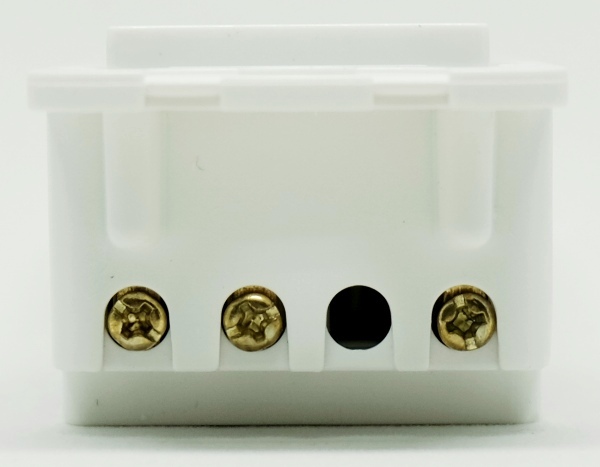
The bottom of the switch has four screws that are used to make the contacts with the wiring.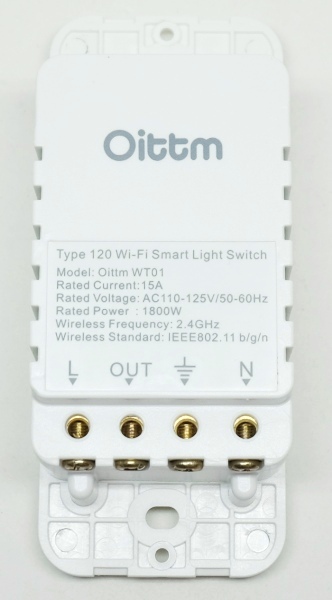
In the above photo, you can better see the screws that eventually will be used to make contact with your home’s switch wiring. Also located on the back of the switch is its technical information.
Installation
I’m not well versed in residential electrical wiring, so I always let my engineer husband install the devices that require it. Thus, he will be the one to describe the installation of the switch in our home (his word are in blue, mine are in black). The following description is NOT meant to be a tutorial but more of an in depth discussion about how we installed the smart switch in our home.
Installation of the Oittm Smart Switch is almost as simple as installing any regular light switch (but not quite). NOTE: If you have never attempted to install an electrical switch or have never even removed a cover plate, then please hire an electrician or some other qualified individual to do this for you. However, if you have a healthy dose of mechanical or electrical aptitude and a decent helping of common sense, or if you have experience with residential electrical wiring and the NEC (National Electric Code), then you should be able to install this switch very easily, and you probably won’t even need to read this section.
So for those of you who fall in the middle, read on! One disclaimer, however …. you MUST follow the local regulations for residential electrical work. If you live in a municipality that requires a licensed electrician and a building permit to do this, then you need to follow the law.
We chose to use the Oittm Smart Switch for our living room light which is part of the ceiling fan fixture. In this case, that switch was part of a 3-gang box that was shared with two other switches that turn on/off the ceiling fan and turn on/off a light over the fireplace.
It is important to note that the Oittm switch cannot be used on a lighting circuit where there is more than one switch controlling the light. This is because those circuits require 3-way or 4-way switches and the Oittm is only a single pole single throw (SPST) switch, thus, it cannot be used in these types of circuits. Because of this, it was necessary for us to select a light that was controlled by only one switch. It will work for a light that is part of a ceiling fan, as long as there are separate switches for the light and the fan control, which is what I have.
The first step of the installation REQUIRED that before I started, I first find the circuit breaker that powers the light AND all other lights controlled by the switches within the box and turn the breaker OFF. Typically it would be a single breaker for a single electrical box, but I never assume that this is the case. Also, because it can be a challenging task to find the right breaker (my house was built in 2009, and yet there is very little rhyme or reason as to how they installed the circuits), I turned on all the switches in that box and then started turning off the breakers, checking to confirm that all the lights controlled by the switches were OFF before proceeding.
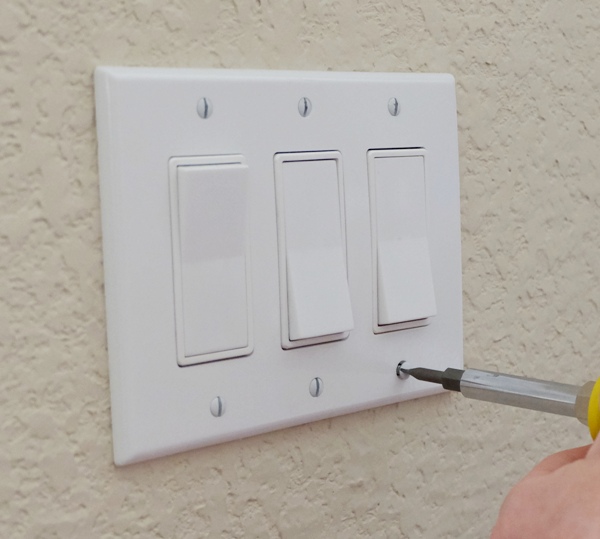
Once I confirmed that the power to the switch was off, I removed the switch cover plate.
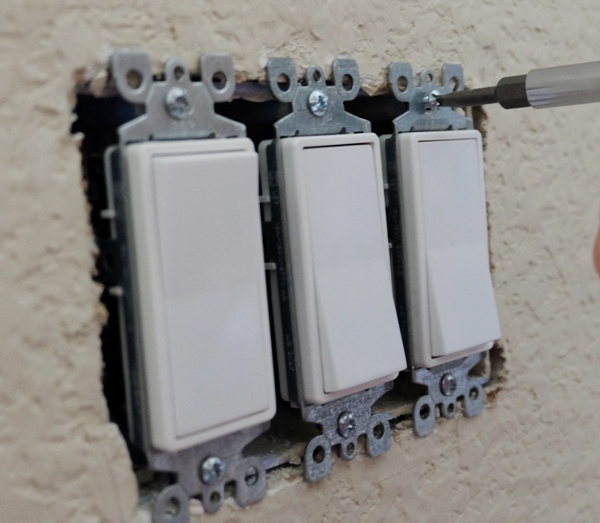
Next, I removed the screws that attach the switch I wished to replace to the electrical box.
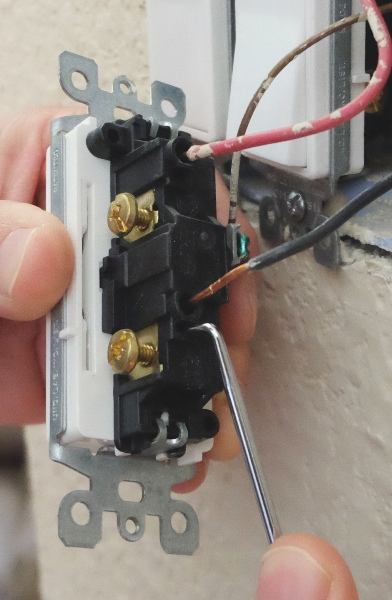
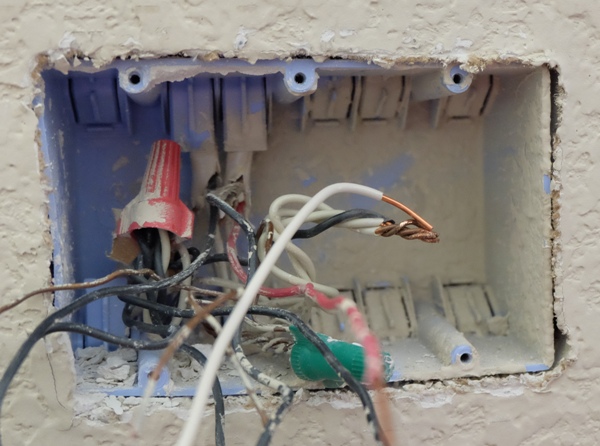
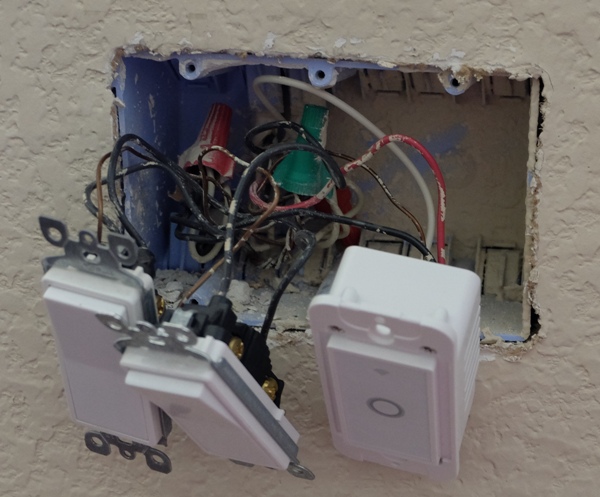
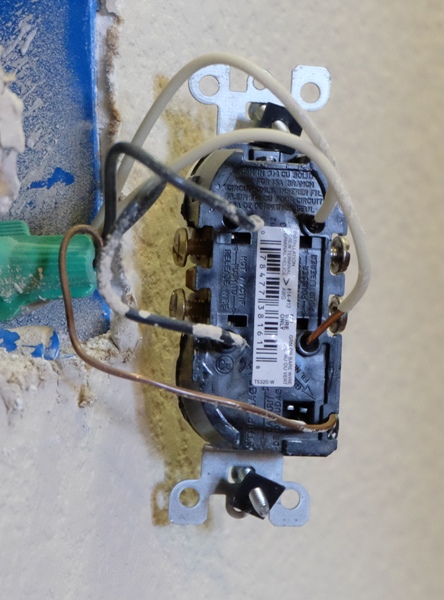
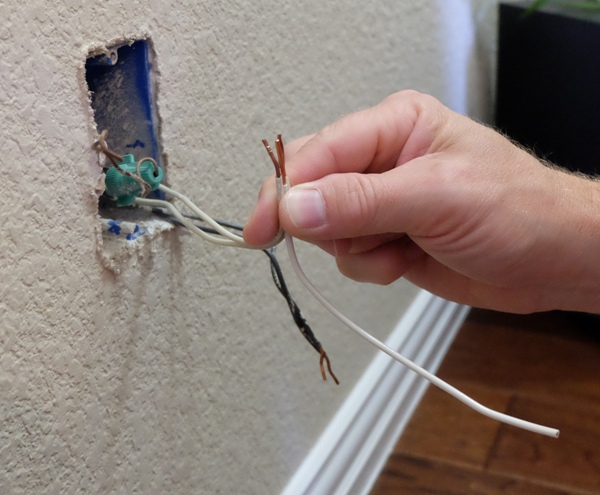
There were two insulated wires connected to the switch and a third uninsulated ground wire. Note that the white (common) wire is not attached to the switch. Typically the two insulated wires would be black wires since the normal convention is the black wire is used as the hot wire and the switched wire for the light. For my switch, you will note in the picture above that one of the wires is a red wire. That is the switched wire to the light in the ceiling fan fixture. In this circuit, the installer used three conductor cable to the fixture (which contains a black, red, and white wires), and this is very typical for ceiling fans. In this case, they happened to use the black wire to power the ceiling fan and the red wire to power the lights. If your circuit is a simple lighting circuit, then they should both be black. Before disconnecting the wires, I made note of which of the two was the hot wire (from the power source) and which was the switched wire (to the light). In my case, I knew the hot wire was the black wire and the red was the switched wire, so I disconnected the wires.
If there are three or four insulated wires connected to the switch (not counting the uninsulated ground wire), then that is a 3-way or 4-way switch and you can’t use the Oittm switch in this location.
Also, note in the picture above that the builders used the quick-connect terminals in the back of the switch instead of using the screw terminals. This is very typical, and allows the installers to save a few bucks by saving a few minutes for installation, but makes removing the wires more difficult. You could simply cut the wires if you want, but the better option is to find a sharp tool and push the release next to the terminal to allow the wires to be pulled out – this is what I did. The ground wire was connected to a screw terminal with a green screw and was also disconnected.
Once I disconnected and removed the switch, I needed to locate the common (white) wires within the box. These were not connected to the switches but were connected to each other with a wire nut. Since the Oittm Smart Switch requires the common wire to be connected to the switch, I had to connect a new piece of white wire to facilitate this connection. I have done a lot of house wiring, so I happen to have a lot of 14-2 (14 gauge 2-conductor) cable around. Our installer used Type NM 14-2 cable, which meets NEC code requirements for residential wiring on a 15 amp circuit, so I made sure to use this type of wire.
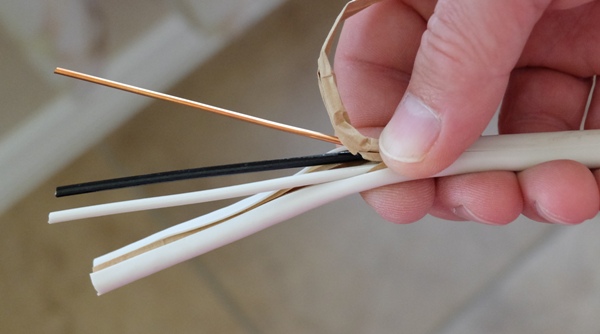
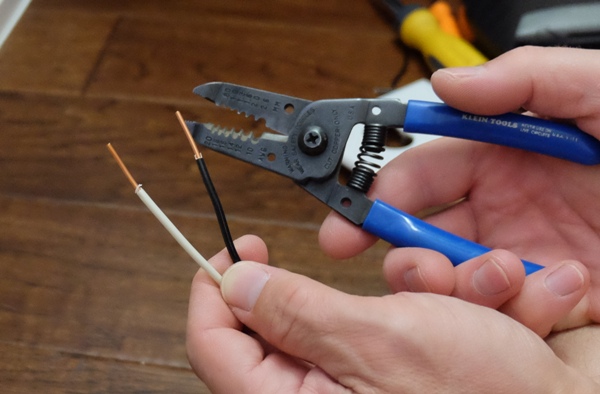
Here is what 14-2 cable looks like when the outer sheath is removed.
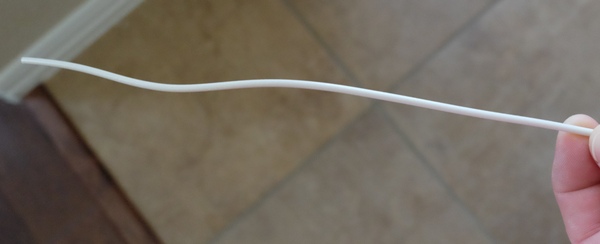
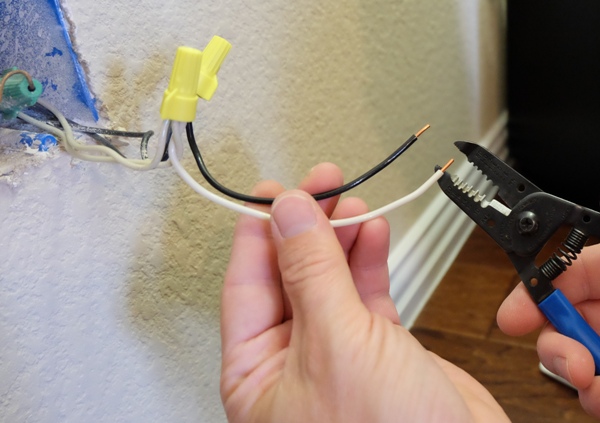
I cut a length (~6″-8″) of white insulated wire.
Using a wire stripper, I removed about 1/2″ of insulation from one end.
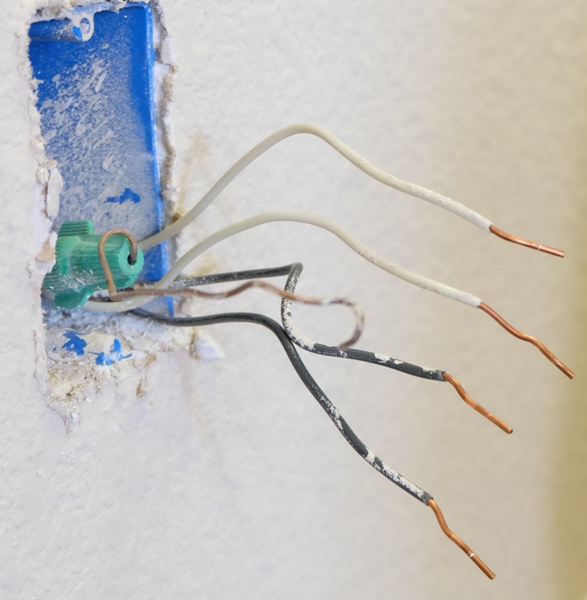
I then removed the wire nut from the bundle of white wires, inserted the new wire, and reinstalled the wire nut. You will note that in my case, in order to simplify access to the bundle of common wires, I went ahead and removed the other two switches, but I did not need to disconnect their wires. You may also note that there happens to be a black wire that is used as a common wire. That is just one example of some of the messed up things that my builder did, but the circuits work (at least this one does). Sometimes your electrical boxes are like a box of chocolates … you never know what you are going to get.
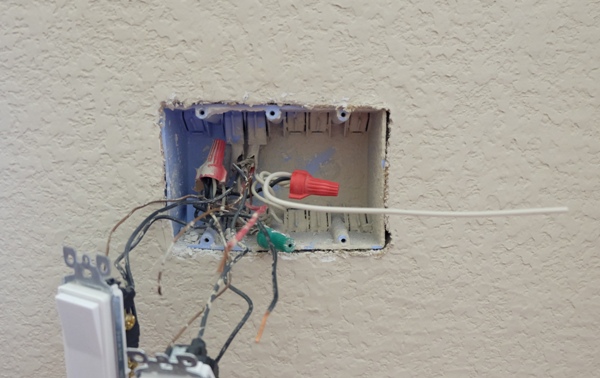
Here is the new common lead attached to the bundle. It is important to note that the wire nut must be sized to connect the correct number of wires of a certain gauge. In my case, the wire nut needed to be sized for five 14-gauge wires.
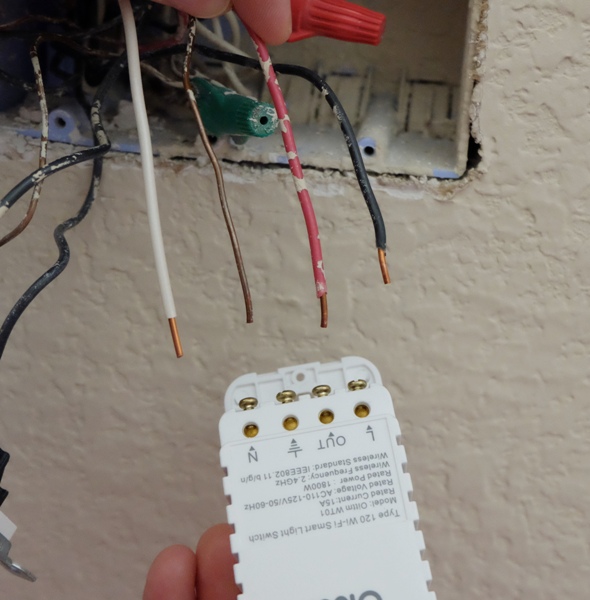
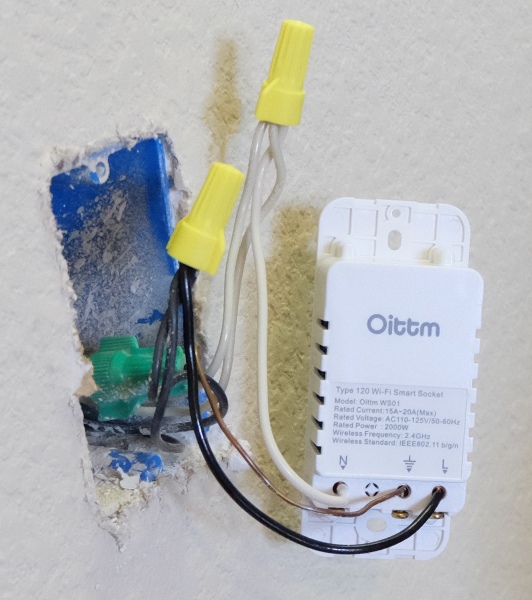
Next, I stripped the insulation off the other end of the white wire. The Oittm does not need a full 1/2″ of insulation removed, but more like 1/4″, so I trimmed the black and red wires also. In the photo above I show the four wires next to the terminals they need to connect to. The hot wire connects to the terminal with the “L” (for line) and the switched wire (red wire in my case but would more typically be black) is connected to the terminal labeled “OUT”. The new white common wire connects to the “N” terminal (for neutral) and the uninsulated ground wire connects to the ground terminal.

I then loosened the screws for the switch terminals.
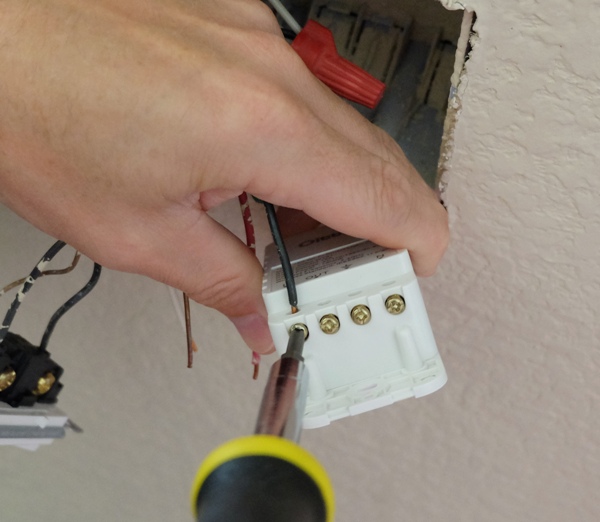
Next, I attached the four wires to the switch by inserting the stripped ends of the wires into their appropriate positions and tightened the screws.
This is what it looked like when completed. Again, the more typical configuration would have two black wires, a white wire, and a ground wire.
At this point, I pushed the wires back into the box, being sure to leave enough space for the new smart switch which was larger than the previous switch. It was necessary to push the bundle all the way to the back of the box to get the switch to fit.

I then re-attached the switches to the box. Since I have three switches, I had to spend some time adjusting the positions to get them all lined up. This, of course, is not an issue if you are installing the switch in a location with only one switch.
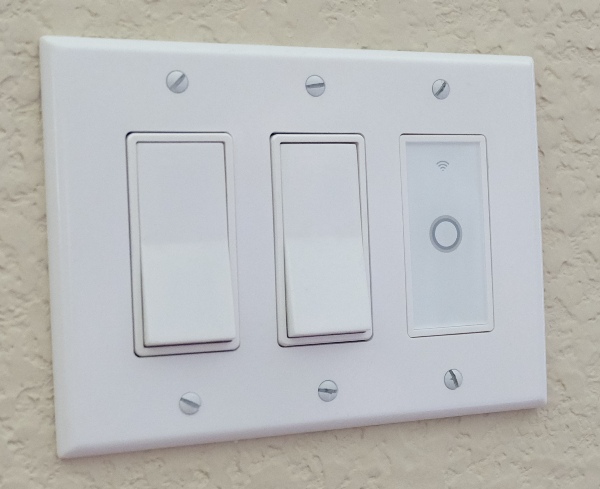
And finally, I reinstalled the cover plate. Since I installed the switch in a 3-gang box and my switches were all rocker switches, my existing cover plate worked with the Oittm switch thus, I did not use the cover plate that came with the switch. The breaker was turned back on and installation was then completed.
Oittm Smart App Setup


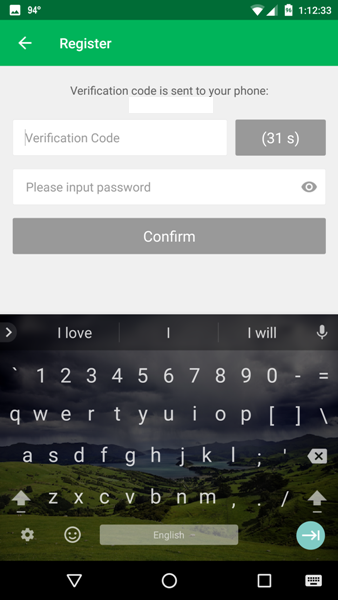
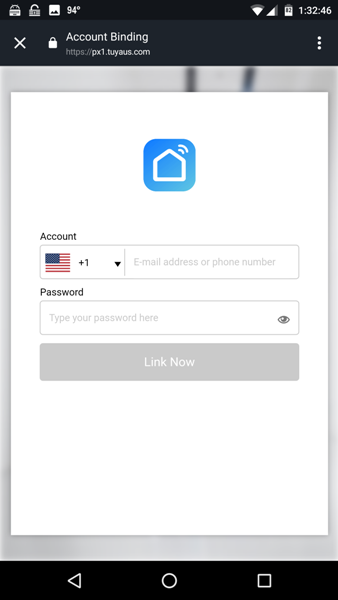
At this point, I needed to download and install the Oittm Smart app. After launching the app, I needed to tap on “Register” to set up an account. The app then prompted me for my region and my mobile device number/email to send me a verification code. After inputting the code and creating a password, my account setup was complete.
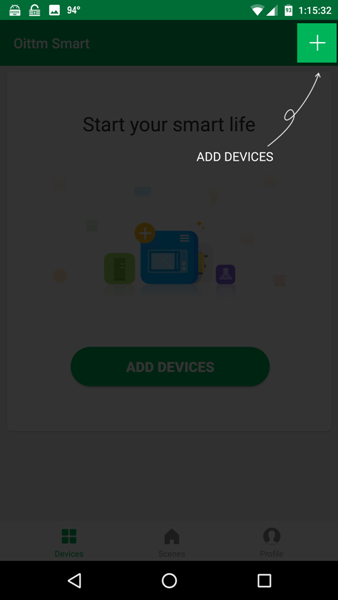
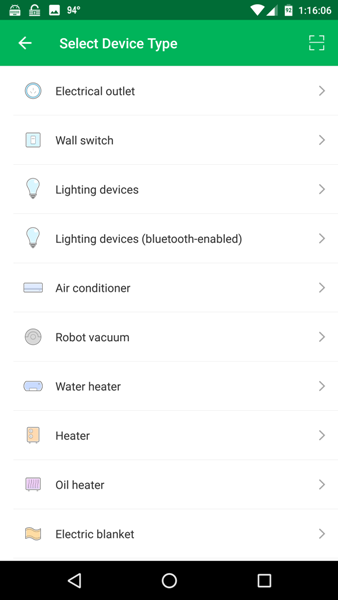
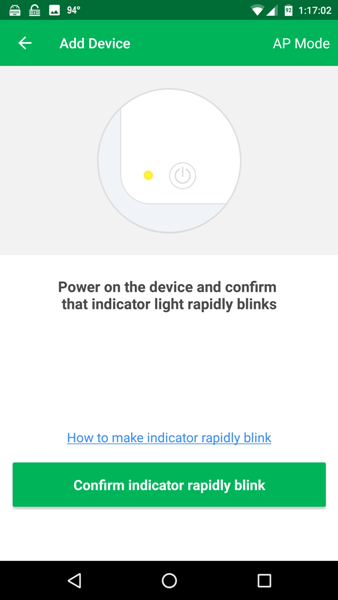
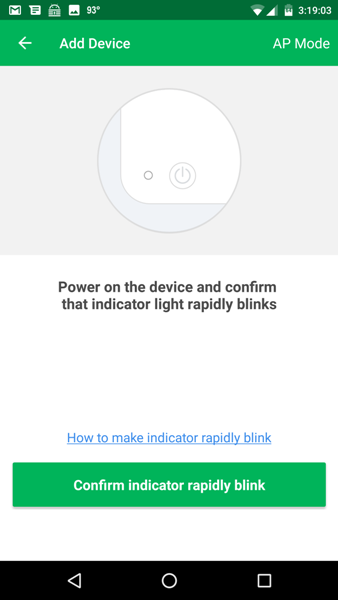
Adding the switch to the app: Now, I needed to add my device to the app. After tapping on the “+” located in the upper right corner of the app, a list of devices popped up. I selected the wall switch and after doing so, the app (and the instruction manual) prompted me to long press the power button on the switch for five seconds until the WiFi status light started to flash blue.
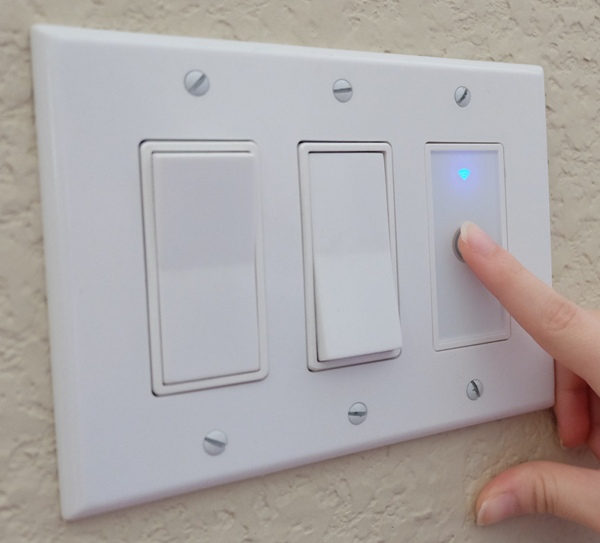
I held the power button down for about seven seconds which made the WiFi LED status light on the switch flash blue (it seemed to take a bit longer to get the WiFi status light to start flashing than the five seconds that was stated in the user manual, so when you do this, just keep holding down the Power button until the WiFi light starts flashing).
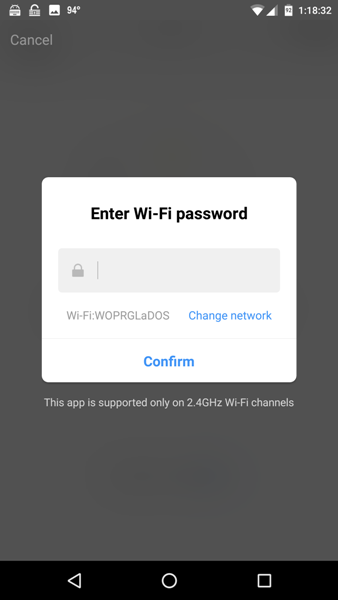
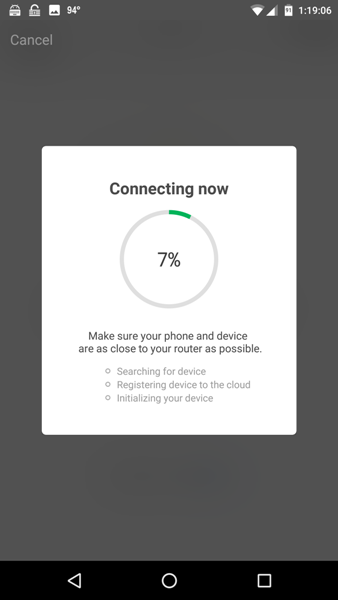
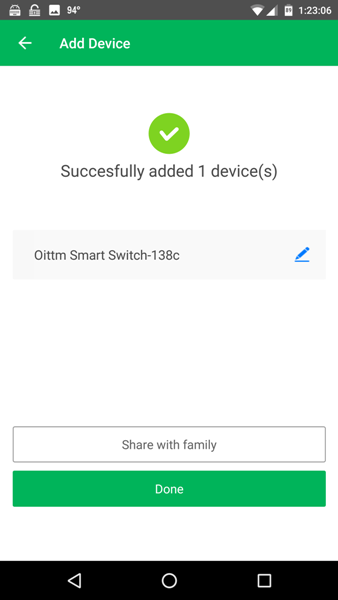
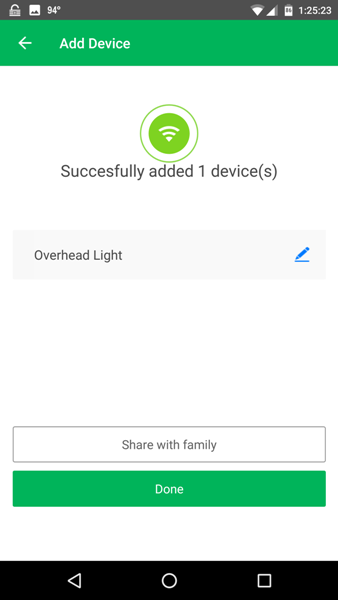
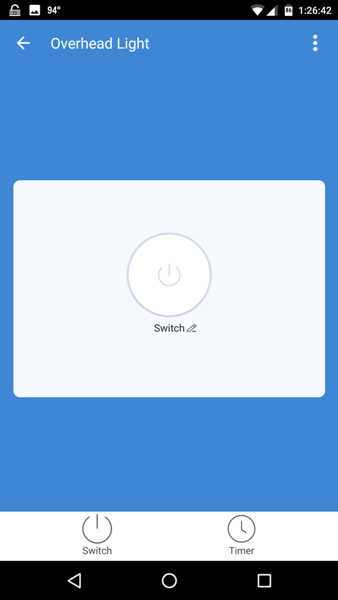
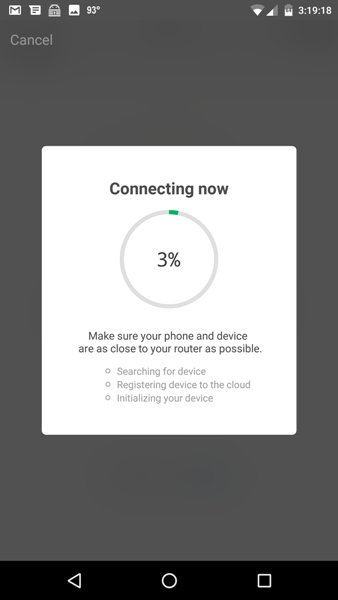
I then selected our home network listed in the app then entered our WiFi network password and the switch was then connected. The last two screenshots show that I changed to name of the switch from “Oittm Smart Switch-138c” to “Overhead Light” (by tapping on the blue pencil icon next to the name of the device).
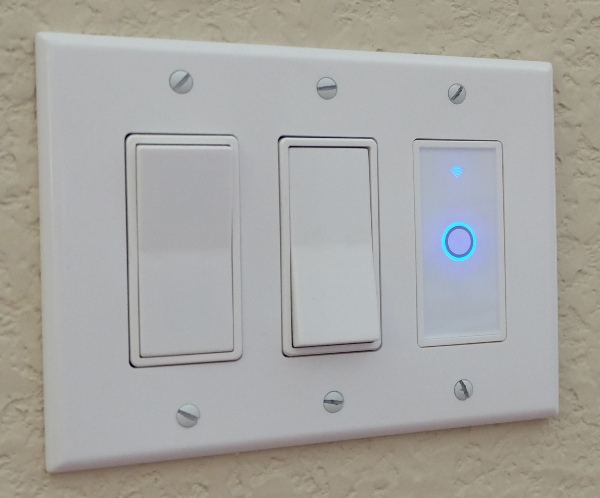
After being connected, the WiFi status light on the switch became a solid blue. Now we were able to touch the power button on the switch to turn the light on or off (blue ring around Power button = On, no blue ring around Power button = Off)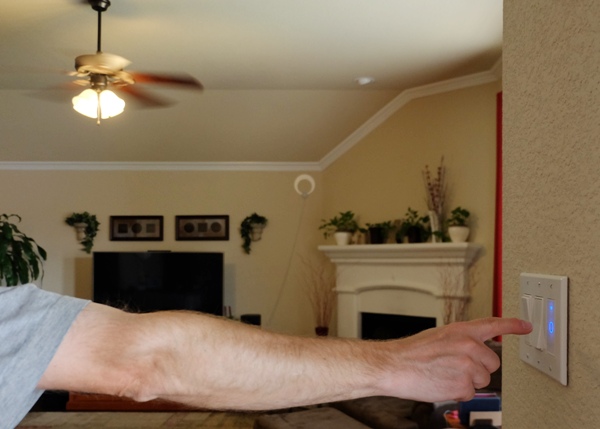
This is the ceiling fan light that the Oittm Smart Switch controls (it does not control the fan).
Oittm Smart App Use
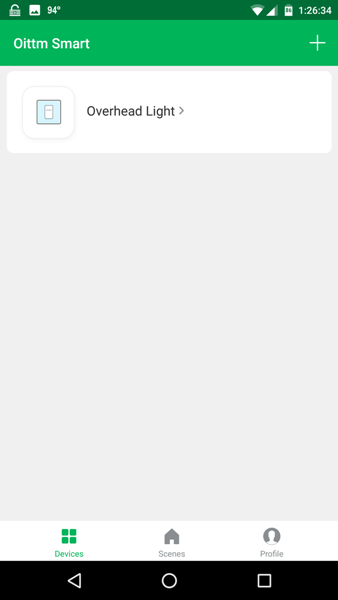
App home screen: The Oittm Smart app home screen shows “Devices”, “Scenes”, and “Profile” sections located at the bottom of the app. When you open the app, it defaults to the “Devices” screen and displays your list of Oittm WiFi connected devices. When I tapped on the “Scenes” section, the app describes it as a way to “Customize your own personal scenes to suit your needs. For example, set your home to automatically turn on the lights and close curtain when you come back home.” This section will be discussed in more detail later in the Oittm Smart Plug Socket portion of this review. The “Profile” section of the app contains links to “Scenes” (the same “Scenes” on the app home screen), Device Sharing (more on this later), Message Center, Use Echo and Google Home, Scan QR code, Feedback, and About.
Turning the switch on/off using the app: When I tapped on my switch from the list of devices, I was brought to an app screen that allowed me to turn our light on or off by tapping the Power button in the center of the app or by tapping on the Switch button located at the bottom left of the screen.
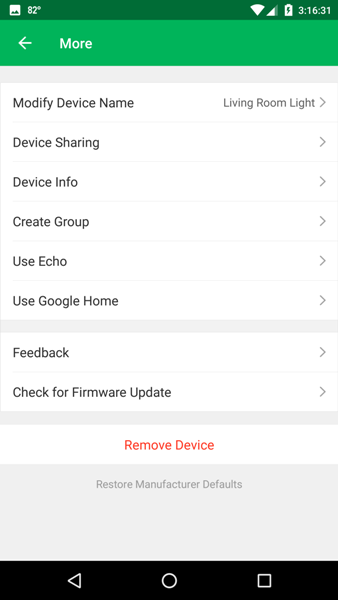
App overflow menu: From the switch screen (shown in the middle screenshot above), I was also able to tap on the overflow menu (three vertical dots located in the upper right corner of the app) and see the list of options available: Device Sharing, Device Info, Create Group, Use Echo, and Use Google Home, Feedback, and Check for Firmware Update.


- Device Sharing: I think this area allows you to share your Oittm device with others who have their own Oittm Smart app account and Oittm devices (first screenshot above). When I tried to “share” the device by tapping on “Add” to add another member of my family, I needed to enter that person’s region and phone number/email and after doing so, my app informed me that the “Sharing failed. The account is not registered. The register message has been sent.” That family member was sent a text and told, “Attention user. [my account] invites you to use smart device. Download app to experience it now.” There was no link to the app and no way for that person to know what device was being shared. So, in essence, that person needed to have the Oittm Smart app already installed and registered under their phone number or email. To avoid all of this with my family and share device control with them, I just installed the app on their devices and logged in using my login information – it just seemed easier.
- Device Info: This area of the menu has the MAC address of your device (not shown).
- Create Group: I’m guessing that this is where you would find a list of your switches which you could group together and perhaps turn them on or off together (second screenshot above).
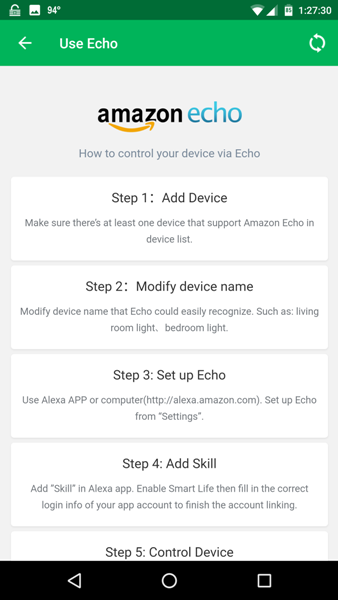
- Use Echo: This area of the menu provides you with the steps necessary to connect your Oittm device to your Echo device (third screenshot above).
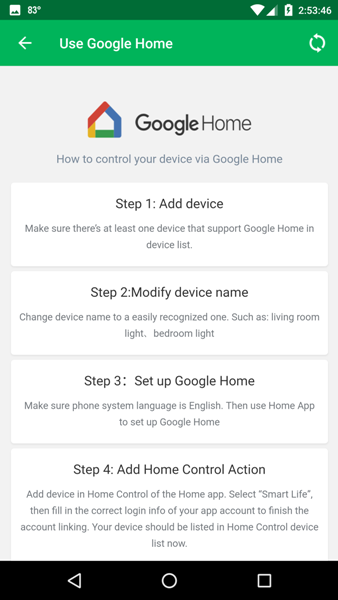
- Use Google Home: This area of the menu only recently became available through an update and provides you with the steps necessary to connect your Oittm device to Google Home (fourth screenshot above).
Setting up a schedule using the app
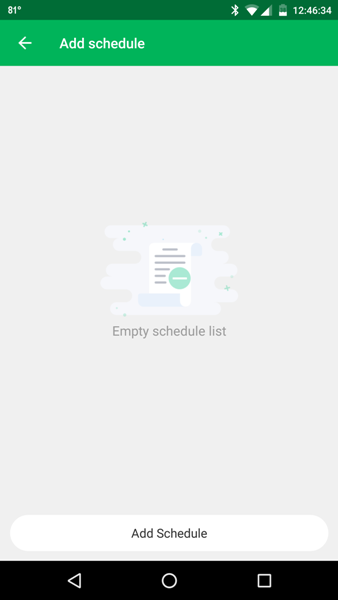
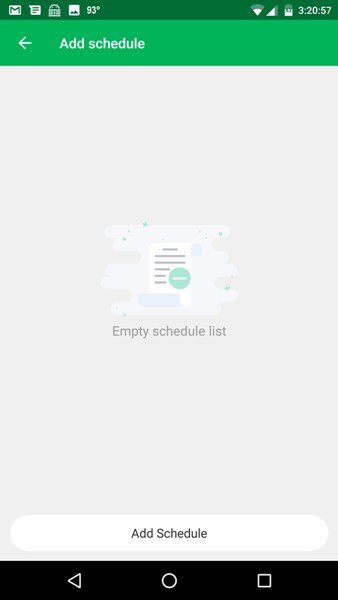
To set up a schedule for the switch, I tapped on the switch in the list of devices, then tapped on the “Timer” icon located at the bottom of the screen (shown in the middle screenshot above). This brought me to the scheduling screen where I then tapped on the “Add Schedule” button located at the bottom of the app.
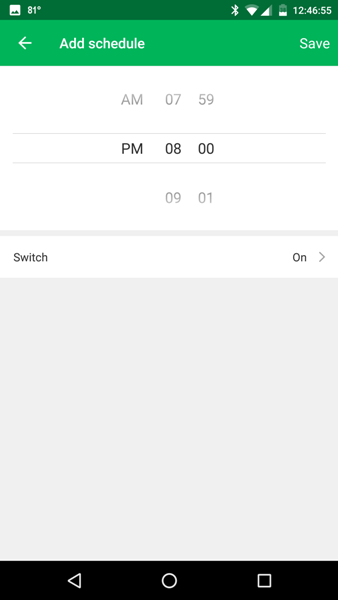
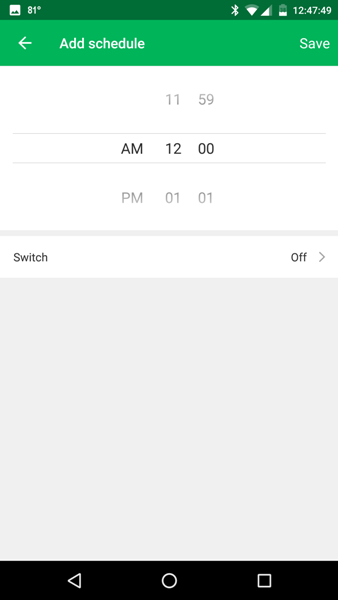

I then selected the time and selected that the switch will be switched “On”. I then added another schedule to set up the time that I wished to switch the switch “Off”. Notice that you do not have the option to choose the days that you want the schedule to repeat; by default, this is set to every day. This is a major oversight, in my opinion, one that Oittm may be working on to rectify. Anyway, when put into practice, the scheduling worked very well – there were no issues.
*NOTE: There has since been an update that took my switch offline. When this happened, I relaunched the app several times with the same “Offline” result. To get the switch back online, I pressed the Power button on the switch for about seven seconds until the WiFi status light started flashing. I then removed the switch from the app by tapping on the Overflow Menu and then tapping on “Remove”. I then re-added the switch to the app like I did when I first set it up. Now the switch is back online and NOW has the added functionality of setting a schedule to repeated on days that you select. As I have been writing this review, there have been at least two other instances where the app has changed without an app update (the last app update date was August 3 so this seems odd to me). The app is improving but these constant changes make writing the review difficult.
Connecting to Alexa

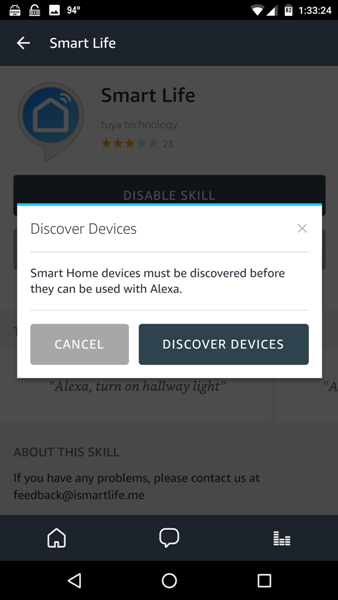
I have an Echo Dot and wanted to connect my Oittm Smart Touch Switch to it. To do so, I launched the Alexa app, then tapped on Menu, then Skills, searched for the “Smart Life” skill and tapped on it, tapped on Enable, entered my account information for my Oittm switch (my phone number and password), then tapped on Discover Devices.

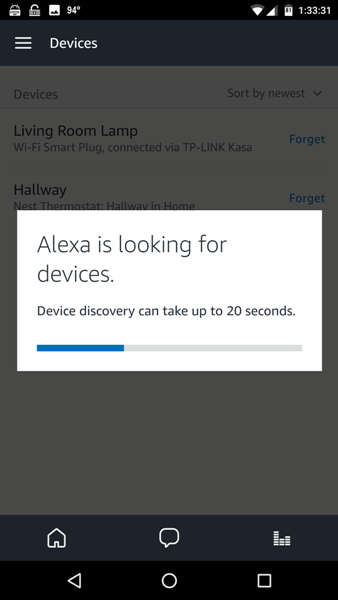
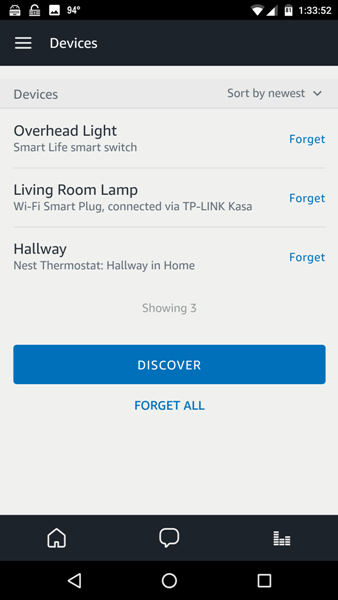
Alexa then discovered the Oittm switch. I could now tell Alexa, “Alexa, turn on the Overhead Light”. It worked like a charm!
Conclusion about the Oittm switch: The Oittm Smart Touch Switch worked well after some updates. The schedule (or “Timer” as it is called in the app) now works like it should and the switch works well with Alexa. In addition, the app works well to control the device even when away from home. The app initially felt incomplete, but as time has passed, it has improved.
OITTM SMART PLUG SOCKET
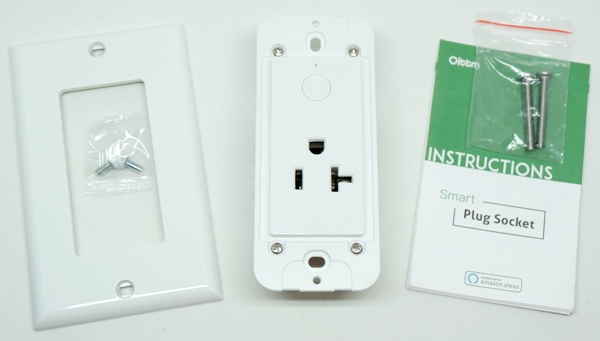
Package Contents
- Oittm Smart Plug Socket + two long screws
- White plastic cover plate + two short screws
- Installation/setup instruction manual
Technical Specifications
- Rated Current: 15A/20A(Max)
- Rated Voltage: AC110V~125V/50-60Hz
- Rated Power: 2000W
- Wireless Standard: IEEE802.11 b/g/n (2.4GHz)
- Working Frequency: 2.412~2.484MHz
- Safety: WEP/WPA-PSK/WPA2-PSK
- Encryption: WEP/AES/TKIP
- Static power loss: ≤0.5W
- Working Temp: -4 – 167℉
- Humidity: 10%-80%
- Dimensions: 1.4″ x 4.52″ x 2.75″
- Unit weight: 0.33 lb
- Remote Control: Smartphone App (Compatible with Android 4.1 / iOS 8.0 Above)
Design & Build Quality

Like the Oittm Smart Touch Switch, the Oittm Smart Plug Socket seems to be a sturdy device. It is made of rigid white plastic. There is also a power button located on the outlet.
The face of the outlet also has a small LED status light just above the Power button.
Just like the Oittm Smart Touch Switch, the smart outlet has vents on both sides of the housing to help with heat dissipation.
The end of the outlet has three screws used to connect the outlet to your home’s wiring.
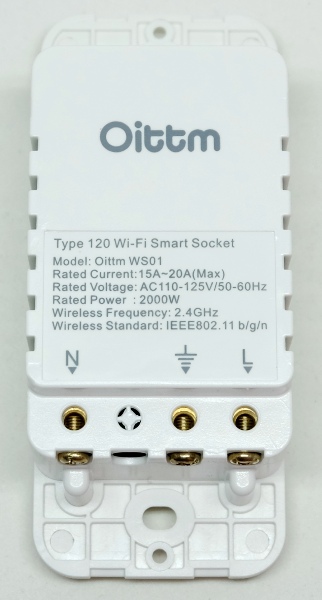
In the above photo, you can better see the screws that eventually will be used to make contact with your home’s outlet wiring. Also located on the back of the socket is its technical information.
Installation
As with the smart switch discussed above, installation of the Oittm Smart Plug Socket is fairly simple but has a few quirks that make it different from a normal outlet.
See the disclaimer above in the switch installation section about whether or not you should attempt to do this installation.
In selecting an outlet to replace with the smart plug socket, there were a couple of things to consider. First, it should not be an outlet that is switched, and secondly, the smart plug socket has only a single outlet, so for us, any outlet where both plugs were being used was not a good candidate. We chose an outlet in the living room where the only thing plugged into it was a lamp.
As with the switch, I first needed to turn the breaker off to the outlet I was replacing. To do that, I left the light plugged in and turned on so that when I found the breaker and turned it off, I could easily tell when the power to the outlet was off.
The above photo shows how our previous outlet was wired after removing the cover plate and the screws that attach the outlet to the box. The outlets in our house, like most others, are connected in series. You will notice that there are two black insulated wires and two white insulated wires connected to the outlet. This means that the power passes through this outlet to the next one. The Oittm outlet does not have this capability, it will only attach one black wire and one white wire and the ground. So, just like the switch installation above, it was necessary to tie these black wires together and the white wires together and to install one additional black wire and one additional white wire to connect to the Oittm outlet to ensure that the next outlet in the series would receive power. If the outlet you are removing has one black and one white wire connected, then you lucked out and found the last outlet in the chain! If this is the case you will not need any additional wires to make the connections and you will be able to simply connect the black, white, and ground wires to the Oittm outlet.
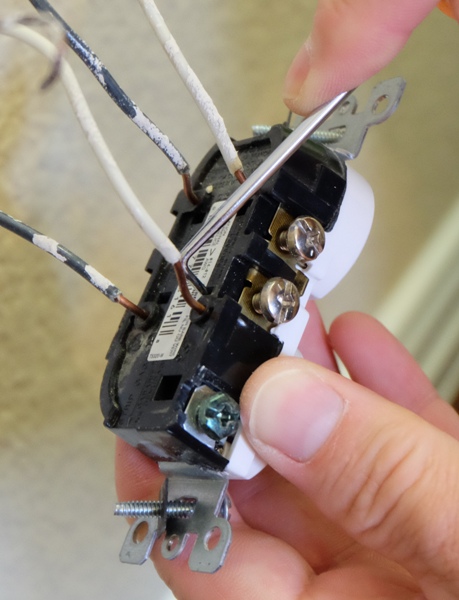
As with the light switch, the wires are likely to be connected to the quick-connect ports and can be removed either by cutting them or by using a sharp tool to release them (which is the preferred option).
Our previous outlet had four wires connected, so I needed to connect new wires to power the new outlet. I used about 6-8″ lengths of Type NM 14-gauge wire, one white and one black to connect to the existing pairs of black and white wires. The ground wires were already connected this way since the existing outlet had only a single ground connection. I always make sure that the new wires installed match the wire gauge of the wiring used in the circuit, so if it is a 15 amp circuit, the wire could be 12 or 14 gauge, and if it is a 20 amp circuit, the wire will be 12 gauge. The Oittm outlet is rated for 20 amps, so the outlet will work in either circuit. You can tell what the circuit is rated for by the size of the circuit breaker. I used 14-2 wire, removed the outer sheath, removed the black and white insulated wires, and stripped approximately 1/2″ off one end of each of the wires.
With the outlet removed, I pulled the existing wires out.
I then grouped the two existing white wires and added the new white wire …

… and connected them with an appropriately sized wire nut.

I did the same for the black wires.

I then stripped about 1/4″ of the insulation off the end of each wire.

Now there were three wires available for the Oittm outlet to connect to. The black wire connects to the terminal labeled “L” (for line), the white common wire connects to the terminal labeled “N” (for neutral), and the uninsulated ground wire connects to the ground terminal.
The wires were connected to the outlet by loosening the screws, inserting the wires into the appropriate holes in the back, and tightening the screws. The above photo shows the wires connected to the outlet.

I then stuffed the bundled wires into the back of the box and attach the outlet using the screws provided.
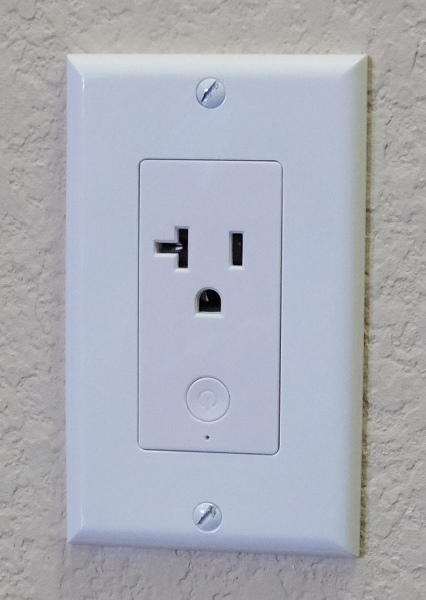
I then installed the cover plate provided and turned the breaker back on, and installation was complete. Note that if you orient the outlet so that the plug is in the typical orientation with the ground plug down, the socket’s power button will be located on the bottom and oriented upside down. It seems that the outlet was intended to be installed the other way with the power button and LED on top, but it will work either way.
Adding the Oittm Smart Plug Socket to the Oittm Smart app


At this point, I needed to add the outlet (or plug or socket) to the Oittm Smart app by tapping on the “+” located in the upper right corner of the app home screen. I then tapped on “Electrical outlet” and the app then indicated that the device should be flashing blue after being powered on by flipping the breaker back on.

The outlet was indeed flashing blue.

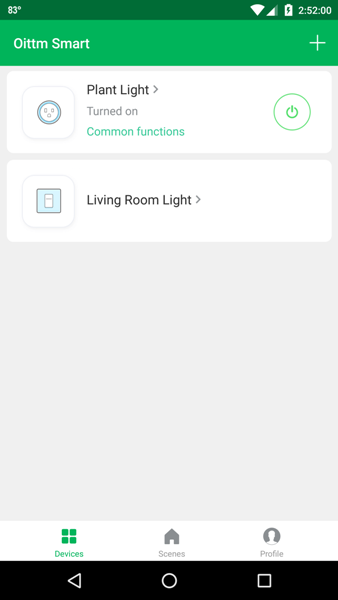
Since I had already connected the Oittm Smart Touch Switch to my home’s wireless network, the app automatically used my network and password information to connect the Oittm Smart Plug Socket to my WiFi. Now listed under Devices was my Oittm Smart Switch that controls my “Living Room Light” (I renamed “Overhead Light” to “Living Room Light”) and my newly added Oittm Smart Socket which I named “Plant Light” because I am using this outlet to power a light to shine on one of my plants.
App Use
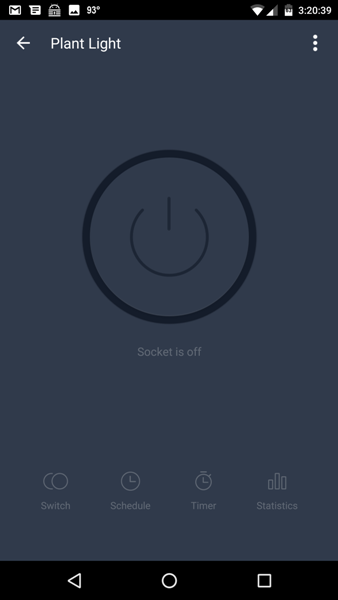
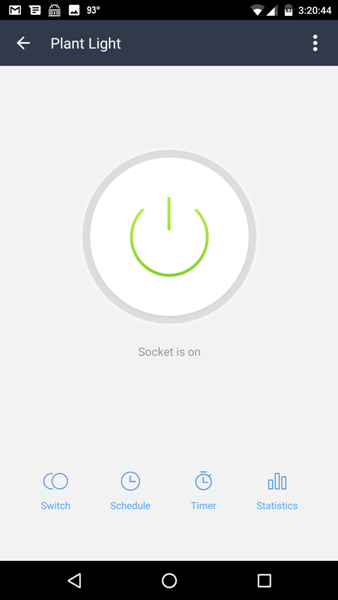
Turning the outlet on/off using the app: After tapping on the smart plug (named “Plant Light”) under the list of connected devices, I was brought to a screen that allowed me to control the outlet. I discovered that when the outlet is turned off, the app screen is dark and that when I tap on the power button in the center of the app screen (or the switch icon located in the lower left corner of the screen), I could turn the light on and the screen then becomes white. You may also set up a schedule, set a timer, and view the statistics of the outlet (these app options are located at the bottom of the screen).

Schedule: Setting up a schedule for the smart outlet is just like that for the smart switch but this time I selected “Schedule” instead of “Timer”. To set up a schedule I did the following: Add Schedule > select the desired time, select days to repeat the schedule, and switch the outlet to “On” > Save; Add Schedule > select desired time, select days to repeat the schedule, and switch the outlet to “Off”.
Timer: The timer function for the switch was actually a schedule for the switch. However, the timer function for the outlet is an actual timer. When setting up the timer for the outlet, you can set it for zero minutes and up to 23 hours and 59 minutes. And when you set the time, make sure that the switch is “On” before you set the timer. This will ensure that you are setting the amount of time that the light will remain on before being turned off. You could also start with the switch off and then set the timer. This would determine the amount of time that the light is off before being turned on. I set the amount of time that I wanted my Plant Light to stay on. When I used the timed setting, it worked well.
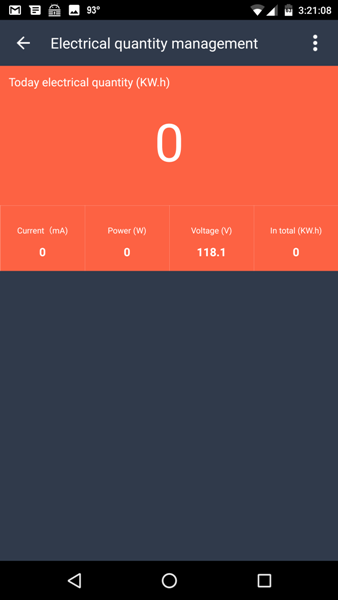
Statistics: The “Statistics” section of the app only displayed information accumulated during the time that the outlet was actively being used. I’m not sure this is very useful. I wanted to see the accumulated data over a period of days. Perhaps this is another area Oittm is working on.
Alexa: Since I had already added the “Smart Life” skill in Alexa for the Oittm Smart Switch, I was able to search for new devices within the Alexa app and it found my Oittm smart outlet named Plant Light. “Alexa, turn the Plant Light on” worked well every time.
Create groups: After I had installed the switch and the outlet, I tried to “Create groups” (this feature is located in the Overflow Menu of each device). When tapping on this feature, I was only shown one device, not both, so I was unable to use this feature.
Scenes
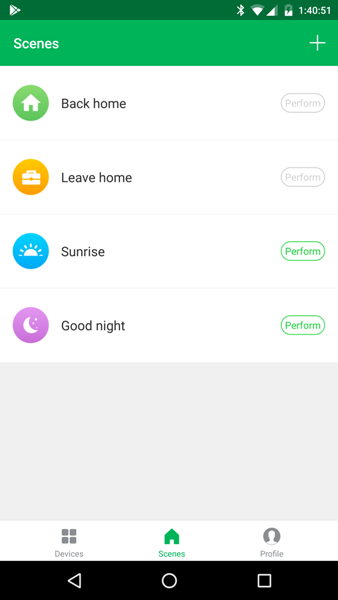
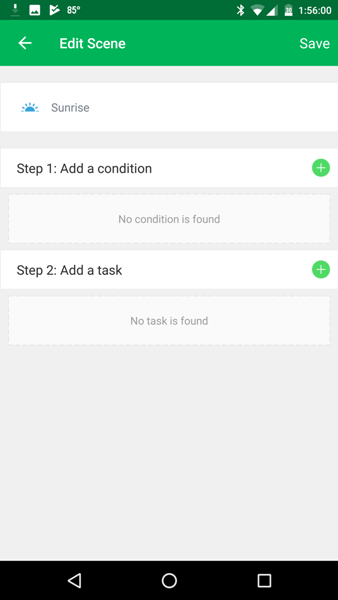
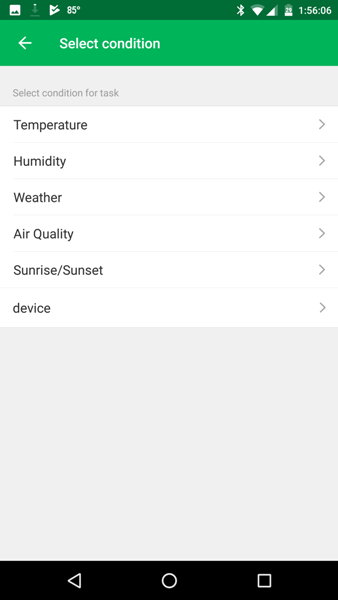

At the bottom center of the app home screen, there is an option for “Scenes”. This setting is described in the app as a way to “Customize your own personal scenes to suit your needs. For example, set your home to automatically turn on the lights and close curtain when you come back home.” After having tapped on “Scenes” and selecting the “Sunrise” scene, there were conditions and tasks to set up. However, when I first installed the app, the only condition available was to turn a device on or off, thus the scenes didn’t work. Since then there has been an update and now there are a variety of conditions that you may set (as shown in the third screenshot above). This time, I was able to select the “Sunrise” scene, tap on the “+” next to “Step 1: Add a condition”, select “Sunrise/Sunset”, select “Sunrise” for the Fort Worth area, then tap on the “Save” button located in the upper right corner of the app screen.
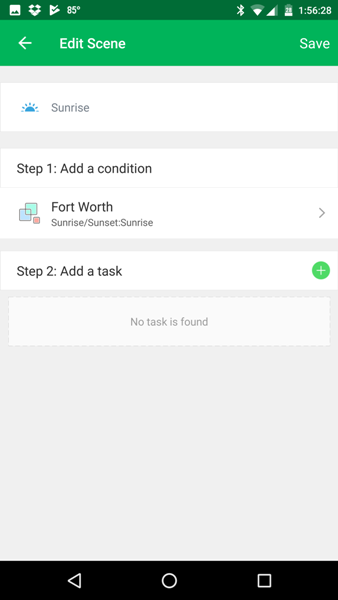
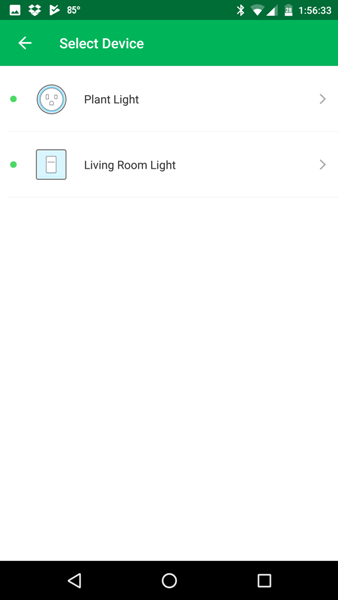
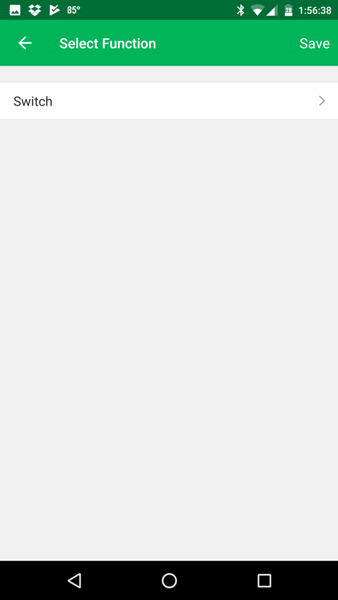
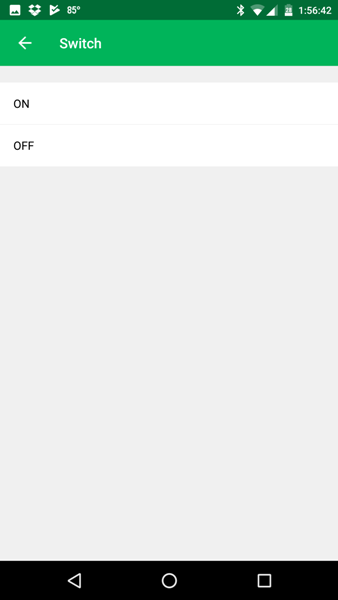
I then added a task by tapping on the “+” located next to “Step 2: Add a task”. I then selected my smart plug named “Plant Light”, tapped on “Switch”, tapped on “On”, then saved my selections. I repeated these steps to set up the Sunset scene.
After setting up my Sunrise and Sunset scenes, I then had to tap on the “Perform” button next to each just once for them to begin to execute turning the Plant Light on and off according to Fort Worth sunrise and sunset times every day. It worked well – I was very pleased with this.
Conclusion about the Oittm outlet: The schedule, timer, and “Scenes” work really well (since a recent update) and the outlet works wonderfully with Alexa as well. However, the statistics part of the app only displays the current information when the outlet is in use. As soon as the outlet is not in use, it displays only the voltage information and all other values are zero. The app does not save any of the historical data for later viewing. Also, there was an instance recently when I tried to turn on/off my Living Room Light and Plant Light while away from home, but both devices were offline. This was an isolated case and was probably one of those times when an update was occurring. All other times, I was able to successfully control the switch and outlet when away from home.
Final Thoughts
I have enjoyed installing and using the Oittm Smart Touch Switch and the Oittm Smart Plug Socket (okay maybe not the installation part so much). Both worked well when I used them with Alexa and/or set a timer, schedule, or set up “Scenes” for them. I could also successfully control the switch and outlet when away from home.
There were some issues that came up while using the Oittm switch and outlet. If you are not familiar with residential electrical wiring, you may have to hire an electrician to install them properly. There were also some issues that I had with the Oittm Smart app, the Oittm Smart Touch Switch, and Smart Plug Socket. One is that there are no instructions available to help you tap into the full functionality of the app to control your devices – I’m still not quite sure how “Create groups” (located in the Overflow Menu of each device) would work since it did not allow me to group my switch and outlet together once both were installed. And the statistics portion of the app only showed real-time information for the outlet and did not allow you to save any historical data to view later. In addition, the app seems to be a work in progress. There have been at least three app changes that I have noticed over the last week or two and it wasn’t an app update (firmware update?) – one of those changes took my device offline such that I had to re-add the switch back to the app. The “Scenes” section of the app only recently started working. And finally, I tried to contact Oittm for help back when “Scenes” didn’t work and it has been a couple of weeks now and I haven’t heard back. Even with all these issues, I would say that in general, I’m happy with both the smart switch and smart outlet.
Updates 09/11/18
I have been using the Oittm Smart Touch Switch and the Smart Plug Socket for almost a year now. I have found that they work inconsistently when using the “Scenes” settings, especially with the latest app update. In addition to the software problems, both devices freeze up entirely such that you need to flip off the electrical breaker for whichever one is not working, leave it off for a few seconds, then turn it back on to “reboot” the switch and plug. After that, they function again (and I did not have to set up my scenes again) until they freeze again. I’ve had to do this procedure probably about 5-10 times for each over the year that I’ve been using them, thus I highly recommend looking for more reliable smart switches and plugs and avoiding this product altogether. I will be replacing these with something else. I’ve had good luck with TP-Link smart plugs, so perhaps I will switch to these.
Source: The samples used in this review were provided by Oittm. Please visit the Oittm website to purchase the Oittm Smart Touch Switch ($25.99) or to obtain more information about it. And please visit Amazon to purchase the Oittm Smart Plug Socket ($29.99) or to obtain information about it.
Product Information
| Price: | $25.99 (Oittm Smart Touch Switch), $29.99 (Oittm Smart Plug Socket) |
| Manufacturer: | Oittm |
| Retailer: | Amazon |
| Pros: |
|
| Cons: |
|
Gadgeteer Comment Policy - Please read before commenting
What about security? The reviews on this site are useful, but for IoT items I think it’s essential that the security is reviewed. Will the company guarantee to provide updates for, say, ten years? Do they conform to any security standards? How much control do I have over which ports the devices can access (in and out) and the protocols they are allowed? Are they password protected and how strong is the encryption?
If you’re going to give companies free reviews then it isn’t unreasonable to expect them to answer questions like this. I’m not an expert; perhaps your readers could come up with a definitive list of questions around internet security for IoT products.
Gregg – You make some good points. I will ask Oittm your questions and see what they say. If they respond, I will pass on the information.
Gregg – In response to your questions – “Will the company guarantee to provide updates for, say, ten years? Do they conform to any security standards? How much control do I have over which ports the devices can access (in and out) and the protocols they are allowed? Are they password protected and how strong is the encryption?” – This is the response I received from Oittm:
“Our product is Rosh, UL and FCC approved for safety and quality assurance. Periodically we would be releasing firmware updates for the products to enhance their features. Every purchase includes our worry-free 2-year warranty and lifetime technical support. If you have any questions, pls feel free to contact us via mail.
The Oittm light switch needs a 2.4 Ghz network for the setup process. It will be connected to your WiFi network and uses your WiFi network password to connect. The Oittm product only creates a wireless network during initialization. The only way to make it do it again is to do a factory reset. So, it doesn’t have an SSID once setup is complete, and can only be accessed through your wifi network coming from your router, so it doesn’t add any security risk beyond that already posed by your router. The Oittm Smart app on your phone communicates with your router, not with the Oittm switch itself. This is much like connecting to an IP camera. So the internet security is up to your wireless router.”
Thanks for the pics.
John – No problem! 🙂
For the outlet, is the schedule actually “downloaded” to the outlet so that it works even if my phone is turned off our out of my Wi-Fi range? Or does it require my phone to operate?
David – the schedule for the outlet works when you are not at home and it works when your phone is off. I can also alter the schedule while away from home and control the light plugged into the outlet while away from home using the app.
Hi,
I have a home in the mountains and the power and Internet go out frequently during winter storms. I am using the wifi plug to control a snow melt system from my phone since we are not always there. Does this device re-connect itself to the wifi when either power or internet come back on line? I need to purchase four of these plugs so this is a critical issue.
Thank you,
Chris
Chris – I performed a test that lasted about two minutes where we flipped the breaker to the outlet and unplugged the power to our AT&T (our ISP) box. When power was turned back on to both, the Oittm outlet reconnected just fine.
If you need an official answer or have any more questions, please contact Oittm support:
http://www.oittm.com/support
The last time I tried automated scheduling functions, it was with another brand of control. That system was not robust to internet outages. An outage during a scheduled change would stop the cycling of the light even after internet was restored and the unit re-connected. Can you test what actually happens with Oittm switch when a scheduled change occurs during internet outage and what happens when outage ends?
Andrew – I will be testing this over the next few days and let you know.
Andrew – I’m sorry for my slow response, I was on vacation.
Anyway, I tested the scheduling (I used my “Good Morning Scene” and “Sunset Scene”) of the Oittm smart switch and plug. I found that when WiFi access was lost during the time that the Good Morning schedule was due to run, it would not run. However, when WiFi access returned, the schedule ran fine the next time and did not require me to do anything. I had some trouble with the “Sunset Scene” during the testing, but I’ve been having trouble with that scene sporadically running and not running even when not doing any tests.
And on another note, both the Oittm smart switch and plug (or outlet) sometimes freeze up entirely such that you need to flip off the electrical breaker for whichever one is not working, leave it off for a few seconds, then turn it back on to “reboot” the switch and plug. After that, they will function again (and I did not have to set up my scenes again). I’ve had to do this procedure probably about 5-10 times for each over the year that I’ve been using them.
Overall, the Oittm switch and plug and their schedules work most of the time but they are twitchy and not entirely reliable.
Thank you for review and discussion. Regarding periodic freezing. I experience the same thing – “touching” the device does not control the wall switch but app still does. Using breaker to turn power off and on again does work. I also found that using the app to “forget” the device causes the switch to go to factory reset and you need to add it back to your app (though interestingly it remembers its name). I sent a note to Oittm but have not heard back yet. Hope this is helpful and may spare trip to the circuit breaker.
Bret – Thanks for the info!
You mentioned not to connect the plug to a “switched” outlet. Why is that? My bathroom overhead light has a switch and plug and I am not concerned about the plug cutting off with the overhead light, in fact, I would prefer it. What other reasons would you advise against this setup?
Hey Oliver.
This is Rob, Kathleen’s husband. I installed the Oittm smart plug in our house and helped out with the installation part of the review.
So when we refer to a “switched” outlet, that is referring to an outlet that is controlled by a switch, meaning a separate wall switch will allow turning the power on and off to an outlet. Sometimes these will be installed in a living room where you can plug a floor lamp into an outlet and control it with a wall switch. The reason you do not want to do that with the Oittm outlet is that when you turn the switch off, the Oittm has no power, and it will not be connected to your network and you won’t be able to turn it on with the app and you will lose all smart control features (voice assistant, app controls, scheduling etc). There is no need for a separate switch to control this outlet because the Oittm itself has a built-in switch. The best type of outlet to use for a switched outlet is a regular outlet that costs about a dollar, not an expensive Wi-Fi enabled smart outlet.
However, you are describing a situation in your bathroom. You typically would not have a switched outlet in a bathroom. And just to be clear, if a switch and an outlet happen to be installed next to each other in the same box (with the same cover plate), that does not mean that the outlet is “switched”, especially if the light switch controls an overhead light. If the outlet has power when the switch is “off”, then it is not a switched outlet, and you can install the Oittm there.
But one other issue to consider is that the outlets in your bathroom are likely GFCI protected (as required by code). The Oittm is not a GFCI outlet, so if the outlet that is installed there is a GFCI (you can tell because it will have a test & reset buttons), you shouldn’t replace it with the Oittm. And even if it isn’t, the outlet is likely protected by a GFCI outlet in the circuit, and you have to be careful not to affect this protection. For that reason, I would personally not install this in a bathroom.
Thanks for the question. I hope this helps you out.
I have three of these switches installed in my house. They work WONDERFULLY with my Google Home system, but the glass touchplates no longer activate/deactivate the lights manually! Any idea why this might be? And/or how to fix it?
Steve – Try flipping the breaker to the switches Off then On. That works for us.
I don’t know why this happens but it has happened to us several times.
Okay, I’ll try that – I *suspected* that might work, but haven’t actually done it!